| Agile Product Lifecycle Management Administrator Guide Release 9.3.6 E71145-01 |
|

 Previous |
 Next |
| Agile Product Lifecycle Management Administrator Guide Release 9.3.6 E71145-01 |
|
Previous |
Next |
This chapter explains how to use Agile PLM's preconfigured privileges and privilege masks, and how to create new ones.
This chapter focuses on privileges and the construction of privilege masks. The actions that users can perform in Agile PLM, such as creating, sending, or canceling, are based on privileges. Privileges are combined with reusable criteria to create privilege masks, which act as filters to manage user actions. Privilege masks are then grouped into roles that provide a way of allocating a common set of privileges to a group of users who have common functions in the change control process.
Agile PLM provides a comprehensive set of preconfigured roles, privilege masks, and reusable criteria that are accessible from the Roles, Privileges, and Criteria nodes, respectively. You can change the preconfigured roles and privilege masks as necessary, or you can create new ones to fit your specific needs.
When you assign a role or a privilege mask to a user, it takes effect only after the user has logged out and logged back into an Agile PLM client.
To view the Privileges window:
Under User Settings, expand the Privileges node. The Privileges node expands to show all the basic privileges (the action component of privilege masks) as subnodes.
Double-click a Privileges subnode. The page that opens is called Privileges for <selected privilege>, although no privilege masks are listed. For example, when you double-click Administrator, the Privileges for Administrator page opens. You must set some filter criteria; often it is useful to set the Match If field to Show All, then click the Apply button to the right. All the privilege masks that use the Administrator privilege are displayed.
|
Note: The page in this example reads "Privileges for Administrator" but makes more sense as follows: "Privilege Masks that use Administrator privilege". |
You can filter the returned privilege masks to further narrow your search of privilege masks. In this example, setting a new filter with Match If set to Contains and Value with User typed in, clicking Apply reduces the returns to Admin Access for User Admin. (See "Filtering Data in Java Client.")
You can click a column header in the privilege mask table to sort the table by that column.
The privilege masks that form a role define the actions its users can perform. Agile PLM provides you with a set of preconfigured privilege masks for the installed roles. Every role has at least one privilege mask.
To view the privilege masks for a particular role:
Under User Settings, double-click Roles.
In the Roles window, double-click the role. The role's tabbed window appears.
Click the Privileges tab. The privilege masks are displayed in the table.
Each of the privilege masks that form a role has its own set of properties that define the privilege being controlled. The available privilege mask properties are listed and described in the following table. Not all of these properties are configurable for all privilege masks.
Table 17-1 Privilege Mask properties
| Property | Description |
|---|---|
|
Name |
A name, for example, "Modify Resume Date." A privilege mask name of up to 255 characters. |
|
Description |
A maximum 510-character description of the privilege mask, for example Modify Resume Date After Release. |
|
Enabled |
Yes or No. When set to No, permits you to work with a privilege without its being in effect. This is useful when setting up privileges. |
|
Privilege (governing action) |
A privilege, for example, Create. Identifies the privilege, or action, such as Create, Delete, Modify, Print, or Read. Only one privilege is defined in a privilege mask. After the privilege mask has been created, this property is not editable. |
|
Privilege Criteria |
The reusable criteria selected for this privilege mask. Only one reusable criteria is selected for each privilege mask. The selected reusable criteria defines two important properties of the privilege mask:
|
|
AppliedTo |
A small subset of privileges use the AppliedTo property, for example: Modify, Read, Administrator, User Administrator, and Client Access. For a full list, see "AppliedTo Property in Select Privileges." For Modify and Read privileges, the AppliedTo property specifies the attributes that a Modify or Read privilege mask is applied to, such as Cover Page.Date Originated. See"Discovery and Read Privileges" and "Modify Privilege". For Administrator and User Administrator privileges, the AppliedTo property specifies which administrator node the Administrator or User Administrator privilege mask is applied to, such as Users. See "AppliedTo Property in Select Privileges". Refer to "AppliedTo Property in Select Privileges" for a full list of privileges that use the AppliedTo property and for more information about those privileges |
|
Workflow |
(Change Status and Override privileges only) For Change Status, specifies the workflow in which the user can change statuses or override change status actions. For Override, the From Status and To Status properties define the change status action the user can override. |
|
From Status |
(Change Status and Override privileges only) For Change Status, specifies the statuses from which the user can change to another status. For Override, the From Status and To Status properties define the change status action the user can override. |
|
To Status |
(Change Status and Override privileges only) For Change Status, specifies the statuses the user can change to. For Override, the From Status and To Status properties define the change status action the user can override. |
To view privilege mask properties:
Under User Settings, double-click Privileges.
In the Privileges window, double-click the privilege mask you want to view. The privilege mask window appears.
Filter privilege mask records to narrow your search. For example, filter records by Privilege Contains Modify to find all the Modify privilege masks on the list. (See "Filtering Data in Java Client".)
To modify a property, enter text in text fields or use the drop-down lists.
|
Note: The Privilege (governing action) field is not editable. |
When you are finished, click Save, or click Close to exit without saving your modifications.
You perform various privilege mask management task from the Privileges window by selecting one or more privilege masks, then clicking the appropriate button.
Table 17-2 Privilege mask management tasks
| Page menu button | Action |
|---|---|
|
Enable |
Enables the selected privilege masks. When the privilege mask is enabled, Yes appears in the Enabled column. |
|
Disable |
Disables the selected privilege masks. When the privilege mask is disabled, No appears in the Enabled column. |
|
Delete |
Deletes the selected privilege masks. |
|
New |
Opens the Create Privilege dialog box. See "Creating a New Privilege Mask from Scratch". |
|
Assign Roles |
Permits you to add the privilege mask to one or more roles. Note: When you assign a role or a privilege mask to a user, or change the privilege masks in a role, the change takes effect for a given user only after the user has logged out and logged back in to an Agile PLM client. |
|
Export |
Exports the selected privilege masks to a text file. See "Object History and Administrative Object History." |
|
Export All |
Exports all privilege masks to a text file. See "Object History and Administrative Object History." |
|
Import |
Imports a text file to create one or more new privilege masks. See "Object History and Administrative Object History." |
|
Refresh |
Refresh the displayed table with the latest information. |
When you double-click a privilege mask, the privilege mask's tabbed window appears.
To remove a privilege mask from a role on the privilege mask Where Used tab:
Under User Settings, expand the Privileges node in the navigation pane. The list of basic privileges appears.
Double-click the basic privilege for the privilege mask you're interested in. The form for that privilege appears.
Click the Refresh button at the bottom of the form. All the privilege masks for that privilege appear.
Double-click the specific privilege mask you want. Its tabbed window appears.
Click the Where Used tab to bring it forward. The roles that include the privilege mask are listed in the table.
Select the role from which you want to delete the privilege mask, and click the Remove button.
When the confirmation dialog appears, click OK. You are not deleting the role itself, you are removing the privilege mask (which is the actual object you have opened) from that role.
To add a privilege mask to a role on the privilege mask Where Used tab:
Under User Settings, expand the Privileges node in the navigation pane. The list of basic privileges appears.
Double-click the basic privilege for the privilege mask you're interested in. The form for that privilege appears.
Click the Refresh button at the bottom of the form. All the privilege masks for that privilege appears.
Double-click the specific privilege mask you want. Its tabbed window appears.
Click the Where Used tab to bring it forward. The roles that include the privilege mask are listed in the table.
Click the Add Roles button. The Select Roles dialog box appears.
Move roles from the Choices list to the Selected list.
Click OK when you are finished. You are not adding a role in any way, you are adding the privilege mask (which is the actual object you have opened) to that role.
You may want to review the simple tutorial "Building and Testing Attributes, Read/Modify Privileges, and Roles".
The following table lists and defines the privileges supplied with Agile PLM. Some privileges depend on the basic Read privilege for their effectiveness, since users must first be able to open and read objects before they can perform most other functions. This table indicates which privileges work only if the user also has a Read privilege.
For more information about the Read privilege and privilege masks, see "Relationships among Discovery and Read Privileges".
Table 17-3 Default Privileges
| Privilege | Allows the user to... | Requires basic Read privilege |
|---|---|---|
|
Acknowledge |
Acknowledge a routable object that the user has been named as a Acknowledger. |
Yes |
|
Add Reviewer |
Add approvers, acknowledgers, and observers to the Workflow tab of a routable object. For more information, see "Add Reviewer and Remove Reviewer". |
Yes |
|
Add to Table |
Add rows to the Attachments table or to Relationships table. The AppliedTo property specifies either Attachments, Relationships, or both. A separate privilege, Deleted from Table, controls the ability to remove rows from the Attachments or from the Relationships table. For more information, see "Add to Table and Delete from Table Privileges." |
Yes |
|
Administrator |
Log in to Java Client with access to PLM Administrator functions. The Administrator role includes the Administrator privilege mask, which can be made specific to nodes based on values selected in the AppliedTo property. For more information, see "Administrator Privilege and the AppliedTo Capability". |
No |
|
Approve/Reject |
Approve or reject a routable object that the user has been named as an Approver. |
Yes |
|
Attachment Redlines for Others |
This privilege is disabled by default. They should be enabled if the administrator wants to create Criteria specific to Workflow Statuses that, for example, prevents users from redlining once the workflow has reached Review or Released statuses. Note: The general ability to enable and control access to attachment redline markups is provided by the Markups subclass (of File Folders class) and its associated Read, Modify, Checkin, and Checkout privilege masks. For more information about redlining in PLM, see "Redline Markup Default Roles and Privileges." |
— |
|
Calendar Administrator |
Configure work calendars for Agile PPM. The calendar configuration capabilities are determined by the privilege mask Applied To property:
Access the Calendar configuration dialog in Web Client through Tools and Settings > Calendar. For information about configuring calendars, see Agile PLM Product Portfolio Management User Guide. |
— |
|
Attachment Redlines for Self |
This privilege is disabled by default. They should be enabled if the administrator wants to create Criteria specific to Workflow Statuses that, for example, prevents users from redlining once the workflow has reached Review or Released statuses. Note: The general ability to enable and control access to attachment redline markups is provided by the Markups subclass (of File Folders class) and its associated Create, Read, Modify, Checkin, and Checkout privilege masks. For more information about redlining in PLM, see "Redline Markup Default Roles and Privileges." |
— |
|
Cancel Checkout |
Cancel a checkout of an attachment (file or URL). For more information, see "Attachment Privileges". See also Chapter 39, "Administering Design File Change Orders (DFCOs)." |
Yes |
|
Change Status |
Move a routable object from any status to any other status. The class of the criteria that is selected determines the list of available workflows to which to apply the Change Status privilege. For more information, see "Change Status". |
Yes |
|
Checkin |
Check in an attachment (file or URL). For more information, see "Attachment Privileges." See also Chapter 39, "Administering Design File Change Orders (DFCOs)." |
Yes |
|
Checkout |
Check out an attachment file (file or URL). For more information, see "Attachment Privileges." See also Chapter 39, "Administering Design File Change Orders (DFCOs)." |
Yes |
|
Client Access |
Allows a user to log in to the Java Client. Choose Java Client in the AppliedTo property. For more information, see "Client Access." Client Access applied to RMW Client – If RMW is installed, then RMW Client also appears in the AppliedTo property list. If RMW is not installed, then Java Client is the only selection in the AppliedTo property list. Note: Client Access for RMW Client is needed only for RMW users. Client Access for RMW Client permits the user to open the RMW user interface in Web Client, and to work in Agile RMW. The administrator adds "Recipe & Material Workspace UI Access" privilege mask to appropriate users. See Agile PLM Recipe Management for Pharmaceuticals Administrator Guide. |
Yes |
|
Comment |
Comment on a routable object. The comment is emailed to specified users, and is recorded in History. (Not the same as comments submitted during approval or rejection of a routable object.) |
Yes |
|
Configure Instance |
Note: Only needed for Variant Management! Launches the Instance Manager. |
Yes |
|
Create |
Create a new object in the business class specified in the privilege mask. Note 1: The Create privilege is required for users of the Agile PLM Import utility. Note 2: If you have activated the Create User attribute for an Agile PLM class by making it visible on the Page Two tab, the user can open and create objects that have a Read privilege. See "Applying Create User Criteria." Note 3: The Create privilege allows the user to fill in required fields at the time of creation even if the user does not have Modify privilege for those fields. Required fields are fields with their attribute property Required set to Yes; see "Defining Attribute Properties." |
Yes |
|
Create From Template |
Used in Create Program From Template privilege mask, which is enabled by default for Program Manager and Program Administrator roles. |
Yes |
|
Dashboard Tab View |
Used in Read Dashboard Tabs privilege mask, which is enabled by default for Executive, Project Manager, and Project Administrator roles. All newly created Dashboard tabs under Systems Settings > Dashboard Management require this privilege to permit viewing the tab in Web Client. For more information, see "Dashboard Management." |
Yes |
|
Delete |
Delete an object. Note: A routable object must be Pending or Unassigned. |
Yes |
|
Delete from Table |
Remove (delete) rows from the Attachments table or from the Relationships table. The AppliedTo property specifies either Attachments, Relationships, or both. A separate privilege, Add to Table, controls the ability to Add rows to the Attachments table or to the Relationships table. For more information, see "Add to Table and Delete from Table Privileges." |
|
|
Discovery |
Learn that an object exists. Note 1: You must restart the WebLogic server when you change the Enabled property of Discovery Privilege in the Database node. Note 2: If Discovery Privilege is disabled in the Database node, users with a basic Read privilege can discover all objects. For more information, see "Discovery Privilege." |
No |
|
Display No Privilege Fields |
Allows or prevents users to view certain Cover Page, P2 and P3 attribute fields that they lack the privilege to view existing content. Note: Only applicable in Web Client |
Yes |
|
Enforce Field Level Read |
Control certain performance consequences when a user does a Field-level Read query. For more information, see "Enforce Field-Level Read Privilege", including Important note about a workaround due to removal of the Specify Output Columns privilege. |
Yes |
|
Export |
Extract data from selected objects and export it to either a comma-delimited text file or a PDX package. For more information about this privilege, see "Export". |
Yes |
|
FileLoad |
Run the FileLoad utility. See the Agile PLM Import and Export Guide for more information about the FileLoad utility. |
Yes |
|
FullSearchDisplay |
See a full return of reports queries on objects. For more information, see "Full Search Display." |
Yes |
|
GetFile |
Get or open a file from an object's Attachments tab. Note that GetFile privilege works in tandem with Checkout privilege to actually deliver the attachment file to the user's computer. The GetFile privilege (without Checkout) enables the administrator to permit a user to get a file without being able to change it in the product record. For more information, see "Attachment Privileges." See also Chapter 39, "Administering Design File Change Orders (DFCOs)." |
Yes |
|
GlobalSearches |
Create, modify, or delete a search that appears in everyone's search list. This privilege also allows user to order searches and search folders: in Java Client, there is a button with a down arrow when you click any search folder or search; in Web Client, in the Organize Search popup, there is an extra Order button. |
No |
|
Grant |
Grant roles, and therefore privileges, to users in a controlled, finite way, using Access Control List (ACL) capability. |
Yes |
|
Import |
Use the Import process. See the Agile PLM Import and Export Guide for more information about the Import tool. |
Yes |
|
Incorporate |
Toggle the incorporation status on the Attachments tab. Note: An item can be Incorporated or Unincorporated under an Introductory rev. |
Yes |
|
Manage Report |
Modify and delete report schedules and layouts, and create and delete global report folders. |
Yes |
|
Manage Tab Display |
Modify and adjust the display order and presence of tabs available on objects. |
Yes |
|
Microsoft Project |
Access, use, or modify Microsoft Project, and part of Project Manager and Project Administrator roles. |
Yes |
|
Modify |
Modify fields on the tab of an object. Modify privileges are assigned using the AppliedTo attribute settings. For more information about various aspects of the Modify privilege, see "Modify Privilege," "AppliedTo Property in Select Privileges," and "Modify Privilege and Attachments." |
Yes |
|
Override |
Override incomplete required fields and required approvers who have not signed off, and move the routable object to the next status. For more information, see "Override." |
Yes |
|
PrintFile |
Print from the AutoVue for Agile window. The user must also have ViewFile privilege. |
Yes |
|
PrintTab |
Print from the tabs of an object. |
Yes |
|
Purge Folder Version |
Purge unused file folder version from the Agile File Management vault. See "Purge Folder Version Privilege." |
— |
|
Read |
Open an object to read all tabs. For more information, see "Discovery and Read Privileges." The Read privilege is based on the AppliedTo property for specific attributes. See "Field-Level Read Privilege." The Read privilege is further applied on a field-by-field basis when Enforce Field-level Read is assigned to the same user. For more information, see "Enforce Field-Level Read Privilege." Note: If Discovery Privilege is enabled in the Database node, a corresponding Discovery privilege mask is required. |
Yes |
|
Remove Reviewer |
Remove approvers, acknowledgers, and observers from a routable object. For more information, see "Add Reviewer and Remove Reviewer." |
Yes |
|
Reset |
Reset the checksum in the Agile PLM database to match a referenced file. Reset privilege is found in Reset File Checksum privilege mask, which is not included in any ready-to-use Agile role. See "Handle File Checksum." |
Yes |
|
Run Report |
Run reports, create schedules for reports, and create report layouts. Modify and delete a user's own schedules and layouts. |
Yes |
|
SaveAs |
Copy an object by saving to another name. |
Yes |
|
Send |
Carry out a File | Send on an open object. A corresponding Create privilege mask is required. |
Yes |
|
Subscribe |
Subscribe to notification emails when selected attributes of an object are modified. Note that the Database-node property Notification Enabled must also be set to Yes. |
Yes |
|
Transfer Authority for Others |
Designates users to approve changes for a specified period of time when the original user—an "other"—is an approver (but not observer) on a routable object; the original approver is copied on all notifying email. For more information, see "Transfer Authority for Others." |
No |
|
Transfer Authority for Self |
Designates users to approve changes for a specified period of time when the designator—oneself—is an approver (but not observer) on a routable object. For more information, see "Transfer Authority for Self." |
No |
|
Undelete |
Undelete an object. |
Yes |
|
Unincorporate |
Unincorporate an item. |
Yes |
|
Update All Timesheets |
View all tasks for a selected user and change timesheet details entered by that user for each task. Overrides system privileges for viewing tasks—the user accessing the timesheet need not be a team member on the task. This privilege also allows the user to search timesheet entries by all users in the system. |
Yes |
|
User Administrator |
Uses its AppliedTo property to tailor which roles that user can assign to other users. |
Yes |
|
ViewFile |
View files in the AutoVue for Agile window. For more information, see "Attachment Privileges." See also Chapter 39, "Administering Design File Change Orders (DFCOs)." |
Yes |
The following section gives more information about selected privileges:
Later this chapter explores how privilege masks are constructed, beginning with "Privilege Mask Component 1: Privileges." Subsequent sections provide detailed information about the Discover, Read, and Modify privileges, and also the important AppliedTo property (which is found in Administrator and just a few other PLM Privileges).
This section provides detailed information about some important Agile PLM privileges. It is not a comprehensive detailing of all the privileges in the Agile PLM system. Keep in mind, the privileges do not work alone; they must be cited by a privilege mask—for example, Create Item—and then activated by inclusion in a role that includes that privilege mask.
Information about privileges that are involved in working with attachments is provided in "Attachment Privileges."
The Add Reviewer privilege allows the user to designate a user, global user group, or partner to approve or reject a specific routable object. This privilege also allows the designation of any of these categories to be an observer that can see the routable object, is not required to approve or reject the routable object, but still can approve or reject if necessary. This privilege also allows the designation of any of these categories to be an acknowledger, who can acknowledge a routable object. The acknowledge action differs from approve or reject, and acknowledge is a required signoff action.
The Remove Reviewer privilege allows the user to remove any of these from the list of approvers or observers on a specific routable object. For more information about adding an approver, acknowledger, or observer, see "More about Affected Items: Adding Approvers, Acknowledgers, and Observers."
|
Note: To successfully add or remove approvers, acknowledgers, or observers from a Review or Released status of a workflow, the Ad Hoc Reviewers property for that status must be set to Yes. |
The Add to Table and Delete from Table privileges are used to define separate add and delete capabilities for the:
Attachments table
Relationships table
Affected Files table
Specific to Design File Change Orders (DFCOs).
Redline/Markup Files table
Specific to Design File Change Orders (DFCOs).
The AppliedTo property of an Add to Table privilege mask or a Delete from Table privilege mask specifies which tables the privilege mask applies to the Attachments table, the Relationships table or both. For File Folder objects, the privilege masks applied to Attachments control the ability to add to or delete from the File Folder object Files table.
For Design File Change Orders (DFCOs – Change subclasses that have the Affected Files tab enabled), Add to Table and Delete from Table privilege masks are used to define capabilities for the tables on the Affected Files tab: the Affected Files table and the Redline/Markup Files table. The AppliedTo property of a DFCO-specific Add to Table or Delete from Table privilege mask specifies the Affected Files table, the Redline/Markup table, or both. See also Chapter 39, "Administering Design File Change Orders (DFCOs)."
|
Important: A Modify privilege mask that includes Attachments.Name and Relationships.Name in the AppliedTo property grants the abilities to add, delete, and update attachments and relationships. Such a Modify privilege mask will override any Add to Table and Delete from Table privilege masks assigned to the user. See also "Modify Privilege and Attachments."Add to Table and Delete from Table privilege masks do not provide modify table field capabilities. A Modify privilege mask, with the appropriate AppliedTo properties, is required. See "Modify Privilege." |
When Agile PLM is installed or upgraded to release 9.3.3 or later, the following pre-defined privilege masks are available, but they are not used in any release 9.3.3 pre-defined roles.
Add to Table All Changes
Add to Table All Items
Delete from Table All Changes
Delete from Table All Items
You can use these predefined privilege masks, or create your own custom Add to Table and Delete from Table privilege masks with the reusable criteria that meet your needs. In the privilege mask AppliedTo property, select one or both:
object_name.Attachments
object_name.Relationships.
When Agile PLM is installed or upgraded to release 9.3.5 or later, the following pre-defined Add to Table and Delete from Table privilege masks relating to Design File Change Orders (DFCOs) are available. They are used in the predefined roles Design Change Analyst and Design Engineer.
Add to Table all Design File Changes
Delete From Table All Design File Changes
In the privilege mask AppliedTo property, select the DFCO-related AppliedTo properties:
Changes.Affected Files.Affected Files
Changes.Affected Files.Redline Markup
The following conditions apply when using Add to Table and Delete from Table privilege masks:
Add to Table and Deleted from Table privileges for a specified object (for example, Parts) require a Modify privilege mask for that business object. A Modify privilege mask with no AppliedTo properties is sufficient to enable the Add to Table and Delete from Table privilege masks.
Any Modify privilege masks for the specified object must not include Attachments.Name or Relationships.Name in the AppliedTo property.
Add to Table and Delete form Table privileges do not control the ability to modify Attachment table attribute fields. The appropriate Modify privilege mask is required to modify Attachment table attribute fields. For example, to edit the File Description field on the Attachment table, the user must be assigned a Modify privilege mask with File Description included in the AppliedTo property.
Checkout, Checkin, and Cancel Checkout privileges require an Add to Table and Deleted from Table privilege mask applied to Attachments. If the user does not have Add to Table and Delete from Table privileges, then the buttons for CheckOut, Cancel CheckOut, and Checkin buttons are disabled on the Attachments tab.
For DFCOs, Checkout, Checkin, and Cancel Checkout privileges for affected files require an Add to Table and Deleted from Table privilege mask applied to Changes.Affected Files.Affected Files. If the user does not have Add to Table and Delete from Table privileges, then the buttons for CheckOut, Cancel CheckOut, and Checkin buttons are disabled on the Attachments tab and on the Affected Files tab.
Change Status is crucial in the approval process that advances changes through workflows. The Change Status privileges use privilege criteria to control the statuses a user can manipulate, that is, for specified changes, move forward or backward in the workflow. The function of the privilege is to designate which statuses can be affected by a user in a given role.
|
Note: Each Change Status privilege mask applies to one named status of one specified workflow. You must create Change Status privilege masks for each status of every new workflow you create and enable them, including the statuses of workflows created by Save As (that is, a workflow that is given another name by using Save As, whether it is modified or not, needs its own Change Status privileges). |
The status types that are available to the privilege are determined by the workflow selection for the privilege when it is created. This is also affected by the reusable criteria applied to the privilege.
There can be multiple "From" or "To" settings defined in Change Status. The administrator can designate a role to move a change from multiple statuses to a single status, for example, Pending, Submit, or Review to Hold status. Or the administrator can designate a role to move a change from a single to multiple statuses, for example, Hold to Pending, Submit, or Review status.
To define a Change Status privilege mask:
Under User Settings, double-click Privileges.
In the Privileges window, click the New button. The Create Privilege dialog box appears.
Fill in the Name and Description fields for the Change Status privilege mask.
By default, the privilege mask is enabled. If you want, select No in the Enable field to disable the privilege mask.
In the Privilege field, select Change Status from the drop-down list.
In the Criteria field, select a criteria from the list, and click the OK button.
Or click the New Criteria button to define a new reusable criteria. (See "Creating a New Criteria.")
In the Workflow field, select a workflow from the drop-down list.
Additional fields, Status-From and Status-To, are displayed in the dialog box.
|
Note: If you select All in the Workflow field, the Status-From and Status-To fields are not available. When you select All for the workflow name, you create a Change Status privilege mask that allows a user to change from any status to any status in any workflow. This is useful when you want to test workflows. |
In the Status-From dialog box, move statuses from the Choices list to the Selected list. Click OK when you are finished.
In the Status-To dialog box, move statuses from the Choices list to the Selected list. Click OK when you are finished. When you have complete all the fields in the dialog box, click OK.
The Client Access privilege is used to limit user access to the Java Client or to the RMW user interface. There are two selections available in the Applied To property of this privilege:
Java Client
RMW UI (appears in Applied To property list only if RMW is installed).
For your convenience, two predefined privilege masks are provided:
Java Client Access
Recipe & Material Workspace UI Access
Java Client Access:
This privilege mask allows you to limit which users are allowed to log in to the Agile Java Client. When a user attempts to log into Java Client, Agile PLM verifies whether the user has the Client Access privilege for Java Client.If the user has the correct privilege, then the user is granted access beyond the login screen. If the user does not have the correct privilege, then he is not allowed to log in and an error message is displayed: "You do not have logon access to this client. Please contact your administrator for assistance."
Because a user can access Java Client only if he has the Java Client Access privilege mask, this allows you, in your organization, to limit access to Java Client to administrator users only.
The predefined Java Client Access privilege mask is included in the predefined Administrator role.
Any user assigned an Administrator privilege mask has access to Java Client by default. If you are not using the predefined Administrator role, this feature prevents an administrator user from being locked out of Java Client.
A predefined role named Java Client Access is provided. If necessary, you can assign this role to specific users who may require access to the Java Client, for example, Change Analyst users.
This role appears in the User Administrator privilege AppliedTo property list. See "Options for Building Administrator Assistants."
Recipe & Material Workspace UI Access:
|
Note: Only RMW users need this privilege mask. |
Permits the user to open the RMW user interface in Web Client, and to work in Agile RMW. The administrator assigns Recipe & Material Workspace UI Access privilege mask to appropriate users
A predefined role Recipe & Material Workspace is provided. This role appears in the User Administrator privilege AppliedTo property list. See also Agile PLM Recipe Management for Pharmaceuticals Administrator Guide.
The Export privilege allows Agile PLM users to extract data from selected objects and export it to such formats as: a comma-delimited text file, a Microsoft Excel file, a PDX package, or an "Agile XML" (aXML) file. PDX is a standard for electronic exchange of engineering and manufacturing information across the supply chain. A PDX package is an XML file that can be viewed with Agile eXpress, a free client.
Please contact Oracle Consulting-Agile Practice for information about the eXpress viewer.
In addition, the Export privilege mask includes three AppliedTo property options (Attachments, Search Results, and Wizard), which refine Export privilege capabilities.
Attachments
If the user has Export privilege applied to Wizard, then the Attachments AppliedTo property allows the user to export object attachments to PDX or aXML file formats. Any user who can export object attachments to these formats can also view the attachment contents. To prevent users accessing information they do not need or should not view, use an Export privilege mask that does not include Attachments in the AppliedTo property, for example, the default predefined Export without Attachments privilege mask.
Search Results
In Web Client and in Java Client, allows the user to export the search results table to a .csv file or to an Excel file
A custom Export privilege mask that includes only Search Results in the AppliedTo property allows users to export search results tables, but does not provide the capability to export object data.
Wizard
Allows the user access to the Export Wizard from various entry points in the Web Client and Java Client user interface, thus allowing the user to export Agile objects. If Wizard is omitted from the Export privilege mask AppliedTo property, then the Export wizard entry points are disabled (grayed) or omitted. When Wizard is included in the Export privilege mask AppliedTo property, then the user can access the Export wizard from the following places in the user interface:
Web Client:
Tools menu, Export
Object Actions menu, Export
Object Actions menu, under Microsoft Excel, Export to Excel
Where Used tab, More menu, Export
Where Used tab, More menu, Export
Report output window (Standard Report output format), Export button
Search Results tables, More menu, Export Objects
Java Client:
Tools menu, Export
Object window, actions menu, Export
The default predefined Export privilege masks are:
Export and (Restricted) Export
These privilege masks give users all available export capabilities: Attachments, Search Results, and Wizard (export objects).
Export without Attachments and (Restricted) Export without Attachments
These privilege masks give the user export capabilities applied to Search Results and Wizard (export objects) only. Because Attachments is not included in the AppliedTo property, when the user exports objects to aXML format or to PDX format, the object attachments are not exported with the object data.
The Full Search Display privilege does not apply to searches. It applies to results of report queries. Users with the Full Report Display privilege mask will see all results of reports; users without the privilege mask will see up to the maximum number of results specified by the Maximum Query Results Displayed preference.
Additionally, all privilege checking is bypassed on users with this privilege when they view report results. This and other factors make this privilege a "dangerous" one to assign to many users in that it can add to the risk of server crashes. You should consider disabling this privilege or keeping its assignment to a minimum.
|
Note: Full Search Display privilege cannot be used to retrieve BOM related reports. |
A user's ability to grant roles to another user for a specific object is handled by the Grant privilege.
The sharing feature of Agile PLM lets a user "grant" one or more of his roles to another Agile PLM user or user group for specific objects. The capability to share a given role includes:
The user's assigned, "permanent" roles, although he shares the role with another user regarding only a specific object
Roles that have been shared with the user (by another user) for a particular object
Roles that have been shared with the user by virtue of belonging to a user group to which the role has been shared.
The named user (or members of the named user group) can then perform actions permitted by the roles for that object only; the user does not acquire the role in any permanent or far-reaching way.
A user's or user group's Share tab lists those objects for which the user has been granted "shared roles" by a different user. A user can click User Profile > Share to see objects being shared with them and what role(s) inform their interaction with each. A user can click User Profile > User Groups > (specific group) > Share to see objects being shared with you through user group.
The Override privilege governs who can override the required fields and required approvers for a status and move the change to the next status without those fields being filled in or approvers signed off. With Override privilege, a user can release a change even when all required fields are not filled in.
The Override privilege is specific to each status. A change can be moved to the next status without all approvals if the user has the privilege to move a change to the next status. For example, a user might be able to override the promotion of a change from the Manager Review status to the CCB Review status, but not the promotion of a change from Final Review to Released.
A warning is issued to the user if there are missing fields, approvers, or other requirements for the usual move to the next status level.
Use Caution when Assigning Users the Override Privilege
A user with the Override privilege can promote a routable object to the next status in all of the following situations:
Regardless of the presence of any required fields.
When Pass Release Audit is set to Yes.
When the Change Status Approver Rejected Change SmartRule is set to Warning or Disallow.
When the Change Status Observer Rejected Change SmartRule is set to Warning or Disallow.
When the Change Status No Response Change SmartRule is set to Warning or Disallow.
For the Change Status Approver Rejected Change and Change Status Observer Rejected Change SmartRules, a Warning setting does not prevent the routable object from being autopromoted; that is, the SmartRules must be set to Disallow to prevent autopromotion.
To allow the change analyst to decide whether or not to promote a routable object that has been rejected, the following conditions need to be true:
AutoPromotion is set to Yes for that status.
These two SmartRules are set to Disallow.
The change analyst has the Override privilege for this status.
The Override privilege calls for specific "From" and "To" settings, such as Change Status. The Override privilege lets a user change the status of a routable object, even if the Pass Release Audit is set to Yes. The only exception is during the initial release of a routable object. If the Pass Release Audit is set to Warning, then the warning appears even during an override.
Note that when the user does not have Override privilege, and Pass Release Audit = Warning or No, the Status Audit should give an Error (which requires user to fix conditions) instead of a Warning.
The Purge Folder Version (PFV) privilege allows a user to purge unused file folder versions from the Agile File Management vault. The file folder version number is removed from the file folder Version drop-down list. You can create PFV privilege masks for specific subclasses of folders by selecting the appropriate folder object criteria when you create and define the PFV privilege mask. The user must have appropriate privilege masks to discover and read the file folder object in order to select the file folder version to purge. If a file folder version is checked out, has redlines, or is in use on a business object Attachments tab or Content tab, it cannot be purged.
The PFV command appears on the file folder object More... menu (Java Client) and Actions menu (Web Client).
The Transfer Authority for Self privilege allows the user to designate a target user, who is allowed to approve or reject changes for her for a specified period of time. The authority transfer applies when the user is an approver on a routable object, but not when the user is an observer. Transfer Authority for Self is very useful for situations where the original user is going on a vacation or extended leave.
The target user can vary depending on criteria within the privilege. For example, all changes for Project A can be directed to Mary and all changes for Project B can go to Joe. If the criteria for the different transfers overlap, then both users who have been defined as the target of the transfer receive the notifications and are able to sign off for the original user.
The transfer of authority is in effect for the duration specified by the start and end dates. Once this time has elapsed, signoff authority is automatically transferred back to the original user.
If a user's authority must be transferred to more than one person, such as multiple targets during a longer vacation, the target users should be specified sequentially, as shown in the following table.
Table 17-4 Example of transferring authority to multiple users
| From User | To User | Start Date | End Date |
|---|---|---|---|
|
Brian Henson |
David Goelz |
14-July-2007 |
30-July-2007 |
|
Brian Henson |
Kevin Clash |
31-July-2001 |
12-Aug-2007 |
|
Note: If you need to remove a user from the system who is named as the "To" user in signoff authority transfers, see "Deleting and Undeleting Users." |
The Transfer Authority for Others privilege allows an authorized user to transfer an original approver's right to approve or reject changes to another user for a specified period of time. The authority transfer applies when the original user is an approver on a routable object, but not an observer.
This privilege overrides transfers designated by users who have the Transfer Authority for Self privilege. The original approver is copied on all notifying email.
|
Note: When you create a transfer criteria, you can include criteria conditions with Affected Items tab fields. To select a specific routable object, an Affected Items field condition must be true for all the objects on the Affected Items tab of that routable object. |
For example, if you specify Affected Items.Old Lifecycle Phase Equals Preliminary, then all the objects on the Affected Items tab must have the Old Lifecycle field equal to Preliminary. If you select Contains as the search operator, then every object on the Affected Items tab must contain the specified value in the specified field.
Site Change Orders (SCOs) affect only site-specific information, and other types of changes are not limited to site-specific information (for example, ECOs and MCOs), SCOs can be Save-As-created only from another SCO. You cannot initiate Save As from a non-Site Change Order change object to create an SCO object, nor can you initiate Save As from an SCO object to create a non-Site Change Order change object. The Site Change Order's site-specific only usage makes it incompatible with other change types when using the Save As feature.
The Subscribe privilege allows a user to subscribe to an object to receive notification of events that happen to that object. Users can even be notified when specified fields are modified, and can select the events about which to be notified.
The user needs the Subscribe privilege for a specific object class to be able to subscribe to that class's objects.
On the Subscriptions tab of a user, you can view the objects to which this user has subscribed.
Subscription events trigger two types of notifications: Email and Inbox. Email notifications are sent only if the user's Receive Email Notification preference is set to Yes; this property is on the Preferences tab of the user object.
Privilege masks are a powerful and complex feature. Each privilege mask is composed of several components. Together, the privilege mask components define the following:
What action the user can perform;
The object type on which the action can be performed;
Filtering conditions that define a subset of objects on which the action can be performed.
AppliedTo attributes—found only in privilege masks based on the Administrator, Modify, Read, Microsoft Project, and Dashboard Management privileges—which displays specific object attributes;
For the Change Status privilege, the workflow, the status the user can change from, and the status the user can change to. See the second diagram in "Combining Options in Criteria and AppliedTo Attributes."
Privilege masks act as filters to either enable or prevent user actions. By combining the types of action with the precise conditions under which it should be enabled, privilege masks control user activity in Agile PLM. The following components are used to construct privilege masks and are among the privilege mask properties:
The privilege or action – See "Privilege Mask Component 1: Privileges."
The object type to be acted upon – See "Privilege Mask Component 2: Object Type."
The criteria or conditions under which to apply the action – See "Privilege Mask Component 3: Criteria."
The attributes to which the action will be applied to – See"Privilege Mask Components."
The final item in the above list refers to attributes in privilege masks; but this element is not found in all privilege masks. A small subset of the PLM privileges (Administrator, User Administrator, Read, Modify, Microsoft Project, and Dashboard Tab View) are the basis of privilege masks that require a fourth component, that is, named attributes found in the AppliedTo property of the privilege. This important property is detailed in "AppliedTo Property in Select Privileges."
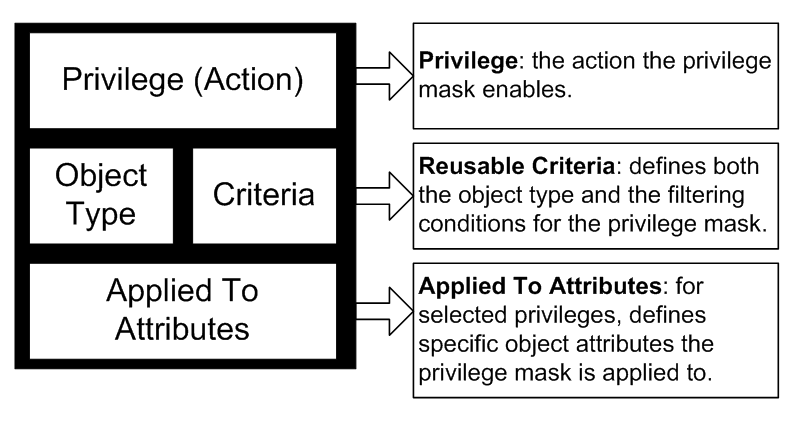
Privilege masks employ a reusable criteria to define the object type and filtering conditions. A privilege mask includes:
Privilege action – the action the privilege mask enables. See "Default Agile PLM Privileges."
Reusable Criteria – the reusable criteria defines both the object type and the filtering conditions of the privilege mask. See Chapter 10, "Criteria."
Applied To attributes – for some selected privileges, the Applied To attributes define specific object attributes or options the privilege mask is applied to. See "AppliedTo Property in Select Privileges."
When you create a privilege mask, you select a reusable criteria from the list of criteria objects, as seen in the schematic diagram.
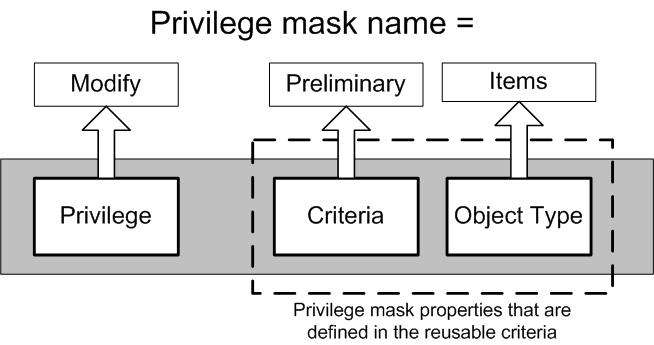
The following convention for naming privilege masks has been used so their purpose and function is as clear as possible. Use the name of the privilege (the action), the name or description of the criteria (the filter), and the name of the object type. For example, Modify Preliminary Items, Checkout for Unreleased Items, or Modify My User Groups.
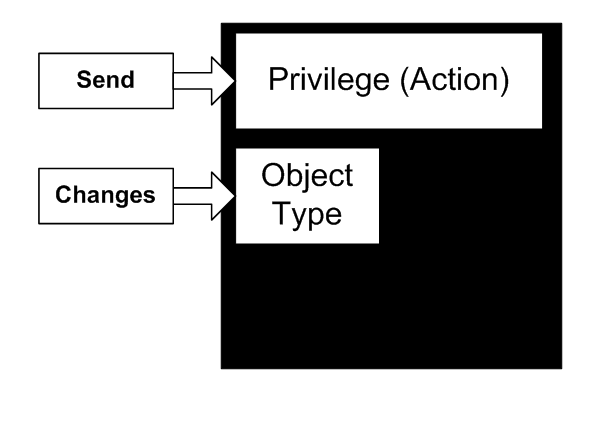
Some privilege masks consist of only the privilege and the object type, for example, Send Changes.
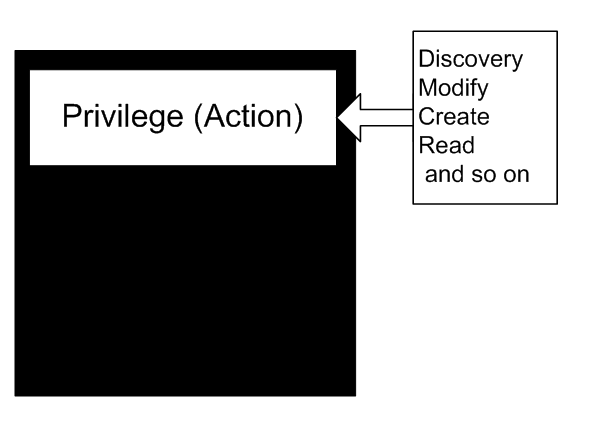
The fundamental building block of a privilege mask is the privilege, or the action it enables, such as Discovery, Modify, or Submit. The basic Agile PLM privileges are described in "Default Agile PLM Privileges."
This basic privilege is defined when the privilege mask is created, and can be viewed on the General Information tab of the privilege mask. For example:
To view the properties of the Modify Eng Changes privilege mask:
Under User Settings, double-click Privileges.
In the Privileges window (which actually lists Privilege Masks based on the named Privilege), double-click the privilege mask Modify Eng Changes. The privilege mask object appears.
Filter privilege records by Privilege Contains Modify to find the all the Modify privilege masks on the list. See "Filtering Data in Java Client."
You can now modify the editable fields of the General Information tab.
Notice that you cannot edit the Privilege field, indicating that you cannot change this value after the privilege mask is created. Notice, also, that you can edit the Privilege Criteria field.
Click Cancel when you have finished viewing the editable properties of the privilege mask.
Most privilege masks consist of the object type to be acted upon, for example, Changes base class, Change Orders class, or ECO subclass. The object type is also a privilege mask property that is defined when the privilege mask is created, when you select the reusable criteria. The object types are defined in the Classes node. For more information about object types, see "Classes."
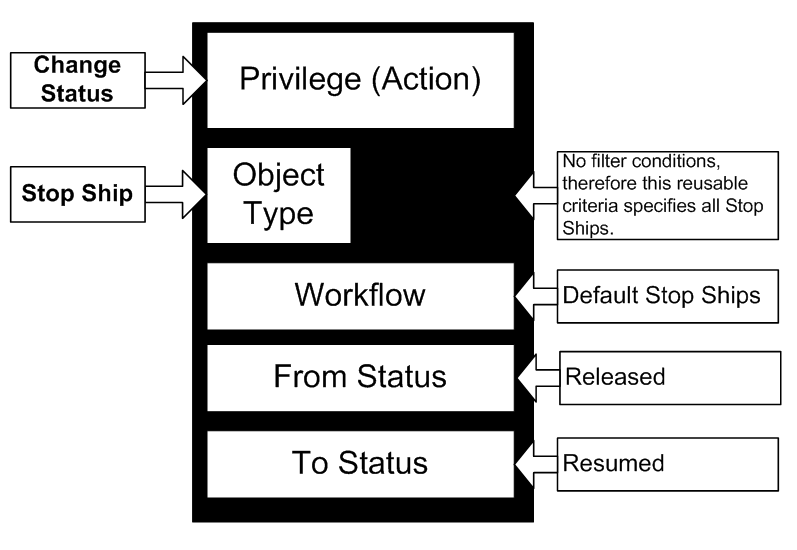
Some privilege masks, such as Send Changes (depicted above), consist of only the privilege and the object type. For this type of privilege mask, select a reusable criteria that specifies the object type only with no filtering criteria, such as the For Changes Only reusable criteria.
You can use the object type to broaden or narrow the privilege. The following example illustrates how a Modify Changes privilege mask could be broadened to include all changes, or narrowed to include just ECOs. See "Agile PLM's Installed Routable Object Types," and "Agile PLM's Installed Nonroutable Object Types" for a complete list of Agile PLM object types.
Table 17-5 Configuring Modify Changes privilege mask
| Select thisobject type | To allow user to modify these classes... | ... and these subclasses |
|---|---|---|
|
Changes |
Change Orders class Change Requests class Deviations class Manufacturer Orders class Price Change Orders class Site Change Orders class Stop Ships class |
ECO ECR Deviation MCO PCO SCO Stop Ship |
|
Change Orders class |
Change Orders class |
ECO (also includes any other Change Order subclasses that you have defined) |
|
ECO |
N/A |
ECO (includes this subclass only) |
|
Note: If you remember to use the Action-Criteria-Object Type naming convention, the object type is part of the privilege mask name. (See "Naming Privilege Masks.") |
Another property of a privilege mask is the set of criteria you want to apply, or the conditions under which the privilege mask will work. Criteria are defined in the reusable criteria when it is created. The criteria for the privilege mask is defined when the privilege mask is created and the reusable criteria is selected from the list. You can select a different reusable criteria later.
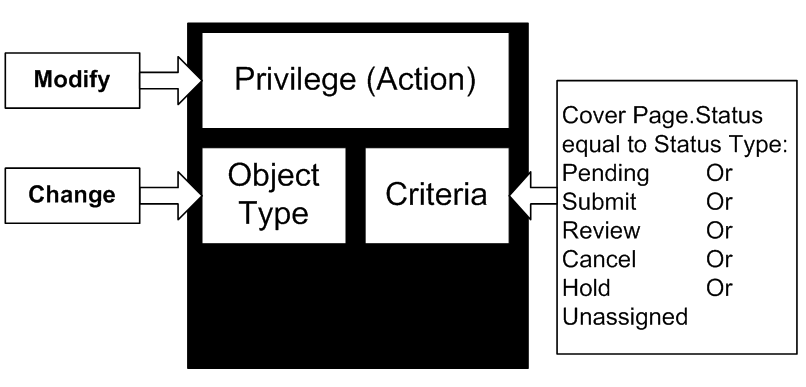
In the example in the diagram below, the privilege (action) is Modify, the object type is Change, and the reusable criteria specifies that the Cover Page.Status attribute must be equal to the status type Pending or Submit or Review or Cancel or Hold or Unassigned. (Note that the status type Released is not included in this reusable criteria.)
Using this particular reusable criteria allows users to modify only engineering changes in one of the status types defined in the reusable criteria (Pending, Submit, Review, Cancel, Hold, or Unassigned).
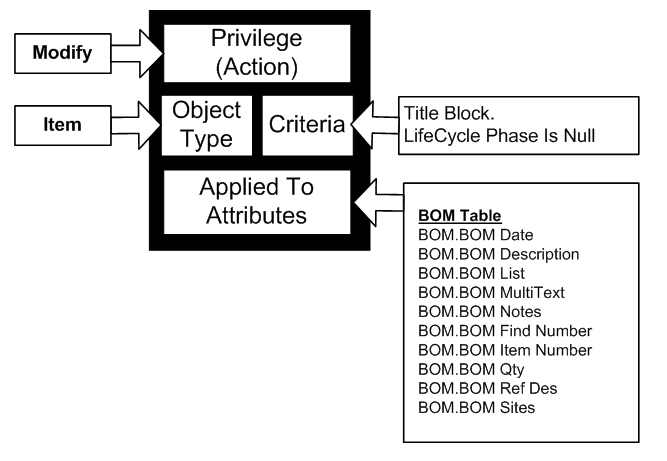
Another building block of a privilege mask is the attribute (or attributes) you want the privilege mask applied to. These are called AppliedTo attributes, and are used only in Modify and Read privilege masks. AppliedTo attributes are defined when the privilege mask is created and can also be changed later.
Modify privilege masks are designed to let users modify the attributes on a particular tab, such as the Cover Page, Title Block, or General Information tab.
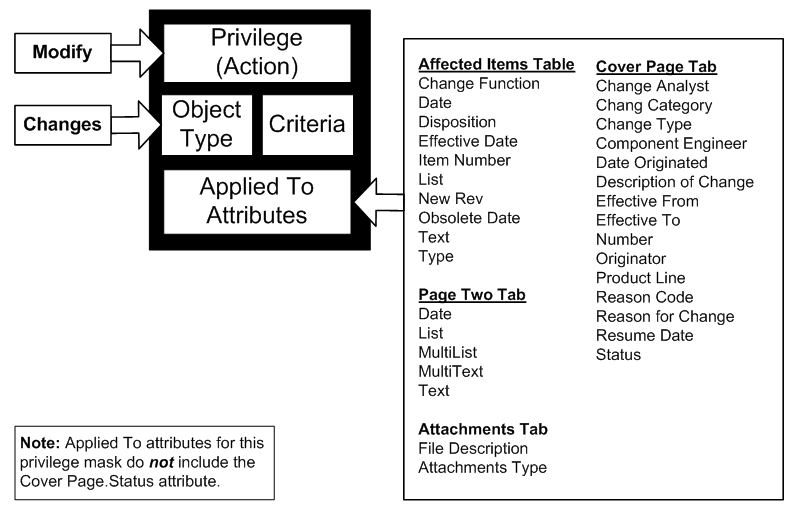
For example, the Modify Eng Changes privilege mask provided with your Agile PLM installation is designed to apply to, or allow users to modify, the attributes shown in the figure below. The attributes in the Applied To property for this privilege mask include attributes on the Attachments tab, the Affected Items table, and the Cover Page tab. The Status attribute on the Cover Page tab is not included in the Applied To property.
To view these AppliedTo attributes:
Under User Settings, double-click Privileges.
In the Privileges window, double-click the privilege mask Modify Eng Changes. The privilege mask appears; see the schematic above.
Filter privilege records by Privilege Contains Modify to find all the Modify privilege masks on the list. (See "Filtering Data in Java Client").
The AppliedTo attributes are listed on the General Information tab.
To view the lists of available attribute values and selected attribute values, click the down-arrow next to the AppliedTo field. The Choices and Selected lists appear in the selection dialog box.
Click Cancel when you have finished viewing the lists. Click Close when you have finished viewing the General Information tab fields.
To enable a privilege mask that is currently disabled:
Under User Settings, double-click Privileges. The Privileges list expands.
Double-click the Privileges subnode you want. The Privileges for <selected privilege> window opens.
Click Refresh to display all privilege masks.
Click the privilege mask you want to enable.
Filter privilege mask records to narrow your search. For example, filter records by Privilege Contains Modify to find all the Modify privilege masks on the list. Or you can click the Enabled column header to sort by Yes (enabled) or No (disabled).
Click the Enable button on the window toolbar.
The disabled privilege mask is now enabled.
|
Note: You can also enable and disable a privilege mask when you edit the General Information tab of the privilege mask. |
You can modify privilege masks in many ways. This section describes these modifications.
To modify existing Privilege Mask Criteria:
Under User Settings, double-click Privileges. The Privileges list expands.
Double-click the Privileges subnode you want. The Privileges for <selected privilege> window opens.
Click Refresh to display all privilege masks.
Filter privilege mask records to narrow your search. For example, filter records by Privilege Contains Modify to find all the Modify privilege masks on the list.
The privilege mask properties are displayed on the General Information tab.
To modify a property, enter text in text fields or use the drop-down lists.
In the Privilege Criteria field, select a different reusable criteria from the drop-down list.
Or click Create to define a new reusable criteria. See "Creating a New Criteria."
When you are finished, click Save. To cancel the changes, click Close.
The AppliedTo capability is set in privilege masks based on the following privileges.
Remember, in a privilege object, the rows are its constituent privilege masks: double-click a row to open the privilege mask object (which has AppliedTo property if it is based on these privileges):
Administrator privilege: Administrator and "Admin Access for User Admin"; see "Administrator Privilege and the AppliedTo Capability."
User Administrator privilege: User Administrator privilege mask sets roles that user can assign to other users; "Specialized Administrator Privilege Masks."
Read privilege: see "Field-Level Read Privilege."
Modify privilege: see "Modify Privilege."
Microsoft Project privilege, a PPM-specific privilege: see "Project Summary Page Configuration." See also Agile PLM Product Portfolio Management User Guide, ”Configuring Product Portfolio Management.”
Dashboard Tab View privilege, a PPM-specific privilege: see "Dashboard Management."
Client Access privilege: Client Access privilege masks allow user to lag in to either Java Client or RMW client; "Client Access."
Export: See "Export."
Manage Report: See "Report Templates."
Specification Management: See Agile PLM Product Governance & Compliance User Guide, "Configuring Product Governance & Compliance."
Although the following discussion centers on the AppliedTo capability as it works with the Administrator-specific privilege masks, the information in this section is pertinent to the privilege masks based on Read, Modify, Microsoft Project, and Dashboard Tab View privileges.
The Administrator role is built on the "Administrator" privilege mask, which provides access to Administrator nodes in Java Client, and the "Admin Access for User Admin" privilege mask, which provides access to Administrator nodes in Web Client.
The User Administrator role includes the "Admin Access for User Admin" privilege mask and the "User Administrator" privilege mask, which defines roles that can be assigned to other users (more on this in "Options for Building Administrator Assistants.")
If an Agile administrator or assisting "user administrator" does not have a particular node properly selected in the AppliedTo property of their "Administrator" privilege mask or "Admin Access for User Admin" privilege mask, that node will not be a live link in that user's view of the Administrator nodes, so that user will not be able to access the capability.
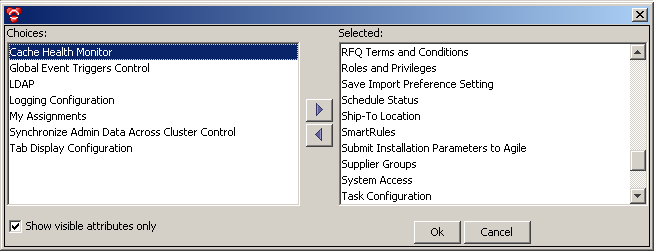
In the task below, you will view the General Info tab of a privilege mask that contains the AppliedTo property. When you click the down-arrow of the AppliedTo property, the Show visible attributes only check box is displayed. It is selected by default: deselect it to view attributes whose Visible property is set to No; all non-visible attributes are then displayed in the Choices list.
This task can be applied to any of the privilege masks that contain the AppliedTo property.
To view the AppliedTo property of the Administrator privilege:
Under User Settings node folder, expand Privileges node.
Double-click Administrator privilege. The Privileges for Administrator filter dialog appears.
In Match If field drop-down list, select Show All. Click the Apply button.
Available Administrator-related privilege masks appear. Double-click Administrator privilege mask.
On the Administrator privilege mask's General Info tab, click the down-arrow of AppliedTo property.
The Choices list displays all Administrator nodes or other Admin utilities (for example, Global Replace) that are not currently available (visible) to any user whose roles and privileges include this privilege mask. The Selected list displays all nodes that are visible. (The Show visible attributes only check box will be selected; it does not really affect matters in the Administrator privileges.)
|
Note: The Choices list reflects the nature of the privilege mask. "Admin nodes and utilities" are selected in Administrator-, Read-, and Modify-based privilege masks. Microsoft Project and Dashboard Tab View-based privilege masks offer a different array of choices. |
To select the AppliedTo attributes for a qualified privilege mask:
Under User Settings, double-click Privileges. The Privileges list expands.
Double-click the Privileges subnode you want. The Privileges for <selected privilege> window opens.
Click Refresh to display all privilege masks.
Filter privilege mask records to narrow your search. For example, filter records by Privilege Contains Modify to find all the Modify privilege masks on the list. See "Filtering Data in Java Client."
Double-click the qualified privilege mask you want to modify. The privilege mask window appears.
On the General Information tab, click the down-arrow next to the AppliedTo field. The selection dialog box opens.
Use right arrow to move selected values from the Choices list to the Selected list.
When you are finished, click OK.
To finish editing the privilege mask, click Save.
|
Note: The AppliedTo selection dialog box lets you select from all available fields on a tab. However, users may not be able to modify all the fields you select under all conditions. |
For example, when creating the Modify Released Eng. Changes privilege mask, you can select from all fields on the Affected Items tab, including Item Number, New Rev, and Type. However, these fields cannot be modified once the routable object is released. Because you can select these attributes from the Choices list in the AppliedTo selection dialog box, it does not necessarily follow that users can modify those fields under all conditions.
It is possible to create specialized Administrator privilege masks. Particularly with this privilege mask, it is safer to alter the individual case, as it is assigned to one or several users, than to change the ready-to-use privilege.
|
Caution: Be extremely careful about modifying the AppliedTo properties of Administrator privilege masks that are already in use. For example, if you were to modify the AppliedTo property of the Administrator privilege mask so that it no longer included Privileges, you and other administrators would no longer have access to the Privileges node, and it would be very difficult to modify the Administrator privilege mask to apply to privileges again. (This kind of scenario is where Example Roles could be needed.) |
If you need multiple administrator privileges and roles, test the new roles and privileges carefully before you modify or disable any existing administrator roles and privileges.
|
Note: Carefully consider the impact on your company of having multiple administrative users, each with specific tasks. This enables you to divide administrative tasks among a larger group of people, restricting each user to a specific type of administrative task. Be sure to read "Options for Building Administrator Assistants." |
Here are specific caveats for removing nodes from the AppliedTo property of a user's Administrator privilege mask, regarding access to Admin nodes in Java Client.
If Criteria is removed, there will be no Criteria link from the privilege object's General Information tab, the Workflow node, the workflow object's General Information tab, or the subscriber object's General Information tab. Also, the New Criteria buttons in Create Workflow and Create Privilege dialog boxes will be disabled.
If Role is removed, there will be no Role link from the Users or Deleted Users nodes.
If Workflow is removed, there will be no Workflow link from the Criteria Where Used table.
If Privilege is removed, there will be no Privileges link from the Criteria Where Used table.
The User Administrator role operates with a "User Administrator" privilege and privilege mask. The User Administrator privilege mask performs a different function than "Admin Access for User Admin."
You, the main Agile PLM administrator, have decided that you want the assistance of a few select users in your administrative tasks. (How many and what kind of assisting administrators depends on the size of your company, the number of PLM solutions purchased, and so forth.) Here are your options:
Assign and refine the Administrator role to give a user access to administrative functions in Java Client. In each user object (to whom you are assigning Administrator privilege mask), use the AppliedTo property to tailor which nodes that user can work in.
Assign and refine the User Administrator role to give a user access to administrative functions in Web Client. The User Administrator performs administrative tasks through Web Client > Tools and Settings > Address Book and Tools and Settings > Administration.
The User Administrator role uses the privilege mask called Admin Access for User Admin, with a reduced AppliedTo list of nodes. In each user object (to whom you are assigning Admin Access for User Admin privilege mask), use the AppliedTo property to tailor which Web Client nodes that user can work in.
The User Administrator role also uses the privilege mask called User Administrator. Using the same sequence of steps (in "Viewing and Modifying AppliedTo Property" above), you see that the Choices list is populated not with names of Admin nodes but with a complete list of PLM roles. In each user object (to whom you are assigning User Administrator privilege mask), use the AppliedTo property to tailor which roles that user can assign to other users.
A role that is moved over to the Selected list permits that user to assign that role to another user.
"Save Import Preference Setting" is a new Choice in the Administrator-specific AppliedTo property (found in Administrator and Admin Access for User Admin privilege masks). This setting (when moved to Selected) enables you or an assistant administrator to set default preferences in the PLM Import utility (Web Client > Tools > Import) that users of Import will see when they use the utility.
Of course, any user can reset preferences in Import for their own use, but these will not be saved. However, it is possible to assign the Admin Access for User Admin privilege mask to any user and select this one Choice in AppliedTo: this enables that user to have no other "User Administrator" capability other than saving preferences in Import.
"Manage Report Templates" is a choice in the Administrator-specific AppliedTo property (that is, found in Administrator and Admin Access for User Admin privilege masks).
When it is moved to the Selected table, Manage Report Templates enables you or an assistant administrator to upload templates for reports in the PLM Report Template utility. Choose Web Client > Tools and Settings > Administration > Report Template to display the Manage Report Template page.
Users see these templates, per assigned privileges, when they use the Reports function in Web Client.
From the Dashboard Management node, you can configure the information display and behavior of the Agile PLM Dashboard. The Dashboard is highly configurable and can be used to present key project information to the user, according to preferences.
As an administrator, you can add an unlimited number of system-level tabs to the dashboard. The visibility of each tab can be controlled through roles and privileges.
You can configure a dashboard tab to generate and display content from any Agile object. Custom dashboard extensions (DXs) can be used to retrieve and present data from external systems (for example, ERP inventory numbers) into the dashboard. Tables within a dashboard tab can be configured to display data retrieved through advanced search queries or process extensions in various graphical formats. You can even configure a dashboard table to display an internal or external website.
Within Dashboard Management, you can:
View and edit all dashboard tabs
Add or delete optional dashboard tabs
Add tables to optional dashboard tabs
Configure multiple sources of data for the tables, such as:
Advanced search queries
Dashboard extensions (chart and table)
Custom content through URL process extensions (PXs)
Configure the display of dashboard tabs
The Administrator privilege mask with Project Summary Page Configuration specified as the AppliedTo property allows you to configure the widgets for the Summary page of a project. To begin configuring the Project Summary widget and page configuration, click the Configure button on the Summary page. For more information, refer to Agile PLM Product Portfolio User Guide, chapter "Configuring Product Portfolio Management."
As with roles, it is easy to create new privilege masks, although you should use extreme caution whenever you change user access and permissions. Before creating a new privilege mask, you should review the privilege masks you currently have. Generate the Privilege Mask Detail report from the Administrator Reports node for a listing of current privilege masks and their criteria. See "Administrator Reports."
We recommend that you modify (or copy and modify) an existing privilege mask that is similar to the one you need instead of creating a new one. The existing privilege masks have been tested extensively; their operation and interaction in Agile PLM are documented.
Consider the following details before creating a new privilege mask.
Does the privilege mask you want already exist? If so, you can assign it to the role without creating a new privilege mask. If the appropriate reusable criteria exists, check its Where Used tab for the privilege mask you want.
What action do you want the privilege mask to enable in Agile PLM?
What action do you want the privilege mask to prevent in Agile PLM?
Upon what object type will the privilege mask act?
What will you name the new privilege mask? Remember to use the Action-Criteria-Object Type naming convention.
Which role will require the new privilege mask?
If you are creating a basic Read or Modify privilege mask, do you also need to create a corresponding Discover privilege mask? Does a corresponding Discover privilege mask already exist? (A Discover privilege mask is not automatically created when you create a new Read or Modify privilege mask.)
If it is not a Read privilege mask, does its effectiveness depend on a Read privilege?
Under what specific conditions do you want to enable this privilege mask? Is there an existing reusable criteria that you can select when you create the privilege mask? If so, check the reusable criteria's Where Used tab to see if the privilege mask you want already exists.
Will the privilege mask conflict with any existing masks in the role?
Does the role have an existing privilege mask you can modify to achieve the results you want?
Is there an existing privilege mask, either in this role or another role, that you can copy (using Save As) and modify to avoid having to create one from scratch?
You can create a new privilege mask by using the Save As process as in the following procedure. You can also create a new privilege mask from scratch.
Use the Save As button in the privilege mask window to make a copy of an existing privilege mask. You can change the copy to suit your needs.
To copy a privilege mask:
Under User Settings, double-click Privileges. The Privileges list expands.
Double-click the Privileges subnode you want. The Privileges for <selected privilege> window opens.
Click Refresh to display all privilege masks.
Filter privilege mask records to narrow your search. For example, filter records by Privilege Contains Modify to find all the Modify privilege masks on the list. See "Filtering Data in Java Client."
Double-click the privilege mask you want to copy. The privilege mask window appears.
Click the Save As button.
Enter a name and API name for the new privilege mask.
Click Save when you are finished. The new privilege mask appears.
To create a new privilege mask:
Under User Settings, double-click Privileges. The Privileges list expands.
Double-click the Privileges subnode you want. The Privileges for <selected privilege> window opens.
Click New on the toolbar. The Create Privilege dialog box appears.
Enter a name and an API name. Remember to use the Action-Criteria-Object Type naming convention. (See "Naming Privilege Masks" and "API Name.")
Enter a description.
By default, the privilege mask is enabled. If you want, select No in the Enabled field to disable the privilege mask. You may want to do this while developing the privilege mask.
Select a privilege from the Privilege drop-down list.
Depending on which privilege you select, more fields may appear for you to complete.
Do one of the following:
To finish creating a privilege mask that does not require a privilege criteria (reusable criteria), click Finish.
For all other privileges, in the Privilege Criteria field, select a reusable criteria from the drop-down list. The reusable criteria defines both the object type and the filtering conditions (criteria) for the privilege mask.
Or click the New button in the dialog box to define a new reusable criteria. See "Creating a New Criteria."
See "Privilege Mask Component 2: Object Type" for more information about selecting an object type for your privilege mask. See "Criteria".
If you are creating a Read or Modify or Administrator privilege mask, you can select the object fields for which the Read or Modify privilege is applied. See "Privilege Mask Component 4: Attributes".
Click the down arrow icon at the AppliedTo field. The selection dialog box opens.
Use the right and left arrows to move selected values from one list to the other.
When you are finished, click OK.
If you selected the Change Status privilege, see "Change Status" for detailed information about completing a Change Status privilege mask.
When you have completed the fields on the Create Privilege dialog box, Click OK.
|
Note: If you disabled the privilege mask while you were creating it, remember to enable it so it can be used. |
When you create or modify a privilege mask, the AppliedTo and Criteria dialog boxes let you make selections from all possible combinations of attributes, but not all criteria or attributes make sense for all privilege masks. Evaluate the options you combine to make sure they function as expected.
For example, when modifying the Modify Released Eng Changes privilege mask, you can select the Affected Items.Item Number and Affected Items.New Rev fields from the list in the AppliedTo dialog box. However, these two fields cannot be modified once the routable object has been released. Because you can specify these attributes in the AppliedTo dialog box, it doesn't necessarily follow that you can modify those fields on a released routable object.
The following are examples of privilege masks and their properties that are provided with your Agile PLM installation.
In this example of a Modify privilege mask, if the Status attribute on the Cover Page tab of a Stop Ship object contains a Released status type, then the user is able to modify the Resume Date attribute on the Cover Page tab.
The Change Status privilege does not include AppliedTo properties, like the Modify privilege mask in the example above. However, the Change Status privilege includes properties for Workflow, From Status, and To Status, as seen in the figure below.
In this example of a Change Status privilege mask, it the Stop Ship object selected workflow is Default Stop Ships and the current status of the Stop Ship is Released, then the user is able to change the status to Resumed.
Table 17-7 Example of Change Status for Stop Ship privilege mask and its properties
| Privilege mask property | Description |
|---|---|
|
Privilege (action) |
Change Status |
|
Reusable Criteria |
Object Type: Stop Ships Filter: (no filter) The All Stop Ships reusable criteria specifies Stop Ship objects and does not include any filter criteria conditions. Therefore, this reusable criteria specifies all Stop Ship objects. |
|
Workflow |
Default Stop Ships |
|
From Status |
Released |
|
To Status |
Resumed |
In this Modify privilege mask example, if the Item object Title Block tab attribute Lifecycle is null (the item does not have a Lifecycle, therefore it is a Preliminary Item), then the user can modify the BOM tab attributes included in the Applied To property.
Table 17-8 Example of Modify for Item privilege mask and its properties
| Privilege mask property | Description |
|---|---|
|
Privilege (action) |
Modify |
|
Reusable Criteria |
Object Type: Items Filter: Title Block.Lifecycle is Null |
|
Applied To Attributes |
BOM.BOM Date BOM.BOM Description BOM.BOM List BOM.BOM MultiText BOM.BOM Notes BOM.BOM Text BOM.BOM Find Number BOM.BOM Item Number BOM.BOM Qty BOM.BOM Ref Des BOM.BOM Sites |
This section looks closely at Discovery and Read privileges.
The Read and Modify privilege masks are made specific by, among other properties, the AppliedTo property naming individual attributes that can be accessed. (To contrast, the Administrator privilege mask is made specific by the AppliedTo property naming individual nodes that can be accessed.)
|
Note: A section in the previous chapter, Advanced Search Security, describes enhancements to "search security" that apply to Discovery, Read, and Field-level Read privileges (not repeated in this section). |
As outsourcing and "virtual companies" become more common, Agile PLM customers are allowing employees of other companies in their supply chain to access their Agile PLM database. For security reasons, it is important that these outside users see only information that applies directly to them. For example, you might not want one supplier to know that another supplier is providing the same part, or that you are providing the same part to a company and its close competitor.
The Agile PLM Discovery features—Discovery Privilege database property, Discovery privilege, and Discover privilege mask—are designed to address these security issues. These features control whether users are allowed to learn that certain objects exist in Agile PLM.
You control object discovery in two ways:
At a global level, by setting the Discovery Privilege database property (in Server Settings > Database) to Enabled or Disabled.
At the level of roles, with Discover privilege masks.
For example, if employees of one supply chain partner have the Discovery privilege only for parts provided by that partner, they can be blocked from seeing parts provided by other partners in search results tables or even on BOMs. See "Related SmartRules".
|
Note: If you grant users Read or Create privileges, you must also grant users a corresponding Discovery privilege for objects that they are allowed to read. Users should always be able to discover and read objects that they created. |
For example, if you create a role that has a Read privilege mask applying to All Change Orders criteria, you must also include in that role a Discovery privilege mask applying to All Change Orders criteria.
For information about using the Discovery Privilege database property for global discovery control, see "Database".
For more information about the Discover privilege masks assigned to each role supplied with Agile PLM, see "Viewing a Role".
|
Note: If a change originator or CCB member has the Discovery privilege removed after an ECO has been routed, the originator or CCB member still receives notifications but cannot view the change. For best results, avoid removing Discovery privileges after their initial assignment. |
Site objects are explicitly filtered out of Discovery privilege criteria. Therefore, you cannot define a new Discovery privilege mask to control a user's ability to access Sites.
To control a user's access to Sites, set user properties appropriately. Open a user in Java Client or Web Client, and specify the Sites and Default Site properties.
If you create Discovery privilege criteria based on RFQ Response lifecycle phases, you must restart the Agile Application Server to run a search that uses the criteria. Otherwise, the search won't return any results.
The following SmartRules define how Agile PLM responds when users encounter objects that their privileges do not allow them to discover:
Display BOM Tables
Discovery Object Tables
Discovery Results Table
For more information about these SmartRules and their default settings, see "SmartRules Defined".
Agile users do not see and cannot run the Administrator reports. The following information is about the availability of specific objects in the standard reports that users can run.
A user who does not have Discovery privilege for an object cannot include that object in a report. Parts for which a user does not have Discovery privilege are displayed in the same way they are displayed on BOMs.
If you, the administrator, have decided to display a warning message, that warning message will appear in the reports. You also have the option of displaying either the item number only or the item description only, so the user can see all the items in the report, but does not have access to the undiscovered items.
To run a report on a particular type of object, a user must be granted the following privileges:
Read privilege
Discovery privilege
Run Reports privilege
|
Note: The Manage Reports privilege alone is not sufficient to execute the report. |
Agile PLM administrators can use the Discovery and Read privileges to grant users several levels of access to Agile PLM data, as shown in the following table.
Table 17-9 Access levels to Agile PLM data
| Access level | Discovery privilege | Read privilege |
|---|---|---|
|
Full access |
Granted |
Granted for all tabs |
|
Limited access |
Granted |
Not granted for History or Workflow tabs |
|
Discovery only |
Granted |
Not granted |
|
No discovery |
Not granted |
Not granted |
Privilege masks made up of the Discovery and Read privileges build on each other, as shown in the following table.
Table 17-10 Discovery and Read privilege mask details
| Privilege mask type | Effects and comments |
|---|---|
|
Discover |
|
|
Read |
|
|
Note: If you remove or modify a Read privilege mask, the Discovery privilege mask is not automatically removed or modified at the same time. |
"Field-level Read" describes an Agile PLM client user's ability or inability to read various fields within tabs through the Read privilege mask. Any field in any tab can be hidden from any user. A good use of Field-level Read is a customer hiding a "cost" field on the Page Two tab from certain suppliers.
To see a field of an object:
A user must have a Read privilege to the object.
The field must appear in the AppliedTo property for that user's Read privilege mask.
For example, in the Privileges window, double-click any Read privilege mask to display it. The AppliedTo field on the General Information tab lists all the fields to which the Read privilege is applied.
When you create a Read privilege mask, there are no values listed in the AppliedTo property. During the creation process, at the AppliedTo field, you click the down-arrow icon to display the selection dialog box. All the fields of the object are in the Choices list. You refine the privilege mask by moving fields from the Choices list on the left to the Selected list on the right.
If you wanted to prevent the user from seeing the Workflow tab for the object specified by the criteria, all the Workflow tab fields would remain in the Choices list. Only the fields in the Selected list will be visible to the user. This is an example of Field-level Read.
The Field-level Read capability may be affected by whether the user has the Enforce Field-level Read privilege, which is discussed in "Enforce Field-Level Read Privilege" below.
This task is specific to Read privilege masks. The AppliedTo capability is a property of a few other privileges also – for more information, see "AppliedTo Property in Select Privileges".
To modify the list of fields to which a Read privilege mask is applied:
Under User Settings, double-click Privileges. The Privileges window appears.
Filter privilege mask records to narrow your search. For example, filter records by Privilege Contains Read to find all the Read privilege masks on the list.
Double-click the privilege mask you want to modify. The privilege mask window appears.
The privilege mask properties are displayed on the General Info tab.
On the General Info tab, click the down arrow icon next to the AppliedTo field. The selection dialog box opens.
Use the right and left arrows to move selected values from one list to the other list.
When you are finished, click OK.
To finish editing the privilege mask, click Save.
When a user does not have the privilege granted to read certain attributes of objects the entire attribute name is hidden, along with the field attribute's content. If you require users, who do not have the Read privilege granted, to view the attribute without the content the Display No Privilege Field privilege allows that in Web Client for Cover Page, P2 and P3 attributes. This is not specific to an object type, but is enforced across all objects throughout PLM.
If the administrator creates a privilege based on this new privilege type and assigns the new privilege to any role, then the users who have that role are able to see the field names even though they do not have privileges to see the value of those fields.
If you are the administrator of a system that is newly upgraded, be aware that the Display No Privilege Fields privilege is added to any role containing an Enforce Field Level Read privilege.
The Enforce Field-level Read privilege is a way the Agile PLM administrator can control certain small performance consequences when a user is under the restrictions of a Field-level Read (see "Field-Level Read Privilege"). The Enforce Field-level Read role comprises only the Enforce Field-level Read privilege mask.
If a user has a role with Enforce Field-level Read privilege included, the software checks everything at the "field level," that is, the fields within tabs in Agile PLM clients. Users with this privilege may notice their computers' performance on some operations is slightly slower; this is because the software is checking all possible fields. This impact depends on how many items are in the tables being searched (for instance, BOMs, affected items, results).
If the user does not have a role with this privilege included, the system does not check everything at the field level, and so computer performance is not affected. In this case, even if the user has the Read privilege defined at the field level, the system does not check everything at the field level; that is done only when the Enforce Field-level Read privilege is present and enabled.
|
Important: Previous versions of Agile PLM used the Specify Output Column privilege to permit users to select output attributes in setting up advanced searches. That privilege is removed; therefore, all users can potentially specify output attributes in advanced searches. However, you may want to assign the Enforce Field Level Read privilege to any user who did not have Specify Output Column privilege previously. This ensures that search results will be appropriately filtered, for example, for sensitive fields such as costs. |
For a user with two roles, one with Enforce Field-level Read privilege and one without, the default is to "enforce" the Field-level Read. Similarly, for a user with a single role that has two Enforce Field-level Read privileges, one disabled and one enabled, the default is to "enforce" the Field-level Read. In both these cases, users can see only the fields for which they have the Read privilege. For this reason, Agile recommends that only users who are prevented from seeing certain fields have this privilege enabled.
System behavior with Enforce Field-level Read set to Yes interacts with certain privileges and SmartRules as follows:
Discovery privilege — Dictates if the object is listed on Results and other tables.
User does not have the Read privilege for the object — The user sees "no privilege" in the object's fields on the Results and most other tables. The display of these objects on the BOM table is governed by the Display BOM Tables SmartRule. The user cannot open these objects.
User has Read privilege for the Object Number and Description fields — The user sees object number and description on Results and other tables. The user can open these objects.
User has Read privilege for all fields — The user sees all fields on all tables. The user can open these objects.
Up to Agile's Product Collaboration Release 7, if a user had a role that included the Enforce Field-level Read privilege, the display of objects that the user could not read but could discover (in the Results, Where Used, Affected Items, and Manufacturers tables) has "no privilege" in all the corresponding fields, and the user could open the objects to view them. Display of fields on the BOM table was governed by the Display BOM Tables SmartRule.
If you want a user to "mimic" the 6.x behavior on the tables, you need to add the Read privilege to the user's roles for a subset of fields. The Read privilege could include the object number and description as AppliedTo attributes, and only these fields will be displayed on the returned tables.
For example, for a certain type of object, you might define Attachment Type values such as Internal Only and External, and then give users outside the company privileges only for files marked as External. If an Agile PLM client user adds an attachment to that type of object and defines it as Internal Only, outside suppliers and contractors won't be able to access the file.
To use the Attachment Type attribute in privilege mask criteria, the object type that you specify cannot be a base class (Items, Changes, Reports, and so forth).
|
Note: If you decide to enable the Attachment Type attribute to control access to attachments, be sure to tell the users how to use the field. This field can be edited in Agile PLM clients. |
The crucial Modify privilege is covered generally in "Some 'Modify' Basics and Rules" and in an important specific context in "Controlling the Ability to Modify Items at Introductory Revision with $CURRENTREV." Again, the Read and Modify privilege masks are made specific by, among other properties, the AppliedTo property naming individual attributes that can be accessed.
The Modify privilege allows a user to modify or edit fields on the tab of an object. Modify privileges are assigned using the AppliedTo attribute settings.
|
Note: The Create privilege allows the user to fill in required fields at the time of object creation even if the user does not have Modify privilege for those fields. (Required fields are fields with their attribute property Required set to Yes). See "Defining Attribute Properties." |
The Modify privilege is required for users of the Agile PLM Import utility.
Modify privilege and Relationships: To create a relationship between two objects without setting up a rule (detailed in Agile PLM Getting Started), you must have the appropriate Modify privilege for both objects tailored to Relationships. To create a rule between two related objects, you must, in addition, have the appropriate Modify privilege for both objects tailored to Rules. For example, for items, a user must have a Modify Items privilege mask that includes, in its AppliedTo property, the Relationship tab "Name" attribute and the Relationship tab "Rule" attribute.
If you are using the Add to Table and Delete from Table privileges to define the creation of relationships, then the Relationship tab "Name" attribute must be removed from the Modify privilege mask for that object in order for the Add to Table and Delete from Table privilege masks to control the ability to create and delete relationships. However, in order to create and modify rules, the Modify privilege mask must include the "Rule" attribute in its AppliedTo property. See"Add to Table and Delete from Table Privileges."
To create revision-specific relationships, the Relationship tab attributes associated with revision-specific relationships must be enabled: Revision, Track Impact, Impacted (Image), and, optionally, Change. These attributes must be enabled for both object (source and target) in the relationship. (These attributes are disabled by default.)
In addition, you must have the appropriate Modify privilege mask that includes in its AppliedTo property the Relationship tab Revision attribute "Revision" (in order to select the desired revision) and "Track Impact" (in order to change the Track Impact setting). The revision-controlled objects that support revision-specific relationships are Parts, Documents, and Published Prices. For more information, see Chapter 43, "Administering Revision-Specific Relationships."and "Item Relationship Creation Using $CURRENTREV and $LATESTREV Criteria."
Users with the Modify Manufacturer Parts privilege mask can modify Manufacturer Parts attributes that also appear on the Manufacturers tab without an MCO or ECO being issued.
|
Note: A user must be assigned the Modify privilege for both Manufacturer.Mfr Name and Manufacturer.Mfr Part Number fields to properly modify Manufacturer (AML) information. |
Item, New Rev, and Type (Lifecycle) fields on the Affected Items tab of changes cannot be modified at Released or Implemented statuses.
For other changes, the item number fields on the Affected Items tab cannot be modified at Released, Closed, Expired, or Resumed statuses.
To be able to modify a Page Three tab, users must have a Modify privilege mask for the specific subclass and attributes.
|
Important: Although Agile PLM can be configured to allow modification of the lifecycle phase of previously released revisions by modifying released ECOs, such a practice is highly discouraged because of the following reasons:a) Potential regulatory compliance violations b) Potential data integrity issues in the system It is strongly recommended that user privileges be configured not to allow modification of lifecycle of released revisions by directly modifying released ECOs. Agile PLM does not allow you to modify the item Rev and item Description on the Affected Items table of a released ECO, even if you have Modify ECO privileges that would, in theory, allow that. |
The Modify privilege is also utilized with regard to attachments; this capability is documented in "Modify Privilege and Attachments."
Modify privilege masks for item objects that use $CURRENTREV in their criteria can be used to control a user's ability to modify (or inability to modify) items that are either released, preliminary, or introductory. To further define a user's modify ability, you can use multiple $CURRENTREV conditions to identify an Introductory revision, the latest revision, and the workflow statuses of the change order associated with the selected item revision.
On item objects, the user can use the Rev drop-down list to display information for a specific revision. The user's assigned Modify privilege masks determine whether he can modify those attributes.
Revision drop-down list is available for the item Sites tab in both Web Client and Java Client.
Revision drop-down list is available for the item Page Two and Page Three tabs in Java Client
Because the item Page Two and Page Three data in Web Client is displayed on the Title Block tab, the Revision drop-down list on Web Client Title Block tab also controls display of Page Two and Page Three data.
Agile has a special variable that can be used in Criteria against items, $CURRENTREV, that enables administrators to build in privilege control based on the displayed revision. With a criteria written using $CURRENTREV, Agile evaluates the currently selected revision in Web Client or Java Client to evaluate the match. That is, when a user has selected a revision in the Revision drop-down list, the $CURRENTREV criteria is evaluated against that displayed revision.
This functionality is discussed in "Controlling the Ability to Modify Items at Introductory Revision with $CURRENTREV."
Using $CURRENTREV in an item criteria enables the administrator to build in privilege control based on the displayed revision. Using combinations of multiple $CURRENTREV criteria conditions enables the administrator to narrowly define which items a user is allowed to modify.
A $CURRENTREV criteria condition can be set to be Equal To or Not Equal To the following values:
$LATEST (the latest released revision of the item)
Status type variables, for example, $STATUSTYPE.RELEASED.
Workflow statuses pertaining to specific workflows, for example, Default Change Orders.Pending.
Special values for evaluating Introductory revisions:
$INTRODUCTORY_NOCHANGE
$INTRODUCTORY_PENDINGCHANGE
$INTRODUCTORY_RELEASEDCHANGE
For detailed information about $CURRENTREV criteria values, see "Using $CURRENTREV and $LATESTREV in Criteria for Items."
A Released Revision occurs when the change object (Change Order or Manufacturer Order) that created the Revision is in its workflow at a status type of Released or Implemented. This is indicated in both clients when the Revision is not in parentheses.
A Pending Revision occurs when the change object that created the Revision is in its workflow at a status type of Unassigned, Pending, Submit, Review, or Hold. This is indicated in both clients when the Revision is in parentheses.
A change object in Canceled status is not applicable because it will not appear in the Revision drop-down listing.
Typically, there are three cases where the Agile administrator needs to control Modify privileges. These can be extended with additional criteria as are needed.
Allow broad Modify at Introductory only
Allow targeted Modify for a Pending revision
Allow targeted Modify for a Released revision
Items ( $CURRENTREV Equal To $INTRODUCTORY_NOCHANGE OR
$CURRENTREV Equal To $INTRODUCTORY_PENDINGCHANGE OR
$CURRENTREV Equal to $UNASSIGNED )
This combination of statements will allow a user to modify the Introductory revision of an item if the item has never been released. The item may have no changes or it may have a pending change.If the item has a pending change, the user must select the Introductory revision in the Rev drop-down list.
Use of a criteria with this combination of statements in a Modify Item privilege mask with many AppliedTo fields will allow broad Modify privilege at Introductory while there is no Released revision, and then prevent broad Modify privilege after the first Released revision when there is a Pending revision.
Items ( $CURRENTREV Equal To $UNASSIGNED OR
$CURRENTREV Equal To $STATUSTYPE.PENDING OR
$CURRENTREV Equal To $STATUSTYPE.SUBMIT OR
$CURRENTREV Equal To $STATUSTYPE.REVIEW OR
$CURRENTREV Equal To $STATUSTYPE.HOLD )
Writing a criteria with these statements will generally satisfy this requirement. Use this criteria in a Modify Item privilege mask with a small number of AppliedTo fields. When the user selects a pending revision from the Rev drop-down list, he will be able to modify the specified fields of the selected pending item revision.
Items ( $CURRENTREV Equal To $STATUSTYPE.RELEASED OR
$CURRENTREV Equal To $STATUSTYPE.IMPLEMENTED )
This combination of criteria statements evaluates as True when the workflow status of change that released the selected item revision has a status type of either Released or Implemented. Use this criteria in a Modify Item privilege mask with a small number of AppliedTo fields. When the user selects a Released revision in the Rev drop-down list, he will be able to modify the specified fields of the selected released item revision.
This section shows examples of ten different criteria statements using $CURRENTREV and $LATESTREV and illustrates how they are evaluated for different item revisions.
The following tables shows five example items (EX-1 - EX-5) and the revision history for each of these items. These tables illustrate how each of the example criteria (Criteria #1 - #10) will evaluate when a specific revision is selected from the Rev drop-down list of the example items.
Example Item EX-1
Example item EX-1 has the following pending revision that can be selected in the Rev drop-down list.
The following table illustrates how each of the ten example criteria are evaluated when the revision of item EX-1 is selected in the Rev drop-down list. A dash (–) indicates that the criteria evaluates as false. The word True indicates that the criteria evaluates as True.
Table 17-12 Evaluation of Item EX-1 Revisions per $CURRENTREV Criteria Examples
| # | Description | Rev: Introductory |
|---|---|---|
|
1 |
|
True |
|
2 |
|
– |
|
3 |
|
*- |
|
4 |
|
True |
|
5 |
|
True |
|
6 |
|
– |
|
7 |
|
– |
|
8 |
|
– |
|
9 |
|
– |
|
10 |
|
True |
Example Item EX-2
Example item EX-2 has the following released and pending revisions that can be selected in the Rev drop-down list.
Table 17-13 Example Item EX-2 Revision List
| Revision | Change Status | Status Type |
|---|---|---|
|
Introductory |
n/a |
n/a |
|
(?) |
Unassigned |
n/a |
The following table illustrates how each of the ten example criteria are evaluated when each revision of item EX-2 is selected in the Rev drop-down list. A dash (–) indicates that the criteria evaluates as false. The word True indicates that the criteria evaluates as True.
Table 17-14 Evaluation of Item EX-2 Revisions per $CURRENTREV Criteria Examples
| # | Description | Rev: Introductory | Rev: (?)Unassigned |
|---|---|---|---|
|
1 |
|
– |
– |
|
2 |
|
True |
– |
|
3 |
|
- |
– |
|
4 |
|
True |
– |
|
5 |
|
True |
True |
|
6 |
|
– |
– |
|
7 |
|
– |
True |
|
8 |
|
– |
– |
|
9 |
|
– |
– |
|
10 |
|
True |
True |
Example Item EX-3
Example item EX-3 has the following released and pending revisions that can be selected in the Rev drop-down list.
Table 17-15 Example Item EX-3 Revision List
| Revision | Change Status | Status Type |
|---|---|---|
|
Introductory |
n/a |
n/a |
|
A |
ECO.Implemented |
Complete |
The following table illustrates how each of the ten example criteria are evaluated when each revision of item EX-3 is selected in the Rev drop-down list. A dash (–) indicates that the criteria evaluates as false. The word True indicates that the criteria evaluates as True.
Table 17-16 Evaluation of Item EX-3 Revisions per $CURRENTREV Criteria Examples
| # | Description | Rev: Introductory | Rev: AECO.ImplementedComplete |
|---|---|---|---|
|
1 |
|
– |
– |
|
2 |
|
– |
– |
|
3 |
|
True |
– |
|
4 |
|
– |
True |
|
5 |
|
– |
– |
|
6 |
|
True |
True |
|
7 |
|
– |
– |
|
8 |
|
– |
True |
|
9 |
|
– |
– |
|
10 |
|
– |
– |
Example Item EX-4
Example item EX-4 has the following released and pending revisions that can be selected in the Rev drop-down list.
Table 17-17 Example Item EX-4 Revision List
| Revision | Change Status | Status Type |
|---|---|---|
|
Introductory |
n/a |
n/a |
|
A |
ECO.Implemented |
Complete |
|
(?) |
Unassigned |
n/a |
The following table illustrates how each of the ten example criteria are evaluated when each revision of item EX-4 is selected in the Rev drop-down list. A dash (–) indicates that the criteria evaluates as false. The word True indicates that the criteria evaluates as True.
Table 17-18 Evaluation of Item EX-4 Revisions per $CURRENTREV Criteria Examples
| # | Description | Rev: Introductory | Rev: AECO.ImplementedComplete | Rev: (?)Unassigned |
|---|---|---|---|---|
|
1 |
|
– |
– |
– |
|
2 |
|
– |
– |
– |
|
3 |
|
True |
– |
– |
|
4 |
|
– |
True |
– |
|
5 |
|
– |
– |
– |
|
6 |
|
True |
True |
True |
|
7 |
|
– |
– |
True |
|
8 |
|
– |
True |
– |
|
9 |
|
– |
– |
– |
|
10 |
|
– |
– |
– |
Example Item EX-5
Example item EX-5 has the following released and pending revisions that can be selected in the Rev drop-down list.
Table 17-19 Example Item EX-5 Revision List
| Revision | Change Status | Status Type |
|---|---|---|
|
Introductory |
n/a |
n/a |
|
A |
ECO.Released |
Released |
|
(B) |
ECO.CCB |
Review |
|
(C) |
ECO.Submitted |
Submit |
|
(D) |
ECO.Pending |
Pending |
The following table illustrates how each of the ten example criteria are evaluated when each revision of item EX-5 is selected in the Rev drop-down list. A dash (–) indicates that the criteria evaluates as false. The word True indicates that the criteria evaluates as True.
Table 17-20 Evaluation of Item EX-5 Revisions per $CURRENTREV Criteria Examples
| # | Description | Rev:Intro- ductory | Rev: AECO.ReleasedReleased | Rev: (B)ECO.CCBReview | Rev: (C)ECO.SubmittedSubmit | Rev: (D)ECO.PendingPending |
|---|---|---|---|---|---|---|
|
1 |
|
– |
– |
– |
– |
– |
|
2 |
|
– |
– |
– |
– |
– |
|
3 |
|
True |
– |
– |
– |
– |
|
4 |
|
– |
True |
– |
– |
– |
|
5 |
|
– |
– |
– |
– |
– |
|
6 |
|
True |
True |
True |
True |
True |
|
7 |
|
– |
– |
– |
– |
True |
|
8 |
|
– |
True |
– |
– |
– |
|
9 |
|
– |
– |
– |
– |
– |
|
10 |
|
– |
– |
– |
– |
– |
Create User criteria statements restrict users to reading only those objects they have created. The Create User feature permits a user without a read privilege to create an object. To implement Create User criteria, you need to first make both of the following visible:
The Page Two tab of that class.
The Create User attribute field on the Page Two tab of an Agile PLM class. See "Showing, Hiding, or Renaming a Tab."
Once you've done this, Agile PLM clients automatically display the creator's name in the Create User field of the Page Two tab for that class. Any user who has a Create privilege can now open a blank form for that class and create an object. In this way, users do not need to have a basic Read privilege to create objects. However, this privilege limits users to reading only pending or preliminary objects they've created.
For users who have the Create privilege, you can expand the Read privilege to include all objects they've created, regardless of the state, by creating a Read privilege mask for the subclass with a reusable criteria that specifies Page Two.Create User criteria conditions. In addition to making the Page Two tab visible and making visible the Create User field on the tab, you need to:
Create a reusable criteria that specifies the Page Two.Create User attribute, typically Page Two.Create User Equal to $USER.
Create a privilege mask that specifies the reusable criteria you created.
For example, for a user who creates ECOs, create a new privilege mask as follows:
Name – Read ECOs
Description – Read-Only ECOs created by this user
Privilege – Read
Select or create a reusable criteria that specifies:
Type: ECO
Attribute: Page Two.Create User
Match If: Equal To $USER
You can read the Create User attribute into the Manufacturers tab for both Manufacturers and Manufacturer Parts by making it visible on these tabs. Remember to first make the Page Two tab and its Create User attribute visible for the class.
You can use the variables listed and described in the following table when creating a reusable criteria for use as a privilege mask criteria. In the Create Criteria dialog box, some variables appear on the Attribute list, and others can be entered in the Value field. For a complete list of variables, see "Agile PLM Variables."
Table 17-21 Privilege Mask Criteria Variables
| Variable | Description |
|---|---|
|
$CHECKOUTUSER |
The user who checked out the object's attachment. |
|
$LATEST |
The latest revision of an object; more specifically, the latest released revision for a released item, or the latest pending revision for an unreleased item (with Pending changes); $LATEST applies only to the Read and Modify privilege. |
|
$CREATEUSER |
The user who created the object. To specify the Create User as an attribute (for example, Create User equal to $USER), select Page two.Create User in the Attribute field when you are defining a reusable criteria. See also "Applying Create User Criteria." |
|
$PARTNER |
The current supply chain partner company. |
|
$CURRENTREV |
The current revision of an object you have selected from the rev list, or the revision of an object you are currently viewing. |