| Agile Product Lifecycle Management Security Guide Release 9.3.6 E71146-01 |
|

 Previous |
 Next |
Agile PLM leverages Oracle Web Service Management (OWSM), which provides a policy framework to manage and secure Agile PLM application server web services on WebLogic server, and the Metro Security framework to secure Agile PLM File Manager web services on Tomcat server. Agile PLM provides a convenient configuration tool, WSSConfigurator, to configure WSS policies for Agile PLM web services that are deployed on both WebLogic and Tomcat servers.
|
Note: SSL should be enabled as a prerequisite. |
|
Note: FMW Patch 20020473 is required as a prerequisite. |
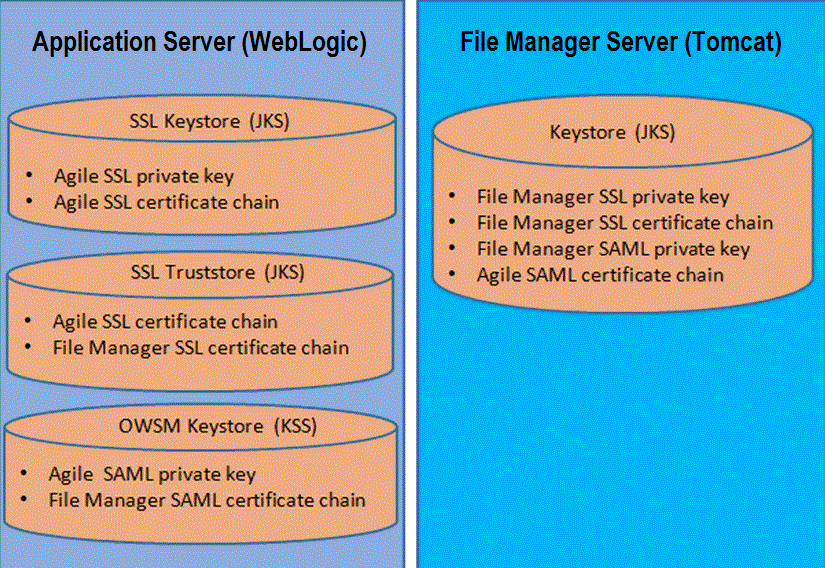
The following figure introduces the keystores/keys required for WSS configurations.
OWSM Keystore stores the Agile SAML key and File Manager SAML certificate. The File Manager keystore, which is same as the keystore storing the SSL key/certificates, stores the File Manager SAML key and Agile SAML certificate.
To set up Web Services security, you have to do the following:
Ensure that OWSM is installed in the Agile domain.
Configure WSS Policy for Agile PLM Web Services.
Configure WSS Policy for File Manager Web Services.
Follow the procedures in this chapter to set up Web Services Security in your environment.
By default, the OWSM component is not installed in Agile Domain. The WSSConfigurator tool reminds users to extend the Agile Domain if OWSM is not installed. The configureWSSecurity tool is shipped under the Agile Installation folder and can be used to extend the Agile Domain to add the OWSM component.
To enable the OWSM component in the Agile domain, do the following:
|
Note: You must back up the entire Agile Domain folder and corresponding RCU database before extending the domain. |
Shut down the Agile server and back it up.
Open the Command Prompt and navigate to C:\Agile\Agile936\Install\bin.
Execute the following command:
configureWSSecurity.cmd <RCU_DB_URL> <RCU_MDS_USER> <RCU_MDS_USER_PASSWORD>
Once the Agile Domain extension is completed, run the WSSConfigurator tool to secure A9 web services as described in the following steps.
|
Note: Make sure that the Agile Server is running, and that the File Manager server is down. |
Navigate to folder <agilehome>\agileDomain\tools, and unzip wssconfigurator.zip.
Run the WSSConfigurator tool and select option [1] to enable security.
In the wizard that follows, the user is prompted to provide the WLS server URL, username, and password to log in to the WebLogic Script Tool (WLST).
The tool automatically attaches an OWSM group policy to the A9 web services deployed on WebLogic. The wizard prompts you to choose the security configuration for the Reference Object web service client, which is used by A9 to call external web services. Choose the correct one according to the security policy defined on the Reference Object web service.
If you installed Agile Server and File Manager Server on the same server box, the WSSConfigurator tool automatically secures the File Manager web services, as well.
If you installed File Manager on another server, you need to do Step 2.a on that server. Then run the WSSConfigurator tool on the File Manager server, which automatically secures the File Manager web services for you.
The wizard prompts you to provide the proper file.server.saml.privatekey.alias (SAML) and file.server.saml.token.issuer (Agile PLM). This updates the Server.conf file as below:
# 936 WSS Service Configuration
file.server.saml.privatekey.alias=saml
file.server.saml.token.issuer=AgilePLM
|
Note: If you are using a CA certificate, the alias name must be the same as the alias in the CA certificate. |
In the previous section, the WSSConfigurator tool automatically created a key pair which is the Agile Server SAML signature key (its alias is AgileWssSamlSignKey) on the WebLogic server. It is a self-signed certificate, however, so we need to export it and request CA signature.
Launch the WSSConfiugrator tool on the Agile Server and enter [4]: To manage OPSS OWSM keystore and press enter. For the second prompt, enter option [3]: Export Certificate and press enter. For the third prompt, enter option[2]: Certificate signing request.
Send the CSR to Certifying Authority to request a new certificate.
Receive the (A) root CA certificate, (B) Intermediate certificates, and (C) CA signed certificate.
Launch the WSSConfiugrator tool on the Agile Server and enter [4]: To manage OPSS OWSM keystore and press enter. For the second prompt, enter option [2]: Import Trusted Certificate and press enter. For the third prompt, enter option [1]: Certificate. Import the signed certificates (C) CA signed certificate.
Enter [2]: Import Trusted Certificate and press enter. For the second prompt, enter option [2]: Trusted Certificate. Import the signed certificates (A) root CA certificate, (B) intermediate certificates.
Export the CA-signd saml certificate. Enter option [3] : Export Certificate, press enter. For the second prompt, enter option [1] : Certificate. Export as a9-saml-cert.cer.
In the previous section, the WSSConfigurator tool automatically created a key pair which is the Agile Server SAML signature key (its alias is AgileWssSamlSignKey) on the WebLogic server for SAML usage. The WSSConfigurator tool, however, can not automatically do the same for File Manager.
To generate the File Manager SAML Signature Key and Certificate Signing Request, do the following:
Generate SAML key in File Manager keystore.
Alias: saml
Keysize: 2048
Algorithm: RSA
Generate the Certificate Signing Request with the SAML keystore above and send it to the Certifying Authority.
Import the CA certificate back to File Manager keystore.
You need to import the Agile Server SAML CA signed certificate, intermediate certificates and root CA certificate into the File Manager keystore.
Import the Agile Server SAML Signature certificate, a9-saml-cert.cer, into the File Manager SAML Keystore.
Import the intermediate certificate into File Manager Keystore SAML.
Import the root CA certificate into File Manager SAML Keystore.
Verify the keys/certificates in File Manager SAML Keystore.
By default the certificate exported by the keytool command is DER encoded binary X.509 certificate. You must convert it to Base64 encoded certificate.
Launch Command Prompt, navigate to the WLS domain directory and run setDomainEnv.cmd.
Export the File Manager SAML certificate from fm-saml.jks, named as fm-ssl-cert.cer.
Execute the following command to change the certificate suffix from.cer to .der.
mv fm-saml-cert.cer fm-saml-cert.der
Execute the following command in the Command Prompt to convert the .der certificate to Base64 encoded .pem certificate
java utils.der2pem fm-saml-cert.der
Launch the WSSConfigurator tool on Agile Server to import File Manager SAML signature certificate. Select option [4]: To manage OPSS OWSM keystore.
Provide the WLS server URL, username and password as prompted. Once these WLS details are verified, select option [2]: Import Trusted Certificate.
Enter FMWssSamlSignKey as the alias name and enter.
Choose option [1]: List All aliases. The aliases FMWssSamlSignKey and FMWssSamlSignKey are displayed.
For the SAML policy, OWSM looks for Issuer name, certificate DN, and compares them with the existing certificates in the OWSM keystore. This section describes how to configure the Trusted Issuer on both the Agile server and File Manager server.
To register a trusted SAML Issuer on the Agile Server, do the following:
Launch the WSSConfigurator on the Agile server, and select option [5]: To Add Token Issuer. Provide the WLS server URL, username, password as prompted to proceed.
Enter the Token Issuer Name and Token Issuer DN.
|
Note: It is supported to have one DN for one Issuer Name. If you are using one SAML signature key everywhere then your system will have only one Issuer Name, or if you are using SAME DN in all SAML signature keys then you just need one Issuer Name. Otherwise, you need to configure this tool for several times to add each Issuer Name and Issuer DN pair.In this guide, we just have File Manager SAML signature key configured, so we just add one entry (Issuer Name: AgilePLM, Issuer DN: The full subject name of File Manager SAML signature key). |
Open the file <AgileHomePath>\agileDomain\config\server.conf. You should see two lines similar as follows:
file.server.saml.privatekey.alias=saml
file.server.saml.token.issuer=AgilePLM
|
Note: The private key alias should be the alias name you used when generating File Manager SAML signature key. In our guide, it is 'saml'The token issuer should be the Issuer Name you configured above. In this guide, it should be 'AgilePLM'. |
|
Note: If you are using a CA certificate, the alias name must be the same as the alias in the CA certificate. |
Delete servers under <Agile_Home>\agileDomain and then restart the WebLogic server and Tomcat server. Web Services Security is enabled for all A9 and File Manager web services.
For WSX web services, policies are attached at design time by using the following annotation.weblogic.wsee.jws.jaxws.owsm.SecurityPolicyBelow is an example of attaching security policy. Add the annotation to the implementation class of your web service.
This section provides information on configuring Web Service Security for Reference Object web services.
Agile PLM ships a reference implementation of Reference Object web service. In this section, we introduce how to configure Web Service Security policy for this reference implementation.
Ensure that SSL is correctly configured on the WLS server where the current Reference Object WS is running.
Ensure that OWSM is installed in the current WLS Domain.
Remove the HTTP Basic Authentication configuration from <agileDomain>\applications\application.ear\extension.war\WEB-INF.
Remove elements of <Security-constraint>,<Security-role>, and <Login-config> from web.xml.
Remove elements of <Security-role-assignment> from weblogic.xml.
Add WSS Annotation for Reference Object WS Reference Implementation.
Modify <referenceswsx>\build.xml to add the following line in the build.classpath element.
<pathelement path="<Oracle_Home>/oracle_common/modules/clients/com.oracle.webservices.fmw.client.jar"/>
Add the following Security Policy annotation in the Java file: <referenceswsx>\src\com\agile\integration\externalreference\services\service\v1\ QuickViewReferenceObjectImpl.java.
import weblogic.wsee.jws.jaxws.owsm.SecurityPolicy;@SecurityPolicy(uri="oracle/wss11_saml_or_username_token_with_message_protection_service_policy")
Add following Security Policy annotation in Java file: <referenceswsx>\src\com\agile\integration\externalreference\services\service\v1\ SearchReferenceObjectsImpl.java.
import weblogic.wsee.jws.jaxws.owsm.SecurityPolicy;@SecurityPolicy(uri="oracle/wss11_saml_or_username_token_with_message_protection_service_policy")
Run Ant to compile this reference implementation and deploy it.
Restart the Agile Server, and then this Reference Object WS will be protected by WSS policy.
Open Java Client, go to Settings > System Settings > Reference Objects Management, and change the Host Base URL to use https, change port to 7002.
Run the WSSConfigurator tool, and choose the Client Policy for Reference Object WS client as introduced in "Configuring WSS Policy for Agile PLM Web Services".
If you choose SAML token client policy, copy the AgileWssSamlSignKey.cer file under WSSConfigurator tool home directory to Reference Object WS service server. Then run the WSSConfigurator tool on the server side, choose option [4], then option [2] to import the client side AgileWssSamlSignKey to the server side, using alias name 'AgileWssSamlSignCert'.
Import the Reference Object WS server SSL certificate to Client WLS trust key store.
Restart the Agile Server. The Reference Object WS client should be able to invoke the secure web services.