| Agile Product Lifecycle Management Import/Export User Guide Release 9.3.6 E71157-01 |
|

 Previous |
 Next |
| Agile Product Lifecycle Management Import/Export User Guide Release 9.3.6 E71157-01 |
|
Previous |
Next |
This chapter includes the following:
Overview
Managing PPM Calendars
Creating and Configuring PPM Calendars
Agile Product Portfolio Management (PPM) is a web-based application designed to enable users to manage all aspects of a project or a program's tasks and progress. The Calendar component supports managing projects or programs' deliverables, schedules, progress, tasks and task assignments, as well as other-related data.
|
Note: The PPM Calendar documented in this chapter and the MS Project Calendar documented in the Product Portfolio Management User Guide are different and use different file formats. |
PLM provides default Calendars with each release of the PPM Calendar to support Calendar management tasks. These tasks include creating, removing, importing, and exporting PPM Calendars
Privileges to Manage PPM Calendars
Before attempting these tasks, make sure you have the following PLM Administrator privileges:
To run Import: The Create and Modify Calendar privileges
To Run Export: The Read and Modify Calendar privileges
For more information, on this topic refer to the Agile PLM Administrator Guide.
To perform any Calendar-related task, you must first access the Calendar page, described in "To access the PPM Calendar page:."
To access the PPM Calendar page:
Log in to the Agile Web Client and select Tools and Settings > Calendar from the drop-down list.
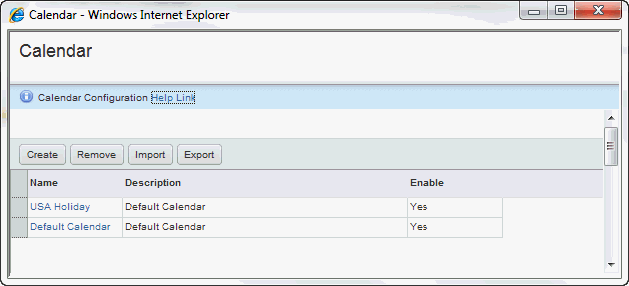
The Calendar page, displaying the default as well other existing Calendars plus the supported tasks appears. See Figure 12-1.
To continue to the next step, which is to create and configure PPM Calendars, see "Creating PPM Calendars."
You can create Calendars by simply selecting the Create tab in the Calendar page, or by selecting an existing Calendar, for example, a default or a previously saved Calendar, followed by selecting Create. Both methods open the Calendar Configuration dialog Figure 12-3.
To Create a PPM Calendar:
In Calendar page, click the row that displays an existing Calendar of your choice, for example, the Default Calendar.
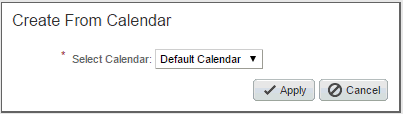
The Create Calendar From dialog appear, shown in Figure 12-2 appears
|
Note: You have the option to select a different saved Calendar from the-down list in the Select Calendar box. |
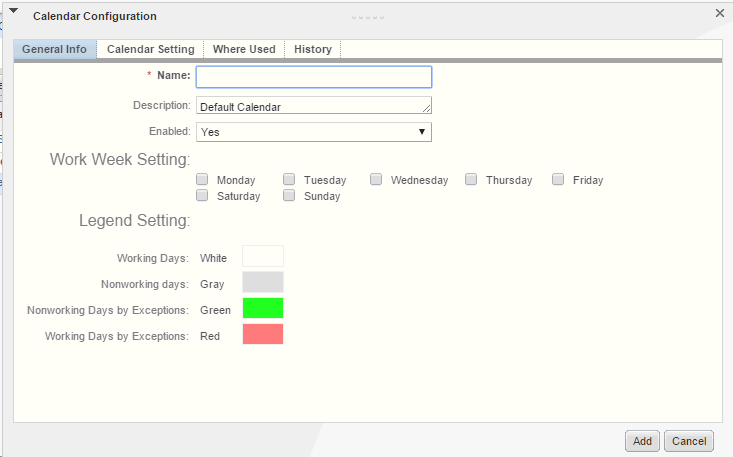
Click the Apply button.The Calendar Configuration page displays Figure 12-3 displaying the Add button.
In Figure 12-3, type the name of your new Calendar and then click the Add. The Calendar Configuration page will replace the Add button with the Save button.
In the
Table 12-1 Tabs and Data in the Calendar Configuration Dialog
| Tab | Data Descriptions, and Functions |
|---|---|
|
General Info |
This page provides Calendar information, that includes project Name, Description, Enabled (Yes by default, but you can reset it to No), Work Week Settings, and Legend Settings. Also, there are the Save, Cancel, and Close buttons to enable saving, canceling, or closing the page. |
|
Calendar Setting |
This page displays Working Days, Nonworking Days, Nonworking Days by Exception, and Working Days by Exception in a given year. You can modify the settings and settings are color coded for identification purposes. In addition, a Notify icon that will send aa PPM Calendar update to owners of all related programs when invoked. |
|
Where Used |
In this page, a drop-down list to access available views such as All Activities/Gates, or Base View, all displaying the Name, Activities Type, Root Parent, Owner, Project State, and Status data the selected project. In addition, there is an Export button, that when invoked, will export the displayed data to a Microsoft Excel file. |
|
History |
This page provides historical data for Actions and related Objects, by user (User Name), when (local Client time), and Detail (what occurred because of the Action). |
Each of the four tabs (General Info, Calendar Setting, Where Used, and History) display their own set of applicable data.
When configuring a PPM Calendar, you are creating a new Calendar from an existing Calendar and updating the Info page of the previous Calendar with information belonging to the newly saved Calendar.
To configure a PPM Calendar
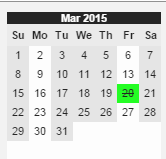
In this procedure, the objective is to create a new 2015 Calendar for a given customer requiring Saturdays and Sundays, plus Vernal Equinox (Friday, March 20, 2015) and Christmas (December 25, 2015) as nonworking days.
Open a default Calendar. For this procedure, use the Default Calendar. shown in the Calendar's Calendar page. Note that you can open any default or a saved Calendar displayed in this page.
Complete the General Info page, Figure 12-3 as shown below.
Set Name to Acme Inc 2015 Calendar.
Set Description to Acme Inc Default Calendar.
Do not change the value of the Enabled field from Yes. You have the option to toggle the value to No.
In Work Week Setting data fields, check the box to the left of Friday, and then click Nonworking days by Exception.
Click Save, and then click Calendar Setting. The Calendar Setting page reappears.
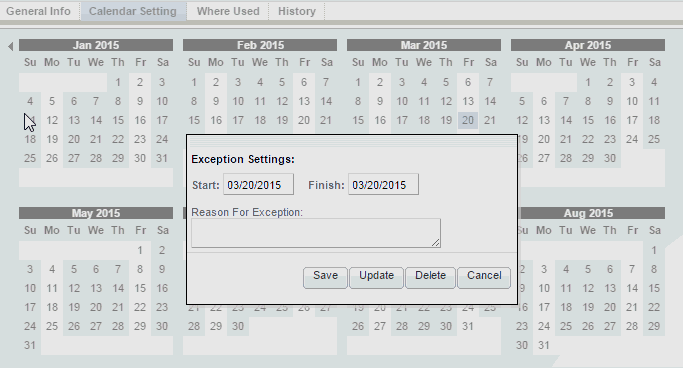
In Calendar Setting page, point to and select March 20, set the Start and Finish dates to Friday, March 20, 2015 and then click Save. The Exception Settings dialog, Figure 12-4, appears.
In reasons for Exception box, type a reason, for example, Vernal Equinox and click Save. The modified March Calendar, showing Friday March 20, a nonworking day by exception, Figure 12-5, appears.
Use this procedure to set, save, update, delete, or cancel Working and Nonworking, days as well as Nonworking Days by Exception and Working Days by Exception.
Click Notify to display the notification message, and then OK in the notification page, to send a Calendar update to the owners of the related programs.
You have the option to remove a single Calendar, or several Calendars. Make sure you have the necessary privileges. See
To remove PPM calendars:
In Web Client, Bring up the Calendar page.
In Calendar page, select the Calendars that you want to remove and then click the Remove button.
|
Note: You cannot remove a default Calendar. |
You have the option to export a single Calendar, or several Calendars.
To Export PPM Calendars
In PLM Web Client, bring up the Calendar page.
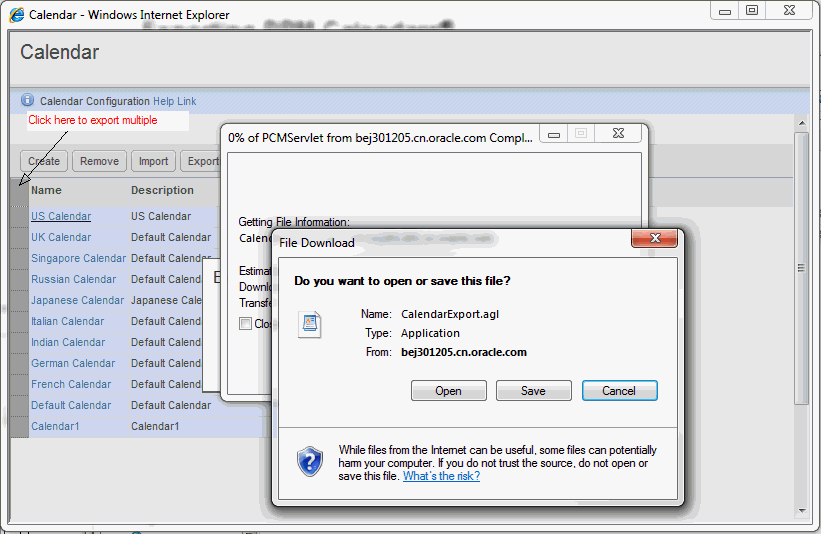
TIn Calendar page, to export a single, or several PPM Calendar(s), point to the row(s) displaying the Calendar(s) of interest and then double-click the selection.
Click Save and then save the Calendar(s) in the Calendar Folder as .AGL file(s). For example, Export_Example_1.agl. The following dialog appears.
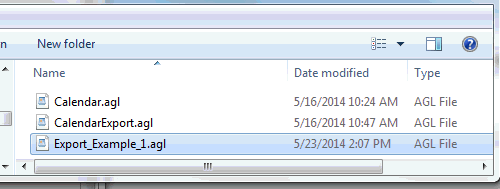
Click the Open Folder button. The following dialog, showing the Calendars that you exported appears.
Select and unzip Export_Example_1.agl. The AgileExport folder appears.
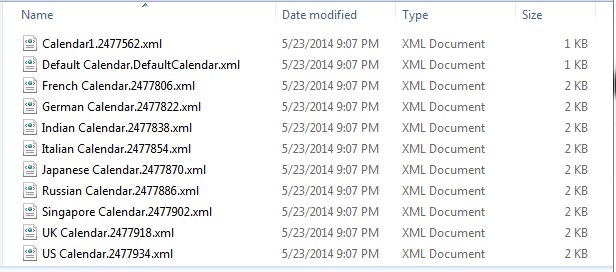
Select and open AgileExport and open the Calendar folder when it appears.
The list of exported Calendar(s) in XML format appear.
You have the option to import a single, or several PPM Calendars into the PLM and the folder containing PPM Calendars. Subsequently, the PPM Import function validates attributes that are in the General Info and Schedule pages. You can also Map Microsoft Project Calendars into the PLM.
To import PPM Calendars:
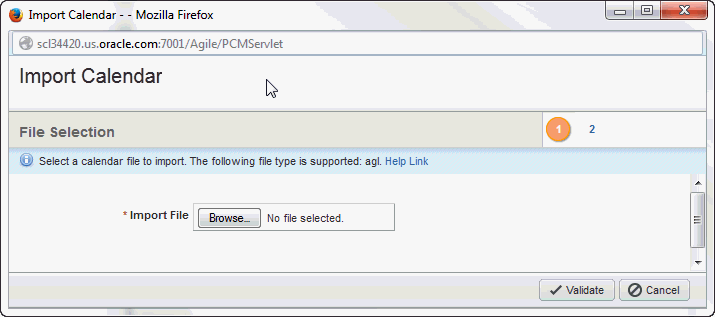
In PLM Web Client, bring up the Calendar page, select the Calendar(s) that you want to import and select the Import tab. Figure 12-10, "The Import Calendar dialog" appears.
Using Browse, locate and select the Calendar(s) that you want to import (in this case, Calendar_Import.agl) and then select Validate. The Import Calendar Validation Log, shown in Figure 12-11, appears.
|
Note: Import validates attributes in the General Info and Schedule tabs. |
Select the Import button. The page 2 of the Import Calendar Validation Log displays the result. If valid, the Validation Log will display calendar(s) are imported successfully, see Figure 12-12.
The purpose of mapping is to MSP project elements are correctly mapped to the PLM object attributes. A brief summary of the necessary steps is documented in "To Map a project in MSP:" and appear in detail in Agile PLM Product Portfolio Management User Guide.
To Map a project in MSP:
Select an existing project in MSP, or create one and assign a calendar, except the Standard Calendar to a task.
Save the project in XML format.
In Web Client, select Tools and Settings > Create Project from XML File and save the file to the local drive.
In Select Microsoft Project XML File, select and load the XML file you created in step 0 to the PLM and click Continue.
In Load As step, click the Active radio button to the right of Published As: option in order to specify the type of file you are loading and click Continue.
Select Continue. The Load Summary dialog displays the result of the mapping.