| Agile Product Lifecycle Management ACS User Guide Release 9.3.6 E71158-01 |
|
 Previous |
 Next |
This chapter includes the following:
About Transfer Orders
The Transfer Order Object
Linking Routable Objects to ATOs Created with Workflow Status Change
Creating Content Transfer Orders
Working with Packages
Transfer orders keep track of what, where, and when product content is transferred by Agile Content Service (ACS). There are two types of transfer orders: automated transfer order (ATO) and content transfer order (CTO). ATOs are created automatically by system-level subscribers that are configured by your Agile PLM administrator. CTOs are created when product content is published on demand by end users.
This section includes the following topics:
Cover Page Tab
Selected Content Tab
Where Sent Tab
Attachments Tab
Workflow Tab
History Tab
When you view a transfer order, you are viewing a set of tabs on the Transfer Order window (Java Client) or page (Web Client). The following table lists the tabs for transfer orders and the section where each tab is described.
Table 11-1 Tabs and transfer orders
| Transfer order tab name | Tab information |
|---|---|
|
Cover Page tab |
General information about the transfer order. |
|
Selected Content tab |
Objects being transferred by the transfer order. |
|
Where Sent tab. See "Where Sent Tab" |
Delivery details about the transfer order and extraction. |
|
Workflow tab |
Where the transfer order is in the assigned workflow. |
|
Attachments tab |
Attached files. |
|
History tab |
Log of all actions taken on the transfer order. |
The Cover Page tab has fields that provide general information about the transfer order. Agile PLM automatically completes some of the fields; you complete the rest.
To edit fields of a transfer order that is not yet released, click the Edit button. You may not be able to edit the contents of some fields.
|
Note: You cannot edit the Cover Page fields of an ATO. |
By default, the Cover Page tab contains the fields listed in the following table. Agile PLM administrators can configure fields on the Cover Page tab.
|
Note: All fields are completed by Agile Content Service for ATOs. |
Table 11-2 Transfer order fields, contents, and status
| Field | Contains... | Completed... |
|---|---|---|
|
Transfer Order Type |
Displays CTO or ATO. |
Automatically or manually, when created. |
|
Transfer Order Number |
The number of the transfer order. |
Automatically or manually, when created. |
|
Description |
Text that describes the transfer order. The maximum length is set by the Agile PLM administrator. |
Manually for CTO; automatically for ATO. |
|
Originator or Subscriber |
The user who created the CTO (can be selected from a drop-down list) or the subscriber of the ATO. Note: For CTOs, the roles assigned to the user listed in this field are the roles used to limit and define what data is extracted by the transfer order. For ATOs, roles are specified in the subscriber details. |
Automatically or manually, when created. |
|
Status |
Transfer order status; if no workflow has been selected, this field is Unassigned. |
Automatically, when created; updated as the transfer order moves through the assigned workflow. |
|
Workflow |
The name of the workflow being used to move this transfer order through the release process. |
Manually, whether one or more than one workflow applies. If more than one workflow applies to a CTO, you can change the workflow selection while the CTO is in the Pending status type. Selecting the blank field in the Workflow drop-down list, switches the CTO to the Unassigned status. For more information about workflows, refer to Getting Started with Agile PLM. |
|
Date Originated |
The date the transfer order is created. |
Automatically, when created. |
|
Date Released |
The date the transfer order is released. |
Automatically, when released. |
|
Final Complete Date |
The date the transfer order is completed. |
Automatically, when completed. |
Agile PLM uses a workflow stamp in the upper right corner of the Cover Page tab to indicate the status of a transfer order. Your Agile PLM administrator defines the name of each status in each workflow.
Your Agile PLM administrator may have created customized workflows as well their respective statuses for your company. The table below shows only the default transfer order workflow statuses.
Table 11-3 Status of default transfer orders
| Status name | Status definition |
|---|---|
|
Unassigned |
No workflow has been assigned to this transfer order. The originator may still be developing the transfer order (CTOs only). No statuses are displayed on the Workflow tab. |
|
Pending |
The workflow has been assigned. The originator may still be developing the transfer order (CTOs only). It has not yet been approved or perhaps even completed. |
|
Review |
The transfer order is under review. It has not yet been approved or completed (Default CTOs workflow only). |
|
Released |
The transfer order is being processed by Agile Content Service. |
|
Complete |
Agile Content Service automatically moves a Released transfer order to Complete status after it is successfully processed. If a transfer order cannot be successfully processed, it remains in Released status, and an error appears on the Where Sent tab. |
|
Note: Do not modify any setting in the Released or Complete status in the default CTO workflow. Transfer orders extract data only while in Released status with enough time allowed for the extraction thread to process it. |
The Workflow tab shows all the statuses the transfer order has been through, and the statuses remaining to complete the extraction process.
With appropriate privileges, you can switch a transfer order to another status with the Workflow tab or the Next Status button.
The Selected Content tab lists the objects that are being transferred by the transfer order. You must have the required privileges to modify the Selected Content tab.
The Selected Content tab includes the following fields that are used to define what is extracted when the transfer order is processed:
Type - the type of the object.
Icons indicating the type of object, whether it has attachments, whether it has pending changes, and, if it is an item object, whether it has AML information on its Manufacturers tab.
Name/Number - the number assigned to the object.
Description - the description of the object.
Lifecycle/Status - the current lifecycle phase or workflow status of the object.
Rev - the revision of the object to be transferred when the transfer order is released.
To view an object listed on the Selected Content tab, click its number.
The Where Sent tab lists the transfer information of the transfer order. You must have the required privileges to modify the Where Sent tab.
The Where Sent tab includes the following fields:
Destination - where the transfer order is published.
Agile PLM provides file, FTP, HTTP(S), JMS queue or JMS topic, and Agile system as destination types. For example, a content manager at an OEM uses Agile Content Service to publish a CTO containing a released assembly to an EMS provider for quoting. That EMS provider may have set up an FTP site (destination) where the CTOs should be published. Or upon the release of an ECO, a content manager publishes a CTO to their EAI system to update the appropriate downstream systems with the latest released assembly. That EAI system would be listed as the destination for the CTO.
Destinations are defined by your Agile PLM administrator.
Filters - the extraction details for the transfer order.
Filters determine what tabs are extracted for the objects listed on the Selected Content tab. Filters are grouped by base classes (for example, Change) and classes (for example, Change Orders). If a filter for a specific class includes a tab that is not visible, the tab is omitted from the extracted data. For example, the Page Three tab of an ECO is not visible, but the filter for the Change Orders class allows you to extract Page Three tabs. When an ECO is extracted using this filter, the data on Page Three is skipped because it is not visible in the ECO subclass.
Default filters are available for all objects. Additional filters are created by your Agile PLM administrator.
Data Format/Data Extraction - the file type of the transfer file: aXML or PDX.
Agile Extensible Markup Language (aXML) format is an XML representation of Agile PLM's business schema. aXML contains all product content managed in Agile PLM. When the transfer order is published, a .ZIP file containing the aXML file and any attachments is created.
Product Definition Exchange (PDX) packages are an industry-standard format for encoding structured data in an XML format. Like aXML, a PDX package is also a zipped file with an attachment payload. The advantage of PDX is that it is an application independent way to describe product content. The disadvantage is that it may not support all Agile objects and data. For example, Price objects and price change orders (PCOs) cannot be exported in PDX format. For more information about PDX packages, see Chapter 12, "Working with Packages."
Language - determines which language is used to label object attributes, for example, field and column names. No language translation of data is performed.
Site - one of the filters used to extract data. For example, if you select the Hong Kong site, only data visible for the Hong Kong site is extracted. To extract data for all sites, select All.
Date Sent - the date the transfer order is released.
Transmission Status -the status of the transmission:
Pending: the transfer order is being processed.
Extracting: the data in the row (Selected Content and Filters) is currently being extracted into the specified file format.
Transmitting: the data was successfully extracted and is currently being transmitted to the specified destination.
Success: the data was successfully transmitted.
Failure: the data extraction or transmission was not completed.
Transmission Notes - the message describing the reason for the transmission failure, if one occurs.
Response - the acknowledgment of the transfer order by the remote system.
A remote system or destination can relay an accept or reject message to Agile PLM after the expected data is received. Responses are defined by your Agile PLM administrator.
Roles - (appears on the Where Sent tab of ATOs only) the roles used to extract data for this transfer order.
For ATOs, roles are specified in the subscriber definition. Roles further fine tune and define the data to be extracted. For example, if the roles selected do not allow a user to read manufacturer part objects, then manufacturer part object data will not be extracted even though manufacturer part objects appear on the Selected Content tab. The output file will contain a section of content not readable by the role, but the details will display No Privilege.
|
Note: For CTOs, the roles used to extract data are defined by the roles assigned to the user who is listed in the Originator field in the Cover Page tab. |
If multiple transfer orders are being published to the same destination and that destination fails, only the first transfer order's Where Sent tab indicates the failure. The status of the remaining transfer orders does not change until the first transfer order is successfully transmitted. The remaining transfer orders are queued in the order they were scheduled to transmit. If a transfer order is failing and blocking a destination, you should delete the failing transfer order.
The Transmission Notes column indicates the transfer order is waiting for another destination. Once the failed destination is reset (your Agile PLM administrator must reset the failed destination), the transfer orders are transmitted according to their order in the queue. This is done to maintain situations where data must be transmitted in sequential order.
|
Note: A transfer order is processed when it enters the Released status. Data extraction takes place at this time, not at the time the transfer order was created. Any changes to an object after the transfer order is created, but before the extraction process begins, are reflected in the extracted content. For example, if an ECO is at the Review status when the transfer order is created, but the ECO is promoted to the Released status before the data is extracted, then the extracted status for the ECO is Released. |
The Workflow tab shows where the transfer order is in the assigned workflow and lists present and past signoff information. It also shows all the approvals and rejections made during each approval cycle.
The Signoff History table on the Workflow tab includes the following fields:
Status Code -
Reviewer - the user who reviewed the transfer order. This can be an approver or an observer, and it can be a single user or a user group.
Action- the action taken by the reviewer.
Required - whether the reviewer is a required reviewer (approver) or not (observer).
Local Client Time - the date and time of the action.
Signoff Comments- any comments made by the reviewers (approvers and observers) during signoff.
Signoff User- the name of the user who actually approved or rejected the transfer order.
Status Changed By - the name of the user who switched the status.
Workflow Status - the name of the status.
Workflow - the name of the workflow that the transfer order is following.
Signoff Duration -
The Workflow tab also includes a chart of the workflow, which shows all possible status names for the transfer order. The current status is highlighted. With appropriate privileges, you can use the Workflow tab to promote the transfer order manually. This information also appears on the History tab.
The Attachments tab of a CTO lists the files that have been attached to that transfer order. Attached files can be drawings or scanned images, documents, non-viewable files, compressed files, and so on. You can also point to a URL instead of a local attachment.
For more information about attachments and the Attachments tab, refer to Getting Started with Agile PLM.
The History tab shows a summary of actions taken against the transfer order, including:
A description of the action
Which user took the action
The date and time of the action (local client time)
Details of the action
Comments made by users
Users notified
The current status of the transfer order
The next status of the transfer order
While the transfer order status is Unassigned or Pending, the creation of the transfer order and any subclass modifications are recorded on the History tab, but no other actions are recorded. A transfer order must have a status type other than Unassigned or Pending before actions are recorded on the History tab.
Comments on the History tab are different from the comments on the Workflow tab. Comments on the Workflow tab come from approvers and observers during the online approval process. Comments on the History tab can be made by anyone with sufficient privileges at any time.
The History tab shows some response information, such as the failure reason. In Java Client, you can double-click a row in the History table to view detailed information.
If you do not have the appropriate Read privileges, you cannot view the fields on the History tab. If you have questions about your privileges, contact your Agile PLM Administrator.
This task requires changing the default value of the Add Back Reference field in the ACS Subscriber Definition pane from No to Yes as shown below.
The following procedures assume you will create the necessary Event that is triggered by the Workflow Status change. For background information and procedures see "Workflow Events," and for Workflows, refer to Getting Started with Agile PLM.
To set the Add Back Reference field:
Log on to Java Client with Admin privileges and select the Admin tab.
Assuming you have created a new Subscriber (for procedures, see "Creating Subscribers," and then select the General Information tab.
If you have the appropriate privileges, you can create or modify a CTO.
When you create a CTO, you select the order type (subclass) and assign a number. Then you complete it by entering data on its tabs.
In Java Client and Web Client, complete the fields on each tab.
For more information about creating transfer orders and other objects, refer to Getting Started with Agile PLM.
Click the New Object button.
In the New dialog box, select the appropriate CTO subclass. Use the supplied autonumber, or enter a number. Click OK.
The CTO is created and displayed with the Cover Page tab on top.
On the Cover Page tab, enter a description and select a workflow. The Default CTOs workflow is recommended. When you have finished, click Save.
|
Note: The roles applied when object data is extracted are determined by the roles assigned to the user listed in the Originator field on the Cover Page tab of the CTO. |
For example, if the originator user does not have the necessary privileges to view items assigned to the Libra product line, when BOM items are extracted, any product line Libra items will be not be extracted.
In a similar manner, if the originator user is not assigned to the Hong Kong site, Hong Kong BOM data will not be extracted, even if Hong Kong is selected in the Site column on the Destinations tab.
On the Selected Content tab, click Add to search for objects you want to transfer. Select the objects in the search results and click OK.
If any of the selected objects are items or prices, you must select a revision for each item or price you have selected. In the Select Revisions dialog box, select an item in the left pane. In the right pane, select the item revision you want. By default, the most recent released revision is selected, but you may select a different revision.
When you have finished selecting revisions for each item, click OK. The objects are added to the Selected Content table.
On the Where Sent tab, click Add button (the Plus sign) to add a destination for the transfer. You can add multiple destinations. See "Where Sent Tab."
In the Add dialog box, select the following:
From the Destination drop-down list, select a destination. Destinations are created and defined by your Agile PLM administrator.
In the Filters field, click the button to open the Filters dialog box. Select as many filters as you need. Your Agile PLM administrator defines the filters used on your Agile PLM system. If you have questions about which filters to use, ask your Agile PLM administrator.
You need at least one filter for each Type of object Type on the Selected Content table of the CTO. On your Agile PLM system, there may be multiple filters for the same object class, each with a different name and definition. Depending on how the filter is defined, Agile ACS may extract only the table information visible on a tab, or Agile ACS may extract the information visible in the table and also the objects listed in the table. For example, a filter for items may include the option for the BOM tab of Tab and Items, All Levels. In this example, when an item on the CTO Selected Content tab is extracted, all the items on its BOM, through all BOM levels, are also extracted.
In a similar manner, a filter can determine whether the AML information on an item's Manufacturers tab is extracted. In that case, you must also select a filter for manufacturer part objects and manufacturer objects.
Each Type of object extracted needs a filter, whether the object Type is listed on the Selected Content tab of the CTO or the object Type is referenced on the tabs of the selected objects.
For details about filters used in your Agile PLM system, ask your Agile PLM administrator.
Select a data extraction format, either aXML or PDX. For details about these formats, see "Where Sent Tab".
|
Note: Refer to the export section of the Agile PLM Import and Export Guide for information about which objects are supported in aXML or PDX. |
Select a language. For details about the language setting, see "Where Sent Tab".
In the Site field, select All, or select one site. For example, if you select the Hong Kong site, only object data that is visible to the Hong Kong site will be extracted.
When you are finished, click OK.
To create a CTO in Web Client:
In the toolbar, choose Create New > Transfer Orders.
On the Create Content Transfer Orders page, select the appropriate CTO subclass. Use the supplied autonumber, or enter a number. Click Save.
On the Cover Page Information tab, enter a description and select a workflow. The Default CTOs workflow is recommended. When you have finished, click Save.
|
Note: The roles applied when object data is extracted are determined by the roles assigned to the user listed in the Originator field on the Cover Page tab of the CTO. |
For example, if the originator user does not have the necessary privileges to view items assigned to the Libra product line, when BOM items are extracted, any product line Libra items will be not be extracted.
In a similar manner, if the originator user does is not assigned to the Hong Kong site, Hong Kong BOM data will not be extracted, even if Hong Kong is selected in the Site column on the Destinations tab.
On the Selected Content tab, click Add to add the objects you want to transfer. In the Search window, enter the search criteria for the objects you want to transfer, and click Search.
Double-click the objects you want to transfer. The objects are added to the Selected Content table.
On the Add Where Sent tab, click Add to add a destination for the transfer. You can add multiple destinations. (See "Where Sent Tab".)
In the Add Transfer Specifications window, select the following:
From the Destination drop-down list, select a destination. Destinations are created and defined by your Agile PLM administrator.
In the Filters field, launch the palette to open the filter selection window. Select as many filters as you need by double-clicking. Your Agile PLM administrator defines the filters used on your Agile PLM system. If you have questions about which filters to use, ask your Agile PLM administrator.
You need at least one filter for each Type of object Type on the Selected Content table of the CTO. On your Agile PLM system, there may be multiple filters for the same object class, each with a different name and definition. Depending on how the filter is defined, Agile ACS may extract only the table information visible on a tab, or Agile ACS may extract the information visible in the table and also the objects listed in the table. For example, a filter for items may include the option for the BOM tab of Tab and Items, All Levels. In this example, when an item on the CTO Selected Content tab is extracted, all the items on its BOM, through all BOM levels, are also extracted.
In a similar manner, a filter can determine whether the AML information on an item's Manufacturers tab is extracted. In that case, you must also select a filter for manufacturer part objects and manufacturer objects.
Each Type of object extracted needs a filter, whether the object Type is listed on the Selected Content tab of the CTO or the object Type is referenced on the tabs of the selected objects.
For details about filters used in your Agile PLM system, ask your Agile PLM administrator.
Select a data extraction format, either aXML or PDX. For details about these formats, see "Where Sent Tab".
|
Note: Refer to the export section of the Agile PLM Import and Export Guide for information about which objects are supported in aXML or PDX. |
Select a language. For details about the language setting, see "Where Sent Tab."
In the Site field, select All, or select one site. For example, if you select the Hong Kong site, only object data that is visible to the Hong Kong site will be extracted.
When you are finished, click Add.
Using the Save As feature is a quick way to create a new CTO that is very similar to an existing CTO or ATO. This feature is also a good way to resend data previously sent in an ATO.
|
Note: If you do not have Discovery and Read privileges for any of the objects on the Selected Content tab of the existing transfer order, an error message appears. You can either cancel the CTO creation process or you can continue. If you choose to continue, the CTO is created, however, on the Selected Content tab some objects rows in the table are missing due to insufficient user privileges (no Discovery and Read privileges for those objects). The missing objects are not extracted when the CTO is processed. |
With sufficient privileges, you can modify editable fields. You can modify only fields that have been made editable by the Agile PLM administrator.
You cannot manually enter information on the Workflow or History tabs; Agile PLM automatically completes these.
|
Note: After a CTO has reached the Released status, it is processed by Agile Content Service, but you can still modify the Description field. |
The CTO page opens with the Cover Page tab on top.
To modify a CTO in Java Client:
Complete or change the appropriate fields on the Cover Page tab. Click Save when you finish editing the Cover Page tab.
On the Selected Content tab:
To add objects, click the Add button and follow steps to search for and select the objects you want.
To remove objects, select and highlight the row you want to remove, and click the Remove button
To select a different revision of an object, delete the object's row and add the object again, selecting a different revision.
On the Where Sent tab:
To add destinations, click the Add button and complete the dialog box, and click OK.
To edit a destination and its filters, click the row you want to select it, and click the Edit button and in the dialog box, change the fields you want to edit, and click OK.
To remove a destination, click the row you want to select it, and click the Remove button.
To modify a CTO in the Web Client
On the Cover Page tab, click Edit, and complete or change the appropriate fields. Click Save when you finish editing the Cover Page tab.
On the Selected Content tab do as follows:
To add objects, click Add, and follow the wizard steps to search for and select the objects you want to add.
To remove objects, check the rows of the objects you want to remove, and click Remove.
On the Where Sent tab do as follows:
To add destinations, click Add. Complete the information in the window.
To edit an existing destination, double-click the field on the row you want to edit, change the value, and click Save.
To remove destinations, check the rows of the destinations you want to remove, and click Remove.
Information provided in the following paragraphs describe how to:
Receive ATO/CTO error and success messages
Correct ATO integration error messages
Reprocess ATOs that generated the error message
Search for ATO integration errors messages and format output results
Format Basic and Advanced ATO Search outputs
Format ATO Integration error message reports
Track ATO integration errors with Custom Dashboards
Resolve Change Object Dependencies
In the event an ATO/CTO fails to process, the error information is passed from the ERP by the WebServices through the adapter, to Agile. These error messages are stored in ATO's Action Items tab. The adapter creates unique IDs for these error codes to facilitate updating their respective statuses to Successful when they are run successfully.
WebServices also receive error and success messages from the ERP. To this end, WebServices accepts ATO ID, Change ID, Error Code, Error Type, Error Message and Notes. The Notes field stores a link to the error log for more detailed error reports. This information is used to generate an action item on the ATO. You can see the Notes field in the illustration in "Reprocessing ATO Integration Error Messages."
When error information is returned by the ERP, you can track it on ATO's/CTO's Action Items tab. If you click on the Action Items tab, the following information about the error appears:

The error message provides the following information about the error:
Status - This field displays the status of the processed ATO. The default Status of the returned error is Not Accepted. Once the ATO is run successfully, the Status is automatically reset to Complete. That is, even if you have not already reset the Status field yourself.
Subject - This field displays the error type. For example, a mapping error, prior change fail, and so on. The error code and error type which are common error classifications, are provided by the Adapter and the values are concatenated by WebServices. If you click on the Subject field, a window displaying the fields in that row will appear.
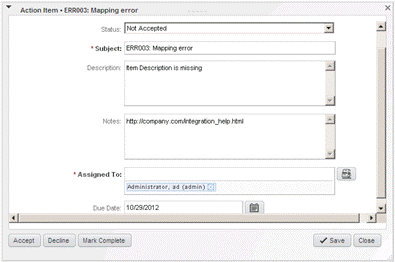
Description - This field displays the error message that was passed from the ERP adapter via WebServices.
Notes - This field is displays the input by an authorized user that aims to provide help/hints, such as a URL, to resolve the error.
Assigned To - This field returns the following information for ATOs and CTOs respectively:
ATOs - This field defaults to the Change Analyst on the Change itself. If there are no Change Analysts, the field is left blank.
CTOs - This field displays the user who created the CTO.
Due Date - This field is set by the WebServices call. If a Default date if not provided by WebServices, this field defaults to one day after the WebServices call ($Now) and WebServices supports setting this field.
Assuming you have created and released the transfer order ATO00001 and received the following response from the ERP system, then to reprocess the ATO, in Actions menu, select Reprocess.
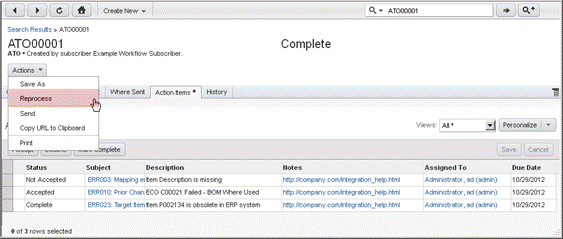
If there is more than one Object on the ATO, they are reprocessed. Once the ATO is reprocessed:
All existing action items are set to complete
New errors, if any, are recorded as new in Action Menu Items
XML data is regenerated and the entire ATO is processed
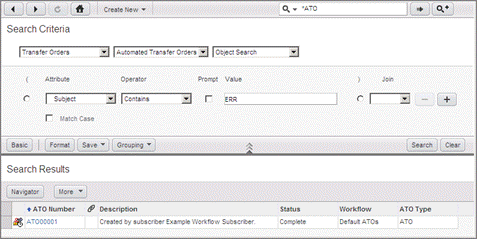
You can search for specific Action Item Subjects that fall under integration error classifications. For example, ATOs with unresolved Data Mapping errors as shown in the following sample procedure.
To search for ATO integration errors:
In Web Client, click the Search button to display the Search Criteria dialog.
In the Search Criteria dialog, click the search button, and then select Transfer Orders > Automated Transfer Orders > Object Search.
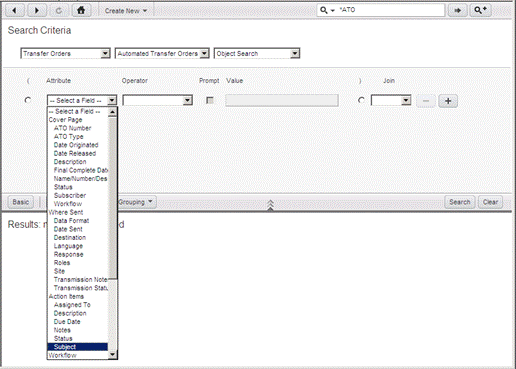
In the Attribute drop-down list, select the applicable attribute, for example, Subject in case of Action Items.
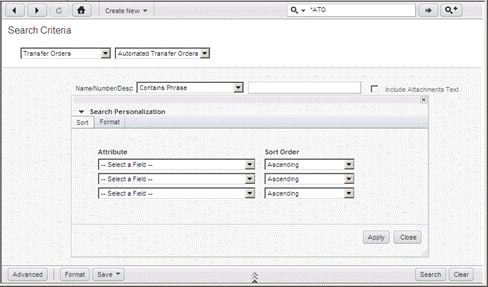
Complete the Operator and Value fields as shown above, and then click the Search button.
Agile will retrieve ATO00001.
This is shown in the following procedure.
To format Basic and advanced search results:
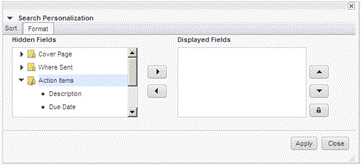
In Search Criteria, click the Format button to display the Search Personalization dialog.
In the Attribute and Sort Order fields, select the desired attributes, the sort order (Ascending/descending), and then click Apply.
In Search Personalization dialog, click Format.
Use and to display, or hide fields you want to display or remove fields in your search result.
Click Apply and then Click Save.
Formatting the output of your ATO Integration error message report, is shown in the following procedure.
To format the output of ATO Integration error message reports:
In Agile PLM Window Client, click and then, select Reports > from the drop-down list, followed by the Custom Reports option. The Create Customs Report Wizard appears.
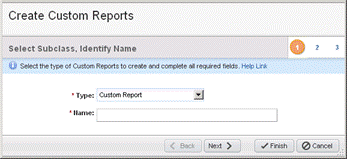
Type a name in the Name field, for example, Test_Report, and then click to open the Define Query page.
In Define Query page, do as follows:
Make sure the Create New radio button is checked
Select Transfer Orders, Automated Transfer Orders, and Object Search options from the drop-down lists if so required.
In the Attribute field, select the applicable fields, for example, Status for Action Items, or ATO Number for Cover Page, and so on, and after defining Operator and remaining fields, click the Next button. The Select Output Field page appears.
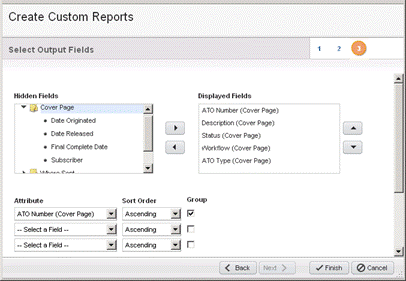
Select the applicable attributes and sort order, similar to "Formatting Basic and Advanced ATO Search Outputs ," and then click the Finish button. The Search results page appears.
You have the option to group the selected attributes, by checking the Group boxes.
In Search results, click the Execute button to place the text in this location. The Select Layout and Configuration page appears.
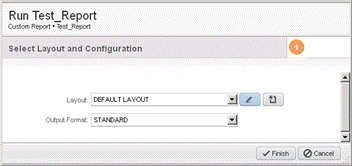
In Select Layout and Configuration, select and configure the layout as described below:
In Output Format, options are PDF, WORD, EXCEL, HTML, and STANDARD,
In Layout, you can select the DEFAULT LAYOUT, or use the Edit button to edit existing layouts, including the DEFAULT LAYOUT and the Create button to open the Layout Personalization dialog for a custom layout. Be sure to save your settings.
Click the Finish button to put text here
|
Note: For more information to create Custom Reports, refer to Agile PLM Getting Started Guide. |
Use the following procedure to configure the Dashboard table to display ATOs.
To configure the Dashboard table to display ATOs:
Log in to the Web Client.
Double-click Dashboard Log Optional Tab 1 or Optional Tab 21.
Click on the Configure button in one of the tables.
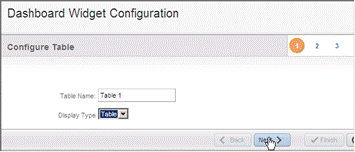
In Dashboard Widget Configuration's Configure Table, type table name and select Display Type and then click the Next > button.
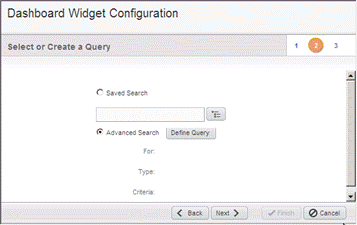
In Dashboard Widget Configuration's Select or Create a Query, select Advanced Search, and then click the Define Query button. Transfer Orders > ATO > Object Search >Selected Content Search and type your search conditions to search for the ATO.
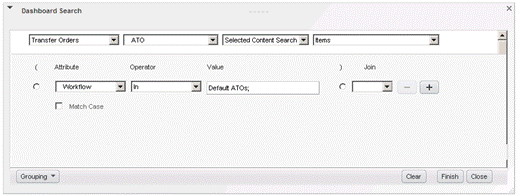
In Dashboard Search dialog, select the values shown for your query and then click Finish. The Select or Create a Query step showing query result appears.
In Select or Create a Query, click the Next button.
The Select Output field step appears.
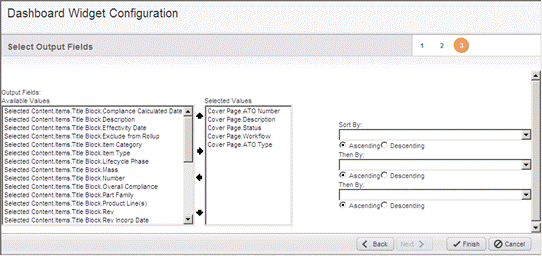
Select the desired fields and then click the Finish button.
When an ATO is released, Agile checks for failed ATOs that have the same affected item numbers by checking the set of ECOs, SCOs, and MCOs for dependencies listed in Dependency Conditions on page 82. Agile will then add tags to the dependent data for identification purposes.
If there are conflicting change items, Agile will add XML tags to the output, listing the dependency conditions and pass the information to AIA.
Affected Object - ECO
Affected Object - SCO
Affected Object - MCO
Affected Object - BOM Child - ECO (1 level above and below)
Affected Object - BOM Child - SCO (1 level above and below)
Affected Object - BOM Child - MCO (1 level above and below)
Affected Object - BOM Where Used - ECO (1 level above and below)
Affected Object - BOM Where Used - SCO (1 level above and below)
Affected Object - BOM Where Used - MCO (1 level above and below)
Change Dependencies are included if:
The ChangeTransferFlag field in Agile.properties file is defined as a P2 text field. The API name of this P2 text attribute which is configured in Java Client, should be the value of this field in Agile.properties file.
And
The value of the P2 text field is set to Errored or Null (awaiting processing and has a chance of failing)
Changes and Dependencies are excluded if:
The ChangeTransferFlag field in Agile.properties file is not defined.
Or,
The ChangeTransferFlag field in Agile.properties file is defined and the value of the P2 text field is NOT set to Errored or Null or is set to Transferred (on the possibility of some Change Order statuses that were processed successfully to the target system and the information was not duplicated during reprocessing) because, otherwise, these values will be included.
Using Java Client, you can delete transfer orders that are not yet released. Agile PLM supports ”soft” and ”hard” deletes.
|
Note: You can undelete a soft-deleted object. You cannot undelete a hard deleted object. |
You can delete only transfer orders that meet the following criteria:
You created it, or Agile PLM administrator has given you the appropriate privileges to delete a transfer order.
The transfer order is at the Pending status type or the Unassigned status.
The transfer order has failed to reach its Destination.
In Java Client, click the Print drop-down list button and select All Tabs or select the tab you want to print. The print preview dialog box opens. When you are ready, in the dialog box, click Print.
In Web Client, you can print transfer order tabs from your Web browser. With the transfer order open, choose Actions > Print. You can print the current tab or all tabs. Attachments are printed from their native applications or the Agile Viewer.
For more information about printing, refer to Getting Started with Agile PLM.
For detailed information about using all types of Agile reports, refer to ”Working with Agile Reports” chapter in Getting Started with Agile PLM, which also includes information about the following:
Standard reports, custom reports, and external reports
How your roles and privileges affect reports
Report object tabs
Creating and modifying report layouts
Creating custom and external reports
Running, scheduling, saving, and deleting reports
Report output window
The IP Transfer Report is the Agile standard report for transfer orders. This report lists the objects sent to a given destination and when they were sent.
To run the IP Transfer report:
Select the IP Transfer report in the Reports > Standard Reports > Process Reports folder. The IP Transfer Report page appears.
Click the Execute button. The Select Date Range and Destination page appears.
Select the start date and end date of the time period you want to the report to cover. This defines the time range in which transfer orders were sent.
Click the Palette button next to the Destination field and double-click the destinations you want to include.
Click Finish to display the report.
Table 11-4 Default IP Transfer report layout fields and descriptions
| IP Transfer report field | Description |
|---|---|
|
Object Number |
The number of the object that was sent, for example, an item number or a change number. |
|
Object Type |
The type (subclass) of object, for example, part type Resistor or change order type ECO. |
|
Description |
Description of the object that appears in the object's Description field. |
|
Date Sent |
The date the transfer order was processed and the object was sent to the destination you selected in the report wizard. |
|
TO Number |
The transfer order number. |