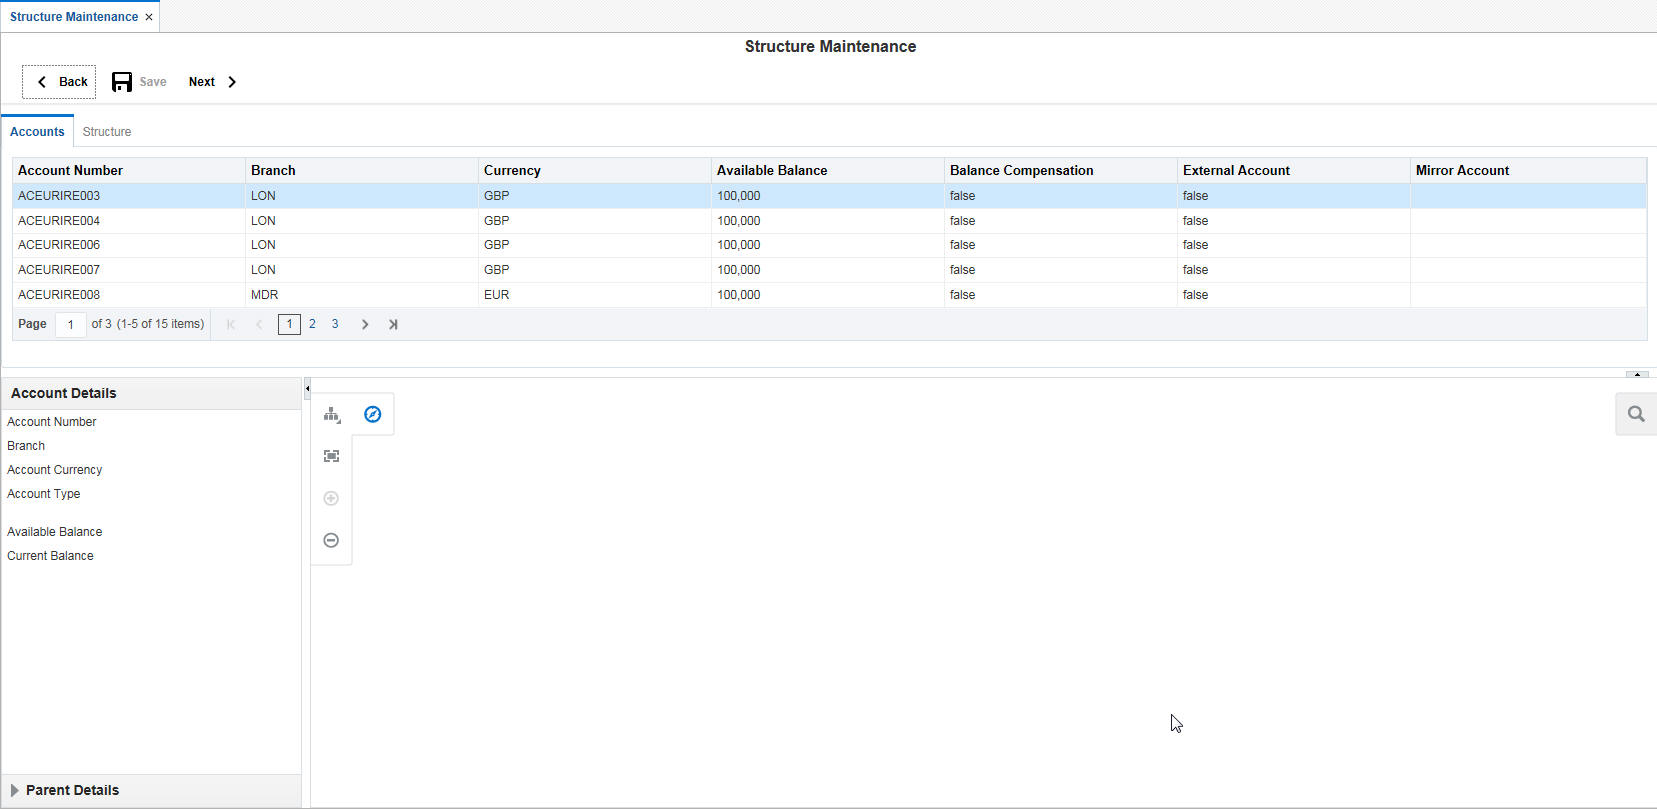
Multiple structures have to be created within a framework to add accounts to allow sweeps/notional pooling. Structure maintenance allows you to do the following:
● Create Structures
● Add accounts to it.
● Assign instruction to pair of accounts
● Assign frequencies to marked instructions
System allows you to add as many accounts and as many hierarchies as required.It also enables hybrid structures, where both pool and sweep can be configured.Hybrid structures are basically pool over sweep structures.
This section contains the following topics:
● Section 7.2.1, "Creating a New Structure"
● Section 7.2.2, "Maintaining Accounts in the Structure"
● Section 7.2.3, "Maintaining a Structure"
● Section 7.2.4, "Validating the structure"
● Section 7.2.5, "Setting Instruction Details"
● Section 7.2.6, "Specifying Payment Details"
● Section 7.2.7, "Modifying Structure"
● Section 7.2.8, "Handling Back Valued Transactions"
7.2.1 Creating a New Structure
You can invoke the ‘Structure Maintenance’ page by clicking on the Structure Maintenance tab in application..
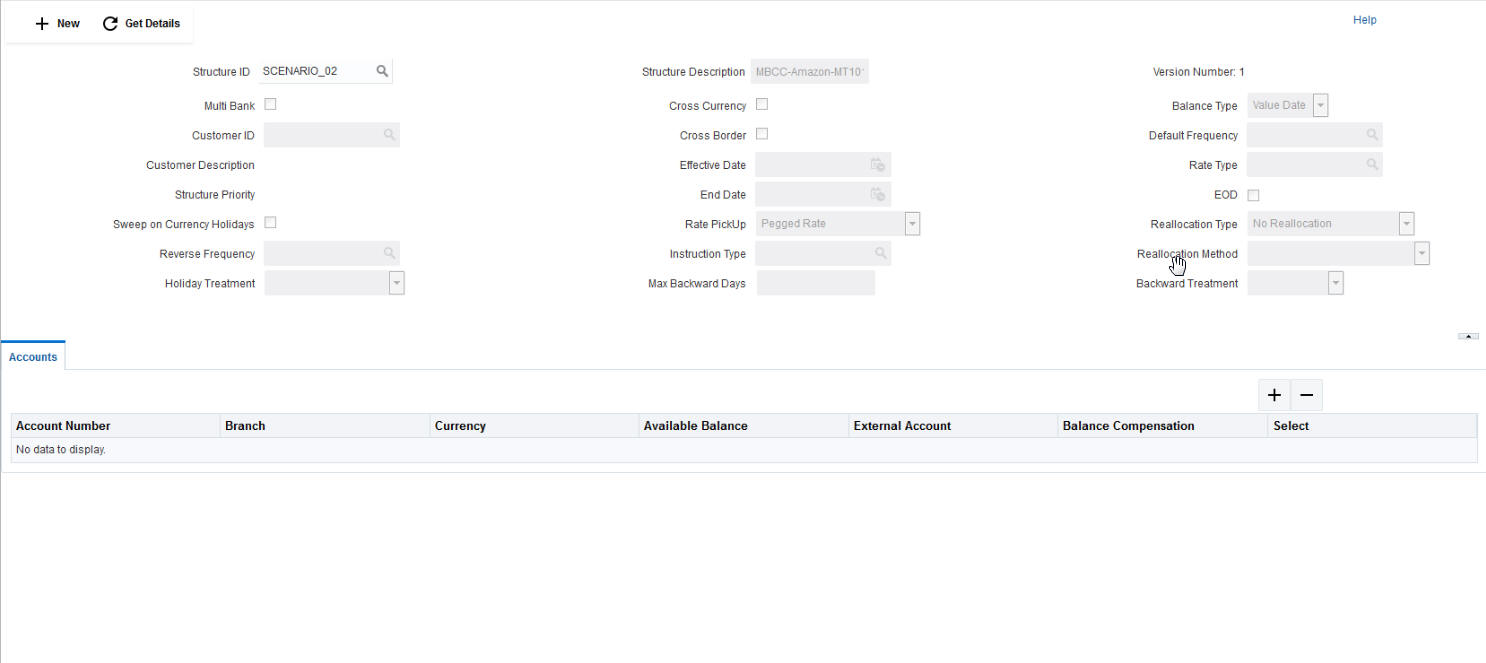
Click New button to add a new structure. Specify the following details:
Structure ID
The system displays the auto generated unique structure ID.
Structure Description
Specify a description for the new structure.
MultiBank
This field will get automatically selected on save if the underlying structure created has external bank accounts.
Cross Currency
This field will get automatically selected on save if the underlying structure is created with accounts which are in different currencies.
Customer ID
Specify the customer. You can select the customer ID from the option list. The list displays all the customer IDs maintained in the system
Customer Description
The system displays the description of the customer selected.
Cross Border
This field will get automatically selected on save if the underlying structure is created with accounts which are from two or more different countries.
Default Frequency
Specify the default frequency at which the structure should be executed. You can select the frequency from the option list. The list displays all the frequencies maintained in the system.
The frequency defined at the structure level will get defaulted to all the account pairs in the structure, but you can over ride and define a specific frequency for a specific pair of account.
This changed preference will override the global preference.
Effective Date
Specify the date from which the structure becomes effective.This date cannot be less than the system date but can be a future date.
Rate Type
Specify the rate type to be used in case the underlying structure has cross currency pairs.
End Date
Specify the date till which the structure is effective.This date should always be greater than the effective date.
EOD
Check this box to execute the structure at end of day.
Allow Sweep on Currency Holidays
Check this field to allow sweep on currency holidays.
Rate PickUp
Specify the rate pick up for the sweeps on currency holidays from the drop down list. The option are:
● Previous Days Rate
● Last Swept Rate for the Pair (when sweep frequency is not daily)
● Past 5 day Average Rate
Note
This field is active only if ‘Allow Sweep on Currency Holidays’ is selected.
Reallocation Type
Specify the type of interest reallocation to be done from the drop down list. System should do reallocation whereby the interest component is allocated back to the participating entities from the designated cash concentration accounts based on the instructions. The options are:
● No Reallocation - No interest is paid back to the child accounts
● Reallocation without benefits - Interest is allocated back to child account but without the additional benefits of accumulation.
● Reallocation with benefit - Interest is allocated back to the child account with the additional benefits of accumulation.
Reverse Frequency
Specify the frequency at which the balance is remitted back to the child account. You can select the reverse frequency from the option list. The list displays all the reverse frequencies maintained in the system.
Instruction Type
Specify the instruction type to be applied to the structure. You can select the instruction type from the option list. The list displays all the instruction types maintained in the system.
Reallocation Method
Specify the reallocation method for the structure from the drop down list. This refers to the method in which the interest is shared with the participating account entities.The options are:
● Central Distribution - Here the interest arrived at is credited to one central account, which can be any one of the participating accounts or a separate account.
● Even Distribution - Here the interest is evenly distributed among the participating accounts.
● Even Direct Distribution - Here Interest reward is evenly spread across all accounts with positive balances
● Percentage Based Distribution - Here pre defined percentage of the interest is distributed among the participating accounts.
● Fair Share Distribution - Here if the interest is positive, it is distributed among the positive contributors in the ratio of their contribution and if the interest is negative, it is distributed among the negative contributors in the ratio of their contribution.
● Reverse Fair Share Distribution - Here if the interest is positive, it is distributed among the negative contributors in the ratio of their contribution and if the interest is negative, it is distributed among the positive contributors in the ratio of their contribution.
● Absolute Pro-Data Distribution - Here absolute balances of all accounts are considered and the interest would be shared proportionally to all accounts.
Holiday Treatment
Specify the action to be taken on the structure in case of a holiday from the drop down list.The options are:
● Next Working Date - Perform the action on the next working day.
● Previous working Date - Perform the action on the previous working day
● Holiday - Perform the action on the designated day itself
Max Backward Days
Specify the maximum number of days the system can go back to execute the structure when the execution day falls on a holiday.
Note
This field will be enabled only if ‘Holiday Treatment’ is selected as ‘Previous Working Date’.
Backward Treatment
When the ‘Holiday Treatment’ is selected as ‘Previous Working Day’ and the ‘Max Backward Days’ set is also falling on a holiday, then the system decides on the day of execution of the action based on the Backward Treatment.
Select the backward treatment to be applied from the drop down list. The options are:
● Move Forward - The action is performed on the next working day
● Holiday - Perform the action on the holiday
Note
This field is enabled only if ‘Holiday Treatment’ is selected as ‘Previous Working Date’.
Parameters like Frequency, Reverse Frequency and Instruction type which are defined at the structure level will be applicable at each account pair level in the structure however user can change these parameters at the account pair level. If the user changes them at the account pair level the system will ignore the structure level set up and go by the pair level settings
7.2.2 Maintaining Accounts in the Structure
Accounts have to be added to create a structure. Click ‘+’ button under the Accounts section to add accounts.The search box opens.
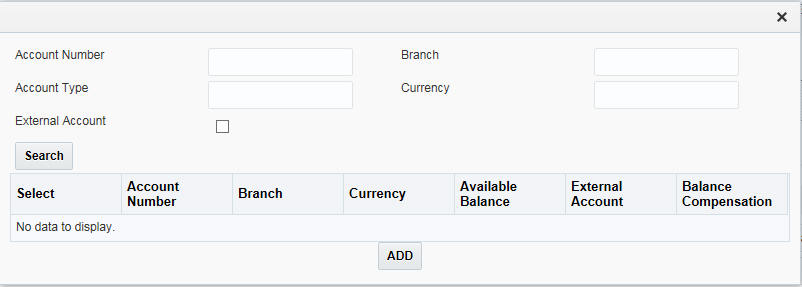
You can search for an account using the following parameters:
● Account Number
● Branch
● Account Type
● Currency
● External Account
Click ‘Search’ button without giving any parameters for viewing all the accounts maintained in the system for the selected customer.
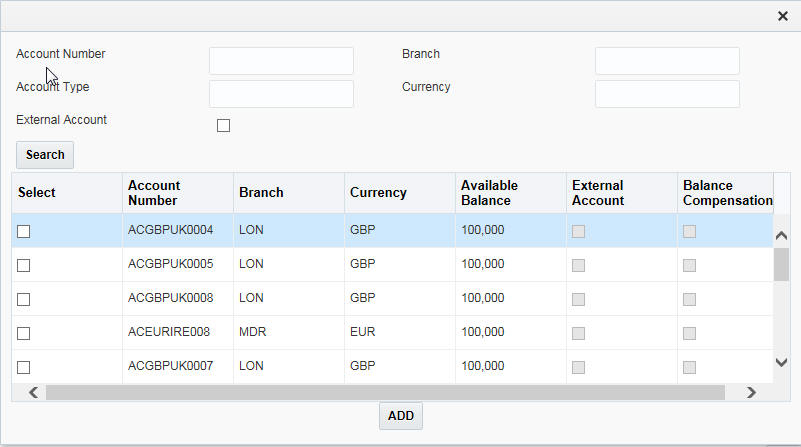
Select the accounts to be added and click ADD button. The accounts get listed under the Accounts section.
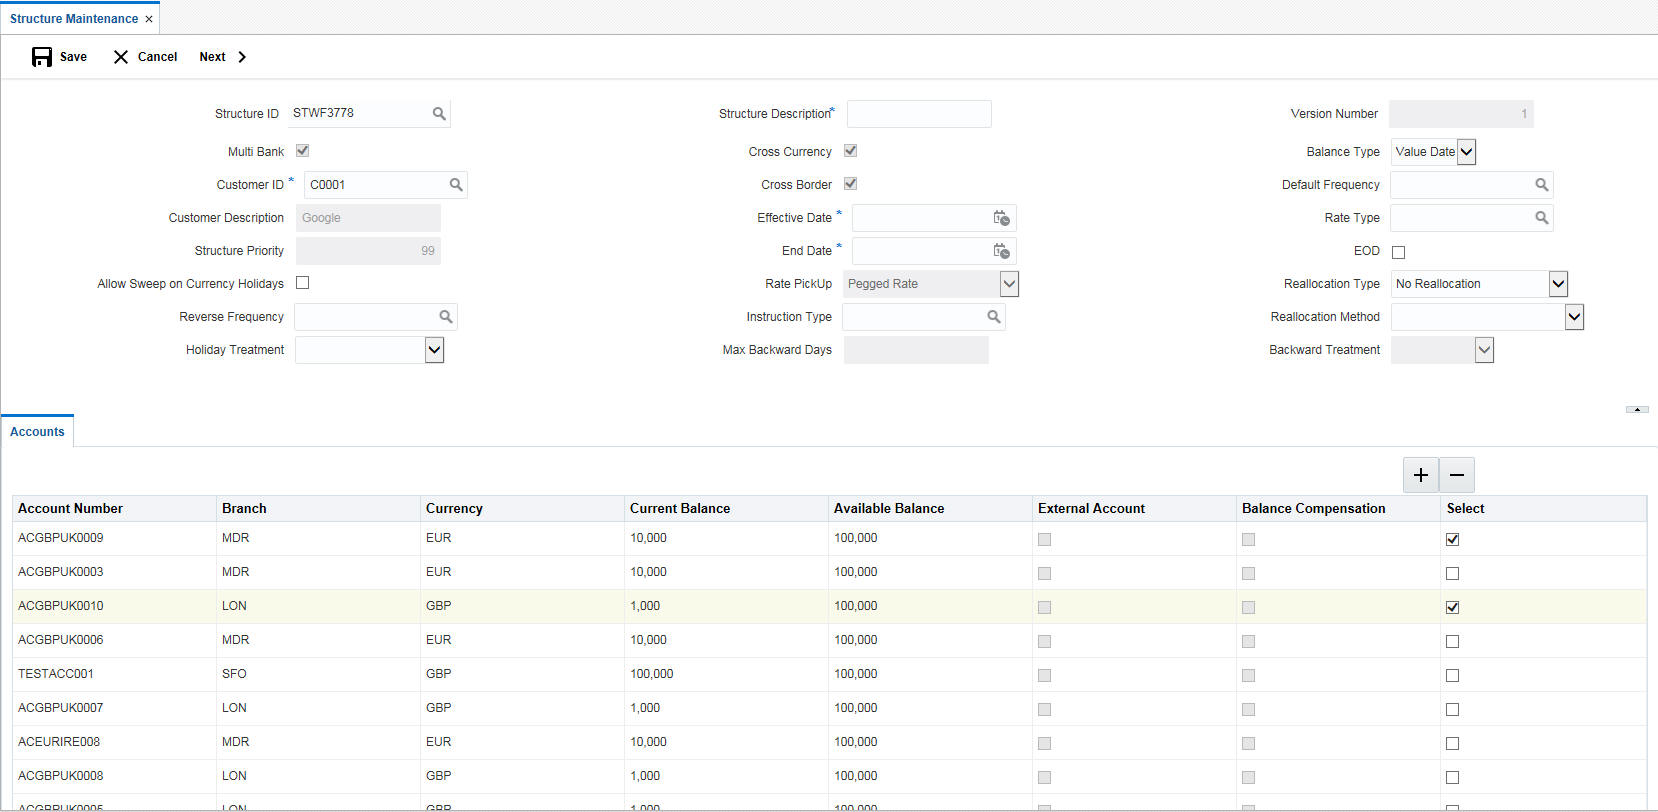
You can view the following details of the added accounts:
● Account Number - The account number of the account
● Branch - The branch to which the account belong to
● Currency - The currency of the account
● Current Balance - The current balance in the account
● Available Balance - The available balance in the account
● External Account - If the account is linked to external account or not
● Select - Check this box to select the accounts and delete if not required.
Click ‘Save’ button to save the details.
After the participating accounts for a structure are selected, you can start creating the structure. Click Next button to start creating a structure.
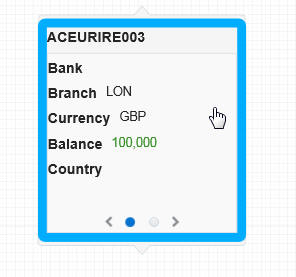
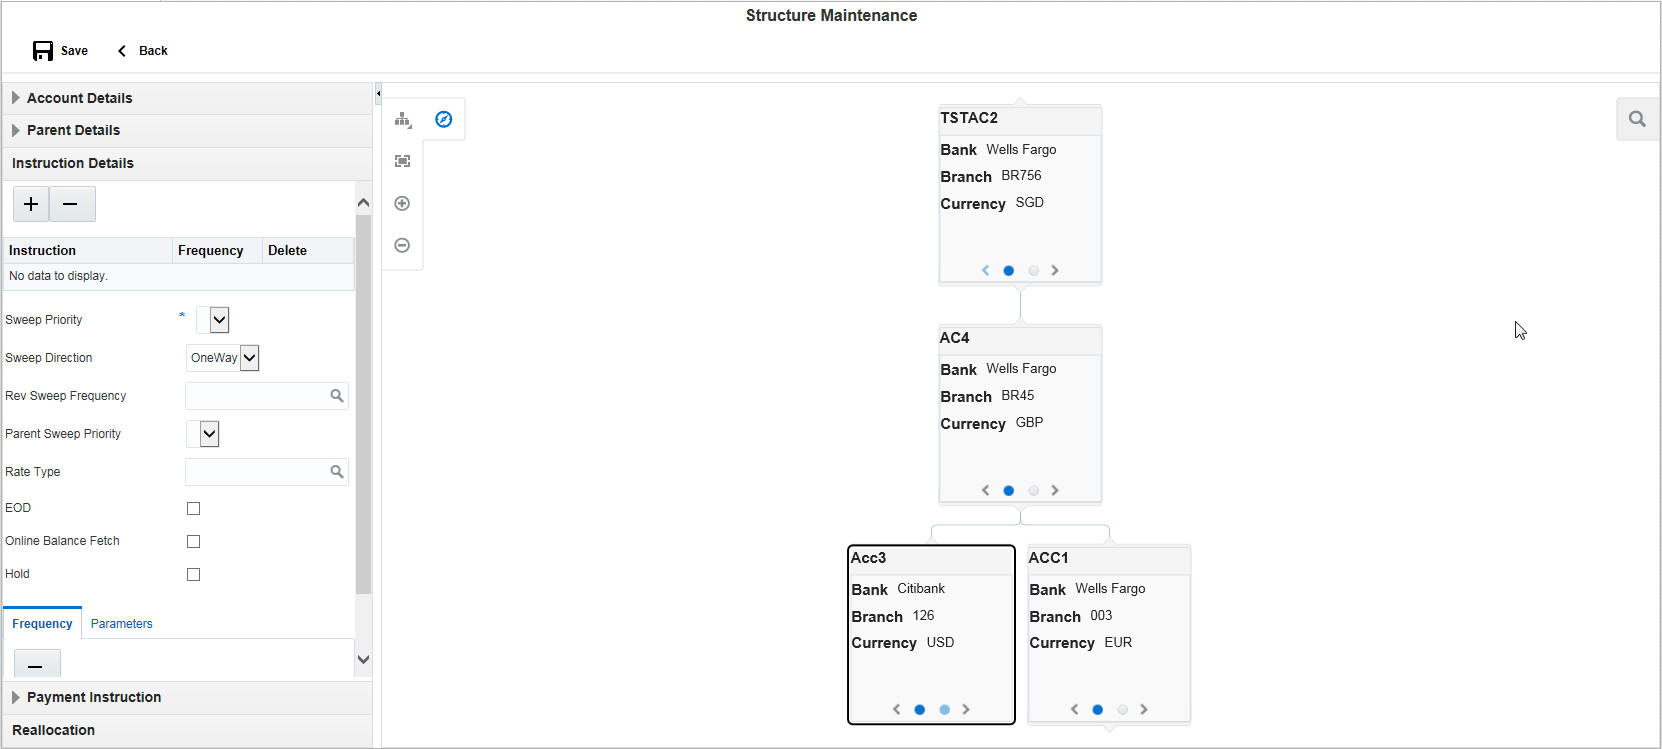
You can drag and drop accounts into the drawing plane to make the structure. For any account selected, click on the account to view the account details in the ‘Account Details’ section in left. You have to enter the following details:
Account Type
Select the account type of the account from the drop down list. The options are:
● Pool
● Sweep
When an account is set as ‘Pool’, this account is highlighted in blue in the system.
To set account as a child account, drag and drop the accounts onto the parent account.
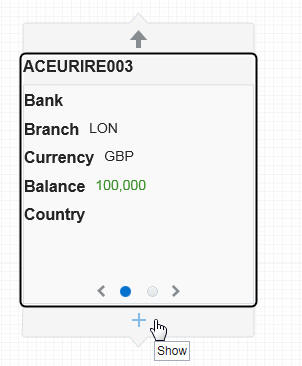
Mouseover the account to view the ‘+’ link. Click on it to view the structure expanded.
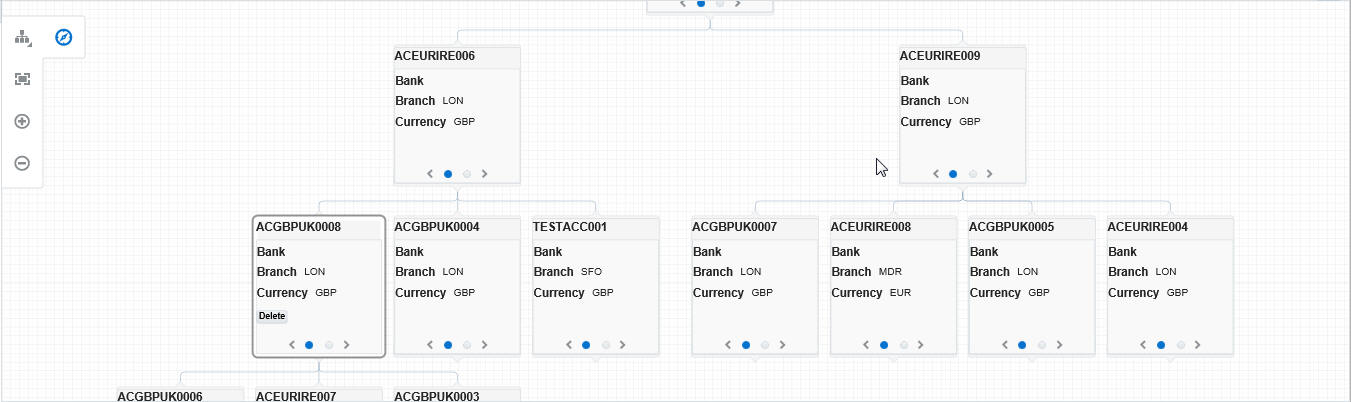
You can mouseover the account to view the ‘-’ link. Click on it to compress the structure.
When an account selected is an external account, this account is highlighted in amber colour..
To view the parent account details of an account, select the account and click on the ‘Parent Details’ link in the left side of the application.You can view the following details:
● Parent Account Number
● Parent Account Bank
● Parent Account Branch
● Parent Branch Currency
● Parent Account Balance
● Parent Account Country
● Parent Account Type
● Parent Account Customer
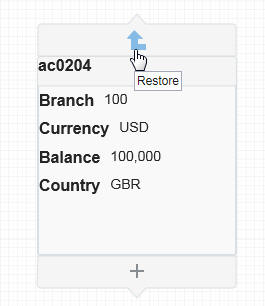
7.2.3.1 Isolating an account from the structure
Mouseover an account in a structure to view the isolate link. Click on it to isolate the account and view its details. This will be helpful in case of complex structures.
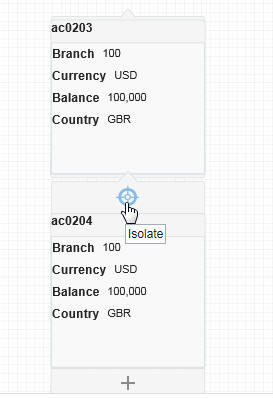
To restore back and view the entire structure, you can click the restore link.
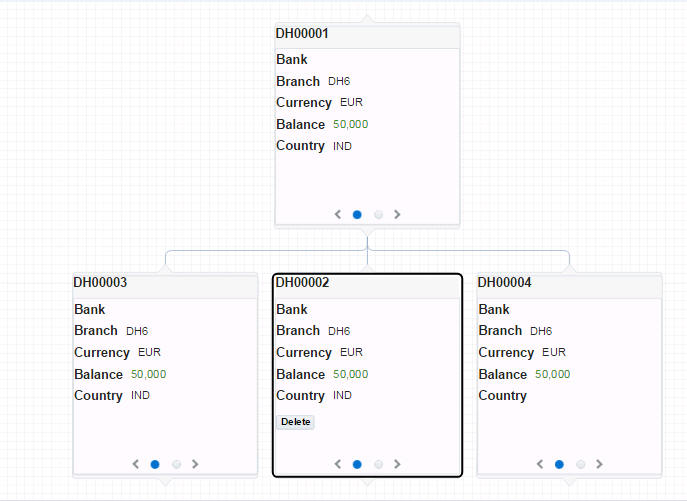
7.2.3.2 Deleting an account in the structure
Click on the account in the structure to view the ‘Delete’ button enabled. Click on this button to delete the account..
7.2.3.3 Maintaining the Control Panel
A control panel allows you to view the designed structure better. Click the control panel icon to open it. The table below briefs the icon and their functions in the control panel.
Icons |
Function |
Description |
|
Control Panel |
Click this icon to open and close the control panel |
|
Structure Panel |
Click this icon to view the designed structure in various inbuilt views. |
|
Zoom to Fit |
Click this icon to view the map zoomed to fit the screen |
|
Zoom In |
Click this icon to zoom in and get a closer look |
|
Zoom Out |
Click this icon to zoom out and get an overall look. |


7.2.4 Validating the structure
Once the structure is set, click ‘Validate’ button to validate the structure. The system checks the validations set up at the various setup screens and throws error, if the structure formed is not complying.
If all the validations are met, system displays a message ‘Structure Validated Successfully’.Click ‘OK’.
7.2.5 Setting Instruction Details
Click ‘Next’ to set the instruction parameters.
Click on a child account to set the instruction details for that child-parent account pair.
Click ‘Instruction Details’ link in the left of the application.Click ‘+’ button to add instruction ID. An option list is displayed with all the instruction IDs maintained in the system.
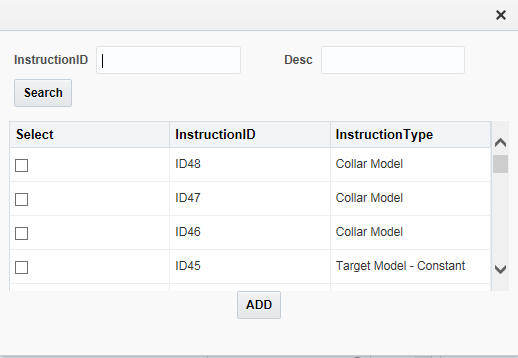
You can select the instruction ID from the option list. One or more instruction IDs can be selected for an account. Click ‘ADD’ to add them.
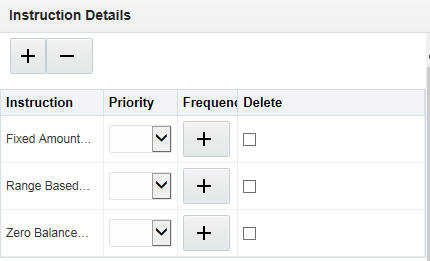
In case of multiple Instruction IDs, you can select the instruction priority from the drop down list.
Setting Frequency
To set frequencies for the selected Instruction ID, click on ‘+’ button. An option list is displayed with all the frequencies maintained in the system.
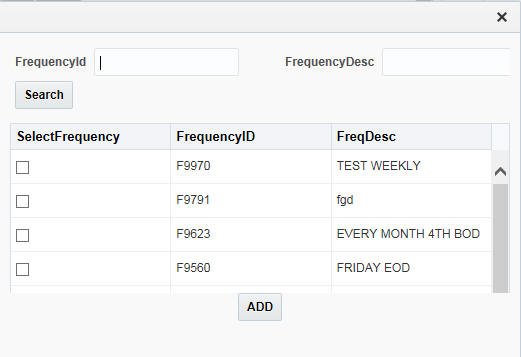
You can select the frequencies from the option list. One or more frequencies can be selected for an instruction. Click ‘ADD’ to add them.
You can click on the Instruction set and view the selected frequencies for it under the tab Frequency.
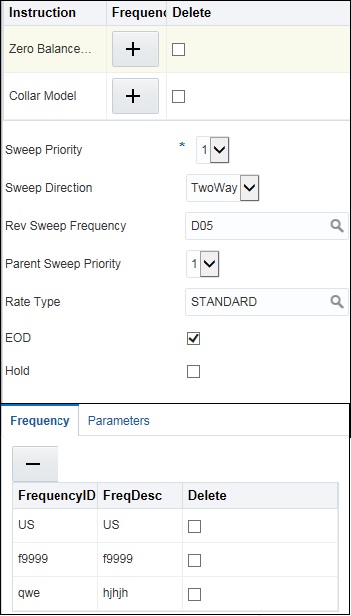
Delete
Select the check box and click ‘-’ button to delete the frequency.
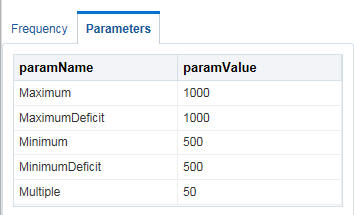
Viewing Parameters
You can view the parameters values set for an instruction. Select the Instruction and Click on Parameter tab to view the parameter values set for it.
Specifying Instruction Details
You can enter the following details in the Instruction Details section:
Sweep Priority
When a parent has more than one child accounts sweeps are executed based on the Sweep priority. During the sweep execution the least account priority pair will get executed first
Select the sweep priority for the account pair from the drop down list.
Sweep Direction
Select the sweep direction from the drop down list. The options are:
● One Way - Credit balances are only swept out of the account
● Two Way - Sweepin is also supported when the balance of the child account are overdrawn
Rev Sweep Frequency
Reverse sweep frequency is the frequency at which the swept funds are remitted back to remitter account.Specify the frequency of reverse sweep. You can select the frequency from the option list. The list displays all the frequencies maintained in the system.
Parent Sweep Priority
The system provides prioritized sweeps to child accounts if a parent has multiple child accounts in debit balances and the Master/parent account does not have sufficient funds to cover all child account overdrafts during the 2 way sweep
The child account having the least priority will get the funds first.
Instruction Priority
Select the instruction priority from the drop down list. When more than one instruction is set up between a pair of accounts the instruction priority comes in to picture, the instruction with the least number will get executed first
Rate Type
Specify the rate type of the account pair. You can select the rate type from the option list. The list displays all the rate types maintained in the system
EOD
Check this box to execute the instructions at EOD.
Hold
Check this box to hold the execution of instruction of the account pair.
7.2.6 Specifying Payment Details
Payment details are set for the account pair based on which payment parameters will be sent to DDA to fetch the balances.
If the account pair is set for one way, only one way parameter can be viewed on screen. Else both one way and two way options can be viewed. Select the one way and two way parameters from the drop down list. The list displays all the parameters that are set for the account in payment parameters setup.
Payment Instruction for Beneficiary Account details are displayed on the payment instruction panel.
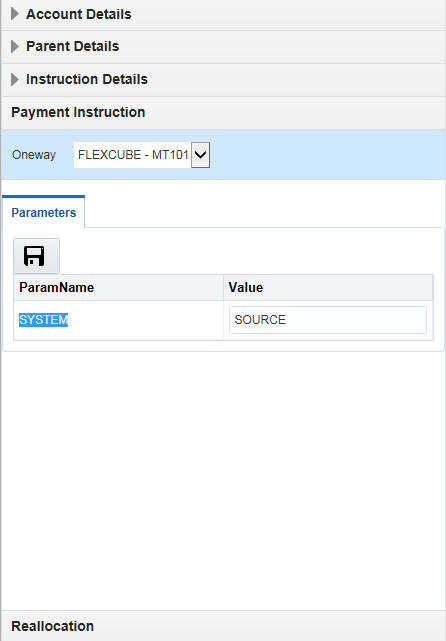
Click Save to save the structure.
Any structure which is designed can be modified by opening the structure and clicking on the Modify button.The following modifications can be done:
● Add or delete accounts in the structure
● Change the Instruction parameters set for an account pair
You cannot change the header account of a structure.
7.2.8 Handling Back Valued Transactions
The system rebooks the sweeps (in case of physical pooling) and adjusts the interest amount that had been accrued and settled in the accounts when you input a transaction with a back value date. In case of a change in the Account Structure in the interim between the Back Value Transaction (BVT) date and current date, the system uses the account structure existing on the execution days.
The following points need to be kept in mind for BVT Processing:
● It is performed only for sweeps and pools which are value based.
● The corresponding System Account active on the Effective Date is considered for a back valued transaction to an account. (If BVT falls on a holiday then BVT is considered only from the next working day, as there will not be any value dated record in system account for holidays)
● The processing involves replaying the sweep from the least date of the BVT which means that the Contributions and Pool Balances of the System Accounts are calculated afresh. The balances in all accounts of the structure are reworked and the sweeps carried out again for each of the previous sweep having the same value date.
● The value dated balances of the Parent Account as well as the Child Accounts in the Account Structure are updated
The system follows the following process for replaying sweeps:
1. It omits BOD processing for the least back value date only and continues till the current processing date. It then identifies the value dated balance of the current processing date for the corresponding System Account and carries out the EOD processing.
2. For a particular Effective Date, it calculates Sweep Amount for the corresponding System Accounts.
3. It fetches the entry posted for the BVT date from the Sweep Log and compares it with the Sweep Amount that has been calculated currently.
4. If the Sweep Amounts are equal, no entry is posted.
5. If the Sweep Amounts are different, it reverses the entry that was posted for the BVT date (SWBK) and the corresponding entry that was used during BOD to reverse the entry above Reverse sweep booking (RSBK)
6. Reversal of Reverse Sweep (RSWR) entry gets posted during reversal of RVSW.
7. It inputs a new entry whose booking date is the processing date of the BVT and whose value date is the BVT date. This entry is entered into the Daily Log.
8. It then updates the post sweep balances for a combination of Account + Effective Date + System Account.
Note
Every time a physical sweep is executed, the system stores the credit balance and the unused OD limit in the Parent Account before and after the sweep.