3. Maintaining Account Class
While defining CIF records and Customer Accounts, you would have noticed that many of the fields have option lists positioned next to them. While some option lists contain pre-defined values for some option lists to be populated you need to capture data through separate screens. For instance, while maintaining CIF records you need to associate each customer with a customer category. For this purpose you will need to maintain customer categories before you begin to maintain CIF records. Similarly, each customer account needs to be associated with an account class. Therefore, you will need to maintain account classes before you start defining customer accounts.
This chapter contains the following sections:
- Section 3.1, "Account Class Maintenance"
- Section 3.2, "Account Class Group Maintenance"
- Section 3.3, "Account Class Transfer"
- Section 3.4, "Manual Status Change Input"
- Section 3.5, "Maintaining Turnover Limits"
3.1 Account Class Maintenance
This section contains the following topics:
- Section 3.1.1, "Maintaining Account Classes"
- Section 3.1.2, "Invoking Account Class Maintenance Screen"
- Section 3.1.3, "Statement Parameters Tab"
- Section 3.1.4, "Preferences Button"
- Section 3.1.5, "GL Lines Button"
- Section 3.1.6, "Auto Deposits Button"
- Section 3.1.7, "Status Rule Button"
- Section 3.1.8, "Amount Block Button"
- Section 3.1.9, "Restriction Button"
- Section 3.1.10, "Statement Button"
- Section 3.1.11, "REG Button"
- Section 3.1.12, "Branches/Currencies Button"
- Section 3.1.13, "Customer Categories Button"
- Section 3.1.14, "Notice Button"
- Section 3.1.15, "Banking Channels Button"
3.1.1 Maintaining Account Classes
In the Oracle FLEXCUBE system, you can classify the customer accounts of your bank into different groups and assign each an identifying code. For instance, you may define a group called INDSB to represent savings accounts held by individuals, SB-INS to comprise institutional savings accounts, COR-CU for corporate current accounts.
Each group is referred to as an Account Class and is maintained in the ‘Account Class’ screen. For each class, you also define certain common attributes applicable to all accounts in this class, such as, the General Ledger lines to which the accounts in this class report to, facilities granted to the account holders (pass book, check book, ATM etc.).
In the ‘Customer Accounts Maintenance’ screen, where you open accounts for the customers of your bank, each customer account is linked to an account class, and the attributes defined for the account class are by default applicable to the customer account. For instance, if the frequency of account statement generation has been defined as daily for an account class CU-COR, the system generates statements for all accounts under this class on a daily basis. However, some of the parameters defined for the account class, can be revised at the account level for any of the accounts linked to the class. Account level parameters will supersede those defined for the account class.
While defining the account classes you should also keep in mind that the interest rate structure is also specified for an account class (in the Interest and Charges module).
The account class table is maintained at the Bank Level by the Head Office branch
3.1.2 Invoking Account Class Maintenance Screen
You can invoke the ‘Account Class Maintenance’ screen by typing ‘STDACCLS’ in the field at the top right corner of the Application tool bar and clicking the adjoining arrow button.
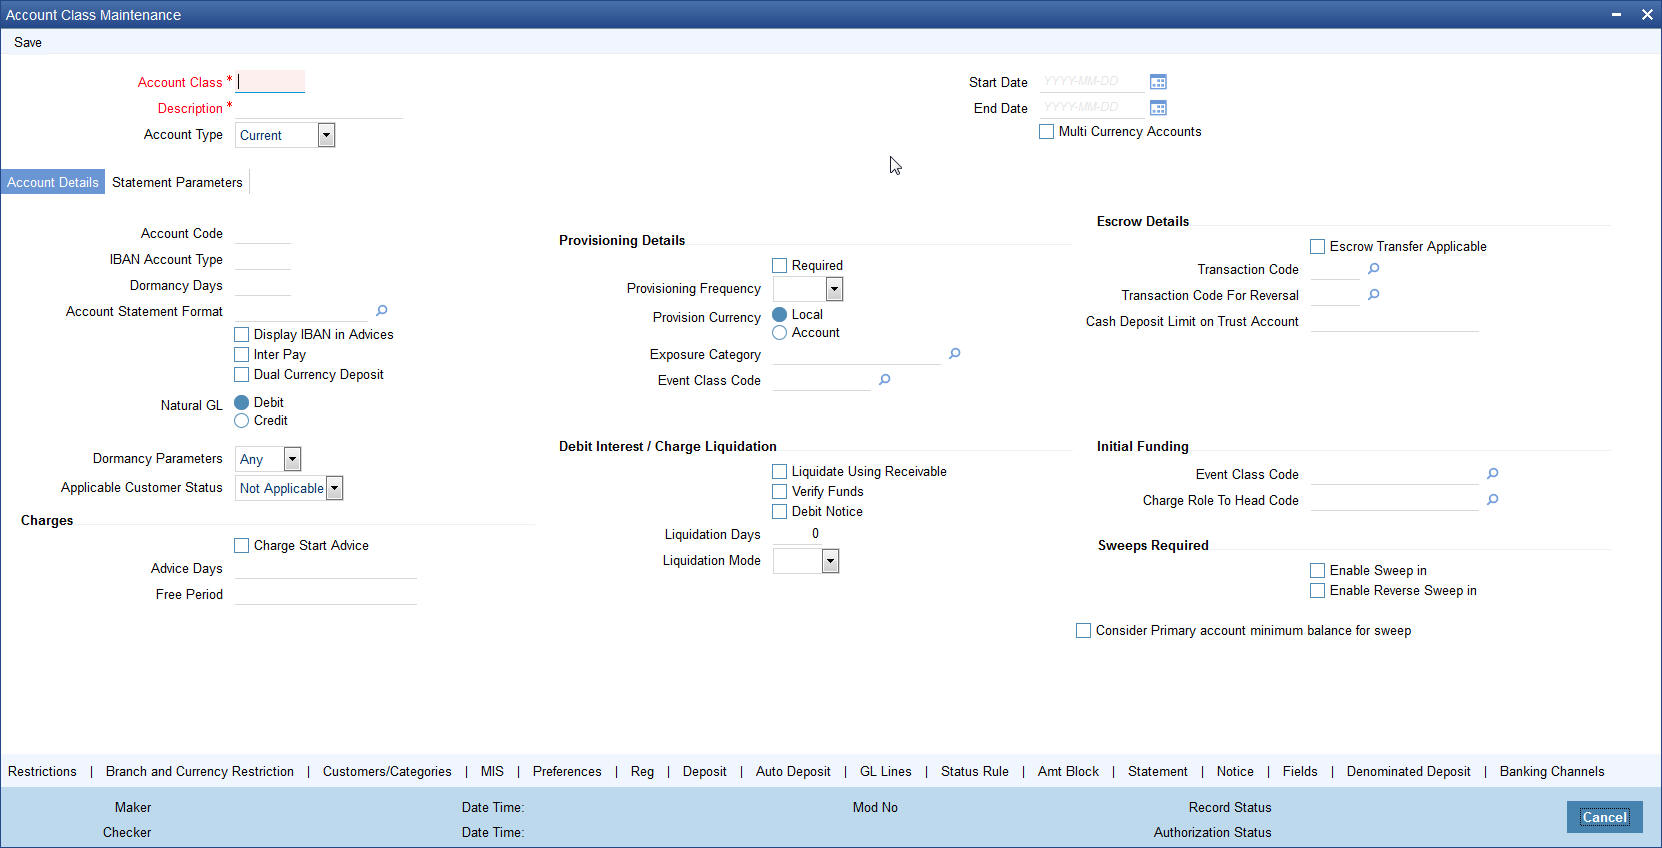
Defining an Account Class includes the maintenance of the following parameters:
Assigning a unique Code to the Account Class and associating an appropriate description with the class
Indicating the type of account for which account class is being maintained
Specifying the period after which accounts in this class should become dormant if no customer transaction is posted into the account.
Indicating the date from when new accounts can be created under the account class.
Indicating the end date after which the new accounts cannot be created for the account class.
Maintaining the different statuses applicable to the accounts for which the account class is being defined. This would be used for tracking NPA’s on current and savings accounts.
Maintaining status-wise GLs for provisioning
Identifying the reporting lines (GL Line, Central Bank Lines and the Head Office Lines) for each status.
Maintaining account statement details like the type of statement that is to be generated, the frequency at which statements should be generated for all accounts under a class.
Indicating the preferences unique to an account class like the check book, passbook or ATM facilities to be given to account holders under this account class; whether overdraft facility should be allowed for accounts linked to this class; whether the credit limit should be checked for all accounts under the class; interest and charges to be computed for accounts under this class.
Specifying preferences regarding account holder facilities, interest computation etc.
Indicating whether status change for all accounts belonging to the account class should be automatic or manual.
Identifying and assigning preferred branches, currencies and customers to the account class.
Specifying whether receivables should be tracked for the account class. This specification will default to all accounts that are linked to this account class.
Specifying whether reordering of Cheque Books for all accounts linked to this account class should be triggered automatically or not. If yes, the parameters for the same.
Specifying liquidation preferences for debit interest and charges, to notify your customers through a Debit Interest Notification message (in the case of charges, a Charge Notification message) before debiting the customer’s personal current account for debit interest or charges.
Maintaining initial funding details for new accounts.
Indicating whether Escrow transfer is applicable or not for new accounts
Each of the parameters has been discussed in detail in the subsequent sections
Account Class and Description
The account class code is a unique 6-character code, which identifies the class. Along with the class code you need to assign an appropriate description to the account class.
For instance, let us assume you are defining a class for savings account of individuals. You could associate the code SB IND with it. Similarly, the description that you associate with it could be something like this – ‘Savings accounts of individuals’.
If the account class is a line account, then the system displays an override message, where the reporting GL for the accounts should be contingent GL.
Multi Currency Accounts
The multi-currency account class Flag is applicable only for current and savings account.
Account Type
The six different types of accounts that you can maintain are:
- Nostro account - your bank’s accounts with another bank
- Miscellaneous Debit - Each transaction is entered with a reference number. In the miscellaneous debit account a single debit transaction is matched subsequently with credits against the same reference number.
While posting transactions into this account, if the first entry is a debit, the subsequent reconciling entries should be all credits.
The system gives you a break-up of the balance by the reference number
- Miscellaneous Credit - as in miscellaneous debit account, in the miscellaneous credit accounts you post each transaction with a reference number. In a miscellaneous credit account a single credit entry is matched subsequently with debit entries with the same reference number.
The system gives you a break-up of the balance by reference numbers
- Savings Account
- Current Account
Line Account - This is used for creating accounts for charging limit fees. Upon save of the account class with type as line account, there will be an override specifying that the reporting GL’s for the accounts should be contingent GLs. There will not be any accounting entries passed into the accounts of line account type. This will only be used as the calculation account for calculating the limit fees. Hence, the account balance of this account will always remain as 0.
To ensure the line account functionality, you will have to maintain the following:
In the ‘Customer Account Maintenance’ screen, you will have to create new customer accounts with Account Class type as Line Account and ensure the following parameters for every new line associated with a liability
- The CIF of the account in the ‘Customer Account Maintenance’ screen will have to be the same as the liability to which the line will be linked in the ‘Limits’ screen.
- The currency of the account in the ‘Customer Account Maintenance’ screen will have to be the same as the currency of the line that will be attached in the ‘Limits’ screen.
- The interest calculation account maintained in the ‘Interest and Special Conditions Maintenance’ screen, will have to be the same as in the ‘Limits’ screen. However, the Interest Booking Account maintained in the ‘Interest and Special Conditions Maintenance’ screen can be some other account belonging to other account class types.
Since accounts can be of different types, you need to indicate the type of account for which you are defining an account class. It could belong to any one of the types mentioned above
Account Code
As per your bank’s requirement you can choose to classify account classes into different account codes. The bank can decide the manner in which the account classes are to be assigned to different account codes. An account code can consist of a maximum of four characters.
Depending on the customer account mask maintained, the value in the account code field would be used during the generation of customer account numbers through the ‘Customer Accounts Maintenance’ screen.
If you have decided to include account code as part of the customer account number (in the account number mask), then at the time of creating a new customer account number, you will need to select the account class for the account number being generated. In the option-list provided, the account class is displayed along with the associated account code. When the account number gets populated, it is the account code that forms a part of the customer account number.
IBAN Account Type
Specify the IBAN account type if BBAN format has an account type.
Start Date
Specify the date from which the account class should become active, using the adjoining calendar. You will be able to create accounts under this account class from this date.
End Date
You can also specify the life span of the account class by indicating the end date.
The end date for an account class refers to the termination date after which, creation of new account under the account class is disallowed.
Consequently, the option list for Account Class in all further transactions screen in Oracle FLEXCUBE, will not display the ‘expired’ account class as of the system date. However, the existing accounts for the account class will be active even after the end date.
Note
If you do not specify an End Date for the account class, the account is taken to be an open-ended account class.
Project Account
Check this box to track the working capital of the project.
Dormancy Days
You have to indicate the period after which an account in an account class becomes inactive or dormant if customer transactions are not posted into the account. The system allows only three numeric characters for Dormancy Days.
Note
However, while maintaining transaction codes, if you have checked the Consider for Account Activity field, all transactions posted to any account under this account class linked to the particular transaction code will become active from dormant irrespective of the dormancy period. If a customer-initiated transaction is posted into the account with the dormant status the account status will be updated to Active from Dormant since the Transaction Code associated with the account has the Consider for Account Activity option enabled.
Dormancy Parameters
As stated above, if Transaction Code associated with the account has the Consider for Account Activity option enabled, the dormant status of the account will be updated to Active. Apart from this, you can specify the parameter that is required for re activating the account. To indicate the re activation parameters for the dormant account choose any from the following options:
- Debit
- Credit
- Any
- Manual
In case of a transaction, the system will check for the parameter you have specified here and accordingly change the status of the account. However, the parameter maintained at the account level will super cede the parameter you have specified here.
Account Statement Format
Specify the format in which account statement should be generated. The adjoining option list displays all valid formats maintained in the system. You can select the appropriate one.
Display IBAN in Advices
For an account class you can indicate whether the IBAN number of the customers involving the accounts within the class should be printed on advices sent to the customer. If you would like to print the IBAN number of the customers on advices sent to the customers involving the account class, you can enable the Display IBAN in Advices option by checking it.
Your specification will be made applicable to all customers linked to the account class. You will be allowed to change this option for a specific account.
Note
IBAN Account numbers for specific customers can be captured while defining a specific account through the IBAN Sub-screen of the ‘Customer Account Maintenance’ screen.
Dual Ccy Deposit
Check this box to enable the account class for Dual Currency Deposit (DCD) type.
Dual Currency Deposit (DCD) is a short-term currency-linked deposit that allows you to earn a higher interest rate than regular time deposits.
Note
You will be allowed to check this field only for ‘Deposit’ Account Type. If this box is checked for other Account types, system throws an error.
The reporting of all turnovers of the particular account class will be directed to the GL that you identify as the natural GL. Based on the characteristic of the account balance; you can specify whether the turnover is to be posted to the Debit GL or to the Credit GL. For instance, if the account class is for overdrafts, the balance is normally a debit whereas current accounts normally do not have a debit balance.
Applicable Customer Status
Specify the applicable customer status from the drop-down list. The available options are:
- Major
- Minor
- Both
- Not Applicable
Note
- By default ‘Not applicable’ option would be selected when a new account class is created.
- If you select ‘Minor’ option at the CIF level and ‘Applicable customer status’ as ‘Major’ at the account class level then the system displays an error message as “The A/c class you selected is for major customer.”
- Similarly if you uncheck ‘Minor’ option at the CIF level and select ‘Applicable customer status’ as ‘Minor’ at the account class level then the system displays an error messages as “The A/c class you selected is for minor customer”
Specifying Liquidation Preferences for Debit Interest and Charges
You must specify the liquidation preferences for debit interest and charges, for those accounts classes where interest/charge has to be debited from a Receivable GL before actually debiting the customer account. This feature is applicable only for the debit interest and any charges on the account calculated through the IC module. The preferences that you need to specify are:
- Liquidate Using Receivable - Indicates whether receivable tracking is required for IC Debit interest and IC charges
- Debit Notice – enabling this option indicates that a notification needs to be sent to customers before debiting the customer account for the interest / charge calculated for the period.
- Liquidation Days – specifies the number of working days from the actual liquidation date before the interest/charge can be liquidated into the customer account. Working days are calculated on the basis of the Local Holiday Calendar.
- Liquidation Mode – debit interest or charges can be liquidated either Manually or Automatically. If you choose the automatic mode of liquidation, debit interest or charges are liquidated automatically as part of the BOD process on the liquidation date. However, after having specified Auto as the mode of liquidation, if you wish to liquidate them manually for a specific account, the System intimates you with an override message. Manual interest liquidation can be triggered through the ‘Debit Interest Liquidation’ screen. Manual liquidation is recommended during Account Closure.
- Verify Funds –enabling this option indicates that an available balance check should be performed for receivable tracking. As a result, the System performs the available balance check before debiting the account. The available balance also includes the limit amount. Verification of funds is applicable only in the case of Auto-Liquidation. If you leave this option unchecked, the System performs a ‘force-liquidation’ regardless of whether the account has sufficient funds or not.
Note
- You will not be allowed to change these preferences at the account level. However in the Amounts and Dates section of the ‘Customer Accounts Maintenance’ screen, both the total debit interest due as well as the charges due, are displayed.
- If there is any outstanding interest or charges on the account, the outstanding amount is displayed as an override while saving the transaction involving the account.
- While closing an account closure, the System verifies whether there is any outstanding debit interest or charges on the account. You will need to liquidate these before Account Closure.
An error log is created to store the error details of accounts for which liquidation could not be performed due to the following reasons:
- The Verify Funds option is enabled and partial liquidation is performed
- The Verify Funds option is enabled and the account has insufficient funds
- Accounting entries do not get passed successfully irrespective of whether the Verify Funds option is set or not.
Refer the End of Day processing for Debiting Receivable GLs section in the Daily Processing of IC chapter of the IC User Manual for details on end of day processes on Auto and Manual liquidation.
Maintaining Details for Free Banking
For account classes for which a free banking period is being provided, you can indicate the free banking parameters. These include:
- The number of days after the account opening date, for which no charges would be levied on the account. This is the free banking period. Charging for the account would commence when the free banking period has elapsed.
- Whether an advice (charge start advice) is to be sent to the customer, indicating the commencement of charging on the account
- The number of days before the charge start date, the charge start advice is to be sent to the customer, indicating the commencement of charging on the account.
Specifying Initial Funding Preferences
You need to specify the following details pertaining to initial funding for opening accounts under the account class.
Event Class Code
Specify the event class code maintained for initial funding process for the module code ‘DE’. This adjoining option list displays all valid event class codes maintained in the system. You can choose the appropriate one.
Charge Role to Head Code
Specify the class code that you wish to use for posting charge-related accounting entries for initial funding. This adjoining option list displays all valid class codes maintained in the system. You can choose the appropriate one.
Refer the section ‘Maintaining Event Class for Account Initial Funding’ in the chapter titled ‘Creating Classes’ under Modularity User Manual for further details about the event class code.
Maintaining Provisioning Details
When you define an account class, you can specify whether provisioning is applicable for accounts using the class. You can make the following specifications in the Provisioning Details section in the ‘Account Classes’ screen:
- Auto Provisioning Required - Check this box if provisioning is applicable
- Provision Frequency - Frequency at which the provisioning would be done, either daily or monthly
Note
The frequency you define here is only applicable if you have indicated individual account-wise status processing for accounts in the Branch Parameters. If you have indicated status processing at Group/CIF level, then the provisioning batch process executes at the frequency maintained in the ‘Branch Parameters’ screen for your branch, and not at the frequency maintained in the Account Classes screen.
- The currency in which the provisioning amount must be calculated – either account currency or local currency
- Default exposure category for accounts using the account class
- Event class for which the provisioning accounting entries would be defined
The specifications you make here are inherited by any account that uses the account class.
In addition to these preferences, you must also indicate:
- The accounting roles and heads representing the GLs to which the accounting entries for provisioning must be passed, for each account status
- Whether provisioning entries for an account must be rebooked when provisioning is done after an automatic status change for the account
You can maintain these details for each account status in the ‘Status Details’ screen.
Maintaining Escrow Details
The following Escrow details can be maintained for the account class:
Escrow Transfer Applicable
Check this box to enable Escrow transfer for the accounts belonging to the selected account class.
Transaction Code
Select the Transaction Code to be used for Escrow transfer from the adjoining option list. The option list displays only those transaction codes which are not enabled for Escrow processing at the ‘Transaction Code Maintenance’ screen.
Note
This is a mandatory input if Escrow transfer is enabled for the account class.
Transaction Code for Reversal
Select the transaction code to be used for Escrow Reversal transactions from the adjoining option-list. The option list displays only those transaction codes which are not enabled for Escrow processing at the ‘Transaction Code Maintenance’ screen.
Note
During account class amendment, the system does not allow you to disable Escrow process for an account class if a Project account has been created using that account class.
Cash Deposit Limit on Trust Account
If you have checked the box ‘Escrow Transfer Applicable’, you will have to specify the maximum cash that can be deposited in the Trust accounts under this account class.
Maintaining Required Sweeps
Sweep in can be initiated for a CASA account if the balance is insufficient. This sweep in process is applicable for all modules of Oracle FLEXCUBE and Channel which initiated the debit transaction on the CASA account.
Enable Sweep in
Check this box to enable sweep in.
Enable Reverse Sweep in
Check this box to enable reverse sweep in. You can check this box only if the ‘Enable Sweep in’ check box is checked. If the check box is checked without checking ‘Enable Sweep in’, the system disable saving, current account class creation and amendment of the account class.
The system defaults these values at account level and are not modifiable for auto deposit accounts. However, the vice verse is applicable.
You can modify these check boxes at CASA and Term Deposit Account Class levels as part of Account class amendment, only if no active accounts are available under that account class. If active accounts are available, the system will disable modification of ‘Enable Sweep in’ and ‘Enable Reverse Sweep in’ check boxes at account class level.
Consider Primary Account Minimum Balance for Sweep
Check this box to consider primary account minimum balance for sweep.
If you modify or save an account class maintenance with ‘Enable Sweep in’ as unchecked and ‘Consider Primary Account Minimum Balance for Sweep' as checked, then the system displays an error message as ‘Consider Primary Account Minimum Balance for Sweep can be enabled only if Enable Sweep in flag is checked’.
During a debit transaction if the available balance for the primary account is below the minimum balance and ‘Consider Primary Account for Minimum Balance Sweep’ is checked at account class level then the system does the cover account sweeps as follows:
- The amount to be swept is arrived at considering the minimum balance requirement of the primary account.
- The system transfers the shortfall from the cover accounts without considering the minimum balance requirement of cover accounts.
- If the primary account or cover account is below minimum balance, then the system displays override message.
Considering the minimum balance requirement of primary account will remain at the cover account sweep level and will not be applicable for sweep from auto deposits or term deposits.
If ‘Consider Primary Account Minimum Balance for Sweep’ is checked, reverse sweep for all linked accounts considers eligible amount for reverse sweep after keeping the minimum balance of primary account.
3.1.3 Statement Parameters Tab
For each account class that you maintain you have the option of generating account statement details, periodically, for all customer accounts associated with the account class.
If you need to generate account statements that would need to be sent across multiple media, generated at different frequencies, you can define up to three different frequencies at which the statements could be generated, with a primary, secondary and tertiary frequency.
Click ‘Statement Parameters’ tab to invoke the screen for maintaining these details. The screen is displayed below:
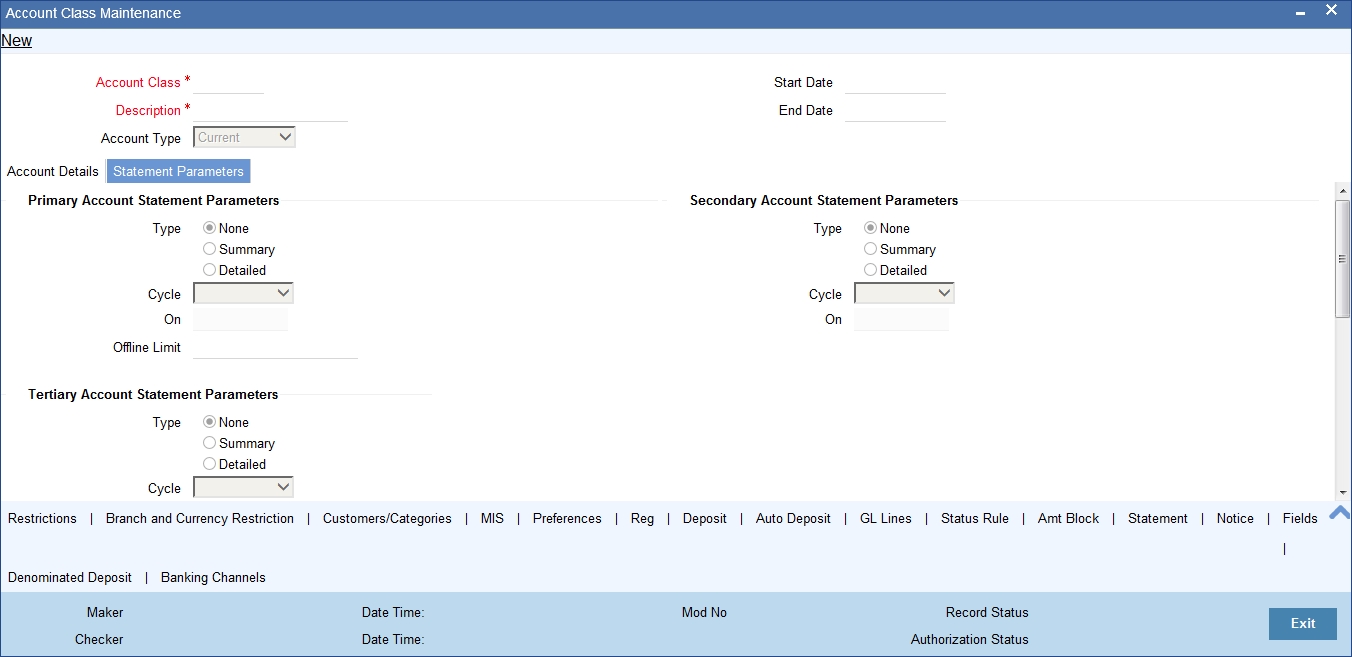
As part of specifying the account statement preferences you can indicate the following for each of the statements, whether primary, secondary or tertiary:
Type
The first preference that you specify for each account class is to indicate whether the periodic generation an account statement is required. If the generation of an account statement is necessary, you have to specify the format in which it is to be generated. The options available are:
- Detailed – indicating that the statement should be a detailed account of all the customer transactions within the account class.
- Summary - indicating that only a summary of the transaction details is enough.
- None – indicating that neither a summary nor a detailed account of transactions is required.
Cycle
The system generates the account statement details at a frequency that you specify. The frequency can be:
- Annual
- Semi-annual
- Quarterly
- Monthly
- Fortnightly
- Weekly
- Daily
If you indicate that the statement generation frequency is weekly, you should also indicate the day of the week on which the account statement is due. Similarly, for a monthly statement you should indicate the day of the month.
To specify the frequency for a monthly statement you can specify a number between 1 and 31 (corresponding to the system date). If you set the statement date to 30, then account statements will be generated on:
- The last working day for months with < 30 days.
- For months with 30 days on the 30th; if 30th is a holiday on the next working day.
If you set the statement date to 31, then account statements will be generated on:
- The 31st, for month with 31 days; if 31st is a holiday on the next working day.
- The last working day for months < 31 days.
For all other cycles, account statement would be generated on the last day of that cycle.
Offline Limit
This is the limiting amount till which transactions will be carried out between account(s) for the account class you are defining here, between branches when the database connectivity is not functional.
Enter the off-line limit here.
Note
- If you are defining primary, secondary and tertiary statements, the frequency for each must be different and unique; for instance, if you define a monthly primary statement, you cannot define a secondary or tertiary statement with a monthly frequency.
- Offline limit is maintained only for primary level.
Document List
Specify the following details:
Document Type
Specify the document type. The adjoining option list displays all the document types that are maintained in the system. You can select the appropriate one.
Customer Type
Specify the customer type. The adjoining option list displays all the customer types that are maintained in the system. You can select the appropriate one.
Mandatory
Check this box to indicate that the document specified here is mandatory.
Note
The document list is defaulted in the account based on the customer type. If any document is mandatory at the account class, then that document is captured and checked in the ‘Account Class Maintenance’ screen otherwise the system does not allow saving the account.
Document Notification Details
Send Notification
Check this box to indicate whether to send notifications or reminders for not submitting the mandatory documents.
Frequency (Notification)
Specify the frequency of notification to be sent from the adjoining drop-down list. The frequency can be one of the following:
- Daily
- Weekly
- Monthly
- Quarterly
- Half yearly
- Yearly
Days (Reminder)
Specify the number of days left for the expiry or submission due date of the documents for sending the reminder.
Maintaining Cheque Book Preferences
Oracle FLEXCUBE provides you with the facility to automatically trigger the reorder of Cheque Books for all accounts reporting to a specific account class. However, you have the option of changing your preferences at the account level also.
To facilitate automatic reordering of Cheque Books, you have to maintain the following details:
Cheque Book
To indicate that automatic reordering of cheque books should be allowed and for specifying the details for the same, you have to check this option. If not selected, you will not be able to maintain the automatic reordering preferences for the account class.
Auto Reorder of Cheque Book
You have to select this option to specify that automatic reordering of Cheque Books is required for all accounts reporting to this account class. This field will be enabled only if you have checked the ‘Cheque Book’ option explained above.
Reorder Level
Here, you have to indicate the level at which the reordering of Cheque Book should happen. Automatic reordering will be set off by the system when the unused number of cheque leaves becomes equal to or less than the re-order level that you maintain here. This field will be enabled only if you have indicated that automatic reordering of Cheque Books is required i.e. the ‘Auto Reorder of Cheque Book’ option is checked.
Reorder No of Leaves
In this field you have to specify the number of leaves that should be ordered for the new Cheque Book. This field will be enabled only if you have checked the ‘Auto Reorder of Cheque Book’ option.
Max No. of Cheque Rejections
Specify the maximum number of cheque rejections that can be allowed for an account.
3.1.3.1 Processing Automatic Reordering of Cheque Books
The automatic reordering of Cheque Books is processed at EOD by executing a batch function.
The following conditions should be satisfied for initiation of automatic reordering:
- The ‘Auto Reorder of Cheque Book’ option is turned on at the account level
- The number of unused check leaves for the account is less than or equal to the reorder level maintained at the account level. The system will pick up the number of leaves to be reordered from the field ‘Reorder Number of Leaves’ maintained for the account.
The numbering of cheque leaves for the new Cheque Book will depend on the ‘Cheque Number Unique for Branch’ option in the ‘Bank Parameters’ screen. If this option is checked, the numbering will begin from the Last Number + 1 of the Cheque Book that was delivered last to any account. If you do not select this option, the number will start from the Last Number +1 of the Cheque Book delivered to the same account previously.
The value of ‘Include for Cheque Book Printing’ and ‘Cheque Type’ (specifications defined in the ‘Cheque Book Details’ screen) will be defaulted from the previous order of the Cheque Book.
Capturing Details about Specially Designated Nationals
Specially Designated Nationals (SDN) are those customers with whom you need to refrain from trading in any form. The US government publishes a list of such nationals and circulates this list among banks and other financial organizations. You can to maintain the details of SDNs in Oracle FLEXCUBE.
The details of Specially Designated Nationals are updated and published by the US government on a regular basis. You could download these details from their web site. You have two options to replicate the contents of this file into Oracle FLEXCUBE. They are:
Upload the file into Oracle FLEXCUBE through the SDN Upload screen.
Maintain the details of each SDN manually.
Both these options have been elaborated upon in the subsequent sections.
3.1.3.2 Maintaining SDN Details Manually
Through the ‘Specially Designated Nationals’ screen you can capture the details of SDN customers manually. Invoke this screen, by typing ‘STDSDNMN’ in the field at the top right corner of the Application tool bar and clicking the adjoining arrow button.
The screen is as shown below:
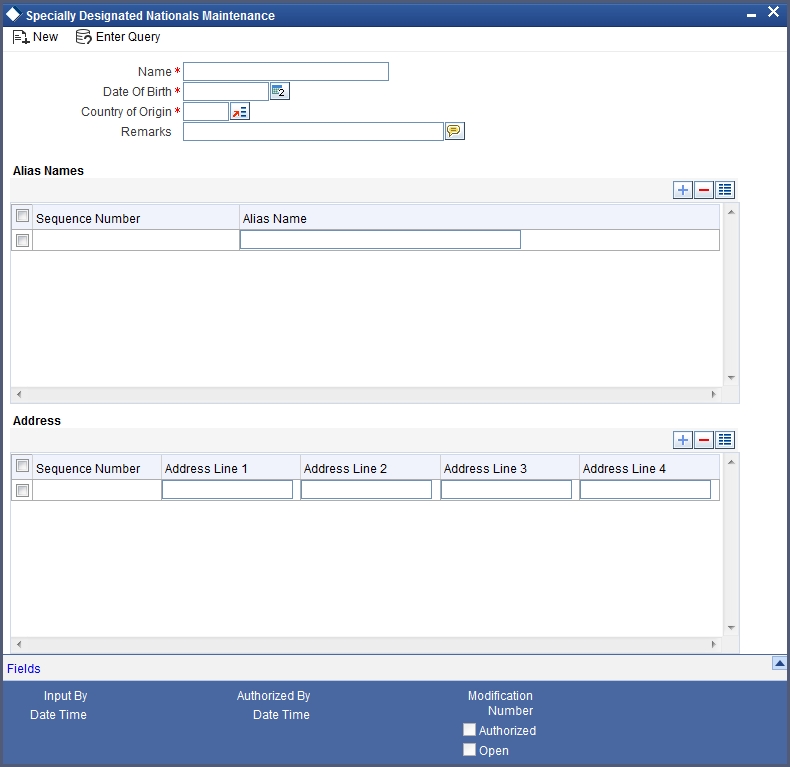
The following details have to be captured:
- Name of the Specially Designated National
- Date of Birth of the SDN: Specify the Date of Birth of the SDN in YYYYMMDD format
- Country of Origin: You can specify the SDN’s country of origin by selecting the same from the option list provided
- Remarks: Any additional remarks, if required can be specified
- Alias Names of the SDN: You can specify a maximum of fifteen alias names
- Addresses of the SDN: You can specify a maximum of fifteen addresses (of address line 1 to address line 4) for a SDN
3.1.4 Preferences Button
Preferences are the options or attributes that uniquely distinguish an account class. You can specify the preferences of an account class in the ‘Preference’ screen. To invoke this screen, click ‘Preferences’ button in ‘Account Class Maintenance’ screen.
The screen is as shown below:
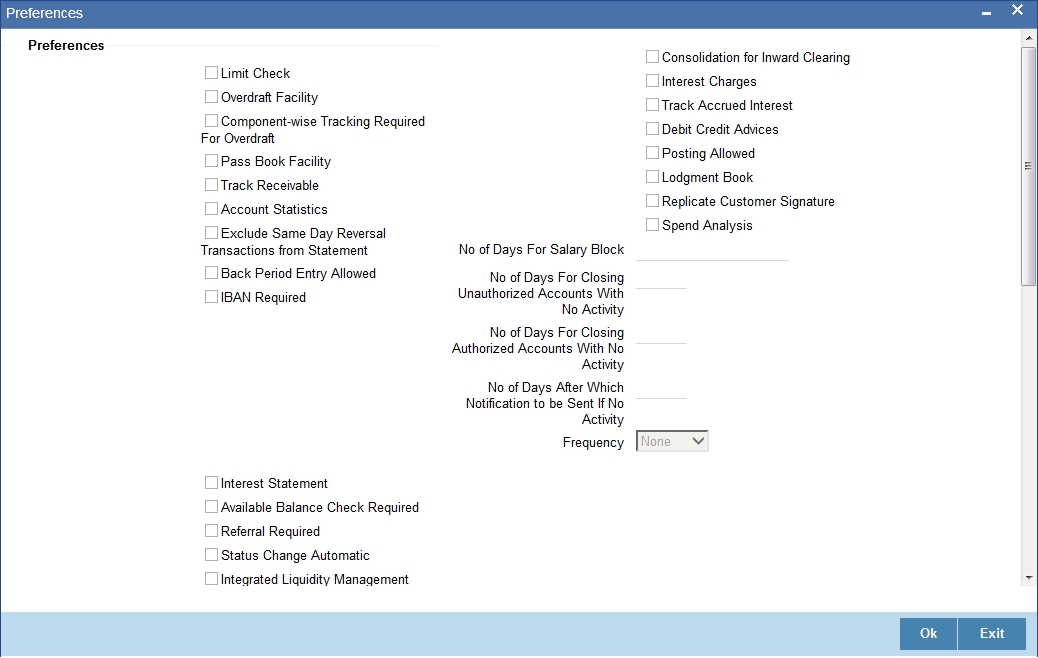
The following are the preferences that you can specify for an account class:
- Limit Check – you can check this box to indicate that a limit check for sufficient availability of funds in the account will be made for all accounts belonging to the account class
- Overdraft Facility – if checked indicates that all accounts belonging to this class would be allowed an overdraft facility (facility to draw a specified amount over and above the balance in the account)
- Component-wise Tracking Required for Overdraft - check this box to indicate if Component-wise tracking is required or not. If component wise tracking required for overdraft is checked and no appropriation sequence is maintained in status rule, then the system displays an error message on save. You cannot modify this once the account class is authorized.
- Interest Charges – if checked indicates that for interest and charges computation the Interest and Charges module will process accounts linked to this class.
- Track Accrued IC – if checked, indicates whether accrued interest in the Interest and Charges module on an account linked to this class, would be considered while computing credit utilization for the account.
- Passbook Facility – if checked, indicates that accounts linked to the account class are issued passbooks.
- ATM Facility – if checked, indicates that accounts linked to the class will avail the ATM facility
- Direct Banking Facility - if checked, indicates that accounts linked to the class will avail Direct banking facility.
- Daylight Limit – if checked indicates that you can specify daylight overdraft limit for all the accounts belonging to this account class. While modifying the maintenance, if you uncheck this box, the daylight overdraft limit will be made zero for all the accounts belonging to this account class.
- Debit/Credit Advices – If checked, indicates that for all accounts belonging to this class, the system will generate a debit/credit advices on interest liquidation. The advices are generated during end of day processing in SWIFT or/and MAIL format. You can also specify this preference through the ‘Special Conditions’ screen.
- Track Receivable – if checked, you can choose to block the subsequent credit that happens to the settlement account (linked to this account class) of a loan contract or retail teller contract, if the system detects insufficient funds in the account, during liquidation. In other words, the system will track the account for receivables (credits). As and when a credit happens, the funds will be allocated to the loan or the retail teller contract for liquidation.
- Posting Allowed – This check box is checked by default. Uncheck this check box to setup Monetary Accounts for the selected Account Class.
This check box is provided to handle IRA Monetary Accounts. Using this facility, you can avoid posting into the IRA Monetary Accounts from Teller/Journal screens and ensure that the details are computed only through IRA subscriptions.
Note
Uncheck this checkbox only for specific Inter-Branch Accounts.
- Available Balance Check Required – Check this box to enable the system to check for the available of funds before posting a debit entry to a customer account.
- Referral Required - enabling this option indicates whether a referral check should be performed on accounts belonging to the account class. Consequently, the system checks the available balance (not the current balance) while performing the referral checks for all transactions involving the account. If a transaction involving the account results in the account moving to overdraft, the account and transaction details will be sent to the Referral Queue.
- Lodgement Book - If you wish to allow orders of lodgement books for all accounts that use an account class, you can indicate so, in the ‘Account Class Maintenance’ screen, by selecting the Lodgement Book option.
- Back Period Entry Allowed – if checked, indicates that back-valued entries can be posted to account belonging to the class as long as the account is open. You will be allowed to change this specification for a specific account.
- IBAN Required - Check this box if IBAN is required for the account class.
Note
IBAN Required is restricted for TD and Nostro account class. The system displays an error message if user defines IBAN Required for Nostro or TD account.
- Integrated Liquidity Management – check to indicate that the accounts created under this account class would be part of an ILM Structure.
- Large Debit Balance Tracking Required – Check this if you require large debit balance tracking for the account class.
- Defer the Balance Update - Check this box to defer the balance update. If ‘Defer the Balance Update’ is checked, then the balance will be updated during EOD.
While posting back-valued transactions, the System verifies whether the Back Period Entry Allowed option has been enabled for the account class. If the option has not been enabled an error message is displayed. This check is also performed while uploading journal entry transactions.
Replicate Customer Signature
Check this box to indicate that customer signature should be replicated. On checking this option, the signature of the customer gets defaulted to account level.
Spend Analysis
Spend analysis classifies the debit transactions from an account under different spend classes. Check this box to enable spend analysis for the accounts that are associated with this account class.
If you check this box, the system allows you to enable spend analysis at the account level. However, you can disable spend analysis for individual accounts by unchecking the checkbox ‘Spend Analysis’ at the account level.
If you do not check this box, the system disables spend analysis for all accounts associated with this account class. In that case, you cannot enable spend analysis at the account level.
Note
You can modify the status of this checkbox. While modifying this, the system verifies whether spend analysis is enabled for any customer account associated with this account class. If spend analysis is enabled for a customer account, the system will not allow you to modify this option. In that case, you need to disable it at the account level first and then modify the status for the account class.
No. of Days For Salary Block
Specify the number of days for salary block. At the time of salary credit in to a customer account, the system will place an amount block for the number of days specified here from the date of salary credit. The amount blocked will be equal to the loan instalments due during this period.
No of days for Closing Unauthorized Accounts with No Activity
Specify the number of days after which the unauthorized accounts without any activity should be automatically closed.
No of days for Closing Authorized Accounts with No Activity
Specify the number of days after which the authorized accounts without any activity should be automatically closed. This is applicable for Term Deposits as well.
No. of Days after which Notification is to be sent if No Activity
Specify the number of days after which a notification needs to be sent to the channels if the account is inactive. If the account is inactive for the particular period of time as mentioned in this field, then the account is closed by the system and the funds will be transferred as per the maturity instructions.
Frequency
Select the frequency at which notifications need to be sent from the drop down list. The field needs to be mandatorily updated if a value has been entered in the ‘No. of Days after which Notification is to be sent if No Activity’ field. The list of values provided are as follows:
- Once
- Daily
- Weekly
- Monthly
- Yearly
This field needs to be mandatorily updated if the ‘No. of Days after which Notification is to be sent if No Activity’ field is updated with a value. If a value has been provided in the ‘Frequency’ field and no value is provided in the ‘No. of Days after which Notification is to be sent if No Activity’ field, then an error is displayed which states that a value needs to be in the No. of Days after which Notification is to be sent if No Activity’ field.
If these two fields have been updated, then a notification is sent to the channels only when a TD account is created with the ‘Goal Reference Number’.
Minimum ECA Block Amount
Specify minimum ECA block amount.
RT-Charge Product For Passbook Issue
Specify the RT product from the adjoining option list. The list displays all the active RT products. You can select the appropriate one.
Enabling Printing of Account Statistics
You can enable printing statistics in respect of accounts using an account class, either period code-wise or financial year-wise, for the following customer information:
- Low and High Balance for a period–The lowest and highest current balances for the period.
- Average credit and debit balance for a period–This is computed as the sum of credit/(debit) current balances in a period, divided by the number of days of credit/(debit) balance during the period.
- Credit and debit days–The number of days the account was in credit/(debit) balance in the period.
- Credit and Debit Turnover–The credit/(debit) turnover for the period.
- Excess days in debit balance–The number of days in a month when the account exceeded the overdraft limits.
- Overdraft Limit–This is computed by summing the temporary overdraft limit and the sub-limit of the account. For each month, this would represent the limit on the last date of the month.
- Credit grade of the Customer–This would be the prevalent rating on the last day of the period. For the current period, this information is provided up to the previous working day.
To enable printing of this information for all accounts using an account class, you must enable the Account Statistics option in the Account Class Maintenance.
For each account class for which account statistics has been enabled, an accounting End of Day (EOD) process updates the statistics table both period-wise and according to financial years. The book-dated balances are used for computation of statistics, and the balances are maintained according to accounting periods.
For information about viewing the period-wise account statistics, refer the section Querying on Account Statistics, found earlier in this chapter.
Status Change Automatic
If you check this option, the status of the account will be changed automatically by the system as per the conditions maintained in the ‘Status Rule Definition’ screen. If you do not select this option, you have to change the status manually through the ‘Manual Status Change’ screen. These screens are discussed in detail in the subsequent sections of this document. This specification will be defaulted to all the accounts reporting to this account class.
Exclude Same Day Reversal transaction from Statement
If you do not wish transactions booked and reversed on the same day to be reflected in the account statement, you can specify the preference here. This feature is applicable only for the customer account legs and not for the related GL legs. Also, reversals made through the DE module will not be considered for exclusion.
Your specification for this at the account class level defaults to all accounts involving the class. You can change it for a specific account.
For comparing transactions the System will look for similarity of reference number and date.
Consolidation for Inward Clearing
You need to indicate whether or not consolidation is required for inward clearing transactions in a batch at the Account Class level. The indication for this option is carried forward to the ‘Customer Account Maintenance’ screen. If this option is unchecked here, it cannot be checked in the ‘Customer Account Maintenance screen’.
3.1.4.1 Processing for Consolidation of Inward Clearing
During the Inward Clearing process, the consolidated entry for clearing will be passed according to the following grouping:
- Remitter’s Account
- Clearing Product
- Instrument Currency
- Remitter’s branch
- End point
A consolidated clearing entry will be passed using a separate Transaction Code maintained in the ‘Clearing Product Preferences’ screen. This Transaction Code should be set with Cheque Mandatory option as No in the ‘Transaction Code Maintenance’ screen.
One consolidated clearing entry will be passed for each of the above groups. Entries will be passed against a common reference no. generated for each of the groups. After the consolidated entry has been passed, each individual instrument will be processed separately to pass charge entries (if applicable) at the transaction level.
Specifying Turnover Limit Preferences
You can specify turnover limits for an account class and thereby monitor the turnover in all accounts linked to the account class.
Turnover Limit Code
Specify a turnover limit code that should be linked to the account class. The adjoining option list displays all valid turnover limit codes maintained in the system using the ‘Turnover Limit Maintenance’ screen. You can choose the appropriate one.
Passbook Compression Preferences
Compression Required
Check this box to specify that transaction compression is applicable to the accounts under the particular account class.
Limit for Unprinted Transactions
Specify the maximum limit for unprinted transactions that can be printed without compression.
Transaction Code
Specify the Transaction code to be used for printing the description for compressed entry on passbook. Alternatively, you can select the transaction code from the option list. The list displays all valid transaction code maintained in the system.
The ‘Limit for Unprinted Transactions’ and ‘Transaction Code’ fields will be enabled only if ‘Compression Required’ field is checked.
If ‘Compression Required’ field is checked, it is mandatory to maintain the values in ‘Limit for Unprinted Transactions’ and ‘Transaction Code’ fields, else the system will display an appropriate error message.
3.1.5 GL Lines Button
Current and Savings accounts that have not generated any interest over a specific period or have remained inactive with interest overdue may be identified as ‘NPAs’ (Non-Performing Asset). In Oracle FLEXCUBE, you can assign different status codes to an account class, which will be applicable to all the accounts under it. The accounts will move from one status to the other based on the number of days they have remained inactive in the system. The status of an account will determine whether the account should be marked as an NPA or not.
Further, you can also specify the reporting lines (for GL, Central Bank, and Head Office) to which accounting entries should be passed when an account moves from one status to the other. You can post all debit and credit balances of one account class to a single General Ledger account. Conversely, you also have the option of posting debits and credits to separate GLs.
The status codes and the reporting lines for each status may be defined in the ‘Status Details’ screen. Click the ‘GL Lines’ button in the ‘Account Classes’ screen to invoke it.
The screen is as shown below:
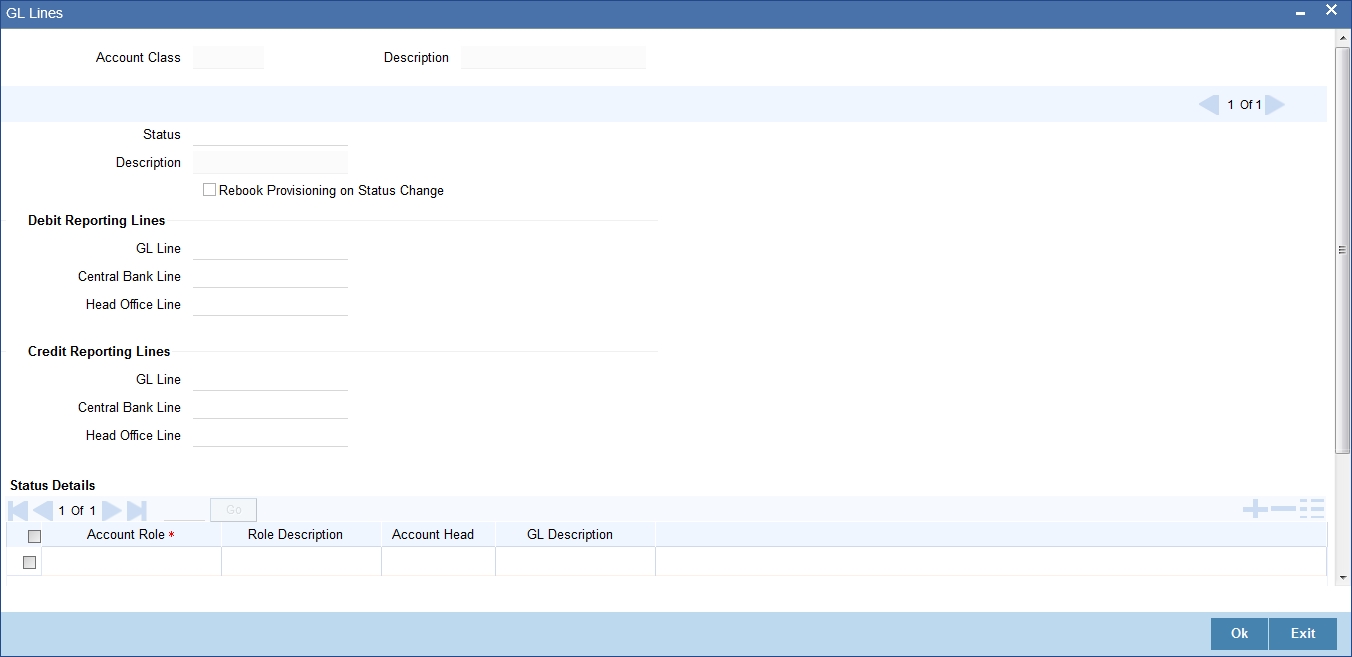
You can specify the following details in this screen:
Status
You can select the different status codes applicable to the account class, in this field. Use the Add icon to define each status and the attributes for the same. You can use the navigation icons to move from one status to the other.
Only status codes with status type ‘Account’ will be available in the option-list if the Status Processing Basis is defined as ‘Contract/Account’ for all branches, in the Branch Parameters. If the Status Processing Basis is defined as ‘Group/CIF’ level for any branch, then the statuses of type ‘Both’ are available. In this case, it is mandatory to link all the statuses defined.
On selection of the status, the associated description will be displayed alongside.
Specifying Reporting line Details
Dr and Cr GL Lines
Select the debit GL account, to which all debit balances within a specific account class will report to, when it moves to the status being defined. You can identify the debit GL from the list of existing GLs. Likewise, all credits within a particular account class will report to the GL account that you have identified to track credits.
Dr and Cr Central Bank Lines
Select the Central Bank Debit line to which all debit accounts belonging to an account class should report to when it moves to the selected status. You have maintained Central Bank Debit lines in the ‘Reporting Lines Maintenance’ screen. You can select the appropriate CB Debit Line from the available option-list.
Similarly, all accounts belonging to an account class, if in credit should report to a Central Bank Credit Line for the selected status. You can identify the CB Credit Line that should be associated with the status from the option-list available.
Dr and Cr Head Office Lines
This is the Debit Head Office GL maintained in the ‘Reporting Lines Maintenance’ screen to which all accounts belonging to this class will report, if they move to the status being defined.
Similarly, select the Credit Head Office GL maintained in the ‘Reporting Lines Maintenance’ screen to which all accounts belonging to this class will report to, when they move to the status being defined.
Note
As a mandatory requirement, you have to associate the status ‘NORM’ (Normal) when maintaining status codes for an account class.
Accounting Roles and Heads for Provisioning
In addition to the provisioning preferences that you specify for an account class, you must also maintain the accounting roles and heads representing the GLs to which the accounting entries for provisioning must be passed, for each account status. You can maintain this information in the ‘Status Details’ screen, when you define each of the status codes.
Rebook Provisioning on Status Change
In the ‘Status Details’ screen, you can indicate whether provisioning entries for an account must be rebooked when provisioning is done after an automatic status change for the account. Rebooking essentially means that fresh provisioning is done, after writing back the previous provisioning amount.
The provisioning batch process, when executed, not only computes the provisioning amount; it also records the current status of the account and checks whether the current status is different from the status that was prevalent when the process was previously executed. If so, the old provisioning amount is reversed (if the Rebook Provision option has been set in the Status Details), and the entries for the new provisioning amount are booked into the provisioning and write back GLs maintained for the current status in the Status Details.
If the Rebook Provision has not been set, there is no reversal of the old provisioning amount, and the differential provisioning entries are passed, as usual, into the GLs maintained for the new status.
3.1.6 Auto Deposits Button
Auto deposits are the linked deposit accounts to the savings accounts. These accounts are created once the threshold balance exceeds in the customer accounts. You can maintain these accounts using ‘Auto Deposits’ screen. Click the button ‘Auto Deposit’ in the ‘Account Class Maintenance’ screen to invoke it.
The screen is as shown below:
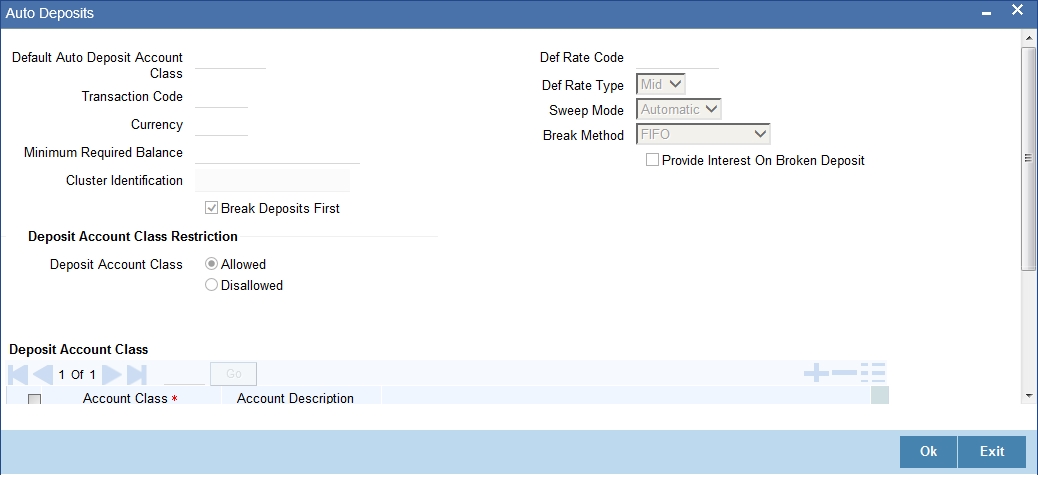
You have to specify the following fields in this screen.
Default Auto Deposit Account Class
Specify the deposit type of account class for the auto deposit account.
Transaction Code
Specify the transaction code (DPN - New deposit account) for the book event to trigger at the time of creation of auto deposit account.
Currency
Specify the currency in which the deposit account has to created.
Minimum Required Balance
Specify the balance that is required to be maintained at the linked savings account. If any balance exists beyond this balance in the account then the system creates an auto deposit account as part of batch process.
Cluster Identification
The system displays the cluster ID linked with the deposit account class linked to the saving account class.
Def Rate Code
Select the code of the differential rate; whether ‘Mid’ or ‘Standard’.
Def Rate Type
Select the type of differential rate code; whether ‘Mid’ or ‘Buy’ or ‘Sell’
Sweep Mode
Select the mode of sweep from the following options.
- Automatic - For the deposit to be created as part of the batch
- Manual - For the deposit to be created manually
Break Method
Select the method in which the break of auto deposit should happen, from the following options.
- MAXB - The system breaks the maximum valued deposit account or the deposit account having the maximum balance in order of descending amount.
- MINB - The system breaks the deposit account having minimum balance in order of ascending amount.
- FIFO - The system breaks the deposit account in order of chronological account creation date.
- LIFO - The system breaks the deposit account in order of reverse chronological account creation date (the latest created deposit account breaks first).
Provide Interest On Broken Deposit
Check this field to indicate the system to calculate interest on the deposits. This is done when the attached account class is mapped to the IC product.
Break Deposits First
Check this field to indicate the system to break the deposit accounts created and transfer the proceedings to the savings account. The system breaks the deposits when the savings account does not have sufficient balance to withdraw the amount.
In this case the system breaks the auto deposit account and restores the savings account with balance to allow withdrawing the money.
For example, the customer has the total balance in the account for $5675 including $650 as auto deposit. He withdraws $5500 from an ATM. As part of intraday batch (DESWPBAT), the system breaks the auto deposit account of $650 and restores the balance amount to savings. So his current standings would be $175 in his savings account and he does not hold any auto deposit account.
Deposit Account Class Restriction Details
You can set restrictions to the selected account class here:
Deposit Account Class
Select restriction type for the selected deposit account from the options. The following options are available for selection:
- Allowed – Select to allow account classes specified under ‘Deposit Account Class’ section.
- Disallowed Select to disallow account classes specified under ‘Deposit Account Class’ section.
While saving account class, the system validates if the Default Deposit Account Class mentioned in the Auto Deposit sub screen is part of the allowed list of Deposit Account classes. If the default deposit account class is not part of the allowed list, then the system will show an error message as “The Auto deposit account class is not part of the allowed list of Deposit Account Class".
Specifying Deposit Account Class
You can maintain the deposit account class details:
Account Class
Specify the account class for which you need to set the restrictions. The adjoining option list displays account classes which are active and authorized. Select the appropriate one.
Account Description
The system displays the description of the selected account class.
3.1.6.1 Handling Batches for AD Creation
The following batches are available in the system to handle batches for AD creation:
- DEDEPBAT – If AD instruction is maintained at account level, then the batch creates AD. If instruction is not maintained at the account level, then the batch creates AD based on account class level maintenance. Batch is maintained in DE module in the ‘End of Txn Input’ stage.
- DEAUTDEP – The system will create AD only if account level instructions are maintained. If not maintained, then AD will not be created for that account. Batch is maintained in IC module in the ‘End of Txn Input’ stage
- DESWPBAT – Intra day batch for AD creation.
3.1.7 Status Rule Button
If you have opted for automatic status change for all accounts belonging to an account class, you have to maintain the criteria based on which the system will bring about the status change automatically.
You can define the different criteria in the ‘Status Rule Definition’ screen. Click the button ‘Status Rule’ in the ‘Account Class Maintenance’ screen to invoke it.
The screen is as shown below:
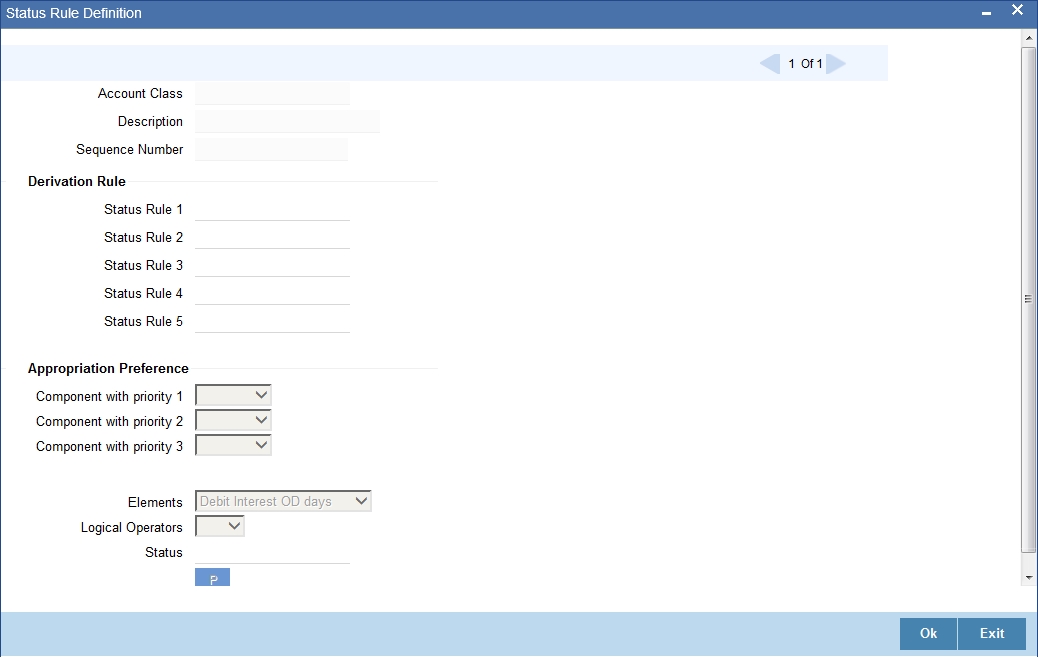
In this screen, you can define five conditions for each status applicable to an account class. An account will be said to be in a specific status if any one of the five conditions associated with the status holds true for an account. Conversely, if all the conditions are false, the account will automatically move to the next available status for which the condition is true.
The following elements are available based on which you can build a condition for automatic status change. You can associate each of these elements with an account, in the ‘Customer Accounts Maintenance’ screen.
The set of elements are as follows:
- Frozen
- Dormant
- No Debits
- No Credits
- Stop Payment
- Current Status
In addition, the following elements will also be available for processing:
- OD (overdraft) Days
- Inactive Days
- Overline Days
- TOD (Temporary Overdraft) Days
- Customer Classification
- Due Count
- Overdue Days
- Customer Credit Ranking
- Debit Interest Overdue Days
- Overdue Limit Breach Days
- Overdue Expiry Days
- Overdue No Credit days
- Principal Overdue Days
- Principal Overdue Amount
- Principal Overdue Local Currency Equivalent Amount
- Interest Overdue Days
- Interest Overdue Amount
- Interest Overdue Local Currency Equivalent Amount
- Charge Overdue Days
- Charge Overdue Amount
- Charge Overdue Local Currency Equivalent Amount
Appropriation Preference
You can define the appropriation sequence for overdraft accounts for each account status.
Appropriation sequence maintenance is mandatory if the ‘Component-wise Tracking for Overdraft’ is checked.The appropriation preference sequence can be modified anytime and this will be applicable for the existing accounts also.This modification will effect only for future credits and appropriation.
Component with priority 1
Select the component with first priority from the adjoining drop-down list. The options available are:
- Principal
- Interest
- Charge
Component with priority 2
Select the component with second priority from the adjoining drop-down list. The options available are:
- Principal
- Interest
- Charge
Component with priority 3
Select the component with third priority from the adjoining drop-down list. The options available are:
- Principal
- Interest
- Charge
Status Change for Overdraft Accounts
Oracle FLEXCUBE processes the status change for overdraft accounts based on the following rules:
- Debit Interest OD Days
- OD Limit Breach Days
- OD Expiry Days
- No Credit days
Debit Interest OD Days
The system processes the status change on overdraft account, if the customer fails to pay the debit interest of the overdraft account for specified number of days.
For example,
OD Utilization date: 01-Jan-2011
Days after which Status Change should happen: 90 Days
Debit interest due date: 01-Feb-2011
In this example, the system modifies the customer account status based on the status rule maintenance, if the customer fails to pay the debit interest by 02-May-2011.
OD Limit Breach Days
The system processes the status change on OD account, if the OD limit of the overdraft account is breached for a specified number of days. The system tracks the overdraft limit breach days based on the utilizations done at the line level.
OD Expiry Days
The system processes the status change on overdraft account, if the OD utilization of the overdraft account is not settled beyond the expiry date.
No Credit Days
The system processes the status change on OD account if there is no credit transaction into the overdraft account for a specified number of days.
Logical Operators
Logical Operators are indicators of certain conditions that you specify while building a rule. These operators are used in combination with the elements discussed earlier. The following is a list of logical operators that you would require to build a status rule:
Operator |
Description |
AND |
The conjunction ‘and’ |
OR |
The conjunction ‘or’ |
> |
Greater than |
>= |
Greater than or equal to (please note that there is no space between the two symbols) |
< |
Less than |
<= |
Less than or equal to (please note that there is no space between the two symbols) |
< > |
Not equal to (please note that there is no space between the two symbols) |
= |
Equal to |
Oracle FLEXCUBE allows data store for tracking of SOD debit interest due. During Interest liquidation for debit interest, the system populates the SOD Debit Interest Due Data Store with the Amount Due as debit interest for the SOD utilized amount and the due date of payment for the interest amount.
The debit interest due amount is adjusted in the SOD utilized amount and the system checks for any credit entries for the SOD corresponding to the debit interest. During EOD, if any credit entry exists for the account, then the system does adjustments on the amount due for the SOD debit interest due data store. The system also adjusts the debit interest payment against the oldest available debit interest due amount, and so on.
Oracle FLEXCUBE provides SDEs for ‘SOD Due Count’ and ‘SOD Overdue Days’ for status rule generation. During EOD while running the status update batch, the system calculates SDE ‘SOD Due Count’ value as the count of the records having due amount not equal to zero from the SOD debit interest due data store. The system updates the ‘SOD Overdue Days’ with the number of days since the last debit interest payment done for the account.
Oracle FLEXCUBE provides an account status called ‘DIDF’ for an SOD account, which is available as part of ‘Status Rule Screen’. If the ‘SOD Due Count ’or ‘SOD Overdue Days’ satisfies the condition specified in the status change rule, then the system changes the status for the account to ‘DIDF’.
While running the status change batch, the system updates the ‘No Debit’ flag as ‘Y’ for ‘DIDF’ status account. If payment for the debit interest happens on the SOD account against the utilized amount, and if on recalculation the value of SDE ‘SOD Due Count’, or ‘SOD Overdue Days’ is not met, the status batch changes the status of the OD account from ‘DIDF’ to the previous account status and updates the ‘No Debit’ flag as ‘N’.
Note
- Amount block is not considered because of the possibilities of simultaneous utilizations of the SOD.
- Any credit transaction towards the SOD account is tracked under interest due for the SOD.
- Any impact on account status after the execution of account status change batch for the day, gets reflected in the next EOD execution.
3.1.8 Amount Block Button
The allocation of funds will occur as per the product sequence you maintain in the ‘Product Maintenance’ screen invoked from the ‘Account Class Maintenance’ screen. Click the ‘Amt Block’ button to access this screen.
The screen is as shown below:
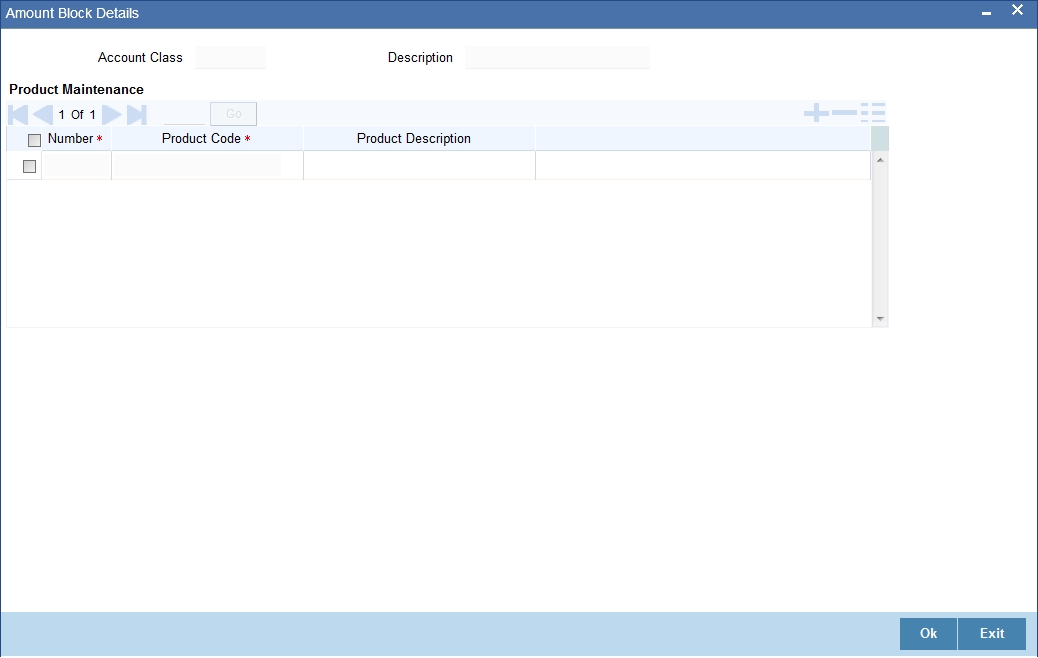
In this screen, you will specify the sequence of products based on which funds will be made available when a credit is posted to an account with a track receivable option. The sequence number is automatically generated by the system. All authorized products of your bank will be available in the option-list. On selection of the product, the product description will appear alongside.
Whenever a credit happens to an account with a track receivable option, the system will check if the account has any receivable being tracked against it. If yes, the amount is blocked as a receivable and this process continues until the amount needed for liquidation becomes fully available.
The batch process run as part of EOD/BOD will liquidate the loan contract or retail teller contracts.
If the amount received is not sufficient for full liquidation, then depending on the minimum amount required for liquidation, the system would initiate a partial liquidation for loans but for retail teller contracts liquidation will be initiated only when full amount is available.
The following example illustrates the manner in which the system will use the sequence for allocation of funds:
Assume that you have maintained the following product sequence for funds allocation:
Sequence No. |
Product |
1 |
ADBN |
2 |
LDBD |
3 |
ABCD |
The liquidation schedule dates for the various loan contracts are as follows:
Contract |
Liq. Schedule Dt. |
Liqd. Amt. (in USD) |
LDBD001 |
1st January 2002 |
1000 |
LDBD002 |
1st January 2002 |
500 |
ADBN001 |
2nd January 2002 |
1000 |
ABCD001 |
2nd January 2002 |
500 |
Further, all contracts are marked for auto liquidation and the settlement account for all contracts is A1. The balance in account A1 as on 1st January 2002 is 500 USD.
Action |
Details |
Batch liquidation run as part of BOD/EOD on 1st Jan. |
Liquidation does not occur as the system detects insufficient funds in A1 (only 400 USD). The account is marked for receivable tracking and a block is placed on 400 USD. |
A credit of 500 USD to A1 on 2nd Jan. |
The total amount blocked gets updated to 1000 USD. Since we have two contracts involving the same product (LDBD) maturing on the same date, funds will be allocated to the first contract, LDBD001 (based on the Contract Reference Number). Subsequent credits to the account will be used towards loan LDBD002. Since contracts with LDBD have earlier schedule dates, funds will be allocated to them though, as per the product sequence, contracts with ADBN should receive the funds first. The liquidation schedule date takes precedence in this case. Further credits to account, A1 will be allocated against the contract ADBN001 followed by the contract ABCD001. This will be based on the product sequence number since both contracts have the same schedule dates. Within a contract, allocation of funds towards the various components like interest, penalty interest etc. will be determined by the ‘Liquidation Order’ maintained for the loan product. To sum up, the schedule date of the loan contract takes precedence followed by the product sequence and finally the liquidation order. |
Note
If insufficient funds are detected in an account with a receivable tracking, the system will trigger the event ‘LBLK’ indicating that enough funds are not available and that subsequent credits made to the account will be blocked as a receivable.
3.1.9 Restriction Button
You can place restrictions on transactions involving customer accounts, at the account class level. As discussed earlier (for customer account), these restrictions get defaulted to all accounts that are linked to the account class. But you are allowed to change these restrictions for individual accounts as well.
To maintain the restrictions click the ‘Restriction’ button in the ‘Account Classes’ screen. The ‘Product and Transaction Codes Restriction’ screen is displayed
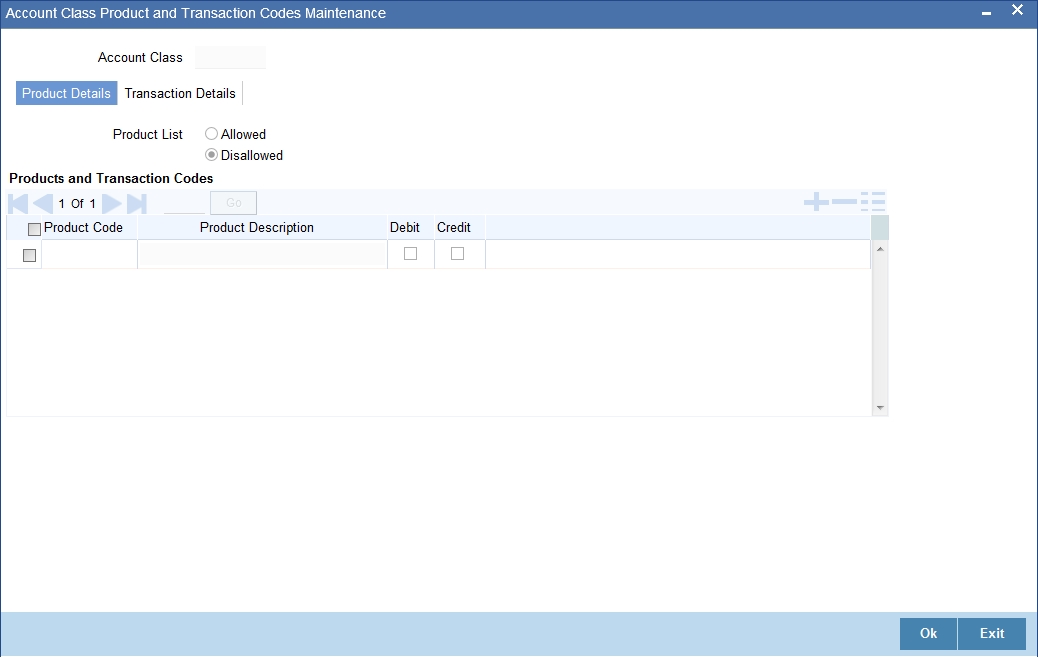
The restrictions can be based on:
- Products
- Transaction Codes
Validation of Restrictions
During maintenance or online operations, in the respective contract screens for the restricted transactions, when you specify the customer account, the system checks whether the account class used by the specified account is restricted for the product that has been selected, or the debit/credit transaction type. If so, an override is sought when such contracts are saved.
3.1.10 Statement Button
To receive the details of account balances you need to capture the relevant information in the MT 941/MT942 message. The account balance details can be linked to the message by employing the statement screen. To invoke this screen click on the ‘Statement’ button, in the ‘Account Class Maintenance’ screen. You need to specify the details for an MT 941/MT942 message.
The screen is as shown below:

This screen contains the details necessary for the account generation parameters. The message details the balance of an account or group of accounts under a particular account class. The account balances indicate the condition of the account for an identified time period.
Specifying Interim Transactions Report
Generate Message
Check this box to indicate that the accounts belonging to the account class are to be considered for periodic interim statement generation i.e., MT942.
Generate Message Only On Movement
Check this box to indicate that the interim statement needs to be generated only if additional entries have been posted subsequent to the previous interim statement generation.
Report Transaction Since
This is a list of all the transactions the accounts under a class have undergone, on basis of which the transactions would be reported in the interim account statement. You can choose the appropriate values applicable:
- Previous MT942: This indicates that all transactions posted and authorized since previous MT942 would be sent in the current interim statement
- Previous MT940/MT950: This indicates that all transactions posted and authorized since previous MT940/MT950 would be sent in the current interim statement. If this option is selected, user will have to specify the cycle of account statement to be considered.
Minimum Debit (Debit and Credit) Amount and Currency
Specify the minimum transaction amount for the debit transaction, which is eligible for reporting in the interim statement. This amount should be qualified by a currency. The amount for the corresponding account currency will be defaulted from here while opening the account.
If you do not specify the minimum credit amount, the system will consider the minimum debit amount specified here for reporting the credit transactions also.
Minimum Credit Amount and Currency
Specify the minimum transaction amount for the credit transaction, which is eligible for reporting in the interim statement. This amount should be qualified by a currency. The amount for the corresponding account currency will be defaulted from here while opening the account.
Generate Balance
To indicate that accounts under certain account classes are to be considered for generation of their balance messages, check this box. The valid values for this action are Y and N.
Of
Select the mode of message for balance generation form the option list
Report Transaction Since
This is a list of all the transactions the accounts under a class have undergone, in the interval of balance messages generated for the accounts under the respective classes. You can choose the appropriate values applicable:
- Previous MT940: This indicates all transactions posted and authorized since the issue of a previous MT 940 in the current balance report.
- Previous MT941: This indicates all transactions posted and authorized since the issue of a previous MT 941 in the current balance report.
- Previous MT950: This indicates all transactions posted and authorized since the issue of a previous MT 950 in the current balance report.
You can synchronize the time instance by hours for generation of balance messages by clicking the ‘Times’ button.
This screen is employed to indicate the the time instance in hours for the generation of the balance reports.
Message Generation Time
Specify the timing for generation of the MT 941/MT942 messages. You can specify the time interval in hours only.
A new message type is created for the balance report process which can be run as part of a scheduled task. This message type is ACST_BALANCE and ACST_INT_DTL.
3.1.10.1 Balance Statement Handoff
The balance statement can be handed off as part of scheduled task under Oracle. You need to assign its frequency in hours. This process is initiated for all accounts requiring a balance account statement. As discussed previously the time for generation of the statement is determined and specified. In case of no subsequent transactions reports, the statement is not generated.
3.1.10.2 Assigning Balance Statement as Job
The balance statement can be facilitated to run as part of a scheduled job as part of the Oracle jobs initiated during processing.
The ‘Jobs Browser’ screen of the application provides you the facility to run the balance statement as a synchronized task, subject to specified time intervals in hours.
Invoke the ‘Jobs Browser’ screen from the application typing ‘CSSJOBBR’ in the field at the top right corner of the Application tool bar and click on the adjoining arrow button.
The screen is as shown below:

In the above screen, you can base your queries on any or all of the following parameters and fetch records:
- Job Module
- Status
- Process
Select the option ‘Generate Balance Report’ from the Process option list. All associated accounts of the particular branch that have been marked for generation of balance statements are procured by Oracle FLEXCUBE.
Select any or all of the above parameters for a query and click ‘Search’ button. The records meeting the selected criteria are displayed.
System displays the following details pertaining to the fetched records:
- Job Module
- Process
- Process Sequence Number
- Status
The debit and credit accounts considered since the previous issue of an MT 941 are picked for the current processing. The previous messages are based on the parameters maintained for each account. This processing produces details of the statement generation.
3.1.10.3 Generation of Ad hoc Reports
Balance reports for each account under an account class can be generated on an ad hoc basis. The Ad Hoc report generation screen is used for capturing details of a balance report sent ad hoc. You can invoke this screen by typing ‘ACDADCRP’ in the upper right corner of the application toolbar, and clicking the arrow adjacent it.

Branch Code
The branch to which the account marked for balance report generation belongs is displayed; you cannot change or modify this value.
Account
Select the account which has been identified for generation of a balance statement, from the option list. The account balance of this account is generated as an outgoing statement.
Swift Message Type
Select the type of message required to be sent. As the message is a balance statement, select MT941/MT942.
Click on the ‘Generate Statement’ button to initiate the generation of balance statement for the account you have selected. This process would pick up the entire debit and credit component accounts created since the issue of a previous MT941, MT942, MT950 or MT940 are included in the generated statement.
You can examine the details of the generated message, to ensure that all details entered are correct. Click on the ‘View’ button, to observe the outgoing message.

You can examine the message for ensuring the information entered is complete. You can only view the details of the message; no input of additional information is supported at this stage.
3.1.11 REG Button
For an account class, you can define whether the Regulation D limits are applicable, and the period over which the limits would be applicable. In the ‘Account Class Maintenance’ screen, click the ‘REG’ button to invoke the ‘Reg Details’ screen. You can specify the Regulation D applicability details in this screen.
If you indicate the periodicity of Regulation D applicability as ‘Statement Cycle’, the restricted transactions would be counted over the primary statement cycle defined for the account class.
The Regulation D applicability details specified for an account class would default to all accounts using the class.However, you can make changes to these details when you set up a customer account that uses the account class.
3.1.12 Branches/Currencies Button
In addition to what you have specified in the ‘Account Class Maintenance’ screen you have the option of specifying the following for an accounts class:
- List of allowed or disallowed branches and allowed or disallowed currencies
- List of allowed and disallowed customer categories and allowed and disallowed customers
You can specify the branch and currency preferences through the ‘Account Class – Branch and Currency Preferences’ screen.
Click ‘Branches/Currencies’ in the ‘Account Class Maintenance’ screen. The ‘Account Class – Branch and Currency Preferences’ screen will be displayed.
The screen is as shown below:

In this screen you can specify the following for an account class:
- Those branches to which all parameters defined for this account class should be available
- Those currencies in which all customer accounts linked to this account class can operate
3.1.12.1 Maintaining Branch Preferences
Customer accounts maintained in any branch can be linked to any account class. However, you have the option of restricting the linkage of customer accounts in a particular branch or branches to an account class.
For example, your bank has a total of 25 branches. Branch 001 and 004 handles only Corporate Customers. For an account class, say, SAV-IND (savings accounts of individuals) you would like to disallow linkage of all customer accounts of branch 001 and 004.
To specify this, click on disallowed since the disallowed branch list is smaller than the allowed branch list. From the list of Available Branches select 001 and click the adjoining arrow. Repeat the procedure for 004. 001 and 004 will be listed under disallowed branches.
Note
For specifying the allowed list of branches, first click on allowed. You will notice that the list title changes accordingly to allowed and vice versa. You should select allowed or disallowed depending upon the length of the list.
3.1.12.2 Maintaining Currency Preferences
For all accounts under this account class you have the option of specifying currencies in which transactions are allowed/disallowed.
For example, you want to restrict all account level transactions under the account class Corporations for corporate type accounts to four important currencies only, say - USD, GBP, JPY, and DEM. You can specify the same.
To do this, click the ‘Currency Preference’ button. The ‘Account Class - Currency Preferences’ screen will be displayed.
All the allowed currencies you have defined for this account class will be displayed in the option list adjoining the ‘Currency Code’ field. You can specify charges that should be levied against each currency for opening a customer account. You can also maintain the maximum number of ATM transactions that can be carried out on every currency. Similarly, you can maintain the maximum cash that can be withdrawn from an ATM for every currency. If the box ‘Escrow Transfer Applicable’ is checked for the account class, you can capture currency-wise cash deposit limit for the Trust accounts linked to the account class.
If ‘Large Debit Balance Tracking Required’ check box is checked at the preferences level, then you have to maintain threshold amount for large debit balance. If the threshold amount is not maintained for large debit balance and the ‘Large Debit Balance Tracking Required’ check box is checked, then the system displays an error message.
3.1.12.3 Maintaining Minimum Balance
You can maintain minimum balance and minimum opening balance for a CASA account based on the account facilities in the Minimum Balance screen. You can also maintain the minimum balance for each currency. Click ‘Minimum Balance’ button under Currency Details tab of ‘Branch and Currency Restriction’ sub-screen to invoke Minimum Balance screen.
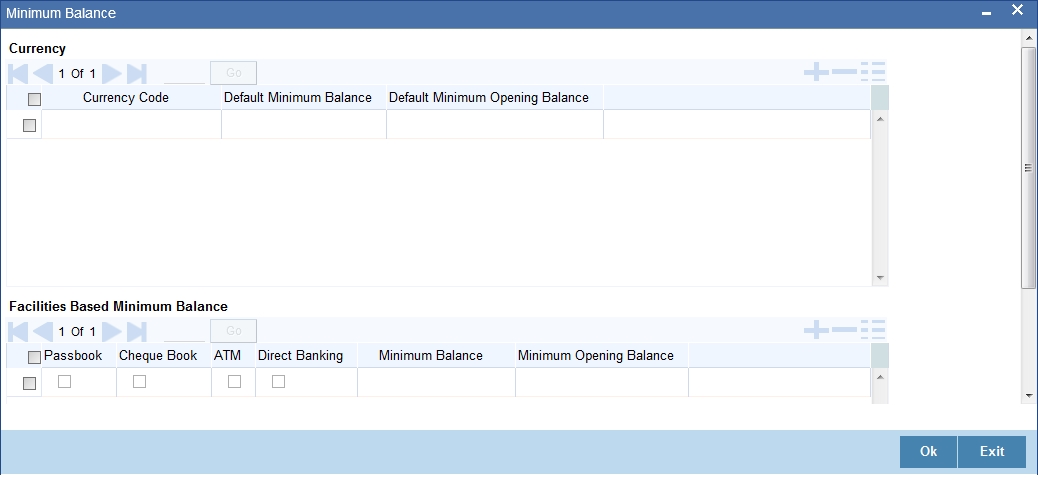
Currency
Currency Code
Specify the currency code of the account. Alternatively, you can select the currency code from the option list. The list displays all valid currency codes maintained in the system.
Default Minimum Balance
Specify the default minimum balance to be maintained for the account.
Default Minimum Opening Balance
Specify the default minimum opening balance to be maintained for the account. Default minimum opening balance amount should not be less than default minimum balance amount.
Facilities Based Minimum Balance
You can maintain minimum balance based on account facilities in this block
Passbook
Check this box if passbook facility is applicable for maintaining minimum balance amount.
Cheque Book
Check this box if cheque book facility is applicable for maintaining minimum balance amount.
ATM
Check this box if ATM facility is applicable for maintaining minimum balance amount.
Direct Banking
Check this box if direct banking facility is applicable for maintaining minimum balance amount.
Minimum Balance
Specify the minimum balance for facility combination for a currency. You can maintain the minimum balance based on the multiple facility combinations.
Minimum Opening Balance
Specify the minimum opening balance for facility combination for a currency. The minimum opening balance should not be less than the minimum balance.
Based on the account facilities availed at account level, the system looks for a matching record of account facilities at account class level for an account currency. The minimum balance and minimum opening balance that is maintained for the matching record will be considered for validating minimum balance and minimum opening balance respectively. If none of the records are matching, then default minimum balance and default minimum opening balance maintained for that currency is considered for minimum balance and minimum opening balance validation.
Note
For each records maintained in ‘Facilities Based Minimum Balance’ section, the criteria combination should be unique. For instance, for a USD currency, if one record is maintained with the value as ‘Y’ for all the facilities, then another record of USD currency should not have value as ‘Y’ for all facilities.
If the minimum balance is maintained for currencies that are disallowed or restricted for an account class, then the system displays an error message.
If ‘Allowed’ option is selected in Branch and Currencies Restriction sub screen and if the currency for which minimum balance details is maintained are not available in the list of allowed currencies, then the system displays an error message.
3.1.13 Customer Categories Button
Instead of linking each customer account to an account class, a customer category is linked to the class.
For an account class you should specify the category that should be linked to it and also specify if all customers under each of the categories are to be linked to the account class. In the ‘Account Class - Customer List’ screen you have the option of specifying the categories that should be linked to this account class and within a category you can also restrict individual customers to be linked to the class.
To indicate allowed customer categories click the ‘Customer/Categories’ button. The ‘Account Class - Customer List’ screen will be invoked.

In this screen you define the following:
- A list of allowed or disallowed customer categories
- A list of disallowed customers (if any) under the allowed category
For an account class you need to specify the customer categories that should be linked to it and also customers within a category who should not be allowed to be linked to this account class.
For example,
Requirement
You are capturing the features of a Nostro account class called NostroLCY, you would like to:
- Associate the customer category called Banks with NostroLCY
- Disallow a customer called Midas-Bank associated with the customer category called Banks from using the features of this class
- Grant your customer Morgan Stanley linked to the customer category called Financial Institutions all rights associated with NostroLCY
Procedure
In the Selection Indicator field click on Allowed (since your allowed list is smaller and therefore easier to indicate).
- Highlight and select the Customer Categories called Banks and Financial Institutions in the Available Categories list and click the adjoining arrow.
- Next, highlight Financial Institutions and click adjoining arrow against Customers. It will display the entire list of customer accounts maintained under the customer category Financial Institutions
- Select Morgan Stanley. It will be listed in the first row. To allow this customer the parameters assigned to this account class check the small square box alongside
- To add a row, click the Add icon. To delete an extra row, click the Delete icon
- To disallow Midas Bank, click on Banks under available categories. Click the adjoining arrow against Customers, to display a list of all the customers under this category. Select Midas Bank. Since you would like to disallow this customer do not check the square box against it
Note
Check the square box to allow a customer the parameters assigned to this account class. Leave the box unchecked to disallow a customer from being assigned to this account class.
3.1.14 Notice Button
You can specify the notice preferences for the withdrawal of amount through the ‘Notice Preferences’ screen. Click ‘Notice’ in the ‘Account Class Maintenance’ screen.
The ‘Notice Preferences’ screen is displayed as follows:
The following fields are displayed in this screen:
- Account Class – The unique code assigned to the account class is displayed
- Description – A short description of the account class is displayed
The following are the notice preferences that you can specify for an account class:
Advance Interest
Check this field to levy the advance interest on the account class.
Note
- The customer of the account class is liable to pay this interest in case he/she fails to provide the required notice to the bank.
- The system deducts the advance interest from the credit Interest earned by the customer of the account class on his/her credit balance in the account.
Monthly Free Amount
Specify the amount that a customer of the account class can withdraw per calendar month from his/her savings account without being liable to pay advance interest.
Notice Days
Specify the number of days before which a customer of the account class should notify the bank if he/she wants to withdraw an amount more than the ‘Free Amount’ from his/her account.
Validity Period
Specify the notice validity period in number of days. During this period, a customer of the account class can do the withdrawal of the amount for which he/she notified the bank.
3.1.15 Banking Channels Button
You can capture the information of channels like Internet Banking, Interactive Voice Response, Mobile, ATM, and Credit Card at customer level. These channel details can be maintained in ‘Static Type Maintenance’ (CODTYPES) screen.
Click ‘Banking Channels’ button to specify the details relating to channels.
Specify the following details:
Banking Channels
Specify the banking channels code. Alternatively, you can select the list of channels from the option list. The list displays the channels maintained in the system.
Banking Channel Name
The system displays the name of the banking channel.
Note
- While populating the channels to the Customer Account screen, the system populates only the channels which are allowed in primary CIF and Account Class. The system defaults the remarks maintained at customer level to the account. You can modify it.
- You can delete the channels which need not be allowed at the customer account level, but you cannot add the channels which are disallowed at the customer or account class level. The system will display only those channels which are available in both CIF and account class levels.
- You can add channels which are mapped at both CIF and Account Class levels. You cannot delete a channel at CIF/Account Class level, which is already mapped to accounts (authorized or unauthorized) belonging to the CIF/Account Class. The system checks only for active accounts. You can delete the channels from customer/account class level only if the account is closed. During reopen of the account, the system validates whether the account is modified after reopening.
- When an account is created automatically from Customer Creation screen, the channels maintained at both Customer and Account Class is defaulted to the account. If no maintenance is performed at CIF/account class levels for channels, the system does not populate any channels at account.
- When account class transfer happens during batch, the system deletes the existing channels attached to the account and repopulates from the new Account Class and Customer.
During authorization of the account, the system does not repopulate the channel details. While authorizing primary party change, the system defaults the existing channels which are attached to the account and repopulates from the new Customer and Account Class. You can modify the channel information from the main screen for Customer Account Creation.
During save, the system defaults the channel details from Customer and Account Class of the account. You can modify the details in the Account Creation screen (STDCUSAC).
3.2 Account Class Group Maintenance
This section contains the following topics:
3.2.1 Maintaining Account Class Group
You can group different account classes under a single account class
group in ‘Account Class Group Maintenance’ screen. To invoke
this screen, type ‘STDACLGP’ in the field at the top right corner
of the Application tool bar and click the adjoining arrow button.
Specify the following here:
Account Class Group
Specify the account class group.
Description
Specify a brief description on the account class group.
A given account class cannot be part of more than one account class group
Account Class
Select the account class from the adjoining option list.
Description
The system displays the description on the account class selected.
3.2.2 Viewing Account Class Group
You can view the account class group details maintained in the 'Account Class Group Maintenance' screen using the 'Account Class Group Summary' screen. You can invoke this screen by typing 'STSACLGP' in the field at the top right corner of the Application tool bar and clicking on the adjoining arrow button.
In the above screen, you can base your queries on any or all of the following parameters and fetch records:
- Authorization Status
- Record Status
- Account Class Group
Select any or all of the above parameters for a query and click 'Search' button. The records meeting the selected criteria are displayed.
3.3 Account Class Transfer
This section contains the following topics:
- Section 3.3.1, "Maintaining Account Class Transfer"
- Section 3.3.2, "Main Tab"
- Section 3.3.3, "Auxiliary Tab"
- Section 3.3.4, "Processing Account Class Transfer"
- Section 3.3.5, "Viewing Account Class Transfer"
3.3.1 Maintaining Account Class Transfer
Oracle FLEXCUBE facilitates the change of account class at the customer account level without changing the customer account number. Depending on the destination account class, system defaults the reporting GL lines and IC related values. The account class transfer can be initiated through the ‘Account Class Transfer Maintenance’ screen.
3.3.2 Main Tab
You can invoke the ‘Account Class Transfer’ screen by typing ‘STDACTFR’ in the field at the top right corner of the Application tool bar and clicking the adjoining arrow button.
The following details are maintained here:
Branch Code
The current branch is defaulted here.
Account
Select the account number which requires an account class transfer, from the adjoining option list. This adjoining option list displays all valid accounts maintained at the account class level.
To view the joint holder’s details of an account and the mode of operation maintained at the account level, place the cursor on the Account Number field and press Ctrl+J. The system displays the ‘Joint Holder’ screen.
For more information on the ‘Joint Holder’ screen refer to the section ‘Joint Holder Maintenance’ in this User Manual.
Old Account Class
The account class to which the selected customer account belongs is defaulted here.
Currency
The currency of the selected customer account is defaulted here.
Account Class
Select the new account class to which the customer account has to be transferred, from the adjoining option list. This adjoining option list displays all valid account class. When the account class is selected, the system checks whether the new account class is a valid one or not.
Click the ‘Default’ button to generate default parameters.
If the old and new account class are of different type, then the system will display the error message as “Old and new A/c class belongs to different a/c class types Failed to Process the Request.
Click ‘Ok’ to reset Account Class parameters.
If the old and new account class are of same type, then the system will display the override message as “Provisioning details should be manually modified, if required.”
Click ‘Accept’ if you wish to continue. The system will display the Information Message as “Request Successfully Processed.”
Click ‘Ok’ to continue. The following GL details are defaulted based on the values maintained at the Account Class level:
- Status
- Credit
- Debit
Effective Date
The effective date of account class transfer can be based on either next liquidation cycle or effective value date.
Next Liquidation Cycle
Check this box to indicate that the account class transfer should be effective from the earliest liquidation date of the products mapped to the account.
Effective Date
Select the effective date for account class transfer from the adjoining calendar.
Note
System displays an error message in the following conditions:
- If the specified date coincides with a holiday
- If the effective date is not provided and the transfer is based on actual date
- If the selected customer account has an unprocessed record
GL Details
The reporting GL details of the account selected is defaulted here when you click ‘Default’ button.
Note
For successful account class transfer, the CB and HO lines of both the account classes must be same.
Preferences
The system defaults the following account facility preferences from account class level. You can modify the values.
Cheque Book
Check this box if you need a cheque book to be issued for your account.
Passbook
Check this box if you need a passbook to be issued for your account.
ATM
Check this box if you need to avail an ATM facility for your account.
Direct Banking
Check this box to avail direct banking facility.
By availing direct banking facility, you can only view the minimum balance of the account. You cannot perform any other transactions with this facility.
Status Change Automatic
Check this box if you need automatic status change for your account.
3.3.3 Auxiliary Tab
Specify the auxiliary details by clicking ‘Auxiliary’ tab in the ‘Account Class Transfer’ screen.
Cheque Book Preferences
Maintain the following cheque book preferences if you have opted for a cheque book for your account in the ‘Main’ tab.
Auto Re-order Cheque Required
Check this box to automatically reorder cheque books for all accounts belonging to this account class.
Reorder Cheque Level
Specify the level at which you need a cheque book for the account.
Reorder Number Of Leaves
Specify the number of cheque leaves you need in the reordered cheque book.
Cheque Book Name 1
Specify the name used for opening savings account A1. This name will be printed on the cheque book and will be used for all cheque transactions.
Cheque Book Name 2
Specify the name if you need to enter the name of the joint account holder on the cheque book, if the customer account is joint operations account.
ATM Preference
You can maintain the following parameter if the ATM box is checked in the Main screen.
Atm Account No
Specify the valid ATM account number that should be linked to the new account class.
Daily Amount Limit
Specify the daily limit for the amount that can be withdrawn from the ATM.
Daily Amount Count
Specify the daily count for the amount that can be withdrawn from the ATM.
Options
You can maintain the following parameters for your account here.
Lodgement Book
Check this box if you need a lodgement book to be issued for the account.
Consolidated Cert. Reqd
Check this box if you need a consolidated certificate to be issued for the account.
Back Period Entry Allowed
Check this box if you need back period entries for the account.
Referral Required
Check this box if you need a referral check for your account.
Track Receivable
Check this box if you prefer to track the receivables for the account.
Remarks
Specify the reason for the account class change.
Processed Status
System displays the status of account class transfer here. The drop-down list displays the following options:
- Unprocessed–This status is defaulted till the account class transfer is effective.
- Processed–This status is defaulted when the account class transfer is effective.
3.3.3.1 Interest Button
You can maintain the interest and consolidated charges of the account class in the ‘IC Special Conditions Maintenance’ screen. The system would generate the details by default. You can manually maintain the products if IC special condition is applicable for this account-account class combination.
Click ‘Interest’ button in the ‘Account Class Transfer’ screen to invoke ‘IC Special Conditions Maintenance’ screen.

The following details are captured here:
Branch Code
The current branch code is defaulted here.
Calculation Account
Select the valid customer account number for calculation from the adjoining option list.
Interest Booking Account
Select the valid customer account number from the adjoining option list.
Interest Start Date
Select to indicate the effective date to generate interest from the adjoining calendar.
Interest Booking Branch
Select to indicate valid Branch for calculating the interest from the adjoining option list.
Interest Statement
Check this box to generate the interest statement.
Charge Booking Account
Select the valid customer account number for booking the charge from the adjoining option list.
Charge Start Date
Specify to indicate the effective date to generate charges from the adjoining calendar.
Charge Booking Branch
Select to indicate the valid Branch from the option list, for calculating the charge.
Dr Cr Advices
Check this box to generate debit and credit related advices.
Consolidated Account
Select the valid account number from the adjoining option list.
Consolidated charge bank
Select the valid bank from the adjoining option list.
Product Details
You can specify product details for your account here.
Product Code
Select the valid product code from the adjoining option list.
UDE Currency
The system generates the user defined currency type maintained at ‘Interest Product Preference’ level.
Waive
Check this box if you need to waive of interest or charges defined for the selected interest product at the Interest Product Preference level.
Generate UDE Change Advice
Check this box if you need to generate advice for change in values of the User Data elements for the account.
Open
Check this box if you need to apply the selected interest product for the account.
3.3.3.2 Charges Button
Click ‘Charges’ button in the ‘Account Class Transfer’ screen to invoke ‘Account level charges conditions’ screen.
The following details are captured here:
Account Details
You can maintain the account details here.
Branch Code
The current branch code is defaulted here.
Account
The system generates the account number maintained in the ‘Main’ screen of ‘Account Class Transfer’.
Product Detail
You can specify the parameters related to product here.
Product Code
Select a valid product code from the adjoining option list.
UDE Currency
The system generates the user defined currency type defined for the selected charges product.
Minimum
Specify the minimum charge that can be applied for the account.
Maximum
Specify the maximum charge that can be applied for the account.
Free Items
Specify to indicate the number of items on which the charges are not levied.
Waive Charges
Check this box if you need to waive the charges defined for the selected charges product at the account level.
Open
Check this box if you need to apply the selected charges product for the account.
Slab Amount
You can specify the parameters related to slab amount here. You can add additional rows by clicking the ‘+’ button and delete rows by clicking ‘-’ button.
Slab Amount
Specify an amount slab for the charges maintained at the account level. Rate will be applied for the amounts less than or equal to the amount slab.
Charge Amount
Specify the charge amount applied for the selected product at the account.
Rate
Specify the rate to be applied for the charges maintained at the account level.
3.3.3.3 Consolidated Charges Button
Click ‘Consolidated Charges’ button in the ‘Account Class Transfer’ screen to invoke ‘Account Level Consolidated Charges Conditions’ screen.
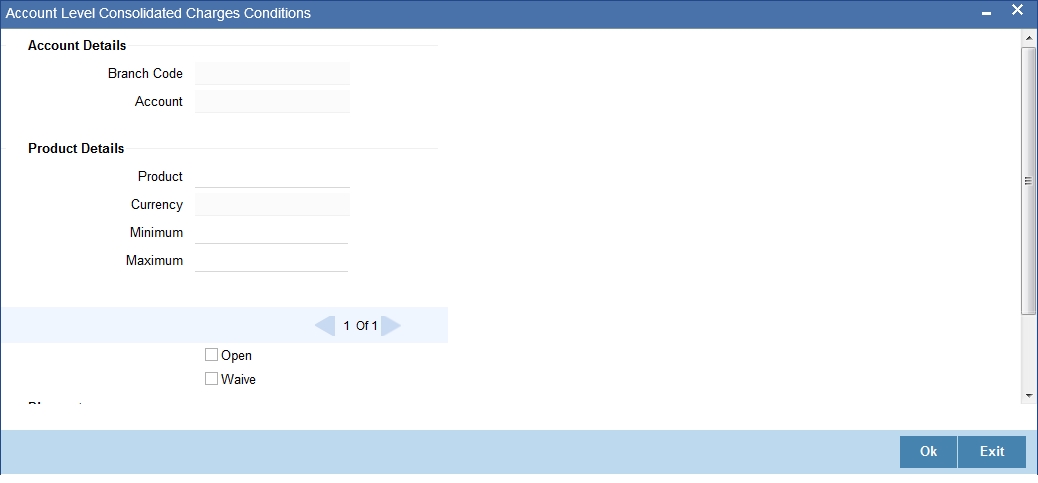
The following details are captured here:
Account Details
You can maintain the account details for an account here.
Branch Code
The current branch code is defaulted here.
Account
The system generates the account number maintained in the ‘Main’ screen of ‘Account Class Transfer’.
Product Details
You can specify product details for your account here.
Product Code
Select a valid product code from the adjoining option list.
Currency
The system generates the user defined currency type defined for the selected consolidated charges product.
Minimum
Specify the minimum consolidated charges that can be applied for the account.
Maximum
Specify the maximum consolidated charges that can be applied for the account.
Open
Check this box if you need to apply the selected consolidated charges product for the account.
Waive Charges
Check this box if you need to waive the consolidated charges defined for the selected consolidated charges product.
Discount
You can specify discount details for the consolidated charges applied for the account.
Discount Percentage
Specify percentage of the amount to be discounted from the computed consolidated charges.
Discount Amount
Specify a flat amount to be discounted from the computed consolidated charges.
3.3.3.4 Statement Button
Click ‘Statement’ button in the ‘Account Class Transfer’ screen to invoke ‘Statement’ screen.
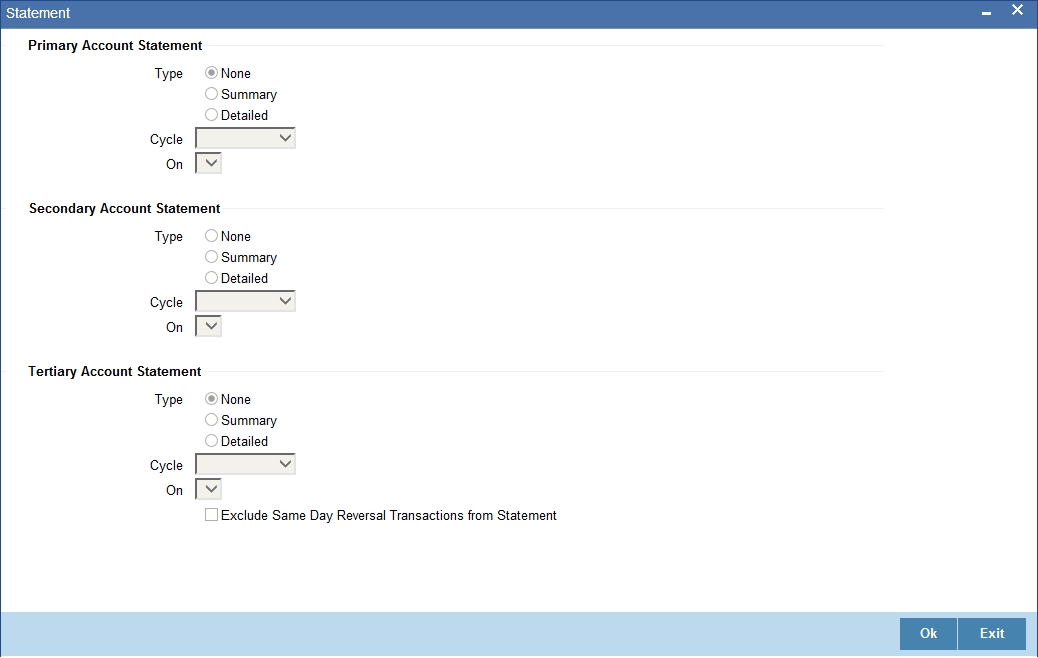
Specify the following parameters for each of the valid account type.
Primary A/c Statement
You can generate account statement periodically for primary account type.
Type
Select the statement type to be generated from the options. The following values are available for selection:
- None–Select this option if you do not need an account statement.
- Summary–Select this option if you need a brief account statement.
- Detailed–Select this option if you need a detailed account statement.
Cycle
Select the frequency to generate statement, from the adjoining drop-down list. This list displays the following values:
- Annual–Select this option if you need to generate the statement annually.
- Semi Annual–Select this option if you need to generate the statement half yearly.
- Quarterly–Select this option if you need to generate the statement quarterly.
- Monthly–Select this option if you need to generate the statement monthly.
- Fortnightly–Select this option if you need to generate the statement fortnightly.
- Weekly–Select this option if you need to generate the statement weekly.
- Daily–Select this option if you need to generate the statement daily.
On
Select a month, a date or a day to generate statement from the adjoining drop-down list. The drop-down list displays following values:
- Displays names of the months when Annual, Semi Annual, and Quarterly are selected at the ‘Cycle’ level
- Displays numbers from 1 to 31 when Monthly is selected at the ‘Cycle’ level
- Displays names of the week days when Fortnightly and Weekly are selected at the ‘Cycle’ level
- Displays a blank list when Daily is selected at the ‘Cycle’ level
Secondary A/c Statement
You can generate account statement periodically for secondary account type.
Type
Select the statement type to be generated from the options. The following values are available for selection:
- None–Select this option if you do not need an account statement.
- Summary–Select this option if you need a brief account statement.
- Detailed–Select this option if you need a detailed account statement.
Cycle
Select the frequency to generate statement, from the adjoining drop-down list. This list displays the following values:
- Annual–Select this option if you need to generate the statement annually.
- Semi Annual–Select this option if you need to generate the statement half yearly.
- Quarterly–Select this option if you need to generate the statement quarterly.
- Monthly–Select this option if you need to generate the statement monthly.
- Fortnightly–Select this option if you need to generate the statement fortnightly.
- Weekly–Select this option if you need to generate the statement weekly.
- Daily–Select this option if you need to generate the statement daily.
On
Select a month, a date or a day to generate statement from the adjoining drop-down list. The drop-down list displays following values:
- Displays names of the months when Annual, Semi Annual, and Quarterly are selected at the ‘Cycle’ level
- Displays numbers from 1 to 31 when Monthly is selected at the ‘Cycle’ level
- Displays names of the week days when Fortnightly and Weekly are selected at the ‘Cycle’ level
- Displays a blank list when Daily is selected at the ‘Cycle’ level
Tertiary A/c Statement
You can generate account statement periodically for tertiary account type.
Type
Select the statement type to be generated from the options. The following values are available for selection:
- None–Select this option if you do not need an account statement.
- Summary–Select this option if you need a brief account statement.
- Detailed–Select this option if you need a detailed account statement.
Cycle
Select the frequency to generate statement, from the adjoining drop-down list. This list displays the following values:
- Annual–Select this option if you need to generate the statement annually.
- Semi Annual–Select this option if you need to generate the statement half yearly.
- Quarterly–Select this option if you need to generate the statement quarterly.
- Monthly–Select this option if you need to generate the statement monthly.
- Fortnightly–Select this option if you need to generate the statement fortnightly.
- Weekly–Select this option if you need to generate the statement weekly.
- Daily–Select this option if you need to generate the statement daily.
On
Select a month, a date or a day to generate statement from the adjoining drop-down list. The drop-down list displays following values:
- Displays names of the months when Annual, Semi Annual, and Quarterly are selected at the ‘Cycle’ level
- Displays numbers from 1 to 31 when Monthly is selected at the ‘Cycle’ level
- Displays names of the week days when Fortnightly and Weekly are selected at the ‘Cycle’ level
- Displays a blank list when Daily is selected at the ‘Cycle’ level
Exclude Same Day Reversal trns from stmt
Check this box to exclude details of the transactions reversed on the same day from the generated statement.
3.3.3.5 Maintaining MIS Details
Click ‘MIS’ button in the ‘Account Class Transfer’ screen to invoke ‘Management Information System’ screen.
The screen is as shown below:
All the parameters are defaulted here. You can change the values if needed. The following parameters are maintained:
Branch Code
The current branch code is defaulted here.
Account No
The system generates the account number maintained in the ‘Main’ screen of ‘Account Class Transfer’.
MIS Group
Select a valid MIS group from the adjoining option list.
Link to Group
Check this box if you need to link MIS group to the account. Any changes to the MIS group would be automatically applied to the linked account.
Ref Rate Code
Specify a valid reference rate code for the account.
Calculation Method
Select a method to calculate the rate from the adjoining drop-down list. This list displays the following values:
- 30-Euro/360
- 30-US/360
- Actual/360
- 30-Euro/363
- 30-US/365
- Actual/365
Ref Rate Code
Select a valid reference type from the adjoining drop-down list. This list displays the following values:
- Fixed–Select this option if you need a fixed reference rate for the account.
- Floating Automatic–Select this option if you need to apply the reference rate maintained at the account level.
Ref Spread
Specify the reference spread for the account.
Rate Flag
Select a valid rate flag from the options. The following values are available for selection:
- Pool Code–Select this option if you need to apply the rate maintained for the pool to which the account belongs.
- Contract Level– Select this option if you need to apply the rate maintained at contract level.
Pool Code
Select a valid pool code to which the account class belongs, from the adjoining option list.
Reference Rate
Select a valid reference rate from the adjoining option list.
Transaction MIS Code
The system generates transaction type of MIS code from the Account Class level. You can select a valid MIS code from the adjoining option list, if needed.
Composite MIS Codes
The system generates composite type of MIS code from the Customer Maintenance level. You can select a valid MIS code from the adjoining option list, if needed.
Cost Codes
The system generates cost codes from the Account Class level. You can select a valid cost code from the adjoining option list, if needed.
3.3.3.6 Account Status Button
Click ‘Account Status’ button in the ‘Account Class Transfer’ screen to invoke ‘Account Status’ screen.
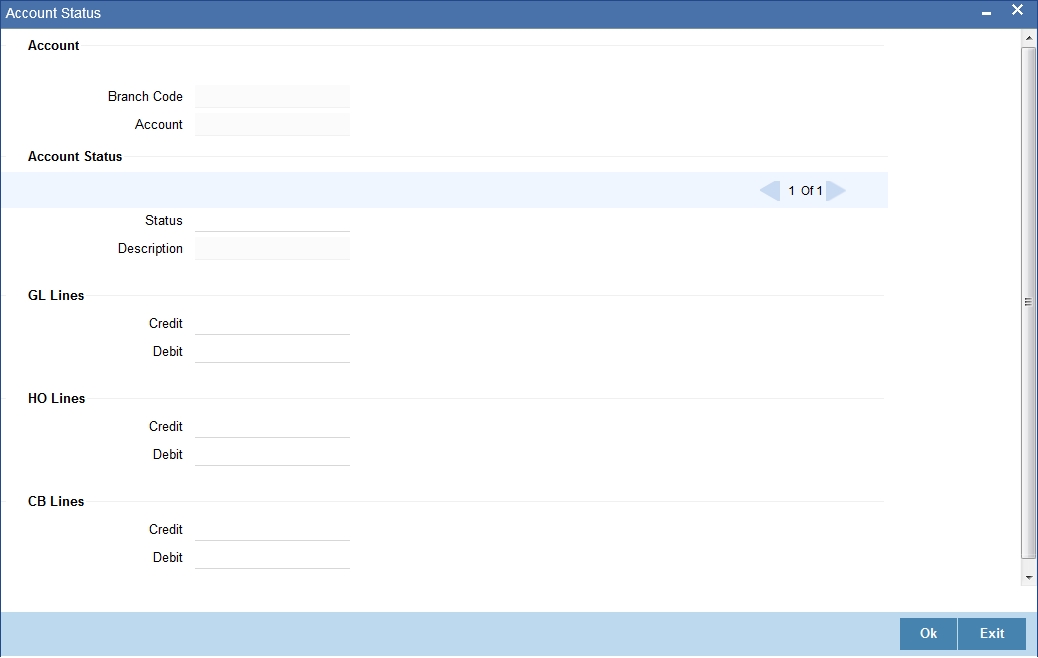
All the parameters are defaulted here. You can change the values, if needed. The following parameters are maintained
Account
You can maintain account details for your account here.
Branch Code
The current branch code is defaulted here.
Account
The system generates the account number maintained in the ‘Main’ screen of ‘Account Class Transfer’.
Account Status
You can maintain account status details for your account here.
Status
The current account status is defaulted here. You can select a valid account status from the adjoining option list, if needed.
Note
Account class transfer is processed only if the account status is ‘NORM’.
Description
The description of the account status is defaulted here.
GL Lines
You can maintain the credit and debit details of the general ledger reporting lines for your account here.
Credit
The GL code related to credit is defaulted here. You can select a valid GL code from the adjoining option list, if needed.
Debit
The GL code related to debit is defaulted here. You can select a valid GL code from the adjoining option list, if needed.
HO Lines
You can maintain the credit and debit details of the Head Office reporting lines for your account here.
Credit
The line code related to credit is defaulted here. You can select a valid line code from the adjoining option list, if needed.
Debit
The line code related to debit is defaulted here. You can select a valid line code from the adjoining option list, if needed.
CB Lines
You can maintain the credit and debit details of the Central Bank reporting lines for your account here.
Credit
The line code related to credit is defaulted here. You can select a valid line code from the adjoining option list, if needed.
Debit
The line code related to debit is defaulted here. You can select a valid line code from the adjoining option list, if needed.
3.3.4 Processing Account Class Transfer
Oracle FLEXCUBE facilitates the change of account class at the customer level without changing the customer account number. Depending on the destination account class, system defaults reports the reporting GL lines and IC related values.
3.3.4.1 Processing EOD Batch
During IC EOD process, system considers interest accrual for the back value dated transactions carried out prior to account class transfer, and computes the interest from the effective date of transfer based on new account class values. If the value date of the back value transaction is before the effective date of transfer, then the system does not compute interest for the period between value date and effective date.
Note
System does not process IC calculation of back valued UDE change, back value dated transaction, CIF type change and bulk change of the old account class.
3.3.4.2 Processing BOD Batch
During BOD process, system initiates the IC online liquidation of interest accrued on various products for all the customer accounts in the account class, till the effective date of account class transfer. Using gateway infrastructure, system authorizes and changes the account class based on the parameters maintained at the account class transfer level. However, GL balance of the accounts processed for account class transfer would be considered for the next day EOC.
Note
- Transfer of the account class would be effective only after the liquidation of customer accounts.
- Error log is written for the customer account which has failed in the account class transfer.
When account class transfer maintenance is saved, the system will enforce restriction and display an error message in following conditions:
- If one of the mask components of the customer account is Account class
- If dual-currency is enabled for the old account class
- If the account is already linked in ILM structure
- If the old account class is deposit type
- If the new account class has customer or currency restriction on the selected customer and account currency respectively
3.3.5 Viewing Account Class Transfer
You can view a summary of Account Class Transfer maintained at the ‘Account Class Transfer’ level using ‘Account Class Transfer’ summary screen. You can invoke the ‘Account Class Transfer’ summary screen by typing ‘STSACTFR’ in the field at the top right corner of the Application tool bar and clicking the adjoining arrow button.

In the above screen, you can base your queries on any or all of the following parameters and fetch records:
- Authorization Status
- Record Status
- Branch Code
- Account Class
- Old Account Class
- Account
- Next Liquidation Cycle
Select any or all of the above parameters for a query and click ‘Search’ button. The records meeting the selected criteria are displayed.
System displays the following details pertaining to the fetched records:
- Authorization Status
- Record Status
- Branch Code
- Account Class
- Old Account Class
- Account
- Next Liquidation Cycle
- Effective Date
3.4 Manual Status Change Input
This section contains the following topic:
3.4.1 Modifying Account Status Manually
You can use the ‘Manual Status Change’ screen for status movements that have to be performed manually on a customer account. You can invoke this screen, by typing ‘STDSTCHN’ in the field at the top right corner of the Application tool bar and clicking the adjoining arrow button.
Click the new button on the Application toolbar.
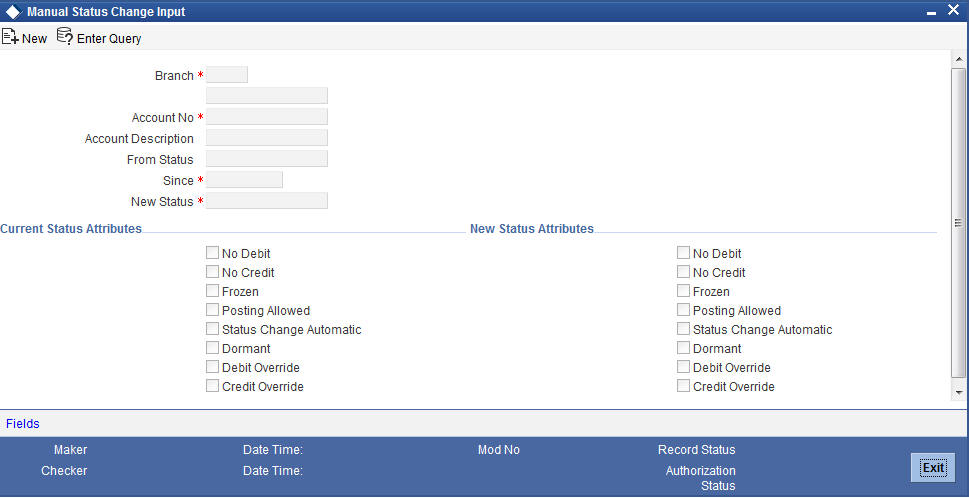
Provide the following details in this screen to facilitate a manual status change:
Account No
Select the customer account for which you are marking a manual status change, from the option-list provided.
On selection of the account, the system will display the current status of the account as well as the date on which the account moved to the current status.
To view the joint holder’s details of an account and the mode of operation maintained at the account level, place the cursor on the Account Number field and press Ctrl+J. The system displays the ‘Joint Holder’ screen.
For more information on the ‘Joint Holder’ screen refer to the section ‘Joint Holder Maintenance’ in this User Manual.
Account Description
The system displays the description of the specified account number based on the details maintained at ‘Customer Account Maintenance’ level.
New Status
Specify the new status of the account. You can select the appropriate status from this list.
If Status Processing Basis specified in the Branch Parameters for all the branches is ‘Contract/Account’, only status codes maintained with status type ‘Account’ (in the ‘Status Codes Maintenance’ screen) will be available in the option-list. If Status Processing Basis for even one of the branches is specified as ‘Group/CIF’ level, then the only statuses available will be of type ‘Both’.
Current Status Attributes
In addition to the new status, you can also mark the account with any one of the following statuses, if required:
- No Credit – if checked, no credit movement will be allowed on the account
- No Debit – the system will not allow debit movements on the account if you select this option
- Frozen – if selected, no activity will be allowed on the account
- Posting Allowed – if checked, posting of accounting entries will be allowed in the account
- Status Change Automatic - You can select this option if you want the subsequent status change for the account to be performed automatically by the system. After the account moves to the new status specified here, all subsequent status movements will be triggered automatically, during the EOD run for the branch. However, the changes will come into effect only upon authorization of the details maintained here. At a later date, you can switch back to the manual mode by unchecking this option and having the same authorized.The manual status movement that you specify in this screen has to be authorized for the new status of the account to come into effect.
- Debit Override - Check this box to selectively allow or restrict debit transactions from an account.
- Credit Override - Check this box to selectively allow or restrict credit transactions to an account.
On authorization of the manual status change operation, the new statuses will be reflected in the customer account and will be effective immediately
Note
When the account status is modified from the Manual Status Change screen (STDTCHN), system will display a configurable override message: "The Account has an active amount block”, if there is an active amount block created from the amount block input screen
Maintaining Status Change Processing
For accounts marked with automatic status change, you can execute a batch process at EOD to trigger the status movement and other associated changes. Use the ‘Account Status Update Processing’ screen available in the Application Browser to begin the batch process.
If the Status Processing Basis defined for the branch is ‘Group/CIF’ level, the worst status for all loans and overdrafts accounts is calculated for a Group/CIF level. This status is displayed in the respective Group/CIF screens as well as at the respective account and contract screens. The individual status of each account and contract is also displayed in the accounts screen as ‘Account Derived Status’.
Refer the ‘Products’ chapter of the Interest and Charges user manual for more details.
3.5 Maintaining Turnover Limits
You can maintain turnover limits for a given period of time using the ‘Turnover Limit Maintenance’ screen. You can attach these limits to an account class and thereby track the turnover on all accounts under the account class.
You can invoke the ‘Turnover Limit Maintenance’ screen by typing ‘STDTOLMT’ in the field at the top right corner of the Application tool bar and clicking on the adjoining arrow button.
The screen is as shown below:

Here, you need to specify the following details.
Limit Code
Specify a unique code used to identify turnover limit.
Description
Specify a brief description associated with the turnover limit.
Period Details
You can specify the following details pertaining to the period for limit application.
Period Code
Specify a unique code to identify the financial period for which you wish to maintain turnover limits.
Start Date
Specify the start date of the financial period, using the adjoining calendar.
End Date
Specify the end date of the financial period, using the adjoining calendar.
You can maintain multiple period codes. However, the periods cannot overlap.
Limit Amount Details
You can specify the following details pertaining limits applicable on the period code.
Limit Currency
Specify the currency of the limit amount. This adjoining option list displays all valid currency codes maintained in the system. You can choose the appropriate one.
Limit Amount
Specify the limit amount applicable of the financial period.
Note
- You can increase or decrease the maximum turnover limit as part of record modification. The modified limits will be applicable only for subsequent transactions.
- Unutilized limit amount does not get carried forward to the next period.