5. Collection Contract Online
During batch processing in Collections Module, the corresponding queue ids are assigned to the asset contracts and the collection reference number gets generated. In case of any error during the batch process and if the queue and collections agents are not mapped, you can manually assign it. The collection reference number for these exceptional queues can be created in the ‘Collections Online’ screen.
This chapter contains the following sections:
- Section 5.1, "Collections Online"
- Section 5.2, "Collection Interactions"
- Section 5.3, "Collection Reminder Messages"
- Section 5.4, "Collection Queue Change"
- Section 5.5, "Broken Promise Fee Reversal"
- Section 5.6, "Interaction Approval Queue"
- Section 5.7, "Collection Agent Dashboard Screen"
- Section 5.8, "Plan Activity"
- Section 5.9, "Collection Agent Assignment"
- Section 5.10, "Customer Restrictions"
5.1 Collections Online
This section contains the following topics:
- Section 5.1.1, "Capturing Collection Reference"
- Section 5.1.2, "Events Button"
- Section 5.1.3, "Interactions Button"
5.1.1 Capturing Collection Reference
The features of ‘Collections Online’ screen are given below:
- You can create a new Collection Reference Number.
- Amend the parameters “Allow Manual collection Agent assignment”, and “Allow Manual Queue Assignment” and “Auto Closure”
- Close a Collection Record. Fire CLOS (click of Close button) event against the collection reference.
Note
Batch program takes care in automatically closing the collection record if no due for assets and auto closure is checked.
You can invoke this screen by typing ‘CNDONONL’ in the field at the top right corner of the Application tool bar and clicking on the adjoining arrow button.

Collection reference number is generated by the system.
Product
Select a valid collection product for which you want to generate a collection reference number.
Asset Reference Number
Specify the CL account number for which you need to map to collections.
In new mode, after supplying the Asset reference number and the product, click ‘P’ button to update the details of the selected combination.
The following details get displayed.
- Collection Reference Number
- Latest Event
- Event Sequence Number
- Source Code
- Collection Creation Date
- Counterparty
- Collection Agent
- Queue ID
- State
Allow Manual Collection Agent Assignment
Check this box to indicate that assigning collection agent manually is allowed.
Allow Manual Queue Assignment
Check this box to indicate that assigning collection queue manually is allowed.
Auto closure
Check this box to indicate that automatic closing of the collection product is allowed.
There will be ‘##’ symbols against the queue and collections agents when a collection is created manually. You can manually assign it through the screen CNDCNQCH (Manual Queue change.) and subsequently the Collection agent assignment using the screen CNDCAASG (Collection Agent Assignment).
Parent Collection Reference Number
Specify the parent collection reference number from the adjoining option list.
Wait for the Child Collection to Close
Check this box to indicate that the parent collection contract should wait till the child collection is closed. If this box is unchecked, then the parent contract will be closed even if the child collection is in active status.
Note
During EOD the collection contract gets created based on this check box checked or unchecked at the collection product level.
Asset Details
The following asset details also get displayed:
- Asset Amount
- Asset User Defined Status
- Asset Currency
- Customer Status
- Asset Outstanding Principal
- Customer Category
- Asset Total Overdue
- Customer Credit Rating
- Asset No. of Schedules Overdue
5.1.2 Events Button
Click ‘Events’ button to view the events that got fired on this collection reference number.
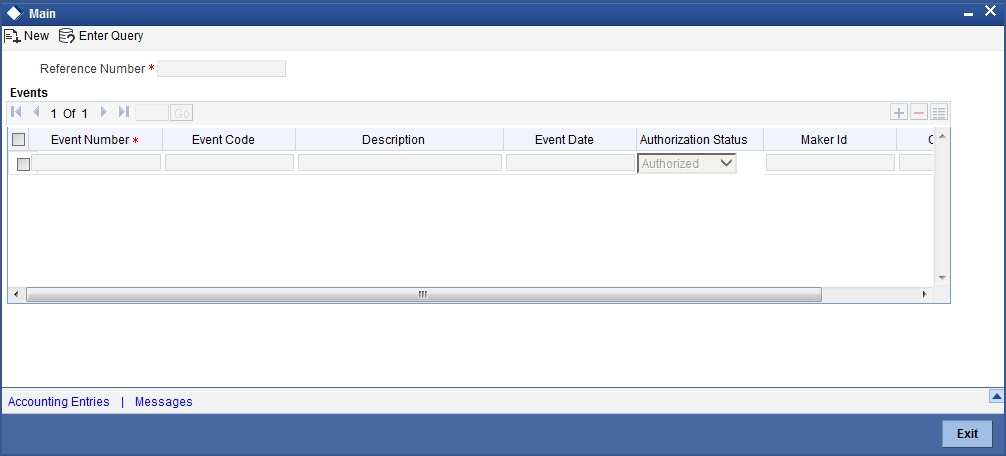
The following events detail gets displayed:
- Event Number
- Event Date
- Event Code
- Description
5.1.3 Interactions Button
Click ‘Interactions’ button to view the interactions that happened for this Collection reference number.
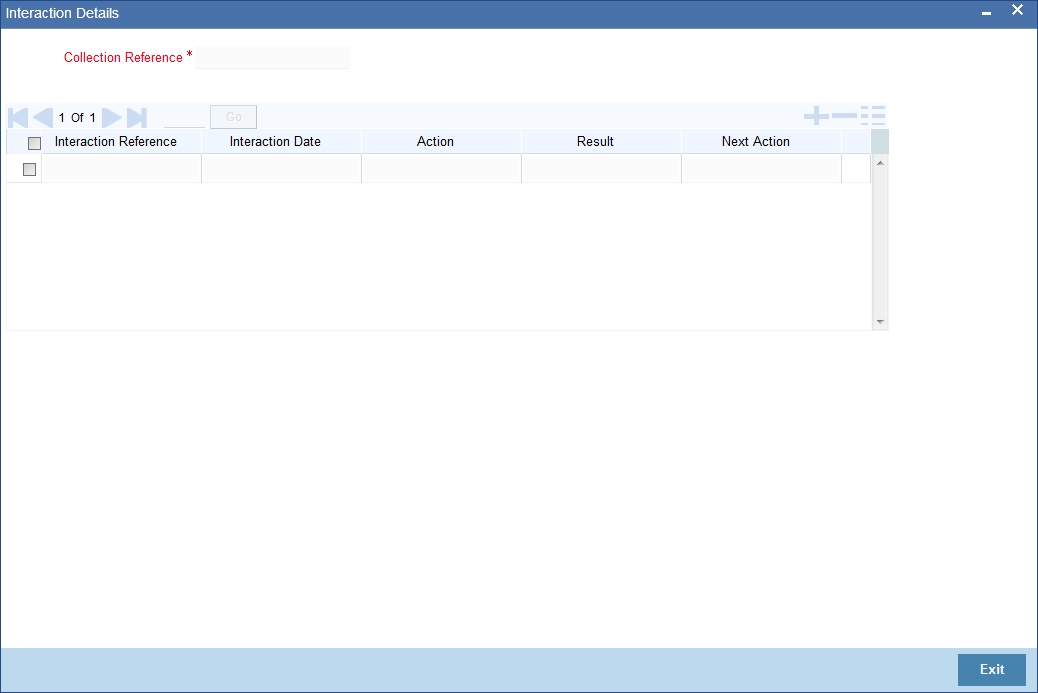
The following interaction details are displayed here:
- Interaction Sequence Number
- Interaction Date
- Action
- Result
- Next Action
5.2 Collection Interactions
This section contains the following topics:
- Section 5.2.1, "Recording Customer Interactions"
- Section 5.2.2, "Asset Tab"
- Section 5.2.3, "Interaction Details Tab"
- Section 5.2.4, "Promise to Pay Details Tab"
- Section 5.2.5, "Legal Proceedings Tab"
- Section 5.2.6, "Asset Details Button"
- Section 5.2.7, "Viewing the Summary of Interaction Record"
- Section 5.2.8, "Operations on Collection Interaction Record"
5.2.1 Recording Customer Interactions
While booking a new interaction (Event CNIB/CNEX) for a collection reference number a new interaction Sequence number is generated. You can record the customer interactions during collection process by the agent in the ‘Collection Interactions’ screen.
In case of external collection agency, you can upload the recordings from ASCII file for bulk uploads or through the Gateway for single upload. Interaction for each loan is recorded separately. While saving the interaction execution, system validates the result code and next action code based on the Action-Result-Next Action Mapping.
You can invoke this screen by typing ‘CNDCOLIN’ in the field at the top right corner of the Application tool bar and clicking on the adjoining arrow button.
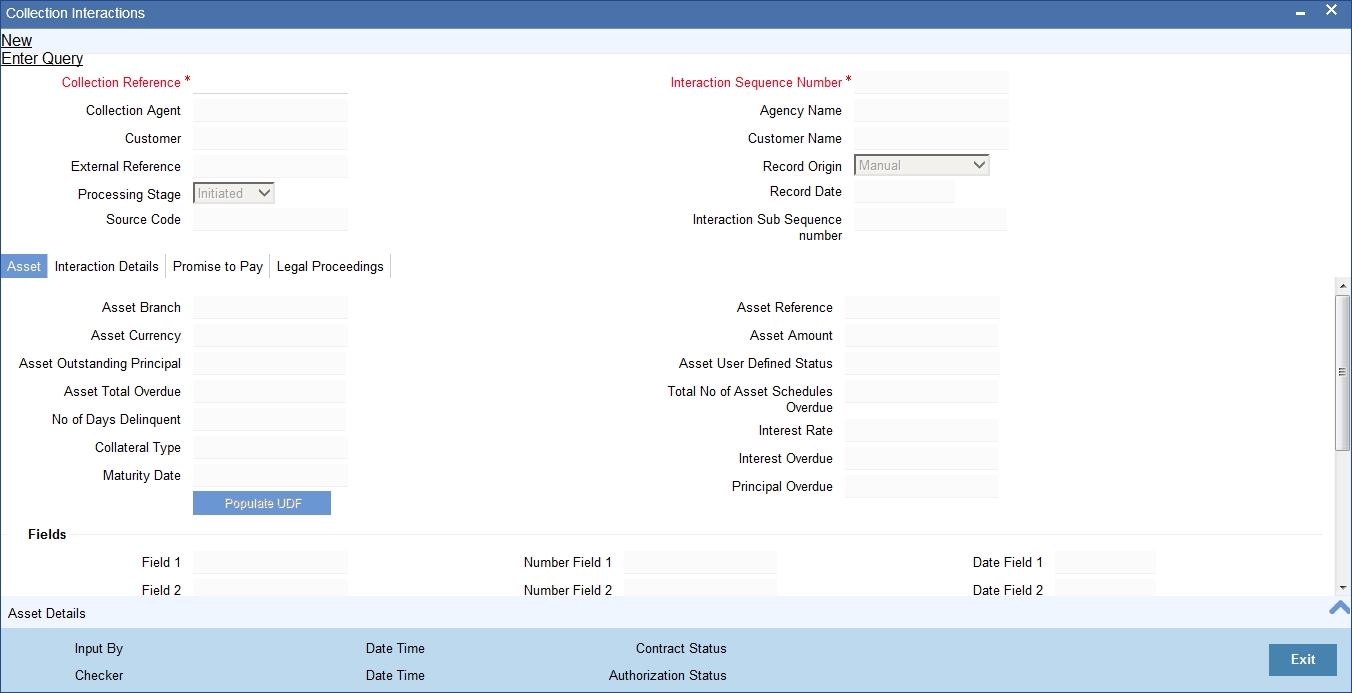
You can record the interactions between the customer and the collection agent here. The interaction sequence number is generated by the system.
Collection Reference
Specify the collection reference number of the collection process for which you are recoding the details
The following details get displayed:
- Collection Agency gets displayed as per the name of the agent.
- Customer gets displayed as the counterparty of the underlying Asset
- Customer Name gets displayed as per the customer name mapped in the system.
- Processing Stage gets displayed as per the current status of the collection process.
- Record Origin gets displayed as per the origination of the interaction created in system.
- Source Code gets displayed as per the origination of interaction.
- External Reference Number gets displayed if the interaction is uploaded from an external source.
- Record Date displays the date on which the interaction is created in the system.
- In case of any further actions performed on a recorded interaction, the latest interaction sub sequence number gets generated and displayed.
In the case where the Action code does not require an approval, upon save itself system will accept the result code/date and next action code/date. If all the data are supplied CNEX Event will be fired directly and CNIB will not be fired. If Result is “WAITING”, CNIB will be fired and Execution needs to be carried out using button ‘Liquidate’. On supply of result and next action codes, Execution event CNEX will be carried out.
After the event CNIB is fired processing stage is updated as ‘Initiated’, if the action code entered by the user requires an approval. In this case the result code, result date, next action and next action date are not accepted by the system while saving the interaction. After the authorisation, Approval (CNAP) event is fired provided you have the approval rights. Bulk Approval is also possible from the screen CNDINAPQ. Authorized records are available for execution. The processing stage after authorization is “Approved”/”Rejected”. In case of the approved records, click ‘Liquidate’ and if all the data is supplied execution is fired and the Processing stage gets changed to ‘Executed’.
During amend the interaction subsequence number get incremented by one. During authorisation, if the next action is ‘REMINDERMSG’ and the next action date is current date the CNMS event gets fired.
5.2.2 Asset Tab
Click ‘Asset Details’ Tab to view the asset details.
The following asset specific details are displayed here:
- Asset Branch – Branch of the asset product gets displayed
- Asset Reference Number - Asset Reference Number gets displayed
- Asset Amount – Total asset amount gets displayed
- Asset Ccy – Asset currency gets displayed
- Asset Outstanding Principal - Principal Outstanding Amount as on date gets displayed
- Asset User Defined Status - User Defined Status for the Asset Reference gets displayed
- Asset Total Overdue - Total Overdue Amount as on Date gets displayed
- Asset No Of Schedules Overdue - Total No of Schedules Overdue gets displayed.
- No of Days Delinquent – Maximum number. of days overdue for the asset (including all overdue components).
- Collateral Type – Type of asset.
- Maturity Date – Maturity date of the asset.
- Interest Rate – Interest rate of the main interest component as on current date.(UDE which has been mapped for the main interest component).
- Interest Overdue – Total interest overdue payment.
- Principal Overdue – Total principal overdue payment.
5.2.3 Interaction Details Tab
Click ‘Interaction Details’ Tab to view the interaction details.
You can capture the following interaction details here.
Action Code
Specify the action which is executed as a part of interaction
Action Date
Specify the date of execution of the aforesaid action
Result of Action
Specify a valid result code from Action-Result-Next Action maintenance
Result Date
Specify the result date in case the customer did not respond on the same date of action.
Next Action
Specify a valid next action as per the Action-Result-Next Action maintenance
Next Action Date
Specify the date of execution of the next action.
Delinquency Reason
Specify delinquency reason for the account going into overdue as per the Customer.
Hour
Specify the hour of the interaction with the customer if available.
Minutes
Specify the minutes of the interaction with the customer if available.
Customer Email
Specify the email id of the customer if available.
Mobile Number
Specify the mobile number of the customer if available.
Interaction Place
Specify the interaction place with the customer if the action is a personal visit.
Total PTP
Specify the total amount, the customer promises to pay if the result of action is PTP.
Comments
Specify the comments related to the interaction you have recorded if any.
5.2.4 Promise to Pay Details Tab
Click ‘Promise to Pay Details’ Tab to view the PTP details.
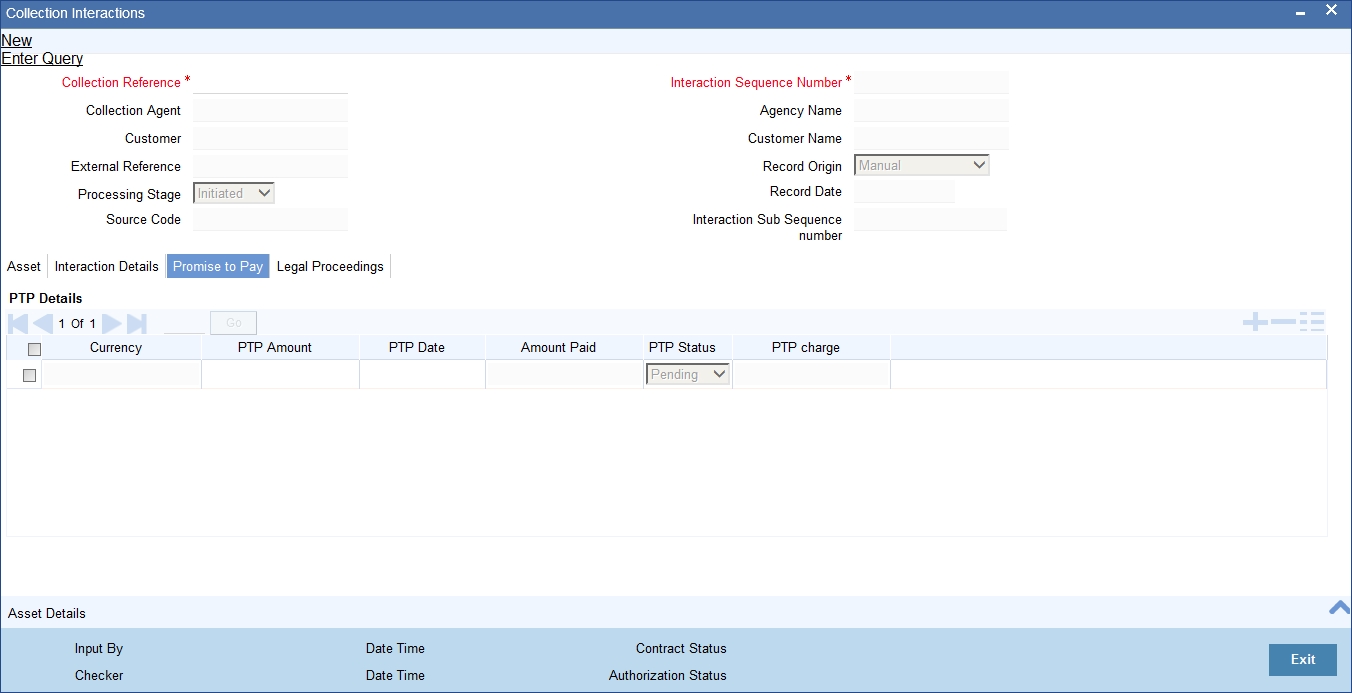
The following details of promise to pay are displayed here:
- Currency – The currency in which the customer has promised to pay.
- PTP Amount – The amount which customer has promised to pay.
- PTP Date – The date on which the amount will be paid.
- Amount Paid - Actual Amount paid by the customer.
- PTP Status – The status of PTP as on date.
- PTP Charge – The PTP Charge calculated by the system
This record is processed on next action date specified during the interaction.
Note
CNMS (Collection reminder message) diary event gets fired in the underlying Collection Reference during BOD batch run.
5.2.5 Legal Proceedings Tab
Click ‘Legal Proceedings’ Tab to view the legal proceedings for the asset.
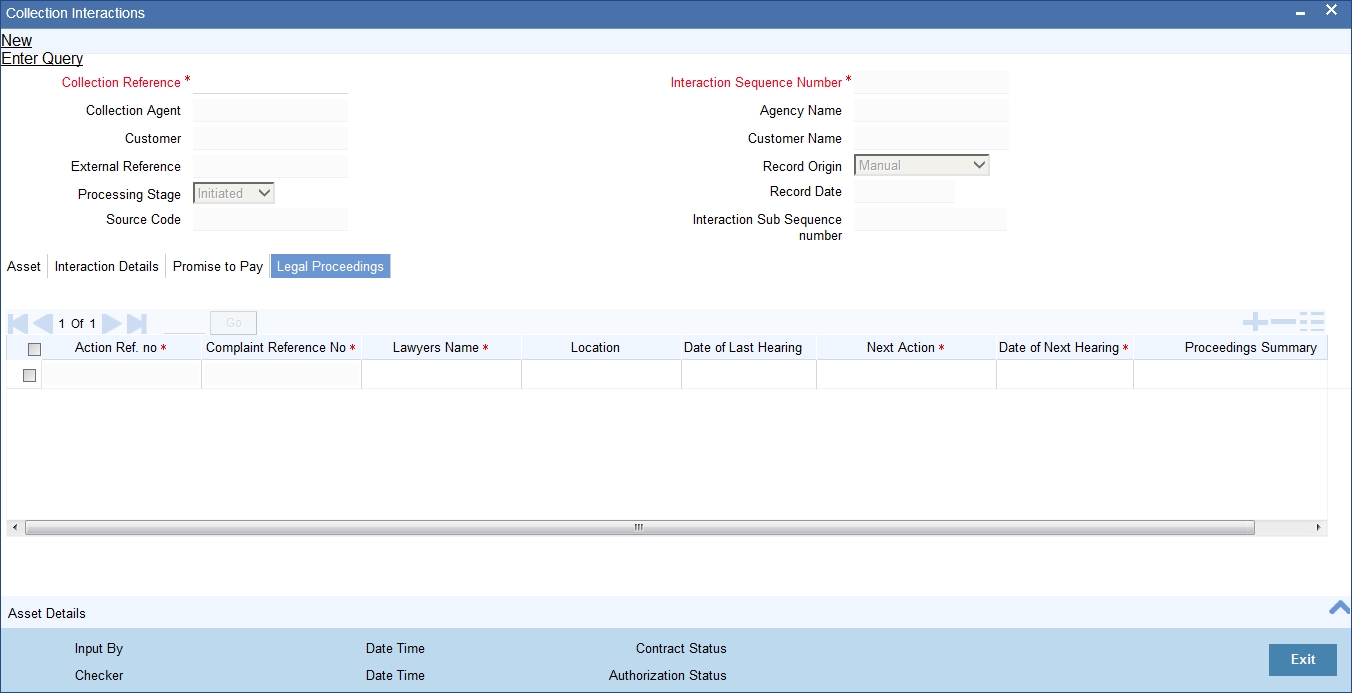
You can specify all the legal proceedings details for the selected asset reference number:
- Action Reference Number – Sequence number for the legal proceedings for the asset
- Compliant Reference Number – FIR number for the legal interaction
- Lawyers Name – Lawyers who has been involved in the legal verification
- Location – Location
- Date of Last hearing – Date on which the last hearing was initiated
- Next Action – Next action defined
- Date of Next Hearing – Next hearing date
- Proceedings Summary – Description for the legal proceedings
5.2.6 Asset Details Button
Click ‘Asset Details’ to invoke the ‘Collection Asset Details’ screen.
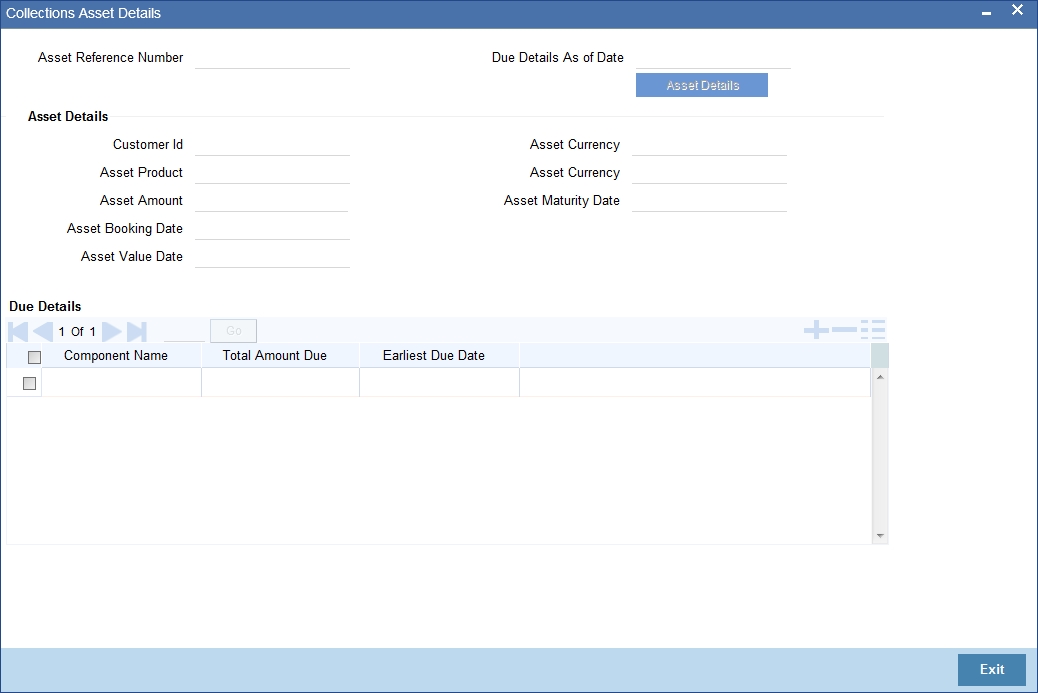
You can view the asset details here.
5.2.6.1 Viewing Asset Payment History
Click ‘Payment History’ to invoke the ‘Asset Payment History’ screen. You can view the asset payment history details using this screen.
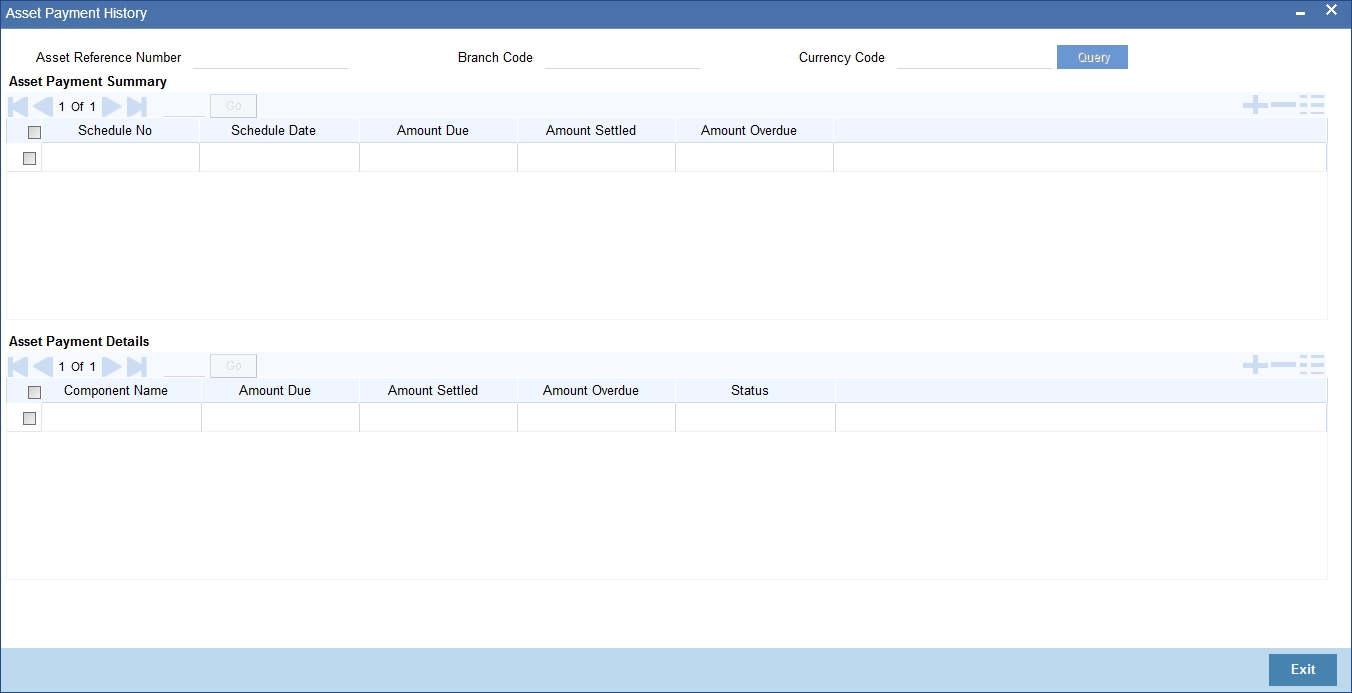
System displays the following details here:
- Asset Reference Number
- Branch Code
- Currency Code
System displays the summery of asset payments in ‘Asset Payment Summery’ section:
- Schedule Number – Schedule sequence number
- Schedule Date – Payment schedule date for the asset including all components
- Amount Due – Payment due amount
- Amount Settled – Amount paid
- Amount Overdue – Overdue payment for the asset
System displays the payment details of individual components in ‘Asset Payment Details’ section:
- Component Name – Individual component in the asset
- Amount Due – Payment due amount
- Amount Settled – Amount paid
- Amount Overdue – Overdue payment for the asset
- Status – Status of the payment
5.2.6.2 Viewing Collection Interaction History
Click ‘Interaction History’ to invoke the ‘Collection Interaction History’ screen. You can view the collection interaction history details using this screen.
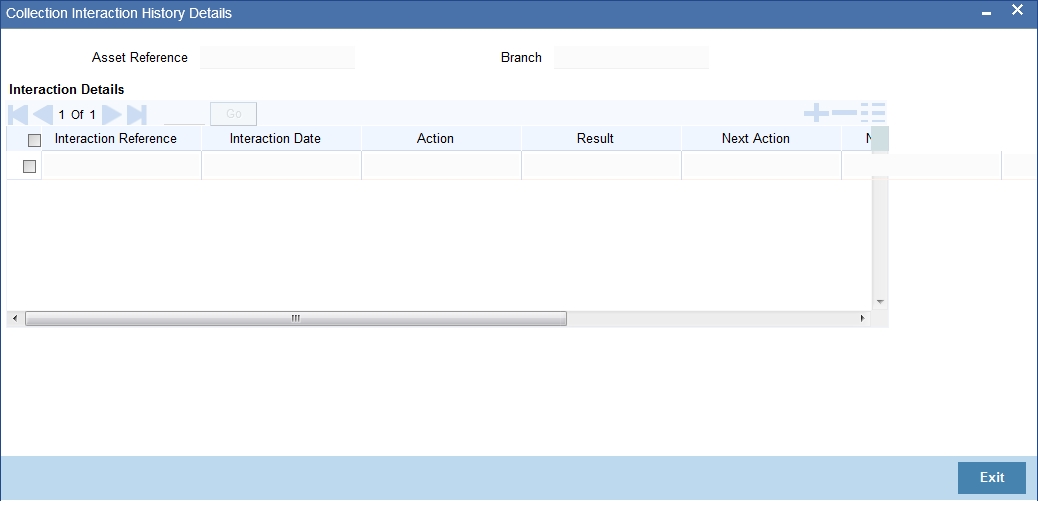
System displays the following details here:
- Asset Reference
- Branch
System displays the interaction history of the selected asset in ‘Interaction Details’ section:
- Interaction Reference – Reference number to identify the interaction
- Interaction Date – Date on which interaction has been initiated
- Action – Action performed on interaction date
- Result – Result of the action
- Next Action – Next action after the result
- Next Action Date – Date on which the next action has been scheduled to be initiate
- PTP Amount – Amount promised to pay
- PTP Date – Date on which customer has promised to pay amount
5.2.6.3 Viewing Customer Contact Details
Click ‘Customer Contacts’ to invoke the ‘Customer Address Details’ screen.
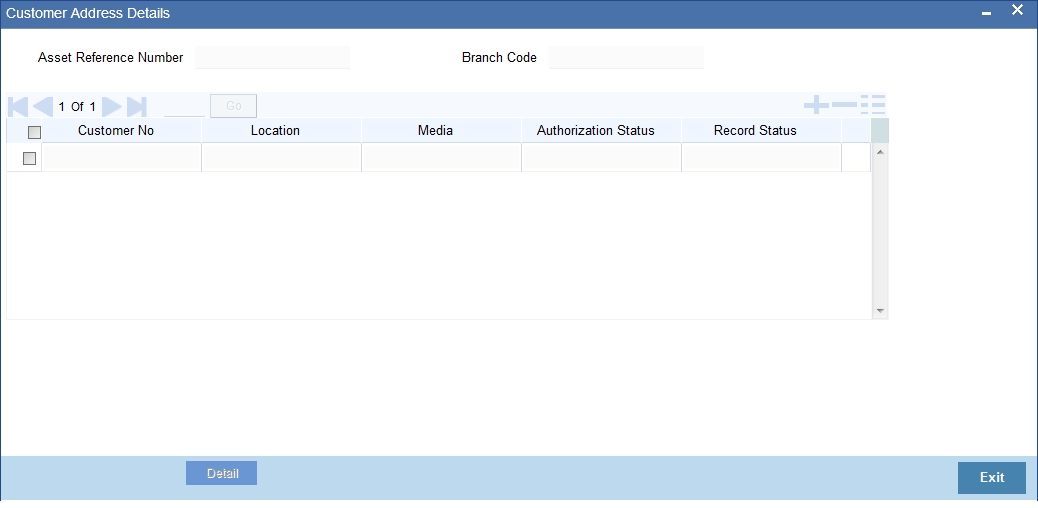
System displays the following details here:
- Asset Reference Number
- Branch Code
System displays the customer address of the selected asset reference number:
- Customer Number
- Location
- Media
- Authorization Status
- Record Status
Click the ‘Detail’ button to invoke the ‘Customer Address’ screen.
5.2.7 Viewing the Summary of Interaction Record
You can view the summary of collection interaction record in the ‘Summary interaction record’ screen. You can invoke this screen by typing ‘CNSCOLIN’ in the field at the top right corner of the Application tool bar and clicking on the adjoining arrow button.
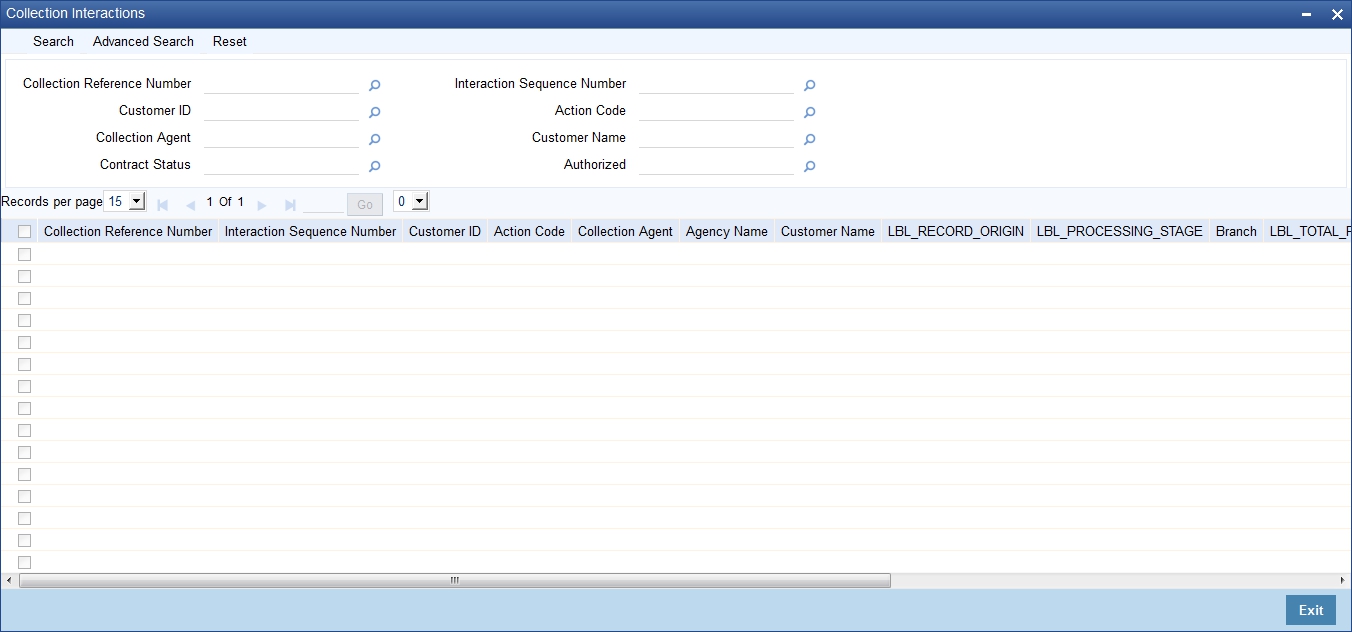
To view the summary of collection interaction record, you can perform a search based on any of the following.
Collection Reference
Select collection reference number from the options maintained.
Customer
Select a valid customer from the options maintained.
Collection Agent
Select a valid collection agent from the options maintained.
Interaction Sequence Number
Select a valid interaction sequence number from the options maintained.
Action code
Select a valid action code from the options maintained.
Click ‘Search’ button to view the records based on criteria you have selected. The following details of the record get displayed.
- Collection Reference
- Customer Code
- Customer Name
- Record Origin
- Collection Agent
- Agency Name
- Interaction Sequence Number
- Action Code
- Processing Stage
- Total PTP Amount
- Result of Action
- Action Date
5.2.8 Operations on Collection Interaction Record
You can perform the following operations on collection interaction record (if any function under the application toolbar is disabled, it means that the function is not allowed for the record):
- Create a record
- Liquidate the record
- Amend the details of the record
- Authorize the record
- Copy the details of a record on to a new record
- Print the details of a record
Refer to the manual on Common Procedures for details of these operations.
5.3 Collection Reminder Messages
This section contains the following topics:
- Section 5.3.1, "Creating Collection Reminder Messages"
- Section 5.3.2, "Viewing the Summary of Reminder Message Record"
- Section 5.3.3, "Operations on Reminder Message Record"
5.3.1 Creating Collection Reminder Messages
During the collection process, there could be an action item which requires a reminder message to be sent from the system. The reminder details can be created as a diary based on the action date and the reminder date based on the details of interaction with the customer.
When a Customer Interaction is recorded by a Collection agent, a record is automatically created in the collection ‘Collection Reminder Messages’ screen depending on the next action code. If the message should be send manually, you can generate it using the manual option and the message date can be given manually.
You can invoke this screen by typing ‘CNDCLDRY’ in the field at the top right corner of the Application tool bar and clicking on the adjoining arrow button.
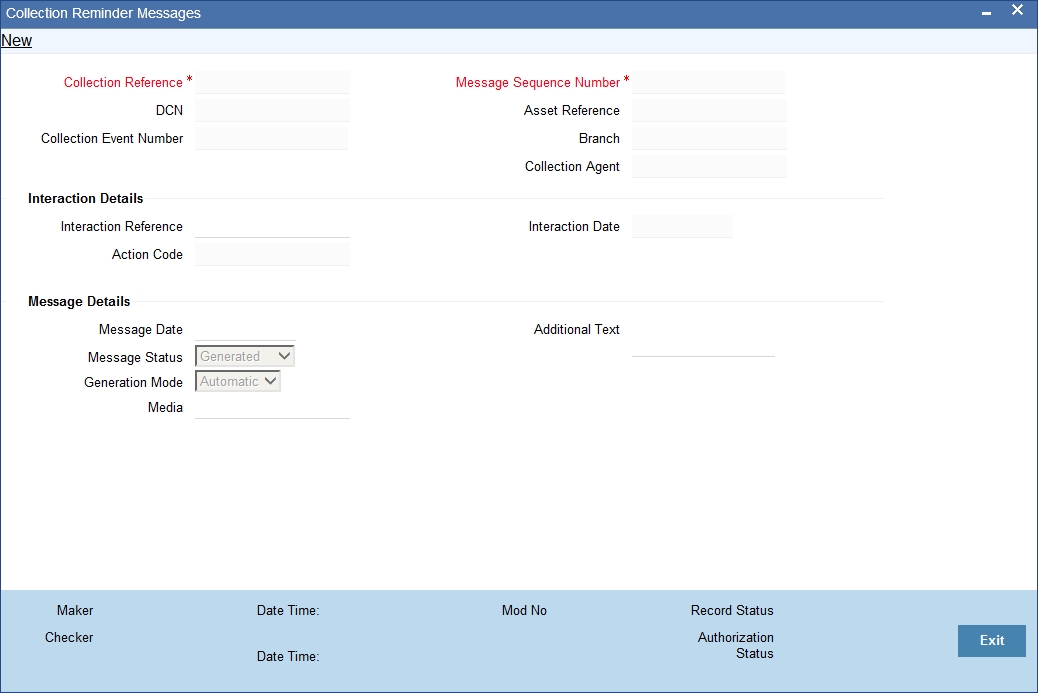
You can map reminder messages to the action codes here. The branch code gets defaulted to the screen. The Message Sequence Number gets generated by the system.
Collection Reference Number
Select the collection reference number associated with the message for which you want to map reminder.
The following details of the selected collection reference number get defaulted here:
- Branch
- Collection Agent
- Asset Reference Number
- Collection Event Number
Interaction Details
The interaction reference number and details are captured here.
Interaction sequence number
Specify the interaction sequence number if have opted for manual input. If opted for automatic input, the interaction sequence number gets defaulted.
The date of interaction gets defaulted.
Message Details
The message details get defaulted here.
Message Date
Specify the date on which the message has to be generated.
Message Status
The message status can be selected as per the current state of collection interaction from the following options:
- Generated – G
- Un-Generated – U
- Cancelled – C
Generation Mode
Specify the mode of message generation as auto or manual.
The media of reminder message gets defaulted here as per the maintenance. Incase the default media is null; ‘Mail’ gets selected as media.
Additional Text
Specify the additional information about the reminder message.
Media
The medium of communication gets defaulted from the Media/Address maintenance. You can amend the details here.
You can save the mapping of reminder message and interaction details. CNMS event gets fired with Collection Event Number while generating message. No operations are allowed after authorizing a reminder message.
5.3.2 Viewing the Summary of Reminder Message Record
You can view the summary of collection interaction reminder record in the ‘Summary Reminder Message Record’ screen.
You can invoke this screen by typing ‘CNSCLDRY’ in the field at the top right corner of the Application tool bar and clicking on the adjoining arrow button.
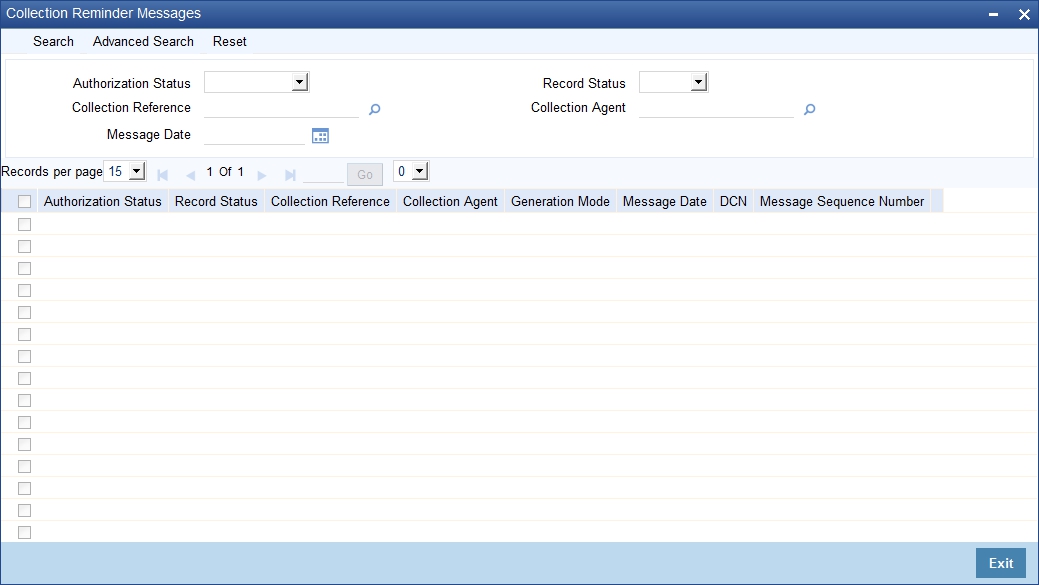
To view the summary of collection reminder message, you can perform a search based on any of the following.
Authorisation Status
Select the authorisation status of the collection reminder message as:
- Authorised
- Unauthorised
Record Status
Select the record status of the collection reminder message as:
- Open
- Closed
Collection Reference
Select collection reference number from the options maintained.
Collection Agent
Select a valid collection agent from the options maintained.
Message Date
The date on which message is generated for the customer.
Click ‘Search’ button to view the records based on criteria you have selected. The following details of the record get displayed.
- Authorisation Status
- Record Status
- Collection Reference
- Collection Agent
- Generation Mode
- Message Date
- DCN
- Message Sequence Number
5.3.3 Operations on Reminder Message Record
You can perform the following operations on collection interaction record (if any function under the application toolbar is disabled, it means that the function is not allowed for the record):
- Create a record
- Amend the details of the record
- Authorize the record
- Query the record
- Delete the record
Refer to the manual on Common Procedures for details of these operations.
5.4 Collection Queue Change
This section contains the following topics:
- Section 5.4.1, "Changing Collection Queue for Loans"
- Section 5.4.2, "Viewing the Summary of Collection Queue Change Details"
- Section 5.4.3, "Operations on Collection Queue change for Loans Record"
5.4.1 Changing Collection Queue for Loans
In Oracle FLEXCUBE, you can manually change the collection queue of a particular loan. You can use ‘Collection Queue Change’ screen to change the existing collection queue and apply new collection queue.
You can invoke this screen by typing ‘CNDCNQCH’ in the field at the top right corner of the Application tool bar and clicking on the adjoining arrow button.

For every manual collection queue change a unique queue change reference number will be generated with the maker id, checker id details stored against each such reference number.
Comments
Specify any comments related to this queue change here, which can be used while retrieving information in the summary screen.
Query
You can query this screen on the following details.
Asset Reference Number
Specify a valid asset reference number to perform a query based on it.
Customer ID
Specify a valid customer id to perform a query based on it.
Collection Queue
The collection Agent can be assigned only within the collection Agent group linked to the Queue. Specify a valid collection queue value to perform a query based on it.
Product
Specify a valid asset product code to perform a query based on it.
Loan Status
Specify the loan status to perform a query based on it.
Minimum Total amount over due
Specify the minimum amount overdue to query the asset records with the total amount Overdue greater than or equal to this amount.
Minimum Overdue Days
Specify a minimum number of overdue days to query the asset records with total number of overdue days greater than or equal to this number.
Minimum Overdue Schedules
Specify a minimum number of overdue schedules to query the asset records with total number of overdue schedules greater than or equal to this number.
Customer Category
Specify the customer category to perform a query based on it.
Customer Credit Rating
Specify the customer credit rating to perform a query based on it.
Currency
If you have mentioned the minimum amount overdue this field is mandatory. Specify the asset currency to perform a query based on it.
Click ‘Query’ button to perform query based on the selected values. The following values get displayed below in the multiple entry blocks of the screen:
- Asset Reference Number
- Total Amount Due
- Currency
- Current Collection Queue
- New Collection Queue
New Collection Queue
Specify the new assign queue to the each asset retrieved.
Note
The event CQAS (Collection Queue assignment) is fired for all the Collection contracts listed after the save.
Apply to All
Select this box if the particular queue selected should be applied to all.
Click ‘Apply’ button to apply the selected queue to be applied to all the asset references queried. And your access to the selected queue is validated while saving the queue change.
Note
You cannot amend the record after the authorization.
5.4.2 Viewing the Summary of Collection Queue Change Details
You can view the summary of collection queue change details in the ‘Summary Collection Queue Change’ screen.
You can invoke this screen by typing ‘CNSCNQCH’ in the field at the top right corner of the Application tool bar and clicking on the adjoining arrow button.
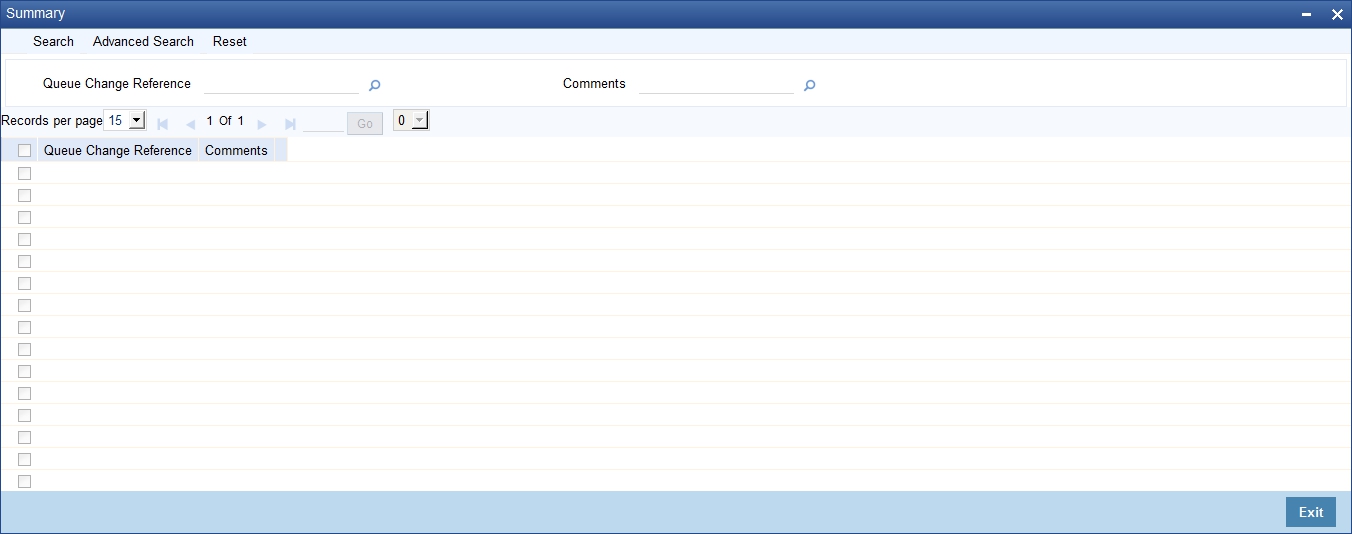
You can query the Collection Queue Change details here.
Queue Change Reference
Select a valid Collection Queue Change reference number from the list of options available.
Comments
Select valid comments for Collection Queue Change from the list of options available.
Click ‘Search’ button to view the records based on criteria you have selected. The following details of the record get displayed.
- Queue Change Reference
- Comments
5.4.3 Operations on Collection Queue change for Loans Record
You can perform the following operations on collection queue change maintenance record (if any function under the application toolbar is disabled, it means that the function is not allowed for the record):
- Create and save new record
- Authorize the record
- Delete the record
- Query the details of record
Refer to the manual on Common Procedures for details of these operations.
5.5 Broken Promise Fee Reversal
This section contains the following topics:
- Section 5.5.1, "Reversing Broken Promise Fee"
- Section 5.5.2, "Viewing the Summary of Reversal of Broken Fee Record"
5.5.1 Reversing Broken Promise Fee
During EOD batch run broken promise fee is collected from the customer if he defaults a PTP (promise to pay) policy. However, if required the fee collected can be reversed through ‘Broken Promise Fee Reversal’ screen.
You can invoke this screen by typing ‘CNDBPFEE’ in the field at the top right corner of the Application tool bar and clicking on the adjoining arrow button.
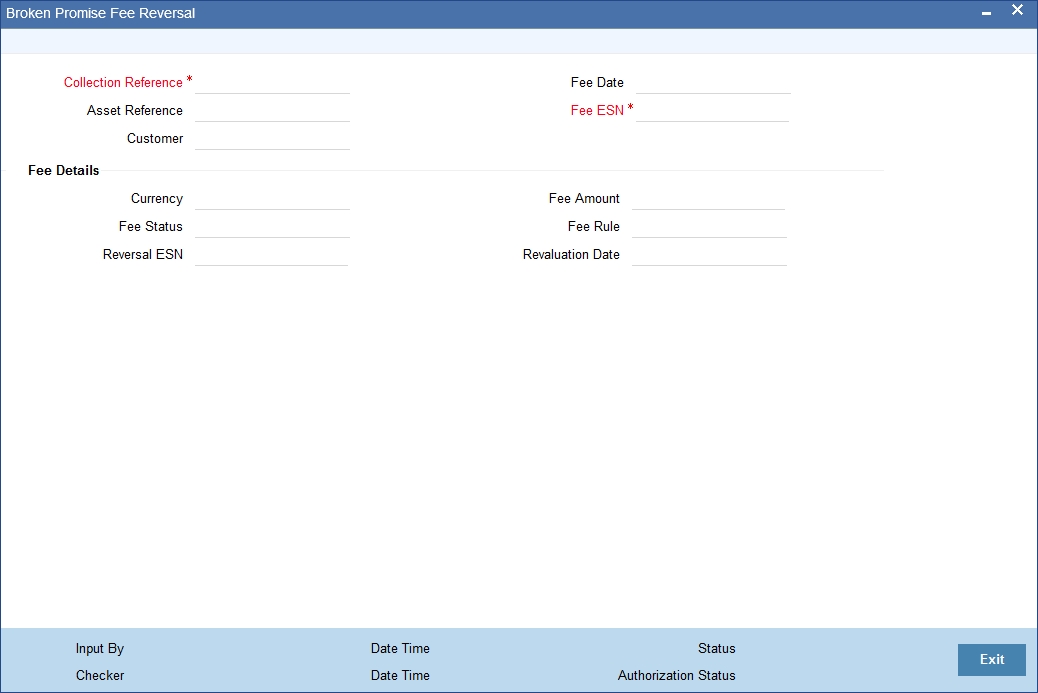
You can reverse the fee of broken fee here.
Collection Reference Number
Specify the collection reference associated with the broken promise fee.
Click ‘query’ button to view all the details of broken fee collected related to the specified collection reference number. The following details get displayed:
- Asset Reference number
- Fee Date
- Fee Event Sequence Number
- Customer
Fee Details
You can view the following fee details here.
- Currency
- Fee Status
- Broken Promise Fee
- Fee Rule
You can click Reverse from the menu to pass the reversal entries. An event Reversing Broken Promise Fee (RFEE) gets fired. After the fee has been reversed the reversal event sequence number and the date of reversal gets defaulted.
5.5.2 Viewing the Summary of Reversal of Broken Fee Record
You can view the summary of broken fee reversal record in the ‘Summary broken fee reversal record’ screen.
You can invoke this screen by typing ‘CNSBPFEE’ in the field at the top right corner of the Application tool bar and clicking on the adjoining arrow button.
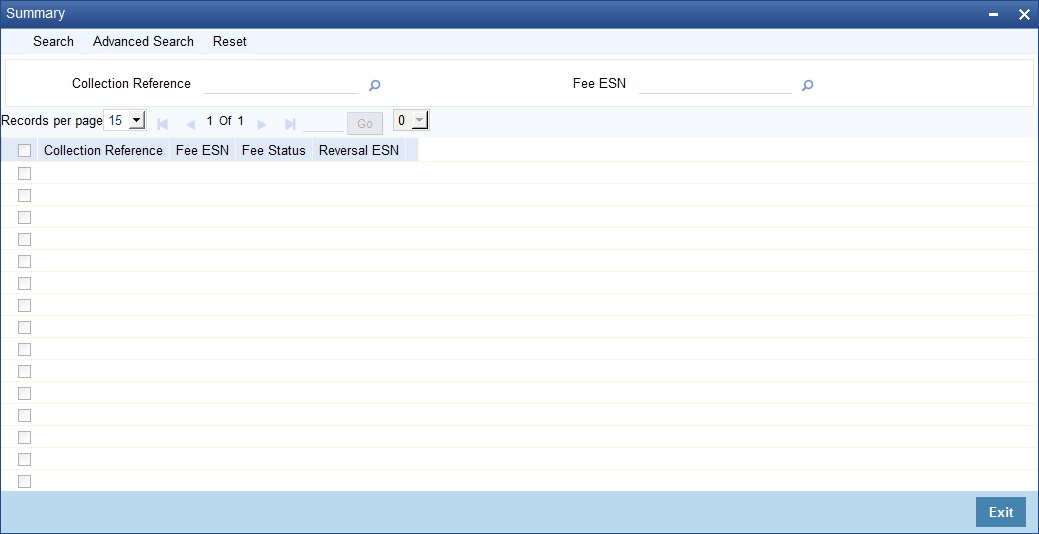
Collection Reference
Select collection reference number from the options available.
Fee Event Sequence Number
Select a valid fee event sequence number from the options available.
Click ‘Search’ button to view the records based on criteria you have selected. The following details of the record get displayed.
- Collection Reference
- Fee Event Sequence Number
- Reversal Esn
- Fee Status
5.6 Interaction Approval Queue
This section contains the following topic:
5.6.1 Processing Collection Interaction Queues
You can process the interaction processing approvals using the screen ‘Interaction pending Approval Queues’. The following types of approvals for the interactions which are in the initiated stages can be processed here:
- The Interactions generated by the batch process on next action date of the previously executed interactions that requires approval.
- The Interactions pending approvals from the daily processing.
You can invoke this screen by typing ‘CNDINAPQ’ in the field at the top right corner of the Application tool bar and clicking on the adjoining arrow button.
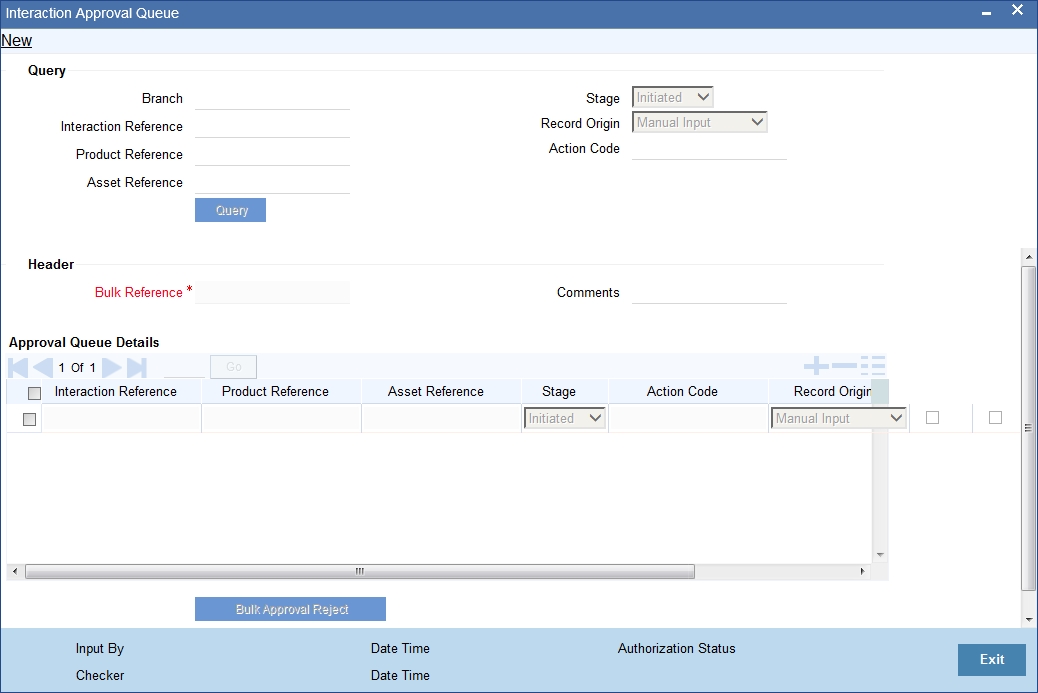
The records can be approved or rejected in bulk. Bulk reference numbers are generated for storing the audit log. The two events which can be fired here are ‘CNAP’ or ‘CNRJ’ which are auto authorised.
5.7 Collection Agent Dashboard Screen
This section contains the following topics:
5.7.1 Viewing Collection Agent Dashboard
You can view the collection activities across the queues for an agent. You can invoke this screen by typing ‘CNDDASH’ in the field at the top right corner of the Application tool bar and clicking on the adjoining arrow button.
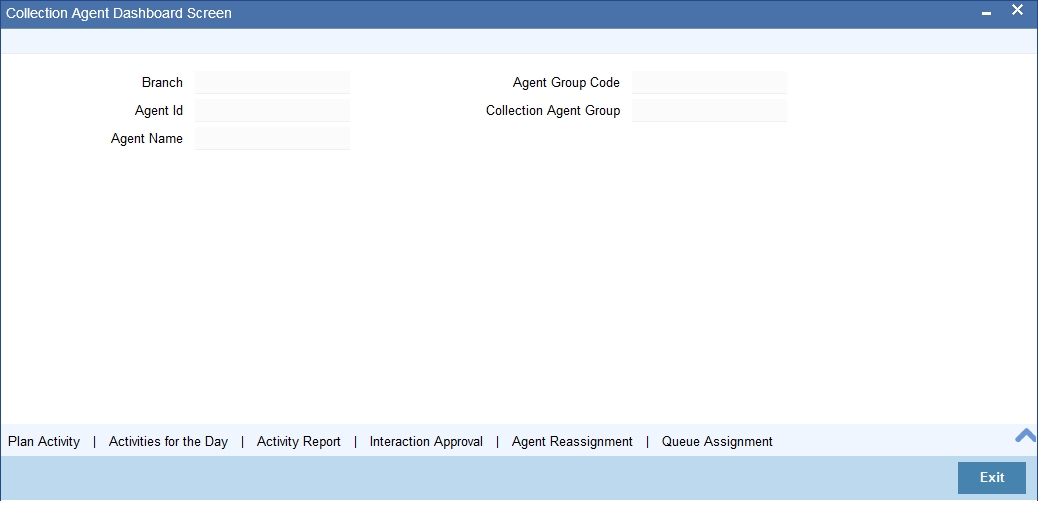
Agent Id
Specify the identification number of the agent from the adjoining option list.
Note
You can access only allowed agents’ details in the dashboard.
System displays the following details:
- Branch – The current branch code from the adjoining option list.
- Agent Name – The agent’s name.
- Agent Group Code – The agent group code.
- Collection Agent Group – The agent group description.
For further information on generic attributes about collection agent, please refer the same user manual.
5.7.2 Plan Activity Button
You can track the daily activities for an agent across the queues. You can invoke this screen from the ‘Collection Agent Dashboard’ by clicking on the ‘Plan Activity ‘button.
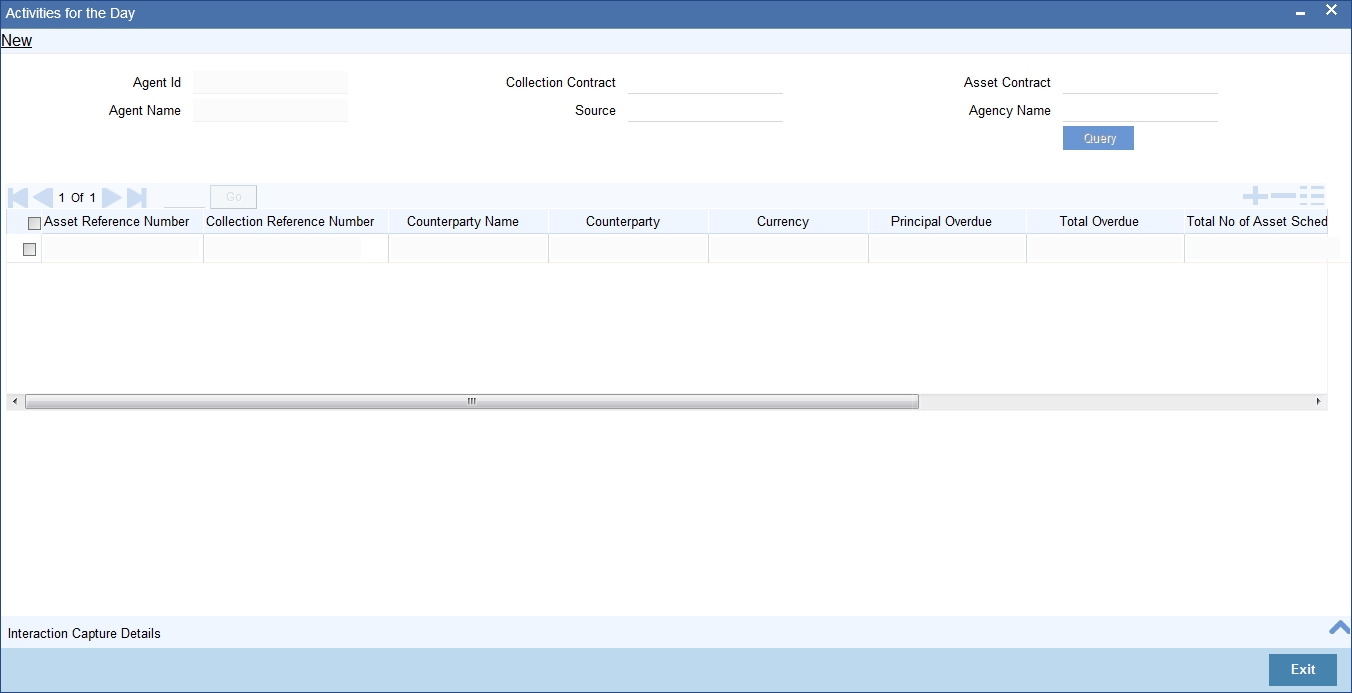
You can specify any or all of the following details and click on ‘Query’ to view the daily activities for the agent.
- Agent Id
- Agent Name
- Collection Contract
- Source
- Asset Contract
System displays the following information based on the query:
- Asset Reference Number – Reference number of the asset
- Collection reference Number – Reference number of the collection contract
- Counterparty Name – Owner of the asset
- Counterparty – Owner Id of the asset
- Currency – Currency of the asset
- Principal Overdue – Overdue of the principal component
- Total Overdue – Total overdue of the principal and the main interest component
- Total No of Asset Schedules Overdue – Maximum number of days overdue for the main interest or principal components
- Phone Number – Contact number of the customer
- E-mail – E-mail address of the customer
- Comments – User comments
5.8 Plan Activity
This section contains the following topic:
5.8.1 Viewing the Plan Activity
You can query the process of collection through ‘Plan Activity’ screen. You can view the details in the screen though you cannot perform any operations.
You can invoke this screen by typing ‘CNDCADSH’ in the field at the top right corner of the Application tool bar and clicking on the adjoining arrow button.
You can query the screen using F7 & F8. After the screen is displayed you can press F7 you can get all the fields enabled to enter the data for querying.
You can perform the query here.
Query
Specify the following details to perform query.
Branch
Specify the branch code to query the collection details based on it.
Collection Product
Specify the collection product code to query the collection details based on it.
Asset Product
Specify the asset product code to query the collection details based on it.
Collection Status
Specify the collection status to query the collection details based on it.
Collection Queue
Specify the collection queue to query the collection details based on it.
Collection Agent Group
Specify the collection agent group code to query the collection details based on it.
Collection Agent
Specify the collection agent code to query the collection details based on it.
Collection Reference
Specify the collection reference number to query the collection details based on it.
Asset Reference
Specify the asset reference code to query the collection details based on it.
Customer
Specify the customer code to query the collection details based on it.
Minimum Overdue
Specify the minimum sum of the overdue amount of principal and main interest components for the asset.
Minimum Principal Overdue
Specify the minimum overdue of the principal component for the asset.
Minimum Interest
Specify the minimum overdue amount for the main interest component for the asset.
Unique Identifier
Specify the unique identifier for the asset owner.
Next Activity
Specify the next planed interaction activity for the asset.
Customer Name
Specify the name of the customer.
Next Activity Dates
Specify the next due date for the planed activity.
After specifying the values in the screen, click ‘Query’ button or press F8 to perform the query. The following list of assets under collections process conforming to the query criterion is displayed:
- Asset Reference
- Latest Collection Reference
- Queue
- Collection Agent Group
- Collection Agent
- State
- Collection Status
- Select
Click ‘View Collection Details’ to view the following collection details.
- The different collection references and interactions that are associated to the Asset reference selected in the parent screen.
- Events that got fired in the latest collection reference number.
- PTP Details for each Collection Reference-Interaction Reference combination
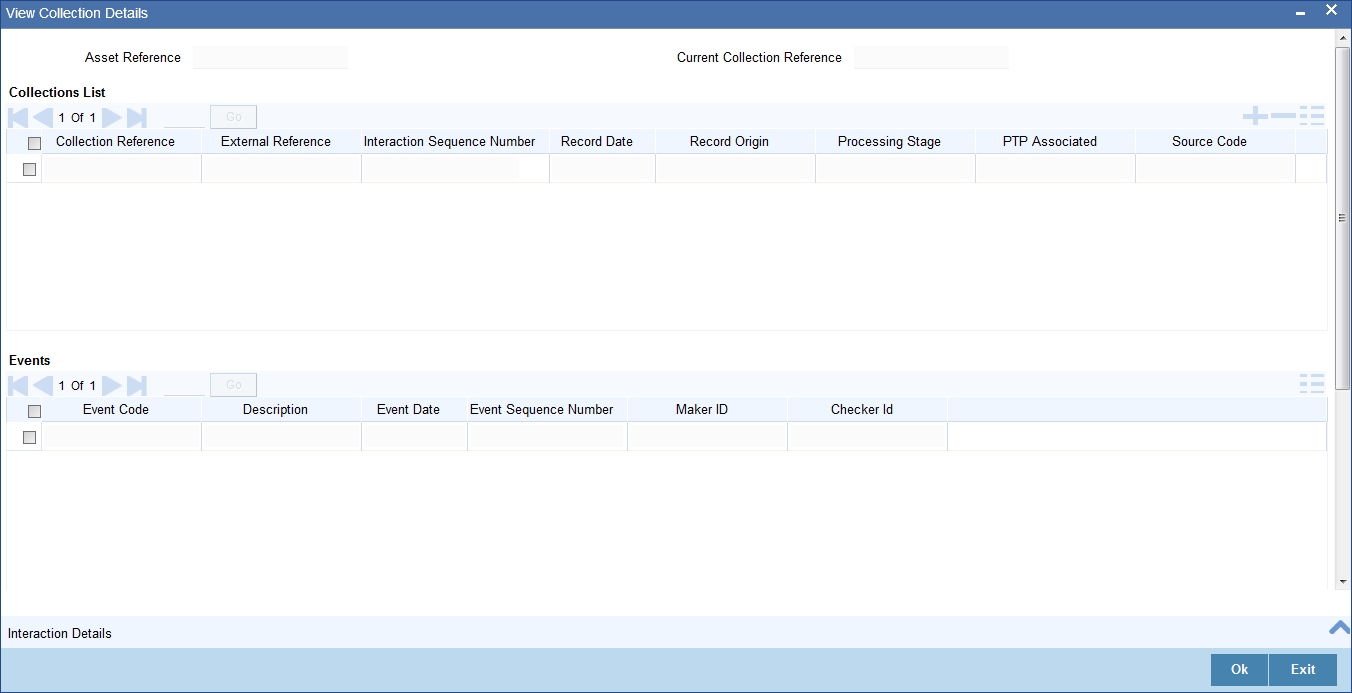
The following details are displayed:
- Asset Reference
- Current Collection Reference
Collections List
- Collection Reference
- External Reference
- Interaction Sequence Number
- Record Date
- Record Origin
- Processing Stage
- PTP Associated
Events
- Event Code
- Description
- Event Date
- Event Sequence Number
- Maker ID
- Checker ID
On click of “Interaction Details” button, the Customer Interaction Screen (CNDCOLIN) is launched for the Collection Reference number and Interaction Reference number selected.
Click ‘View Asset Details’ to view the basic asset details.
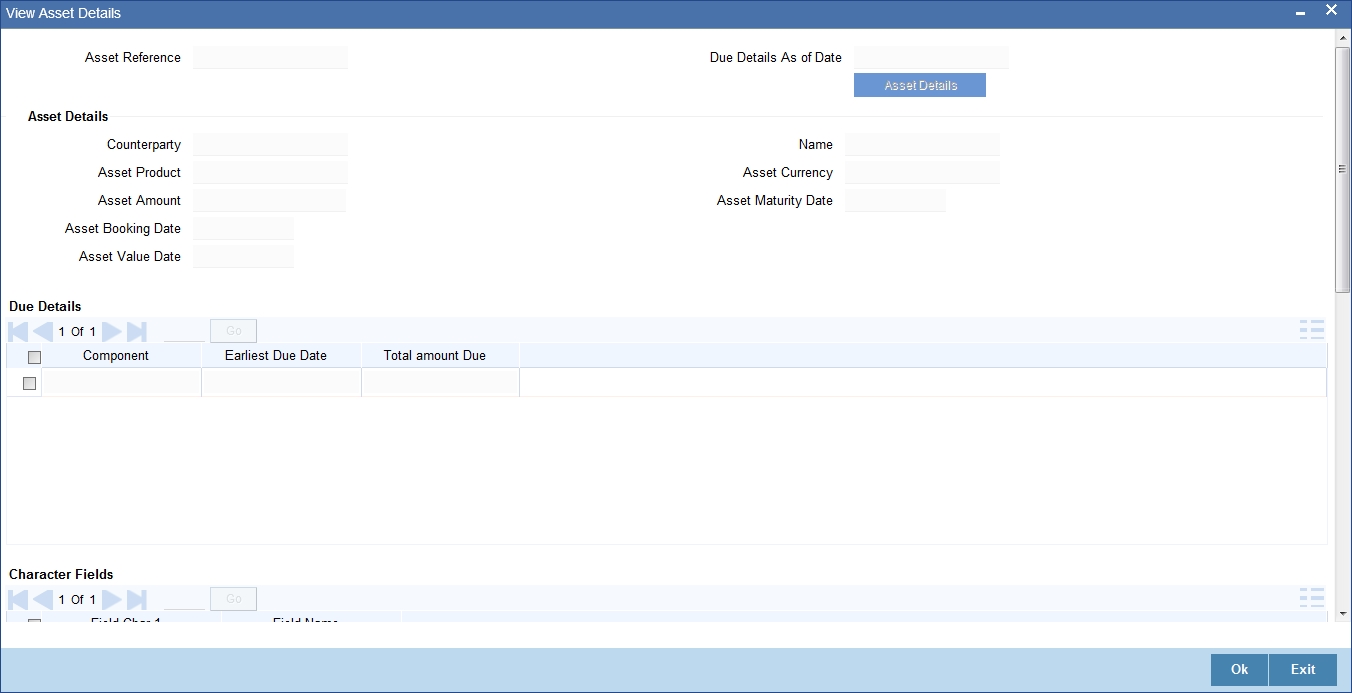
The Asset Reference Number and Due Details as of Date are displayed from the parent screen.
Asset Details
Following asset details are displayed here:
- Counter Party
- Asset Product
- Asset Amount
- Asset Booking Date
- Asset Value Date
- Name
- Description
- Asset Currency
- Asset Maturity Date
Due Details
The following due details are displayed here:
- Component
- Earlier Due Date
- Total Amount Due
- Amount Paid
5.9 Collection Agent Assignment
This section contains the following topic:
- Section 5.9.1, "Assigning Collection Agent for a Loan"
- Section 5.9.2, "Component Wise Balance Details Button"
- Section 5.9.3, "Processing Collection Agent Fee"
- Section 5.9.4, "Viewing the Summary of Collection Agent Assignment Record"
- Section 5.9.5, "Operations on Collection Agent Assignment Record"
5.9.1 Assigning Collection Agent for a Loan
In Oracle FLEXCUBE, you can change the collection agent, if a particular collection agent fails to collect the loan amount due in the ‘Collection Agent Assignment’ screen. You can assign new agent through ‘Collection Agent Assignment’ screen. When you assign a new collection agent the interactions recorded for the old agent gets cancelled.
You can invoke this screen by typing ‘CNDCAASG’ in the field at the top right corner of the Application tool bar and clicking on the adjoining arrow button.
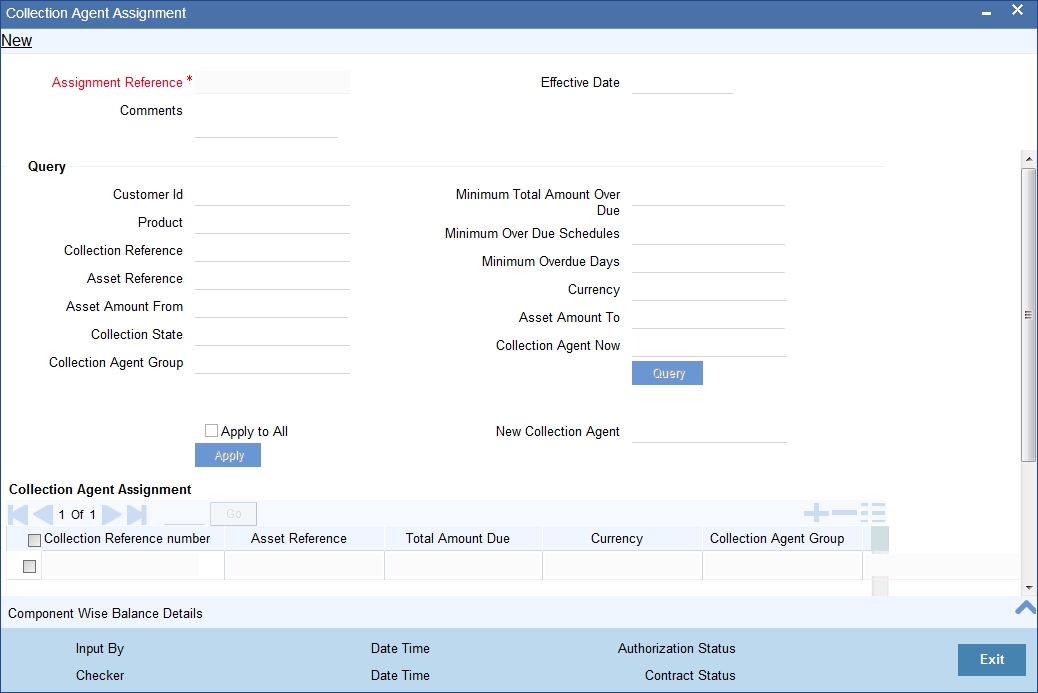
You can query the screen based on the following fields:
Customer ID
Specify the customer ID of the customer whose loan amount is due.
Product
Specify the asset product for which the amount due.
Asset Reference number
Specify the asset reference number as per the collection assignment.
Collection Reference number
Specify the collection reference number of the amount due.
Asset Amount From
Specify the starting amount range for which you want to change the collection agent.
Asset Amount To
Specify the amount limit for which you want to change the collection agent.
Collection State
Specify the collection status of the loan for which you want to change the collection agent.
Collection Agent Group
Specify the collection agent group for which you want to change the collection agent.
Minimum Total Amount Overdue
Specify the total outstanding amount of a loan for which you want to change the collection agent.
Minimum Overdue Schedules
Specify the limit of overdue schedules of a loan for which you want to change the collection agent.
Minimum Overdue Days
Specify the limit of overdue days of a loan for which you want to change the collection agent.
Currency
Specify the currency of a loan for which you want to change the collection agent.
Collection Agent Now
Specify the current collection agent of a loan for which you want to change the collection agent.
Click ‘Query’ button to perform a query based on any of the fields above. The bellow grid displays the following details of all the records matching the selected criteria.
Apply to All
Check this box and click apply button to assign the new collection agent to all the records with the selected criteria.
Comments
Specify any comments related to this new collection agent assignment here.
While authorizing the new collection agent assignment, as event ‘CASG’ (Collection Agent Re-Assignment) is fired in all the underlying Collection contracts. A unique assignment reference number is generated which can be used to identify the bunch of contracts for which the assignment has been done in a particular lot. You cannot perform any operation after the authorization.
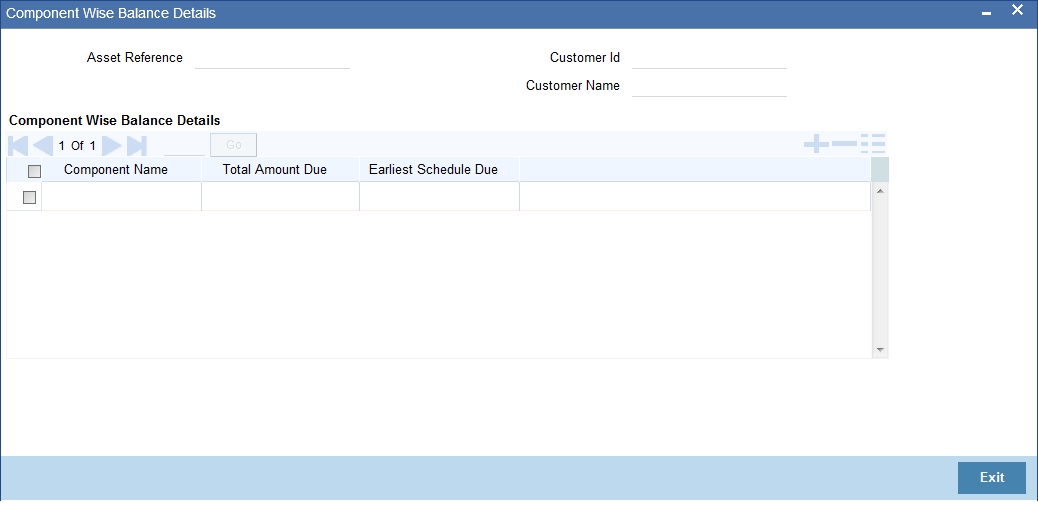
5.9.2 Component Wise Balance Details Button
Click ‘Component Wise Balance Details’ button to view component wise due details of the asset reference number selected in the ‘Collection Agent assignment’ screen.
You can view the details of assets from the Oracle FLEXCUBE in the ‘component wise balance’ screen.
5.9.3 Processing Collection Agent Fee
In the intermediary module, total liquidated amount paid as collection agent fee is available as an SDE for the definition of collection agent fee. The payment reversal is also handled through another SDE for the reversal amount. The liquidation process also happens in intermediary module.
Element |
Description |
LOAN_COLLECTED_AMT |
This SDE will return the sum of the amount collected by the intermediary (collection agent). |
LOAN_COLL_REV_AMT |
This SDE will return the sum of the reversed amount, which was collected by the intermediary (collection agent) but reversed. |
Refer intermediary module to know more details on collection agent fee definition, fee reversal and liquidation
5.9.4 Viewing the Summary of Collection Agent Assignment Record
You can view the summary of collection agent assignment record in the ‘Summary Collection Agent Assignment’ screen.
You can invoke this screen by typing ‘CNSCAASG’ in the field at the top right corner of the Application tool bar and clicking on the adjoining arrow button.
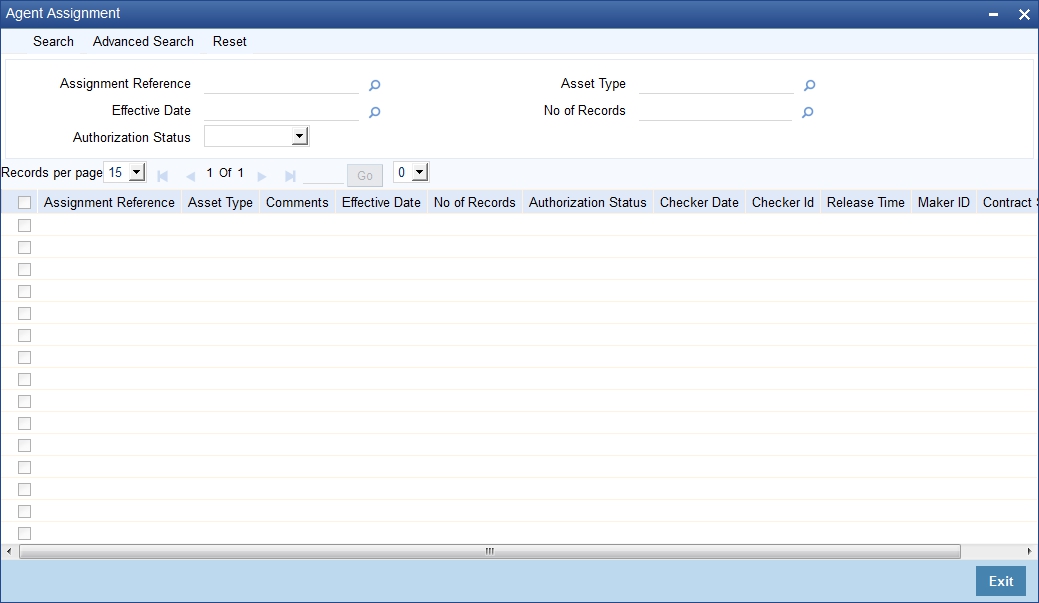
Assignment Reference
Select assignment reference number from the options available.
Maker
Select a valid maker id of the record from the options available.
Effective Date
Select a valid date from the calendar option from available
Click ‘Search’ button to view the records based on criteria you have selected. The following details of the record get displayed.
- Assignment Reference
- Effective Date
- Maker
5.9.5 Operations on Collection Agent Assignment Record
You can perform the following operations on collection agent assignment record (if any function under the application toolbar is disabled, it means that the function is not allowed for the record):
- Create and save a record
- Amend the details of the record
- Authorize the record
- Query the record
- Delete the record
Refer to the manual on Common Procedures for details of these operations.
5.10 Customer Restrictions
This section contains the following topics:
5.10.1 Restricting User – Agent Access
You can restrict the agent access for the user using ‘User Agent Access’ screen. You can invoke this screen by typing ‘CNDUSRAG’ in the field at the top right corner of the Application tool bar and clicking on the adjoining arrow button.
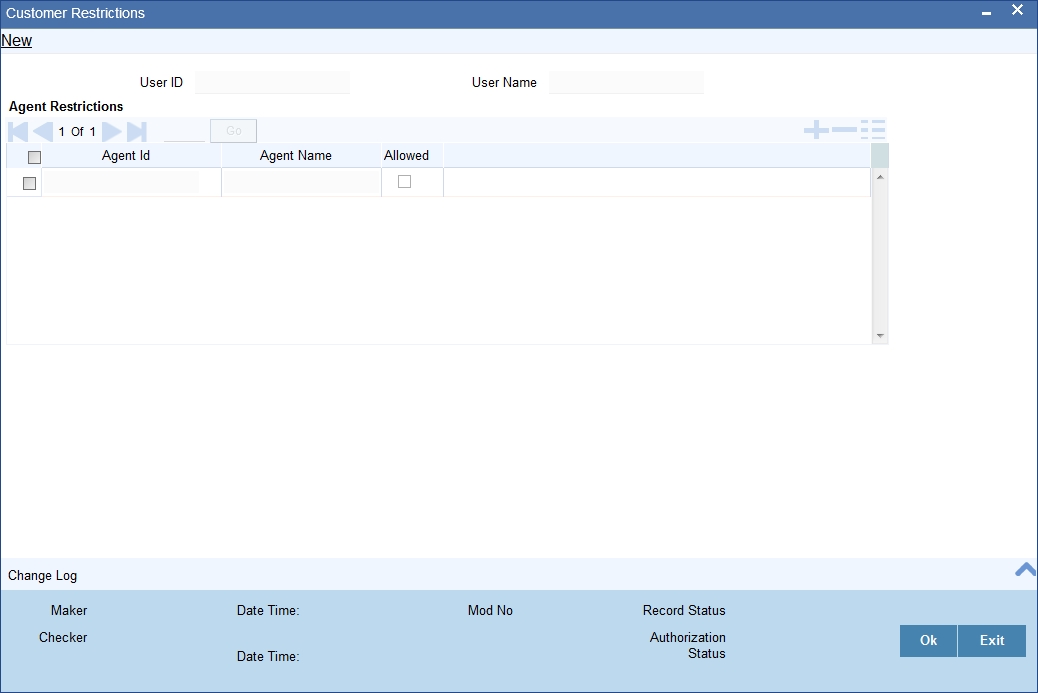
Specify the following details:
User Id
Specify the user Id from the adjoining option list for whom the agent access is restricted.
User Name
Specify the name of the user.
Agent restrictions
Agent Id
Specify the agent Id from the adjoining option list.
Agent Name
Specify the name of the agent.
Allowed
Check this box to indicate that the agent access is allowed for the user.
5.10.2 Viewing User - Agent Details
You can view the agent details using ‘User Agent Summary’ screen. You can invoke this screen by typing ‘CNSUSRAG’ in the field at the top right corner of the Application tool bar and clicking on the adjoining arrow button.
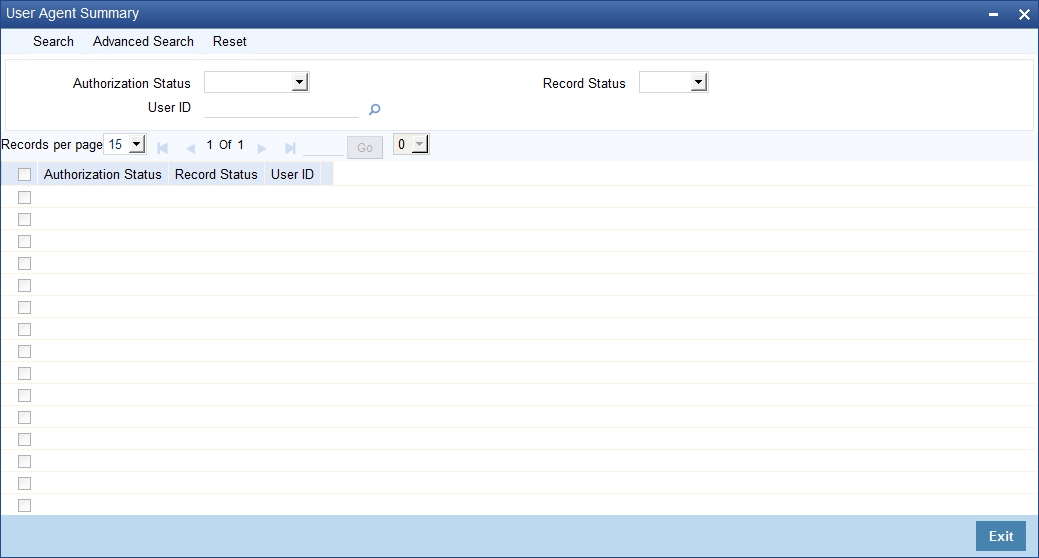
In the above screen, you can base your queries on any or all of the following parameters and fetch records:
- Authorization Status
- User ID
- Record Status
Select any or all of the above parameters for a query and click ‘Search’ button. The records meeting the selected criteria are displayed.
The system displays the following details pertaining to the fetched records:
- Authorization Status
- User ID
- Record Status