4. Defining the Attributes of an Islamic Bills and Collections Product
4.1 Introduction
In this chapter, we shall discuss the manner in which you can define attributes specific to an Islamic Bills and Collections (IBC) product.
This chapter contains the following sections
- Section 4.2, "Characteristics for a Product"
- Section 4.3, "Specifying the Role Details"
- Section 4.4, "Specifying Event Details"
- Section 4.5, "Specifying Branch Details"
- Section 4.6, "Specifying Customer Details"
- Section 4.7, "Specifying Preferences for a Product"
- Section 4.8, "Specifying The Charges"
- Section 4.9, "Specifying MIS Details"
- Section 4.10, "Specifying ICCF Details"
- Section 4.11, "Specifying Discount Accrual Details"
- Section 4.12, "Specifying Tax Details"
- Section 4.13, "Specifying Tracer Details"
- Section 4.14, "Specifying Free Format Text Details"
- Section 4.15, "Documents for a Product"
- Section 4.16, "Status Details"
- Section 4.17, "Specifying Field Details"
4.2 Characteristics for a Product
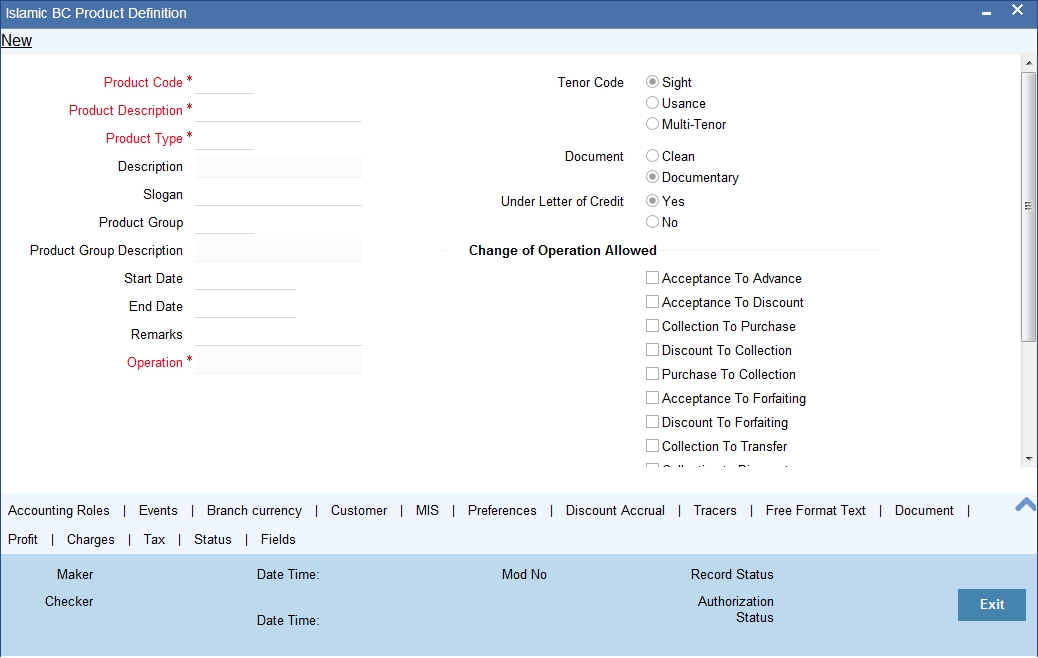
You can create a bills and collections product in the ‘Islamic BC Product Maintenance’ screen, invoked from the Application Browser. You can invoke the ‘Islamic BC Product Maintenance’ screen by typing ‘IBDPRMNT’ in the field at the top right corner of the Application tool bar and clicking the adjoining arrow button. In this screen, you can enter basic information relating to an IBC product such as the Product Code, the Description, etc
.
The primary attribute of a product is whether the bills linked to it are either:
- Import Bills under LCs
- Import Bills not under LCs
- Export Bills under LCs
- Export Bills not under LCs
- Incoming Collections
- Outgoing Collections
- Usance or Sight Bills
- Documentary or Clean Bills
The first attribute you define for a product is its Type. Once you have made this basic classification you can tailor the product to suit your requirements. To explain further, within the broad categories of the type of Bills listed above you can further define attributes that are characteristic to each type. Each of these types that you define, with its distinctive features, constitutes a Product in Oracle FLEXCUBE.
Since you define products for convenience, all the Bills involving the product inherit the attributes defined for the product. Yet, you have room for flexibility. You can change the inherited attributes of a specific bill to suit your requirement at the time of processing it.
For any product you create in Oracle FLEXCUBE, you can define generic attributes, such as branch, currency, and customer restrictions, profit details, tax details, etc., by clicking on the appropriate icon in the horizontal array of icons in this screen. For an IBC product, in addition to these generic attributes, you can specifically define other attributes. These attributes are discussed in detail in this chapter.
You can define the attributes specific to an IBC product in the Product Definition screen and the IBC Product Preferences screen. In these screens, you can specify the product type and set the product preferences respectively.
For further information on the generic attributes that you can define for a product, please refer the following Oracle FLEXCUBE User Manuals under Modularity:
- Product Definition
- Profit
- User Defined Fields
- Settlements
4.2.1 Defining Characteristics for a Product
The characteristics that you define for a product helps distinguish it from another. The entries that are passed, the messages that are generated and the processing of bills involving this product are determined by the characteristics that you define for it. You can indicate characteristics like:
Product Code
Select the product code from the option list provided.
Product Description
Specify a description for the product.
Product Type
An important detail in defining a product is to specify the type of product you are creating. A Bill product that you create in Oracle FLEXCUBE can be of the following types:
- Import
- Export
The type of bill product you are creating determines the operations that can be performed on a bill.
Description
Description of the product type selected.
Slogan
Here you can specify a slogan for the product, if required.
Product Group
Select the group to which the product is associated, from the option list provided.
Product Group Description
Description of the product group selected,
Start Date
Specify the start date for the product.
End Date
Specify the end date for the product.
Remarks
Enter any remarks related to the product, if required.
Operation
This indicates the operation that is allowed for the bills linked to a product. The operation that you can select for the product is determined by the type of bill product you define (import, export, and collection). The operation type selected for the bill determines the type of accounting entries passed and the messages that are generated.
You can select an operation from the option list available. The type of operation that you can perform on a bill has been represented below:
Incoming |
Outgoing |
Advance |
Negotiation |
Payment |
Payment |
Discounting |
Discounting |
Collection |
Collection |
Acceptance |
Acceptance |
Purchase |
Purchase |
Tenor Code
The tenor that you define indicates when the bills linked to the product will be paid (immediately or after a usance period).
The bills linked to a product can be paid either at:
- Sight - Indicating that the bill is paid immediately
- Usance - indicating that bill is paid after a usance period
- Multi-Tenor – Select if you want to pay the bill in multiple tenors
Document
A bill that is drawn under an LC issued at your bank or at another bank can be either clean or documentary. If you indicate that bills under an LC can be processed using the product, you can also indicate the type of LC that the bill was drawn under. The options available are:
- Clean - indicating that no documents are required to process the bills linked to this product
- Documentary - indicating that documents are required for the processing of bills linked to this product
Under Letter of Credit
The bills that you process at your bank can be drawn under an LC that was issued at your bank or at another bank. You can indicate whether bills drawn under an LC can be processed using the product you are creating.
Reimbursement Claim
Check this option to indicate that the product is applicable for processing reimbursement claims. This field is enabled only when the operation is chosen as ‘Payment’ and the type is specified as ‘Import’.
Change of Operation Allowed
In addition to indicating the operation that is allowed for the bills linked to a product, you also have an option to indicate whether a change of operation is allowed for the bills linked to the product.
Acceptance to Discount
If you are creating a product with operation type ‘Acceptance’ you can indicate that the bills, which are processed, using this product, can also be discounted.
Acceptance to Advance
If you are creating a product with operation type ‘Acceptance’ you can also indicate that the bills, which are processed, using this product, can be advanced as well.
Collection to Purchase -
If you are creating a product with operation type ‘Collection’ you can indicate that the collection bills processed using this product can be purchased as well.
Discount To Collection -
If you are creating an export bill product with operation type ‘Discount’ click here to indicate that discounted bills processed using this product can be booked for collection also. If you select this option, you should also maintain accounting entries for the events ‘BCOL’ and ‘LCOL’.
Purchase To Collection
If you are creating an export product with operation type ‘Purchase’ click here to indicate that purchase bills processed using this product be changed to Collection also. If you select this option, you should also maintain accounting entries for the event ‘BCOL’ and ‘LCOL’.
Acceptance To Forfaiting
If you are creating an export product of Bills under LC with Tenor as ‘Usance’, you can indicate that the bills coming under this product can be forfaited, by checking this option.
This option will be available only if the selected operation for the product is ‘Acceptance’.
The system will trigger the event FACP if the bill operation changes from ‘Acceptance’ to ‘Forfaiting’
Discount To Forfaiting
If you are creating an export product of Bills under LC with Tenor as ‘Usance’, you can indicate that a discounted bill coming under this product can be forfaited, by checking this option.
This option will be available only if one of the two cases is true:
- The selected operation for the product is ‘Discount’.
- The selected operation for the product is ‘Acceptance’ with the change preference ‘Acceptance to Discount’ checked.
The system will trigger the event FDIS if the bill operation changes from ‘Discount’ to ‘Forfaiting’. If the initial operation for an export bill with tenor ‘Usance’ is set as ‘Acceptance’ then you can change the operation to ‘Acceptance to Discount’. If ‘Acceptance to Discount’ is chosen, then you will be able to select any one of the following operations:
- Discount to Collection
- Discount to Forfaiting
On save of the product, the system will check whether the bill product was saved initially with the Forfaiting operations or not. If the product had been saved earlier with any of the forfaiting operations, the system will not allow you to save the product.
The process for changing a bill status is given below:
- First you have to unlock the contract
- Secondly, you have to change the operation code
- Specify the limits tracking parameters for the changed contract
Collection to Transfer
Check this box to indicate that the operation for the contracts created under this product can be changed from Collection to Transfer. You can do this operation only for Collection Bills.
After you save the changes, a BCOL (Collection of Bill under Purchase/Advance/Discount) event is passed for the transaction. During BCOL event, the system will:
- Reverse all the purchased/discounted/advanced assets
- Execute a complete profit accrual
- Pass collection contingent entries
- Pass profit liquidation entries – if profit collection is of arrears type
- If there is any compensation, then it will also be liquidated
Partially liquidated contracts can also be reverted to collection operation. Also, this can be done before/on/after maturity date. In case it is done after the maturity date and if there is any compensation due and compensation accounting entries are defined in BCOL event of product, then it will liquidate the compensation as well. Limits utilization will get matured on triggering the BCOL event. Following are the accounting entries passed during the BCOL:
Accounting Role |
Amount Tag |
Dr./Cr. |
BC CUSTOMER |
BILL_OS_AMTEQV |
DR |
BILLSPURCHASED/DISCOUNT |
BILL_OS_AMTEQV |
CR |
CONT GL |
BILL_OS_AMTEQV |
DR |
CONT OFFSET GL |
BILL_OS_AMTEQV |
CR |
BC CUSTOMER |
INT_LIQD |
DR |
RECIEVABLE GL |
INT_LIQD |
CR |
BC CUSTOMER |
PENINT_LIQD |
DR |
RECIEVABLE GL |
PENINT_LIQD |
CR |
Note
Last two entries of profit liquidation should be defined only for arrears type collection products.
Following are the accounting entries passed during LCOL:
Accounting Role |
Amount Tag |
Dr./Cr. Indicator |
CONT GL |
BILL_LIQ_AMTEQ |
CR |
CONT OFFSET GL |
BILL_LIQ_AMTEQ |
DR |
BC CUSTOMER |
BILL_LIQ_AMTEQ |
DR |
NOSTRO ACCOUNT |
BILL_LIQ_AMTEQ |
CR |
For forfaited bills, BCOL entries should be defined with MRG_AMT_EQUIV tag instead of BILL_OS_AMTEQV. In LCON event, MRG_LIQ_AMOUNT should be used in place of BILL_LIQ_AMTEQ.This operation type is treated as a foreclosure and outstanding discount accruals are completed unconditionally when the operation is carried out before the maturity date of an IBC contract linked to the product.
Refer to the chapter titled ‘Defining Discount Accrual Fee Classes’ for more information on discount accruals.
While processing a bill involving the product, you need to book a bill under Discount. If you change the Operation to Collection, the accounting entries defined for BCOL will be passed. When the bill is liquidated, the accounting entries defined for LCOL will be passed.
This operation type is treated as a foreclosure and outstanding discount accruals are completed unconditionally when the operation is carried out before the maturity date of a BC contract linked to the product.
You can refer to the chapter titled ‘Defining Discount Accrual Fee Classes’ for more information on discount accruals.
The process for changing a bill status in Oracle FLEXCUBE is given below:
- First you have to unlock the contract.
- Secondly, you have to change the operation code.
- Specify the limits tracking parameters for the changed contract.
After you save the changes, a BCOL (Collection of Bill under Purchase/Advance/Discount) event is passed for the transaction. During BCOL event, the system will:
- Reverse all the purchased/discounted/advanced assets
- Execute a complete profit accrual
- Pass collection contingent entries
- Pass profit liquidation entries – if profit collection is of arrears type
- If there is any compensation, then it will also be liquidated
Partially liquidated contracts can also be reverted to collection operation. Also, this can be done before/on/after maturity date. In case it is done after the maturity date and if there is any compensation due and compensation accounting entries are defined in BCOL event of product, then it will liquidate the compensation as well.
Limits utilization will get matured on triggering the BCOL event.
Following are the accounting entries passed during the BCOL:
Accounting Role |
Amount Tag |
Dr./Cr. Indicator |
BC CUSTOMER |
BILL_OS_AMTEQV |
DR |
BILLSPURCHASED/DISCOUNT |
BILL_OS_AMTEQV |
CR |
CONT GL |
BILL_OS_AMTEQV |
DR |
CONT OFFSET GL |
BILL_OS_AMTEQV |
CR |
BC CUSTOMER |
INT_LIQD |
DR |
RECIEVABLE GL |
INT_LIQD |
CR |
BC CUSTOMER |
PENINT_LIQD |
DR |
RECIEVABLE GL |
PENINT_LIQD |
CR |
Note
Last two entries of profit liquidation should be defined only for arrears type collection products.
Following are the accounting entries passed during LCOL:
Accounting Role |
Amount Tag |
Dr./Cr. Indicator |
CONT GL |
BILL_LIQ_AMTEQ |
CR |
CONT OFFSET GL |
BILL_LIQ_AMTEQ |
DR |
BC CUSTOMER |
BILL_LIQ_AMTEQ |
DR |
NOSTRO ACCOUNT |
BILL_LIQ_AMTEQ |
CR |
Note
For forfeited bills, BCOL entries should be defined with MRG_AMT_EQUIV tag instead of BILL_OS_AMTEQV. In LCON event, MRG_LIQ_AMOUNT should be used in place of BILL_LIQ_AMTEQ.
Collection to Discount
Check this box if you want to change the operation from ‘Collection’ to ‘Discount’.
If an under LC Bill needs to be partially financed, the same can be booked under Collection and then moved to Discount operation with partial Discount.
Payment Operation is not supported for multi-tenor products; however, a multi-tenor contract can be booked with collection operation and then liquidated when it has to be marked as payment.
4.3 Specifying the Role Details
Click the ‘Accounting Roles’ button to define Accounting Roles for the product you are creating.
In the screen that corresponds to this icon you can map Accounting Roles to Accounting Heads.

For more information on specifying Accounting Roles, refer ‘Products’ User Manual under ‘Modularity’.
4.4 Specifying Event Details
Click the ‘Events’ button to invoke the ‘Bills - Product Events’’ screen. Through this screen, you can specify the details of the Accounting Entries and Advices that have to be generated for the events that take place during the life cycle of a bill.

For more information on specifying Event Details, refer ‘Product Definition’ User Manual under ‘Modularity’.
4.5 Specifying Branch Details
Click the ‘Branches & Currency’ button to invoke the ‘Branch/Currency Restriction’ screen. In this screen you have the option of allowing all the branches of your bank to use the product or restricting its use to only some branches. By default when a new product is created no branches will be disallowed.
You can also specify the currencies allowed or restricted for the product. This currency corresponds to the Bill currency. By default when a new product is created no currencies will be disallowed.
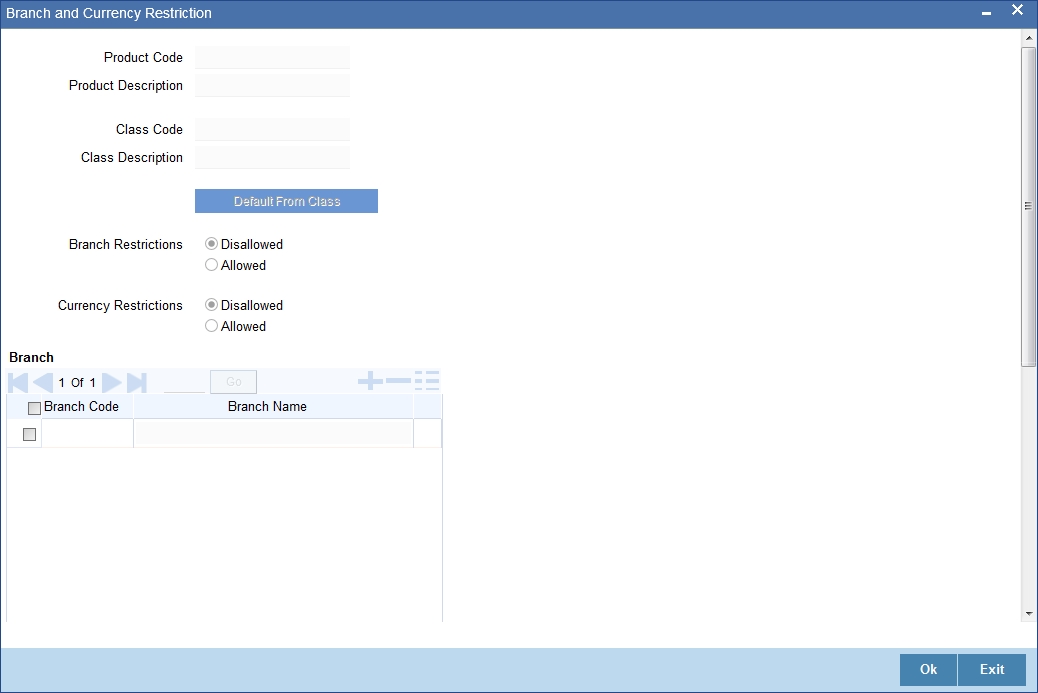
For more information on specifying Branch Details, refer ‘Products’ User Manual under ‘Modularity’.
4.6 Specifying Customer Details
Click the ‘Customer’ button to invoke the ‘Customer Restrictions’ screen.
In this screen you can specify the categories of customers or the customers themselves with whom you can enter into bills involving the product.
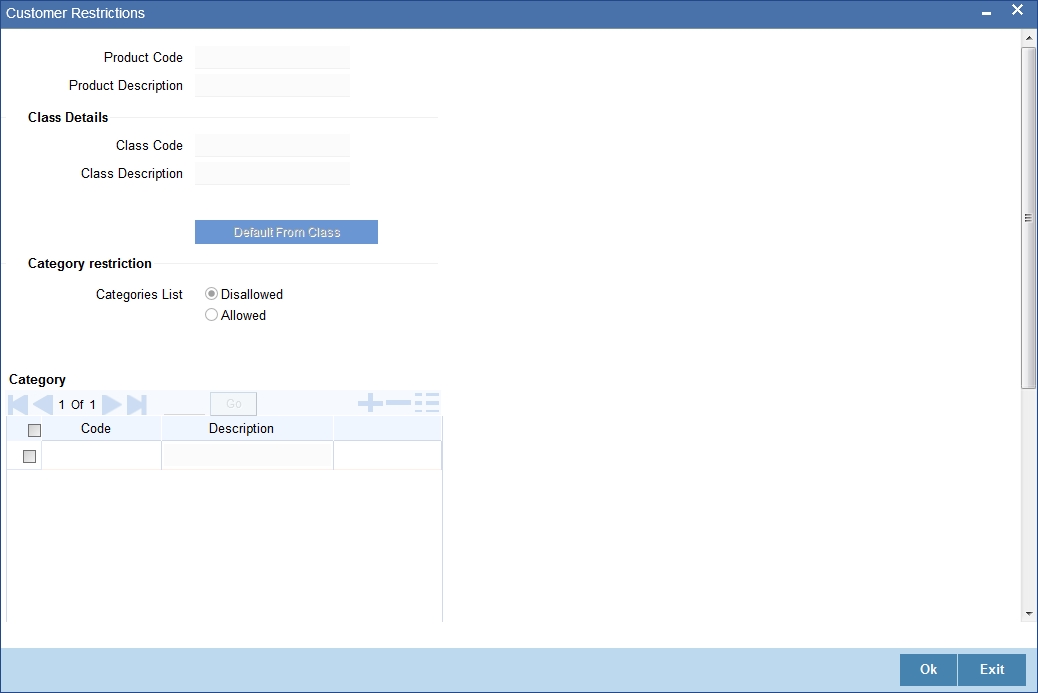
For more information on specifying Customer Details, refer ‘Products’ User Manual under ‘Modularity’.
4.7 Specifying Preferences for a Product
Preferences are the options available to you for defining attributes that will help distinguish a product. The preferences that you state will ultimately shape the product.
By default, a bill involving a product inherits all the attributes defined for the product. However the attributes defined as the product’s preferences can be changed for a bill. Click the ‘Preferences’ button to invoke the ‘Islamic BC Product Preference’ screen.
Through this screen you can define preferences for the product you are creating.

4.7.1 Main Preferences
This section contains the following topics
- Section 4.7.1, "Main Preferences"
- Section 4.7.2, "Specifying Main Preferences"
- Section 4.7.3, "Specifying Profit and Charge Details"
4.7.2 Specifying Main Preferences
The Preferences that you define for a product will be made applicable to all Bills involving the product. The preferences that you can define for a product are discussed below.
4.7.2.1 Indicating Preferences for Limits Monitoring
You can capture the following details regarding Limits Monitoring.
Track Accrued Amounts
You have to specify whether the accrued profit of bills that have not yet been paid should also be considered as the utilized amount for the purpose of credit administration. You can make more than one profit type of component applicable to a bill product. In such a case, one type is designated as the main profit. The following example illustrates how this concept works.
Track Bill Amount for Discounted Bill
Under a discounted bill, the profit that is calculated for the bill is deducted at the time of initiating the bill.
For the purpose of limits tracking, you should indicate whether the actual bill amount or the discounted amount should be tracked, against the limit assigned to the customer under a Credit Line.
Check against this field, to indicate that the actual bill amount should be considered for the purpose, of limits tracking. Leave it unchecked to indicate that the discounted amount should be considered.
Limits Tenor Calculation Type
For tenor-based bills, you can indicate the type or manner in which the bill needs to be tracked. The tenor calculation type can be either of the following:
- Fixed
- Rolling
If you indicate fixed for a tenor-based bill, through out its tenor, it will be tracked against the relevant credit line.
4.7.2.2 Indicating Profit Preferences
In this section specify the following details:
Advance by Financing
Checking this option allows you to book finance. Finance booking is allowed only during final liquidation and is not allowed during partial liquidation of bill. Once you have opted for this option, you need to specify the finance product and the bridge GL in the consecutive fields.
Note
You are allowed to create finance only for import bills that are of Acceptance type.
Suspense General Ledger
To create finance, you need to transfer the principal from Bills to Finances. For this purpose, a Bridge GL has to be specified in this field. Select the GL from the option list.
The Suspense GL selected as a part of the crystallization preferences is used as a bridge for transfer of the charges in bill contract transferred from the LC.
Note
The system displays only GL’s in the option list and will not display any customer accounts.
Financing Product
After opting to book finance, you need a finance product to create finance. Choose the finance product from the option list. The finance will be created using this product at the time of liquidating the bills.
Note
Only Finance products will be displayed in the option list.
Rate Type
Select the appropriate rate type in case the charge / commission components transferred onto the finance are in different from the finance currency, from the option list. This exchange rate will also be used in the case of the finance currency is different from the bill currency to arrive at the finance amount.
Rate Code
Select the appropriate rate code in case the charge / commission components transferred onto the finance are in different from the finance currency, from the option list. This exchange rate will also be used in the case of the finance currency is different from the bill currency to arrive at the finance amount.
Crystallization Type
Select the type of bill crystallization from the drop down list. The two values allowed here are Spawn Finance and Linked Contracts.
- Spawn Finance – Selecting this indicates that the finance contract is to be spawned on the maturity date of the bill
- Linked Contracts – Selecting this indicates that a finance will be manually linked to the bill
Note
If the crystallization type parameter is set to – linked finance, the Auto liquidate Flag in the BC contract would be set to ‘Y’ and the user shall not be allowed to modify the same.
Default Asset Details
This check box is used to default the goods details from the Bills Contract to the multiple assets details of the loan. Check this box for the system to validate the following:
- The flag ‘Advance by Finance’ is checked.
- The finance product linked has ‘Multiple Asset’ option checked with the Asset type as ‘Goods Info’ in its preferences.
4.7.2.3 Exchange Rates for Charges Accounting in case of Linked Contracts
In case of linked contracts, the finances amount is computed at the time of booking of the finances contract.
If the charges and commission in the bill, carried forward from the LC are to be a part of the crystallized finance and are defined in a currency different from the finance currency, the system uses the rate type and rate code maintained as a part of the bills crystallization product preference.
Since the actual crystallization event which performs the accounting for the charges occurs at a later date (on the initiation date of the finance or the maturity date of the bill), the exchange rate, if a re pickup is done, can be different from the one used to arrive at the finance amount. In order to overcome this discrepancy, the system internally stores the exchange rate used in the computation of the finance amount as a part of new charges and commission transfer.
It is these exchange rates that get used subsequently as a part of the bills crystallization accounting for the appropriate charges and commission components transfer onto the Finances – Bills bridge GL.
4.7.2.4 Specifying the Past due Reckoning Status of a Bill
The Past Due Status preferences that you define for a product default to the bills processed under it.
By Goods Arrival Date
In the ‘Islamic BC Product Preferences’ screen, you can indicate if the past due status (of bill contracts entered under the product) should be determined with respect to the Goods Arrival Date.
Days after Goods Arrivals
If you opt to determine the past due status with respect to the Goods Arrival Date, you can enter the number of days vis-à-vis the Goods Arrival Date that should determine the past due status. The following example illustrates what this implies.
4.7.2.5 Specifying Batch Processing Preferences
You can specify the following preferences related to Batch Processing:
Auto Change From Acceptance to Advance
A product to cater to the acceptance type of bills is being created. You can indicate whether the bills linked to this product, should be automatically converted into a payment type of bill, on its liquidation date.
Auto Liquidate BC Contracts
Components of a bill can be liquidated automatically or manually. In the Product Preferences screen, you can indicate whether the mode of liquidation is to be automatic or manual.
If the automatic mode of liquidation is specified, a bill will be automatically liquidated on the day it falls due, by the Contract Auto Liquidation function run as part of the BOD processing. If a bill for which you have specified auto liquidation matures on a holiday, the bill will be processed based on your holiday handling specifications in the Branch Parameters table.
- If you have specified that the processing has to be done on the last working day before the holiday, a bill maturing on a holiday will be liquidated during the End of Day processing on the last working day.
- If you have specified that the processing has to be done only up to the system date, the bills maturing on a holiday will be processed on the next working day, during the Beginning of Day process.
If you do not specify auto liquidation, you have to give specific instructions for liquidation through the Manual Liquidation screen on the day you want to liquidate the bill.
Verify Funds
Check this option to check the available balance in settlement account of a bills contract during its auto liquidation. If you check this option, the system verifies the balance only to cover the bill amount. Charges associated with the bill liquidation will not be considered.
If the account has insufficient funds during manual liquidation of a bills contract, the system does not generate advices to issuing bank and claiming bank. An error message is displayed in such instances.
Auto Status Change
A status change is one in which the status of a bill changes from one to the next.
If you specify that status changes have to be carried out automatically, the status of the bill will be changed after the specified number of days. If not, you have to change the status of a bill, through the bill processing function. In the Bills - User Defined Status Maintenance screen, you can specify whether the status change should be in the forward or reverse direction. Other details related to the status change can also be specified here.
Even if automatic status change has been specified for a product and therefore a bill involving it, you can manually change the status of a bill, before the automatic change is due. It can be done through, the Contract On-line Details screen.
If a product has been specified with manual status change, you cannot specify automatic status change, for a bill involving the product.
Note
You will be allowed to specify whether automatic status change should be in the forward or reverse direction in the status maintenance screen only if you specify that automatic status change is allowed for the product.
Upload Security
This needs to be checked if the Bills contract is to be considered as Banker’s Acceptance and uploaded as an instrument into the Securities module. The value date of the Bill would be the issue date of the Security and maturity date will be mapped to the redemption date of the security. The Bill amount will be uploaded as the initial and current Face Value of the security.
Liquidate Using Collateral
Check this box to indicate that the bill should be liquidated using the collateral account instead of customer account if the collateral account has sufficient funds.
Transfer Collateral from LI
Check this box to indicate that the collateral amount obtained during LI creation should be transferred to the Bill availed under LI proportionately. This flag is defaulted from product level and can be modified at contract level after which it cannot be changed.
4.7.2.6 Specifying Rekey Requirements
All operations on a bill (input, modification, manual liquidation etc.) have to be authorized by a user other than the one who carried out the operation.
Authorization is a way of checking the inputs made by a user. All operations on a bill, except placing it on hold, should be authorized before you can begin the End of Day operations.
As a cross-checking mechanism to ensure that you are invoking the right bill for authorization, you can specify that the values of certain fields should be entered before the other details are displayed. The complete details of the bill will be displayed only after the values to these fields are entered. This is called the rekey option. The fields for which the values have to be given are called the rekey fields.
If you indicate positively for the cross-checking mechanism, you should also specify the fields that will have to be rekeyed at the time the contract is authorized. You can specify any or all of the following as rekey fields:
- Amount
- Currency
- Customer
- Value date
- Maturity date
- Total Paid
If no re-key fields have been defined, the details of the bill will be displayed immediately once the authorizer calls the bill for authorization.
This facility has been incorporated as a safety measure. It is advisable to indicate positively in these fields as the possibility of human error cannot be discounted. For instance, let us assume that the value date has been input incorrectly for a bills contract. You have specified ‘Yes at the Rekey Required field and checked on Value date under it. At the time when the contact is being authorized this field will have to be rekeyed and the error that could have otherwise been overlooked can be corrected.
4.7.2.7 Specifying Preferences for Acceptance Commission
For incoming bills in the acceptance stage, you can collect Acceptance commission. This is different from main profit and compensation profit applicable to advance bills. Acceptance profit can be either fixed profit or floating profit or special profit.
Profit Component
To compute and accrue acceptance commission, you need to associate a profit component. Select the profit component from the option list. All profit components maintained through the product ‘ICCF Details’ screen are made available here.
During acceptance, you have not funded your customer. If you select an acceptance profit commission component here and click on the ‘OK’ button, system checks whether the ‘Consider as Discount’ option is checked at the corresponding product ‘ICCF Details’ screen. If checked, system does not allow you to save the same. It gives you an error message. This is because you do not compute IRR during the acceptance stage.
Profit Collection Type
After choosing the profit component, you need to specify the mode in which the Profit is to be collected. Indicate this by choosing either:
- Advance
- Arrears
Note
- Acceptance commission fields are enabled only for ‘Incoming Acceptance’ Bills.
- Acceptance Commission is not considered as the Main Profit component
or the Compensation component.
4.7.2.8 Specifying Pay due Advice Generation Preferences
In this section specify the following details:
Notice Days
Specify the number of days before/after maturity when the advice should be generated.
The advice will be automatically generated as part of BOD for all Incoming Collections associated with the product based on the preferences that you specify.
Required
Specify the number of days before/after maturity when the advice should be generated.
The advice will be automatically generated as part of BOD for all Incoming Collections associated with the product based on the preferences that you specify.
Refer to the chapter titled Automatic Processes of this User manual for the procedure to manually generate a Payment due Advice before the automatic generation date.
4.7.2.9 Indicating Rollover Preference
In this section specify the following details:
Allow Rollover
For a Bills product, you can specify whether bill contract can be rolled over into a new bill if it is not liquidated on its Maturity Date.
Checking this box will indicate that the rollover is allowed for the bill, involving the product you are defining. Once you specify this option, the system allows you to change/extend the rollover to a new maturity date.
Rollover is possible on maturity date or after maturity date. However, rollover option is enabled only when:
- The IBC product is an import bill with operation as ‘Advance’
- The IBC product is an import bill with operation as Acceptance and Acceptance to Advance option is enabled. However the bill can be rolled over only when the current operation is advance and not when it is in the acceptance stage.
- Both the above products have profit collection type specified as ‘Arrears’
For handling Rollover, you will have to maintain two events and associate the relevant accounting roles and amount tags while defining the Bills Product. The two events are:
- ROLL – Triggered on Old Bills Contract
- INIT – Triggered on New Bills Contract
The system posts the following accounting entries when rollover is initiated manually on the bills contract:
Event |
Dr./Cr. Indicator |
Accounting Role |
Amount Tag |
ROLL |
DR |
ROLL_BRIDGE_GL |
PRINCIPAL_ROLL |
ROLL |
CR |
ADV UNDER LCS |
PRINCIPAL_ROLL |
INIT |
DR |
ADV UNDER LCS |
PRINCIPAL_ROIN |
INIT |
CR |
ROLL_BRIDGE_GL |
PRINCIPAL_ROIN |
4.7.2.10 Specifying the Discounting Method
As a product preference, you have to specify the discounting method that would be applicable when discounting a bill.
The following options are available:
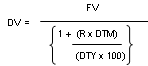
Discounted (Straight Discounting basis)
The following formula will be used for calculating the discounted value:

In the formula above,
- DV = Discounted Value
- FV = Face Value
- R = Discount Rate
- DTM = Days to Maturity/Number of Days
- DTY = Number of Days in a year
True Discounted (Discount to Yield basis)
In the Discount to Yield method, the following formula will be used:
Here,
- DV = Discounted Value
- FV = Face Value
- R = Discount Rate
- DTM = Days to Maturity/Number of Days
- DTY = Number of Days in a year
In the True Discounted method, the profit will be computed on the discounted value and not on the Bill Amount.
Note
This option will be available for selection only if you choose the ‘Profit Collection Type’ as ‘Advance’.
4.7.2.11 Specifying Charge Claim Advice
Claim Advice in Swift
Check this box to indicate that the Charge Claim Advice (CHG_CLAIM_ADV) that gets generated as part of LQ EOD batch should be in Swift MT799/MT499 Format.
4.7.2.12 Specifying Brokerage Preference
Allow Brokerage
Check this box to indicate that brokerage should be applicable to all the contracts under this product.
4.7.3 Specifying Profit and Charge Details
Click the ‘Profit and Charge Details’ tab to specify the profit and charged details.

4.7.3.1 Specifying Preferences for the Profit Components of a Bill
In this section specify the following details:
Start Day
In the case of monthly, quarterly, half yearly or yearly accruals, you should specify the date on which the accruals have to be done during the month. For example, if you specify the date as 30, accruals will be carried out on that day of the month, depending on the frequency.
If you want to fix the accrual date for the last working day of the month, you should specify the date as 31 and indicate the frequency. If you indicate the frequency as monthly, the accruals will be done at the end of every month. That is, on 31st for months with 31 days, on 30th for months with 30 days and on 28th or 29th, as the case may be, for February.
If you specify the frequency as quarterly and fix the accrual date as 31, the accruals will be done on the last day of the month at the end of every quarter. It works in a similar manner for half-yearly and yearly accrual frequency.
Grace Days
The grace period specifies the period after the repayment date, within which the compensation profit (if one has been defined for the product) will not be applied, even if the repayment is made after the due date. This period is defined as a specific number of days and will begin from the date the repayment becomes due.
Compensation profit will be applied, on a repayment made after the grace period. The compensation profit will be calculated for the entire period it has been outstanding (that is, from the date the payment was due).
Start Month
If you set the accrual frequency as quarterly, half yearly or yearly, you have to specify the month in which the first accrual has to begin along with the date.
Frequency
Apart from the bill amount, a bill can have other components, such as profit, charges or fees. They can be accrued over the tenor of the bill. The frequency, at which these components should be accrued, can be specified as a Product Preference.
The attributes of the other components are defined in the ICCF sub-system of Oracle FLEXCUBE. However the frequency with which the components should be accrued is specified in this screen.
The system carries out automatic accruals at the frequency specified by you, as part of the End of Cycle processing. However, if the accrual date falls on a holiday, the accruals are done as per your holiday handling specifications in the Branch Parameters screen:
- You could have specified that automatic events for a holiday(s) are to be processed on the working day before the holiday. The accruals falling due on a holiday(s) will be then processed during End of Day processing on the last working day before the holiday.
- You could have specified that the automatic events for a holiday(s) are to be processed on the working day following the holiday; the automatic events falling due on a holiday(s) will be processed on the next working day, during the Beginning of Day processing.
The frequency can be one of the following:
- Daily
- Monthly
- Quarterly
- Half yearly
- Yearly
Profit Collection Type
After choosing the profit component, you need to specify the mode in which the Profit is to be collected. Indicate this by choosing either:
- Advance: If the profit component of a bill is to be collected in arrears, the profit is collected on the maturity date of the bill.
- Arrears: When profit is to be collected in advance, it will be collected at the time of initiating the bill.
4.7.3.2 Specifying Forfeiting Details
Forfeit Profit Component
For bills that can be forfeited, you need to specify the profit component at the product preference level. The adjoining option list displays all the profit components (except the main profit component) attached to the product. You can select the appropriate one.
4.7.3.3 Specifying Tenor Related Details
You can set the Standard, Minimum and the Maximum limits for tenor based bills. The tenor details that you specify for a bill product, is always expressed in days.
Minimum
You can fix the minimum tenor of a product. The tenor of the bills that involve the product should be greater than or equal to the Minimum tenor that you specify.
Maximum
You can fix the maximum tenor of a product. The tenor of the bills that involve the product should be less than or equal to the Maximum tenor that you specify.
Standard
The standard tenor is the tenor that is normally associated with a bill, involving a product. The standard tenor of a bill is always expressed in days and is applicable to all bills involving the product. If you do not specify any specific tenor while processing a bill, the standard tenor will be applicable to it. However, the standard tenor applied on a bill can be changed during bill processing.
Note
You can create a product with the standard tenor as zero. While processing a bill involving such a product, you will need to specify the maturity and the expiry date of the bill.
If you attempt to save the bill without entering the expiry or maturity date you will be prompted for an override.
Transit Days
The transit days is used to compute the maturity date of the bill. Enter the transit days for the bill. The system does not allow you to save the record in case the transit day exceeds the standard tenor.
4.7.3.4 Specifying the Rate Code Details
In this section specify the following details:
Buy/ Sell Rate
Select this option if you want to specify Buy/Sell rate for exchange.
Mid Rate
If it is a cross currency bill the exchange rate that has to be used for conversion can be mentioned as MID/BUY/SELL rate. Select this option if you want to specify the exchange rate as Mid rate.
Free Collection
Check this option if you wish to use the product for free collection.
4.7.3.5 Specifying Exchange Rate Related Details
You can capture the details regarding the exchange rate here.
Default Rate Type
You can specify the exchange rates that are to be picked up and used for, liquidating the Bill Amount, Profit and Charge components of a bill. You can indicate that the standard rate prevailing, as of the issue date of the bill should be used. You can also specify an exchange rate of your choice.
The possible values for the rate pickup are:
- As per Standard rate
- As input in the Contract
If you specify ‘As input’ in the contract, then the system computes the components of the bill, based on your input in the Exchange rate field, in the Bills Contract Main screen.
If you choose ‘As per standard rate’ the system computes the applicable components, by picking up the exchange rates as of the transaction date, from the Currency table maintained in the Core Services module of Oracle FLEXCUBE.
For a Bills product, you can specify the exchange rate type to be used to process the bill amount, the profit, charge or fee components of the bill. At the time of entering a contract involving a product, you have the option of, changing the exchange rate defaulted from the product and specifying an exchange rate, of your choice.
The exchange rate variance is applicable only if you have decided to change the standard rate defaulted from the currency table and if the contracts linked to the product involves a foreign currency.
You can specify the minimum and maximum limit by which, the exchange rate entered for contracts involving this product can exceed the standard exchange rate.
In the ‘Override Variance Limit’ field, specify the minimum percentage over which you can exceed the normal exchange rates.
Maximum Variance
In the Maximum Variance field specify the maximum percentage up to which you can exceed the normal exchange rate.
Their Charges
Here you can define the charge component for the charges that are due to the counterparty bank.
4.8 Specifying The Charges
Click the ‘Charges’ button to invoke the ‘Charge Details’ screen. In this screen, you can define the charge component for the charges that are due to the counterparty bank.

The steps involved in processing charges for a contract, i.e. defining charge rules, defining charge classes, associating charge classes with a product, and amending charge details to suit a contract are explained in the Building Charge Components User Manual.
4.9 Specifying MIS Details
Click the ‘MIS’ button to define Management Information Details (MIS) details for the product you are defining.

For more information on specifying MIS Details, refer ‘Products’ User Manual under ‘Modularity’.
4.10 Specifying ICCF Details
Click the ‘Profit’ button to define the Profit that is to be collected for Bills involving this product.

For more information on specifying ICCF Details, refer ‘Interest’ User Manual under ‘Modularity’.
4.11 Specifying Discount Accrual Details
Click ‘Discount Accrual’ button to invoke the ‘Discount Accrual Preference Association’ screen. Refer to the Discount Accrual chapter in the same user manual for more details.

For more information on discount accruals, you can refer to the chapter titled ‘Defining Discount Accrual Fee Classes’ in this manual.
4.12 Specifying Tax Details
Click the ‘Tax’ button to indicate the tax schemes that are applicable to the product you are creating.

For more information on specifying Tax details, refer ‘Tax’ User Manual under ‘Modularity’.
4.13 Specifying Tracer Details
Tracers are reminders, sent to various parties involved in a bill indicating that an exception that has occurred, while processing the bill.
In this screen you can capture tracer details for the following exception events:
- Payment Exception
- Acceptance Exception
- Charge Exception
- Reserve Exception
Reserve Exception – sent by negotiating bank (for bills under LC), if discrepancies are noted and negotiation is done under reserve (right of recourse). The tracers are for reminding resolution of the discrepancies and get stopped when the respective discrepancy is marked as resolved.
The details specified for the product involved in the bill will be defaulted to the contract. You can change the defaults to suit the requirements of the bill you are processing. Click the ‘Tracers’ button to invoke the ‘Islamic BC Traders’ screen.

You can specify the following details here:
Tracer Generation
You can indicate whether the exception tracer is applicable to the bill you are processing. You can select one of the following options:
- Required -If you specify that a tracer is applicable to a bill, you should also specify the number of tracers that should be generated, for the exception
- Not Required -You can select this option to indicate that the exception tracer is not applicable, to the bill you are processing
- Till resolved -If you indicate that the tracer should be generated until the exception is resolved, you need not specify the number of tracers that should be sent. This is because the tracer will be generated at the frequency that you specify, until the exception is resolved.
Number of Tracers
If you have indicated that the tracer is applicable, to the bill you are processing, you should also specify the maximum number of tracers that should be generated, for each of the exception events.
By default, the first tracer for all authorized bills linked to this product, will be sent after the number of days that you prescribe, for the product.
Start Tracer after Days
Exception tracers can be generated, only after the maturity date of the bill. While creating a product, you have also indicated the number of days that should elapse after the Bill matures on which the first tracer should be generated.
Generation Frequency Days
You can specify the frequency (in days), with which the tracer should be sent to the concerned parties, involved in the bills linked to this product.
Preferred Medium
For each of the exception tracers that you specify, indicate the preferred medium through which the tracer should be generated to the concerned party.
For a bill involving the product, you can change the medium that is defaulted. The medium you specify here is only the preferred medium, for the exception tracer.
Template ID
Specify the template related to MT799 or MT499 message types. The adjoining option list displays all the templates related to MT799 (if it is under LI) or MT499 (if it is not under LI) message types defined in the ‘Swift FFT Template Screen Maintenance’ screen. You can choose the appropriate one.
This field is mandatory if the ‘Tracer Generation’ is indicated as ‘Required’ and ‘Preferred Medium’ as ‘SWIFT’. This Template id is used while generating Charge and Commission Tracer (CHG_COM_TRACER) in MT799/MT499 swift format as part of LQ EOD Batch if the ‘Preferred Medium’ is ‘SWIFT’.
For further details on Swift FFT Template Screen Maintenance screen, refer the section ‘Maintaining SWIFT FFT Template’ in the ‘Defining Free Format Messages‘ chapter in the ‘Messaging System’ User Manual.
4.14 Specifying Free Format Text Details
Free Format Texts (FFTs), Instructions and Document codes applicable to the product you are creating can be defined here. These FFTs and Instructions can appear along with the advices that are generated, during the lifecycle of the Bills linked to this product.
Click the ‘Free Format Text’ button to invoke the ‘Bills and Collections Product – Instructions and Free Format Text’ screen.

4.14.0.1 Specifying FFT Details
In this screen specify the FFTs that are applicable, to the bills product you are creating. A list of the standard FFTs that can accompany a bill is maintained in the ‘Free Format Text Maintenance’ screen. You can select an FFT code from the pre-defined list of FFTs. The description associated with the FFT code you have selected will be displayed.
More than one of the predefined FFTs can be specified for the product you are creating. The FFTs, including the other details that you define for it will be defaulted to all bills involving this product.
While entering a bill contract involving this product, you can however, add to or delete from the defaulted list of FFTs.
4.14.0.2 Specifying whether the FFT should Appear in the Advices Sent for the Bill
You have an option to specify whether the FFT or instruction is for the internal reference of the bank or should it appear on the advices generated, for the bills linked to the product.
If you do not specify an advice code for an FFT or instruction it is assumed that it is for the internal reference of the bank. If the FFT is to appear on the advices, you can specify the advice on which, the FFT or Instruction should be printed. Select an advice code from the list of the advices that you specified for the product, in the Advices screen.
After you have specified details for an FFT, click add icon to add it to the list of FFTs, for the product. Click delete icon to delete an FFT from the screen.
4.14.0.3 Indicating whether advice processing charges need to be collected
Oracle FLEXCUBE provides you with the facility to automatically debit customers of the charges you incur in sending them advices over different media types. When creating a product, you can set up these charges. However, when processing a contract, you can opt to waive these charges.
At the time of saving a contract, the system displays the ‘Product Event Advices Maintenance’ screen wherein you will be allowed to:
- Suppress an advice from being sent
- Change the Priority of the advice
- Indicate that charges have to be collected from the receiving party.

If you indicate that the customer is the receiver of charges, the system automatically locates the relevant Receiver, Media and Country combination from the available Charge Maintenance Details records, and deducts the charge amount associated with the particular combination. The Charge amount is deducted from the customer account in the specified currency.
Note
If you have not maintained a Charge Maintenance Details record for the particular customer, the system uses the wildcard entry type record to deduct the charge amount.
4.14.0.4 Specifying Instructions Details
Through this screen, you can specify the instructions that are applicable to the Bills product you are creating. A list of the standard instructions that can accompany the bill is maintained in the ‘Instructions Codes Maintenance’ screen. Select an Instruction code from the list of instructions maintained earlier.
More than one of the predefined Instructions can be made applicable to the product you are creating. The instructions, including the other details that you define for it, will be defaulted to all bill contracts, involving this product.
However, while entering a bill involving this product, you can add to or delete from the defaulted list of instructions.
4.14.0.5 Specifying if the Instruction should Appear in the Advices Sent for the Bill
You have the option to specify whether the instruction is for the internal reference of your bank or should it appear on the advices generated for the bills linked to the product.
If you do not specify an advice code for an instruction it is treated as an internal instruction. If the Instruction is to appear on the advices, you can specify the advice on which, the Instruction should be printed. You can select an advice code from the list of the advices in the Advices screen.
After you have specified details, of the Instructions applicable to a product, click add icon to add it to the list of instructions, for the product. Click delete icon to delete an instruction from the screen.
4.15 Documents for a Product
This section contains the following topics
- Section 4.15.1, "Specifying Documents for a Product"
- Section 4.15.2, "Specifying the Clauses that should Accompany the Document"
4.15.1 Specifying Documents for a Product
In addition to the Instructions and FFTs that you specify for a product, you can also specify the documents and clauses. Click the ‘Document' button to invoke the Islamic BC Document’ screen to specify the documents and clauses applicable to the product you are creating.
The documents that can be associated with a bill are broadly classified into:
- Transport documents
- Insurance documents
- Invoices
- Other documents (includes packaging list, certificate of origin, etc.).

There are certain standard documents that are required, under a documentary bill. You can specify the documents that are applicable to the bills that are linked to the product.
A list of the standard shipping documents that can accompany the bill is maintained in the Documents Maintenance screen. Along with these documents, you will also be provided with a pre-defined list of documents.
Select a document code from the list of documents maintained earlier. The description and the document type associated, with the code you have selected will be displayed.
You can specify more than one of the predefined documents, for the product you are creating. All the documents that you define for the product will be defaulted to all the bills involving this product. However, while entering a bill you can add to or delete, from the defaulted list of documents.
After you have specified details of the document, click add icon to add it to the list of documents, applicable to the product. Click delete icon to delete a document from the product.
4.15.2 Specifying the Clauses that should Accompany the Document
A clause is a statement that can accompany a document, sent under a bill. After indicating the documents applicable to a product, you can specify the related clauses that should accompany the document.
A list of the standard clauses that can accompany a document required under a bill is maintained in the ‘Clauses Maintenance’ screen.
From the pre-define list of clauses select the clauses applicable. You can attach more than one clause, to a document that you have specified, for a bills product.
By default, all the clauses including the number of copies that you specify for the product will be sent for all bills involving this product. However, while entering a bill, you can add to or delete, from the defaulted list of clauses.
After you have specified details of the clause, click add icon to add it to the list of clauses, for the document. Click delete icon to delete a clause from the screen.
4.16 Status Details
This section contains the following topics
- Section 4.16.1, "Specifying Status Details"
- Section 4.16.2, "Indicating if Status Changes have to be carried out Automatically"
- Section 4.16.3, "Advices to be Generated for a Status Change"
- Section 4.16.4, "Specifying the Number of Days for a Status Change"
- Section 4.16.5, "Changing the GL under which the Bill is Reported"
4.16.1 Specifying Status Details
An Active status is automatically allotted to a bill on its initiation. However, a bill on which payment has not been made, on the due date can pass through more than one status. Click the ‘Status’ button to invoke the ‘Islamic BC Status’ screen.

You can define attributes for each status through the User Defined Status Maintenance screen. These attributes are:
- The number of days for which a bill should stay in a particular status, after its repayment date has been reached
- Whether the GL under which it is reported should be changed when there is a status change
- The new GL under which it should be reported
Status
This is the sequence in which, a bill should move to the status you are defining. Usually, more than one status is defined for a product. In this context, you should indicate the sequence in which a bill moves from status to status.
You can also specify the number of days after a repayment falls due that a component has to be moved to the status you are defining.
Incase of a component for which repayment is due; you can specify the number of days after the Maturity date, on which the component should be moved, to the status being defined.
Transaction
When the GL under which a component is reported is changed along with the status of a bill, an accounting entry is passed. This accounting entry will be to transfer the component from one GL to another.
A Transaction Code is associated with every accounting entry in Oracle FLEXCUBE. You should indicate the Transaction Code to be used for the GL transfer entries, involved in the status change.
Stop Accrual
You can indicate that accruals (on all accruable components of the bill), should be stopped, when the bill moves to the status being defined. By doing so, you can ensure that your Receivable accounts, for profit and other components, are not updated for a bill on which repayment has been defaulted.
Reverse Accrual
You can indicate that the outstanding accruals (where a component has been accrued but not paid) on the bill should be reversed when it moves to the status that you are defining. If you specify so, the accrual entries passed on the bill, will be reversed when the status change is carried out.
Note
Future accruals should necessarily be stopped, if those done till the date of status change have to be reversed.
Complete Accrual
Check this option to complete accruals.
4.16.2 Indicating if Status Changes have to be carried out Automatically
A forward status change is one in which the status changes from one to the next. In our example, the movement from Active to PDO, PDO to NAB and NAB to Write Off are forward changes.
A reverse status change is one in which the status changes from present status to the previous. Such a situation arises when a payment is made on a bill with a status other than Active.
If you specify that forward changes have to be carried out automatically, the status of the bill will be changed, after the specified number of days. If not, you have to change the status of a bill through the bill processing function. Even if automatic status change has been specified for a product and therefore a bill involving it, you can manually change the status of a bill before the automatic change is due. You can do it through the, Contract On-line Details screen.
If a product has been specified with manual status change, then you cannot specify automatic status change for a bill involving the product.
If you specify, that reverse changes have to be carried out automatically, the status will be changed when a payment is made on a bill with a status, other than Active. If you specify that reverse changes should not be automatic, the status remains unchanged, even if a repayment is made on the bill. The status has to be changed by you through the, Contract Processing function.
A reverse change may also become necessary, when the number of days of default is increased for a product.
If you specify that forward changes or reverse changes have to be carried out automatically, the status changes will be carried out by the Automatic Contract Update function during BOD processing. This is done on the day the change falls due. If the day on which the forward or reverse status change is due happens to be a holiday, then, the processing would depend upon your specifications in the Branch Parameters screen.
If you have not specified that the forward or reverse changes should be carried out automatically, the status remains unchanged till you change it for a bill, through the Contract Processing function.
4.16.3 Advices to be Generated for a Status Change
You can specify whether an advice has to be generated to inform the customer about the status change of the bill. You can also specify the kind of advices, to be generated.
You can generate advices, to notify the customer of the forward status change and possibly urge him to take action, to make the payments for liquidating the outstanding components.
You can specify the advice or message that you want sent to the customer, when a bill moves automatically (forward) into the status you are defining. These messages or advices are maintained by the messaging sub-system of Oracle FLEXCUBE.
4.16.4 Specifying the Number of Days for a Status Change
The number of days after which, a component should be moved to a particular status can vary for each of the components of the bill.
The number of days is always counted as calendar days, from the maturity date specified for the bill. The following example illustrates how this concept works:
4.16.5 Changing the GL under which the Bill is Reported
You may have a GL structure under, which bills in the Active status are reported in on GL, while those with defaulted payments are in different GLs, depending on their status.
For example, the GL structure for Discounted bills for 45 days could be as follows:
Status |
GL |
Active |
1001ASSF |
PDO |
1001ASSF |
NAB |
1110ASSC |
WO |
1111ASSE |
For each component, you should indicate the GL to which it has to be moved, when there is a status change. For principal, the GL will be changed, while for the other components, the receivable accounts will be moved to the new GL.
Specify the accounting role (asset, liability, contingent asset, etc), for the GL into which the bill has to be transferred, when its status changes.
Also specify the new GL (accounting head), under which the bill has to be reported. Select an option from the option list, which displays the description of the GL.
4.17 Specifying Field Details
Click the ‘Fields’ button to invoke the ‘Product User Defined Fields’ screen.

In the ‘Product User Defined Fields’ screen, you can specify the Field Name. Select the Field Name from the option list provided.