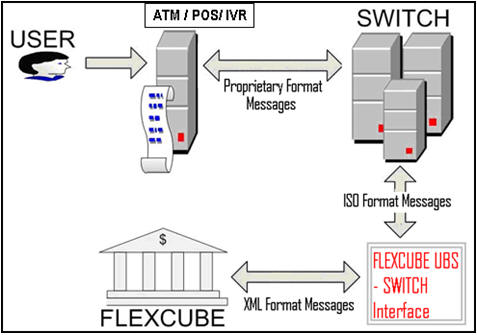
2. Switch Interface Gateway
Oracle FLEXCUBE Switch Interface helps in processing both Financial and Non-Financial Transactions. The interface helps in first validating each transaction request against the Oracle FLEXCUBE database and then posting the transactions into the system.
The interface with Switch software system supports Automatic Teller Machine (ATM) and Point Of Sale (POS) transactions originating from bank terminals or from Interchanges such as VISA or MasterCard. Switch Interface also supports Interactive Voice Response (IVR) transactions. The interface functionality includes the following:
- Interface with support for ISO 1987/1993/2003 protocols
- Authorization and posting of Switch/IVR transactions into Oracle FLEXCUBE
The following diagram illustrates the flow of messages via the Oracle FLEXCUBE – Switch system interface.
This chapter contains the following sections:
- Section 2.1, "Interface Functionalities"
- Section 2.2, "Gateway Maintenance for Switch Interface"
- Section 2.3, "Switch Interface Maintenance"
- Section 2.4, "Batch Processes"
- Section 2.5, "Cards Upload"
- Section 2.6, "Terminal ID Upload"
- Section 2.7, "ATM Cash Deposits"
2.1 Interface Functionalities
This section contains the following topics:
- Section 2.1.1, "ATM Transactions"
- Section 2.1.2, "Point Of Sale Transactions "
- Section 2.1.3, "ATM/POS Notifications"
- Section 2.1.4, "IVR Transactions"
2.1.1 ATM Transactions
The following functionalities are with respect to ATM transactions. This section describes all Transactions required for Switch interface and expected accounting entries.
2.1.1.1 Cash Withdrawal
During a Cash Withdrawal transaction the product is determined and the preferences are checked for processing. Amount blocking or account posting is done depending upon the class of the message. Amount blocking will include all the charge components also (for Online and Issuer). The balance amount is recorded after amount posting is done.
Refer the Annexure chapter for the corresponding accounting entries.
2.1.1.2 Balance Enquiry
This facility produces a quote of the Account Balance for a given account. The following balances are provided:
- Ledger balance
- Available balance
- Unclear balance
You can select the ‘Include OD limit’ option when showing balance.
Refer the Annexure chapter for the corresponding accounting entries.
2.1.1.3 Mini Statement Enquiry
The interface facilitates the enquiry for Mini Statements. You can specify number of rows/the period for which the statement is to be generated.
The statement can have the following columns:
- Originating Branch Code
- Transaction Literal
- Transaction Amount Sign
- Transaction Amount
- Flag Dr/Cr
- Value Date
- Transmission Date
- Transaction Reference Number
The accounting entries are the same as those for Balance Enquiry
2.1.1.4 Deposit
The system can automatically select the product based on the check or cash deposit. In case of cash deposits the system checks whether immediate accounting or posting is required or whether it is to be only logged.
Refer the Annexure chapter for the corresponding accounting entries.
2.1.1.5 Funds Transfer
This facility is used when a customer initiates a Fund Transfer between his accounts or to another customer’s account. The Switch system will send both Account numbers in ISO messages.
Account to account transfers can be initiated using the Virtual Account number as well. The virtual account number is recognized as the credit account number and the transaction currency is defaulted to the credit account currency. The system validates whether the virutal account number entered is in ‘Closed’ or ‘Inactive’ status and displays appropriate error messages. The physical account number is identified based on the Virtual Account Number and Transaction Currency combination. If a physical account number is not mapped then a default physical account number is generated.
Refer the Annexure chapter for the corresponding accounting entries.
2.1.1.6 Utility Payments
This facility helps in making payments into a Utility Provider’s account.
Accounting entries are same as that of Fund Transfer.
2.1.1.7 Ad-Hoc Statement Generation Request
Here the customer requests a Statement through the ATM. This request is reaches the Switch interface at the bank where is passed to the Oracle FLEXCUBE system. Oracle FLEXCUBE system will generate Book Dated statements by default. The period for which the statement is required can be specified.
Accounting entries are same as that of Balance Enquiry.
2.1.1.8 Cheque Book Issue
The customer requests a Cheque Book via the ATM, thereby informing the bank. This request is sent to the Oracle FLEXCUBE system via the interface. The number for cheque leaves can be specified. The cheque numbers are automatically generated.
Accounting entries are same as those for Balance Enquiry.
Note
ATM transaction data will be handed-off to Mantas for the branch as per the Mantas maintenance. Transactions whose value date is same as the branch EOD date is extracted for Mantas hand off. Transactions whose status is other than ‘Success or Reversed’ will not be handed off to Mantas.
2.1.2 Point Of Sale Transactions
The following are the facilities provided for Point Of Sale (POS) Transactions.
2.1.2.1 POS Purchase
The customer initiates a normal purchase at Merchants POS Terminal. This purchase request reaches Oracle FLEXCUBE via the Switch interface. Based on the purchase a product is identified and the preferences are considered. Depending upon the message class, either amount blocking or account posting is done. Amount blocking will include all the charge components. The account balance is recorded after the amounts are posted.
Refer the Annexure chapter for the corresponding accounting entries.
2.1.2.2 Cash Advance
For cash advances the Oracle FLEXCUBE product is derived at and the preferences are checked for processing. Depending upon the message class, either amount blocking or account posting is done. Amount blocking will include all the charge components. The account balance is recorded after the amounts are posted.
Accounting entries are same as that of POS purchase.
2.1.2.3 Refund
Accounting entries are similar to those of Cash Deposit.
2.1.2.4 Adjustments
The Adjustments facility corresponds to Partial Reversals in ATM, the difference being that Cr Adjustments are also possible.
Accounting entries are same as that of POS purchase.
2.1.2.5 Pre-auth-Completion
Pre-auth completion involves removing amount block.
Accounting entries are similar to those of POS purchase.
Note
Point of Sale (POS) transaction data will be handed-off to Mantas for the branch as per the Mantas maintenance. Transactions whose value date is same as the branch EOD date is extracted for mantas hand off. Transactions whose status is other than ‘Success or Reversed’ will not be handed off to Mantas.
2.1.3 ATM/POS Notifications
Oracle FLEXCUBE provides a facility to insert notification of transactions done through an ATM in the notification table. These notifications are sent for transactions which have a financial impact. These transactions includes transaction done in ATM of the same bank and ATM or POS transactions done in other banks as well. The following list of fields is sent in the notification for an ATM/POS transaction:
- Transaction Reference Number.
- Amount Block Reference Number.
- Transaction Code of Main Leg.
- Transaction Code Description of Main Leg.
- Transaction Product Code.
- Transaction Product Code Description.
- Debit Account Number.
- Debit Account Currency.
- Debit Amount.
- Credit Account Number.
- Credit Account Currency.
- Credit Amount.
- Date of the Transaction along with Time(Time Stamp).
- Value date of the Transaction.
- Transaction Narration.
- Location of the ATM where the transaction has been done.
- Terminal Id.
- RRN.
- Merchant ID (If the transaction is done through a POS).
- ATM/Debit Card Number (for ATM /POS).
- Current balance & Available Balance in the debit account at the time of notification in Account Currency.
- Current balance & Available Balance in the credit account at the time of notification in Account Currency.
- Acquirer Institution Id.
- Acquirer Institution Description.
- Forwarding Institution Id.
- Response Code.
- Message Type.
- Processing Code.
- File Process (Y or N)
- Merchant Name
Notifications are sent during the following events:
- On Amount block creation (if amount block created).
- On Account debit.
2.1.4 IVR Transactions
The following transactions are supported by IVR:
- Balance Enquiry
- Mini Statement Enquiry
- Ad-Hoc Statement Generation Request
- Cheque Book Issue
- Funds Transfer
- Utility Payments
Note
IVR transaction data will be handed-off to Mantas for the branch as per the Mantas maintenance. Transactions whose value date is same as the branch EOD date is extracted for Mantas hand off. Transactions whose status is other than ‘Success or Reversed’ will not be handed off to Mantas.
2.2 Gateway Maintenance for Switch Interface
The following are the interface gateway maintenances done for setting up the Switch Interface Gateway.
- Section 2.2.1, "Maintaining Upload Source"
- Section 2.2.2, "Maintaining FLEXSWITCH External System"
- Section 2.2.3, "Specifying External System Functions"
- Section 2.2.4, "Specifying Source Preferences"
2.2.1 Maintaining Upload Source
The Upload Source is maintained in the ‘Upload Source Maintenance’ screen. You can invoke the ‘Upload Source Maintenance’ screen by typing ‘CODSORCE’ in the field at the top right corner of the Application tool bar and clicking the adjoining arrow button.
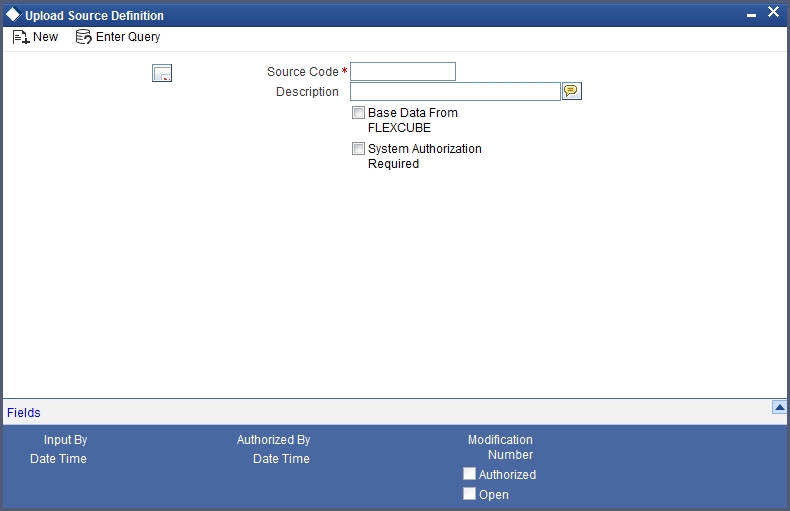
In the above screen the Source Code – FLEXSWITCH – and the brief description of the source are maintained.
2.2.2 Maintaining FLEXSWITCH External System
The FLEXSWITCH external system is maintained in the ‘External System - Detailed’ screen. Here you can maintain the Correlation pattern, Message pattern, and Queue names for the external system i.e. FLEXSWITCH.
You can invoke the ‘External System - Detailed’ screen by typing ‘GWDEXSYS’ in the field at the top right corner of the Application tool bar and clicking the adjoining arrow button.
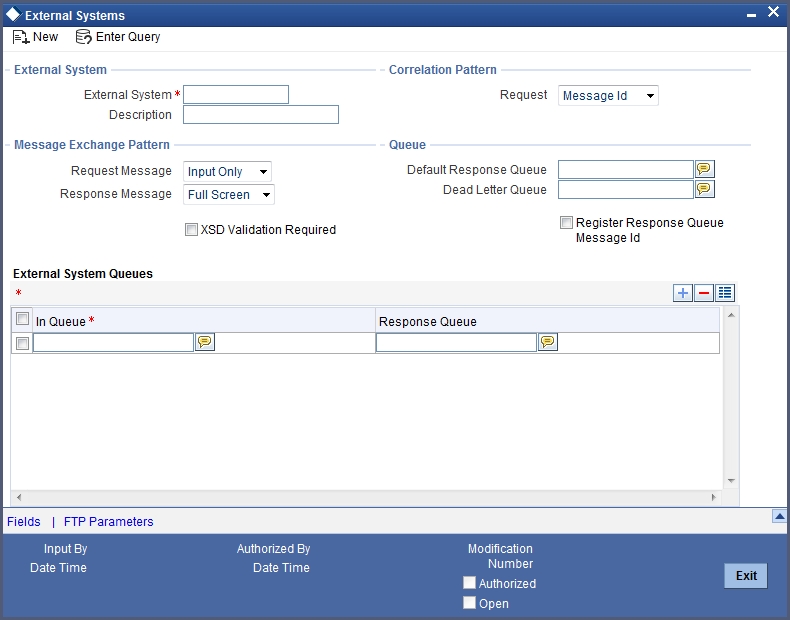
You must specify the following in the above screen.
External System and Description
Specify the External System as ‘FLEXSWITCH’. You may optionally give a brief description of the External System too.
Correlation Pattern - Request
Select and set ‘Correlation ID’ against this field.
Message Exchange Pattern – Request Message
Select ‘Input only’ from the adjoining drop-down list.
Message Exchange Pattern – Request Message
Select ‘Full screen’ from the adjoining drop-down list.
Default Response Queue
Specify the default response queue as ‘SW_MDB_QUEUE_RESPONSE’.
Dead Letter Queue
Specify the dead letter queue as ‘MDB_QEUEU_DLQ’.
XSD Validation Required
Select this checkbox if the request xml and response xml has to be validated against the XSD.
Register Response Queue Message Id
Select this checkbox to register the response queue message Id.
External System Queues
Give the External IN-QUEUE and RESPONSE-QUEUE for Switch.
2.2.3 Specifying External System Functions
You can specify the external system’s functions in the ‘External System Functions – Detailed’ screen. Here you can maintain Function ID, Action, Service name and Operation code for the Switch Interface Gateway External system.
You can invoke the ‘External System Functions – Detailed’ screen by typing ‘GWDEXFUN’ in the field at the top right corner of the Application tool bar and clicking the adjoining arrow button.
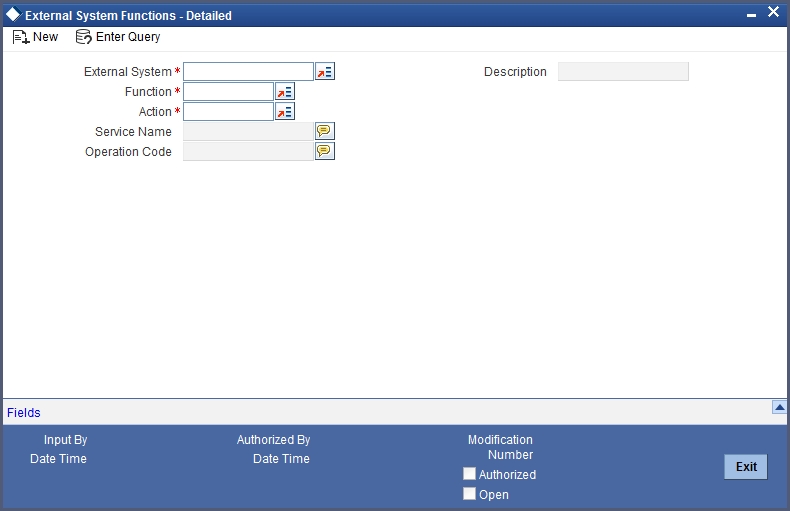
External System
Select the External system – FLEXSWITCH – from the list of options available.
Function
Select the Function id from list.
Once you have entered the above details the following fields are filled automatically:
- Action
- Service Name
- Operation Code
2.2.4 Specifying Source Preferences
You can set the preferences for the External system in the ‘Upload Source Preferences Maintenance’ screen.
You can invoke the ‘Upload Source Preferences Maintenance’ screen by typing ‘CODUPLDM’ in the field at the top right corner of the Application tool bar and clicking the adjoining arrow button.
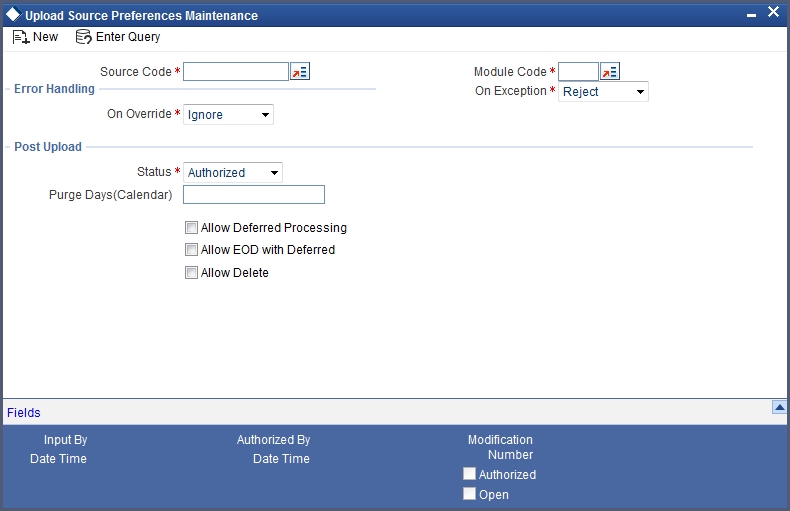
Source Code
Select Source Code - FLEXSWITCH - from the list.
Module Code
Select Module Code from the list of options.
On Override
Select ‘Ignore’ to ignore error handling overrides.
On Exception
Select ‘Reject’ to reject error handling exceptions.
Post Upload Status
Select ‘Authorized’ for the uploads to be automatically authorized on completion of the upload process.
Leave the following checkboxes cleared:
- Allow Deferred Processing
- Allow EOD with Deferred
- Allow Delete
2.3 Switch Interface Maintenance
You must perform the following maintenances for the Oracle FLEXCUBE – Switch system interface.
- Section 2.3.1, "Defining Currency for Currency Code Conversion"
- Section 2.3.2, "Maintaining Card Transaction Limits"
- Section 2.3.3, "ATM/Debit Card Mapping for Card Account Number Conversion"
- Section 2.3.4, "Card Accounts Detail"
- Section 2.3.5, "Card Customer Maintenance"
- Section 2.3.6, "Maintaining Channel Details"
- Section 2.3.7, "Maintaining Process Code Mapping Details"
- Section 2.3.8, "Maintaining Network Details"
- Section 2.3.9, "Maintaining Merchant Details"
- Section 2.3.10, "Maintaining Terminal Details"
- Section 2.3.11, "Maintaining Utility Provider Details"
- Section 2.3.12, "Maintaining Product Types for Product Derivation"
- Section 2.3.13, "Showing Amount Block Transactions in Account Statements"
- Section 2.3.14, "Modifying a Product Preferences Screen"
- Section 2.3.15, "Maintaining Charges for Non-financial Transactions"
- Section 2.3.16, "ARC Maintenance"
- Section 2.3.17, "Service Charges for Inter- branch Transactions"
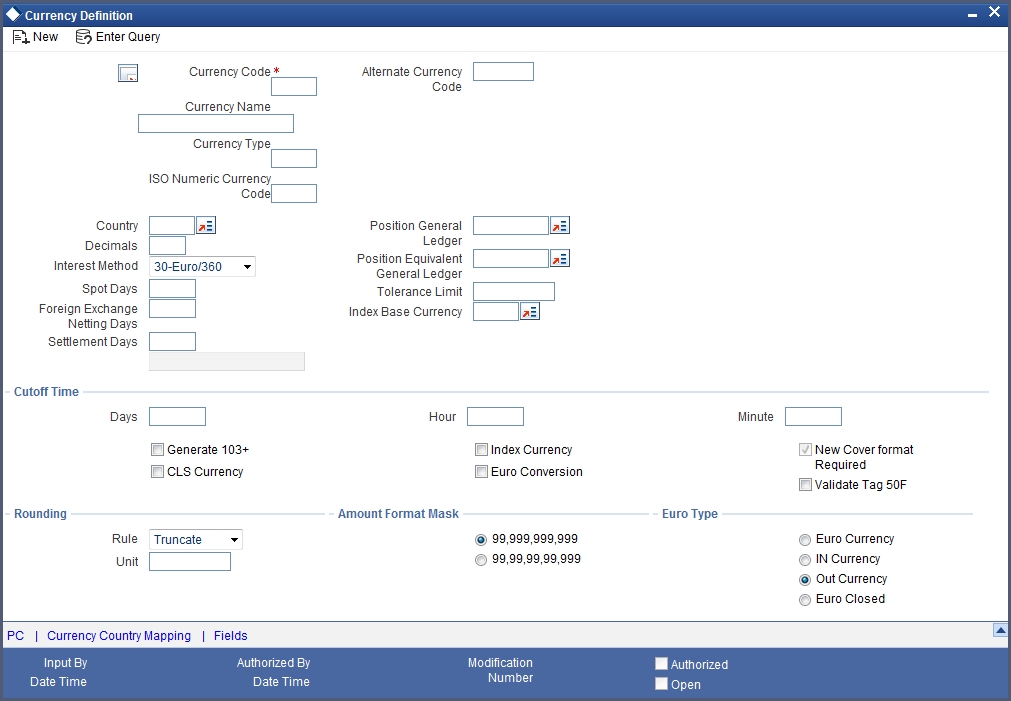
2.3.1 Defining Currency for Currency Code Conversion
ISO numeric currency codes are converted into Oracle FLEXCUBE’s alpha numeric currency code. The definition for the conversion is maintained against the ‘ISO Numeric Currency Code’ field in the Currency Definition screen as shown below.
You can invoke the ‘Currency Definition’ screen by typing ‘CYDCDEFN’ in the field at the top right corner of the Application tool bar and clicking the adjoining arrow button.
2.3.2 Maintaining Card Transaction Limits
You can maintain card and currency wise transaction limits here. You can invoke this screen by typing ‘SWDCDTLM’ in the field at the top right corner of the Application tool bar and clicking the adjoining arrow button.
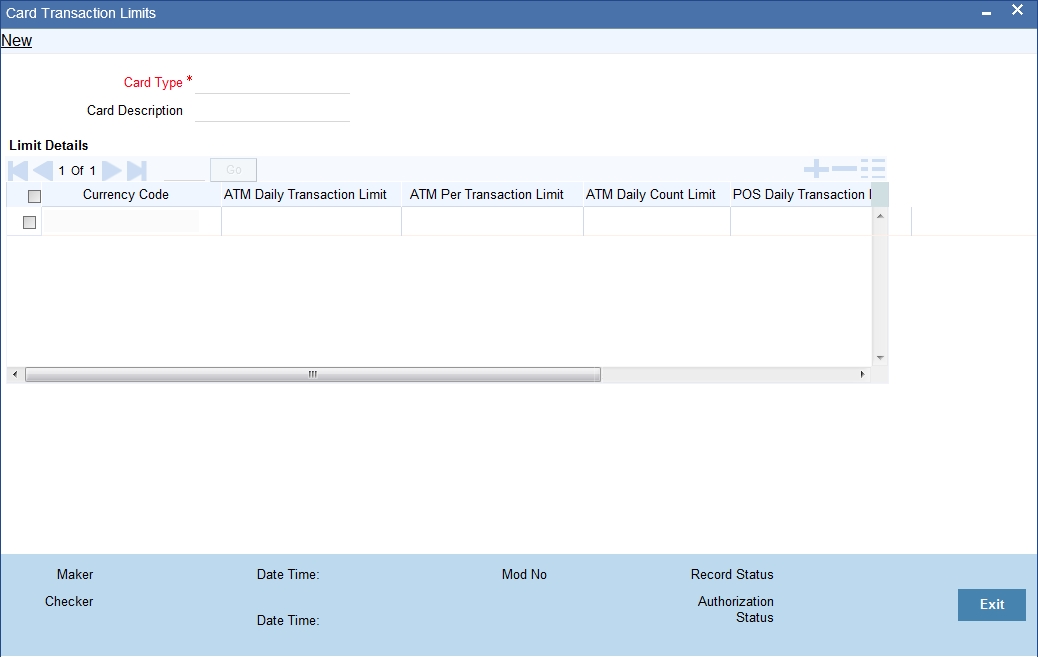
Specify the following:
Card Type
Specify the type of card.
Card Description
Give a brief description about the type of card.
Limit Details
Currency Code
Select the currency code from the adjoining option list.
ATM Daily Transaction Limit
Specify the daily transaction limit of the ATM.
ATM Per Transaction Limit
Specify the per transaction limit of the ATM. If the transaction limit is zero, then there is no limit validation.
ATM Daily Count Limit
Specify the daily count limit of the ATM.If the transaction limit is zero, then there is no limit validation.
POS Daily Limit
Specify the daily limit of POS. If the transaction limit is zero, then there is no limit validation.
POS Per Transaction Limit
Specify the per transaction limit of POS. If the transaction limit is zero, then there is no limit validation.
POS Daily Count Limit
Specify the daily count limit of POS. If the transaction limit is zero, then there is no limit validation.
2.3.3 ATM/Debit Card Mapping for Card Account Number Conversion
The interface facilitates conversion of ATM Card Number and Card Account Number to Oracle FLEXCUBE’s alphanumeric account number. For this facility you must map the card account numbers to Oracle FLEXCUBE account numbers. This mapping can be done in the ‘Debit Card Oracle FLEXCUBE Account Mapping’ screen. Upload will be provided for this date tends to be in bulk and banks will prefer to maintain it using handoffs.
You can invoke the ‘ATM/Debit Card FCC Account Mapping’ screen by typing ‘SWDCDMNT’ in the field at the top right corner of the Application tool bar and clicking the adjoining arrow button.
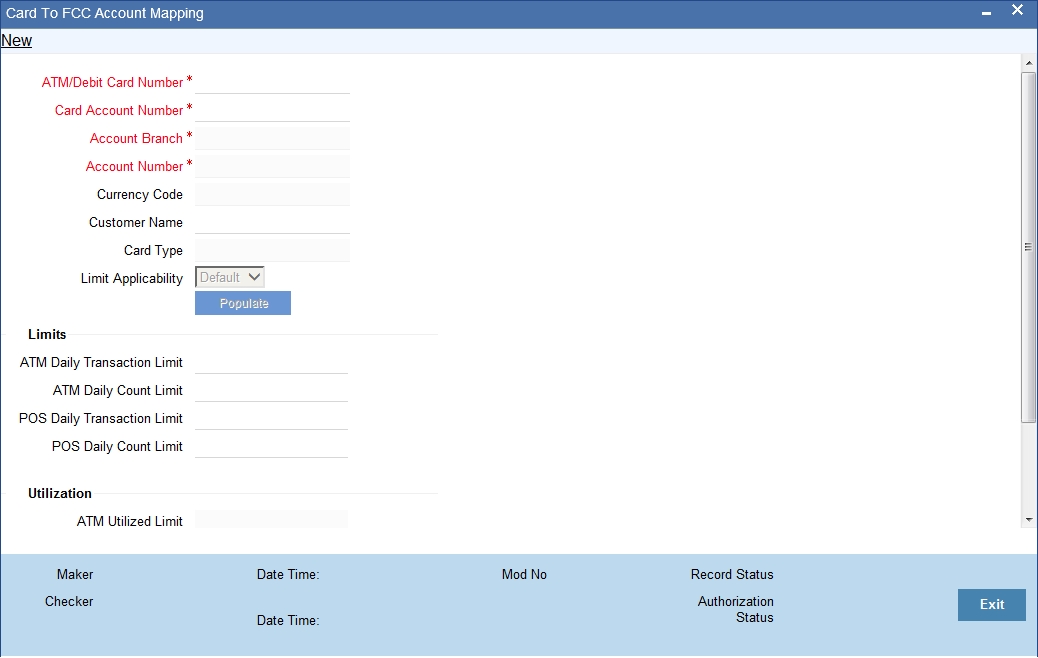
You must maintain the following mandatory fields in the above screen.
Card Number and Card Account Number
Specify the card number and the card account number here. This must be a unique combination. The Card Account Number is mandatory only when the transaction account is the Card Account and not the account maintained in Oracle FLEXCUBE.
Branch
Specify the card issuer branch from the list of options available alongside.
Account Number
From the list of options available alongside, specify the Oracle FLEXCUBE account number for which the card has been issued.
Customer Name
The system displays the name of the customer.
Currency
The system displays the currency of the account.
Card Type
The system displays the card type based on the Account currency maintained in the 'Card Transaction Limits' maintenance screen.
Limit Applicability
Select the limit applicability from the adjoining drop-down list. The values available are:
- Default - On choosing Default, the system defaults the daily limit for ATM/POS maintained at Card Transaction limit level.
- Special - On choosing Special, system allows to enter the daily limits for ATM/POS manually.
Limits
ATM Daily Transaction Limit
Specify the daily transaction limit of the ATM.
ATM Daily Count Limit
Specify the daily count limit of the ATM.
POS Daily Transaction Limit
Specify the daily transaction limit of the POS.
POS Daily Count Limit
Specify the daily count limit of the POS.
Note
CASA account closure is validated if any active card mapping exists in the card to account mapping screen
Utilization
ATM Utilized Limit
System defaults the utilized limit when ATM Cash withdrawal transaction is posted.
ATM Utilized Count
System displays the utilized count when the ATM cash withdrawal transaction is posted
POS Utilized Limit
System displays the utilized count when the POS transaction is posted.
POS Utilized CountSystem displays the utilized count when the POS transaction is posted.
The above limits are updated for both ON-US and Remote ON-US transactions
When any of the ATM/POS transaction is reversed respective utilized limit/count will also be updated accordingly.
Note
If Daily transaction limit is lesser than the per transaction limit for both ATM/POS, then the system throws an appropriate error.
2.3.4 Card Accounts Detail
You can query your card accounts detail using the ‘Card Accounts Detail’ screen. You can invoke this screen by typing ‘SWDCARDA’ in the field at the top right corner of the Application tool bar and clicking on the adjoining arrow button.
The ‘Card Accounts Detail’ screen is shown below:
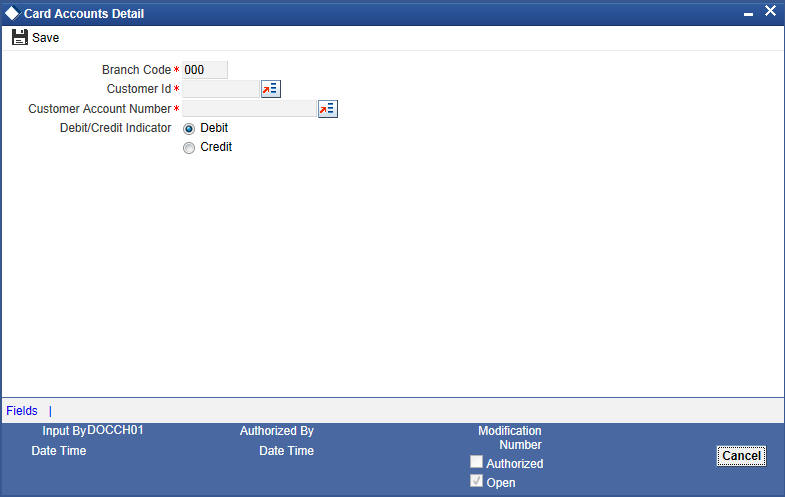
Click the Enter Query button to enter the following query criteria.
Branch Code
Specify the branch code of the account.
Customer ID
Select the customer Id from the option list.
Customer Account Number
Specify the customer account number.
After entering the details, click the ’Save’ button.
2.3.5 Card Customer Maintenance
You can invoke the ‘Card Customer Maintenance’ screen by typing ‘SWDCUSTM’ in the field at the top right corner of the Application tool bar and clicking on the adjoining arrow button.
The ‘Card Customer Maintenance’ screen is shown below:
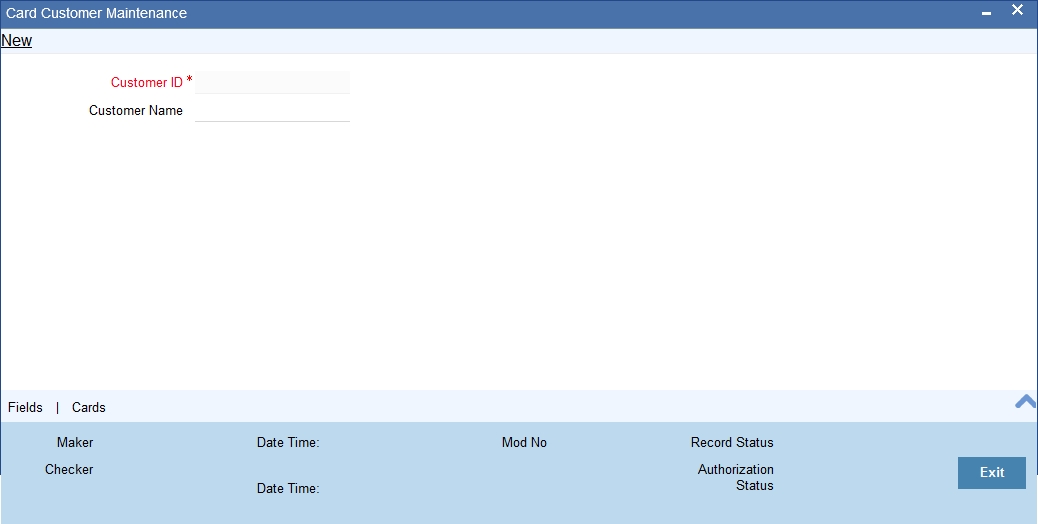
Click the Enter Query button to enter the following query criteria.
Customer ID
Select the customer ID from the option list. The option list displays all the customers maintained in the system.
Customer Name
On selecting the customer ID, the customer name gets displayed here. However, you are allowed to change the customer name.
2.3.6 Maintaining Channel Details
You can define channel names using ‘Channel Details’ screen. You can invoke this screen by typing ‘SWDCHNID’ in the field at the top right corner of the Application tool bar and clicking the adjoining arrow button.
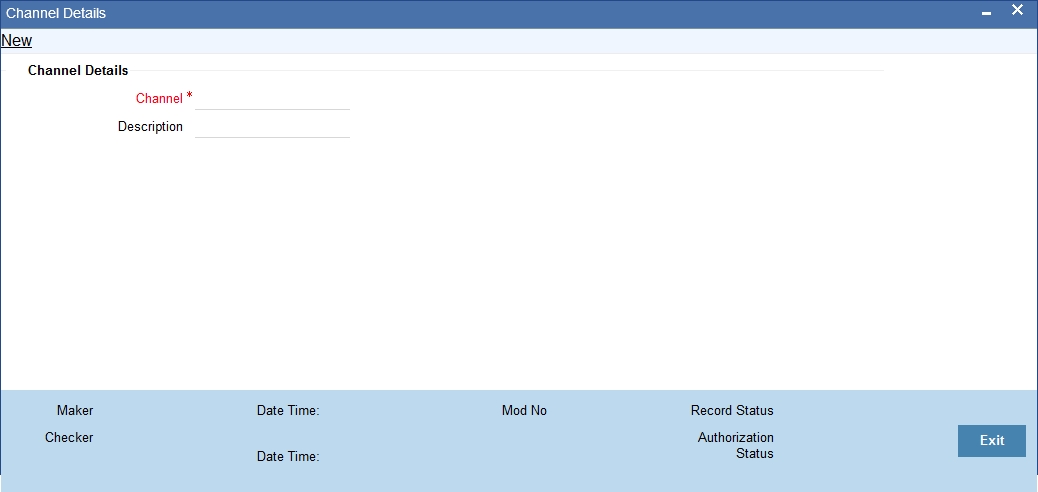
Specify the following details here:
Channel
Specify the channels like ATM/IVR/POS and ALL. These channels are factory shipped.
Description
Enter a brief description about channels.
2.3.7 Maintaining Process Code Mapping Details
All transaction requests from the switch system are conveyed in ISO transaction codes. These are resolved into corresponding specific transactions in Oracle FLEXCUBE. For this you must maintain the ISO transaction code and its corresponding Oracle FLEXCUBE transaction literal in the ‘Process Code Mapping Details’ maintenance screen.
Create and maintain process code types for all Oracle FLEXCUBE literals in the ‘Process Code Mapping Details’ screen. You can invoke the ‘Process Code Mapping Details’ screen by typing ‘SWDFCLTL’ in the field at the top right corner of the Application tool bar and clicking the adjoining arrow button.
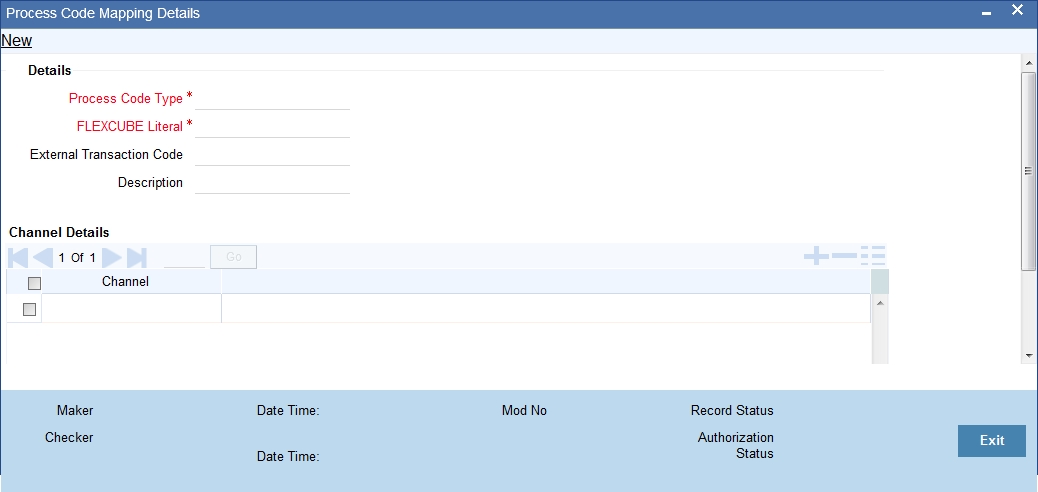
Specify the following details here.
Oracle FLEXCUBE Literal
Select the Oracle FLEXCUBE literal from the drop-down list available alongside. This is a mandatory field. You can enter additional information in the editor that is displayed on clicking the adjoining icon.
Process Code Type
Specify the first two characters from the ISO process code here. It is a two-digit unique number. This is a mandatory field.
Channel
Specify a channel that should be used. The adjoining option list displays all valid channels maintained in the system. You can choose the appropriate one.
External Transaction Code
Specify the external transaction code here. This is an optional field.
Description
Optionally you can specify a brief description of your maintenance here.
2.3.8 Maintaining Network Details
For every network interacting with the SWITCH system, you need to maintain the Network, Issuers and Acquirer details. This maintenance is done in the ‘Network Details’ screen as shown below.
You can invoke the ‘Network Details’ screen by typing ‘SWDNWDET’ in the field at the top right corner of the Application tool bar and clicking the adjoining arrow button.
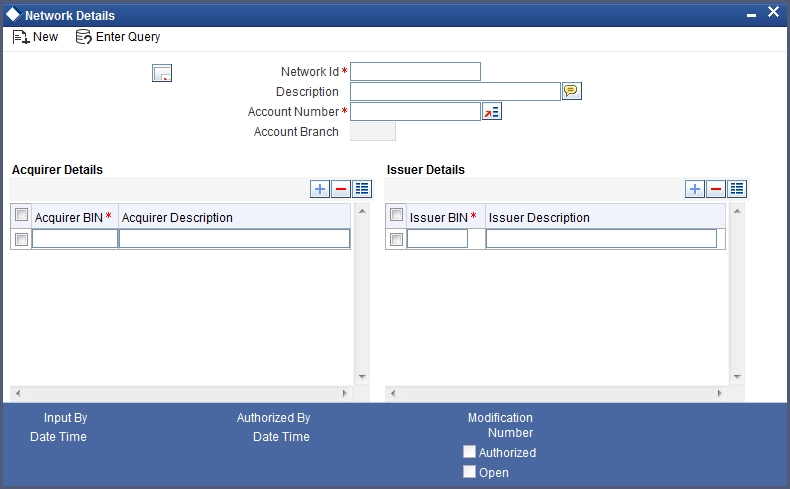
Network ID
Specify the Network Id of the card issuing agency here. This is a mandatory field.
Account Number and Account Branch
Specify the Account Number from the list of options available alongside each field. This account number – a Nostro account – belongs to the specify Network Id. This is used to post entries when the corresponding network is involved in the transaction. It is a mandatory field. Depending on the Account Number selected, the corresponding Account Branch is displayed.
Issuer and Acquirer Details
Acquirer is the Bank that owns the ATM and POS terminals and offer access to card holders from their own and also other banks. Issuer is the Bank that issues the Card to account holders and authorizes/posts transactions.
You must maintain the Issuer and Acquirer Banks for the network here. Specify the BIN (Bank Identification Number ) alias IMD ( International Member Descriptor ) to identify the Acquirer and Issuer. You may also specify a description for each.
2.3.9 Maintaining Merchant Details
You may have various POS machines at different locations, each having their own Merchant Details. For facilitating POS transaction you must maintain the Merchant Details in the screen as shown below.
You can invoke the ‘Merchant Details’ screen by typing ‘SWDMRCID’ in the field at the top right corner of the Application tool bar and clicking the adjoining arrow button.

Merchant Id
Specify the Merchant ID of the POS machine here. This is mandatory.
Account Branch
Specify the related branch of the Merchant’s account here. This is mandatory.
Account Number
Specify the Merchant’s account number here. This is mandatory. This will be the Oracle FLEXCUBE account to which postings will be done.
2.3.10 Maintaining Terminal Details
You must maintain Terminal Details such as the Originating branch, Cash GL and Terminal ID for each ATM or POS Terminal. This is done in the ‘Terminal Details’ screen as shown below.
You can invoke the ‘Terminal Details’ screen by typing ‘SWDTRMID’ in the field at the top right corner of the Application tool bar and clicking the adjoining arrow button.
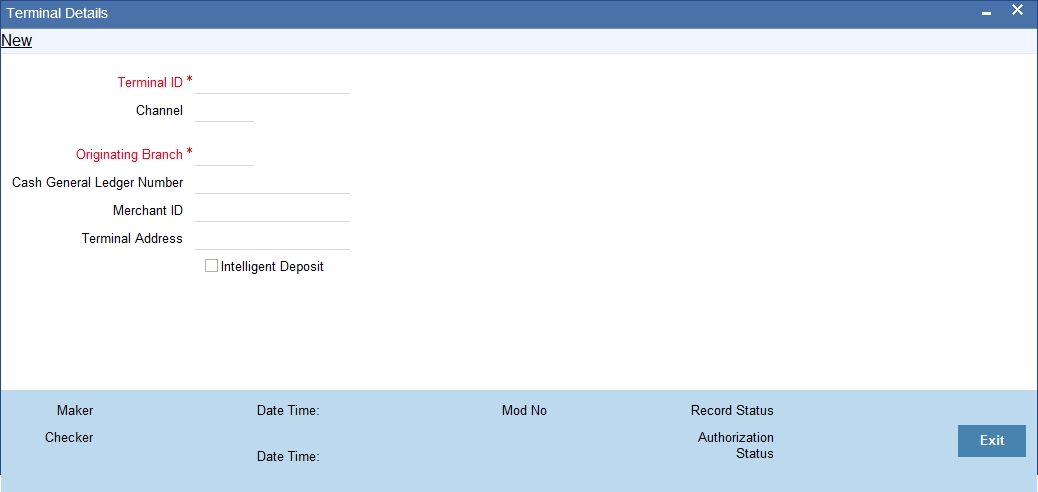
Terminal ID
Specify the unique terminal ID of the ATM machine/POS machine to uniquely identify then. This is mandatory.
Channel
Specify a channel that should be used. The adjoining option list displays all valid channels maintained in the system. You can choose the appropriate one.
Note
- If you select the channel as IVR, then you need to leave ‘Intelligent Deposit’ option unchecked.
- If you select the channel as IVR, then the options ‘Cash General
Ledger number’ and ‘Merchant ID’ should be blank.
Originating Branch
Specify the Originating Branch from the list of options given alongside. It is either the issuer branch of the POS or the ATM branch, as the case may be.
Cash GL Account
This field is enabled and is mandatory for ATM type terminals only. Specify the Cash GL Account form the adjoining list of options.
Merchant ID
This field is enabled and is mandatory for POS type terminals only. Specify the Merchant ID here.
Terminal Address
Specify the address of the terminal here.
Intelligent Deposits
This checkbox is valid only for ATM terminals. Select this checkbox to indicate the ATM provides Intelligent Deposits facility. In the Intelligent Deposits facility, accounting entries are done as soon as the customer makes the Deposit.
2.3.11 Maintaining Utility Provider Details
Maintain the details of a utility provider in the ‘Utility Provider Details’ screen. You can invoke the ‘Utility Provider Details’ screen by typing ‘SWDUTLPR’ in the field at the top right corner of the Application tool bar and clicking the adjoining arrow button.
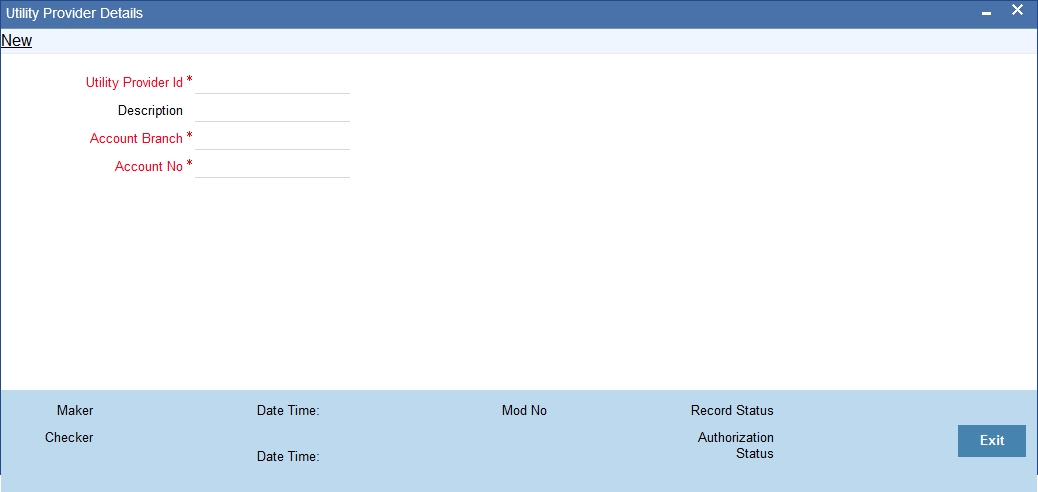
Utility Provider Id
Specify the Utility Provider Id here.
Account Branch
Specify the related branch of the Merchant’s account here. This is mandatory.
Account Number
Specify the Merchant’s account number here. This is mandatory. This will be the Oracle FLEXCUBE account to which postings will be done.
Description
Optionally you can give a brief description of the utility provider here.
2.3.12 Maintaining Product Types for Product Derivation
Every transaction request from the switch system is assigned under a particular product type. This maintenance is done in the ‘Product Type Maintenance’ screen. Here, you can map products to Oracle FLEXCUBE literals.
For every transaction request the Oracle FLEXCUBE product is derived based on the Category, Oracle FLEXCUBE literal and the Customer Category.
You can invoke the ‘Product Type Maintenance’ screen by typing ‘SWDPRMAP’ in the field at the top right corner of the Application tool bar and clicking the adjoining arrow button.
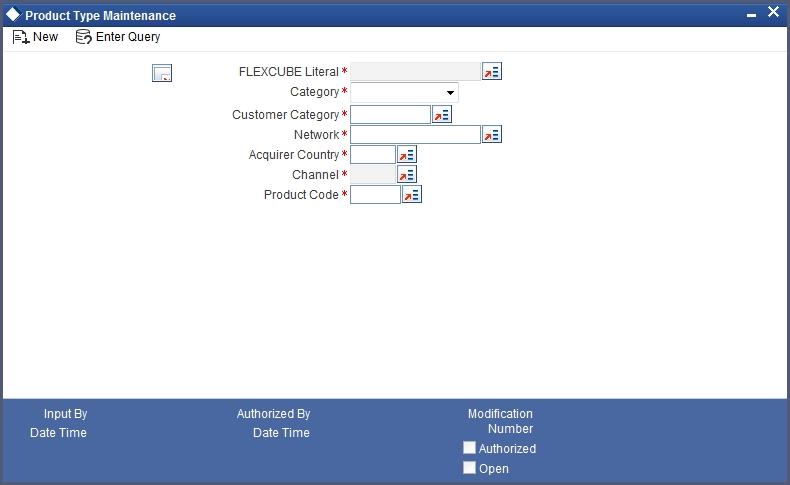
You can specify the following details here.
Oracle FLEXCUBE Literal
Select a three digit literal from the list of options available alongside.
Category
Select the category of the transaction – On-Us, Off-Us or Remote-On-Us – from the list of options available alongside.
Customer Category
Select a customer category from the list of options available alongside.
Channel
Specify the channel that should be used for transaction. The adjoining option list displays all the channels maintained in the system.
Note
ATM, POS and IVR requests may come from the same port or from different ports based on the configuration done in the property file. If they are configured to arrive from different ports, then the channel is identified based on the port number. If they are configured to arrive from the same port then the channel is identified as ‘ALL’. It is also possible that some of the channels alone share a port.
Product Code
From the list of options available alongside, select the Oracle FLEXCUBE product code to be mapped to the specified literal.
Network
Select the network from the list of options available alongside.
Acquirer Country
Select the country of the acquirer from the list of options available alongside.
2.3.13 Showing Amount Block Transactions in Account Statements
You can have any field from the transaction log included in the Customer Account statement generation. Additionally you can also choose to include transactions that resulted in amount blocks.
You can invoke the ‘Amount Block Input’ screen by typing ‘CADAMBLK in the field at the top right corner of the Application tool bar and clicking the adjoining arrow button. Click the new button on the Application toolbar.
Note
The system performs the action level access rights validation only on ‘Save’ operation.
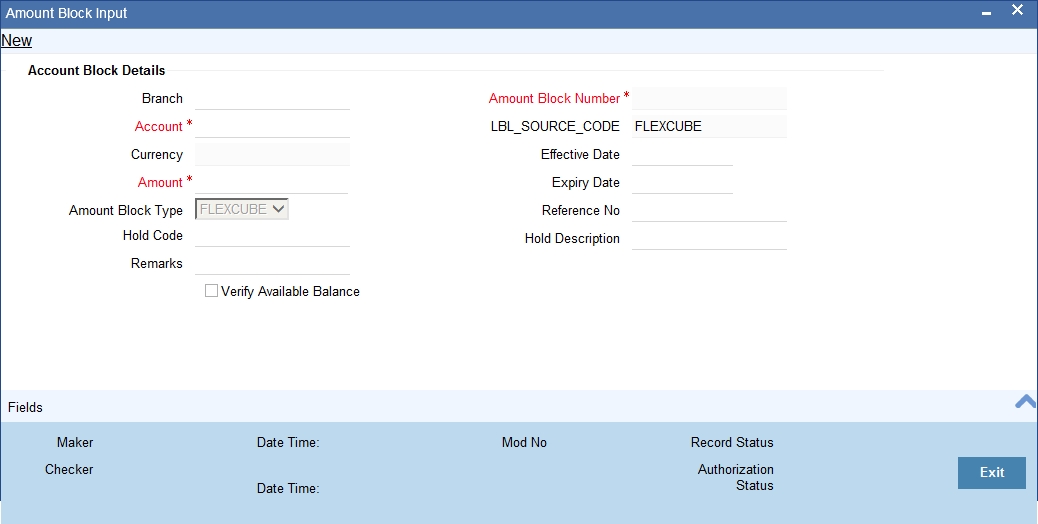
Account Number
Specify the Oracle FLEXCUBE account number for blocking the amount. This field is mandatory.
Amount Block Number
Amount block number is unique and is created after the amount block creation.
Amount
Specify the Amount blocked. This field is mandatory.
Expiry Date
Specify the expiry date of the Amount Block.
Effective Date
Specify the date from which the Amount block is effective.
Amount Block
This list shows Switch, Oracle FLEXCUBE, and Pre-Auth. If the amount block is done via Switch, then it must be selected here.
Remark
Optionally you may add your remarks here.
Source Code
The source from which the amount block has been initiated is displayed.
Verify Available Balance
Check this box to enable creation of amount block only when sufficient funds are available.
2.3.14 Modifying a Product Preferences Screen
During the implementation of the Switch interface system you can use the following facility to modify the ‘Preferences’ screen for a product.
You can invoke the ‘Retail Teller Product Preferences’ screen by typing ‘DEDRTPRM’ in the field at the top right corner of the Application tool bar and clicking the adjoining arrow button.
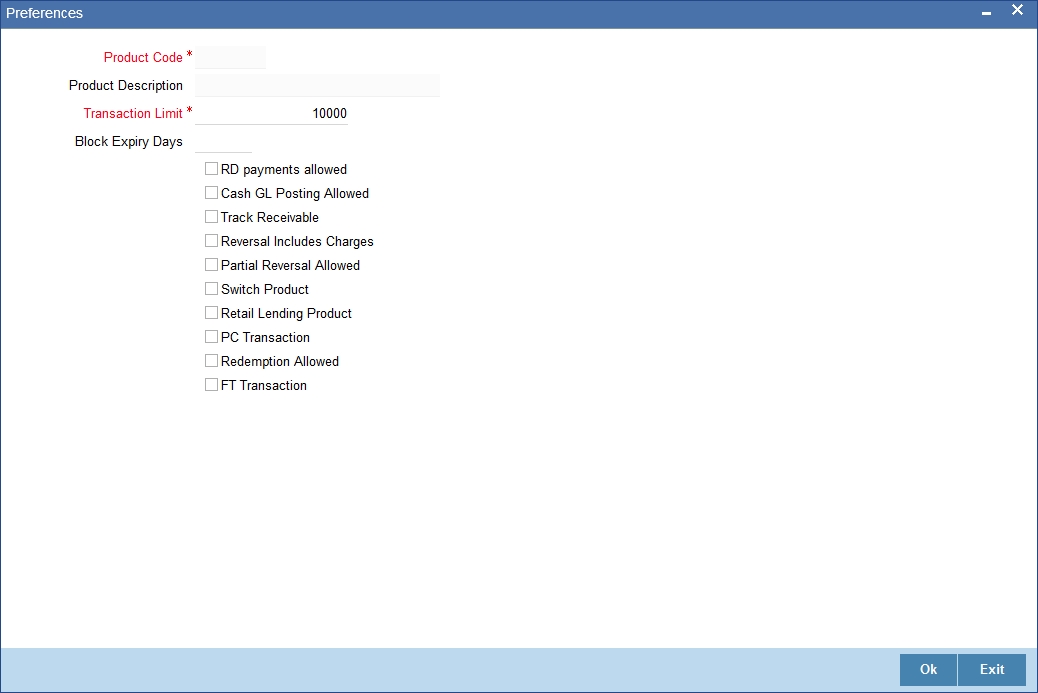
You may select the following checkboxes if you wish to have them in a product’s ‘Preferences’ screen.
- Partial Reversals allowed
- Reversal Includes charges - Reversal should reverse charges
- Switch product
2.3.15 Maintaining Charges for Non-financial Transactions
You can have the following non financial transactions charged:
- Balance Enquiry
- Cheque Book request
- Mini statement request
- Ad-hoc statement request
You can facilitate the above service by first using the ‘Retail Teller Product Maintenance’ to maintain a Retail Teller product as shown below.
You can invoke the ‘Retail Teller Product Maintenance’ screen by typing ‘DEDRTPRM’ in the field at the top right corner of the Application tool bar and clicking the adjoining arrow button.
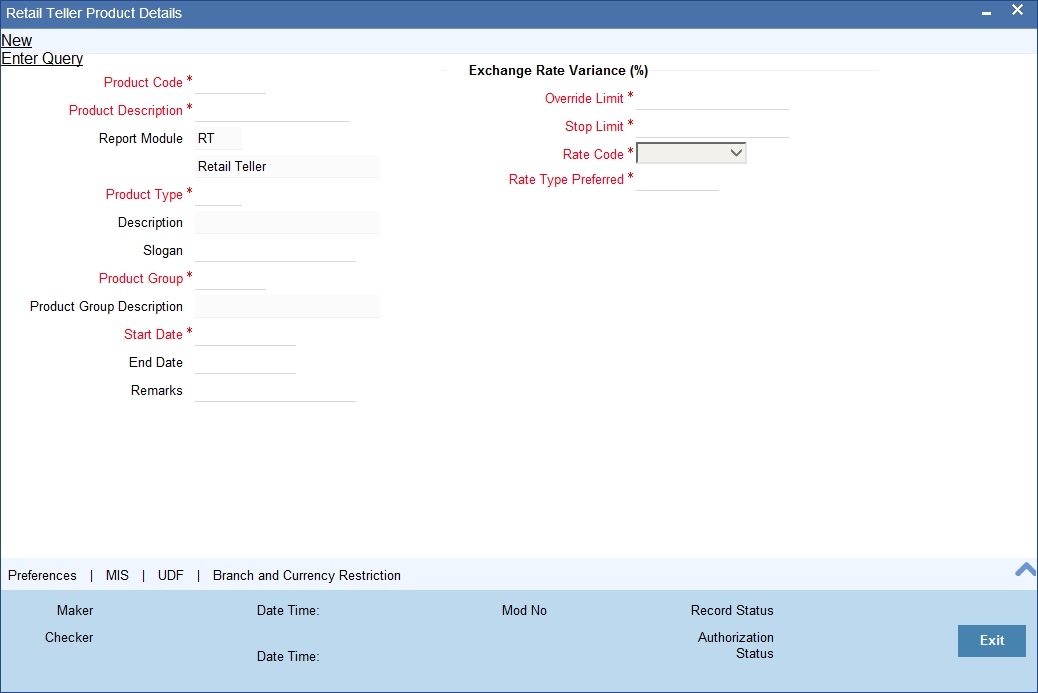
You must next do the ARC Maintenance for the above product in the ‘ARC Maintenance’ screen as shown below. In the ARC Maintenance you can maintain the charges for the various non-financial transactions under the CHARGE 1-5 tabs. The transaction amounts will be zero and so the accounting entries will have only the charges.
2.3.16 ARC Maintenance
You can maintain the charges for the product type in the ARC Maintenance screen.You can invoke the 'ARC Maintenance’ screen by typing ‘IFDATMMN’ in the field at the top right corner of the Application tool bar and clicking the adjoining arrow button.
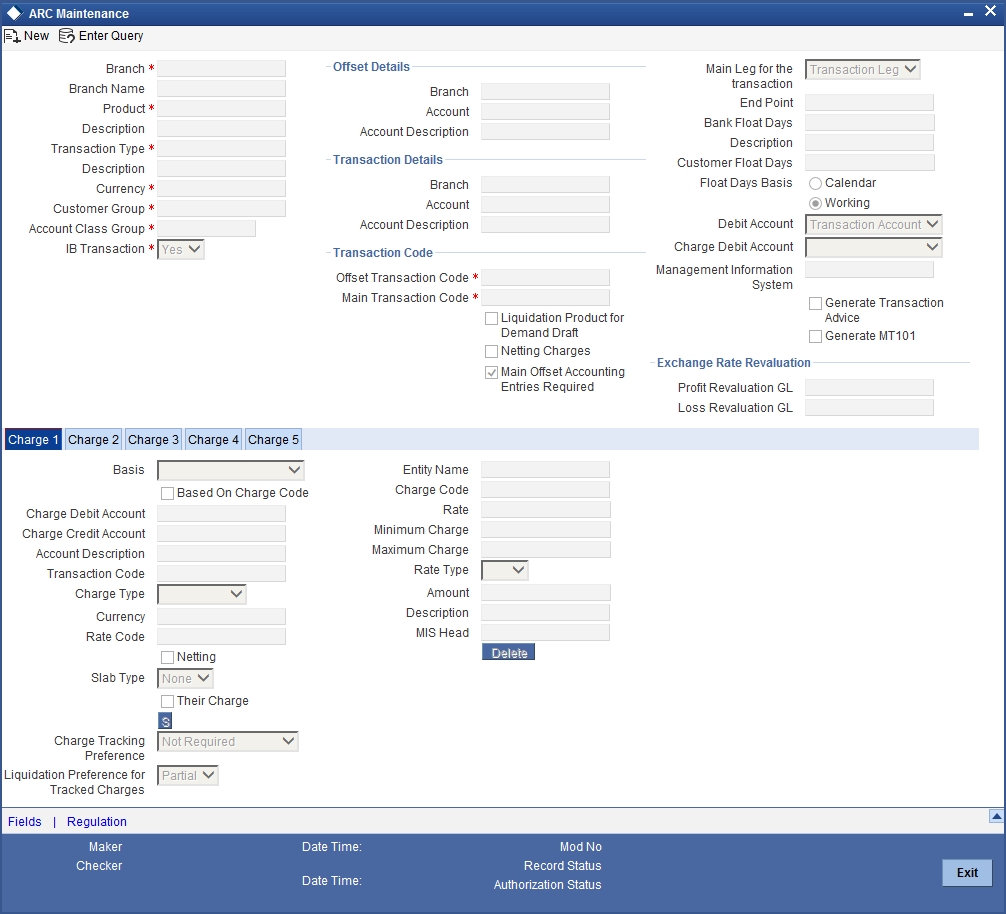
The ARC maintenance is done for the product Cash Withdrawal (CHWL).You can maintain charges (under charge tabs CHARGE1 -5) for both financial and non-financial transactions.
CHARGE1 must be the Transaction Fee. The Description under ‘CHARGE1’ tab should be given as TXN_FEE. CHARGE2 must be the Transaction Processing Fee. The Description under the ‘CHARGE2’ tab should be given as TXN_PROCESS_FEE.
2.3.17 Service Charges for Inter- branch Transactions
In a transaction, if the account branch of the teller transaction is different from the transaction branch, then charges maintained by inter-branch product will be applied to the transaction.
If the IB checkbox is checked for a product, then the system will pick up and process the charge entries maintained at the IB product level.
During a transaction, If IB product is not maintained and if the transaction branch is different from account branch, then charges maintained in non-ib product will be applied to the transaction.
IB Transaction
Check this box if you want the system to pick up the product for inter-branch transactions.
You will notice the difference in the service charges processed for two transactions with same kind of product.
Refer the chapter ‘Maintaining Account, Rate, and Charge Details’ in the FCC_Host_Clearing user manual, for detailed explanation of the fields in this screen..
2.4 Batch Processes
The following batch processes are part of the Oracle FLEXCUBE – Switch Interface.
- Section 2.4.1, "Maintaining Batches for Batch Operations"
- Section 2.4.2, "Settlement Upload"
- Section 2.4.3, "Intra Day Batch"
- Section 2.4.4, "Viewing Transaction Monitor"
For more information on Batch Processes refer the corresponding Oracle FLEXCUBE user manual.
2.4.1 Maintaining Batches for Batch Operations
You can maintain the following batches for Batch Operations in the ‘Batch EOD Function Inputs’ screen:
- SWSWRECN – Switch Reconciliation Batch
- SWDPRCRT – Process Transaction Batch
- SWNETSET – Network Settlement Batch
- SWMERSET – Merchant Settlement Batch
- SWDPURGE – Adhoc Purge Batch
- SWDRETBT – Retry and Suspense Processing Batch.
You can invoke the ‘Batch EOD Function Inputs’ screen by typing ‘BADEODFE’ in the field at the top right corner of the Application tool bar and clicking the adjoining arrow button.

2.4.2 Settlement Upload
You can perform settlement uploads for the Switch, Network and Merchant categories from the ‘Settlement Upload’ screen. You can invoke the ‘Settlement Upload’ screen by typing ‘SWDUPLST’ in the field at the top right corner of the Application tool bar and clicking the adjoining arrow button.
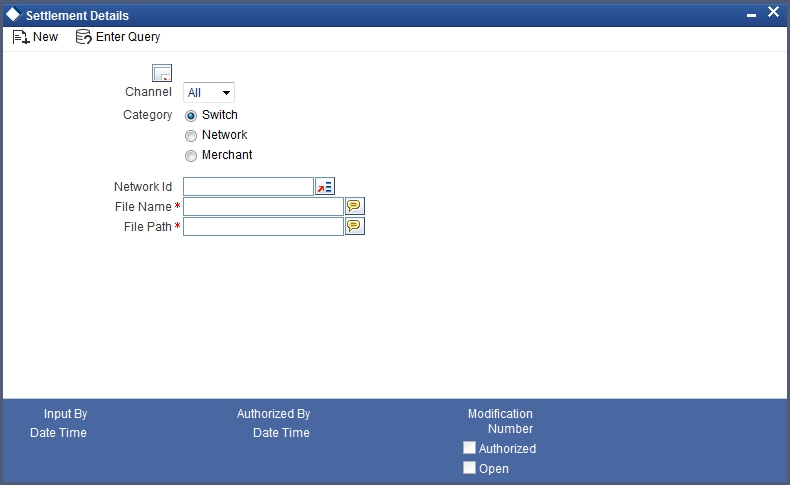
You need to specify the following details.
Channel
Select the channel to be used while uploading settlement files into Oracle FLEXCUBE, from the adjoining drop-down list. The following values are available:
- ALL
- ATM
- POS
- IVR
Based on the channel specified, the system will pick up the appropriate Retail Teller product and ARC maintenance for settlement and reconciliation processing.
Category
The categories for which you can perform settlement upload are:
- Switch
- Network
- Merchant
In the above screen you can specify the Reconciliation File/Network file/Merchant upload file’s name and path.
2.4.3 Intra Day Batch
You can run the following Functions in the ‘Intra Day Batch Start’ screen:
- SWSWRECN – This is the batch for the reconciliation file.
- SWNETSET– This is the batch for the network file.
- SWDPRCRT – This batch removes the amount block.
- SWMERSET – This is the batch for Merchant settlement.
- SWDPURGE – This is the batch for Adhoc purge of transaction data to history table.
- SWDRETBT – This is the batch for retry and suspense processing.
Once the batches are successfully run, their corresponding accounting entries will be posted.
You can invoke the 'Intra Day Batch Start’ screen by typing ‘BADIDBAT’ in the field at the top right corner of the Application tool bar and clicking the adjoining arrow button.
Click ‘Ok’ button to initiate the Intra Day Batch process.
You can monitor the status of successfully run SWSWRECN and SWNETSET functions in the ‘Intra Day Batch Start Monitor’ screen.
You can invoke the 'Intra Day Batch Start Monitor’ screen by typing ‘BASIDMTR’ in the field at the top right corner of the Application tool bar and clicking the adjoining arrow button.
2.4.4 Viewing Transaction Monitor
You can view a summary of transaction status in the ‘Switch Transaction Monitor’ screen. You can invoke this screen by typing ‘SWDTXQRY’ in the field at the top right corner of the Application tool bar and clicking the adjoining arrow button.
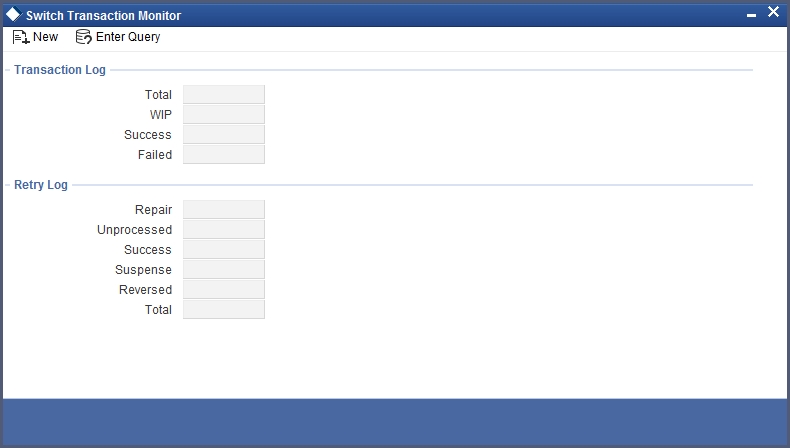
Here you can view the following details.
Transaction Log
You can view the number of transactions in the following statuses.
- WIP
- Success
- Repair
- Failed
- Total
Retry Log
You can view the retry log of transactions in the following statuses.
- Unprocessed
- Success
- Suspense
- Reversed
- Total
2.5 Cards Upload
You can upload card account mapping maintenance through the ‘Debit Card FCC Account Upload’ screen. You can invoke this screen by typing ‘SWDCDUPL’ in the field at the top right corner of the Application tool bar and clicking the adjoining arrow button.
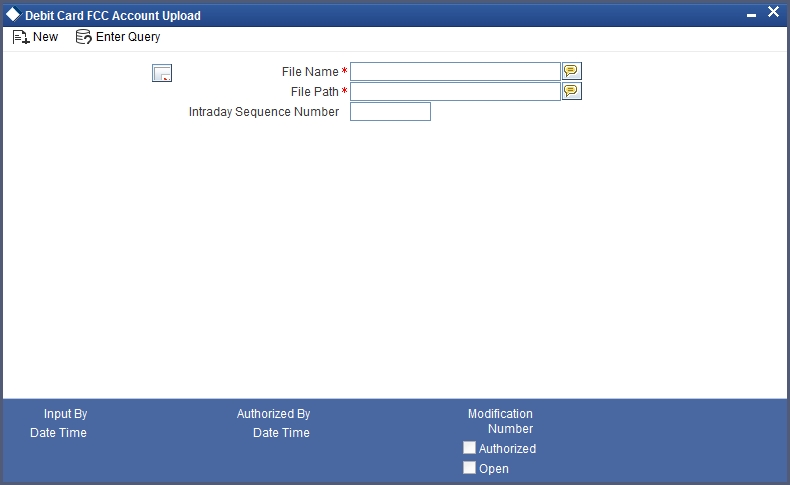
You can specify the following details.
File Name
Specify the name of the file that should be uploaded.
File Path
Specify the path from where the file should be picked up for uploading.
Intraday Sequence Number
The system generates a sequence number for the upload transaction and displays it here.
2.6 Terminal ID Upload
You can upload terminal ID maintenance through the ‘Terminal ID Upload’ screen. You can invoke this screen by typing ‘SWDTIDUP’ in the field at the top right corner of the Application tool bar and clicking the adjoining arrow button.
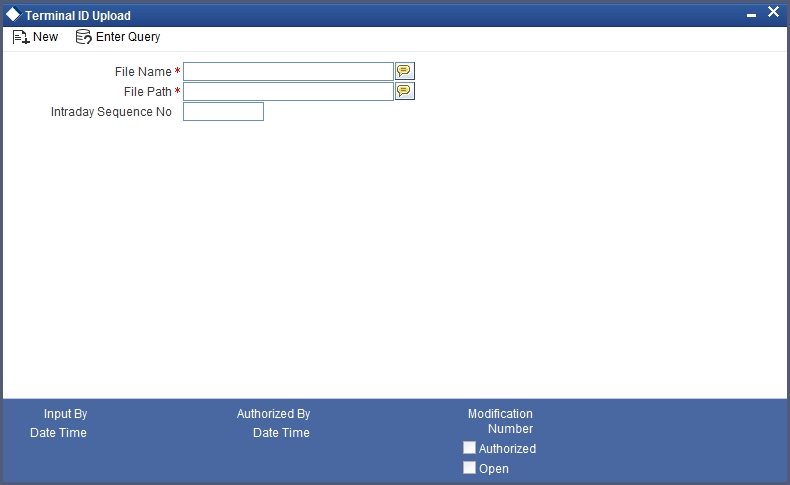
You can specify the following details.
File Name
Specify the name of the file that should be uploaded.
File Path
Specify the path from where the file should be picked up for uploading.
Intraday Sequence No
The system generates a sequence number for the upload transaction and displays it here.
2.7 ATM Cash Deposits
Cash deposits can happen at ATMs which don’t have the Intelligent Deposits facility. For such ATMs the ‘Intelligent Deposits’ option also is not selected in Terminal Details maintenance. In the case of such ATMs the cash deposit details are stored as a ‘Tanked Deposit Transaction’ until you can validate the transaction amount.
For Tanked Deposit Transactions, accounting entries are not passed until the transaction amount is validated and authorised. You can validate the transaction amounts of Tanked Deposit Transactions in the ‘ATM Cash Deposit Details’ screen.
You can invoke the ‘ATM Cash Deposit Details’ screen by typing ‘SWDCSHDP’ in the field at the top right corner of the Application tool bar and clicking the adjoining arrow button.
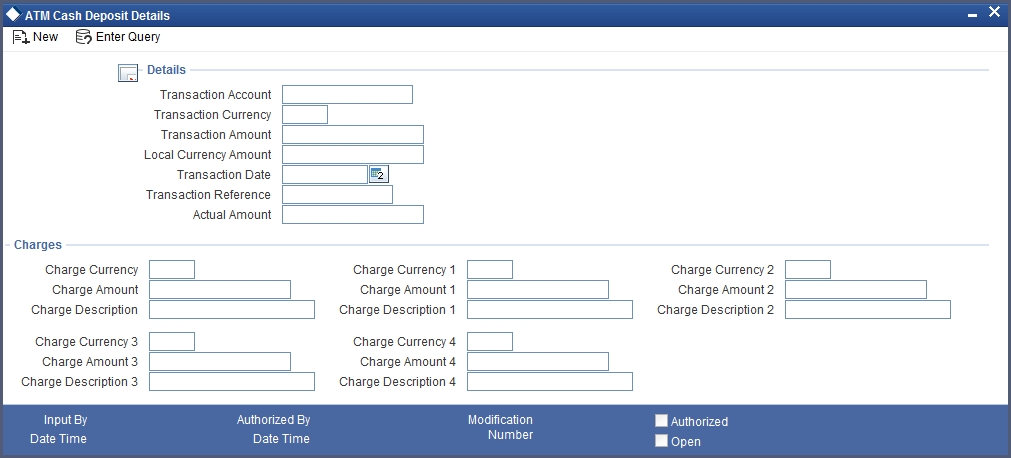
You must validate the tanked deposit by specifying the actual transaction amount in the ‘Actual Amount’ field. Once done, click ‘Exit’ button to exit and save your validation.
The following details are displayed in the above screen. The details give information regarding the cash deposit.
Transaction Account
This displays the Oracle FLEXCUBE account which has been linked to the Card Account Number.
Transaction Currency
This field displays the Oracle FLEXCUBE currency which has been linked to the numeric currency in the ISO message.
Transaction Amount
This is the deposit amount sent through the ISO message.
Local Currency Amount
If a local currency has been maintained then the transaction amount is converted to the local currency and displayed here.
Transaction Date
This is the Deposit transaction date as sent in the ISO message.
Transaction Reference Number
This is the Transaction Reference Number which is generated for the deposit transaction.
Charge Currency and Charge Currency 1-4
Charges may be levied as Transaction Fee, Transaction Processing Fee and as other charges maintained in Oracle FLEXCUBE. The currency that has been defined for the corresponding charge is displayed here.
Charge Amount and Charge Amount 1-4
The charge amount for the corresponding charge is displayed here.
Charge Description and Charge Description 1-4
The description for the charge is displayed here.