3. Transaction Workflow
3.1 Introduction
The Workflow engine, which forms the core of Savings, guides the transaction through its various stages. Each transaction is defined as a workflow with a series of steps or stages.
At the beginning of each stage, you (teller) have to capture the relevant data in the appropriate screen and then click on the ‘Save’ button. Upon clicking this button, the Workflow engine checks the Workflow definition and appropriately moves the transaction to the next logical step.
This chapter contains the following sections:
- Section 3.2, "Features of Savings Workflow"
- Section 3.3, "Workflow Interfaces"
- Section 3.4, "Maintaining Function Group"
- Section 3.5, "Workflow Definition"
- Section 3.6, "User Role Definition"
- Section 3.7, "Workflow Transaction"
3.2 Features of Savings Workflow
The following are the features of savings workflow:
- The workflow can be defined for each function.
- For functions which consist of similar workflow, the definition is defined at a generic level.
- Once a stage for a transaction is completed, the workflow engine moves the transaction to the next logical stage automatically.
- The number of stages and workflow using front end maintenance can be configured.
- Any change in workflow does not result in re-deployment.
- It minimizes the number of host trips.
- The workflow is supported in offline scenario.
- For Savings, you can have a default authorizer. If default authorizer is defined, then the transaction gets assigned to that authorizer automatically.
- For cash transactions, you can configure the denomination tracking, whether it is required or not.
3.3 Workflow Interfaces
This section contains the following topics:
- Section 3.3.1, "Defining workflow interfaces"
- Section 3.3.2, "Locking a Workflow stage"
- Section 3.3.3, "Tracking and Auditing"
- Section 3.3.4, "Defining a Workflow stage "
3.3.1 Defining workflow interfaces
The workflow engine provides the following interfaces:
Initiation of a new transaction
This interface is invoked when you select a transaction from the Menu. Internally, a Workflow object corresponding to the transaction you select in the Menu is created and control passed to it. This Workflow object will first check if you have the rights to execute the selected transaction. It will then, display the appropriate screen and data.
Execute a workflow stage
This interface is called after you capture the mandatory data and click on the ‘Save’ button in relevant transaction screen. The Workflow object, created on initiation of a new transaction, checks if any server code needs to be invoked and appropriately invokes it with the data received. Based on the response from the server code, the Workflow object routes the workflow to the next appropriate stage. On completion of a stage, the stage details including the input data xml and response data xml are logged in Savings to indicate that the workflow has moved to the next stage.
Load a Workflow stage
This interface is invoked when you click on a stage in your task list. This results in the Workflow object providing you the appropriate screen and data. The transaction workflow stage status is marked as Work In Progress (WIP).
Hold a Workflow stage
This interface is used when you don’t want to execute the workflow stage immediately but save the data captured for use at a later point.
Cancel a Workflow
This interface is used when you need to cancel a transaction at any stage.
Assign a Workflow stage
This interface is invoked when you click on the ‘Assign’ button in the assignment screen. If you need to assign the workflow stage to a different user, the assignment screen is displayed where you can specify the new user in the ‘Assign To’ field. Upon clicking the ‘Assign’ button, the workflow object updates the ‘Assigned To’ column in the Log Master table. The transaction then, appears in the pending tasks list of the new user from where the user can pick up the transaction.
Discard a Workflow
If you need to discard a transaction at any stage, the discard interface is invoked.
3.3.2 Locking a Workflow stage
You can assign a workflow stage to more than one user. This means that any user with appropriate rights can pick up and execute a given workflow stage. However, to ensure that only one user executes a stage, the workflow engine ensures that as soon as one of the assigned users selects a workflow stage for execution, the stage is locked for that user. If any other user tries to execute the stage, the system displays an error message informing that another user has already locked the workflow stage.
3.3.3 Tracking and Auditing
The Workflow engine provides highest level of security and auditing capabilities. It captures and maintains the following information about every action taken by each user:
- The transaction stage that was invoked
- The name of the user who invoked the stage
- The time when it was invoked
- The data captured for the transaction
- The result of the action performed
The data thus captured will be sufficient to replay the entire life of any given transaction, at given time. The table Txn_LogDetails holds the details of every stage of the transaction including the input and output data.
3.3.4 Defining a Workflow stage
You can define workflow stages as per the bank’s requirements. The class generator utility will automatically generate the transaction specific classes. The workflow definitions for all transactions are generated in XML format. Whenever you change the workflow definition for a transaction, the respective class should be generated again and replicated to the workflow.
3.4 Maintaining Function Group
You can logically club the function IDs to a function group using the ‘Function Group Detail’ screen. To invoke this screen, type ‘STDFNGRP’ in the field at the top right corner of the Application tool bar and clicking the adjoining arrow button.

Here you need to enter the following details:
Function Group
Specify the appropriate function group that has to be created.
Function Group Description
Specify the description of the function group code.
Function ID
Select the function ID which is part of the function group from the option list provided. The system will list only savings functions.
The system performs the following validation while clubbing the function IDs to a function group:
- The function ID should be unique. Same function ID should not be mapped to multiple function groups.
- The function group code should not be a function id.
- At least one function ID should be defined for a function group.
While generating workflow if you select function group, then the system generates online and offline workflow. The system generates offline workflow only if the function supports offline processing or if workflow is maintained for a group. The static data released for stage wise response does not include override and undo (auto reversal).
3.5 Workflow Definition
This section contains the following topics:
- Section 3.5.1, "Maintaining Workflow Definition"
- Section 3.5.2, "Specifying User Preferences Details"
- Section 3.5.3, "Specifying Validation Preferences Details"
- Section 3.5.4, "Specifying Authorization Preferences Details"
- Section 3.5.5, "Authorization Limit Check Button"
- Section 3.5.6, "Multi Authorization Role Details Button"
- Section 3.5.8, "Maintaining Auto Assignment of Authorizer"
- Section 3.5.9, "Maintaining Default Authorizer"
3.5.1 Maintaining Workflow Definition
You have to maintain certain parameter which determines the workflow of a savings function. You can either define a workflow for individual savings functions like Cash Deposit, Cash Withdrawal or you can define for a group of similar functions like Function Group.
You can set the parameters for workflow definition for a branch using ‘Function Workflow Definition Detail’ screen. To invoke this screen, type ‘STDWFDEF’ in the field at the top right corner of the Application tool bar and clicking the adjoining arrow button.

Here you need to enter the following details:
Branch Code
Specify the appropriate branch code from the option list provided.
Function ID Group
Specify the function ID group from the option list provided.
3.5.2 Specifying User Preferences Details
MIS amendable
Check this box to amend the system defaulted MIS details.
UDF amendable
Check this box to amend the system defaulted UDF details.
Charges amendable
Check this box to modify charges picked up by system.
Exchange rate amendable
Check this box to modify the exchange rate picked up by system.
Till Required
Check this box to update the till balances. This is applicable only for cash transactions.
Note
If Till Required is checked and if the transaction amount is greater than or equal to maximum cash deposit maintained in Retail Teller Branch parameter then the system displays an override message. The override message can be configured as an error message also.
Signature Verification
Check this box to to mandate the signature display screen as part of the workflow for various transactions.
Note
- If you manually traverse to ’Customer Signature\ Image View’ by pressing F12, then the workflow (of displaying ‘Customer Signature View’) is not triggered. System will however validate for the click of ‘OK’ or ‘Cancel’ button to post the transaction.
- Even though in Workflow definition the “Signature Verification” is checked, you have to keep focus on the debit account and press F12 key to verify signature and F10 to verify image, else system will throw an error during workflow stage to verify the same.”
3.5.3 Specifying Validation Preferences Details
Inter Branch check
Check this box to indicate whether the transaction involving inter branch account needs authorization.
Authorization limit check
Check this box to indicate the transaction amount limit beyond which an authorization for the transaction limit is enforced.
Note
You have to maintain a currency wise transaction limit in online and offline mode. If the limit is not maintained for a currency then transaction amount limit authorization is not enforced.
3.5.4 Specifying Authorization Preferences Details
Auto Authorization
Check this box to indicate transaction requires authorization.
Authorization on charge amendment
Check this box to indicate whether authorization is required in case if you have amended the charge defaulted by the system.
Authorization on exchange rate amendment
Check this box to indicate whether authorization is required in case is you have amended the exchange rate defaulted by the system.
Assignment Mode
Select the assignment mode to indicate whether remote authorization assignment is automatic or manual operation. The assignment modes available are:
- Auto – It indicates whether the authorizer is chosen automatically based on default authorizer maintenance.
- Manual – It indicates whether the maker of transaction can choose the authorizer from the list of authorizers.
Authorization Role
Select the authorization role of the authorizers. The users belonging to this role are the valid authorizers for this workflow. This field is applicable if assignment mode is ‘Manual’ or if assignment mode is ‘Auto’ and no default authorizer is maintained for the user.
Two Step Role
Select the role, who can execute the second step, from the adjoining option list.
Two step role for cash deposit and cash withdrawal are maintained only if the setup is configured for two step process. A role maintained in the two step role is not considered if the process is a single step.
Click ‘Populate Stage’ to derive the number of stages. A maximum of two stages are displayed, they are:
- INPUT Stage
- ENRICH Stage
The derived stages are displayed in the ‘Branch Work Flow Details’ section in the screen.
Note
You can add another stage if single stage is populated. This is required if two stages are enforced despite the preferences that are maintained. The stages added explicitly by you are allowed to be deleted.
Multiple Level Authorization Preferences
Multi Authorization
Check this box to route the transaction for multiple authorization.
Follow Sequence
Check this box to follow a sequence during various levels of multiple authorization of a transaction. This is enabled if ‘Multi Authorization’ is checked.
3.5.5 Authorization Limit Check Button
Click ‘Authorization Limit Check’ button to maintain the currency wise transaction limit in online and offline mode. The ‘Authorization Limit Check’ screen is displayed.
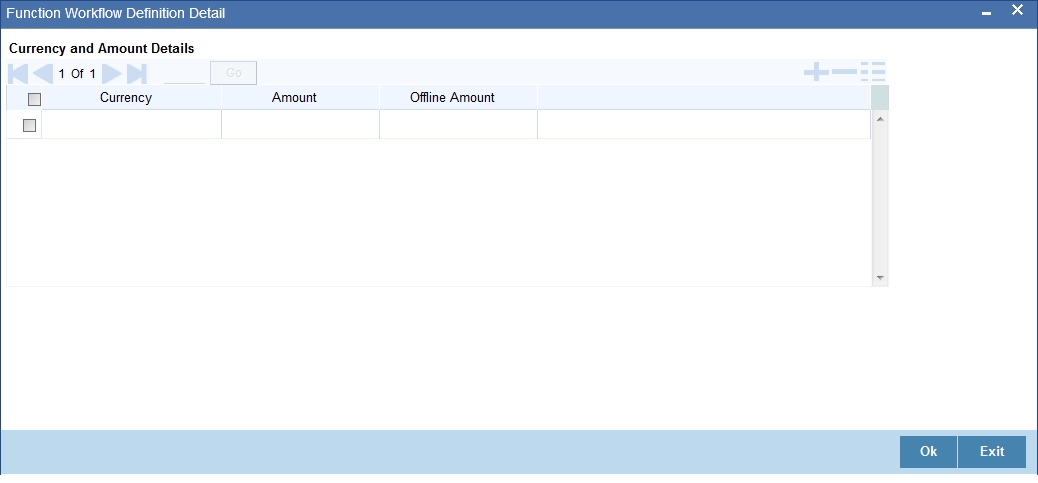
Here you need to maintain currency wise transaction limit in online and offline mode. If the limit is not maintained for a currency then it is treated as authorization required.
Currency
Specify the currency for the authorization limit check.
Online Amount
Specify the online amount for the authorization limit check.
Offline Amount
Specify the offline amount for the authorization limit check.
The system performs the following validation while setting the preferences for Workflow definition:
The denomination tracking check should be Y only if ‘Till Required’ is Y.
Authorization Preference should be Y only if corresponding amendment preferences are Y.
The override handling in last stage cannot be Defer.
If you select ‘Auto Authorize’ option then the following options cannot be selected.
- Auth limit check
- IB check
- Authorization on charge amendment
- Authorization on exchange rate amendment
You cannot select the override handling to ‘Auto’.
3.5.6 Multi Authorization Role Details Button
You can configure roles eligible to authorize transactions specific to a currency and amount combination in the ‘Multi Level Authorization Role Details’ screen. You can configure the roles only if you select the ‘Multi Level Authorization’ check box in the ‘Function Work flow Definition Detail’ (STDWFDEF) screen.
To configure the roles eligible to authorize transactions, click the ‘Multi Authorization Role Details’ button. The ‘Multi Authorization Role Details’ screen is displayed.

You can specify the following details here:
Currency
Currency Code
Specify the currency code using which the amount slabs are defined. Alternatively, you can select the currency code from the option list. The list displays all the currency code maintained in the system. This is enabled if ‘Multi Authorization’ is checked.
Amount Slab and Authorization Levels Grid
Amount Slab
Specify the amount slab up to which authorization can be performed. Alternatively, you can select the amount slab from the option list. The system refreshes the amount slabs for the selected currency. This is enabled if ‘Multi Authorization’ is checked.
No of Levels Path1 and Path2
The system displays the maximum number of levels of authorization required for selected currency and amount slab combination as maintained in ‘Authorization Role Mapping’ section.
Authorization Role Mapping
Authorization Rule
Select the authorization rule from the adjoining drop-down list. This list displays the following values:
- Primary - To apply the authorization rule as primary
- Alternate - To apply the authorization as alternate
Level (1-5)
Specify the user role to authorize the transaction in the respective level.
Note
For Primary rule, you should specify the role for at least one level.
3.5.6.1 Authorizing Mutli Level Authorization Details
When a maker submits a transaction eligible for multi level authorization, all the authorizers mapped to various levels can view and authorize the record in their authorization queue.
If you had checked the ‘Follow Sequence’ check box in the ‘Function Work flow Definition Detail’ screen (STDWFDEF), the transaction appears in the authorization queue only after the previous level of authorization. If you did not check the ‘Follow Sequence’ check box, all authorizers mapped to primary or secondary rule across levels can authorize the transaction from the queue in any order.
To authorize a record in the authorization queue, click the ‘Reference Number’ link of the record in the ‘Multi Authorization Role Details’ screen. The system displays the transaction and authorization role details as maintained in the ‘Multi Authorization Role Details’ screen.
You can navigate to the respective transaction from the authorization queue by double-clicking on a record. This is applicable for authorizers with multi branch access to navigate from the same branch they are logged in.
You can view the roles for each level as per primary and alternate rule in successive rows. By default, the system selects the role as per the lowest level in the primary rule. During authorization, you can edit the role by clicking the check box against respective role based on the roles mapped and authorize the transaction
After verifying all the details, click ‘Authorize’ button to authorize the transaction.
Note
If you have Multi Branch Access, you can view and authorize pending records from other branch by querying on records of the respective branch. You can filter the records for authorization belonging to a specific branch and authorize the transaction.
3.5.7 Handling of Local Transactions and Pure Query
In Oracle FLEXCUBE, the workflow for local transactions and the query stage is pre-configured. You are allowed to amend the following options in work flow maintenance:
- Till Required
- Denomination Tracking Required
- Authorization Limit Check
- Assignment Mode
- Assignment Role
- Authorization Limit Check Button
3.5.8 Maintaining Auto Assignment of Authorizer
Following are the maintenances for handling Auto Assignment of Authorizer, they are:
3.5.9 Maintaining Default Authorizer
You can maintain the default authorizer by using ‘Default Authorizer Detail’ screen. To invoke this screen, type ‘STDDEFAU’ in the field at the top right corner of the Application tool bar and clicking the adjoining arrow button.

Here you need to enter the following details:
User ID
Select a user ID from the adjoining option list. The option list consists of user IDs for whom a default authorizer needs to be maintained..
User Name
The system displays the name of the user, when you select the user ID.
Branch Code
Select the appropriate branch code. This field is enabled if the ‘All’ option is chosen in the ‘User ID’ field. If specific authorizer is selected, then the system will default the home branch as branch code.
Branch Name
The system displays the branch name, when you select the branch name.
Default Authorizer
The system displays the default authorizer, if you already set a default authorizer while assigning the transaction. However you are allowed to change it, if the mode assigned is Manual. Select the authorizer ID from the adjoining option list. The option list consists of authorizers who are mapped to a role with ‘Savings Authorizer’ flag value as ‘Y’ and ‘All’ option.
There are two different modes of assignment of workflow transaction, they are:
- Manual - If you assign the mode as ‘Manual’ then the system will display the default authorizer. You are allowed to change the authorizer.
- Auto - If you assign the mode as ‘Auto’ then the transaction will be automatically assigned to the authorizer.
Description
The system displays the description.
3.6 User Role Definition
This section contains the following topics:
- Section 3.6.1, "Maintaining User Role Definition"
- Section 3.6.2, "Maintaining Denomination Tracking"
- Section 3.6.3, "Maintaining Savings Function Definition"
3.6.1 Maintaining User Role Definition
You can define the user role in the ‘Role Maintenance’ screen. To invoke this screen, type ‘SMDROLDF’ in the field at the top right corner of the Application tool bar and clicking the adjoining arrow button. Then click ‘Branch Limit’ button on the ‘Role Maintenance’ screen.

Here you need to enter the following details:
Authorizer Role
Check this box to indicate the user role is defined.
For more information about ‘Role Maintenance’ refer ‘Defining a User Role’ topic under ‘Security Management System’ User Manual.
3.6.2 Maintaining Denomination Tracking
Oracle FLEXCUBE facilitates denomination tracking. For cash transactions, there is an internal stage called Till Update. The system will update the user till with the amount of cash transaction. If denomination tracking is checked in the ‘Workflow Definition’ screen then the system updates the denomination wise update of Till. If denomination tracking is not checked then you should not input the denomination details in the denomination block. If input, the same is ignored.
3.6.3 Maintaining Savings Function Definition
Oracle FLEXCUBE allows you to set preferences for function ID specific configuration using ‘Branch Function Definition Detail’ screen. The primary data are pre-shipped with an option to modify certain parameters. Here you are allowed to enter query, modify, authorize and close. To invoke this screen, type ‘STDBRFUN’ in the field at the top right corner of the Application tool bar and clicking the adjoining arrow button.
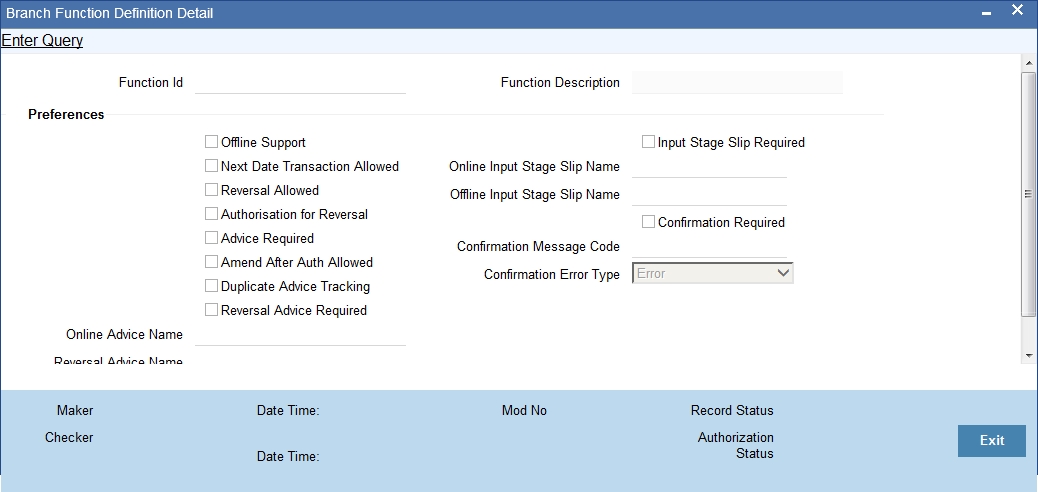
Here you need to enter the following details:
Function Id
Specify the function Id for which preference is to be set.
Function Description
The system displays the function description.
Preferences
Offline Support
Check this box to indicate if offline is allowed.
Next Date Transaction Allowed
Check this box to indicate if next date transaction is allowed.
Reversal Allowed
Check this box to indicate if reversal allowed.
Authorization Required for Reversal
Check this box to indicate if authorization is required for reversal. Reversal is an internal stage in workflow. The system triggers reversal authorization based on the flag.
Advice Required
Check this box to indicate if advice has to be generated.
Duplicate Advice Tracking
Check this box to track the duplicate advices. When an advice is duplicated or regenerated, the word ‘Reprint’ appears in the header of the advice.
Amend After Auth Allowed
Check this box to indicate if the transaction can be amended after approval.
If this field is not checked, then whenever the maker picks up a transaction from the pending queue and if the transaction had been approved, then all the fields on the screen will be disabled. Only the denomination details will be enabled for editing.
Reversal Advice Required
Check this box to indicate whether Reversal advice is required or not.
If you check this field, then the system will pick the values from ‘Reversal Advice Name’ field for advice generation during reversal.
Reversal Advice Name
Specify the reversal advice name.
Online Advice Name
The system displays the advice template name to be used in online mode. However you can amend it.
Note
If new templates are not created during implementation of the product, the system will display the default advice template in online and offline advice name. If you require advices specific to the bank, then new templates must be created during implementation and maintained in this screen. Also new tags required in the existing advice must be modified during implementation.
Input Stage Slip Required
Check this box to indicate if input stage slip is required.
Online Input Stage Slip Name
Specify the input stage online slip file name.
Offline Input Stage Slip Name
Specify the input stage offline slip file name.
Confirmation Required
Check this box to indicate if confirmation is required before completing the transaction.
Confirmation Message Code
System defaults the confirmation message code as ‘LBL_DEFAULT_CONFIRM’ if you have selected ‘Confirmation required’.
Confirmation Error Type
Select the error type from the drop down list.
The system performs the following validations:
Authorization Required for Reversal can be set as Y only if Reversal Allowed is Y.
Offline Allowed and Reversal Allowed option can be set only if they are supported for the function. The support will be as per factory shipped information.
3.7 Workflow Transaction
This section contains the following topics:
- Section 3.7.1, "Stages in Workflow Transaction "
- Section 3.7.2, "Input Stage"
- Section 3.7.3, "Enrich Stage"
- Section 3.7.4, "Running Savings EOD Mandatory"
3.7.1 Stages in Workflow Transaction
Oracle FLEXCUBE allows you to set preferences before generating the workflow. The following are the preferences you can set for each stage, they are:
Handling of overrides – The following options are supported:
- Defer – It indicates whether the display and remote authorization handling of savings and host overrides raised in the current stage are combined with the branch validation step of the subsequent stage. If the branch validation step of the subsequent stage does not raise any overrides then the host overrides are not displayed and the transaction proceeds. If the next host hit again results in overrides then they will be displayed.
- Immediate – It indicates whether the host overrides are handled in the current stage. When you accept the overrides and submit the transactions for remote authorization. The workflow proceeds only on successful remote authorization.
- Auto – It indicates whether all the overrides from branch and host do not require authorization. The system sets the ‘Auto’ option, if you have opted for ‘Auto Authorize’ option.
- Sl. Number – This is a system generated number which determines the sequence of execution of the stages.
While saving the preferences the workflow gets generated. There are two stages for generating a workflow. They are:
- Input
- Enrich
After generating the workflow, INPUT and ENRICH stages, the system performs the following validations after determining whether validations need to be carried out before calling HOST:
- The system raises the inter-branch override if the transaction account does not belong to the current branch.
- The system raises an override if the transaction amount is greater than transaction level limit or role level limit.
- The system raises an override if you amend the exchange rate that is defaulted by the system.
- The system raises an override if you amend the charges that is defaulted by the system.
If validation raises any override then transaction will require Remote Authorization. On successful Remote Authorization, transaction will proceed with Work Flow i.e. to HOST. If validation does not return overides, transaction will proceed with Work Flow i.e. to HOST directly. The Inter Branch and transaction limit checks are carried out in first stage and the remaining validations are carried out in second stage.
Note
Online and Offline transaction level limit is maintained in ‘Savings Workflow Defenition’ and Role level limit is maintained in ‘User Roles Defination’ Screen.
The diagram below consists of two stages for generating the workflow:

3.7.2 Input Stage
The system performs certain validation during input stage. During validation, if system raises an override as Immediate, then the transaction is moved to Savings Overrides for authorization. On successful Remote Authorization if required, the transaction will proceed with Work Flow i.e. to HOST. If Remote Authorization is not required the transaction directly hits HOST.
If the validation does not return overides, then the transaction will directly proceed with Work Flow i.e. to HOST.
Under HOST, if the system raises any host overrides, then the transaction moved for override handling validation. Here if system raises an override as Immedite, the transaction will require Remote Authorization. On successful Remote Authorization, the transaction will proceed with Work Flow i.e. to HOST. If Remote Authorization is not required the transaction directly hits HOST and then moves to ENRICH stage.
If the system raises an override as Defer, then the transaction are clubbed and sent for Remote Authorization during ENRICH stage. If the system does not raise any host override, then the transaction directly hits the ENRICH stage.
3.7.3 Enrich Stage
The system performs certain validation during enrich stage. During validation, if system raises an override as Immediate, then the transaction is moved to Savings Overrides for authorization. On successful Remote Authorization if required, the transaction will proceed with Work Flow i.e. to HOST. If Remote Authorization is not required the transaction directly hits HOST.
If the validation does not return overides, then the transaction will directly proceed with Work Flow i.e. to HOST.
Under HOST, if the system raises any host overrides, then the transaction is moved for override handling validation. Here if system raises the override as Immediate, the transaction will require Remote Authorization.
On successful Remote Authorization, the transaction will proceed with Work Flow i.e. to HOST. And then moves to Till. If the system does not raise any override, then the transaction directly moves to the Till. If the validation does not return any host overrides, then the transaction directly moves to the Till.
If Till required is selected then on successful completion of the enrich stage, the system will update the Till automatically. After updating the Till, the transaction is completed.
Note
If ‘Advice Required’ is selected in the ‘Branch Function Definition Detail’ screen, the system generates the advice and displays on successful completion of the transaction.
3.7.4 Running Savings EOD Mandatory
Oracle FLEXCUBE facilitates to make savings EOD (End of Day) mandatory to run EOD for a particular branch wherein the workflow cannot be modified. Therefore the ‘Workflow Allowed’ flag is maintained as ‘N’. The EOD batch run is carried out for both stages. During the first stage, the system performs validation needed for executing savings EOD. And in the second stage, it performs HOST call.
You have to maintain the following function to make savings EOD as mandatory for running host EOD:
The function ‘BRNRECON’ should be maintained as a mandatory function in ‘Mandatory Batch Programs’.
In ‘Mandatory Batch Programs’ maintenance, the End of cycle group will be ‘End Of Transaction Input’ for the function ID ‘BRNRECON’.
The HOST keeps a track whether savings EOD execution is completed for each branch and date. After completion, the HOST marks the savings EOD execution as completed for that application date and branch. The batch program ‘BRNRECON’ checks if savings EOD is completed and return success. If savings EOD is not mandatory, then ‘BRNRECON’ is not maintained as a mandatory function