14. Security Management
14.1 Introduction
Controlled access to the system is a basic parameter that determines the robustness of the security in banking software. In Oracle Banking Liquidity Management, we have employed a multi-pronged approach to ensure that this parameter is in place.
Only Authorized Users Access the System
First, only authorized users can access the system with the help of a unique User ID and a password. Secondly, a user should have access rights to execute a function.
User Profiles
The user profile of a user contains the User ID, the password and the functions to which the user has access.
Restricted Number of Unsuccessful Attempts
You can define the maximum number of unsuccessful attempts after which a User ID should be disabled. When a User ID has been disabled, the Administrator should enable it. The password of a user can be made applicable only for a fixed period.
Restricted Access to Branches
You can indicate the branches from where a user can operate in the Restricted Access screen.
All Activities Tracked
Extensive log is kept of all the activities on the system. You can generate reports on the usage of the system anytime. These reports give details of unsuccessful attempts at accessing the system along with the nature of these attempts. It could be an invalid password attempt, the last login time of a user etc.
Audit Trail
Whenever a record is saved in the module, the ID of the user who saved the record is displayed in the ‘Input By’ field at the bottom of the screen. The date and time at which the record is saved is displayed in the Date/Time field.
A record that you have entered should be authorized by a user, bearing a different login ID, before the EOD is run. Once the record is authorized, the ID of the user who authorized the record will be displayed in the ‘Authorized By’ field. The date and time at which the record was authorized is displayed in the ‘Date/Time’ field positioned next to the ‘Authorized By’ field.
The number of modifications that have happened to the record is stored in the field ‘Modification Number’. The Status of the record whether it is Open or Closed is also recorded in the ‘Open’ check box.
This chapter contains the following sections:
- Section 14.2, "User Creation Setup"
- Section 14.3, "Role Maintenance Setup"
- Section 14.4, "User Maintenance"
- Section 14.5, "Password Policy Setup"
- Section 14.6, "Customer User Linkage"
14.2 User Creation Setup
You can create a user with this option. To invoke the user creation setup page, click on SMS tab on the LM application and select User Creation link.
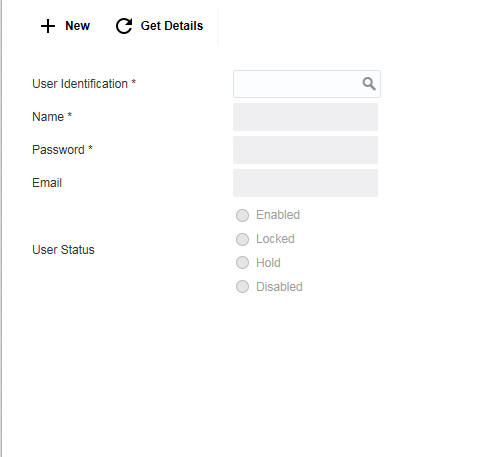
Click New button to create a new user. You can specify the following details here:
User Identification
Specify a unique User ID, which identifies the user.
Name
Specify a description for the user.
Password
Specify a unique password for the user. This password should adhere to the Password Policy Maintenance
Specify email address of the user
User Status
Indicate the user status. The options are:
- Enabled
- Locked
- Hold
- Disabled
Click Save to save the user and password in the database
14.3 Role Maintenance Setup
You can create roles using this option. To invoke the Role Maintenance setup page, click on SMS tab on the LM application and select Role Creation link.
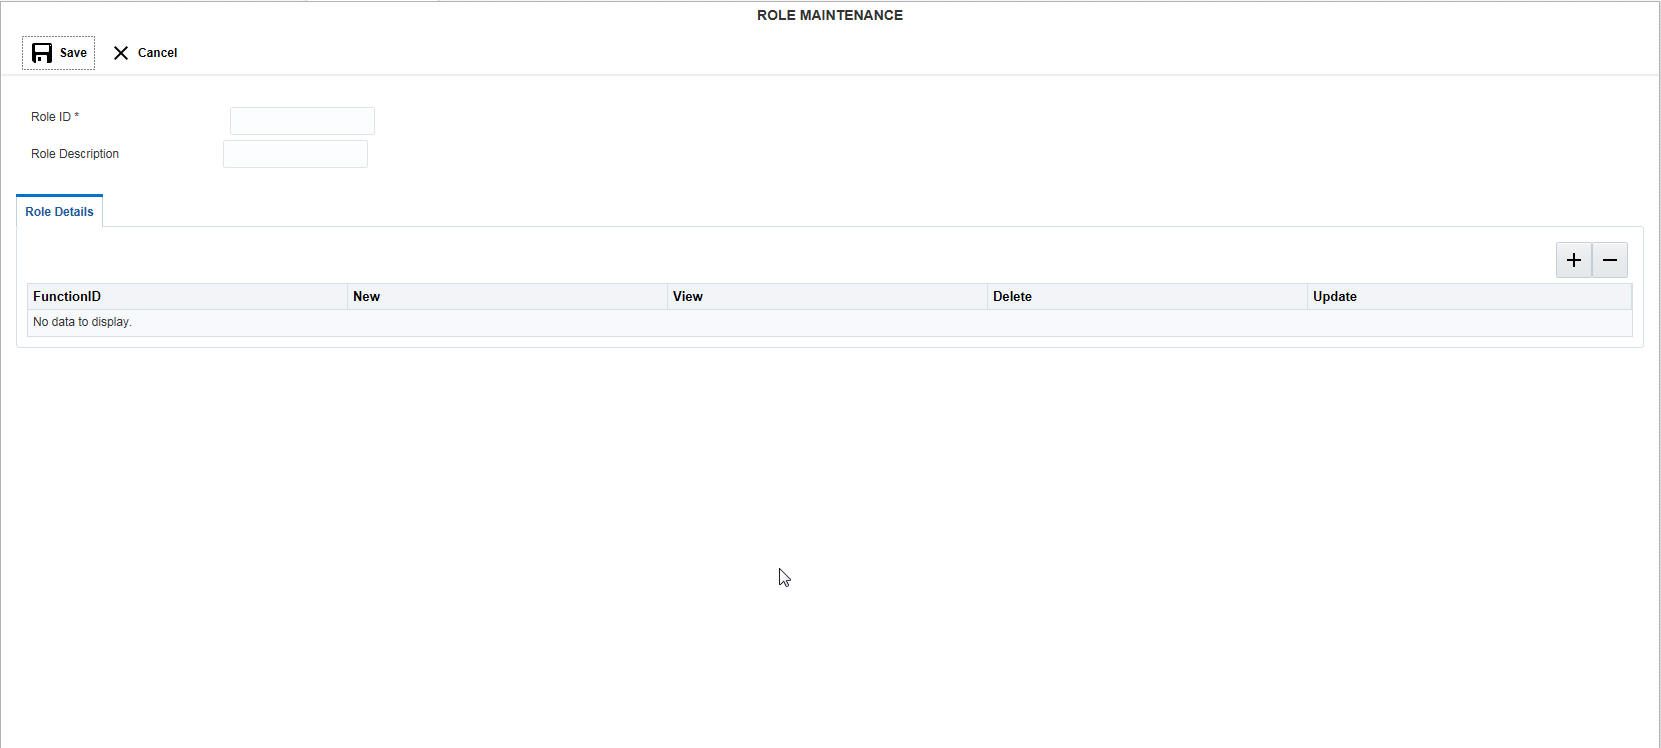
Click New button to create a new role. You can specify the following details here:
Role ID
Specify a unique ID for the new role.
Role Description
Specify a description of the role.
14.3.1 Maintaining the Role Details
You can assign the rights to the new role using this option. Click ‘+ button to add row under Role Details section. Specify the following details here:
Function ID
Select the function for which the rights are to be set from the drop down menu.
New
Check this box to give rights to create a new entity.
View
Check this box to give rights to view the details of the selected feature of LM.
Delete
Check this box to give rights to delete an existing entity.
Update
Check this box to give rights to modify or update an existing entity.
Click Save button to save the details in the system.
Note
LMADMINROLE is a factory shipped role and is the master role having access to all the functionalities.
14.4 User Maintenance
You can map the roles to users using this option. To invoke the Role Maintenance setup page, click on SMS tab on the ORACLE BANKING LIQUIDITY MANAGEMENT application and select User Maintenance link
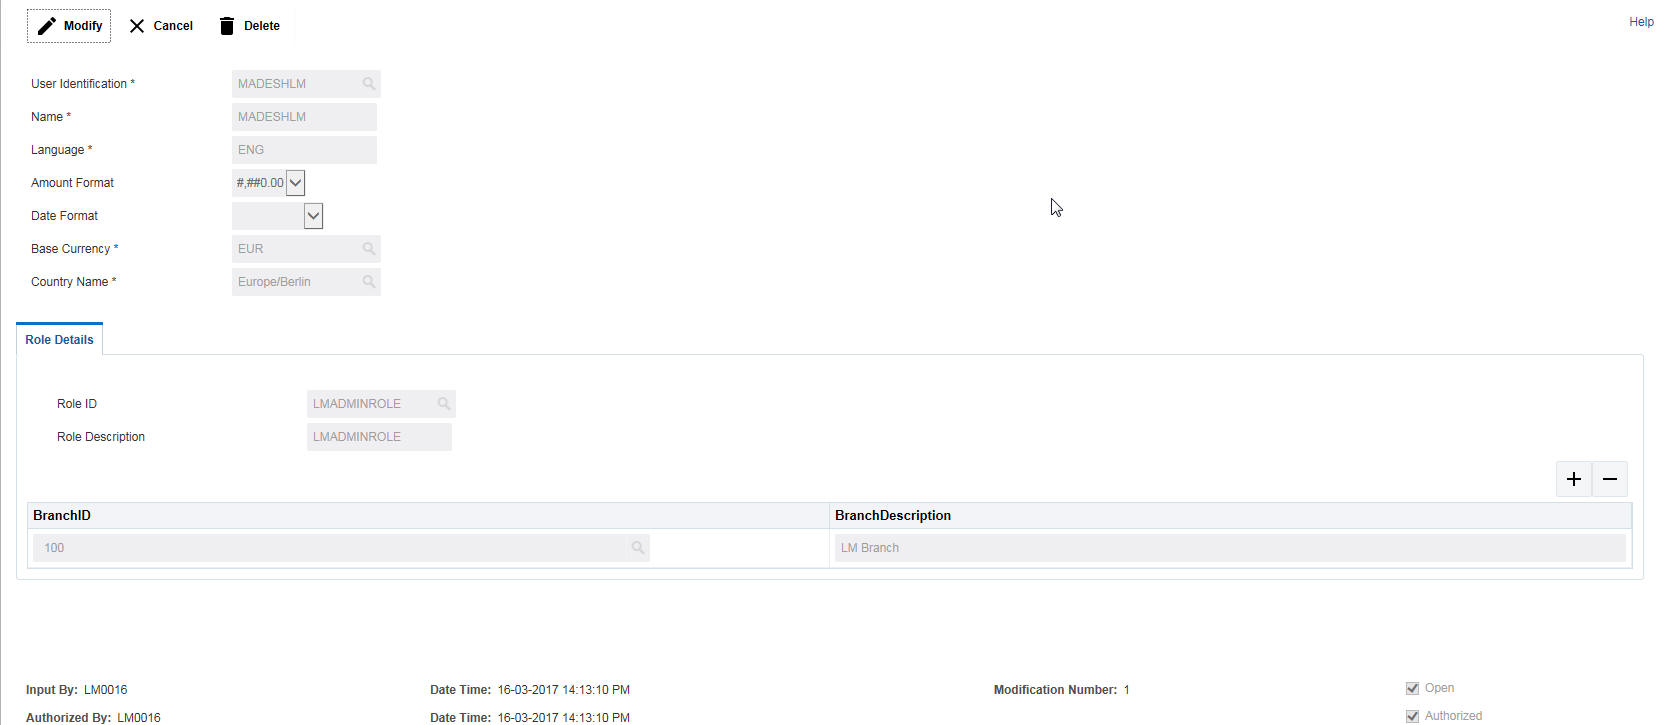
Click New button to set the user for role mapping. You can specify the following details here:
User Identification
Specify the user ID for which the role mapping is to be done. You can select the user ID from the option list. The list displays all the user IDs maintained in the system
Name
The system displays the name of the user selected.
Language
The system displays the language of the selected user. You can modify this if required.
Amount Format
Select the amount format for the user from the drop down list. The options are:
- #,##0.00 - Amount rounded to two decimal points only
- #.00## - Amount displayed to more than two decimal points
Date Format
Select the date format for the user from the drop down list. The options are:
- dd:MM:yyyy
- dd.MM.yyyy
- dd-MM-yyyy
- MM/dd/yyyy
- MM:dd:yyyy
- MM.dd:yyyy
- MM-dd-yyyy
- yyyy/MM/dd
- yyyy-MM-dd
- yyyy:MM:dd
- yyyy.MM.dd
Start Date
Specify the start date from which the role mapping is active.
End Date
Specify the end date till which the role mapping is active.
Base Currency
Specify the base currency of the user.You can select the currency from the option list. The list displays all the currencies maintained in the system.
All the dashboard values for the user will be displayed in the base currency selected.
Country Name
Specify the country of the user. You can select the country from the option list. The list displays all the countries maintained in the system
14.4.1 Maintaining Role Details
You can map the role to the selected user and select the branches for which this mapping is active using this option. You can indicate the branches from where the user can operate. You can specify the following details here:
Role ID
Specify the role ID to be mapped to the user. You can select the role ID from the option list. The list displays all the role IDs maintained in the system
Role Description
The system displays the description of the selected role.
Click ‘+ button to add row under Role Details section. Specify the following details here:
Branch ID
Specify the branch ID in which the role mapping will be enabled. You can select the branch ID from the option list. The list displays all the branch IDs maintained in the system
Branch Description
The system displays the description for the selected branch ID.
Click Save button to save the details in the system.
14.5 Password Policy Setup
You can set the password policy for your system using this option. To invoke the Password Policy setup page, click on SMS tab on the LM application and select Password Policy link.

Click Modify button to set the password policy for the system. You can specify the following details here:
Bank Level Parameters
Site Code
Specify the site code for which the password policy is to be set.
Parameters
Password Repetitions
Specify the number of times after which a password can be repeated.
Dormancy Days
Specify the number of days the password can be dormant after which the password would be disabled.
Maximum Consecutive Repetitive Character
Specify the number of times a character can be repeated consecutively in a password.
Minimum Number of Numeric Character in Password
Specify the minimum number of numerics which should be included in the password.
Minimum Number of Special Character in Password
Specify the minimum number of special characters which should be included in the password.
Minimum Number of Lower Case Character in Password
Specify the minimum number of lower case characters which should be included in the password.
Minimum Number of Upper Case Character in Password
Specify the minimum number of upper case characters which should be included in the password.
Password Lenght
Maximum
Specify the maximum length of the password allowed.
Minimum
Specify the minimum lenght of the password allowed.
Invalid Logins
Cumulative
Specify the number of cumulative logins after which the user should be disabled.
Successive
Specify the number of successive invalid logins after which the user should be disabled.
Click Save button to save the details in the system.
14.6 Customer User Linkage
You can establish one-to-many relationship in this i.e. we can link single user to many customers and vice versa. To invoke the RM-Linkage page, click on SMS tab on the LM application and select Customer RM-Linkage link which is further have two tabs:-
This section contains the following topics:
14.6.1 User to Customer Linkage
To link one users to one or many customers.
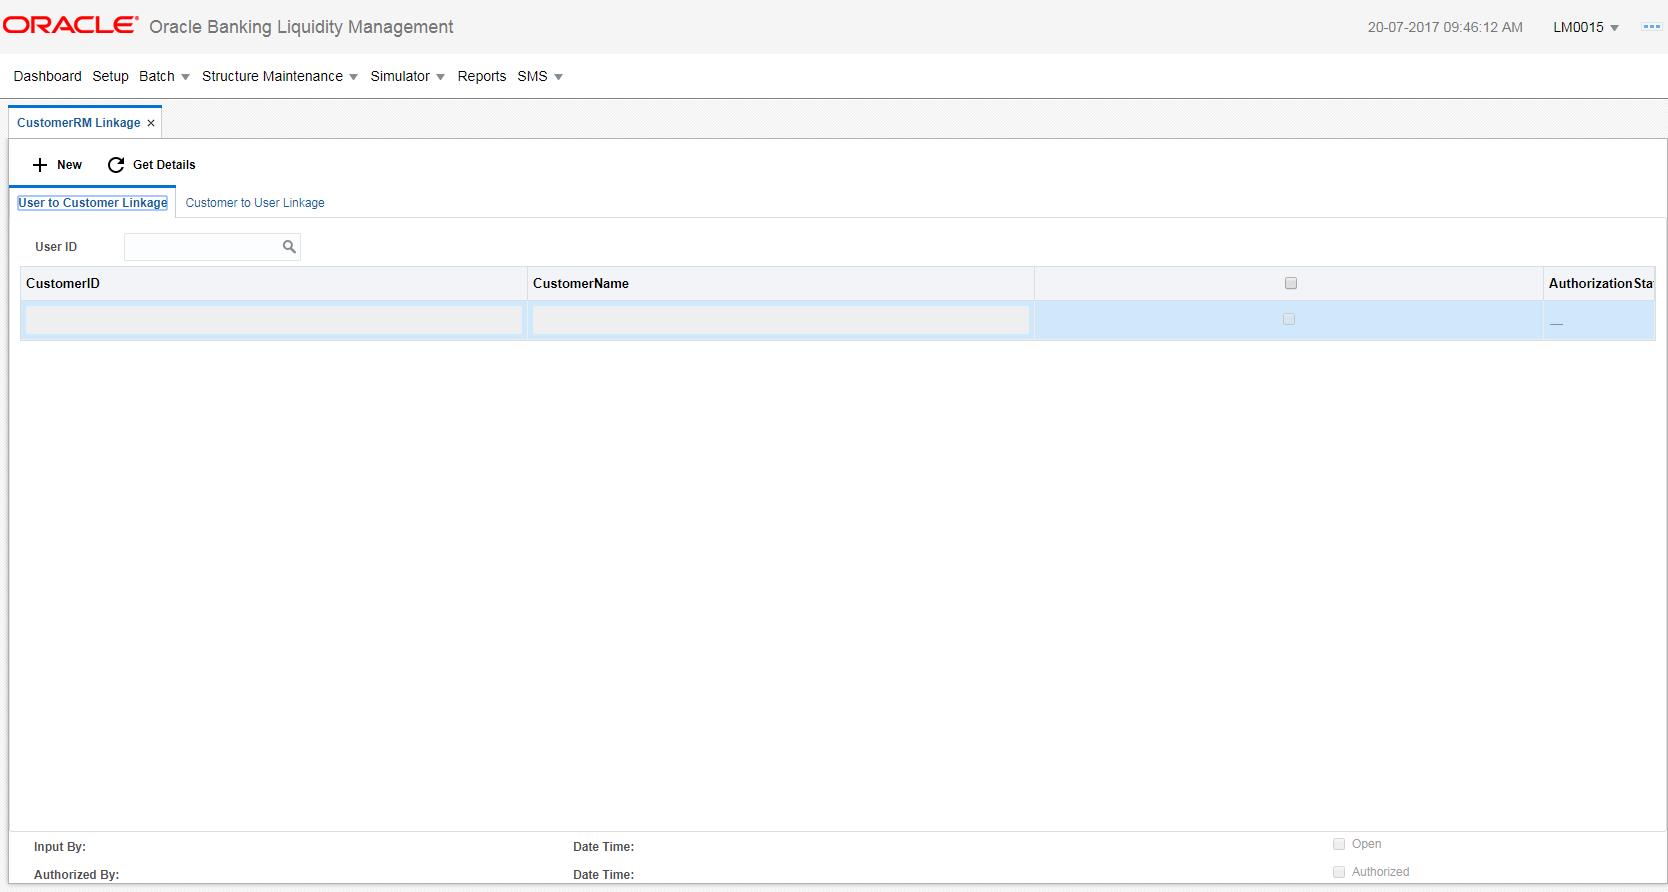
Click New button to link users to customers. You can specify the following details here:
User ID
Specify a unique User ID, which identifies the user.
Customer ID
Specify the customer ID, which identifies the customer.
Customer Name
Specify a description for the customer.
Authorization
It will authenticate the records once verified by the authorizer.
Check box
Link customers to users.
Click Save to save the user and customer linkage in the database.
14.6.2 Customer to User Linkage
To link one customers to one or many users.
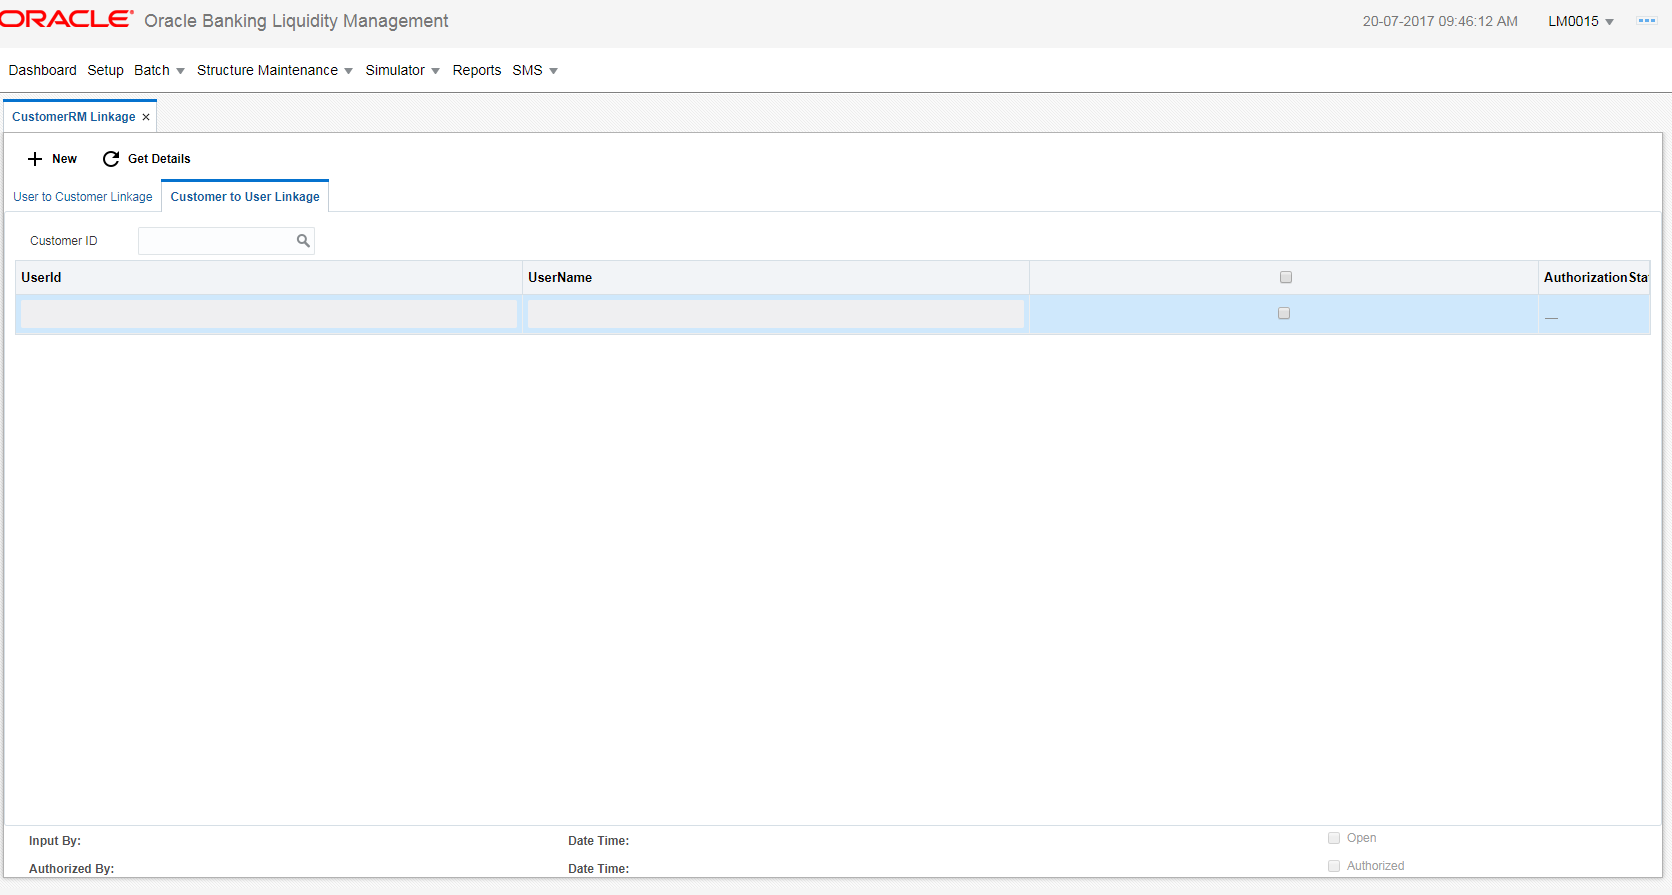
Click New button to link customers to users. You can specify the following details here:
User ID
Specify a unique User ID, which identifies the user.
Customer ID
Specify the customer ID, which identifies the customer.
User Name
Specify a description for the user and customer.
Authorization
It will authenticate the records once verified by the authorizer.
Check box
Link users to customers.
Click Save to save the user and customer linkage in the database.