5Customizing in Siebel CRM
Customization in Siebel CRM: Overview
Siebel CRM is extremely customizable, allowing you to modify and create new objects, properties, validation rules, workflow, guided help (iHelp), integration with other applications, and so on.
This customization requires an understanding of the following:
Siebel Repository. Contains metadata that defines how the application behaves. For example, it defines all of the tables in which data is stored, the business logic layer, the objects that allow integration with other systems, the user interface, and so on. The Siebel CRM application provides an extensive set of repository metadata, providing you with functionality supporting all aspects of customer relationship management across many industries and 22 out-of-the-box languages with the ability to add more. Customers can modify and augment the repository to support their business needs.
Workspaces. Provide a version-controlled mechanism for business analysts and developers to make changes to the Siebel Repository. It allows for many users to make changes simultaneously and in parallel, for example, when they are working on unrelated features, different timelines, or for other reasons. Workspaces provide standard version control features, such as checkpointing, delivery, reversions, and rebasing. Workspaces replace the older process of checking in and out that was previously used in Siebel Business Applications. In Innovation Pack 2017, it is mandatory to use Workspaces. This provides more flexibility, parallel repository development, and the ability to integrate with Siebel Approval Manager (or other tools) for change control.
Siebel Repositories: Overview
Technically speaking, there are actually two Repositories involved in the implementation of Siebel CRM.
Siebel Design Repository (DR). This repository contains the editable definitions of the metadata. Siebel Tools and Siebel Web Tools applications use this repository to make changes to the repository.
Siebel Runtime Repository (RR). This contains a compiled, denormalized version of the Siebel Repository. Siebel Application Object Managers use this at runtime to provide application functionality to users and integration points. This in-database version of the repository replaces the old Siebel Repository File (SRF). Changes to the runtime repository affect application behavior in real-time, unlike the old SRF paradigm, which required compilation and restarting Application Object Managers and other components for changes to take effect.
About the Siebel Design Repository
The Siebel Design Repository is the traditional repository that has always been part of Siebel CRM. It contains editable metadata that defines application behavior. It is used make modifications to the delivered Siebel CRM applications.
To configure these modifications, you make changes to the Siebel Design Repository by using either one, or both, of the following tools:
Siebel Web Tools. This allows configuration of repository objects within a Web browser.
Siebel Tools. This allows for more complex configuration, such as, creating or updating Workflow Processes or Task Based UIs. Developers usually perform this level of configuration. Eventually, all functionality remaining in Tools will be migrated to and only available in Siebel Web Tools.
The Siebel Design Repository consists of a hierarchical set of objects. For more information, see Siebel Object Types Reference, but let’s consider some simple examples:
Table Objects. Describe the physical tables in which data is stored. Table objects and their child objects are often referred to as the data layer.
Column Objects. Describe the individual data attributes within those tables.
Index Objects. Describe database indices used for optimization, uniqueness, or performance.
Business Component Objects. Provide an abstraction layer on top of the data layer. These are often referred to as part of the business layer that helps define relationships between data as well as business rules affecting that data. This allows for far more complexity than you define at the database layer.
Field Objects. Describe data elements and basic validation rules, for example, which fields are required, numeric, read-only, and so on.
Join and Multivalue Link Objects. Define relationships between objects, for example, a Contact object can have many Address objects.
Applet Objects. Provide a visual representation of a business component so that a user can interact with it, and can then form part of the user interface layer.
Control Objects. Define the possible items that can appear on the applet, for example, buttons, labels, fields, menus, and so on.
Web Templates. Provide possible physical layouts for the applet, that is, specifying controls and their corresponding locations.
There are 50 top-level repository object types, many of which have child objects as described in the examples above. By default, only the most commonly used object types are displayed in Siebel Tools and Siebel Web Tools, as illustrated below:
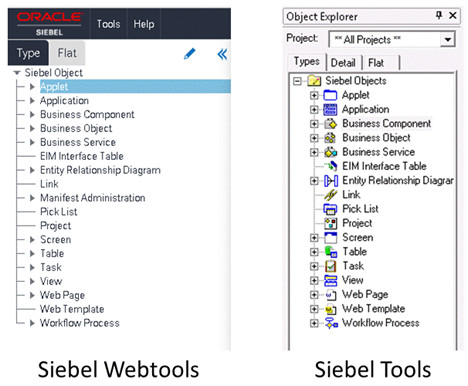
To expose or remove object types from being available, do one of the following:
Siebel Web Tools. Click the pencil icon.
Siebel Tools. Click Options, then Object Explorer in the View menu.
About the Siebel Runtime Repository
Whether operating as the user interface, or operating in the background as an interface with other systems, how the Siebel CRM application behaves depends on the contents of the Siebel Repository.
In theory, the Siebel CRM application could read its configuration directly from the Design Repository tables, and then to function according to this specific configuration. This approach, however, is inefficient. These tables store hierarchical data with great-grandparent objects, grandparent objects, parent objects, and so on, and pulling information from the supporting tables at runtime would inhibit performance at runtime.
Consider the following diagram, which illustrates a basic Applet object, its corresponding entity relationships, and its layout, as physically defined in the database.
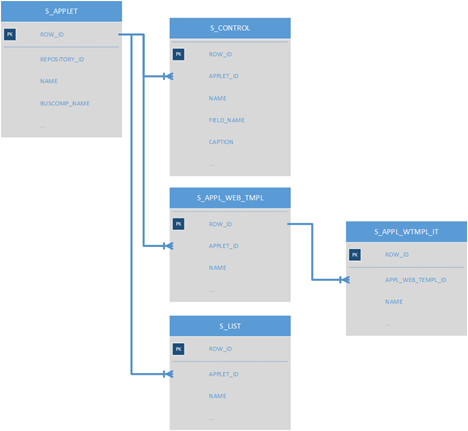
The purpose of this diagram is to illustrate only that the top level object has many child objects, and that there are relationships from each child object to the parent, as well as relationships from the grandchild to the child objects, and so on.
When you create applets, make changes to existing applets, and so on, the underlying tables in the Design Repository are updated to reflect those changes.
In its entirely, the Applet object has a top level object based on S_APPLET, and 13 child objects (Controls, Lists, Charts, Web Templates). Some of child objects have grandchild objects (for example, Web Template Items), which add a further thirteen tables to the applet. In addition, there are another six great-grandchild objects, these are mostly locale-specific captions. To get a full definition of an applet from the Design Repository at runtime, would require the Siebel CRM application to query 33 tables.
To improve runtime performance, the Siebel Design Repository data is compiled into the Siebel Runtime Repository. This process summarizes each object type into an easily queried set of tables that has a one-to-one mapping to the top- level repository objects. For example, an Account List Applet has 822 distinct records across 33 tables in the seeded repository. However, in the Siebel Runtime Repository, these 822 records are condensed to a single denormalized, compiled record that summarizes all 822 records and is placed in a runtime repository table, for example S_RR_APPLET.
Siebel CRM Workspaces: Overview
Understanding Workspaces is critical to modifying the Siebel Design and Siebel Runtime Repositories, and to accommodating specific customer business requirements effectively.
A Workspace is a sandbox environment in which you can update Siebel CRM application configuration, and in which you can validate those configuration changes before deployment. You can also use Workspaces for parallel development, geographically distributed teams, and, in conjunction with Siebel Approval Manager, providing a governance process to changes to the application.
We will illustrate the basic use of workspaces through a simple example: you want to display contact home phone numbers instead of work phone numbers on the Contact List Applet.
The configuration process is illustrated in the following diagram:

Modify the label on the existing column in the list applet to be: Home Phone #. Analysis: While this approach would work, the underlying field and physical database storage would still be using the Work Phone # field. There may be other areas of the application or other types of users who want to continue to use this field for the Work Phone #, so relabeling it here would cause confusion and possible data loss.
Create a new physical column at the database layer, map a BusComp Field to that column, and add it to the list. Analysis: This would also work, but by examining the existing Table and BusComp definitions, we can observe that a column already exists for this purpose. Creating a new column would mean that home phone numbers could be stored in two different columns–the original and our new column. This is clearly not desirable.
Make use of the existing Home Phone # field on the Contact BusComp. Analysis: This is the best approach–it will ensure that the types of problems inherent in the first two approaches are not encountered. It will also be the fastest and easiest, as there is no requirement to make changes at the data or business object layers–all changes are done at the user interface layer.
Having performed our analysis, we can confine the scope of the change needed to meet the requirement to the following two changes:
Expose the existing Home Phone # Field on the Contact List View so that users may see and edit it.
Remove the existing Work Phone # Field
Creating and Opening a Workspace
The first step in making changes to the configuration and behavior of the application is to create a Workspace in which to make those changes. One of the most fundamental things to understand about a Workspace is that changes made within it will not affect other users, therefore enabling the developer or business analyst to test and verify changes safely without adverse effects to the system.
Enter a description for your Workspace in the Comments field.
See the following diagram for more information: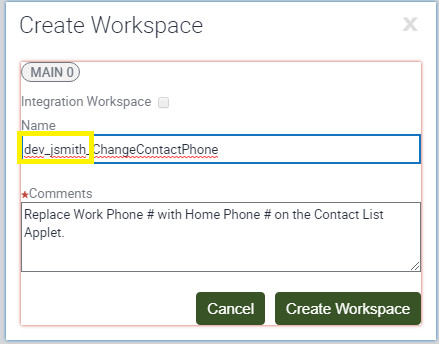
Configuring Changes in Siebel CRM
Configuring in the browser-based Siebel Web Tools application is very similar to the configuration performed in Siebel Tools. In this example, you add the existing Business Component field called Home Phone # to the Contact List Applet. This Business Component Field replaces the existing field called: Work Phone #.
Testing Your Siebel CRM Configuration Changes
Only the user who opens the Workspace, and any user with Composer Administrator Responsibility, can see any changes implemented in that Workspace.
Submitting the Siebel CRM Configuration Changes
After configuration changes are implemented and validated in the Workspace, you submit these for review by an approving user. Once reviewed, these changes are delivered to the Siebel Runtime Repository, making them available to all users.
In the Workspaces pane, the Workspace icon and the comment after the Workspace name are updated to indicate that it has been submitted.
In the Workspace version pane, the most recent version has a lock icon, indicating that you cannot implement further changes because the Workspace has been submitted for approval.
The Workspace name at the upper right is highlighted with a different color, indicating that you cannot implement further changes because the Workspace has been submitted for approval.
Delivering the Updated Siebel CRM Workspace
Once you submit the updated Workspace, this is usually reviewed and approved by another user, who then inspects it and delivers it.
Verifying Changes in the Delivered Workspace
When the Workspace has been submitted, approved and delivered to the Siebel Runtime Repository, the configuration changes are available to all users.
Log in as a standard user.
Validate that all changes are visible on the Contact List Applet.