3Installing and Configuring Siebel CRM
Installing and Configuring Siebel CRM: Overview
The following diagram illustrates the steps required to install Siebel CRM.
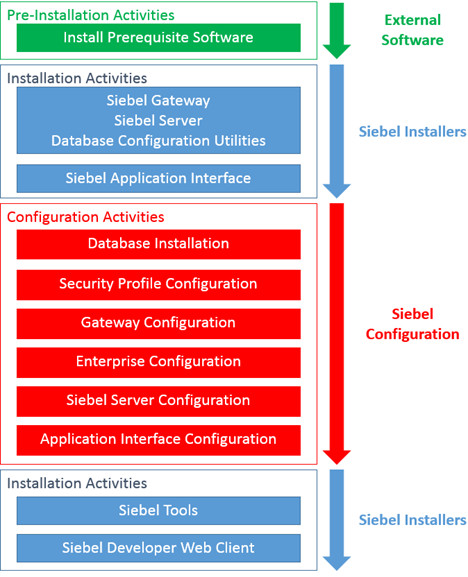
Pre-installation Activities. The tasks required to prepare your environment for Siebel CRM installation.
Installation Activities. The tasks required to install Siebel CRM on your server(s).
Configuration Activities. The tasks that prepare the various components of the software to work together to deliver the Siebel User Interface to users, interface with other systems, and so on.
This chapter will provide guidance on each of these topic areas. It is important to note that detailed information on the information provided in this chapter can be found in the Siebel Installation Guide for Microsoft Windows or in Siebel Installation Guide for UNIX, available on the Siebel Bookshelf, as appropriate. This is intended as a high-level overview only.
Installing Prerequisite Software: Overview
Siebel CRM installs most of the software that it requires to run. However, depending on your operating system and database, you may need to install the following software before you install Siebel CRM. The minimum software requirements for installing Siebel CRM are as follows:
Operating System. A number of different operating systems support Siebel CRM, including various releases of Microsoft Windows and UNIX. Before beginning installation, confirm that your operating system is certified on the Certifications tab on My Oracle Support.
-
Enterprise Database. A number of different enterprise databases support Siebel CRM, including various releases of Oracle, Microsoft SQL Server, and IBM DB2. Before beginning installation, confirm that your enterprise database is certified on the Certifications tab on My Oracle Support. You must install the enterprise database software before you install Siebel CRM.Note: It is strongly recommended that you install the database platform on a separate server to that of your Siebel CRM installation.
Database Connectivity. The server on which you install Siebel CRM installation requires database connectivity software to interact with the enterprise database. For example, to interact with an Oracle database, you must install the Oracle 32-bit database client. To interact a Microsoft SQL Server instance, you must install the SQL Server Native Client on each server where you install Siebel CRM. Before installing, confirm that your database connectivity software is certified on the Certifications tab on My Oracle Support.
-
Java Development Kit. You must install the Java Development Kit (JDK) on at least one server to generate certificate requests and to install the resulting signed certificate on each server hosting any of the Siebel Enterprise Applications. JDK is freely available from the Oracle Technology Network. Before installing, confirm for specific supported versions on the Certifications tab on My Oracle Support. The 64-bit version of the JDK is required for Windows servers.Note: Other tools are available for generating certificate requests. Your organization may choose to use one of these alternate tools, which would eliminate the need for the JDK to be installed.
-
Java Runtime Environment. When you download Siebel CRM, the installation files are stored in a set of Java Archives (JAR) files. In order to create an image of the software during installation, you require a Java Runtime Environment (JRE). The JRE is freely available from http://www.java.com. Before installing, confirm for specific supported versions on the Certifications tab on My Oracle Support. Note that either the 32-bit or 64-bit version of the JRE is acceptable for Siebel CRM installation.Note: The JRE is only required on the machine where you generate the Siebel installation image.
Downloading Siebel CRM
You can download Siebel CRM from the following locations:
Oracle Software Delivery Cloud (OSDC). The most recent Innovation Pack (IP) for Siebel CRM is available on the Oracle Software Delivery Cloud (OSDC). This is the foundation installation for Siebel CRM.
My Oracle Support (MOS).The most recent Innovation Pack and subsequent Monthly Updates are available on My Oracle Support (MOS). Only customers with a current support agreement have access to MOS.
Building a Network Image
This topic describes creating a network image.
In Windows Explorer, navigate to the base release files that you downloaded from Oracle Software Delivery Cloud (OSDC) or My Oracle Support (MOS).
The following diagram illustrates the downloaded base release files.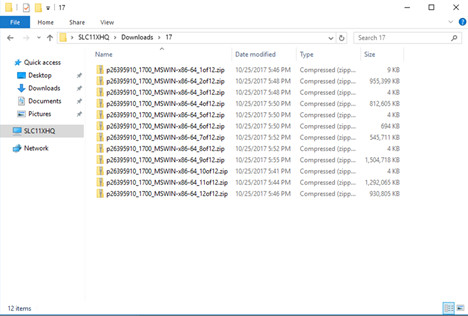
Unzip the base release files into the same folder.
The following diagram illustrates the correct file structure after you unzip the base release files.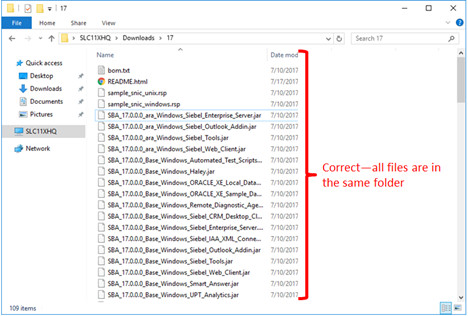
Secure Sockets Layer Requirements: Overview
Several Siebel Application components are hosted within application containers that need to trust each other and also need to be trusted by client browsers or other external servers that integrate with Siebel CRM. This requirement is accommodated by creating a Secure Sockets Layer (SSL) certificate.
Generate a certificate request on the server.
Send the certificate to a certificate authority (CA) to approve the request and issue the certificate.
Import the certificate into a keystore used by the Siebel CRM components.
About Keystores
Secure Sockets Layer (SSL) certificates and Trusted Root Certification Authorities are placed in keystores on each server where Siebel CRM components are installed.
Siebel CRM uses the following keystores:
Keystore. This contains the private key and your SSL certificate, in addition to the certificates for the certificate authority (CA) which issues your SSL certificate. The certificate in this keystore is used for securing:
Inter-server communication.
Communication between your browser and other applications for inbound requests to Siebel CRM.
Truststore. This contains at least a root certificate for the CA which issues your SSL certificate and it may contain additional Trusted Root Certificates. The certificate in this keystore is used for the following purposes:
Inter-server communication between Siebel CRM components. This is accommodated by the certificate from the CA which issues your SSL certificate.
Outbound integration. When Siebel CRM makes outbound calls to other services, it uses the root certificates in this file to verify the identity of other services. For example, consider a call originating in Siebel CRM to a Google API. Google's SSL certificate is issued by an intermediate authority (Google Internet Authority G2) whose certificate was issued by the Trusted Root Certification Authority, GeoTrust. In order to trust the Google certificate, Siebel CRM must first trust GeoTrust, and therefore requires that the GeoTrust root CA certificate be imported into the Truststore.
Generating a Certificate Request
Regardless of the certificate authority (CA) type that you plan to use, you need to generate a certificate request. A simple way to do this is with the keytool utility included in the Java Development Kit (JDK) as shown in the following example.
About Selecting a Certificate Authority
The following options are available when choosing a certificate authority (CA):
Trusted Root Certificate Authority. These are external companies who are inherently trusted by various operating systems and browsers, such as Symantec or GeoTrust. This is the preferred option because most components, including end-user browsers, will trust a certificate issued by a Trusted Root CA without requiring special action. This is a required approach for any environment that will be Internet-facing, such as a customer or partner portal.
-
For environments that are specifically internal, you can use an existing internal CA to issue a certificate. In this scenario, machines within the corporate network will typically already be configured to trust the internal CA, and therefore a certificate signed by that CA to servers running Siebel CRM will inherently be trusted by internal clients.Note: You cannot use this method for Internet-facing environments. External computers and other devices will not trust the certificate and will therefore throw security warnings when a user accesses the Siebel CRM environment. This method is sufficient only for specifically internal production environments and development, such as test or training environments and so on.
When no internal CA is available and it is not feasible to obtain a certificate from an external Trusted Root Certificate Authority, you can create your own CA. However, anyone who accesses this environment will receive certificate security errors unless they manually import the root certificate for your CA. We recommend that you consider this method only when no other options are possible, and that it is used only for development and test environments.
After selecting a CA, submit your certificate request and the CA will issue an actual certificate.
The CA provides the specific information required to make the certificate request. An important consideration during this process is how you select Subject Alternative Names (SANs). These allow multiple machines to use the same SSL certificate. For example, if you want to install Siebel CRM components on five servers: server1.mycompany.com, server2.mycompany.com, server3.mycompany.com, and so on, you can create a single certificate request on any machine, providing all five machine names to the CA as SANs. You can then install the resulting certificate on all of your servers. It is also possible to request a wildcard certificate, for example, *.mycompany.com, which can be used on all servers.
Importing the Certificate Request
After you generate the certificate request, you submit it to your chosen certificate authority (CA). You then import the returned certificate into the keystore. Because your servers rely completely on your keystore, you need to import the root and any intermediate certificates. These are provided by the CA and you must import them to the same keystore where you created the certificate request.
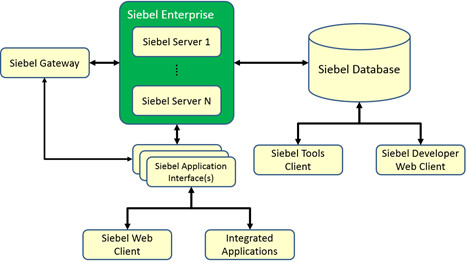
Installing Software for the Siebel CRM Application
There are a number of software components required to implement Siebel CRM fully, depending on your requirements and your implementation. The following illustration shows the minimum required components and how they interact with each other.
There are three distinct software installers that you will use to create your development environment:
-
Siebel Enterprise Software. This provides the required software for the following components:
Siebel Gateway. This uses the embedded application container functionality to manage communications with other modules. Configuration data for the Siebel environment is stored internally to the Siebel Gateway.
Siebel Enterprise. This is a logical profile that defines the physical storage locations used by the Siebel Servers. For example, database type, name, location, and credentials, as well as the Siebel File System location and other global parameters.
Siebel Server. This is the application server that provides the interface to the Siebel database and file system, enforcing business logic. This is typically a load-balanced component running parallel on multiple servers.
Siebel Application Interface. This provides the delivery of Web pages from the Siebel Server to Web clients.
Siebel Database. The Siebel CRM product stores all of its configuration information and user data within a customer-selected database, for example Oracle, Microsoft SQL Server, or IBM DB2. The Siebel Enterprise Software installer provides the scripts necessary to populate this database with the required tables, indexes, data, and other objects necessary to run Siebel CRM.
Siebel Tools. This is a 32-bit Windows application that allows developers and administrators to make changes to the Siebel repository. You can implement many changes using the Siebel Web Client, however in Siebel Innovation Pack 2017, there are some specific types of repository changes that require the 32-bit Windows Siebel Tools client, such as modifications to Workflow processes.
Siebel Developer Web Client. This is a 32-bit Windows application that allows developers and administrators to interact with the Siebel Database without needing any Siebel Server components. While it is not mandatory to run the application, having Siebel Developer Web Client available typically facilitates certain configuration and deployment activities, such as debugging scripts or workflow processes.
During a basic installation, for example in a development environment, you only require a single instance of each component, but you can chose to install additional servers. For a test or production environment, it is likely that there will be more than one Siebel Enterprise Server and more than one Siebel Application Interface. This is to provide load balancing and resiliency.
This guide describes a minimal configuration, installing one of each component. For more information, see Siebel Applications Administration Guide.
Installing the Siebel Enterprise Software
To install the Siebel Enterprise Software, do the following:
Installing the Siebel Application Interface
The Siebel Application Interface (SAI) replaces the Siebel Web Server Extension (SWSE or SWE) used in previous versions. It provides a standards-based HTTPS entry point to the Siebel CRM application and is installed using the same Siebel Enterprise Server installation media as the Gateway, Siebel Servers, and Database Configuration Utilities. However, although it may be installed on the same physical server as these components, it must be installed separately and into a different directory structure from the components installed previously.
Re-run the Siebel Enterprise Software installer.
In many cases, the options for installation will be the same as those used when installing the Gateway, Siebel Servers, and Database Configuration Utilities. You must use the following installation prompts and recommended responses for Siebel Application Interface, described as follows:
Installation Directory. This must be different from the previous directory used for the Siebel Enterprise Server. The recommended path is C:\Siebel\sai
Components. Only install Siebel Application Interface.
Languages. You must install the same set of languages selected during the previous installation. Other than disk space, there is no negative impact to installing additional languages.
-
Port Configuration. The HTTP and HTTPS ports will serve as the entry point into the application (with the HTTP port automatically redirecting to the HTTPS port). If you do not want users to have to enter a port, set these to ports 443 and 80 (the default ports for HTTPS and HTTP respectively). The Shutdown port must be unique. We will continue numbering from the Siebel Enterprise Server installation and use 9014. The following port settings are therefore recommended for the Siebel Application Interface components:
HTTPS Redirect Port. 443
HTTP Connection Port. 80
Shutdown Port. 9014
Username and Password. The credentials that you specify will be used for accessing the Siebel Management Console initially, which is the user interface that we will use to configure the Gateway, Enterprise, Siebel Servers, and other components. After the initial setup, that is, once you have configured the Gateway Security Profile, you will use the username and password for the configured authentication authority. Any values are acceptable; for simplicity use: sadmin.
Client Authentication Parameters. These indicate the SSL certificate key stores (that we created earlier) which will be copied into the installation location for the Siebel Application Interface:
Keystore Name. The location of the keystore we created previously.
For example: C:\Siebel\Keys\siebelkeystore.jks
Truststore Name.The location of the trust keystore for our certificates.
For example: C:\Siebel\Keys\truststore.jks
Password. Whatever password you used when you created your keystores.
Note: If you did not use the same password when creating the keystores, you will have to manually edit the file C:\Siebel\ses\applicationcontainer\conf\server.xml after installation to set the passwords correctly.
About Installing the Latest Monthly Update
Before proceeding to the configuration steps below, it is very important that you install the latest Monthly Update. While it is possible to install Updates later, it is possible that an Update could contain bug fixes, repository data, or seed data that would not otherwise be included in your Siebel database. Only the most recent Monthly Update is required for installation, as they are cumulative. For example, if the 18.5 Update is available, it can be installed directly on top of the 17.0 Innovation Pack without the intermediate installation of 17.1, 17.2, 18.4, and so on. To install the Monthly Update, run the installers on the same machines on which you previously ran the base Innovation Pack installers.
Verifying the Siebel Application Interface Installation
Automatically Starting SES and SAI Components
Although the Siebel Enterprise Server and Siebel Application Interface components will start automatically after installation, they do not run automatically after a restart of the server. Before proceeding further, it is recommended that these be configured to start automatically. The specific method for doing this will vary by operating system. For example, on Windows, you could add the scripts to the Local Computer Startup Scripts Policy so that they will be run automatically every time the computer is restarted, while on UNIX, a shell script could be placed in /etc/init.d/.
The script to startup each component is named startup.bat (or startup.sh for UNIX) and is found in the ...\applicationcontainer\bin folder for each component, for example C:\Siebel\sai\applicationcontainer\bin\startup.bat.
After configuring the scripts to run automatically, restart the machine(s) before continuing to validate that automatic startup process is working, and then proceed to the configuration of your Siebel Database.
Creating the Siebel Database
About Installing Client Connectivity Software
Before you create the Siebel database, you must ensure that you have the appropriate client connectivity software.
This varies by database platform:
-
Oracle Database. You must install the 32-bit Oracle client, even if you are running on a 64-bit machine. This is available for download from Oracle Technology Network. Consider the following guidelines when installing Oracle Database:
When installing the software, select the Administrator option. Do not select the Instant Client or Runtime options.
Before installing the client on a Windows server, re-install the Microsoft Visual C++ 2010 Redistributable Package (x86). This prevents errors during the client installation process. Ensure that you run the installer as a local administrator.
If installing on a Windows server that also has a 64-bit version of Oracle installed, you need to edit the following registry value before running the installation: HKEY_LOCAL_MACHINE\SOFTWARE\Wow6432Node\Oracle\inst_loc, where the Value name field is inst_loc and the Value data field is c:\\Program Files (x86)\\Oracle\\inventory
Microsoft SQL Server. Install the Microsoft SQL Server Native Client, available from Microsoft.
DB2. Install the IBM DB2 Connect 32-bit client (even if running on a 64–bit operating system). Select from the versions noted on the Certifications tab on My Oracle Support that are compatible with your DB2 database server version according to IBM’s certification matrix.
Prerequisites for Installing the Database
Before we can start installing the Siebel Database, the database administrator must perform some preliminary steps. These are documented in detail in the Siebel Installation Guide for Microsoft Windows and Siebel Installation Guide for UNIX, but here is a short description:
Oracle. Create a tablespace in which the Siebel database objects will live. The recommended name is SIEBEL.
Microsoft SQL Server. Create a database. The recommended name is siebeldb.
DB2. Create the SIEBEL and other database users.
Running the grantusr.sql Script
A database administrator, who may or may not be a direct member of the Siebel development team, performs these steps.
After preparing the database, run the grantusr.sql script found in the .../dbsrvr/{db_platform} folder (for example, C:\Siebel\ses\dbsrvr\ORACLE). There are brief instructions at the top of each script explaining how to run the script. It will prompt you for information about the preparatory work done in the previous step, for example. the server where the database resides, the name of the database, any tablespaces, usernames, passwords, and so on. When the script completes, you will have an empty shell of a Siebel database with all the required users. Note that the execution of the script is typically done by a database administrator who may or may not be a direct member of the Siebel development team. This allows the Siebel team to have everything they need to populate the Siebel CRM Database without the need for specialized database administrator skills. The Siebel team should provide the desired passwords for the database users that the script will create. These include:
SADMIN. The Siebel Administrator user will be used for administering the Siebel CRM application throughout the implementation.
GUESTCST. The anonymous Guest Customer user. This user's credentials are used automatically by customer-facing applications before a user has actually logged in, providing access to the login page itself. This allows access to non-sensitive areas of the product, such as Branch Locators, without the need for every visitor to have a login.
GUESTERM. The anonymous Employee user. This user's credentials are used automatically by employee-facing applications before a user has actually logged in.
LDAPUSER. This is a generic user used by the authentication system.
After the script has been executed, test the SADMIN login using a database platform-specific tool, such as SQL*Plus for Oracle, to verify that the user was correctly created.
Installing the Siebel Database
The Siebel CRM database is installed using the Database Configuration Wizard. You can execute it using the Database Server Configuration shortcut from the Windows Start menu or from the following UNIX shell: $SIEBEL_ROOT/config/config - mode dbsrvr
The configuration wizard prompts you for information on the location of the database, database names, tableowners, tablespaces, and so on, depending on your database platform. For more information, see Siebel Installation Guide for Microsoft Windows or Siebel Installation Guide for UNIX as appropriate. The following are important points to consider during database installation:
When referring to directory locations, specify the path where the Siebel Enterprise Server (SES) components are installed, not the Siebel Application Interface (SAI) components.
When performing the Siebel User/Role Creation step, ensure to change the default selection to: “GRANTUSR.SQL has been run by the DBA to create Siebel users and roles”.
This is because you already executed the grantusr.sql script. If you do not update this selection, the installation will not continue.
Ensure that the Database Encoding value is Unicode. Oracle does not support non-Unicode Siebel CRM databases for new installations.
If you are installing one and only one language, you may pick it here. However, if there is any possibility that you will ever be installing multiple languages, it is recommended that you select English as the base language. This will default all log files and other settings to English, making it easier to debug when working with Oracle Technical Support. You will be able to install additional languages later.
The Configuration Wizard displays all the information you entered, and allows you to apply the changes. Once you confirm these changes, the Siebel Upgrade Wizard displays the steps necessary to install the database. Click OK to start the Siebel database installation. When the installation is complete, review the log files before continuing. For more information, see the installation guide for your selected database.
Configuring the Siebel Gateway
The Siebel Gateway maintains the configuration information for the components in the Siebel CRM environment. For example, it monitors where each Siebel Enterprise Server (SES) and Siebel Application Interface (SAI) instance is running, which components should be run on which physical servers, and so on.
When you complete these steps, the Siebel Gateway service will be created, and the Siebel Deployment Hierarchy page opens.
Configuring the Siebel Enterprise
The Siebel Enterprise maintains environment-wide settings that are shared by all components, such as the location of the Siebel File System, the database, and so on.
Before continuing, it is important to understand that in the Siebel Management Console (SMC), a profile represents a template that provides the information needed for a given component. However, a profile is not an actual instance of that component. Using profiles allows us to deploy many instances of the same entity quickly, and repeatedly. You deploy the Enterprise only once, whereas a Siebel Server or Siebel Application Interface profile can be used many times.
Creating the Enterprise Profile
To create the Siebel Enterprise profile, navigate the Siebel Management Console (SMC) to the Profiles/Enterprise node and create a new profile. For more information on each parameter, see Siebel Installation Guide for Microsoft Windows or Siebel Installation Guide for UNIX as appropriate.
Some of the key parameters are as follows:
Profile. A profile is a template for a component that can be deployed many times. To distinguish a profile from an instance of a component, it is recommended that profile name always includes the word: profile. For example, the Enterprise profile could be named EnterpriseProfile.
Primary Siebel File System. The Siebel File System will be used to store documents associated with Siebel CRM data, such as spreadsheets, word processing documents, presentations, images, and so on. This must be a network location that allows read-write access to all the servers on which Siebel Servers are eventually deployed. While the Enterprise creation requires only a single Siebel File System, it is possible to create multiple file systems to improve load-balancing and performance. For more information, see Siebel System Administration Guide in Siebel Bookshelf.
Authentication. The username and password for the Siebel Gateway.
Security Encryption Level. Setting this to SISNAPI Using TLS 1.2 will cause inter-process communication amongst Siebel Enterprise Components to use TLS, improving security for these conversations. If this option is selected, it will be necessary to provide information about the Certificate Authority and other information needed to encrypt those conversations.
Deploying the Enterprise Profile
After successfully creating the Enterprise profile, deploy it as follows:
Configuring Siebel Servers
Siebel Servers are the application servers that provide the business logic layer for Siebel CRM. A Siebel Enterprise must include at least one Siebel Server, but in most cases, particularly for non-development instances, there is more than one Siebel Server.
You would deploy more than one Siebel Server for one of the following reasons:
Performance and Load Balancing. Siebel CRM is very scalable horizontally. Additional Siebel Servers allow more users to connect to the system, allow the execution of more background jobs, and so on.
Specialization. In addition to providing the business logic layer for active users, Siebel Servers run background jobs, such as large data import jobs or integration with other systems. To avoid these jobs interfering with the user experience, it is common to deploy more than one Siebel Server specifically for this reason.
Operating System Dependence. Siebel CRM software runs equally well on Microsoft Windows and the various UNIX platforms on which it is certified. However, in some instances Microsoft Windows is specifically required. For example, Document Generation which interacts with Microsoft Word via Microsoft's Component Object Model (COM) technology and Siebel Server Sync for Microsoft Exchange (SSSE), which relies on Windows Integrated Authentication to interact with Microsoft Exchange. It is not uncommon for a customer to run most of their Siebel Servers on a UNIX platform, and to use a few Microsoft Windows servers to support these specific use cases.
Creating the Siebel Server Profile
As with all Profiles, the Siebel Server Profile is created in SMC: in this case, under the Profiles area, Siebel Servers node. Unlike the Enterprise Profile, it is possible, and in fact likely in a non-development environment, that you will create multiple Siebel Server profiles. The following example profiles illustrate possible examples how you might do this:
SiebSrvrUIProfile. Supports end-user User Interface sessions.
SiebSrvrWFProfile. Supports background workflow processes.
SiebSrvrEIMProfile. Supports Enterprise Integration Manager processes for bulk data loads.
SiebSrvrRESTProfile. Supports REST integration.
Different profiles allow you to define specifically which application services are available on a given Siebel Server and, if needed, easily deploy an additional instance of that set of services onto additional servers for high availability and scalability.
When determining how many profiles to create, you must consider the different possible ways that users and other systems interact with Siebel CRM. You can add more profiles and Siebel Servers at any time, and you can deploy and redeploy a Siebel Server quickly if needed.
For assistance determining number of profiles, servers and so on based on, customer requirements and expected usage, contact the Oracle Advanced Customer Support team (Expert Services).
Create the Siebel Server profile using the SMC as follows:Deploying the Siebel Server Profile
After successfully creating the Siebel Server profile, deploy it by doing the following:
Configuring the Siebel Application Interface
The Siebel Application Interface (SAI) provides the external interface to the Siebel CRM application. This includes user interface channels, such as employees, customers, and partners using browsers to interact with the application, as well as integration with other applications through REST or Web service calls. Normally a development instance requires a single SAI, but as with the Siebel Server, the Application Interface can be enabled on multiple servers to provide load balancing and high availability. For more information, see Siebel Installation Guide for Microsoft Windows or Siebel Installation Guide for UNIX as appropriate.
The key parameters of the SAI are those that are affect client interactivity, such as session timeouts.
Consistent with the Enterprise and Siebel Servers, the SAI, configuration is completed in two parts:
Creating or more SAI profiles. For many environments, it is likely that you only need one a single profile, even if you will have Application Interfaces running on multiple machines. You might consider creating multiple profiles for one of the following reasons:
Differing authentication. For example, using a different authentication authority for your internal users from that which you will use for your Internet users.
Isolation. For example, to place Application Interfaces supporting customer-facing applications on one set of servers and employee-facing applications on another.
- Deploying the SAI profile as many times as required to support capacity requirements, high availability, isolation, and other technical and functional requirements.
Creating the Siebel Application Interface Profile
You create the Siebel Application Interface (SAI) profile in the Siebel Management Console (SMC), under the Profiles area/Application Interfaces node. It is recommended that the profile name contains the word: profile. For example, SiebelAppIntProfile.
At least one Siebel Server with an EAI Object Manager must be deployed before you can create the first SAI profile. This is because the SAI profile requires selection of an existing EAI Object Manager.
Create the SAI profile using the SMC as follows:Deploying the Siebel Application Interface
After successfully creating the Siebel Application Interface (SAI) profile, deploy the profile by doing the following:
Adding the License Keys
Siebel CRM requires you to activate valid license keys in the database. Without valid license keys, any attempt to connect causes the following browser error: The server you are trying to access is either busy or experiencing difficulties. Please close the Web browser, open a new browser window, and try logging in again.
The Object Manager log file in the siebsrvr\log folder provides a more informative message for the administrator. For example in the SCCObjMgr_enu_XXXX_YYYYYYYY.log file:ObjMgrLicense Error 1 000000035a0b2200:0 2YYYY-MM-DD HH:MM:SS (dmlicmgr.cpp (308)) SBL-DAT-00172: No valid license keys were found in the database.
To add the license key, do the following:
Setting up the Siebel Tools Client
In Siebel Innovation Pack 2017, you perform most configuration changes, such as adding custom fields or validation rules, using Siebel Web Tools. However, there are some types of configuration that require the Siebel Tools client, such as development of Workflow processes or Task-Based UI, as well as certain functions associated with upgrades, such as reviewing conflicts, that are identified by the Incremental Repository Merge (IRM) process. For this reason, you need to install Siebel Tools on all machines that you use for these purposes for all Siebel CRM configuration team members.
Siebel Tools must have database connectivity software. Before proceeding, install the required software for your database platform on each machine where you install Siebel Tools. In Siebel Innovation Pack 2017, Siebel Tools also installs the Oracle Express (Oracle XE) database platform. As a result, all clients on which Siebel Tools is installed, require the Oracle 32-bit Client, even if your server database is Microsoft SQL Server or IBM DB2.
To install Siebel Tools, first install the base Innovation Pack release, for example 17.0, then the most recent Monthly Update (for example, 18.5). Monthly Updates are always cumulative. If there is more than one patch set available, you only need to install the latest version.
Unlike the Siebel Enterprise Server (SES) and Siebel Application Interface (SAI) components, installing and configuring Siebel Tools is done in a single step. During the installation, all the information that Siebel Tools requires is requested. The majority of this information was specified during previous steps. For example, the server where the Gateway Server is deployed, the name of the Enterprise, and so on. You will be required to provide the following new information:
Directory Path for 32-bit Oracle Client. The Siebel Innovation Pack 2017 Siebel Tools installer always installs the Oracle XE database, and therefore requires pre-installation of the Oracle 32-bit Database Client. Specify the path of the client here, for example, C:\Oracle\client\product\12.1.0\client_1.
Install the most recent Monthly Update.
Verify that Siebel Tools connects to the Siebel CRM Enterprise database. You can do this by launching the Siebel Tools client, selecting the ServerDataSrc data source, and logging in using the SADMIN credentials.
Setting up the Developer Web Client
All administration activities can be performed using the browser-based user interface. However, it is sometimes convenient to have access to the Siebel CRM database using a Developer Web Client. This client does not rely on any of the Siebel Enterprise Server (SES) or Siebel Application Interface (SAI) components, but is a self-contained client with all the features of the browser client, with independent binaries.
This is convenient in the following situations:
Troubleshooting server connectivity issues using the SAI.
Logging in with a different authentication mechanism than is provided by the SAI. For example, logging in using database authentication when the SAI has been configured for a Single Sign-On (SSO) authentication mechanism.
Debugging scripts, workflow processes, and Task-Based UI.
The Siebel Developer Client installation is similar to the Siebel Tools client installation; it is installed and configured in a single step. Much like Siebel Tools, it also requires the Oracle 32-bit client (even for customers using IBM DB2 or Microsoft SQL Server for their Siebel CRM Enterprise .database) and automatically installs an Oracle Express (Oracle XE) database as part of the installation process if you select the Sample Database option.
To install Siebel Developer Web Client, first install the base Innovation Pack release then the most recent Monthly Update (for example, 18.5). Monthly Updates are always cumulative. If there is more than one Update available, then you only need to install the latest.
The majority of the required information matches values specified during previous installation steps. You require the following new information:
Languages. While Siebel Tools can be used to configure all languages in the Repository, you must install the Siebel Developer Web Client for all languages that you plan to deploy in your Enterprise.
-
Type of Client. There are two types of clients available:
Siebel Remote Client. This is used by end users to work in an offline mode. For more information, see Siebel Remote and Replication Manager Administration Guide.
Developer Web Client. This is the recommended selection for administrative purposes.
Search Server Hostname and Port. Accept the defaults provided.
HTTP Connection Port and Shutdown Port. These are used for test automation and other purposes. If you install the Developer Web Client on a different machine from SES and SAI, it is still recommended that these ports be unique to avoid any possible confusion. The defaults of 9001 and 9005 are acceptable unless already in use.
Install the most recent Monthly Update.
Verify that Siebel Developer client connects to the Siebel CRM Enterprise database. You can do this by launching one of the shortcuts it created, for example Siebel Call Center, selecting the ServerDataSrc data source, and logging in using the SADMIN credentials.