5 Defining Flows
This chapter explains how to add and update flows in the Flow Tree. This chapter contains the following sections:
5.1 Overview
Flows define the test flow and Test Data used to generate OpenScript scripts for testing application functionality. The Flow Tree represents a library of Flows that specify test instances.
The Flow Tree on the Flows page has the following structure:
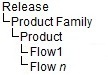
A Oracle Flow Builder administrator defines the Release, Product Family, Product, and Feature structure of the Flow Tree. Oracle Flow Builder users add Components to the tree and define the keywords and parameters that will be used to specify Component Sets and Flows that generate the OpenScript scripts used to test the application under test.
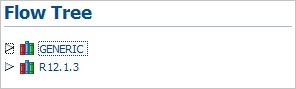
Clicking the Flows link at the top of the main window shows the Flow Tree and Search Flows options. The default Flow Tree includes two releases, Generic and R12, as follows:
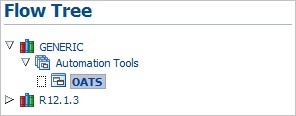
Generic flows consist of those component sets that group functions that can be used across all product families. Expanding the Generic tree shows the list of products and features contained in the Generic tree:
Release and application specific flows are listed below the Release(s) listed in the Flow Tree. Expanding the tree shows the list of products and features in the release tree:
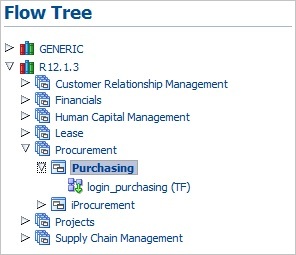
Note that the list of available product and features may vary based upon your specific installation.
The Search pane of the Flow page lets you search for specific flows:
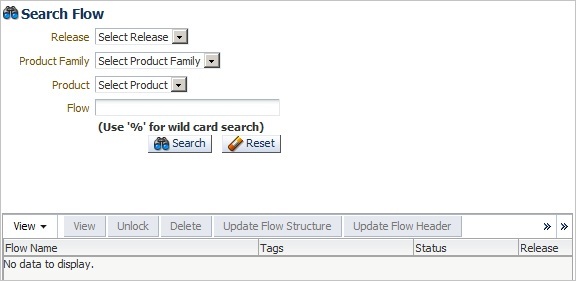
You can select the Release, Product Family, Product, and Flow to narrow the search criteria. You can also use the % wildcard character in the Flow field to narrow the search:
Figure 5-6 Search Flow Options with Search Criteria
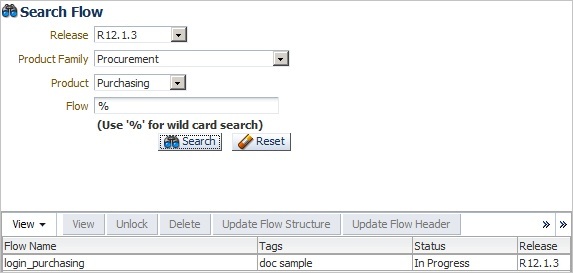
Description of "Figure 5-6 Search Flow Options with Search Criteria"
5.2 Adding Flows
This section explains the procedure for adding flows to the Flows Tree. Flows can be added to the Flows Tree directly in the application UI.
To add a flow to the Flows tree:
-
Expand the Flow Tree to the product feature where you want to add the flow.
-
Right-click the Feature name and select Create Flow from the shortcut menu
Figure 5-7 Create Flow Option of the Shortcut Menu
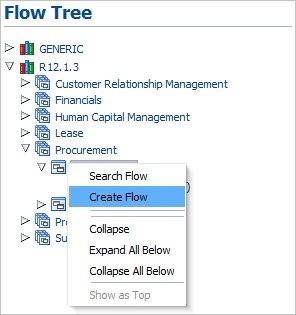
Description of "Figure 5-7 Create Flow Option of the Shortcut Menu"
-
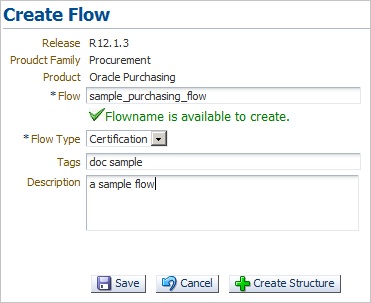
In the Create Flow pane, enter a Flow name, Flow Type, Tags and Description.
The flow name should be between 5 and 30 characters. The Flow name is available to create check mark appears if the name does not currently exist in the database.
-
Click Create Structure. The Select Component or Components Set and the Flow Creation pane opens for specifying the components or component sets to add to the new flow and a new scenario is added to the flow tree. A scenario defines a specific OpenScript child script name within the overall flow. See Section 5.2.1, "Adding Scenarios to a Flow" for additional information about adding scenarios to a flow.
-
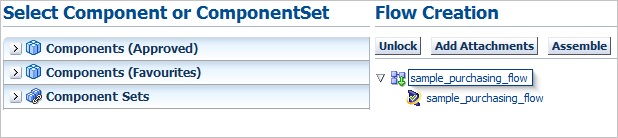
Expand the Flow tree and select the scenario where you want to add components or component sets.
-
Expand the Components (Approved), Components (Favourites), or Components Sets tree to view the available components or component sets.
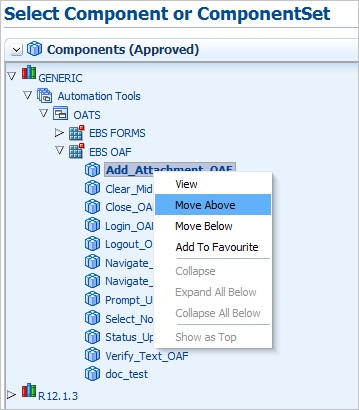
Figure 5-11 Select Component Set Pane Shortcut Menu
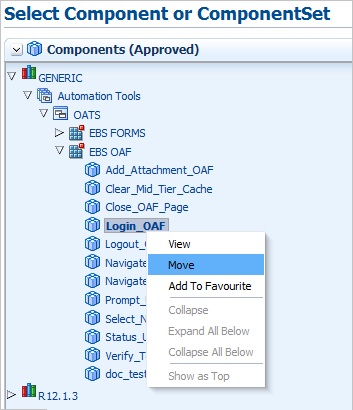
Description of "Figure 5-11 Select Component Set Pane Shortcut Menu"
-
Right-click the component or component set to add to the Flow Creation tree and click Move (or click and drag the component or component set to the flow tree).
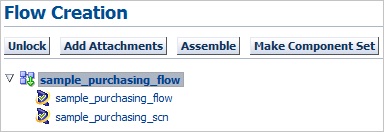
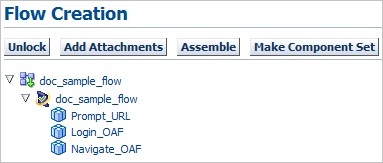
Figure 5-12 Flow Creation Pane with Components Added
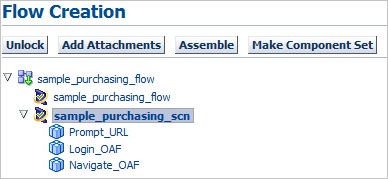
Description of "Figure 5-12 Flow Creation Pane with Components Added"
-
Repeat steps 5-7 to add additional components or component sets to the Flow Creation tree as needed. Select Move Above or Move Below to add the component or component set above or below the currently selected component or component set in the Flow Creation tree.
Figure 5-13 Select Component Pane Shortcut Menu
Description of "Figure 5-13 Select Component Pane Shortcut Menu"
-
Right-click a component in the Flow and select Enter Test Data from the shortcut menu. You can also download a Test Data Excel file for the flow, enter the Test Data for the flow into the Excel file, then upload the Excel file. See Section 5.2.2, "Entering Test Data Using an Excel File" for additional information about entering Test Data using an Excel file.
Figure 5-14 Flow Creation Pane Enter Test Data Shortcut Menu Option
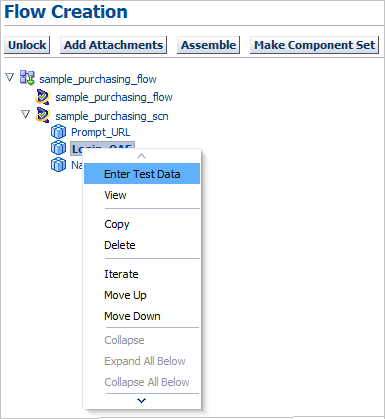
Description of "Figure 5-14 Flow Creation Pane Enter Test Data Shortcut Menu Option"
-
Enter the Test Data required for the component.
Figure 5-15 Enter Component Test Data Window
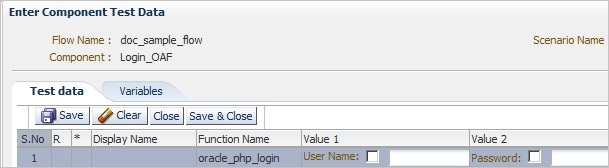
Description of "Figure 5-15 Enter Component Test Data Window"
The following are guidelines for entering Test Data for component objects:
-
Rerunable: For fields marked Rerunnable in the component code, the Test Data is entered as "?Value" in the Value column. For example, the Test Data entered for Username field would be ?RTUser. Rerunable fields are indicated with an "R" in the R (Rereunable) column in the Test Data entry screen.
-
Mandatory: Test data is mandatory for all fields marked as Mandatory=Yes in the component code. Mandatory fields are indicated with an asterisk in the * (Mandatory) column in Test Data entry screen.
-
Value field checkbox: Select the checkbox in value fields if the value is to be passed as a variable. When checked, the text field for the value changes to a list of values (LOV) listing all variable names from previous components in the flow. Variable s are appended with sequence number, for example, var1, var2, etc. If data is not provided to any field in "Enter Test Data", the code for that line would not be generated in the OpenScript script.
-
Button objects: For button object clicks, select True/False. Test data input is required only if the button object keyword is enclosed in Optional tags.
-
Checkbox objects: For checkbox object clicks, enter True to select the checkbox, False to clear the checkbox. Test data input is required only if the checkbox object keyword is enclosed in Optional tags.
-
Date fields: For date fields, Test data is entered for different date requirements as follows:
To empty the value in a Date field enter: #EMPTY
To specify the date format as DD_MMM_YYYY enter: #RAND(2_3_4)
To add n days to system date enter: #SYSDATE(+n) Ex. #SYSDATE(+2)
To subtract n days to system date enter: #SYSDATE(-n) Ex. #SYSDATE(-2)
To use the System Date enter: #SYSDATE(0)
-
Function calls: For calls to library functions, the data entered is specific to the function called. See the library reference for additional details.
-
Link objects: For Link object clicks, select True to click the link. Test data input is required only if the link object keyword is enclosed in Optional tags.
-
Menu selection: For simple menu selections, enter the menu names separated by the pipe (|) character. For example, File|Open. Test data input is required only if the menu object keyword is enclosed in Optional tags.
-
Navigation (Forms): To handle navigation to a form from the forms navigator, enter data as follows in the Navigate component:
Security,User,Define
-
Navigation (OAF): To handle navigation to a form or OAF page with multiple drill menus from the application home page such as: Purchasing, Vision Operations (USA)- Setup-Profile Management Configuration-Organization Encryption, enter data as follows in the Navigate component:
Resp: Purchasing, Vision Operations (USA)
Menu Path: Setup,Profile Management Configuration
Menu Choice: Organization Encryption
-
Radio button objects: For Radio button object clicks, enter True to select the Radio button, False to clear the checkbox. Test data input is required only if the Radio object keyword is enclosed in Optional tags.
-
Text/Text Area objects: Enter the value to input into the text/textarea field.
-
Wait: For Wait for all objects: No Test Data required. Wait uses the default wait time. For Wait > Normal: No Test Data required. Wait uses the default wait time.
-
Webtable/Forms table-Entry: For components containing tables in forms / Web, enter Test Data for "Enter Line Number" or similar Display Name as the line number where values are to be entered. For example, to enter data for the 1st line in the form or table, enter 1 as the Test Data.
Figure 5-16 Test Data for Webtable/Forms-Entry
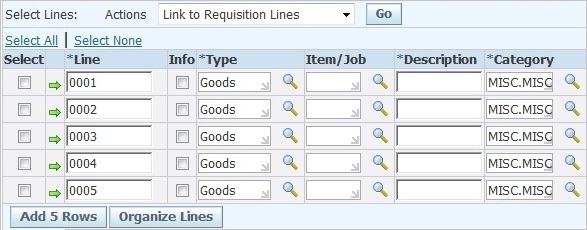
Description of "Figure 5-16 Test Data for Webtable/Forms-Entry"
-
Webtable/Forms table-Verify/Update: For components that require updating a line in a table or performing an action on any element in a table, the Test Data entered is the unique column name.For example, if the action to perform is check the checkbox in the "Select" column for *Member = Stock, Ms.Pat, then the Test Data to be entered for the Search column specified as "*Member" is "Stock, Ms Pat".
Figure 5-17 Test Data for Webtable/Forms-Verify/Update
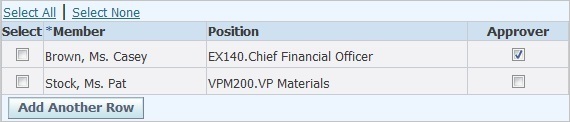
Description of "Figure 5-17 Test Data for Webtable/Forms-Verify/Update"
-
WEBSELECTLOV Function: Test data entry for the WEBSELECTLOV Function corresponds to the following:
Figure 5-18 Test Data Locations for WEBSELECTLOV Function
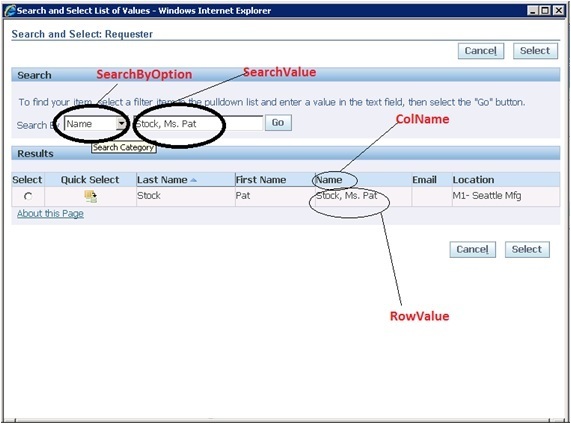
Description of "Figure 5-18 Test Data Locations for WEBSELECTLOV Function"
-
-
Click Save and Close when finished.
-
Repeat steps 9-11 to enter Test Data into additional components in the flow.
-
Set the status of the flow as necessary for the current state of development:
-
Click Unlock at any time when adding components and entering Test Data to save and exit the Flow Creation pane. The Search pane indicates Published Flow Successfully. The Flow is set to In Progress status and can be changed and updated as necessary.
-
Click Assembled when finished entering the Test Data for all the components and exit the Flow Creation pane. The Search pane indicates Assembled Flow successfully. The flow is set to Assembled status. When the flow is in Assembled status, the flow cannot be updated or changed. The flow status must be changed to Stabilizing to make any updates. Change the status to Stabilizing by right clicking on the flow name in the flow tree.
When a flow is in Assembled status, it can be evaluated by an Automation Team member who changes the status to Stabilizing. The automation user can update the flow if required. When in the Stabilizing status, the automation user generates and executes the OpenScript scripts and tests if the scripts generated from the flow are executing properly. The automation user determines if changes are required to update the components in the flow and continue stabilizing the flow. Once the automation user stabilizes the flow completely, an Automation POC verifies the flow and OpenScript scripts and changes the flow status to Completed.
Once the flow is in Completed status, if any user clicks on Create / Update flow structure, the flow changes back to In Progress status.
-
5.2.1 Adding Scenarios to a Flow
When you create a flow structure, a scenario name is automatically created to define the OpenScript child script name. Each scenario in a flow corresponds to an OpenScript child script. A flow may have only one scenario or it can have multiple scenarios depending upon the flow and the automation process the flow designer is developing.
-
The number of scenarios in a flow depends upon the user/automation process the flow designer is developing.
-
If the flow is small requiring only a few steps (components or component sets) to complete the flow, only one scenario may be required which will create the MASTERDRIVE script and one OpenScript child script. There is no need to add additional scenarios to the flow.
-
If the purpose of the flow is to automate multiple functional scenarios in one flow, then the better practice is to break the flow into multiple scenarios (and create multiple OpenScript child scripts) under one flow.
-
If a flow is to automate a lengthy end-to-end scenario, the better practice is to break the flow into multiple simple scenarios to make it easier to execute and troubleshoot the OpenScript child scripts, if necessary.
-
OpenScript script code is contained in Java ".class" files. There is a technical limitation that a ".class" file cannot exceed a file size of 65536 Bytes. If a scenario in a flow is too large, it is possible for the generated OpenScript script ".class" file to exceed the file size limitation for one script. Use multiple scenarios to break up larger scenarios (and multiple generated OpenScript scripts) to avoid exceeding file size limitations.
To add scenarios to the flow tree:
-
Open the flow tree and select the flow name.
-
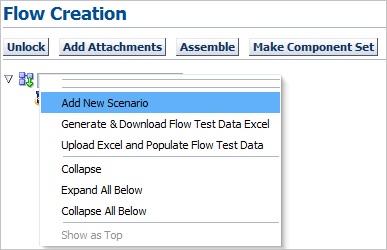
Right-click the flow name and select Add New Scenario from the shortcut menu.
Figure 5-19 Add New Scenario Shortcut Menu
Description of "Figure 5-19 Add New Scenario Shortcut Menu"
-
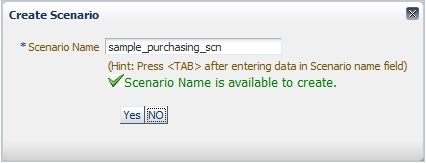
Enter a scenario name, then press the Tab key. The Scenario Name is available to create check mark appears if the name does not currently exist in the database.
-
Click Yes.
-
Click OK to confirm.
-
Add components and/or component sets to the flow tree under the scenario name.
When you generate the OpenScript scripts, each scenario name will correspond to an OpenScript child script along with the MASTERDRIVE script.
5.2.2 Entering Test Data Using an Excel File
You can enter Test Data for an entire flow into an Excel file and then upload the Excel file to the flow. The basic steps are as follows:
-
Download the test Data Excel file for the flow.
-
Enter the Test Data into the Excel file.
-
Upload the Test Data Excel file to the flow.
-
Populate the flow with the Test Data.
To enter Test Data for a flow using an Excel file:
-
Create a new flow or search for an existing flow.
-
Select Update Flow Structure.
-
Right-click the flow name in the Flow Creation pane and select Generate & Download Flow Test Data Excel from the shortcut menu.
Figure 5-21 Flow Creation Pane Generate & Download Excel Shortcut Menu Option
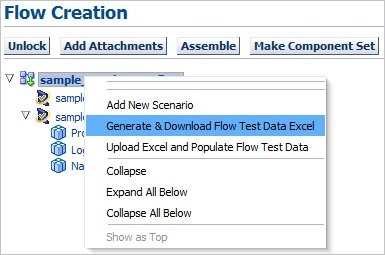
Description of "Figure 5-21 Flow Creation Pane Generate & Download Excel Shortcut Menu Option"
-
Select Save and specify the location to save the Excel file.
-
Edit the Excel file to enter the Test Data for the flow and save the Excel file.
-
Right-click on the flow name in the Flow Creation pane and select Upload Excel and Populate Flow Test Data from the shortcut menu
Figure 5-22 Flow Creation Pane Upload Excel Shortcut Menu Option
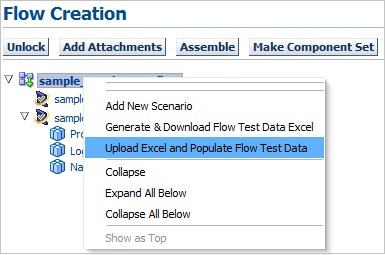
Description of "Figure 5-22 Flow Creation Pane Upload Excel Shortcut Menu Option"
-
Select the Excel file for the flow Test Data and click Start. Close the Browse dialog box after successfully uploading the file. The data will be populated to all components in the flow.
5.3 Updating Flows
Existing flows can be updated to add or remove components or components sets from a flow or change Test Data.
5.3.1 Updating Flow Headers
To update a flow header:
-
Expand the Flow Tree to the flow you want to update.
-
Right-click the flow name and select Update Header from the shortcut menu.
Figure 5-23 Update Header Option of the Flow Tree Shortcut Menu
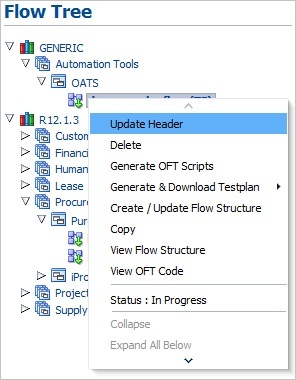
Description of "Figure 5-23 Update Header Option of the Flow Tree Shortcut Menu"
-
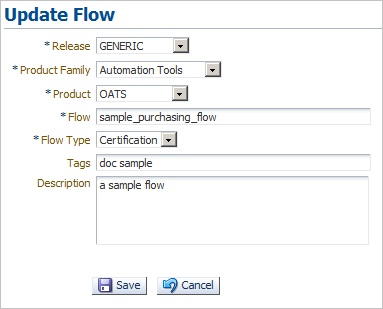
In the Update Flow pane, edit the Release, Product Family, Product, Flow name, Flow Type, Tags and Description.
-
Click Save when finished to save and exit the Update Component Set pane. The Search pane indicates Updated Flow <name> Successfully.
5.3.2 Adding Components or Component Sets to an Existing Flow
To add a component or component set to an existing component set:
-
Expand the Flow Tree to the flow you want to update.
-
Right-click the Flow name and select Create/ Update Flow Structure from the shortcut menu.
Figure 5-25 Create/Update Flow Structure Option of the Flow Shortcut Menu
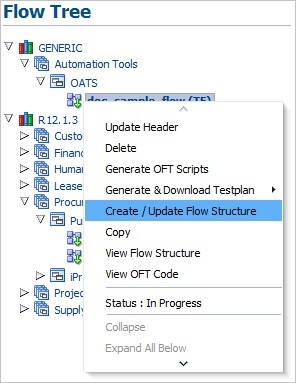
Description of "Figure 5-25 Create/Update Flow Structure Option of the Flow Shortcut Menu"
-
The Select Component or Components Set and the Flow Creation pane opens for specifying the components or component sets to add or update in the Flow.
-
Expand the Components (Approved), Components (Favourites), or Components Sets tree to view the available components or component sets.
Figure 5-27 Select Component Set Pane with Expanded Components Tree
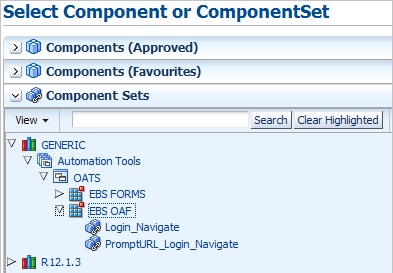
Description of "Figure 5-27 Select Component Set Pane with Expanded Components Tree"
-
Expand the Flow Creation tree to view the existing components or component sets.
Figure 5-28 Flow Creation Pane with Components Added
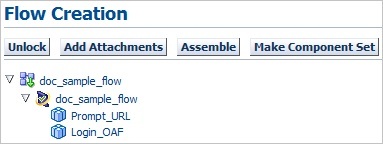
Description of "Figure 5-28 Flow Creation Pane with Components Added"
-
Select a component or component set in the Flow Creation tree where you want to add the new component or component set.
-
Right-click the component or component set in the Select Component (Approved), Select Component (Favourites) or Component Set tree that you want to add to the Flow Creation tree and click Move Above or Move Below.
Figure 5-29 Move Options of the Shortcut Menu
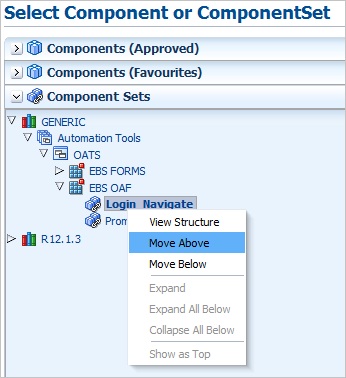
Description of "Figure 5-29 Move Options of the Shortcut Menu"
-
Repeat step 7 to add additional components or component sets to the Flow Creation tree Component Set as needed.
Figure 5-30 Flow Creation Pane with Additional Components Added
Description of "Figure 5-30 Flow Creation Pane with Additional Components Added"
-
Enter Test Data into the components as needed.
-
Click Assemble when finished to change the flow status to Assembled and unlock the flow. The Search pane indicates Assembled Flow Successfully.
-
To change the flow to Stabilizing status, right-click the flow name in Flow Tree and select Set Status to Stabilizing.
Figure 5-31 Flow Tree Set Status to Stabilizing Shortcut Menu Option
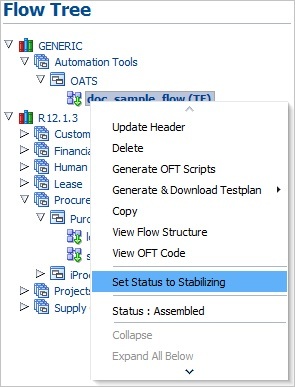
Description of "Figure 5-31 Flow Tree Set Status to Stabilizing Shortcut Menu Option "

5.4 Deleting Flows
To delete flows from the Flow tree:
-
Expand the Flow Tree to the flow you want to remove from the flow tree.
-
Right-click the Flow name and select Delete from the shortcut menu.
Figure 5-32 Delete Flow Option of the Shortcut Menu
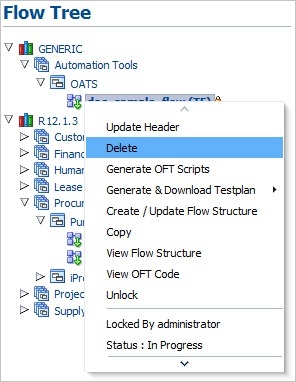
Description of "Figure 5-32 Delete Flow Option of the Shortcut Menu"
-
Click Yes to confirm.
-
Click OK.
5.5 Generating OpenScript Scripts
To generate OpenScript script code from an existing flow:
-
Expand the Flow Tree or use the search options to select the flow to use to generate OpenScript code.
-
Select Generate OFT Scripts from the Flow Tree shortcut menu or the search pane.
Figure 5-33 Generate OFT Scripts Option of the Shortcut Menu
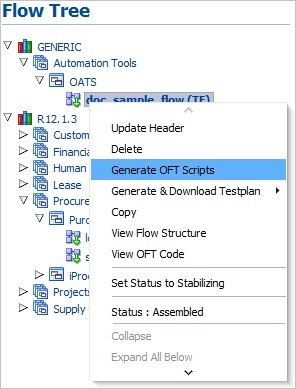
Description of "Figure 5-33 Generate OFT Scripts Option of the Shortcut Menu"
-
Enter the Execution location folder.
-
Enter the Normal wait time.
-
Enter the Page wait time.
-
Select if the script is rerunable or not.
-
If Rerunable, select the time zone, specify the Rerun type.
-
Select the time zone.
-
Click Download Suite.
-
Extract the zip file into the OpenScript repository.
-
Start OpenScript.
-
Open and playback the MASTERDRIVE script located in the flowname folder. The MASTERDRIVE script executes the script containing the OpenScript code for the flow. You can also open the script with the flow code in OpenScript to view the Tree View and Java Code.
5.6 Viewing OpenScript Code
To view OpenScript script code from an existing flow:
-
Expand the Flow Tree or use the search options to select the flow to use to view OpenScript code.
-
Select View OFT Code from the Flow Tree shortcut menu.
Figure 5-34 View Code Window Showing OpenScript Code for a Flow
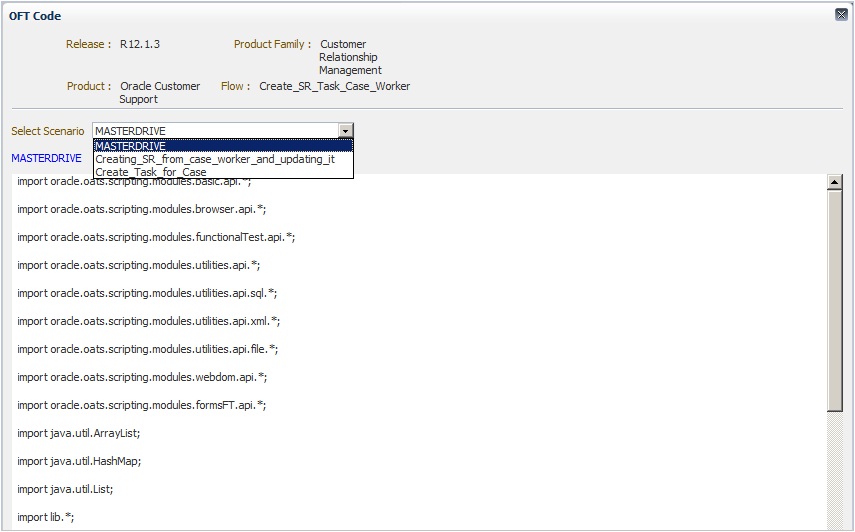
Description of "Figure 5-34 View Code Window Showing OpenScript Code for a Flow"
-
Select the MASTERDRIVE or flow scenario name from the Select Scenario list to view the OpenScript code for the specific flow.
-
Click the [X] button to close the code view when finished.
5.7 Flow Development Guidelines for PLSQL Flows
This section provides guidelines for developing flows for PLSQL flows.
-
An OFB flow can have multiple scenarios.
-
Each scenario in a flow can have only one of the following as scenario module:
-
PLSQL Procedure
-
Open Interface
-
WebService
-
UI Scenario
A Scenario can not have a combination of PLSQL / Open Interface / Webservice / UI components.
-
-
Oracle Flow Builder provides the flexibility to create hybrid flows. For example, a flow can have combination of different interfaces and GUI.
-
Oracle Flow Builder supports Multiple Test Data. For example, a single scenario with multiple sets of data. Multiple Test Data is supported for the following interfaces:
-
PLSQL
-
Open Interface
-
Webservice
-
-
The better practice is to have a hybrid flow with a single set of Test Data.
-
Multiple Test Data is supported at the scenario level.
-
Excel is used for flow level Test Data only for GUI.
-
Use Excel for flow level Test Data for GUI flows.
-
Do not use Excel for flow level Test Data for interfaces like PLSQL, Open interface and Webservice with single or Multiple Test Data.
-
Do not use Excel for flow level Test Data for hybrid flows.
-
5.7.1 Adding PLSQL Flows
Oracle Flow Builder supports creation of flow for execution of PLSQL procedures with single and Multiple Test Data. OFB PLSQL flow can be created as follows:
-
Use an Oracle Flow Builder Flow scenario to provide database details.
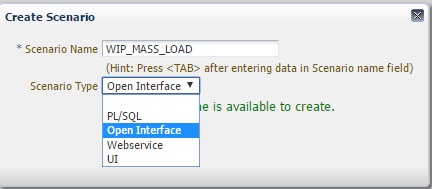
Create Scenario by right clicking on the flow and selecting Add New Scenario. Provide the following details in the Create Scenario dialog box.
-
Scenario Name
-
Scenario Type as Empty
Figure 5-35 Create Scenario Details: Database
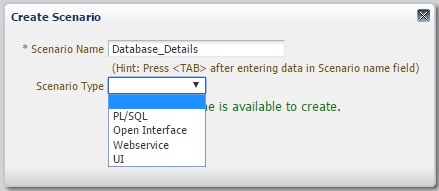
Description of "Figure 5-35 Create Scenario Details: Database"
Drag the component "Database_WS_Details" into the scenario.
-
-
Each procedure call should have one Flow scenario.
-
A separate scenario is to be created after PLSQL procedure execution scenario for verification of data and to retrieve any data from the database using queries. The following components are required for verification and select query:
-
Verification Components - for verification of data.
-
Select Components - to retrieve data from the database.
-
5.7.1.1 PLSQL Flow Scenario Structure
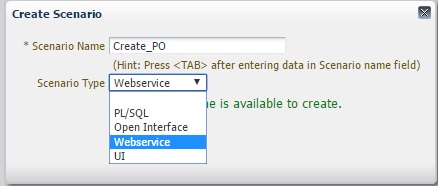
Create Scenario by right clicking on the flow and selecting Add New Scenario. Provide the following details in the Create Scenario dialog box as follows:
-
Scenario Name
-
Scenario Type as "PL/SQL"
Figure 5-36 Create Scenario Details: PL/SQL

Description of "Figure 5-36 Create Scenario Details: PL/SQL"
The Scenario Type will be displayed next to the scenario names as "(PLSQL)".
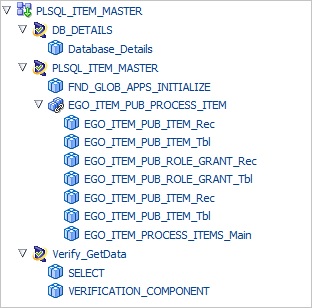
A PLSQL scenario should have following structure:
-
Add components related to PLSQL initialization like FND_GLOBAL.APPS_INITIALIZE, which is required to execute a specified procedure. Some of the initialization/Org Context components are as follows:
-
FND_REQUEST_SET_ORG_ID
-
FND_GLOBAL_SET_NLS_CONTEXT
-
MO_GLOBAL_SET_POLICY_CONTEXT
-
MO_GLOBAL_INIT
-
-
Add Component Set(s) related to the procedure to be executed.
Note:
If a procedure has only "Standard Types" as parameters, then there will be only one component available for that procedure and there will not be any Component Set created for that. You need to drag the Component instead of the Component Set while creating the PLSQL scenario for that procedure execution.
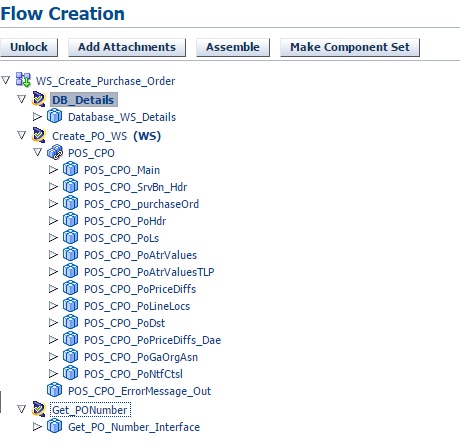
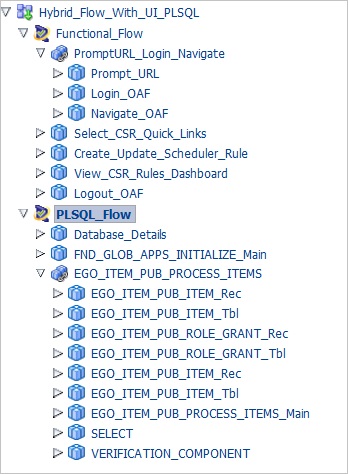
The following shows an example PLSQL Flow Structure:
5.7.1.2 Test Data for PLSQL Flows
There are two types of Test Data for PLSQL flows:
-
PLSQL flow with a single set of Test Data.
-
PLSQL flow with multiple sets of Test Data.
The following sections provide details for entering Test Data for the two types of flows.
5.7.1.2.1 PLSQL Flows with a Single Set of Test Data
For PLSQL Flows with a single set of Test Data, do the following:
-
Right-click on a component in the PLSQL scenario and select Enter Test Data from the menu.
Figure 5-38 Example Enter Test Data Menu Option for PLSQL Flows
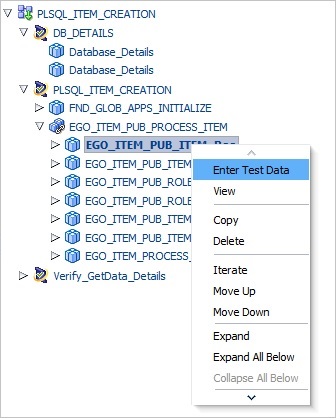
Description of "Figure 5-38 Example Enter Test Data Menu Option for PLSQL Flows"
-
Specify the Test Data for the PLSQL procedure and its associated components, such as Records/Table of Records, etc.
-
Specify the Test Data for the all the Standard type parameters that are available in the procedure component.
-
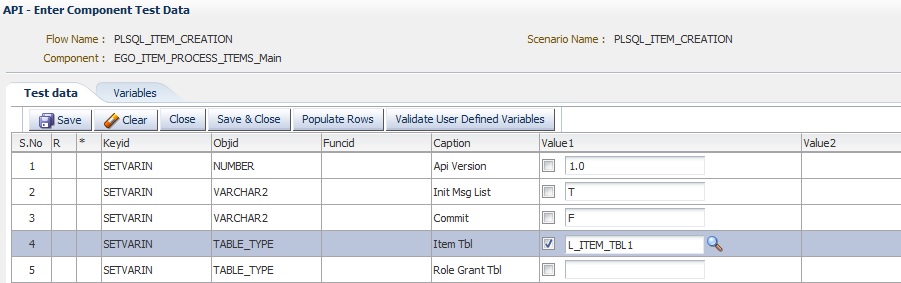
If any user defined data type like Record/Object is taken as input to the procedure, then go the corresponding component in the component set and specify the data for that component.
Specify data as “INPUT” for the first field “START RECORD TYPE”/”START OBJECT TYPE”.
Specify data for the Record/Object fields.
The following figure shows an example of the Record/Object Component Test Data.
Figure 5-39 Example Record/Table Component Test Data
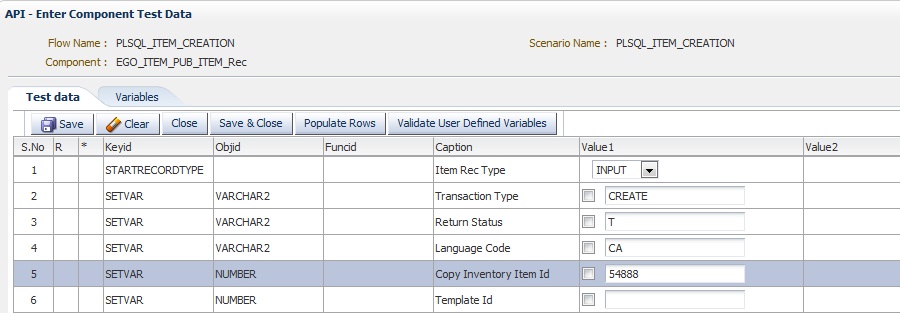
Description of "Figure 5-39 Example Record/Table Component Test Data"
-
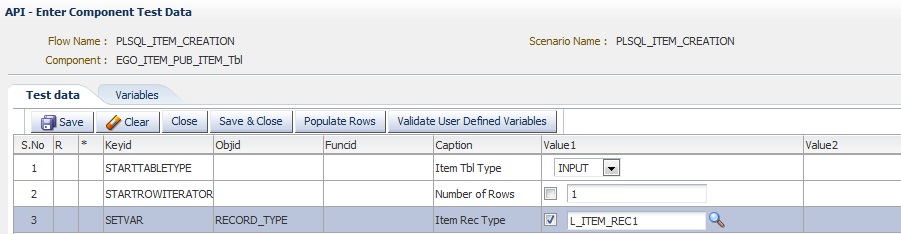
If any user defined data type like Table of Records/Table of Objects is taken as input to the procedure, then go the corresponding component in the component set and specify the data.
Table of Records/Objects corresponds to two components:
- Record/Object
- Table
Need to drag the Record/Object component above the table component based on the number of records to be passed to the table.
Specify the data for all the Record/Objects.
Specify the data for the table component, as follows:
- Specify the number of rows that are to be passed to the table at "STARTROWITERATOR" and click "Populate Rows".
- Associate all the dragged record/object component variables in the table component for each row.
The following figure shows an example of the Record/Object Component Test Data.
Figure 5-40 Example Record/Object Component Test Data
Description of "Figure 5-40 Example Record/Object Component Test Data"
The following figure shows an example of the Table Component Test Data.
-
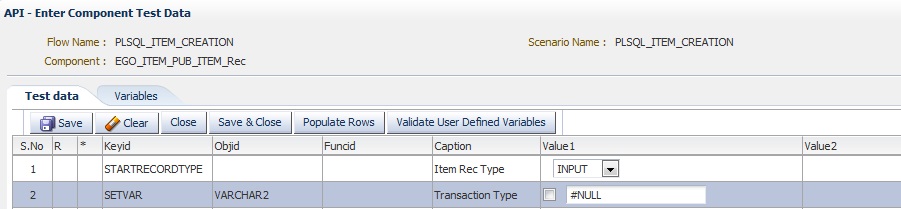
If any user defined data type like Record/Object is returned as output from the procedure, then go the corresponding component in the component set and provide the data as mentioned.
- Specify data as "OUTPUT" for the first field "START RECORD TYPE"/"START OBJECT TYPE".
- Specify data as "YES" for all the fields which are required as output from specified Record/Object.
- These fields can be used in the subsequent scenarios as {{RecordVariable_FieldName}}.
The following figure shows an example of the Record/Object Component Test Data.
Figure 5-42 Example Record/Object Component Test Data
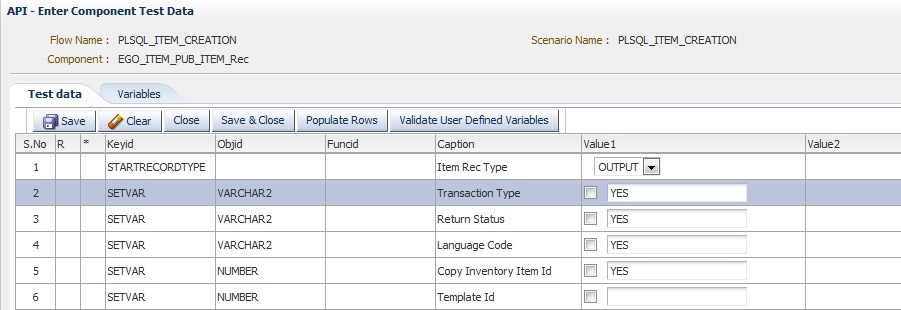
Description of "Figure 5-42 Example Record/Object Component Test Data"
-
If any user defined data type like Table of Records/Table of Objects is returned as output from the procedure, then go the corresponding components in the component set and specify the data as follows.
- Specify the data for the Record/Object component of the table as follows:
1. Specify data as "OUTPUT" for the first field "START RECORD TYPE"/"START OBJECT TYPE".
2. Specify data as "YES" for all the fields which are required as output from specified Record/Object.
- Specify data as "OUTPUT" for the first field "START TABLE TYPE" of the table component.
- These fields can be used in the subsequent scenarios as {{TableVariable_RowNumber_FieldName}}.
The following figure shows an example of the Record/Object Component Test Data.
Figure 5-43 Example Record /Object Component Test Data

Description of "Figure 5-43 Example Record /Object Component Test Data"
The following figure shows an example of the Table Component Test Data.
Figure 5-44 Example Table Component Test Data
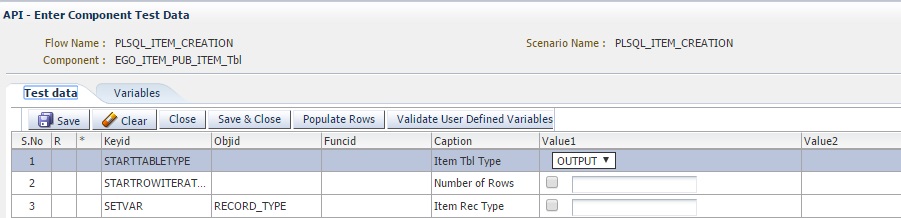
Description of "Figure 5-44 Example Table Component Test Data"
-
Specify the Test Data for the main procedure as follows:
- Specify Test Data for all the "Standard data types"(Varchar, Boolean, Number etc.) with the required data.
- Test data for all the "User defined data types"(Record/Object/Table of Objects/Table of Records) can be provided by selecting the variable name of the corresponding components.
-
Specify Test Data for DATE field as follows:
Value1: Specify date as #SYSDATE(+n), for example: #SYSDATE(+1)
#SYSDATE(0) - Today's date
#SYSDATE(+1) - Tomorrow's date
#SYSDATE(-1) - Yesterday's date
Value2: Specify date format as "DD-MON-YYYY"
The following figure shows an example of the Date Test Data.
-
Specify Empty in the Test Data as #EMPTY.
-
Specify a function call in the Test Data as #FUNCTIONCALL(functionName).
-
Specify Null in the Test Data as #NULL.
The following figure shows an example of the Null Test Data.
-
-
Providing Test Data for some of the procedure requirements
-
Passing user defined types like record/table of records to the procedure without providing any Test Data, for example:
- Declare Record/Table of Records variable
- Pass the Record/Table of Records variable to the procedure.
This can be achieved in an Oracle Flow Builder Flow by just providing data as "INPUT" to "START RECORD TYPE" or "START TABLE TYPE" field and associate the record or table component variable with the corresponding field in the procedure component.
-
5.7.1.2.2 PLSQL Flows with Multiple Sets of Test Data
Multiple Test Data for PLSQL flows should be specified in the Excel spreadsheet and a separate Excel spreadsheet should be generated for each procedure Scenario.
-
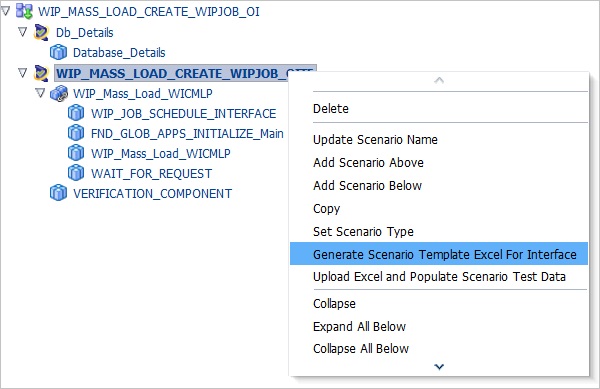
Right-Click on the Scenario name in the Flow Structure pane and select Generate Scenario Template Excel For Interface. Oracle Flow Builder will generate the Multiple Test Data Excel spreadsheet file with a .xlsm extension for the specified procedure. The Excel spreadsheet file will be downloaded as
scenarioname.xlsm.Figure 5-48 Generate Scenario Template Excel for Interface Menu Option
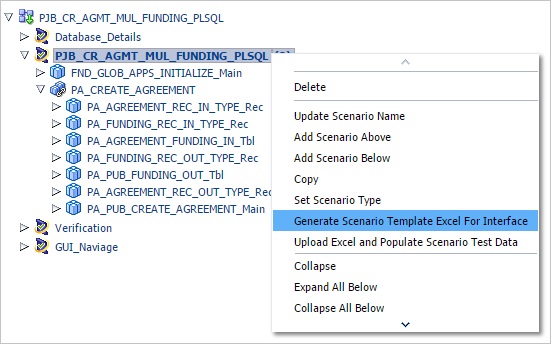
Description of "Figure 5-48 Generate Scenario Template Excel for Interface Menu Option"
The multiple PLSQL Excel spreadsheet file will have the following details.
Figure 5-49 Example Multiple PLSQL Excel Spreadsheet
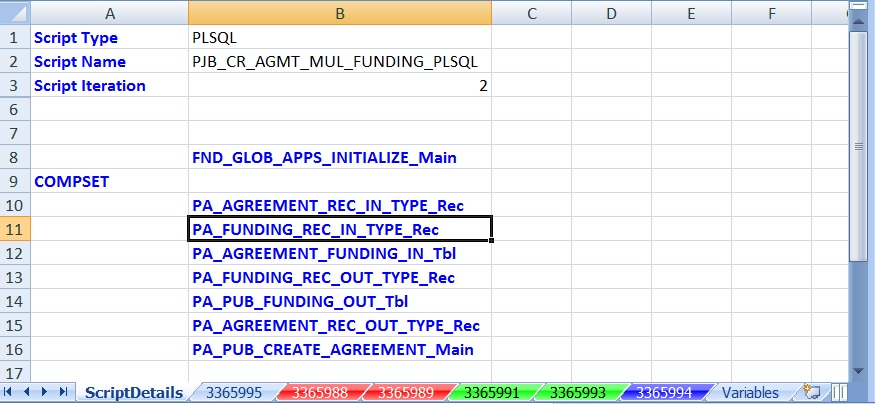
Description of "Figure 5-49 Example Multiple PLSQL Excel Spreadsheet"
-
Script Details sheet - this sheet will have details about the Scenario Name, Scenario Type, Scenario Iterations, and Scenario Structure.
-
Scenario Iteration indicates the number of times scenario needs to be executed.
-
Scenario structure will have the hyperlinks to navigate to the corresponding sheet in the Excel spreadsheet.
-
Components in the component structure will be mapped to the Excel sheets as follows:
Each Record/Object will have one sheet.
Table of Records/Table of Objects will be comprised of two components and those two components together will have one sheet. These two components are available in the corresponding sheet.
Table of Standard types will have one sheet.
One sheet for the Procedure Component and will be highlighted with blue color in the Excel spreadsheet.
-
-
Variables sheet - this sheet includes all the variables from the first scenario to the current scenario.
Open the Excel file and enable macros.
Specify the following in the Script Details sheet:
-
Enter number of iterations in "Script Iteration" field to specify number of times the scenario need to be executed.
-
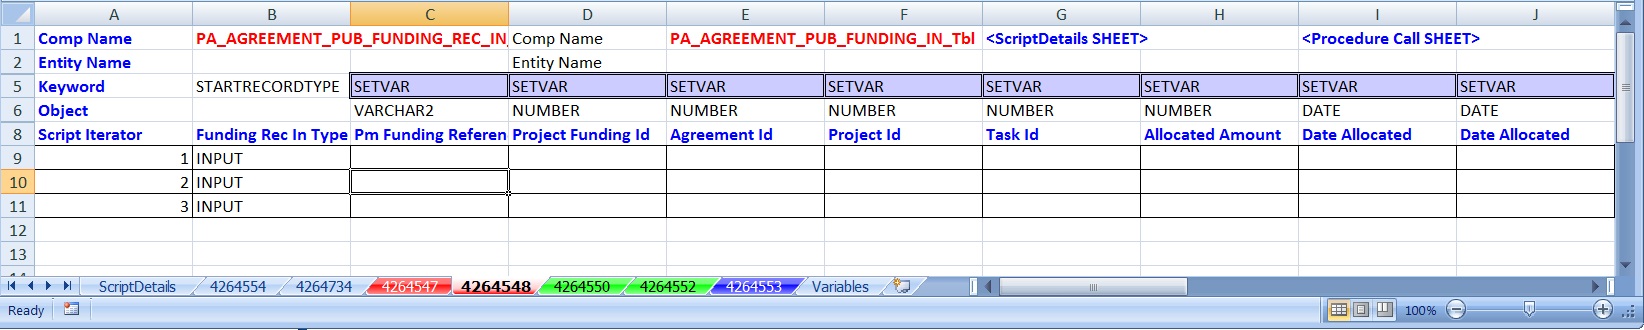
Test Data for Table of Records/Table of Objects As Input
Specifying Test Data for Table of Records/Table of Objects which are passed as input to the procedure requires the following details:
Figure 5-50 Example Test Data for Table of Records/Table of Objects as Input

Description of "Figure 5-50 Example Test Data for Table of Records/Table of Objects as Input"
-
Table of Records/Objects corresponds to two components in Oracle Flow Builder, as follows:
-
Record/Object component
-
Table component
-
-
These two components become one sheet in the Excel spreadsheet. The component names will be displayed in the top header of the sheet.
-
Script Iterator indicates data for the specific iteration.
-
If you wish to pass multiple rows to the table, then provide all the rows with same script Iterator. For example:
-
If you want to pass two rows to the table during first iteration, then provide "1” for those two rows of data.
-
If you want to pass a single row to the table during second iteration, then provide "2" for the single row of data.
-
Test Data for Records/Objects as Input
Specifying Test Data for Records/Objects which are passed as input to the procedure requires the following detail:
Figure 5-51 Example Test Data for Records/Objects as Input

Description of "Figure 5-51 Example Test Data for Records/Objects as Input"
-
Record/Table Component will have one sheet in the Excel spreadsheet.
-
Script Iterator indicates data for the specific iteration.
-
Record/Object can have only one row of data for each iteration.
-
Two rows of data can not have the same iterator.
-
Specify the script iterator for each row of data.
Test Data for Table of Records/Table of Objects as Output
Specifying Test Data for Table of Records/Table of Objects which are returned as output from the procedure requires the following details:
Figure 5-52 Example Test Data for Table of Records/Table of Objects as Output
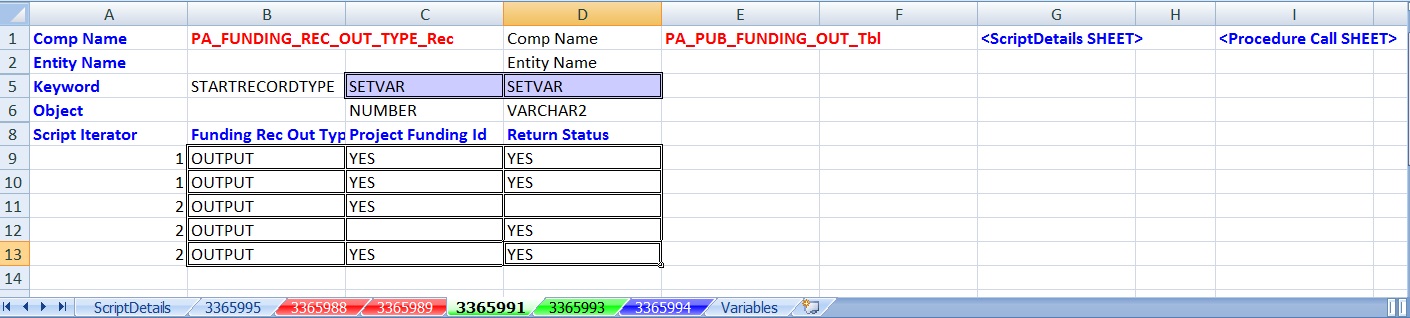
Description of "Figure 5-52 Example Test Data for Table of Records/Table of Objects as Output"
-
Table of Records/Objects corresponds to two components in Oracle Flow Builder:
-
Record/Object component
-
Table component
-
-
These two components becomes one sheet in the Excel spreadsheet. The component names will be displayed in the top header of the sheet.
-
Script Iterator indicates data for the specific iteration.
-
If the table is returning multiple rows as output, then provide all the rows with same script Iterator and "YES" for the fields which needs to be returned as output.
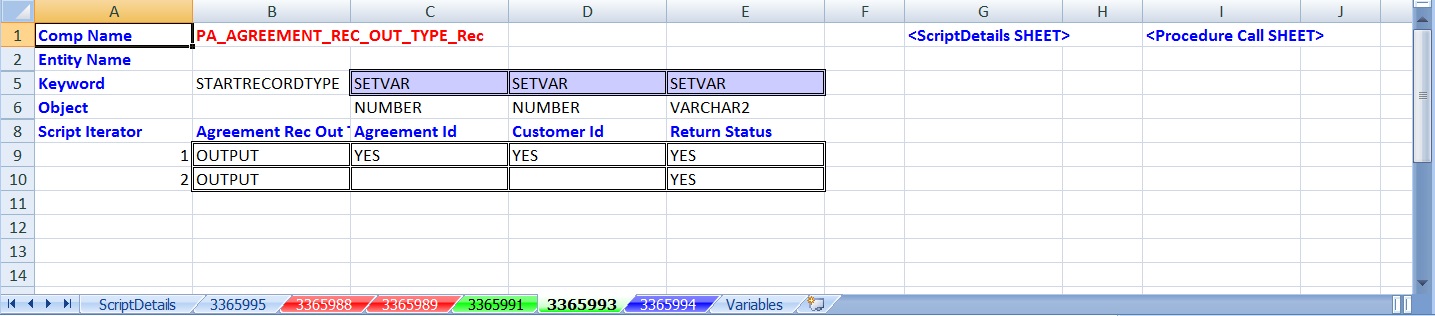
Test Data for Records/Objects as Output
Specifying Test Data for Records/Objects which are returned as output from the procedure requires the following detail:
Figure 5-53 Example Test Data for Records/Objects as Output
Description of "Figure 5-53 Example Test Data for Records/Objects as Output"
-
Script Iterator indicates data for the specific iteration.
-
If the record/object is returning as output, then provide specific row with Iterator and "YES" for the fields which needs to be returned as output.
-
Two rows should not have same iterator.
Test Data for User-Defined Components
Specify the data for all the user-defined components except the procedure component in the Multiple Test Data Excel spreadsheet and save the Excel spreadsheet.
Upload Excel and Populate Test Data
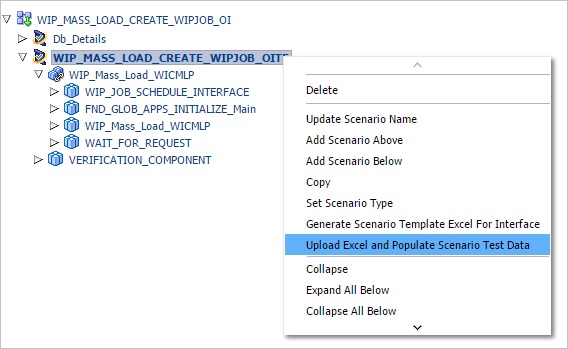
Right-click on the scenario name in the Flow creation pane and select Upload Excel and Populate Scenario Test Data.
Figure 5-54 Upload Excel and Populate Scenario Test Data Menu option
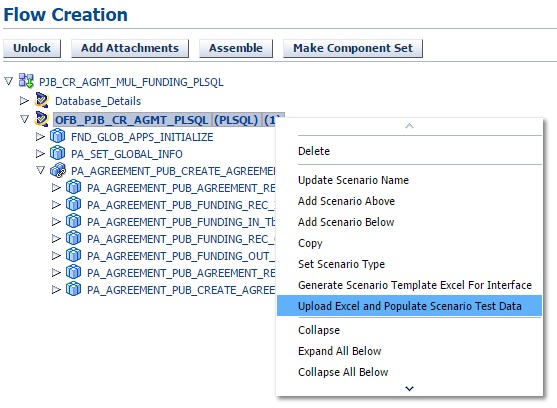
Description of "Figure 5-54 Upload Excel and Populate Scenario Test Data Menu option"
On uploading the Excel spreadsheet, following set of the actions will be performed:
-
The number of Iterations will be displayed next to the script name.
-
Variables will be created for all the iterations specified in the excel based on the number of rows of data.
-
Data will be stored in the Oracle Flow Builder application.
Figure 5-55 Example Flow After Uploading Excel Spreadsheet
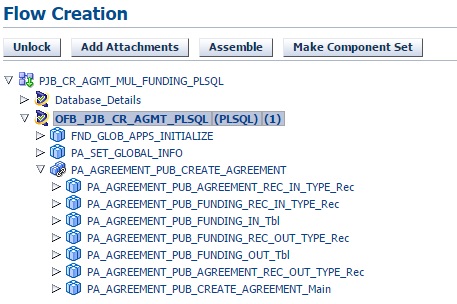
Description of "Figure 5-55 Example Flow After Uploading Excel Spreadsheet"
Test Data for Procedure Component in Excel
Specify the Test Data for the Procedure component in the Excel spreadsheet, as follows:
-
Right-Click on the Scenario name in the Flow Structure pane and select Generate Scenario Template Excel For Interface to generate the Excel spreadsheet.
-
Specify the Test Data for Standard Data types such as Varchar, Number, Boolean, etc, in the procedure component.
-
Specify the Test Data for user defined data types of all iterations with a corresponding variable. Variables in the Excel spreadsheet can be specified as follows:
-
Enable Macros for the Excel spreadsheet.
-
Double-click on the cell where you need to provide the variable to open a dialog box for selecting variables.
Figure 5-56 Example of Variable Selection in Excel
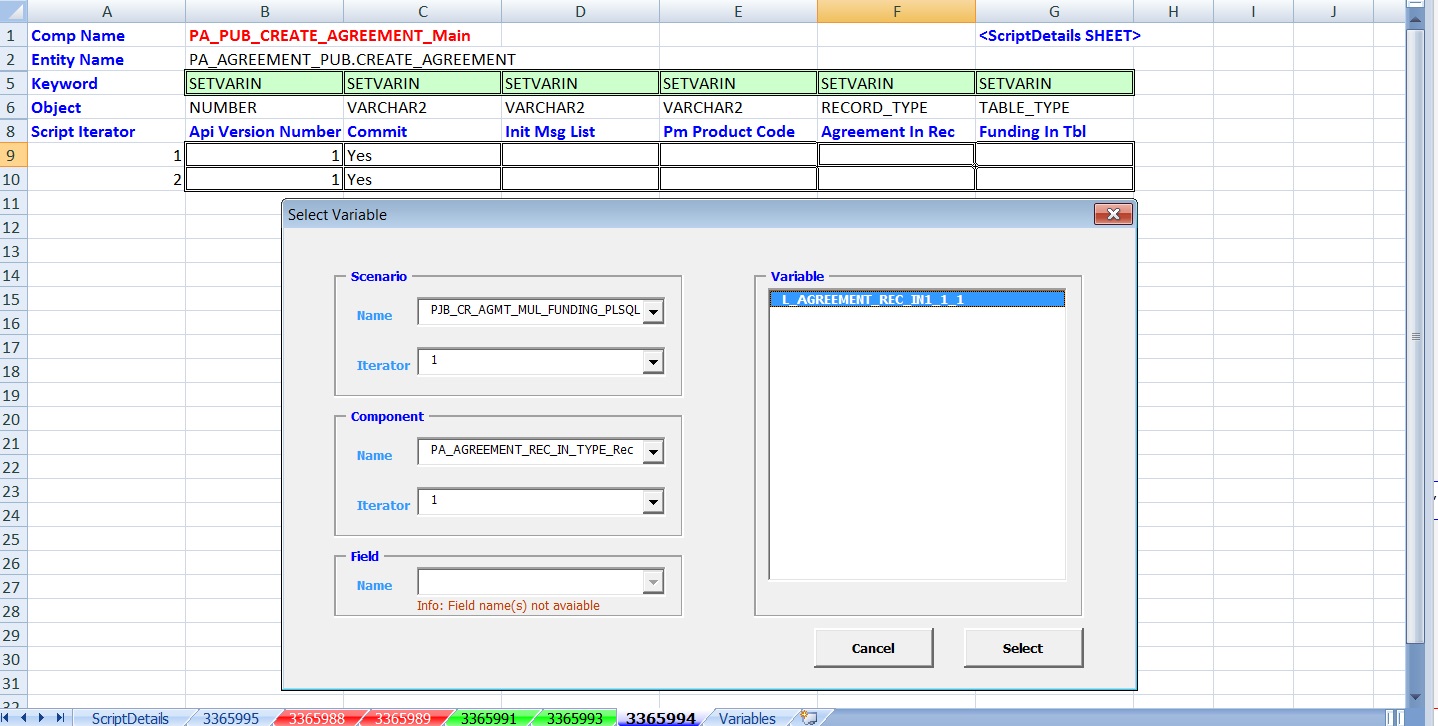
Description of "Figure 5-56 Example of Variable Selection in Excel"
-
Provide details like Scenario name, Scenario iteration, component name, component iteration to filter exact variable. Select the variables from the variables pane.
Figure 5-57 Example Test Data For Procedure Component

Description of "Figure 5-57 Example Test Data For Procedure Component"
-
-
Upload the Excel spreadsheet into the scenario after providing data for the procedure component.
Test Data for Procedure Requirements
To pass user defined types like record/Table of Records to the procedure without providing any Test Data:
-
Declare Record/Table of Records variable
-
Pass the Record/Table of Records variable to the procedure.
This is performed in Oracle Flow Builder PLSQL Scenario with Multiple Test Data as follows:
-
Specify data as INPUT to START RECORD TYPE field in the Record/Table Sheet.
Figure 5-58 Example Test Data for Record Component

Description of "Figure 5-58 Example Test Data for Record Component"
-
Associate the record or table component variable with the corresponding field in the procedure component in Excel.
Figure 5-59 Example Test Data for Table of Records Component
Description of "Figure 5-59 Example Test Data for Table of Records Component"
5.7.2 Adding Open Interface Flows
Oracle Flow Builder supports creation of flows for execution of Open Interfaces with Multiple Test Data. Oracle Flow Builder Open Interface flow can be created as follows:
-
Oracle Flow Builder scenario to provide database details.
-
Oracle Flow Builder scenario to insert data into interface tables and execute one Open interface concurrent request.
-
A separate scenario is to be created after the Open Interface Concurrent program execution for verification of data and to retrieve any data from the database using queries. The following components are required for verification and select query:
-
Verification Components - for Verification of data
-
Select Components - to retrieve data from the database
-
5.7.2.1 Open Interface Flow Scenario Structure
Create Scenario by right click on the flow and select Add New Scenario. Provide the following details in the Create Scenario dialog box as follows:
-
Scenario Name
-
Scenario Type as "Open Interface"
Figure 5-60 Create Scenario Details: Open Interface
Description of "Figure 5-60 Create Scenario Details: Open Interface"
Scenario Type will be displayed next to the scenario names as "(OI)".
An Open Interface scenario should have following structure:
-
A Component Set corresponds to a specific concurrent request. The Component Set should have the following:
-
Components to insert data into Interface database tables.
-
PLSQL procedure component to execute concurrent request.
-
-
Drag any components such as FND_GLOB_APPS_INITIALIZE, etc. above the "Concurrent Request" component based on requirement.
-
Drag "WAIT_FOR_REQUEST" component below the "Concurrent Request" component to wait till the concurrent request is completed.
The following figure shows an example of the Open Interface Flow structure:
Figure 5-61 Example Open Interface Flow Structure
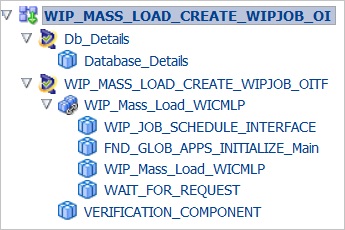
Description of "Figure 5-61 Example Open Interface Flow Structure"
5.7.2.2 Test Data for Open Interface Scenario
Test Data for Open Interface flows should be specified in the Excel spreadsheet. To specify Test Data for Open Interface flows, do the following:
-
Right-click the Scenario name in the Flow Structure pane and select Generate Scenario Template Excel For Interface.
Figure 5-62 Generate Scenario Template Excel For Interface Menu Option
Description of "Figure 5-62 Generate Scenario Template Excel For Interface Menu Option"
Selecting this menu option does the following:
-
Generates the Excel spreadsheet for all the interface tables.
-
Each sheet corresponds to one interface table.
-
Each sheet has the following details:
-
Database table Name
-
Primary_Key & Foreign_Key
-
Database table columns
Figure 5-63 Example Excel Spreadsheet for Open Interface Flow Test Data
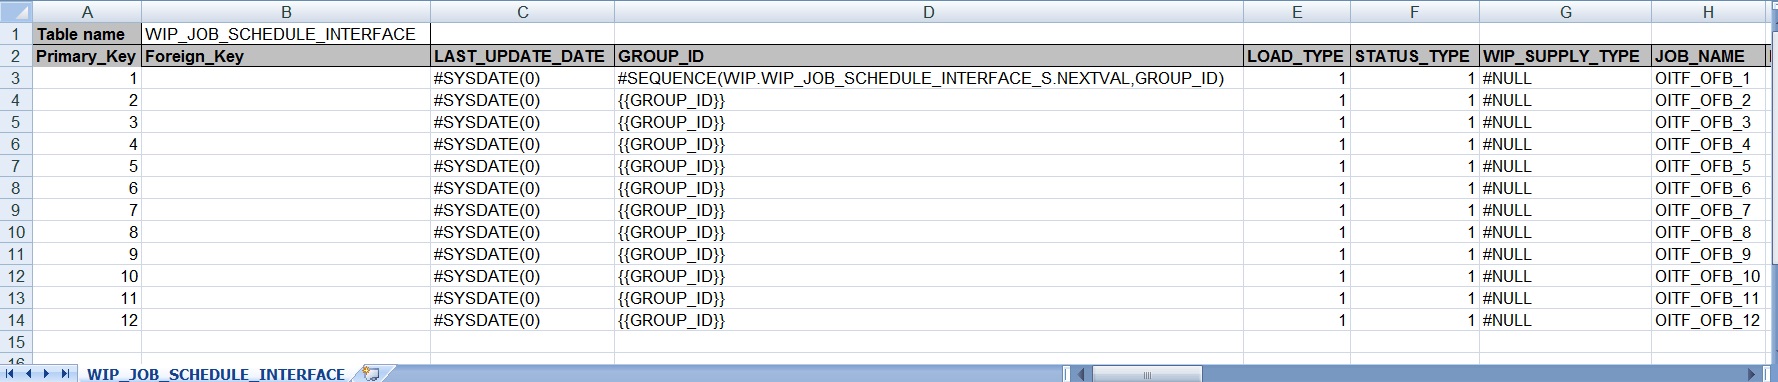
Description of "Figure 5-63 Example Excel Spreadsheet for Open Interface Flow Test Data"
-
-
-
Specify the data for interface tables. Primary_Key & Foreign_Key columns are used for user reference. Primary_Key field is a mandatory field and should be provided in sequence.
-
Save the Excel spreadsheet.
-
Right-click on the scenario name in the Flow creation pane and select Upload Excel and Populate Scenario Test Data.
Figure 5-64 Upload Excel and Populate Scenario Test Data Menu Option
Description of "Figure 5-64 Upload Excel and Populate Scenario Test Data Menu Option"
Upon uploading the Excel spreadsheet, the Excel file will be added to the Flow Attachments.
Figure 5-65 Excel File as Open Interface Flow Attachment
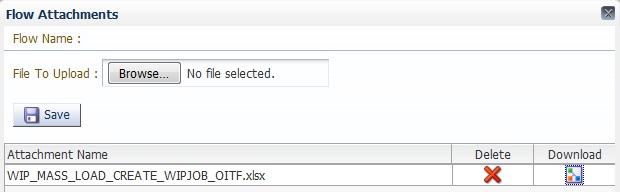
Description of "Figure 5-65 Excel File as Open Interface Flow Attachment"
-
Right-click on the procedure component in the Open Interface scenario and select Enter Test Data from the menu.
Figure 5-66 Example Enter Test Data Menu Option for Open Interface Flow
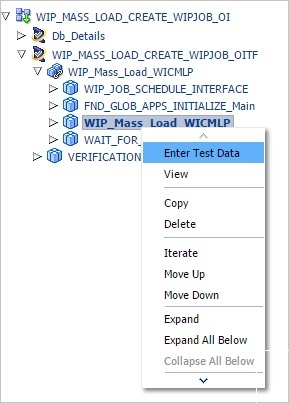
Description of "Figure 5-66 Example Enter Test Data Menu Option for Open Interface Flow"
-
Specify the Test Data for the procedure as per the concurrent request.
Figure 5-67 Example Component Test Data for Concurrent Request
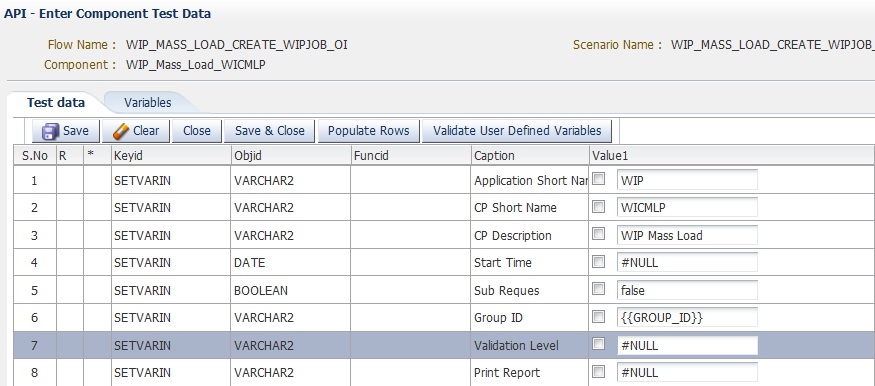
Description of "Figure 5-67 Example Component Test Data for Concurrent Request"
-
Specify the values for Request Id, Interval and Max Wait data field in Wait for Request component. This component is used to wait till the concurrent request is completed.
Figure 5-68 Example Component Test Data for Wait for Request
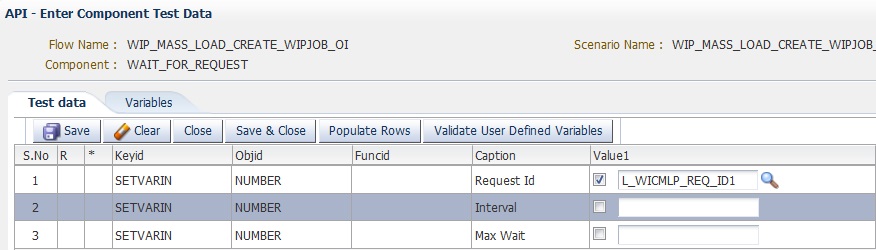
Description of "Figure 5-68 Example Component Test Data for Wait for Request"
The Open Interface template generated from the flow scenario always comes without Test Data.
The Open Interface template will be generated as ScenarioName.xlsx. Do not change the file name while uploading the Excel file to the flow.
5.7.2.3 Update Test Data for Open Interface
To update the Test Data for an Open Interface scenario:
-
Download the Excel spreadsheet that corresponds to the specified scenario from the Flow Attachments, as follows:
-
Click the Add Attachments button just above the flow name.
-
Download the Open Interface Excel spreadsheet.
-
-
Update the data in the Open Interface Excel spreadsheet.
-
Delete the Open Interface Excel spreadsheet in the flow attachments that corresponds to the scenario, as follows:
-
Click the Add Attachments button just above the flow name.
-
Delete the Open Interface Excel spreadsheet that corresponds to the scenario.
-
-
Upload the updated Open Interface Excel spreadsheet using the Upload Excel and Populate Scenario Test Data menu item at the scenario level.
5.7.2.4 Specifying Test Data for Open Interface
This section describes how to specify Test Data for Open Interface scenarios.
-
All database table fields should be provided as String.
-
Date values can be specified as #SYSDATE(+n). For example:
-
#SYSDATE(0) - Today's date
-
#SYSDATE(+1) - Tomorrow's date
-
#SYSDATE(-1) - Yesterday's date
-
-
Null value can be specified as #NULL.
-
Empty ("") value can be specified as #EMPTY.
-
Space (" ") value can be specified as #SPACE.
-
Rerunnable value can be specified using "?". "?" can be used anywhere in the existing data.
-
A unique number with a database sequence can be specified as #SEQUENCE(SequenceName.NEXTVAL). For example:
#SEQUENCE(WIP.WIP_INTERFACE_S.NEXTVAL)
-
A unique number with a database sequence and store the runtime database sequence in a variable for further usage in the same Excel template or another scenarios can be specified as #SEQUENCE(SequenceName.NEXTVAL, VariableName). For example:
#SEQUENCE(WIP.WIP_JOB_SCHEDULE_INTERFACE_S.NEXTVAL,GROUP_ID)
Variable Name can be used as {{Varaible Name}} in the same Excel spreadsheet (any sheet) or in the subsequent scenarios.
The following image shows an example of Open Interface Test Data:
Figure 5-69 Example Open Interface Test Data

Description of "Figure 5-69 Example Open Interface Test Data"
5.7.3 Adding Webservice Flows
Oracle Flow Builder supports creation of flow for web services execution with multiple sets of Test Data and supports verification of response data. A Webservice flow can be created as follows:
-
A flow scenario to provide hostname and port details.
-
Each Webservice payload and corresponding response verification as one scenario.
5.7.3.1 Webservice Flow Scenario Structure
Create a Scenario by right clicking on the flow and selecting Add New Scenario. Provide the following details in the Create Scenario dialog box, as follows:
-
Scenario Name
-
Scenario Type as "Webservice"
Figure 5-70 Create Scenario Details: Webservice
Description of "Figure 5-70 Create Scenario Details: Webservice"
Scenario Type will be displayed next to the scenario names as "(WS)".
The Webservice scenario should have following structure:
-
Add Component Sets related to the Webservice payload. The component set should have the following:
-
A component for WSDL and payload root structure details.
-
Components for Payload nodes having elements.
-
-
Add Components related to Webservice response based on the requirements. Add all the output response components to the scenario which are required for the following:
-
Verification.
-
To retrieve the value from a response for further usage in the scenarios.
Figure 5-71 Example Webservice Flow Structure
Description of "Figure 5-71 Example Webservice Flow Structure"
-
5.7.3.2 Specifying Test Data for Webservice Flows
Specify the Test Data for Webservice flows as follows:
-
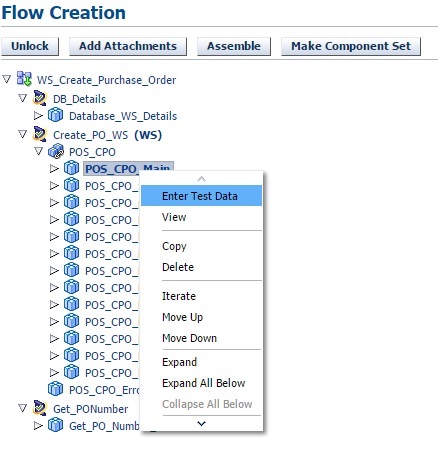
Right-click on a Payload structure component in the Webservice scenario and select Enter Test Data from the menu.
Figure 5-72 Example Enter Test Data Menu Option for Webservice Flow
Description of "Figure 5-72 Example Enter Test Data Menu Option for Webservice Flow"
-
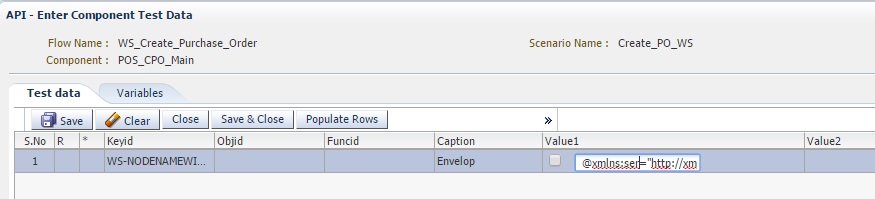
Specify the Test Data for the envelop (specify attributes of the root node for the Envelop field). For example:
@xmlns:ser="http://xmlns.oracle.com/apps/fnd/ServiceBean",
@xmlns:ser1="http://xmlns.oracle.com/apps/po/service",
@xmlns:soapenv="http://schemas.xmlsoap.org/soap/envelope/"
Figure 5-73 Example Test Data for Payload Component
Description of "Figure 5-73 Example Test Data for Payload Component"
-
Save and close.
-
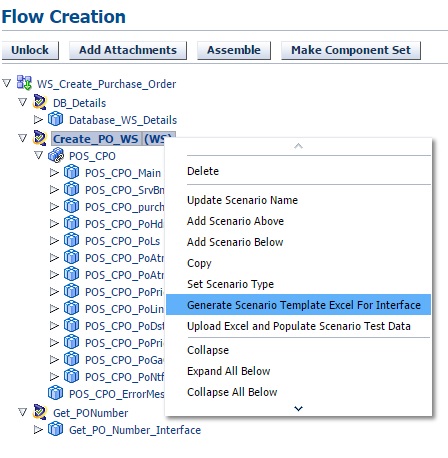
Right-click on the Scenario name in the Flow Structure Webservice scenario pane and select Generate Scenario Template Excel For Interface.
Figure 5-74 Generate Scenario Template Excel for Interface Menu Option
Description of "Figure 5-74 Generate Scenario Template Excel for Interface Menu Option"
Generating the Scenario Template Excel does the following:
-
Generates an Excel spreadsheet for all the Webservice payload node components and WebService Response Components. Each "node component" in the scenario corresponds to one sheet in the Excel spreadsheet.
The Webservice Excel spreadsheet file will have the following details:
-
Main sheet - this sheet will have details about the number of times payload needs to be executed.
-
Payload_Key indicates the number of times payload needs to be executed.
-
Primary_Key indicates unique number in that sheet.
-
Test Case Name indicates the purpose of the payload. This must always be provided for each payload.
-
Username and Password are used for Webservice security authentication. These values should be provided for each payload iteration.
-
AllowEmptyNode indicates inclusion of empty nodes (Nodes which doesn't have any data) in the generate payload. Provide data for this field as follows:
YES - indicates Empty will be included in the payload even if data is not provided.
NO - indicates Empty nodes will be removed in the payload when data is not provided.
-
-
Component sheets - each component from the Webservice scenario (payload & respose) will have one sheet in the Excel spreadsheet.
-
Each sheet will have "Parent Name" and "Node Name" of the payload node. These will come automatically into the Excel spreadsheet from the component for user reference.
-
-
Variables sheet - this sheet will have all the variables from the first scenario to the current scenario.
-
-
Specify the following details in the Main sheet:
Figure 5-75 Example Main Sheet Test Data for Webservice Flow
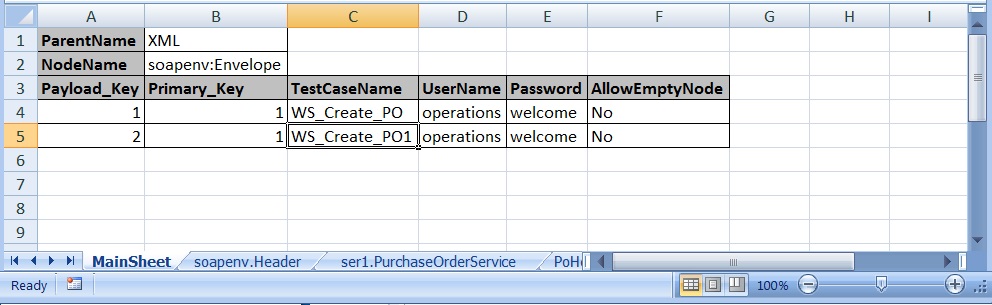
Description of "Figure 5-75 Example Main Sheet Test Data for Webservice Flow"
-
Payload_key for each iteration of the payload.
-
Provide Primary_Key corresponds to each payload.
-
Provide TestCaseName corresponds to each payload. This must be provided for each payload.
-
Provide UserName/Password, which are required as Webservice security authentication during payload execution.
-
AllowEmptyNode indicates inclusion of empty nodes (Nodes which doesn't have any data) in the generate payload. Provide data for this field as follows:
YES - indicates Empty will be included in the payload even if data is not provided.
NO - indicates Empty nodes will be removed in the payload when data is not provided.
-
-
Specify the Payload data, as follows:
Figure 5-76 Example 1 PoHeader Sheet for Webservice Flow

Description of "Figure 5-76 Example 1 PoHeader Sheet for Webservice Flow"
-
Provide data for each node component with Payload_Key.
-
Primary_Key and Foreign_Key to be provided based on node structure. These are to be provided corresponding to the payload.
-
If the same node data is repeated multiple times, then provide multiple rows in the Test Data with the same Payload_Key.
Figure 5-77 Example 2 PoLines Sheet for Webservice Flow

Description of "Figure 5-77 Example 2 PoLines Sheet for Webservice Flow"
Figure 5-78 Example 3 PoLineLocations Sheet for Webservice Flow

Description of "Figure 5-78 Example 3 PoLineLocations Sheet for Webservice Flow"
-
-
Specify data to retrieve from payload response or verification of data in payload response.
Figure 5-79 Example Data to Retrieve/Verification of Data

Description of "Figure 5-79 Example Data to Retrieve/Verification of Data "
-
If user needs to verify any data for specific field from the output payload response, provide the data to be verified as Test Data in the corresponding field.
-
If user needs to retrieve any data for specific field from the output payload response, then provide "YES" in the Test Data for the corresponding field.
-
The column INDEX_VALUE in the output response components is used specify the index of the specific fields. This is to support repetition of the same node multiple times.
-
-
Save and close the Excel spreadsheet.
-
Upload the Excel spreadsheet by right-clicking on the Webservice scenario name in the Flow creation pane and select Upload Excel and Populate Scenario Test Data.
Figure 5-80 Upload Excel and Populate Scenario Test Data Menu Option

Description of "Figure 5-80 Upload Excel and Populate Scenario Test Data Menu Option"
Upon uploading the Excel spreadsheet, the Excel file will be added to the Flow Attachments:
Figure 5-81 Excel File as Webservice Flow Attachment
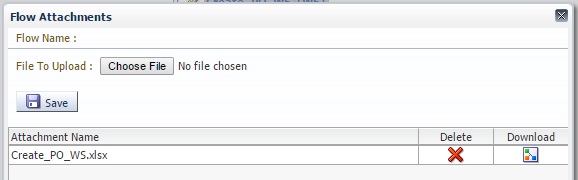
Description of "Figure 5-81 Excel File as Webservice Flow Attachment"
5.7.3.3 Updating Test Data for Webservice Flows
To update Test Data for Webservice flows:
-
Download the Excel that corresponds to the specified scenario from the Flow Attachments, as follows:
-
Click Add Attachments just above the flow name.
-
Download the Webservice Excel spreadsheet file.
-
-
Update the data in the Webservice Excel spreadsheet file and save the file.
-
Delete the Webservice Excel spreadsheet file from the flow attachments that corresponds to the scenario, as follows:
-
Click Add Attachments just above the flow name.
-
Delete the Webservice Excel spreadsheet file that corresponds to the scenario.
-
-
Upload the updated Webservice Excel spreadsheet file using the Upload Excel and Populate Scenario Test Data menu item at the scenario level.
5.7.4 Adding Hybrid Flows
Oracle Flow Builder supports creation of flows with a combination of Functional Flow and PLSQL / Interface / Webservice flows.
5.7.5 Best Practices
This section provides general guidelines on best practices and things to avoid when creating PLSQL flows.
5.7.5.1 Best Practice
General best practices are as follows:
-
Create a separate scenario to provide database details.
-
Provide the scenario type when creating any interface scenario. The scenario type is required to download the Multiple Test Data template for interfaces.
-
Data provided in the Excel spreadsheet should be in Text format.
-
-
Create separate scenario for verification and select components.
-
To validate data.
-
To retrieve any data from database using queries.
-
-
It is best to have a hybrid flow with a single set of Test Data.
-
Multiple Test Data is supported only for the following interfaces at the scenario level:
-
PLSQL
-
Open Interface
-
Webservice
-
-
Flow level Test Data Excel spreadsheet is used only for GUI flows.
-
You should use flow level Test Data Excel spreadsheet for GUI flows.
-
You should not use flow level Test Data Excel spreadsheet for interfaces like PLSQL, Open interface and Webservice with single or Multiple Test Data.
-
You should not use flow level Test Data Excel spreadsheet for hybrid flow.
-
-
When a flow is using Multiple Test Data scenario:
-
Enter the data for GUI scenario using the Oracle Flow Builder Enter Test Data option.
-
Do not download the Flow level Excel spreadsheet for entering Test Data.
-
5.7.5.2 Things to Avoid
Things to avoid are as follows:
-
Do not unlock the flow or logout from the Oracle Flow Builder when a Multiple Test Data template is downloaded for adding or updating data. Other users may modify the components.
-
Do not delete any rows in the PLSQL Multiple Test data Excel spreadsheet while updating data in Excel. Deletion of rows is not supported while updating data in PLSQL Multiple Test Data.
-
Do not include Verification and Select components in Multiple Test Data scenario.
-
Do not enter the Test Data using the Oracle Flow Builder Enter Test Data option for Multiple Test Data scenario components.