Alerts maintenance allows the bank administrator to define required parameters for each alert that is to be sent to the banks internal and external users. User can define the alert messages to be sent to different recipients on different channels. Also the type of alert Mandatory or subscribed can be defined by the user for each event.
Pre-Requisites
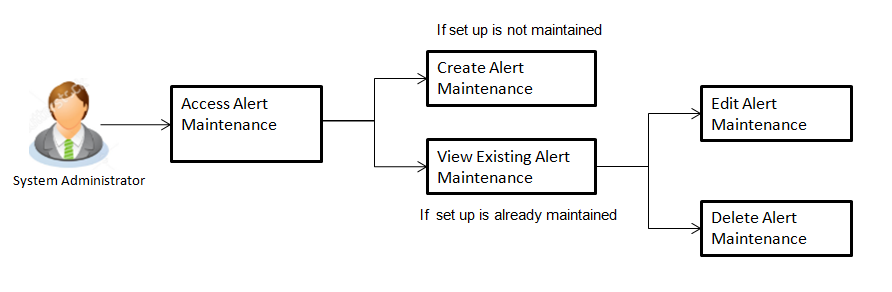
Workflow
Features Supported In Application
Alert maintenance available features available to system Administrator users in the application:
![]() How to reach here:
How to reach here:
Administration Dashboard > Alerts > Alert Maintenance
Using this option, system administrator can search and view the details of any alerts maintained based on the search parameters. If the search parameters are not specified, records of all the alerts maintained in the application are displayed (i.e. a blank search is allowed).
To view alerts:
|
Field Name |
Description |
|---|---|
|
Module Name |
Name of the module to which alert is maintained. The options can be:
|
|
Event Name |
The event activity associated with the alert based on the Module name selection. |
|
Search Results |
|
|
Event Name |
The event activity associated with the alert. |
|
Module Name |
Name of the module to which the event was linked. |
|
Alert Type |
The type of alert i.e. if the alert is a subscription based alert or is one that is sent by the bank by default. The options are:
|
|
Field Name |
Description |
|---|---|
|
Module Name |
Name of the module to which alert is maintained. The options can be:
|
|
Event Name |
The event activity associated with the alert based on the Module name selection. |
|
Alert Type |
The type of alert i.e. if the alert is a subscription based alert or is one that is sent by the bank by default (mandatory). The options are:
|
|
Message Settings |
|
|
Recipient Type |
The facility to select the category of recipients of the alert. The values can be:
|
|
Locale |
Language in which the message is defined. |
|
Alert Type |
The type of alert i.e. if the alert is a subscription based alert or is one that is sent by the bank by default. The options are:
|
|
Delivery Mode |
The delivery mode through which the alert is to be sent. The options are:
|
|
Subject |
The subject as specified in the template. |
|
Content |
The content of the template. |
|
Data Attribute |
The data attribute that is to be masked, in the communication. |
|
Attribute Mask |
The attribute mask, may be in the form of masking all but the last 4 digits of the account number. |
Alerts Maintenance- Create Using this option, the system administrator defines the alerts. User has to select the module-event combination for which the alert needs to be maintained. Further user has to select the recipients for whom the alerts need to be sent on an event.
To create an alert:
|
Field Name |
Description |
|---|---|
|
Create |
|
|
Module Name |
The unique name to be given to the module for which alert is to be created. The options are:
|
|
Event Name |
The event activity associated with the alert. |
|
Alert Type |
The type of alert i.e. if the alert is a subscription based alert or is one that is sent by the bank by default. The options are:
|
|
Message Settings Click the ‘add’ button to enable the following fields. Click on the drop down for Recipient type 1. (Repeat the following steps, for every new recipient you wish to add) |
|
|
Recipient Type |
The facility to select the category of recipients of the alert. The values can be:
|
|
Locale |
Language in which the message is defined. |
|
Alert Type |
The type of alert i.e. if the alert is a subscription based alert or is one that is sent by the bank by default. The options are:
|
|
Delivery Mode |
The delivery mode through which the alert is to be sent. The options are:
Click on one or more of the delivery mode to enable the following fields |
|
Subject |
The subject as specified in the template. |
|
Message |
The content of the template. Click to add one or more data attributes. |
|
Data Attribute |
The data attribute that is to be masked, in the communication. |
|
Attribute Mask |
The attribute mask, may be in the form of masking all but the last 4 digits of the account number. |
Using this option, system administrator can edit the details of selected alerts maintenance defined in the application.
To modify an alert:
Module Name, Event Name and Alert Type fields are read only, and cannot be edited.
Using this option, you can search and delete an existing alert. Note that mandatory alerts cannot be deleted.
To delete an alert:
FAQs
![]() What is a significance of Mandatory and Subscribe types of alerts?
What is a significance of Mandatory and Subscribe types of alerts?
![]() What is a reason for applying attribute masking?
What is a reason for applying attribute masking?
![]() Can I define the masking for data attribute available in subject?
Can I define the masking for data attribute available in subject?
![]() Can I add an attribute masks for more the one data attribute for a specific recipient and channel?
Can I add an attribute masks for more the one data attribute for a specific recipient and channel?
![]() Can I delete specific recipient added for an alert event in Alert Maintenance?
Can I delete specific recipient added for an alert event in Alert Maintenance?
![]() What happens to the in-transit transactions if I edit the alert maintenance for specific recipient?
What happens to the in-transit transactions if I edit the alert maintenance for specific recipient?