User group is a set of people/ users with similar interests and goals.
Using this option Bank Administrator can maintain the user groups of Bank administrator and of corporate users of same party ID. User groups maintained by administrators for Bank administrator users and corporate users are used while creating approval workflows and approval rules.
Also the user groups created for Bank Administrator type of user are used for mapping secured mail subjects. Each subject category can be linked to a group of bank administrator users. So that administrators will receive the mails only of the subjects mapped to the users.
Pre-Requisites
Workflow
Features Supported In Application
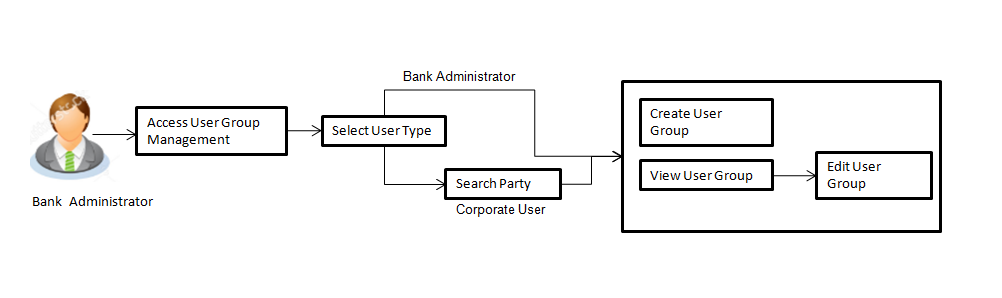
User Group Management allows Bank Administrator to:
![]() How to reach here:
How to reach here:
Administration Dashboard >Toggle menu > Others > User Group Management
Bank Administrator logs into the system and navigates to the User Group screen. On accessing the ‘User Group Management’ menu, bank administrator has to select the user type for whom the user groups are to be maintained.
User Group- Admin User:
Bank administrator user can search the user groups maintained for administrator users.
Bank Administrator can create user groups for the Administrator users. Administrator can create multiple user groups and one user can be part of multiple user groups, whereas creating a user group without any user is not allowed.
To create a user group:
Admin User Group -Create
|
Field Name |
Description |
|---|---|
|
Create |
|
|
Group Code |
User group code. |
|
Group Description |
Description provided to the user group. |
|
User Group |
|
|
User Name |
User name list to select and add a user to the user group. All the administrator users will be listed down |
|
User ID |
User IDs of each user selected from user list are displayed. |
Note: You can click ![]() to delete a record.
to delete a record.
User Groups maintained (if any) for administrator users are displayed on the screen after searching with valid input. User can opt to view the details of existing user groups or can create new user group using this screen.
|
Field Name |
Description |
|---|---|
|
Summary |
|
|
Group Code |
Code of the already maintained user group. |
|
Group Description |
Description of the already maintained user group. |
|
Users |
Number of users associated with each user group. |
|
Field Name |
Description |
|---|---|
|
View |
|
|
Group Code |
User Group code is displayed. |
|
Group Description |
User Group code description is displayed. |
|
User Name |
User name of the user who is part of the selected user group is displayed. |
|
User Id |
User ID of the user who is part of the user group is displayed. |
This function enables the bank administrator to edit the description of existing user groups. Bank Administrator can also add new users and remove existing users of the user group as part of this function. A check is performed on minimum and maximum number of users allowed as a part of user group while adding or removing the users from the user group.
To edit or update a user group:
|
Field Name |
Description |
|---|---|
|
Summary |
|
|
Group Code |
User Group description is displayed in editable form. |
|
Group Description |
User name of the user who is part of the user group. User name list to select and add a new user to the user group. |
|
Users |
Number of users available in each user group. (This field will be displayed only if there are existing user groups available under a party). |
Bank administrator logs into the system and navigates to the User Group Management screen.
System displays a screen to enter the party information (party ID or party name) and search party for which the user groups are to be maintained/ viewed.
User can enter the party ID (if known) or the party name with a minimum of 5 characters. System matches the input provided by the user with the party name records and displays the matching party records.
In case of a party search by party ID, it is an exact match and system displays the user groups maintained if any.
System displays a screen to enter the party information (party ID or party name) and search party for which the user groups are to be maintained/ viewed.
In case of a party search by name, system displays the matching party records. The records have parties listed with both Party ID and Party Name information. User can select the record by clicking on the Party ID from the list.
|
Field Name |
Description |
|---|---|
|
Search |
|
|
Party ID |
List of the Party IDs as per search input. |
|
Party Name |
List of the Party names of the party IDs as per search input. |
Bank administrator can create a new User Group for a specific Party ID by using this option. Only the users of party ID can be clubbed together in a User Group.
Administrator can create multiple user groups and one user can be part of multiple user groups, whereas creating a user group without any user is not allowed.
To create a user group:
Corporate User Group -Create
|
Field Name |
Description |
|---|---|
|
Create |
|
|
Party ID |
Party ID mapped for which user group to be created is displayed. |
|
Party Name |
Party name of Party ID for which user group to be created is displayed. |
|
Group Code |
To specify User Group code. |
|
Group Description |
To specify User Group description. |
|
User Name |
User name list to select and add a user to the user group. Users belonging to the same Party are listed. |
|
User ID |
User IDs of each user selected from user list are displayed. |
Note: You can click ![]() to delete a record.
to delete a record.
Once the logged in Bank administrator navigates to User Group Management screen, and searches the party ID. User groups maintained if any under the party are displayed on the screen. User can opt to view the details of existing user groups or can create new user group using this screen.
|
Field Name |
Description |
|---|---|
|
Summary |
|
|
Party ID |
Party ID of which user groups are to be viewed/ edited. |
|
Party Name |
Party name of Party ID of which user groups are to be viewed/ edited. |
|
Group Code |
User group code. (This field will be displayed only if there are existing user groups available under a party.) |
|
Group Description |
Description provided to the user group. (This field will be displayed only if there are existing user groups available under a party.) |
|
Users |
Number of users available in each user group. (This field will be displayed only if there are existing user groups available under a party.) |
Corporate User- View Group Details
On accessing ‘User Group Management’ menu option and searching the user groups of specific party, summarized view of all the user groups created (if any) for the Party is displayed on the screen. Further drill down is given on the each user group to view the details of the users who are the part of user group.
|
Field Name |
Description |
|---|---|
|
View |
|
|
Party ID |
Party ID of which user groups are to be viewed/ edited. |
|
Party Name |
Party name of Party ID of which user groups are to be viewed/ edited. |
|
Group Code |
User Group code is displayed. |
|
Group Description |
User Group description is displayed. |
|
User Name |
User name of the user who is part of the selected user group is displayed. |
|
User ID |
User ID of the user who is part of the user group is displayed. |
This function enables the Bank administrator to edit the description of existing user groups. Bank Administrator can also add new users and remove existing users of the user group as part of this function.
A check is performed on minimum and maximum number of users allowed as a part of user group while adding or removing the users from the user group.
To edit or update a user group:
|
Field Name |
Description |
|---|---|
|
Edit |
|
|
Party ID |
Party ID of which user groups are to be viewed/ edited. |
|
Party Name |
Party name of Party ID of which user groups are to be viewed/ edited. |
|
Group Code |
User Group code is displayed. |
|
Group Description |
User Group description is displayed in editable form. |
|
User Name |
User name of the user who is part of the user group. User name list to select and add a new user to the user group. |
|
User ID |
User ID of the user who is a part of the user group is displayed. |
FAQs
![]() Can user be the part of multiple user groups created under a party?
Can user be the part of multiple user groups created under a party?
![]() Can user groups created for Administrator user be used for multiple purposes?
Can user groups created for Administrator user be used for multiple purposes?
![]() Can I delete an existing user group?
Can I delete an existing user group?
![]() Can I add users of linked party ID while creating a user group for primary party?
Can I add users of linked party ID while creating a user group for primary party?