A ‘Payee’ is the final recipient of payment transactions. Application provides an option to a user to maintain the payees for payment transactions. The advantage of creating payee is, it saves the time and effort of re-keying payee details, every time a payment is to be made.
Once a Payee is created, funds transfer can be done by selecting the Payee name. Details of selected payee are auto populated on transaction screen. User needs to fill in payment details to initiate the transaction.
Payee Maintenance is provided for following payment transactions:
Payee Access Type:
User can specify payee access type while maintaining a payee. Payee access type decides if only creator of a payee or all users of a party can access a payee. Payee access type is categorized as ‘Private’ and ‘Public’.
Pre-Requisites
Features Supported In Application
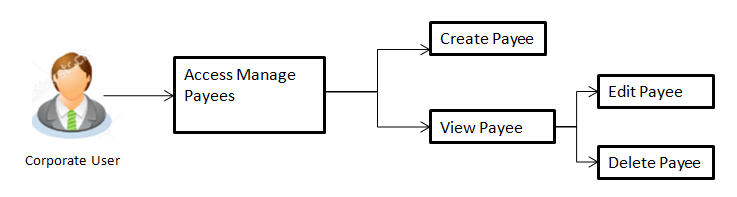
Functions available on Payees are as follows:
![]() How to reach here:
How to reach here:
Dashboard > Toggle menu > Payments > Setups > Manage Payees
Summarized view of all the Payees maintained by the logged in user, along with the public payees created by other users of the Party, are listed on Payee Summary screen. A separate section is provided on the screen to view the ‘Account’ payee and ‘Demand Draft’ payees. By default, all the payees maintained (created by logged in user and shared by other users of a party) under type ‘Accounts’ are listed on the screen.
A quick search is available on the screen, by specifying the payee name. Further drill down is provided for the payee to view the complete details of a payee.
To manage payees:
|
Field Name |
Description |
|---|---|
|
Payee - Bank Account Below fields appears for Account type of payees. |
|
|
Payee Name |
Name of the payee. |
|
Account Type |
Type of account associated with the payee. |
|
Account Details |
The details of account associated with the payee. |
|
Nickname |
Nickname of the payee. |
|
Created By |
Name of the user by whom the payee is been created. |
|
Access Type |
The access type for payee. The options are:
|
|
Payee - Demand Draft Below fields appears if the payee is holding a demand draft. |
|
|
Payee Name |
Name of the payee. |
|
Draft Type |
Type of draft . |
|
Draft Favouring |
Payee name of the draft. |
|
Created By |
Name of the user by whom the payee is been created. |
|
Access Type |
The access type for payee. The options are:
|
The details of the payee are displayed on clicking on payee name hyperlink.
|
Field Name |
Description |
|---|---|
|
Payee Details - Bank Account Below fields appears for Account type of payees. |
|
|
Payee Name |
Name of the payee for identification. |
|
Account Type |
Type of account associated with the payee. The type can be:
|
|
Account Number |
Account number of the payee. |
|
Account Name |
Name of the payee in the bank account. |
|
Pay Via |
Network for payment. Note: This field is displayed only for Domestic and International type account payee. |
|
Bank Details |
Address of the payee 's bank account. Note: This field is displayed only for Domestic and International type account payee. |
|
Nickname |
Nick name to identify the payment destination (account). |
|
Access Type |
The access type for payee. The options are:
|
|
Payee Details - Demand Draft Below fields appears for Draft type of payees. |
|
|
Payee Name |
Name of the payee for identification. |
|
Draft Type |
Type of draft. The options are:
|
|
Draft Favouring |
Payee name of the draft. |
|
Draft payable at Country |
Country name where the draft would be payable at. Note: This field is displayed if the International option is selected in Draft Type list. |
|
Draft payable at City |
City name where the draft would be payable at. |
|
Delivery Location |
Address where the draft is to be delivered. The options are:
|
|
This section appears if customer select My Address option in the Delivery Location field. |
|
|
Select Address |
The address at where the draft is to be delivered. |
|
This section appears if customer select Branch Near Me option in the Delivery Location field. |
|
|
City |
The customer can filter branches based on city. |
|
Branch Near Me |
The customer can select a branch at which the new card is to be delivered. The names of all the branches in the city selected in the previous field will be displayed. |
|
Branch Address |
The complete address of the branch selected will be displayed once the customer selects a branch. |
|
Access Type |
The access type for payee. The options are:
|
Application allows the user to edit the payees created by logged in user. As a part of edit payee functionality, user is allowed to change only the ‘Payee Access Type’. An option of editing a payee details is available on a drill down of a specific payee from payee summary screen.
![]() How to reach here:
How to reach here:
Dashboard > Toggle menu > Payments > Setups > Manage Payees > Click on Payee Name Hyperlink >Click Edit
|
Field Name |
Description |
|---|---|
|
Payee Details - Bank Account Below fields appears for Account type of payees. |
|
|
Payee Name |
Name of the payee for identification. |
|
Account Type |
Type of account associated with the payee. The type can be:
|
|
Account Number |
Account number of the payee. |
|
Account Name |
Name of the payee in the bank account. |
|
Pay Via |
Network for payment. Note: This field is displayed only for Domestic and International type account payee. |
|
Bank Details |
Address of the payee 's bank account. Note: This field is displayed only for Domestic and International type account payee. |
|
Access Type |
The access type for payee. The options are:
|
|
Payee Details - Demand Draft Below fields appears for Draft type of payees. |
|
|
Payee Name |
Name of the payee for identification. |
|
Draft Type |
Type of draft. The options are:
|
|
Draft Favouring |
Payee name of the draft. |
|
Draft payable at |
City name where the draft would be payable at. |
|
Delivery Location |
Address where the draft is to be delivered. The options are:
|
|
Access Type |
The access type for payee. The options are:
|