3 Checksum Support Operations
In this chapter, you will examine checksum support operations to verify that the data you end up with matches the original data.
Verify Read (VR) Workflow (Default)
During the archive process, the checksum is generated real-time by the Actor and stored in the database. This checksum is not verified until an initial read-back or Restore operation is performed.
You view checksum verifications and failures through the Control GUI Manage tab in the Archived Objects view. The Archived Objects view shows the Checksum column, indicating the status of the checksum for any particular object in the system. The status is identified by circles (empty, partially filled, or fully filled) and text.
Double-clicking on the resource opens the Object Properties dialog box showing verification or failure messages and checksum information.
The Checksum column displays the following different status values:
-
Not Verified (empty circle)
-
Verification has not been completed for this object.
-
The checksum has never been calculated because the object was archived in a software release before Oracle DIVArchive 6.4, or because it is a complex object.
-
The default checksum was used and the object has not been read-back for verification.
-
-
-
Partially Verified (half green and half empty circle)
-
For objects with multiple instances this status appears if both of the following statements are true:
-
Verification succeeded for at least one instance.
-
Verification did not succeed, or has not been performed, for at least one instance.
-
-
-
Verified (filled green circle)
-
Verification completed successfully.
-

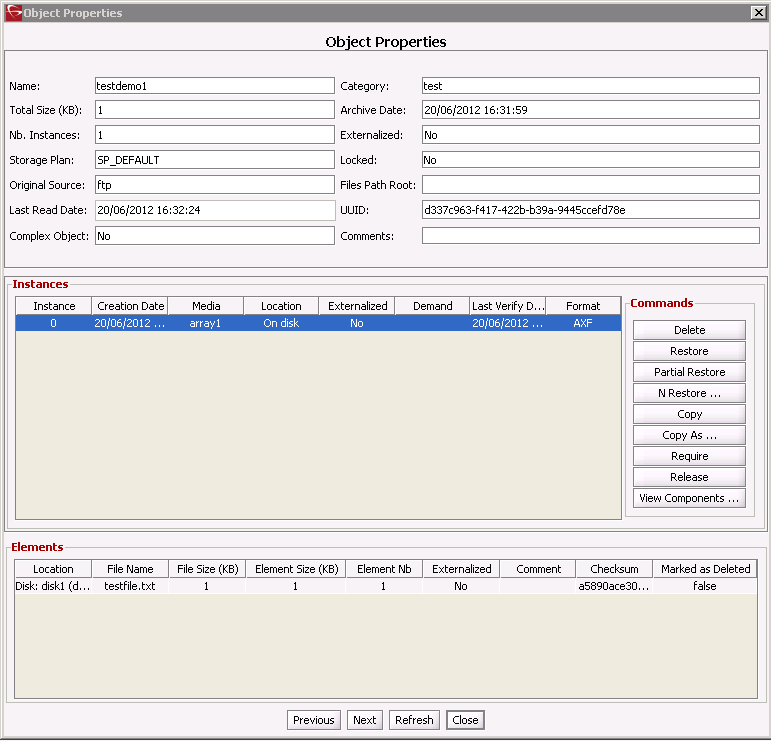
In the following figure, although the highlighted object has not been verified, a checksum for that object was saved in the database. The Last Verify Date is viewable in the center portion of the screen labeled Instances. The checksum entered into the database is viewable in the bottom portion of the screen labeled Elements.
Checksum Failure Recording
Checksum failure dates are recorded in the DIVArchive database, however they are not (currently) displayed in the Control GUI. Whenever there is a checksum failure for a particular instance, the timestamp is stored for the instance in the database's Instance table. If a checksum failure occurs for an instance, the corresponding object's checksum status will be updated.
An object has two instances and the current object checksum status is Fully Verified. If a checksum failure occurs for one of the instances, the timestamp is recorded and the object status will be updated to Partially Verified.
-
Instance A is on Tape-1 and verified.
-
A restore of Instance A is made, however the checksum verification fails.
-
The time of the failure is recorded in the DIVArchive database and the Checksum Status in the Control GUI is updated to Partially Verified.
-
This is because there is only one fully verified instance and one instance that failed verification.
-
The first instance of the object remains verified.
-
The following DIVAprotect daily metrics for checksum failures are available:
TAPE_CHECKSUM_FAILURE_COUNT_DAY-
Tape operations checksum failure count.
DISK_CHECKSUM_FAILURE_COUNT_DAY-
Disk operations checksum failure count.
SD_CHECKSUM_FAILURE_COUNT_DAY-
Source/Destination operations checksum failure count.
Verify Following Archive (VFA) Workflow
Verify Following Archive (VFA) re-transfers the data from the source device after an initial archive operation and compares it against the calculated AC. Only after this full second transfer is completed, and the checksums compared, is the archive operation considered successful.
Note:
This verification mode is not supported with GC-enabled sources or complex objects.VFA reassures that there was no corruption introduced by the source gateway or network path to DIVArchive to the best level possible without a GC being passed. Generally, this verification will trap random errors introduced during the archive transfer into DIVArchive. However it will not discover more common corruptions (for example, header corruptions) introduced by a bug in the video server gateway. In this case the checksums will match, and the header corruption will not be detected.
Note:
The impact on the video server (or gateway) performance and overall network bandwidth can be significant in this mode of operation.Click the Home tab in the Control GUI, and then click the Manager icon to display the current Manager requests. Alternatively, you can click the Manage tab and then click the Requests icon to display the same view.
In either location, double-clicking the desired object opens the Request Properties dialog box, where you view the verification status of the checksum for that object.
These are the different verification status IDs you will see in the Events List display, and the overall VFA workflow for a successfully verified checksum:
-
ID 1143: The system begins the archive process. -
ID 1144: The checksum is read from the source file. -
ID 1145: The VFA process starts. -
ID 1147: The checksum is compared to the original and correctly matches the original (fromID 1143) in the database. -
ID 1148: The read-back process begins. -
ID 1150: The checksum is compared to the original and correctly matches the original (fromID 1143) in the database. -
ID 1152: The verification succeeded because the checksum returned by the Actor matches the checksum value saved in the database. -
ID 1153: The request status is changed to Completed.
Verify Write (VW) Workflow
Verify Write (VW) reads back data that was just written to a storage medium (for example, a disk or tape) inside DIVArchive, and performs checksum verification. A real-time checksum is calculated using the read-back data, which is then discarded. The write operation is only considered successful after the full read operation is complete and the checksums are compared and verified to be identical.
The purpose of VW is to perform a read-after-write operation to compare the original checksum for the object elements with those calculated during the read-back operation. This guarantees no corruption was introduced because of disk, tape, or file system errors. VW is not required on cache disks since the subsequent read operation will trap any potential issues.
Note:
The impact on DIVArchive disk bandwidth, internal network bandwidth, and (most importantly) on data tape operations are significant in this mode of operation.Failed checksum verifications are indicated with red highlight in the Events List area in the Request Properties dialog box.
These are the different verification status IDs you will see in the Events List display, and the overall VW workflow for a successfully verified checksum:
-
ID 1146: Displays the original checksum. -
ID 1148: DIVArchive writes the file to the tape and a read-back is initiated. -
ID 1150: The transfer is verified because the checksums match. -
ID 1151: The object is saved. -
ID 1152: This notification states that the instance has been verified using the checksum.
Verify Following Restore (VFR) Workflow
Verify Following Restore (VFR) re-transfers the data from the destination device after restoring, and then performs checksum verification. An on-the-fly checksum is calculated using the read-back data, which is then discarded. Only after the full second transfer is completed and the checksums compared is the archive operation considered successful. This verification mode is not supported for complex objects.
Note:
This verification mode is not supported for complex objects.After GC passes verification, VFR provides confidence that there was no corruption introduced by the destination gateway or network path from DIVArchive. This mechanism guarantees a full path restore verification since the restored item is fully transferred back to DIVArchive to calculate and compare a checksum value.
It is possible that some sources will not pass this verification check because they modify the restored files. For example, some video servers (for example, Leitch servers) will modify some headers upon restore. These sources should not be configured with VFR. The Oracle DIVArchive Supported Environments Guide document includes information on the compatibility of this feature with each specific Source/Destination device type.
Note:
The impact on the video server or gateway performance, and overall bandwidth, can be significant in this mode of operation.These are the different verification status IDs you viewable in the Events List display, and the overall VFR workflow for a successfully verified checksum:
-
ID 1120: The VFR process is started and a second transfer is initiated -
ID 1121: The original checksum -
ID 1122: The transfer is verified because the checksums match -
ID 1123: VFR was completed successfully -
ID 1124: The request status is changed to Completed -
ID 1125: The instance has been verified (following restore) using the checksum
Verify Tape Request Workflow
Click the Tapes icon on the Control GUI's Home tab to display the Tapes screen. Double-clicking on one of the tapes, or on a Tape Group, results in the Tape Properties dialog box being displayed. In the Tape Properties dialog box there are columns for both the Checksum Value and the Verification Status for each component on the tape.
Use the following procedure to verify a tape:
-
Right-click the tape name that requires verification in the list shown on the Tapes screen.
-
Select the Verify Tape menu item from the resulting context menu - the Verify Tape dialog box is displayed
-
Select the request's Priority in the Verify Tapes dialog box.
-
Click Send to initialize the verification process.
During the verification process, the system will read-back through every object on the tape one at a time and verify all of the checksum values. If the checksum verification fails for a particular object, the verification process continues to the next object. The process continues running until the checksums of all objects have been checked (regardless of whether they failed).
Failed object checksum verification errors are displayed for that tape and indicated by red highlight in the Request Properties area on either the Manager screen in the Home tab, or the Requests screen in the Manage tab. The error will show the reason for the failure (checksums do not match), and the component that failed the verification.
If the verification of an object on the tape fails, the Logged Requests screen shows a status of Partially Aborted in the Status column. This indicates that the tape verification process examined everything on the tape, but there was at least one object that could not be verified. The checksum verification status is also displayed in the Tape Properties dialog box.
See Appendix A for Oracle DIVArchive options and licensing information.
Tracking Checksum Errors in the DIVAprotect Journal
Checksum error events (generated by failed checksum verification) are displayed in the DIVAprotect Journal and indicated by red highlighting. There are three checksum events (see the following first table) that could be displayed, each having up to sixteen fields (see the following second table).
Note:
Refer to the Oracle DIVArchive DIVAprotect User's Guide for detailed information.The following table describes the checksum events:
| Event ID | Event Name | Event Description | Severity |
|---|---|---|---|
| 180 | CHECKSUM_ERROR_TAPE |
Checksum verification error while reading from tape. | 2 |
| 181 | CHECKSUM_ERROR_DISK |
Checksum verification error while reading from disk. | 2 |
| 182 | CHECKSUM_ERROR_SD |
Checksum verification error while reading from a Source/Destination. | 2 |
The following table describes the fields for the associated events (X indicates support):
CHECKSUM_ERROR_TAPE |
CHECKSUM_ERROR_DISK |
CHECKSUM_ERROR_SD |
|
|---|---|---|---|
| Event Type | X | X | X |
| Tape Type | X | ||
| Tape Barcode | X | ||
| Drive Type | X | ||
| Drive Name | X | ||
| Disk Name | X | ||
| Drive Serial Number | X | ||
| Library Serial Number | X | ||
| Source/Destination Name | X | ||
| Actor Name | X | X | X |
| Object NameFoot 1 | X | X | X |
| Object CategoryFootref 1 | X | X | X |
| Object InstancesFootref 1 | YFoot 2 | YFootref 2 | YFootref 2 |
| Media Name | X | X | |
| Request ID | X | X | X |
| Event End Time | X | X | X |
Footnote 1 Object information is not provided for Repack requests.
Footnote 2 The Instance ID (number) is not known for all conditions. The ID is assigned, for a new instance, only after the final write to the destination media.
Export and Import Requests
Checksum is supported in the system export functions. In the XML file created, the checksum Value (csValue), Source (csSource) and Type (csType) are included. See Appendix A for Oracle DIVArchive options and licensing information.
Note:
The checksums are not verified during importing of an exported XML file. A subsequent Read operation must be performed to achieve checksum verification.Genuine Checksum using a Checksum File
The TEXT Genuine Checksum mode allows DIVArchive to archive all files and subfolders in a specified folder while comparing their checksum values against known values stored in an external checksum file.
User Guidelines
Files that do not have a matching checksum in the external checksum file will be archived with DIVArchive's calculated checksum and the external checksum file will not be archived.
This implementation is customer-specific, supports only MD5, and checksums must be in a .md5 text file. Unicode is not supported.
External Checksum File Format
The external checksum file for the TEXT Genuine Checksum mode follows the file format of standardized MD5 Hash File Generators (for example, md5sum). The format of each line in the external file is as follows:
<32-character MD5 hash><2-character whitespace>[relative path/file name]
The relative path/file name must be a path relative to the folder that is being archived. Consider the following sample file tree:
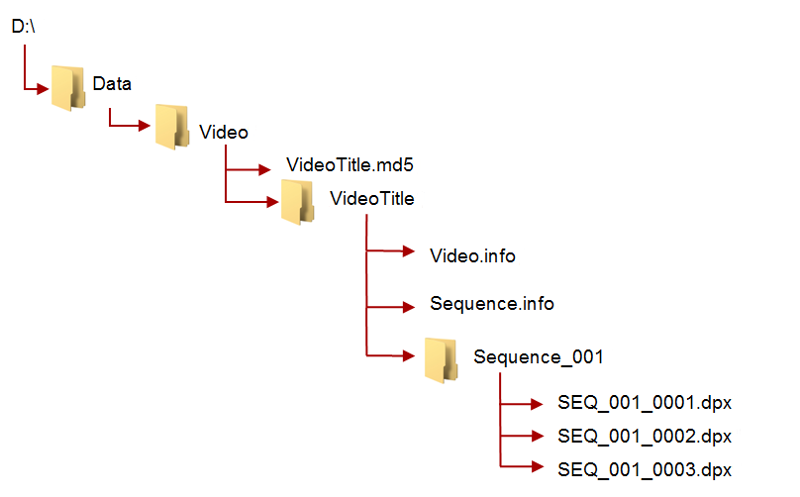
In the previous figure the external checksum file is D:\Data\Video\VideoTitle.md5. The contents to be archived will be every file and folder within D:\Data\Video\VideoTitle. The external checksum file will contain the MD5 hash and the path (relative to D:\Data\Video\VideoTitle) for each file formatted similar to the following:
9400bbcc4b97a40e2679ff1cc6941052     Video.info
237a702a03927458e1a6fc981466adf6     Sequence.info
ff58404ce3a01ca44273c8a619d4284d     Sequence_001/SEQ_001_0001.dpx
a1f1ca44204ca619d4a41273c80bbc47     Sequence_001/SEQ_001_0002.dpx
Requirements
-
A checksum file must be present in the folder specified by the Root File Path.
-
Checksum files must end with a
.md5file extension. -
The folder name is associated with the checksum file's file name (excluding the md5 extension) which contains all the files that will be archived (this folder must exist).
For example, if the checksum file is
D:\Data\Video\VideoTitle.md5then the corresponding folder containing the files to be archived isD:\Data\Video\VideoTitle. -
The checksum file must be present in the folder that is the parent to the folder specified by the Root File Path.
-
For a file to be archived with the Genuine Checksum value, the file must be referenced with a corresponding checksum within the checksum file.
-
Files can be archived without a corresponding checksum within the checksum file. In this case, no checksum comparison will be performed.
DIVArchive Configuration Utility Configuration
Use the following procedure to configure Genuine Checksum TEXT mode using the Configuration Utility:
-
Create a new Source/Destination entry with the Source Type set to either DISK or FTP_STANDARD.
-
Specify an appropriate Root Path - this path, along with the input files, specified during the Archive request will be used to determine the location of the checksum file (see Selecting the Root File Path for further details).
Examples:
-
If the Source Type is DISK, the Root Path can be set to
D:\Data. -
If the Source Type is FTP_STANDARD, the Root Path can be set to
/Data.
-
-
Perform the following actions in the DIVArchive Configuration Utility:
-
Set the External Checksum Source to YES.
-
Set the Checksum Type to MD5.
-
Set the GC Mode to TEXT.
-
Click the OK button.
-
Click the Tools menu, then click the Notify Manager menu item to notify the Manager of the new (or changed) configuration.
-
Selecting the Root File Path
The Root File Path must point to the folder containing the files to be archived. Therefore, the correct folder and file paths in the Source/Destination and Archive Request form must be set so that the checksum file can be located one folder level above. For example, if the checksum file is located in D:\Data\Video\NewTitle.md5 (or /Data/Video/NewTitle.md5 for FTP_STANDARD type), the appropriate file and folder paths can be set as follows:
This table describes Root File Paths for disks.
| Source/Destination (Root Path) | Archive Request (File Path Root) | Archive Requests (Files) |
|---|---|---|
D:\ |
Data\Video\NewTitle |
* |
D:\Data |
Video\NewTitle |
* |
D:\ |
Data\ |
Video\NewTitle\ |
D:\ |
Data\Video\NewTitle\ |
This table describes Root File Paths for FTP.
| Source/Destination (Root Path) | Archive Request (File Path Root) | Archive Request (Files) |
|---|---|---|
/ |
Data/Video/NewTitle |
* |
/Data |
Video/NewTitle |
* |
/ |
Data/ |
Video/NewTitle/ |
/ |
Data/Video/NewTitle/ |
Limitations
-
Long path names are supported on both Windows and Linux.Absolute path names are supported on both Windows and Linux to a maximum of 4000 characters.Relative path names are limited to 256 characters on Windows systems (only).
-
Only ASCII, non-UTF-8 encoded checksum files are supported.
-
The format of the checksum file is that each line begins with an MD5 checksum, followed by 2 spaces, and then the file path to the referenced file. No other formats are recognized.
Archive Instructions
Use the following procedure to perform an Archive operation:
-
In the DIVArchive Control GUI, navigate to the Manager area.
-
Click Action, and then click Archive.
-
In the Source list, select the Source/Destination entry that was created earlier during the configuration stage.
-
Set the desired File Path Root (see Selecting the Root File Path for details).
-
In the Files field, enter in the path to the location of the files to be archived (see Selecting the Root File Path for details) and append with a wildcard symbol (an asterisk - *). Remember that the location of the checksum file is one folder above the files to be archived.
-
Enter
-rin the Options field. -
Fill in the rest of the entry fields in the request form and click Send.
DIVArchive API Support for Checksum Verification
Parameters for the getFilesAndFolders API call support checksum retrieval. In the following examples, only the updates associated with checksum retrieval are described. Refer to the Oracle DIVArchive C++ API Reference Manual in the DIVArchive Additional Features Documentation library for detailed information.
Functionality includes the following:
-
Folders do not contain a checksum.
-
Several checksums per file are provided (if available) including MD5, SHA1, and so on.
-
The Genuine Checksum will be identified.
Synopsis
class DIVA_FILE_FOLDER_INFO {
public:
DIVA_STRING                fileOrFolderName ;
bool                       isDirectory ;
long                       sizeBytes;
int                        fileId ;
int                        totalNumFilesFolders ;
int                        totalSizeFilesFolders ;
vector<DIVA_CHECKSUM_INFO> pChecksumInfoList ;
};
pChecksumInfoList-
This is the pointer to a list of checksums for a file. Directories will not contain checksums. It is also possible that some files in the archive will not contain checksum information. See the following description.
class DIVA_CHECKSUM_INFO {
public:
DIVA_STRING         checksumType ;
DIVA_STRING         checksumValue ;
Bool                isGenuine ;
};
checksumType-
The type of checksum, such as MD5, SHA1, and so on.
checksumValue-
The value of the checksum in hexadecimal format.
isGenuine-
True if this checksum was provided at the time of the archive and verified as Genuine, otherwise this is false.
Oracle DIVAnet Checksum Workflows
Oracle DIVAnet releases that coincide with DIVArchive 7.3.0 and earlier releases are considered Legacy DIVAnet releases. They are also referred to as DIVAnet 1.0 and the Access Gateway. See Appendix A for Oracle DIVArchive options and licensing information.
DIVAnet 2.1 is a new release for compatibility with DIVArchive 7.6 Linux-based installations. DIVAnet 2.1 also runs on Windows-based systems, however, it is not backward compatible to releases before DIVArchive 7.3.1. You must use either DIVAnet 2.0 or Legacy DIVAnet (Release 1.0) when running DIVArchive releases earlier than DIVArchive 7.3.1.
The Legacy Oracle DIVAnet (Release 1.0) is still available for connecting DIVArchive systems with different software release levels, and releases before DIVArchive 7.3.1.
If you are operating a DIVArchive release earlier than 7.3.1, refer to the DIVAnet Installation, Configuration, and Operations Guide in the Oracle DIVAnet 2.0 Documentation library, or the appropriate Legacy DIVAnet documentation in the Oracle DIVArchive Legacy library (for releases 6.5 and 7.2).
The DIVArchive 7.6 API has the option to retrieve checksum values from the stored objects using the getFilesAndFolders call.
Since DIVAnet does not store the checksum values in the DIVAnet database, it must retrieve values from the corresponding DIVArchive system containing the object. Described below are three DIVAnet scenarios suitable for different customer configurations.
-
DIVAnet will always retrieve checksum values from the local DIVArchive system (primary processor).
Configuration
This scenario uses the default configuration
Expected Functionality
Always sending the request to the primary DIVArchive system.
Failure Scenario
If the local DIVArchive system does not contain the specified object, the process fails and an error will be returned.
-
DIVAnet will select the DIVArchive system based on the location of the object specified in the request parameters (resource-based processor).
Configuration
-
The following line must be placed in the
router.xmlfile:<message class=".api.GetFilesAndFoldersMessage" messageProcessorClass=".ResourceBasedRoutingMessagesProcessor" Object="objectName,objectCategory"/>
-
The following line must be added to the
uniqueness-config.xmlfile in the<siteIdProcessingConfig>section:<siteIdProcessor messageClass=".api.FilesAndFoldersMessage" siteId="siteName"/>
Expected Functionality
-
Checks which DIVArchive system has the object stored and sends the request to that system. If the object is present on both the primary and secondary DIVArchive sites, the request will be sent to the primary DIVArchive site.
-
The DIVArchive site selected by DIVAnet will be returned in the siteName field.
Failure Scenarios
-
If the DIVArchive siteName is incorrect, an error will be returned.
-
If the selected DIVArchive system does not contain the specified object, an error will be returned.
-
Example:
If the SelectiveRoutingMessagesProcessor is used for a getFilesAndFolders request, the message will be sent to the DIVArchive system specified in the options parameter of the getFilesAndFolders request. When specifying this parameter, DIVArchive's siteName from the Access Gateway Configuration File (AccessGateway.conf) will be used.
The AccessGateway.conf file contains the following DIVArchive Manager configurations:
<managerConnections>0
  <address siteName="diva1_local" host="127.0.0.1" port="9007" />
  <address siteName="diva2_remote" host="172.16.4.218" port="9008" />
</managerConnections>
-
To send a
getFilesAndFoldersrequest to a local DIVArchive system (ip:127.0.0.1, port:9007),diva1_localshould be the value for the options parameter. -
To send a
getFilesAndFoldersrequest to a remote DIVArchive system (ip:172.16.4.218, port:9008),diva2_remoteshould be the value for the options parameter.
Genuine Checksum through AXF Transfer
The AXF Genuine Checksum Mode allows DIVArchive to archive all files and subfolders in a specified AXF file, while comparing their checksum values against known values stored in the AXF file. This type of workflow is typically combined with a Restore request with the -axf keyword in the Request Options. The requirements to perform this type of checksum verification are as follows:
-
The AXF containing the files to be archived must contain checksum information for each file.
-
The AXF must contain checksums of the expected type (specified in the configuration).
DIVArchive Configuration Utility Settings
Use the following procedure to configure the DIVArchive settings in the Configuration Utility for using GC in AXF transfers:
-
Create a new Source/Destination entry with the Source Type set to either DISK, FTP_STANDARD, or EXPEDAT as appropriate.
If required specify an appropriate Root Path - this path along with the input files specified during the Archive request, will be used in determining the location of the checksum file.
Examples:
-
If the Source Type is DISK, the Root Path can be set to
D:\root. -
If the Source Type is FTP_STANDARD, the Root Path can be set to
/root.
-
-
Set the External Checksum Source to YES.
-
Set the Checksum Type to the expected checksum type (for example MD5).
-
Set the GC Mode to AXF.
-
Click the OK button.
-
Click the Tools menu, and then Notify Manager to notify the Manager of the new (or changed) configuration.
Limitations
-
This workflow only works with AXF requests generated by DIVArchive.
-
Verify Following Restore (VFR) is not compatible with the -axf option.
-
VFR was designed to read back the restored content from a video server to verify it has not been corrupted. Using the -axf option does not create a real restore, rather an object export in an AXF wrapper. These options are mutually exclusive and must not be part of the same workflow.
-
Archive Instructions
Use the following procedure to perform an Archive operation:
-
In the DIVArchive Manager, click Action, and then Archive.
-
In the Source list, select the Source/Destination entry that was created in the configuration stage.
-
Set the desired File Path Root.
-
Enter the path to the location of the AXF file in the Files field. The extension of this file must be
.axf. -
Fill in the remaining entries in the request form and then click Send.
Genuine Checksum through an Archive Request
The Genuine Checksum (GC) may be passed as part of the Archive Request API command. This may be used with a C++, Java, or Oracle DIVA Enterprise Connect. To use this feature, include the GC Checksum Value for each file in the request and set the option in the Options field. The requirements to perform this type of checksum verification are as follows:
-
The
-gcinfilelistoption must be specified either in the Archive request or the source (in the Manager configuration). This parameter must not be used with Source/Destinations that have Genuine Checksum enabled (read from a file). -
The GC Type must match the configured default checksum type specified in the DIVArchive configuration.
File Names List Formatting
The GC Value is included as part of the file list within the Archive request using the fileNamesList parameter. A colon separates the file name and checksum fields as shown in the following example:
Note:
The example presented uses Oracle DIVA Enterprise Connect. Other APIs will have different parameter formatting (not XML). See the Oracle DIVA Enterprise Connect documentation for more information.<archiveObject> <sessionCode>test</sessionCode> <objectName>OBJ1</objectName> <objectCategory>CAT</objectCategory> <source>localftp</source> <mediaName>array1</mediaName> <filesPathRoot>movies/subdir</filesPathRoot> <fileNamesList>test1.txt:a6f62b73f5a9bf380d32f062f2d71cbc</fileNamesList> <fileNamesList>test2.txt:96bf41e4600666ff69fc908575c0319c</fileNamesList> <priorityLevel>50</priorityLevel> <comments>test</comments> <archiveOptions>-gcinfilelist MD5</archiveOptions> </archiveObject>
Archive Request Option
You use the -gcinfilelist [type] parameter in the Archive request. The type is the same as the type specified by the Manager: Default Checksum Type in the DIVArchive configuration (this is MD5 by default).
The -gcinfilelist keyword specifies that Genuine Checksum (GC) values are included in the File Names list. The value of gcType must match the Manager: Default Checksum Type as specified in the DIVArchive configuration (this is MD5 by default). The GC values are then used to verify the transfer from the source.
Limitations
-
The checksum data must be formatted as
file_name:123456789abcdef. No spaces are allowed after the file name. -
Wildcards for file names are not allowed. If a wildcard is provided in a file name and a Genuine Checksum is passed, the request will be rejected.
-
A maximum of one thousand files can be archived with this feature.
-
This feature only works with non-complex object archives.
-
Empty checksums (a colon with no values or just a space) are not allowed and result in an Invalid Checksum error.
-
If a GC error occurs during the archive, error text in the
getRequestInfo/getFinishedListcall indicates that a GC error has occurred. -
If the archive is transmitted on a Source/Destination where the GC has been configured, the GC functionality of the Source/Destination will override the GC in the request.
-
This option may be specified in the Source/Destination options of a Source/Destination (similar to most other options in the DIVArchive Manager).