5 Direct ISIS AM Communicator Workflows
The following figures are examples of standard Direct ISIS AMC workflows for various requests (Archive, Restore, and Partial File Restore), followed by a description of the sequence of events for each request.
All Delete commands are the same as in the Legacy AMC Delete Workflow described in Legacy AM Communicator Delete Workflow.
This chapter includes the following information:
ISIS AM Communicator Archive Workflow
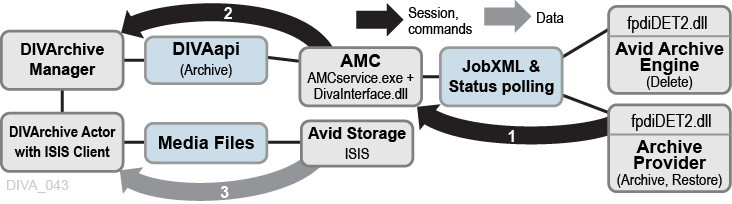
The general ISIS Archive workflow is as follows:
-
The Media Services Application submits a JobXML to the Archive service.
-
The Archive Service loads the
fpdiDET2.dllandDET2calls provided. -
The
fpdiDET2uses the Avid Archive SDK for this purpose. -
The
fpdiDET2connects to AMC, and then submits the JobXML.
-
-
AMC receives the command, and then receives the JobXML from
fpdiDET2. -
The JobXML is parsed and a list of all files, and their details, is constructed.
-
AMC confirms whether the clip (or sequence of clips) is part of any existing object, determines if deletion is required (based on the configuration), and then sends the Archive request to the Manager.
-
The Manager processes the requests, and then forwards all necessary information to the Actor (using the ISIS Client).
-
The Actor then archives the objects directly from the ISIS server.
ISIS AM Communicator Restore and Partial File Restore Workflow
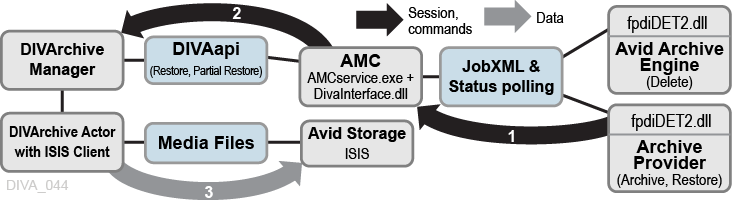
The general ISIS Restore workflow is as follows:
-
The Media Services Application submits a JobXML to the Restore service.
-
The Restore service loads the
fpdiDET2.dllandDET2calls provided. -
The
fpdiDET2connects to AMC, and then submits the JobXML.
-
-
AMC receives the command, and then receives the JobXML from
fpdiDET2. -
The JobXML and
fpdiDET2provide AMC with the file path and MOB ID to construct the Manager request. -
AMC searches all categories, identifies a list of objects to Restore, and then sends the Restore request to the Manager.
-
The Manager notifies the Actor of the request, and then the Actor proceeds to restore the objects directly to the ISIS server.
Configuring AM Communicator for Direct ISIS Connectivity
Caution:
Never change any category parameters, for example,DIVA_DEFAULT_CATEGORY when the system has been used previously. This will affect all Restore operations.The default configuration file named amc.conf.ini is delivered in both 1.x and 2.x packages with specific parameters for Legacy and ISIS respectively. You must configure the file with the appropriate parameters. If an upgrade is being performed from a previous release, you can copy amc.conf, and then add any new parameters for the release to the new file.
Installing the ISIS Client
You must install the newest ISIS client on the Actor computer that interfaces with the ISIS server. Execute the ISIS client installation file, and install the program with the default settings.
If the ISIS server is on the same subnet as the Actor where the ISIS client is installed, the ISIS client will automatically detect the server. You right-click the server name in the top Systems panel, and select Connect from the resulting context menu to connect to the server.
If the ISIS server is on a different subnet than the Actor computer where the ISIS client is installed, you use the following procedure to add the server to the ISIS client interface:
-
Open the ISIS client and click the Add Server icon in the icon bar (it looks like a globe). The Remote Hosts dialog box appears.
-
Enter the IP address of the remote ISIS server in the field and click + to add the host name to the Host panel.
-
Confirm that the server has connectivity, and has been added, by clicking the Network icon on the icon bar (the icon looks like two computers connected together).
A window is displayed showing the added server on the network. Confirm that the Enabled check box is selected to use the server.
-
You right-click the server name in the top Systems panel, and select Connect from the resulting context menu to connect to the server.
Configuring the AM Communicator Source/Destination in DIVArchive
To enable archive and restore workflows, you must configure dedicated FTP-like Source/Destinations with the Source Type AVID_AMC in DIVArchive. You perform this task in the Sources and Destinations panel in the Configuration Utility.
You use the following specific parameters when you add a Source/Destination for use with Legacy AM Communicator. You set the other parameters as you normally would for your environment and operations.
- Source Name
-
This parameter identifies the AMC Source/Destination name. The name must either match the value of the
DIVA_SRCDSTparameter from the AMC configuration, or thepartitionparameter value from the Archive Profile in Avid (depending on configuration). - IP Address
-
This parameter identifies the IP address of the AMC FTP interface. The value must be consistent with the
FTP_IPparameter value from the AMC configuration. - Source Type
-
This parameter identifies the Source Type and must be set to AVID_AMC for Legacy AM Communicator operations.
- Connect Options
-
The AMC FTP interface port, login, user name and data socket buffer size (in kilobytes) must match the values of
FTP_PORT,FTP_LOGIN,FTP_PASSWORD, andAM_BUFFER_SIZEfrom the AMC configuration.An example entry in this field might be
-login amc -pass diva -port 6121.AMC supports Passive Mode FTP. To switch to Passive Mode FTP add the
-PASVoption to the string as follows:-login amc -pass diva -port 6121 -PASV
You use the following specific parameters when you add a Source/Destination for use with Direct ISIS AM Communicator.
You must keep the Source/Destination Root Path value empty for Direct ISIS. There is only one Source/Destination type that is AVID_DIRECT for all Actors. Multiple Actors do not require METASOURCE.
All Actors with an ISIS Client and the AVID_DIRECT Source/Destination must be in a single production system so that other (non-ISIS) Actors are not used with this Source/Destination.
You must set the other parameters as you normally would for your environment and operations.
- Source Name
-
This parameter identifies the AMC Source/Destination name. The name must either match the value of the
DIVA_SRCDSTparameter from the AMC configuration, or thepartitionparameter value from the Archive Profile in Avid (depending on configuration). - IP Address
-
This parameter field is left empty for Direct ISIS AM Communicator operations. The IP address does not have any significance for ISIS configuration. An IP address is not required in the configuration because the ISIS Source/Destination acts like a CIFS Source/Destination. The Actor uses the
-login {user_name} -pass {password}options for authentication to access the ISIS Workspace Paths for reading and writing files in the file list.For example:
\\rd-avid-isis5k\raw\avid mediafiles\mxf\rd-avid-mc.1\justinseq1_audi5384fd47.1.mxf
- Source Type
-
This parameter identifies the Source Type and must be set to AVID_DIRECT for Direct ISIS AM Communicator operations.
- Connect Options
-
The Connect Options field must include the login and password for the Source/Destination ISIS server.
An example entry in this field might be
-login amcdirect -pass is-admin.
The amc.conf configuration file must be configured with all required parameters. Important parameters for Direct ISIS configuration include the following:
-
AM_MAX_CONNECTIONS- the default is 100. -
DIVA_SRCDEST- this is a type of AVID_DIRECT. -
DIVA_DEFAULT_CATEGORY
You set all other parameters the same as a Legacy configuration.
Note:
TheAM_TIMEOUT parameter is no longer used for status because the status is no monitored by AMC. The AM_TIMEOUT parameter will continue to monitor requests until they are canceled or terminated.See AM Communicator Default Configuration File for the default, delivered amc.conf file.
Configuring the Avid Archive Manager
The Push, Pull, and Remove requests are initiated, and processed by, three separate Avid services. The services normally reside on different computers. In a typical configuration, Archive and Restore services are installed on the Archive Provider server, and the Archive Engine server handles Remove services.
The DET2 DLL must be installed on the servers where the corresponding Avid services reside to enable Archive, Restore, Partial File Restore, and Delete functionality.
The following procedure is identical for all Avid servers:
-
Copy the
fpdiDET2.dll, and all other files, from the$AMC_INSTALLATION/fpdiDET2folder to$DLL_HOMEfolder on the target Avid server. Oracle recommends you use the defaultC:\DET2\fpdiDET2path. -
If the selected
$DLL_HOMEfolder is different from the recommended default path, you must edit theam_regkey.regfile'sVendorFolder Key Valueso it matches the$DLL_HOMEvalue. -
Merge the
am_regkey.regfile into the Windows Registry. -
Change the
AMCparameter value infpdiDET2.xmlto define the correct AM Communicator network address using the format{IP}:{Port}.IP-
This parameter is the IP address of the AM Communicator Listener. This must be consistent with the value of the
AM_IPparameter from the AMC configuration file. Port-
This parameter is the port number for the AM Communicator Listener. This must match the value of the
AM_PORTparameter from the AMC configuration file.
-
If required, set the optional
SOCKET_BUFFER_SIZEparameter infpdiDET2.xmlto enable TCP/IP Scaling.This parameter value specifies the socket receive and send buffer sizes in kilobytes. The value must match the value of the
AM_SOCKET_BUFFER_SIZEparameter from the AMC configuration.Leave this parameter set to the default value if TCP/IP Scaling is not configured for your system.
-
The Archive and Restore Provider services must both be restarted for these changes to take effect. Oracle also recommends restarting the Avid Archive Engine server.
You must define both the Archive and Restore profiles using the Avid Interplay Media Services and Transfer Status utility to submit Archive, Restore, or Partial File Restore requests to the AM Communicator.
The partition parameter value defines either the destination tape group or disk array name, or the Source/Destination Name in DIVArchive. Creation and use of multiple Archive profiles enables archiving to different tape groups, disk arrays, or both.
Using the partition parameter as the Source/Destination Name enables the creation of Storage Plans based on the Source/Destination in DIVArchive. You can also use the Storage Plan as media.
Changing or adding Archive profiles does not require AMC Service reconfiguration or restarting.
If you do not specify the partition parameter value, or you submit a request with no profile selected, AMC uses the tape group, or disk array, and Source/Destination Names from its configuration file.
Note:
All other parameters in the Archive and Restore profiles depend on your specific requirements and are left to your discretion.You can configure Avid Interplay 1.4 and later to store AAF (Advanced Authoring Format) Metadata with the media files. This configuration enables duplicate media files in a single archive.
You use the following procedure to enable these options:
-
Open the Avid Interplay Administrator application.
-
Connect to the
AvidAMdatabase by clicking the name in the navigation tree on the left side of the screen. -
Click the Asset Tracking/Archive Settings link.
-
You select the value for the options in the Archive and Restore Settings section of the screen.
Enabling the Allow duplicate media file(s) option consumes more storage space in DIVArchive, but generally decreases the time required for archived object restoration.
In Direct ISIS, metadata files (
.AAF) are not archived as part of the objects like they are in Legacy AMC. Therefore, Oracle highly recommends setting the Allow Metadata Archive parameter to No. -
Click Apply Changes to save your changes.
You can configure Avid Interplay 1.6 and later to enable Best Effort Restore. When the Best Effort Restore option is enabled, AMC attempts to restore as many media files as it can, and reports an error only if cannot restore any files at all.
Caution:
It is recommended to disable Best Effort Restore because the Avid Interplay Media Services, and Transfer Status GUIs, do not show partially restored, and completely restored clips and sequences differently. As a result, it may appear that some content is successfully restored while it actually is not.You use the following procedure to enable Best Effort Restore:
-
Open the Avid Interplay Administrator application.
-
Connect to the
AvidWGdatabase by clicking the name in the navigation tree on the left side of the screen. -
Select the check box next to Use best effort restore option to enable the function. Deselect the check box to disable the function.
-
Click Apply Changes to save your changes.