4 Start Configuring DIVArchive
This chapter describes initial DIVArchive configuration and includes the following information:
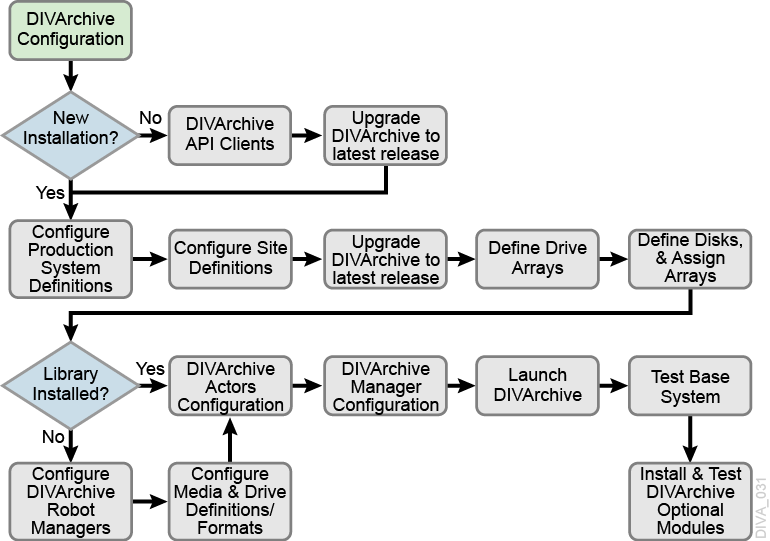
There are many interrelated components in a DIVArchive System. The following figure shows the basic configuration workflow.
The configuration of DIVArchive is hierarchical and top-level parameters such as Production Systems, Sites, Arrays, and Disks need to be configured before configuring other components such as DIVArchive Actors.
If you intend to modify an existing DIVArchive system, you must always start by backing up the existing DIVArchive installation, configuration files, and especially the DIVArchive Oracle and Metadata Databases.
Contact Oracle Support before making any modifications to your DIVArchive platform if you are unsure about any steps in the procedures, or require clarification.
SSL (Secure Sockets Layer) and Authentication
DIVArchive consist of services in Java and C++. The format in how certificates and keys are represented are different in each. DIVArchive has the keys and certificates for JAVA services in a Java Keystore file, and in PEM (Privacy Enhanced Mail) format files for the C++ services.
The Manager can simultaneously support two communications ports - one secure, and one unsecure. The default secure port number is 8000 and the unsecure default port number is 9000.
All internal DIVArchive 7.6 services (Control GUI, Configuration Utility, DBBackup, Migration Utility, Actor, SPM, DFM, SNMP, Robot Manager, RDTU, and Migration Services) can only connect to secure ports. The control GUI will report an SSL Handshake Timeout if you attempt to connect to the non-secure port. Clients using the Java or C++ API are allowed to connect to either port.
The following is a relative snippet from the Manager configuration file:
# Port number on which the DIVA Manager is waiting for incoming connections.
# Note: If you are using a Sony library and plan to execute the DIVA Manager
# on the same machine as the PetaSite Controler (PSC) software, be aware
# that the PSC server uses the 9000 port and that this cannot be modified.
# In that situation, you have to use a different port for the DIVA Manager.
# This same warning applies to FlipFactory which uses ports 9000 and 9001.
# The default value is 9000.
DIVAMANAGER_PORT=9000

# Secure port number on which the DIVA Manager is waiting for incoming connections.
# The default value is 8000.
DIVAMANAGER_SECURE_PORT=8000
A new folder called %DIVA_API_HOME%/security is added to the DIVArchive API installation structure as follows:
%DIVA_API_HOME%
    security
      conf
The conf folder contains the SSLSettings.conf file to configure the SSL handshake timeout.
Secure Communication with Oracle Database
With DIVA 7.6.1, a new DIVAOracle package version 3-1-0 was created:
-
Windows: OracleDivaDB_3-1-0_12_2_0_1_0_SE2_Windows_64-bit
-
Linux: OracleDivaDB_3-1-0_12_2_0_1_0_SE2_OEL7_x86_64
This new package includes the following
-
Secure Oracle Database listener listening on port 1522, additional on top of the regular unsecured listener listening on port 1521.
-
Oracle Database wallet for storing the Trust Certificate and DIVADatabaseServer Certificates. During installation DIVADatabaseServer.jks holding the default DIVA_CA trust certificate and Default DIVADatabaseServer certificate is import into the Oracle Database wallet for enabling the secure communication.
-
This new package also creates a secure TNSNames LIB5SSL which enables any DIVA services to connect to the oracle database securely over SSL connecting to the new secure Oracle database listener listening on port 1522 using the TNSNames.
- New Entry in TNSNames.ora:
-
LIB5SSL =
  (DESCRIPTION =
    (ADDRESS = (PROTOCOL = TCPS)(HOST = HOSTNAME)(PORT = 1522))
    (CONNECT_DATA =
      (SERVER = DEDICATED)
      (SERVICE_NAME = LIB5.WORLD)
    )
  )
A new Configuration Parameter "DIVAMANAGER_DB_SECURE_CONNECT" was added to the Manager,Migrate,DBBackup configuration file to enable secure communication to database using Hostname/IPAddress and port. This parameter has no effect if using DIVAMANAGER_TNSNAME parameter in the configuration file.
Valid parameter values are:
-
TRUE - When set to TRUE, the DIVAMANAGER_DBPORT in the Manager,Migrate,DBBackup configuration file must point to the secure port of the Oracle Database.
-
FALSE (default)
The Configuration Utility and Control GUI also supports connecting securely to the database. SPMService can connect securely only using TNS names.
Security Tools
A new Security Tool is included in the DIVArchive 7.6 release as follows:
-
Windows:
DivaSecurityTool.bat -
Linux:
DivaSecurityTool.sh
The tool is located in the %DIVA_HOME%/security/bin directory and provides the following functions:
- Reset Key Store and Trust Store Passwords
-
The JAVA Keystore file
DIVA.jks, Trust Store fileDIVATrust.jks, and the private keys in the respective PEM format files are protected by a single password. Use the Reset Key Store and Trust Store Password option to reset the default password (changit), add the new password to%DIVA_HOME%/security/conf/DIVAKeyPass.conf, and restart all services. Use the following format for the file:DIVAKeyPass=newpassword
The KeyPass must be between 8 and 12 characters. All services must check for the existence of the
DIVAKeyPass.conffile and attempt to read the password from it before defaulting tochangeit.To protect the password from being visible in the configuration file when the Manager is started, it reads the password and encrypts it. Then the Manager writes the encrypted value back into the configuration file. The file could look like the following after the Manager is started with a new password.
DIVAKeyPass=ycJrKsA8NPQUuVaXBA+kkO/XpZ4PQNeq6YTkcxq5SwJF==MEbFTnOHd8jxXBA3jnQ0w=
All of the services will try to decrypt the password if the value for the property
DIVAKeyPassis longer than 12 characters. If the length of the value for the propertyDIVAKeyPassis less or equal to 12 charterers the value will be used as password directly. - Generating New Keys and Certificates
-
This option generates new keys and certificates for all DIVArchive services. DIVArchive installs with default private keys and SSL certificates for all of its services by default. The new generated keys and certificates are signed by
DIVA_CA. - Generating Certificate Signing Requests
-
This option generates certificate signing requests for
DIVA_CAto send to third party Certificate Authorities. The generated Certificate Signing Request file is placed in the%DIVA_HOME%/Program/security/CSRfolder.If you use a third party CA to sign the
DIVA_CAcertificate, the third party CA becomes the Root CA, andDIVA_CAbecomes the intermediate CA. TheDIVA_CAwill sign all SSL certificates for the DIVArchive services.You send the Certificate Signing Request file to the third party to have it signed. The third party CA returns the signed
DIVA_CAcertificate and the third party's own certificate. - Installing External Certificate Authority
-
This option installs the third party CA Certificate into the DIVArchive installation. After the third party completes the CSR they will return the signed
DIVA_CAcertificate and their own certificate. You must include the path to the returned files as arguments, to install the external third party CA Certificate into DIVArchive.
DIVADBWallet
You can use DIVADBWallet (Windows - DIVADBWallet.bat or Linux - DIVADBWallet.sh) to update the Oracle Database Server wallet with the DIVADatabaseServer.jks changes after installing an external certificate authority using the DivaSecurityTool. Oracle Database Server wallet is created during Oracle Database Installation using DIVAOracle Database package OracleDivaDB_3-1-0_12_2_0_1_0_SE2_Windows_64-bit or OracleDivaDB_3-1-0_12_2_0_1_0_SE2_OEL7_x86_64 and later.
DIVADBWallet provides the following options that DIVA administrator can choose to perform.
- Display DIVADBWallet
-
Displays the certificates information from Oracle Database Server wallet used by DIVArchive.
- Update DIVADBWallet
-
Updates the Oracle Database Server wallet with the new DIVADatabaseServer.jks provided by the user. Use this option after installing an external certificate authority to communicate securely with the Oracle Database server.
- Change DIVADBWallet password
-
Resets the password for Oracle Database Server wallet.
Securing the API
The following sections describe securing communications when using one of the available DIVArchive APIs. The JAVA and C++ Initiators use the default keys and certificates file in the %DIVA_API_HOME%/Program/security folder when connecting to the Manager.
The Manager Service is backward compatible with earlier versions of the DIVArchive JAVA, C++, Web Services APIs, Oracle DIVA Enterprise Connect 1.0, and DIVAnet 2.2 establishing connections over regular sockets. The DIVArchive 7.6 (and later) Java and C++ API releases can establish Manager communications using secure, or unsecure, sockets. Secure communications are only supported by the Manager.
The Manager Service supports both secure and unsecure communication ports simultaneously. The default secure port is tcp/8000, and the default unsecure port is tcp/9000.
Oracle DIVArchive Java API
See the Oracle DIVArchive Java API documentation for information on the new methods added to the SessionParameters Class for secure communications. See the Oracle DIVArchive Java API Readme in the Oracle DIVArchive Additional Features documentation library for the location of the full Java API documentation (delivered with the API).
Oracle DIVArchive C++ API
The DIVArchive C++ API includes a new call named DIVA_SSL_initialize added to set the environment for secure communication with the Manager Service. You must call DIVA_SSL_initialize before calling DIVA_connect starting with DIVArchive 7.6, otherwise the DIVA_connect call will fail.
Defining Production Sites and Other Sites
A Production System is a logical group within DIVArchive that associates Actors to your sources and destinations. It enables splitting DIVArchive resources among different applications, or prioritizing specific functions over others within the platform. This is accomplished by assigning more DIVArchive Actors to one Production System over another. Although DIVArchive Actors cannot be shared between Production Systems, it is possible to share a source or destination. In this case, you can declare the specific source or destination more than one time, but each instance declared must have a unique name. All installations must have at least one Production System defined.
For applications requiring extremely high bandwidth, the Production System concept also enables you to dedicate an Actor to an individual source.
For example, you may have a Production System used for on-air transmission, and another Production System for offline editing. The Production System concept enables fine-tuning your resource allocation between the two systems based on the workflow and bandwidth requirements of each system.
A Site enables you to associate an Actor tape library or disk with a physical location. DIVArchive determines the most optimal use of resources during event execution. For example, a remote installation connected over a WAN that is used for disaster recovery purposes for the primary site. All installations have at least one Site Definition.
You identify Production Systems and Site Definitions under the Configuration Utility's System tab.
Defining Sources and Destinations
A Source is defined as any connected system that contains content intended to be transferred to DIVArchive. A Destination is defined as any connected system that requires content to be transferred to it from DIVArchive. Examples of both are Broadcast Video servers, FTP servers, and disk file systems.
These entries are defined in the Sources and Destinations frame of the System tab in the Configuration Utility. See Appendix C for details on specific settings for each type.
Use the following procedure to define a source or destination:
-
Open the Configuration Utility.
-
Click the System tab.
-
Click the + button at the top of the Sources and Destinations frame.
-
Enter the following information in the appropriate fields on the Sources and Destinations Entry dialog box:
- Source Name
-
Enter a unique source name in this field. You can have multiple entries for the same physical source if they have different names. Multiple entries enables sharing the source with multiple Production Systems.
- IP Address
-
Enter the IP Address or host name of the source. If you use host names they must be resolvable by the Actor host computers. Some Source Types, such as Disk, do not require an IP Address and can be left blank for those Source Types.
- Source Type
-
Select a Source Type from the list. The Actor uses the Source Type to select the correct communications protocol for the device.
- Prod. System
-
This field specifies this source's dedicated Production System.
- Site
-
Select the Site location from the list. This field identifies the physical location of the source.
- Connect Options
-
Enter any parameters required to connect to the source. For example, the user name and password.
- Root Path
-
Enter the root directory path (if any) for accessing content on the source.
- Max. Throughput (Mb/s)
-
This setting limits the total bandwidth used in transfers to or from this source. This is useful when the source does not natively provide any bandwidth throttling. This is typically set to a higher value than the source can provide (that is, unthrottled).
- Max Accesses
-
Enter the maximum combined simultaneous read and write operations permitted to the source. For example, if this value is five and there are five requests active, any additional requests will be set to Waiting for Resources until at least one of the other requests has completed.
- Max Read Accesses
-
The Max Read Accesses and Max Write Accesses enable fine tuning of transfers to and from the source. For example, you can allocate more restore operations than archive operations.
If the Max Read Accesses value is zero, this component is only used as a Source.
- Max Write Accesses
-
The Max Write Accesses and Max Read Accesses enable fine tuning of transfers to and from the source. For example, you can allocate more restore operations than archive operations.
If the Max Write Accesses value is zero, this component is only used as a Destination.
- First Utilization Date
-
This is a read-only field that displays the first date this component was put into service.
The remaining fields are related to Checksum Support and identified here for completeness. See the Oracle DIVArchive Checksum Support User's Guide in the Oracle DIVArchive Additional Features documentation library for detailed information.
- External Checksum Source
-
Select the appropriate option to identify whether the checksum source is external (Yes) or internal (No).
- Checksum Type
-
Select the type of checksum (MD5, SHA256, and so on) in use from the list.
- GC Mode
-
Select the Genuine Checksum (GC) mode from the list.
- Verify Following Archive (VFA)
-
Select the check box to enable VFA on this source. Deselect the check box to disable VFA.
- Verify Following Restore (VFR)
-
Select the check box to enable VFR on this source. Deselect the check box to disable VFR.
-
Click OK to save your configuration.
Object Storage Destinations
DIVArchive 7.6 enables restoring content to a destination, and archiving content from a source, linked to an Oracle Object Storage account. You can restore any type of object to these destinations. However, these destinations do not support symbolic links.
The Files Path Root for the destination must contain a value, and can contain an optional prefix. The value identifies the name for the target container. You use the optional prefix if you do not want to restore to the container root directory. The prefix must be separated from the container name using either / or \. For example, container, container\folder, and container/subdir1/subdir2 are all valid paths.
You must select Swift from the Source Type list, and select an account from the IP Address list to link a Swift Source (or Destination) to a Swift Oracle Object Storage account. The following two specific connection options are associated with this type of Source/Destination:
-max_object_size-
As a destination, the Swift connector can create SLO (Static Large Objects) on the destination server if the size of the file being restored is larger than a configurable size; the maximum object size. This option defines the size threshold and the size of each segment of an SLO. Segments of an SLO are uploaded to a separated container. For example, if DIVArchive needs to restore a large object named
directory/large_fileundermy_container, the segments of the SLO will be uploaded to a container namedmy_container_segments.The syntax for this option is
-max_object_size {size in MB}.Example:
my_container/directory/large_file [this object contains the manifest file]
my_container_segments/directory/large_file_00000
my_container_segments/directory/large_file_00001
my_container_segments/directory/large_file_00002
-oracle_storage_class-
This option defines the type of container that DIVArchive must create if the container does not exist. If this option is set to ARCHIVE, the Swift Source/Destination will create an archive container; otherwise, standard containers are created. This option is specific to the Oracle Archive Cloud.
The syntax for this option is
-oracle_storage_class {ARCHIVE|STANDARD}.
After you define a Swift destination, you can use the DIVArchive Object Transfer Utility (through the Control GUI) to browse the Oracle Object Storage account container's folder trees, and to initiate Archive and Restore requests to the Source/Destinations. The Cloud OTU can also identify a manifest file and remove all file fragments in the manifest so that only a single manifest file is displayed.
You must select OCI from the Source Type list, and select an account from the IP Address list to link a Source (or Destination) to an OCI Oracle Object Storage account. See the Oracle DIVArchive Object Transfer Utility (OTU) User's Guide in the Oracle DIVArchive Additional Features documentation library for more information on using OTU with Object Storage Accounts.
Source and Destination Overview
This section describes additional Source and Destination configuration and expands on the previous section.
Source and Destination Configuration Limitations
If you configure a Source/Destination with the -rxml option, a proper MD5 checksum is generated only if the object contains a single file. If the object contains more than one file, no checksums are generated. You typically use this configuration in DIVAnet configurations for restoring to a second DIVArchive system with checksums.
When this is the case, and an object that contains more than one file is restored, the resultant .xml Metadata file will not have checksums present. A Source/Destination on the receiving side configured with GC active will fail to archive the object because the checksum verification will fail (there is no matching checksum).
Source Type
The Source Type parameter of the Source or Destination definition establishes the specific protocol for the interface between the DIVArchive Actor and the target device or file system.
The source types supported by DIVArchive are predefined and selection is limited to the listing from the Source Type list.
Deprecated indicates that this is a software feature or function within DIVArchive that has subsequently been replaced by an improved feature set, however the feature or function is still supported by DIVArchive in the current release. The following is a list of source types available in the current DIVArchive release:
- AM Communicator
-
Avid Archive Manager interface
- TM Communicator DET Interface
-
AVID Unity interface using the Dynamically Extensible Transfer (DET) protocol.
- TM Communicator DHM Interface
-
AVID Unity interface using the Data Handling Module (DHM) protocol.
- CIFS
-
A disk source (that is assumed to be) visible to all Actors in the associated Production System. Buffered I/O will be used for transfers to and from this source. Linux-based Actors cannot use CIFS, and a new path is required to enable Linux-based Actors to transfer content to and from SMB network shares (transcoder cache).
- Disk
-
A disk source (that is assumed to be) visible to all Actors in the associated Production System. Direct I/O will be used for transfers to and from this source.
- EXPEDAT
-
DataExpedition (Expedat) Server (up to release 1.17)
- FTP_STANDARD
-
FTP protocol for RFC959 compliant servers.
- LEITCH
-
This source type is deprecated, and is only provided for backward compatibility for older Leitch servers. Newer servers must use the FTP_STANDARD source type.
- LOCAL
-
Represents a disk partition bound to a specific Actor.
- MEDIAGRID
-
Omneon MediaGrid
- METASOURCE
-
Used for accommodating multiple servers sharing the same online storage.
- MSS
-
AVID MediaStream servers
- OBJSTORE_ON_DISK
-
Used to export a DIVArchive object to a disk in the cloud instance format. For example:
divastorage_DIVA_STD_000006_metadata/72ecd6fe-157b-11e8-b642-0ed5f89f718b.axf
divastorage_DIVA_STD_000006_metadata/72ecd6fe-157b-11e8-b642-0ed5f89f718b.axf.footer
divastorage_DIVA_STD_000006/72ecd6fe-157b-11e8-b642-0ed5f89f718b.axf.00001
divastorage_DIVA_STD_000006/72ecd6fe-157b-11e8-b642-0ed5f89f718b.axf.00002
divastorage_DIVA_STD_000006/72ecd6fe-157b-11e8-b642-0ed5f89f718b.axf.00003
divastorage_DIVA_STD_000006/72ecd6fe-157b-11e8-b642-0ed5f89f718b.axf.00004
divastorage_DIVA_STD_000006/72ecd6fe-157b-11e8-b642-0ed5f89f718b.axf.00005
- OCI
-
The interface to Oracle Cloud Infrastructure (formerly Oracle Bare-Metal Cloud) for use with object storage accounts.
- OMNEON
-
Omneon Spectrum servers using unique FTP site commands
- PDR
-
GVG Profile servers
- QUANTEL_ISA
-
Quantel Q or sQ servers utilizing the Quantel Power Portal
- QUANTEL_QCP
-
Older Quantel servers utilizing the QCP protocol
- SEACHANGE_BMC
-
SeaChange Broadcast Media Clusters or Media servers using Vstream Streaming API
- SEACHANGE_BML
-
SeaChange Broadcast Media libraries using FTP or CIFS protocols
- SEACHANGE_FTP
-
SeaChange FTP support; this Source Type is deprecated
- SFTP
-
Secure Shell (SSH) FTP protocol
- SONY_HYPER_AGENT
-
For use with Sony Newbase FTP server
- SWIFT
-
The interface to Oracle Cloud Interface Classic (Ffrmerly Oracle Public Cloud) and EMC ECS for use with Object Storage Accounts.
- SIMULATION
-
For simulator platforms only. This creates simulated Sources and Destinations
One record is required for each Content Director that DIVArchive has to move data to and from. The following list identifies the Content Director attributes:
Connect Options
You define the Default Quality Of Service for DIVArchive transfer requests and additional protocol specific parameters (for example, user name and password) in the Connect Options field.
The Connect Options enable the DIVArchive Actor to establish a connection to the target device or disk file system. This applies to both requests submitted through the Control GUI or from third party archive initiators using the DIVArchive API.
See Appendix C for details on specific Connect Options for supported Broadcast Servers and file system types.
Root Path
You can explicitly specify the directory path at the request level. However, you can define the default directory path for the source, or a disk mount point for disk and local sources, in the Root Path field. The specified Root Path is appended before any Files Path Root specified in an archive, restore, or partial file Restore request unless the Files Path Root specified in the request is an absolute path.
The benefit of the Root Path approach is that you can specify the server's directories at the source and destination configuration level rather than at the request level. You can alter it without affecting commands issued from DIVArchive clients.
See Appendix C for details on the interaction of the Files Path Root and Root Path parameters.
Metasource
The optional Metasource enables DIVArchive to combine two or more existing Source/Destinations, which use common storage, or multiple Drop Folder Monitors, into a single Source/Destination configuration.
The Metasource feature offers load balancing and fault tolerance from within DIVArchive if an individual server or DFM fails. DIVArchive automatically attempts to use the next server (or DFM) in the Metasource configuration if the attached server (or DFM) is unavailable for a request.
Arrays and Disks
DIVArchive's disk management defines each physical disk, how it is attached (or mounted) to the system, and then groups the disks together to perform specific roles within the archive.
Defining an Array
The first step to disk management is to define an array. In DIVArchive an array is a logical grouping of one or more disks for the storage of DIVArchive objects. You define arrays in the Arrays frame of the Disks tab in the Configuration Utility.
Use the following procedure to define an array:
-
Open the Configuration Utility and connect to the DIVArchive Database.
-
Click the Disks tab.
-
Click the + button at the top of the Arrays frame to open the Add new row in Arrays dialog box.
-
Enter the following information in the fields on the dialog box:
- Id
-
The array's ID is automatically generated by the system. The Id field is not editable.
- Array Name
-
Enter a name for the array in the Array Name field. This is symbolic and typically represents the purpose of the stored objects.
- Description
-
Enter a description for the array in the Description field. This is arbitrary and typically denotes the array's function.
- Format
-
Select the array format from the list. Options are AXF and Legacy. The AXF format is required for complex objects.
- Max Allowed Disk Space For Repack (%)
-
Enter the percentage of disk space available for use by repack requests.
- Verify Write (VW)
-
You select whether to enable Verify Write from the list. Verify Write is not compatible with complex objects.
- Default Checksum Type
-
The MD5 algorithm is the Default Checksum Type. This field is not editable in this dialog box.
- Array Options
-
Enter the Oracle Storage Class -oracle_storage_class=[*NONE|ARCHIVE|STANDARD] and the Oracle Storage Location –storage_location=[*LOCAL|OPC|OCI] in the Storage Options field.
The Oracle storage class and storage location must be separated by a space. Ex: -oracle_storage_class=ARCHIVE -storage_location=OCI
The asterisk indicates the default selection. OPC represent the Oracle Cloud Infrastructure Classic (formerly Oracle Public Cloud). OCI represents Oracle Cloud Infrastructure (formerly Bare-Metal Cloud).
-
Click OK to save the array configuration.
You highlight a desired array and click Edit on the top of the Arrays frame to edit an existing array. When you finish making changes, click OK to save your changes.
Note:
Existing arrays cannot be edited or removed while they are referenced by a disk, or contain DIVArchive objects.The Storage Options column associated with the array is displayed in the Control GUI on the Home, Disks tab. Non-cloud disks have a storage class of NONE. Cloud disks have a storage class of Standard (immediately available for download from the cloud) or Archive (requires a maximum four hours to download from the cloud).
When you click an object in the Manage, Objects screen, the Object Properties window is displayed. You can see the instances storage options for the selected object in the Instances area of the window.
Defining Disks
Next you define the physical disks that are going to be used by DIVArchive, and assign them to arrays based on their intended function. You configure disks in the Disks frame of the Disks tab.
Each configured disk represents a distinct physical volume. Logical associations of disks to DIVArchive are performed in the Actor-Disk Connections frame
You can assign each disk declaration in this frame to only one Array. If you intend to share a physical disk between two or more arrays, you can declare the disk multiple times, but each declaration must have a unique name.
Defining how the disks are actually interfaced to DIVArchive is performed in the Actor-Disk Connections frame of the Disks tab.
Use the following procedure to define a disk:
-
Open the Configuration Utility and connect to the DIVArchive Database.
-
Click the Disks tab.
-
Click the + button at the top of the Disks frame to open the Add new row in Disks dialog box.
-
Enter the following information in the fields on the dialog box:
- Disk Name
-
Enter a symbolic name for the disk in the Disk Name field. Oracle recommends that the name describes its function or its location.
- Array
-
Assign the disk to an array selected from the menu list. Only arrays configured in the Arrays frame are listed.
- Site
-
Select the Site that defines the location of this disk. This parameter is taken into consideration by DIVArchive for optimum allocation of disk resources in the array if the Site Selection parameter is enabled in the DIVArchive Manager configuration file
- Status
-
Set the current status of the disk using the list (ONLINE or OFFLINE). OFFLINE indicates that the disk is offline and not to be used. During DIVArchive operations, the status may be set Offline by DIVArchive if an unexpected disk I/O error occurs.
- Min. Free Space, MB
-
You set the minimum free space of the disk in this field. When the remaining free space reaches this amount, DIVArchive considers the disk full. Use this setting on disks that are shared with other applications, or with file systems that suffer poor or degraded performance when approaching 100% capacity.
- Verify Write (VW)
-
You select whether to enable Verify Write from the list. Verify Write is not compatible with complex objects.
- Default Checksum Type
-
The MD5 algorithm is the Default Checksum Type. This field is not editable in this dialog box.
-
Click OK to save the disk configuration.
You highlight a desired disk and click Edit on the top of the Disks frame to edit an existing disk. When you finish making changes, click OK to save your changes.
Configuring Oracle Archive Cloud for DIVArchive
You can use your Oracle Archive Object Storage Account for operations in DIVArchive. Any disks added to cloud arrays are considered cloud disks.
You must create an array with a storage class of Archive or Standard. Content stored using the Archive storage class requires a minimum of four hours retrieval time. Content stored using the Standard storage class is immediately available for retrieval. The None storage class is reserved for non-cloud arrays.
You can view the Storage Class associated with an array in the Disks View under the Consumed Size column. The column value represents the space (in kilobytes) consumed by content on disk. The column is especially useful for Object Storage Accounts with unlimited disk space because it provides visibility into the amount of content stored in the cloud. To view the storage class associated with a particular cloud instance, the Object Properties View contains a new column called Storage Options.
In the Actor-Disk Connections frame a cloud disk must be designated with the new Swift/OCI interface type, and must have a mount point that points to a Object Storage Accounts. When you select a Swift/OCI interface during the creation or modification of an Actor-Disk connection, the corresponding Mount Point updates with a list of all Object Storage Accounts and you can select the appropriate Object Storage Account from the list.
Note:
The Object Storage Account name must not contain a colon and cannot start withcifs.Object Storage Accounts are defined in the Object Storage Accounts frame. You must specify a unique Account Name, Login, Password, URL, Service Name, and Identity Domain. These five parameters are configured when you create an account through Oracle's Cloud Configuration site (https://cloud.oracle.com). The parameter controlling the number of threads used by an Actor in writing content to the cloud is also configurable in the Object Storage Accounts frame. For OCI configuration, additional parameters were introduced: Private Key, Key Password, Fingerprint, Namespace, and Compartment ID. The Private Key, Key Password and Fingerprint may be automatically generated and need NOT be specified by the user.
Actor-Disk connections including a disk belonging to an array with an ARCHIVE or STANDARD storage class must have the Swift/OCI Interface setting and a Mount Point pointing to a Object Storage Account name. See the following section for configuring EMC ECS storage arrays.
The Actor-Disk connection interface must be the same for all disks of a specific array, that is, either all Swift/OCI interfaces or all non-cloud interfaces.
Using an Actor-Disk connection with a Swift/OCI interface must be identified as STORAGE ONLY. Cache and Nearline are not supported for cloud content.
The ability of an Actor to archive or restore from the cloud is configurable in the Actor Settings tab of the Actor Settings Entry dialog box. Only Actors with Cloud Archive enabled will be used for transfers to the Oracle Archive Cloud. Only Actors with Cloud Restore enabled will be used for transfers from the Oracle Archive Cloud.
For example, when you are copying from tape to the cloud, the Manager will only use Actors configured for Cloud Archive. When you are copying from the cloud to tape, the Manager will only use Actors configured for Cloud Restore. Both Cloud Archive and Cloud Restore require Direct Archive and Direct Restore respectively. These settings are enabled when the corresponding cloud settings are configured.
EMC ECS (Elastic Cloud Storage) Integration
Instances stored on EMC Elastic Cloud Storage are local instances whose priority is lower than other types of local disk instances, but a higher priority than tape storage instances.
In DIVArchive 7.6 you can define Oracle Storage Class and Storage Location separately. If you require new cloud or local arrays in the future, you can specify all of these parameters as options. You can set the Media Priority of a source instance for a Restore, Oracle Partial File Restore, and Copy to Group requests, which enables restoring an instance stored on a local non-EMC ECS array with a higher priority than an instance on an EMC ECS array. If the priorities for the media are all the same, then the Manager decides which source instance is preferred during these requests.
Source Media Priority
The Source Media Priority determines which source instance is preferred (according to the media where the instance resides) during the instance selection process of a Restore, Partial File Restore, and Copy To Group request. Instances on media with a higher priority are preferred. Cloud instances are only copied or restored if all local instances are offline, or no local instances exist. This is an absolute condition independent of the Source Media Priority.
If you want to assign a higher priority to a local non-EMC ECS than an EMC ECS array, but a higher priority to an EMC ECS array than a tape group, you can assign the appropriate priorities in the Media panel.
Use the following procedure to configure the Source Media Priority:
-
Navigate to the Media panel on the Sets, Groups & Media Mapping tab in the Configuration Utility.
-
Double-click the media to edit.
-
When the Edit Media Entry dialog box appears, enter the appropriate value in the Source Media Priority field.
-
Click OK to save your changes.
The default priority value for all media is 50. Also, when you upgrade from an earlier DIVArchive release, all media is assigned the default priority value (50).
See the Oracle DIVArchive Operations Guide in the Oracle DIVArchive Core documentation library for detailed information.
EMC ECS (Elastic Cloud Storage) Integration
DIVArchive 7.6 supports local arrays that include disks with Swift interfaces, such as an EMC ECS Object Store. First, define a disk and assign it to the EMC ECS array (like a local disk), and then define an Object Storage Account (formerly a Cloud Account).
You can also specify a proxy server to use if your Oracle DIVArchive Actor cannot access the Object Storage Account directly. You can view the storage options on the Home, Disks screen in the DIVArchive Control GUI. For an EMC ECS array, all disks must have actor-disk connections with a Swift Interface. The Mount Point must point to the EMC ECS Object Storage Account, and the only supported Usage is Storage Only.
Note:
With ECS, DIVArchive reports infinite capacity because ECS's Swift implementation does not support retrieving the account quota.-
Navigate to the Arrays panel on the Set, Groups & Media Mapping tab in the Configuration Utility.
-
Add a new array, or double-click an existing array to configure.
-
In the Storage Options field, configure array option to
-oracle_storage_class=NONE -storage_location=LOCAL.Start each option with a dash and include an equal sign between the option and its value. Separate multiple options with a space.
-
Click OK to save the configuration and add, or update, the array.
Configuration Checks
DIVArchive 7.6 includes validation checks to verify each step in the configuration process. The validation checks will produce errors in the following instances:
-
You attempt to link an object storage account to a local array.
-
You attempt to link a local account to a cloud array.
-
You attempt to link a cloud mount point to a local array. A cloud mount point is one that points to an object storage account with the type Cloud.
-
You attempt to link a local mount point to a cloud array.
Configuring Oracle Cloud Infrastructure
In 7.6.1, DIVArchive supports Archives and Restores to the Oracle Cloud Infrastructure (OCI) object storage. This functionality works from both Windows and Linux actors.
Use the Configuration Utility to create a new type of Storage Account (OCI):
-
On the Object Storage Accounts Entry screen, select Type: OCI.
-
Enter Account Name, Login, Password, URL, Tenant Id, and Vendor.
-
Specify the Namespace and Compartment Id of your account, and then click OK.
-
Click OK.
-
Copy the key from the pop-up warning.
-
Go to your OCI account. Click Add Public Key and then paste the key. Click Add.