6. Viewing Clearing Transactions
This chapter contains the following sections:
- Section 6.1, "View Clearing Transactions"
- Section 6.2, "Inward Clearing Transaction Query"
- Section 6.3, "Query the Clearing Transactions Summary"
- Section 6.4, "Query Clearing (Repair) Upload Summary"
- Section 6.5, "Inward Query Clearing Upload"
- Section 6.6, "Intra-day Clearing Batch Process"
- Section 6.7, "Clearing Auto Reject Mapping Maintenance"
- Section 6.8, "Clearing Batch Process (CGUPLOAD)"
- Section , ""The following are the fields which are mandatory for Outward Clearing:Clearing Intra-day Batch ProcessThis section contains the following topic:
6.1 View Clearing Transactions
This section contains the following topic:
6.1.1 Invoking Clearing Transaction Query Screen
You can view clearing transactions in the ‘Clearing Transaction Query’ screen, where you provide the details of the check instruments as well as the clearing details. You can invoke this screen by typing ‘CGDQUERY’ in the field at the top right corner of the Application tool bar and clicking on the adjoining arrow button.
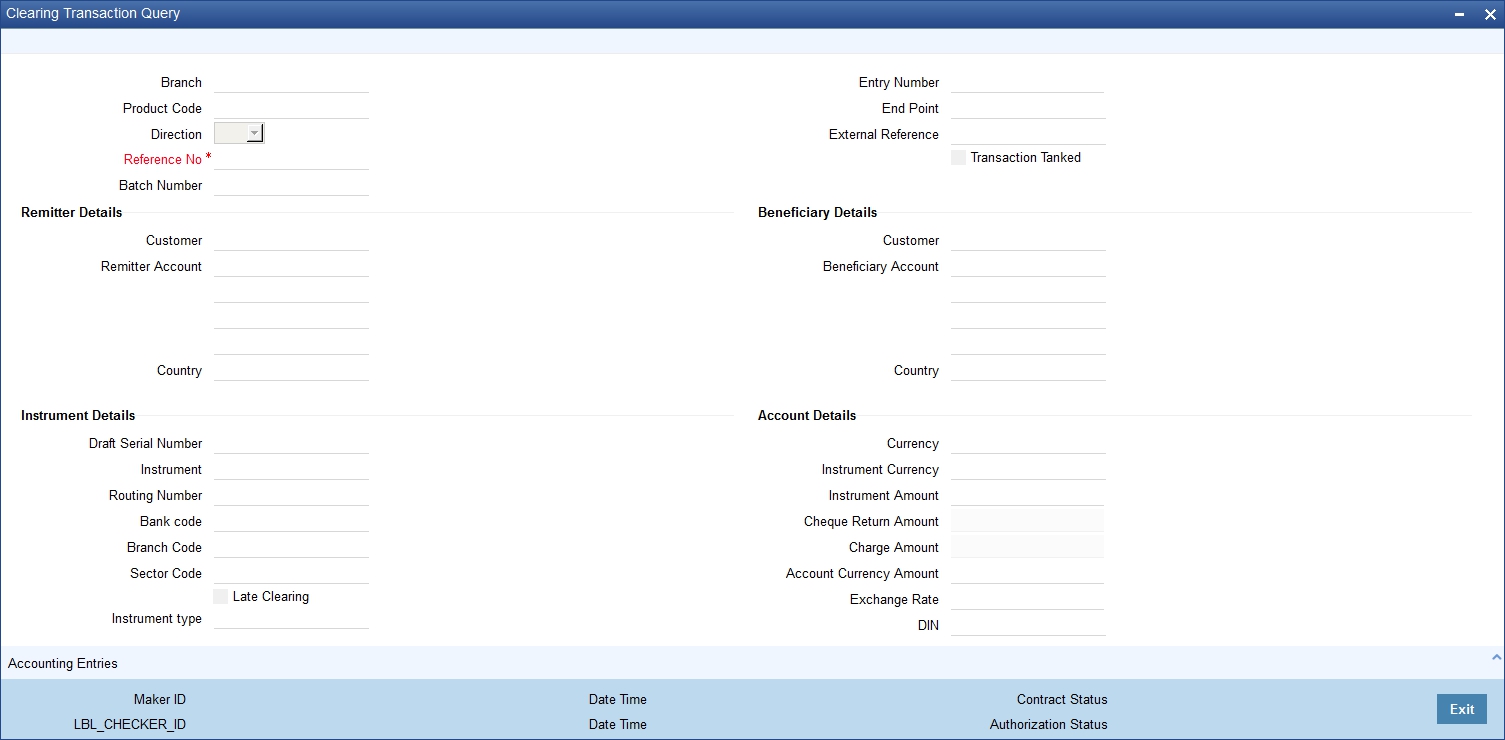
In the Clearing Transaction Input screen, you can view the following:
- Remitter Details
- Customer
- Remitter Account
- Country
- Beneficiary Details
- Customer
- Beneficiary Account
- Country
- Instrument Details
- Draft Serial Number
- Instrument
- Routing Number
- Bank code
- Branch Code
- Sector Code
- Late Clearing
- Instrument type
- Account Details
- Currency
- Instrument Currency
- Instrument Amount
- Cheque Return Amount
- Charge Amount
- Account Currency Amount
- Exchange Rate
- DIN
- Document Identification Number Date
- Date Details
- Transaction Date
- Instrument Date
- Bank Value Date
- Customer Value Date
- Module Details
- Module List
- Module Description
- Reference No
- ESN
- Regulation CC Availability for Check Deposits
- Consider For Reg CC
- Special Avail
- Remarks
- Reject Reason
- Status Movement
- MT110 Reconciliation Detail
- MT110STATUS
- MT110MSGREFNO
For more information on Tanked Transaction, refer Branch Parameters chapter under Core Services module.
6.2 Inward Clearing Transaction Query
This section contains the following topic:
6.2.1 Invoking Inward Clearing Transaction Query Screen
You can view inward clearing transactions in the ‘Inward Clearing Transaction Query’ screen, where you provide the details of the check instruments as well as the clearing details. You can invoke this screen by typing ‘CGDIWQRY’ in the field at the top right corner of the Application tool bar and clicking on the adjoining arrow button.

In the Clearing Transaction Input screen, you can view the following:
- Remitter Details
- Customer
- Remitter Account
- Country
- Beneficiary Details
- Customer
- Beneficiary Account
- Country
- Instrument Details
- Draft Serial Number
- Instrument
- Routing Number
- Bank code
- Branch Code
- Sector Code
- Late Clearing
- Instrument type
- Account Details
- Currency
- Instrument Currency
- Instrument Amount
- Cheque Return Amount
- Presenting Bank Charge Amount
- Account Currency Amount
- Exchange Rate
- DIN
- Document Identification Number Date
- Date Details
- Transaction Date
- Instrument Date
- Bank Value Date
- Customer Value Date
- Module Details
- Module List
- Module Description
- Reference No
- ESN
- Regulation CC Availability for Check Deposits
- Consider For Reg CC
- Special Avail
- Remarks
- Reject Reason
- Status Movement
- MT110 Reconciliation Detail
- MT110STATUS
- MT110MSGREFNO
For more information on Tanked Transaction, refer Branch Parameters chapter under Core Services module.
6.3 Query the Clearing Transactions Summary
This section contains the following topics:
- Section 6.3.1, "Querying the Clearing Transactions Summary"
- Section 6.3.2, "Maintaining Settlement Details"
- Section 6.3.3, "Resolving Customer Credits for Clearing Checks"
- Section 6.3.4, "Levying Charges on Dishonored Cheque"
6.3.1 Querying the Clearing Transactions Summary
You can view the processed clearing records through the Clearing transaction screen. You can reverse a transaction or input a transaction through this screen. Also, you can query/view the list of transactions with a particular reconciliation status.
You can invoke this screen by typing ‘CGSQUERY’ in the field at the top right corner of the Application tool bar and clicking on the adjoining arrow button.
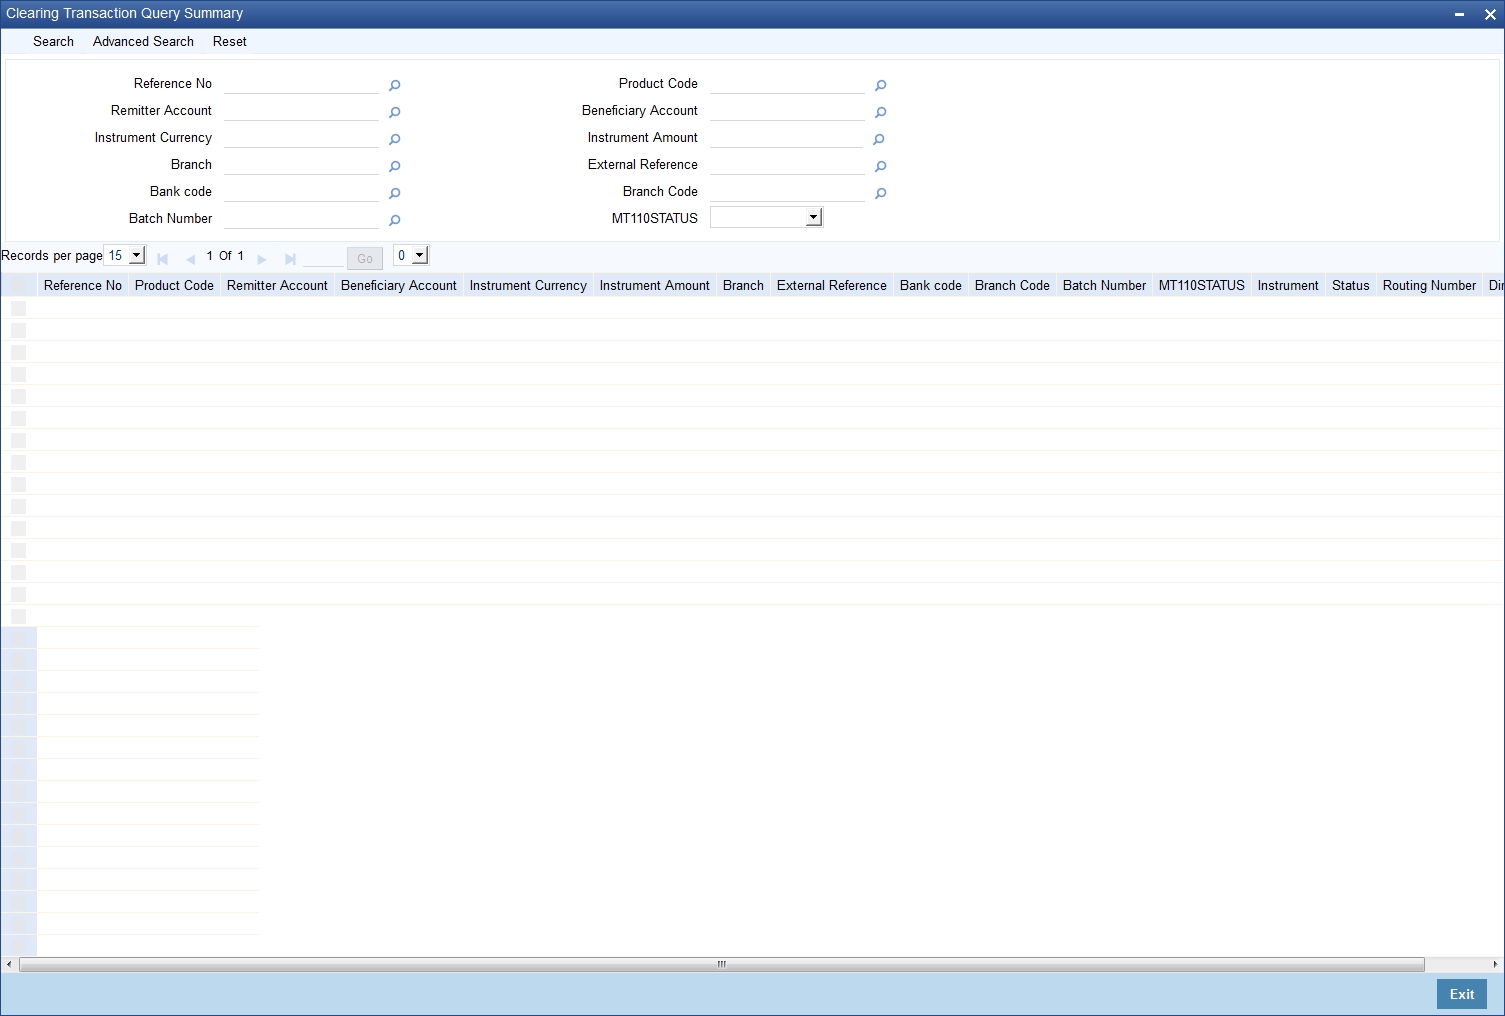
You can query the clearing transactions based on the following details:
- Authorization Status
- Contract Status
- Reference Number
- External Reference
- Product Code
- Instrument Date
- Remitter
- Beneficiary
- Remitter Account
- Beneficiary account
- Instrument Currency
- Instrument Amount
- Bank Code
- Branch Code
- Reconciliation Status
- Batch Number
- MT110 Status
Click ‘Search’ button to view the records based on criteria you have selected. The following details of the record get displayed:
- Authorization Status
- Contract Status
- Reference Number
- External Reference
- Product Code
- Instrument Date
- Remitter
- Beneficiary
- Remitter Account
- Beneficiary account
- Instrument Currency
- Instrument Amount
- Bank Code
- Branch Code
- Reconciliation Status
- MT110 Status
Refer heading ‘Specifying Clearing/Cheque Details’ in the Utility Payments Manual for further details on Clearing Transaction Query screen.
6.3.2 Maintaining Settlement Details
You can maintain settlement details for Inward and Outward Direct Credit transactions.
For details on Inward and Outward Direct Credit transactions, refer to the Retail Teller and Retail Branch user manuals.
Invoke the ‘Settlement Details’ screen from the Application Browser by typing ‘FTDRCST’ in the field at the top right corner of the Application tool bar and clicking the adjoining arrow button.
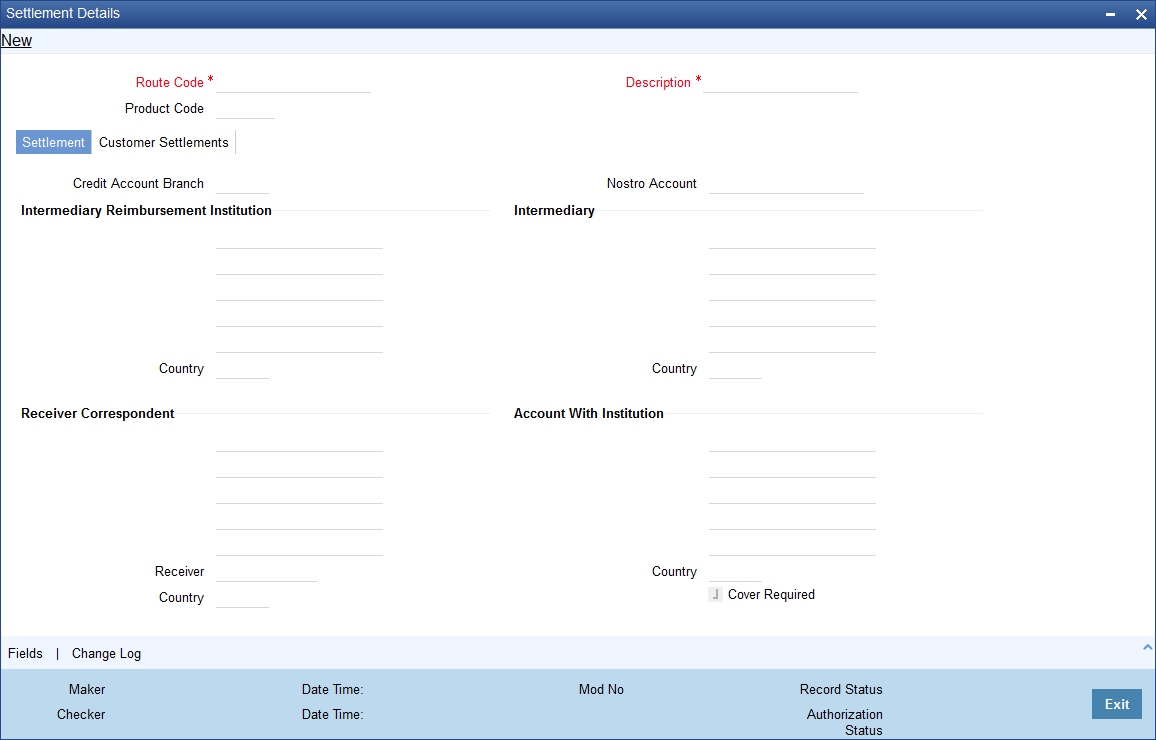
This screen contains fields that explore possible routes of the transfer. Depending on the type of transfer you are initiating and on the number of banks involved in the transfer, you can enter details of the parties involved in the transfer route.
Note
The country information is captured to enable Mantas to analyze the transactions for possible money laundering activities.
For more details on Mantas, refer 'Mantas' interface document.
Route Code
This is an identifier for the transfer route that you are creating. During a retail teller transaction input, you can use this route code to call up the settlement and messaging details that you maintain in this screen.
Intermediary Reimbursement Institution
An ‘Intermediary Reimbursement Institution’ is the financial institution between the Sender’s Correspondent and the Receiver’s Correspondent, through which the reimbursement of the transfer will take place.
Intermediary
The ‘Intermediary’ in a transfer refers to the financial institution, between the ‘Sender’ and the ‘Account With Institution’, through which the transfer must pass.
The Intermediary may be a branch or affiliate of the Sender or the account with Institution, or an entirely different financial institution. This field corresponds to field 56a of S.W.I.F.T.
Here you can enter either the:
- ISO Bank Identifier Code of the bank or the
- Name and address of the Bank.
- Local Clearing Code of the bank
Receiver’s Correspondent
The ‘Receiver’s Correspondent’ is the branch of the Receiver or another financial institution at which the funds will be made available to the Receiver. This field corresponds to field 54a of S.W.I.F.T. You can enter one of the following:
- ISO Bank Identifier Code of the bank
- The branch of the Receiver’s Correspondent
- Name and address of the Receiver’s Correspondent.
Account With Institution
An ‘Account With Institution’ refers to the financial institution, at which the ordering party requests the Beneficiary to be paid. The Account With Institution may be a branch or affiliate of the Receiver, or of the Intermediary, or of the Beneficiary Institution, or an entirely different financial institution.
This field corresponds to Field 57A of S.W.I.F.T. You can enter one of the following:
- ISO Bank Identifier Code of the bank
- The branch of the Receiver’s Correspondent
- Name and address of the Receiver’s Correspondent
- Other identification codes (for example, account number)
- Local Clearing Code of the bank
Sender to Receiver Information
You can include any message that the Sender wishes to pass on to the Receiver as part of the funds transfer.
Receiver Intermediary
The ‘Receiver Intermediary’ in a transfer refers to the financial institution, between the ‘Receiver’ and the ‘Account With Institution’, through which the transfer must pass.
The Intermediary may be a branch or affiliate of the Receiver or the account with Institution, or an entirely different financial institution. This field corresponds to field 56a of S.W.I.F.T.
Here you can enter either the:
- ISO Bank Identifier Code of the bank
- Name and address of the Bank
- Local Clearing Code of the bank
Beneficiary Institution
Here, you can enter details of the institution in favor of which the payment is made. It is in reality the bank that services the account of the Ultimate Beneficiary. This field corresponds to Field 58A of S.W.I.F.T.
You will be allowed to make entries into this field only for Bank Transfers (when the remitter and beneficiary of the transfer are financial institutions — MT 100 or MT 202). Here you can enter either:
- The ISO Bank Identifier Code of the Beneficiary Institution
- The Name and Address of the Beneficiary Institution
- The Local Clearing Code of the bank. If the receiver of funds is the same as the Beneficiary Institution, you can specify the bank’s own local clearing code.
6.3.3 Resolving Customer Credits for Clearing Checks
For processing outward clearing checks, you need to ensure that:
- You have maintained the clearing products that would be used for processing the Registration (INIT) and Liquidation (LIQD) events.
- In the Demand Drafts Details screen, you must associate the statuses used for registration and liquidation with the appropriate product codes. Assume, you have maintained the products CGOC (Registration of Outward Clearing checks) and DDLQ (Liquidation of Outward Clearing checks). You need to associate the status INIT (Registration) with the product CGOC and LIQD (Liquidation) with the product DDLQ.
- The Clearing Required option has not be enabled for the product maintained for the liquidation event, in the Demand Draft Details screen.
- Charges in respect of an outward clearing check transaction could be collected either upfront or after the credit to the customer account. The manner in which accounting is done in both cases, along with the appropriate ARC maintenance, is illustrated below:
When charges are collected upfront
Step 1
This is the registration event (INIT), for which you can define the following entries:
Debit/Credit Indicator |
Accounting Role |
Amount Tag |
Debit |
Nostro with the collecting bank |
Check amount |
Credit |
Clearing Suspense account |
Check amount |
Debit |
Clearing Suspense account |
Our charges |
Credit |
Income - |
Our charges |
Step 2
This is the liquidation event, for which you can define the following entries:
Debit/Credit Indicator |
Accounting Role |
Amount Tag |
Debit |
Clearing Suspense account |
Check amount |
Credit |
Customer |
Check amount |
Debit |
Customer |
Our charges |
Credit |
Clearing Suspense account |
Our charges |
Debit |
Customer |
Collecting bank charges |
Credit |
Collecting Bank charge Account |
Collecting bank charges |
When clearing charges are collected from the customer after credit
Step 1
This is the registration event. The following entries can defined for this event:
Debit/Credit Indicator |
Accounting Role |
Amount Tag |
Debit |
Nostro with the collecting bank |
Check amount |
Credit |
Clearing Suspense account |
Check amount |
Step 2
This is the liquidation event. The following entries can be defined for this event.
Debit/Credit Indicator |
Accounting Role |
Amount Tag |
Debit |
Clearing Suspense account |
Check amount |
Credit |
Customer |
Check amount |
Debit |
Customer |
Our charges |
Credit |
Clearing Suspense account |
Our charges |
Debit |
Customer |
Collecting bank charges |
Credit |
Collecting Bank charge Account (Nostro of collecting bank with your bank) |
Collecting bank charges |
For the registration product, when the charge is collected upfront, the ARC Maintenance must be as follows:
Txn Account |
Offset Account |
Charge Account |
Charge From Account |
Suspense |
Nostro |
Income |
Transaction Account |
For the registration product, when clearing charges are collected from the customer after credit, the ARC Maintenance must be as follows:
Txn Account |
Offset Account |
Charge Account |
Charge From Account |
Suspense |
Nostro |
- |
- |
For the liquidation product, when clearing charges are collected from the customer after credit, the ARC Maintenance must be as follows:
Charge Type |
Txn Account |
Offset Account |
Charge Account |
Charge From Account |
Our charges |
Customer |
Suspense |
Income |
Transaction Account |
Collecting Bank charges |
Customer |
Suspense |
Income |
Transaction Account |
6.3.4 Levying Charges on Dishonored Cheque
You can levy charges on dishonored cheques based on the reason for rejection. Invoke the ‘Clearing Rejection Reason’ screen from the application browser.
You can invoke this screen by typing ‘CGDRJMNT’ in the field at the top right corner of the Application tool bar and clicking on the adjoining arrow button.‘
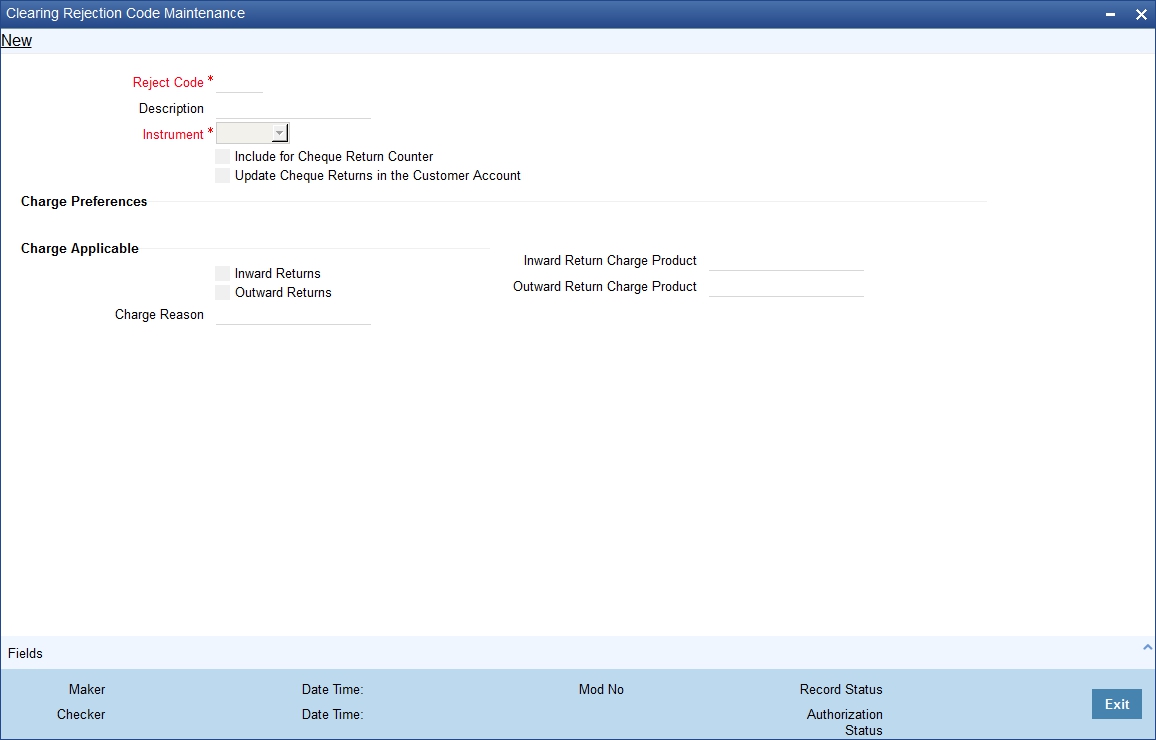
In this screen, you have to specify a reject code and give a description of the same. A reject code has to be assigned to every check that you reject.
Reject Code
Specify the reject code.
Description
Specify the description for the specified reject code.
Instrument
Select the instrument type from the drop-down list. The list displays the following values:
- Cheque
- Others
Include for Cheque Return Counter
Check this box to include for cheque return counter.
Update Cheque Returns in the Customer Account
Check this box to to identify if entries for Cheque bounce has to be updated at the Customer account based on the reject code.
Charge Preferences
Charge Applicable
Select the appropriate check box to indicate if the charge applicable is for inward returns or outward returns. The list displays the following values:
- Inward Returns - if charges are applicable for Inward Returns
- Outward Returns - if charges are applicable for Outward Returns
Inward Return Charge Product
Specify the inward return charge product. Alternatively, you can select inward return charge product from the option list. The list displays all valid inward return charge product maintained in the system.
Outward Return Charge Product
Specify the outward return charge product. Alternatively, you can select outward return charge product from the option list. The list displays all valid outward return charge product maintained in the system.
Charge Reason
The system displays the reason for charge applicable.
Select ‘CHQ’ as the instrument used and check the Charge Applicable box. You can also mention a reason for application of charge.
For all reject codes where charge is applicable a charge basis is automatically created by the system. You have to link the charge basis to a charge product in the IC module.
You can check the box ‘Include for Cheque Return Counter’ to indicate that the reject code is considered for incrementing the return counter, when the cheque comes in for clearing.
Refer to the Interest and Charges user manual to find out how to create a charge basis.
If you wish to levy charge for a dishonored check, then, when marking the check as dishonored, specify a reject code that has a charge basis linked to it. You can do this in the Interface Clearing Details screen, which is explained in the next section.
On authorization of dishonored checks, the system will validate if the reject code associated with a dishonored check has a charge basis linked to it and process charges accordingly.
6.3.4.1 Processing of Presenting Bank Charges
During inward return handling, the presenting bank charges maintained using Inward Return Charge Product will be received from the Debtor bank and credited to income GL. The system will directly map Inward return charge products maintained in the ARC maintenance to the Reject codes and the inward return suspense GL maintained in Endpoint maintenance will be used to pass reversal entries for RETN event for Inward returns
The system processes the charges during inward returns handling as follows:
- During return/reject of an outward clearing contract, the system validates the associated reject code with the type of charge applicable and the respective charge product linked to it. The charge amount derived based on the reject code during inward return will always be added to Cheque return amount and debited from the customer account during RETN event and this amount will be reduced/ knocked from the customer account book balance (uncollected funds)
- The computed charge amount will be credited to the Income GL
- If an inward return transaction is received with the Transaction code/Reject code for which Charge applicable flag is set as ‘Y’ in Reject code maintenance, then the system will compute the charge amount and credit it to the Income GL based on the charge setup defined at Inward Return product code.
In case a return is received from Inward clearing, the system will automatically trigger the RETN event with the following accounting entries:
Event |
Account |
Dr/Cr |
Amount tag |
Transaction Code |
Branch Code |
RETN |
Customer |
Dr |
Cheque Amount |
Main Transaction code |
Account Branch |
(Cheque_Retn_ amt+ Charge amount) |
|||||
RETN |
Income GL |
Cr |
Our_charge |
Transaction code from ARC for the specific charge product |
Transaction Branch |
RETN |
Inward Return Suspense GL |
Cr |
Cheque_Retn_ amt |
Offset Transaction code |
Transaction Branch |
If no Charges are applicable, then Cheque return amount will be the Cheque Amount.
If the Original parent transaction is found, then the system will validate if:
Computed Charge amount = Cheque amount –Cheque return amount
Else the system will log an exception for the transaction.
Based on the reason for rejection and if you have selected ‘Charge Applicable’ field as ‘Outward returns’ for the corresponding Reject code in the ‘Clearing Reject Code Maintenance’ screen, the, the presenting bank charges can be levied from the customer account for an outward return based on the charge set up at ARC maintenance.
You can maintain the presenting bank charges using the charge products in ARC setup with ‘Their Charge’ selected as ‘Yes’. The Outward return charge products maintained in the ARC maintenance will be directly mapped to the Reject codes and when the transactions are rejected, depending on the reject codes with which it gets rejected, the corresponding charge amount will be credited to income GL.
The following accounting entries will be triggered during Outward return handling if presenting bank charges are applicable:
Dr/Cr |
Account/GL |
Amount Tag |
Dr |
Customer for Presenting |
Bk_Chg_Amt at Account branch |
Cr |
Return Cheque GL for Presenting |
Bk_Chg_Amt at Account branch |
If presenting bank charges are applicable for an outward return clearing transaction, then ‘Cheque Return Amount’ field will be derived based on the charge maintained for the respective reject code.
To add the accounting entries as part of the REVR event that includes with customer account with charges, the following events and accounting entries will be maintained.
6.3.4.2 Inward Return Handling without the parent match:
During the Inward Return File upload, in case the cheques are returned, when original parent contract cannot be identified, the system will check if the parameter ‘Process_return__without_ParentMatch’ is maintained as ‘Yes’. If Yes, the system will allow the return process as follows:
- An entry is created internally for the outward clearing transaction having the cheque amount as Cheque return amount + computed charges
- The system will not pass any accounting entries for the internally created outward clearing transaction.
- This is updated as’ Returned’ and RETN event will be triggered to handle the accounting entries
- Any inward returns without parent match cannot be handled through 6560
- The remarks field can be updated accordingly with an appropriate narration indicating that ‘This is Single cheque return that is a part of the bulk deposit’
The system will pass the following Accounting entries:
Event |
Account |
Dr/Cr |
Amount tag |
Transaction Code |
Branch Code |
RETN |
Customer |
Dr |
Cheque Amount (( Cheque_Retn_ amt + Charge amount)) |
Main Transaction code |
Account Branch |
RETN |
Income GL |
Cr |
Our Charge Amount |
Offset Transaction code |
Transaction Branch |
RETN |
Inward Return Suspense GL |
Cr |
Cheque_Retn_ amt |
Offset Transaction code |
Transaction Branch |
6.3.4.3 Amount Tags and Accounting Entries
Amount Tags
As part of cheque return amount and presenting bank charge amount, the following amount tags are passed:
- CHK_RETN_AMT [Cheque Return Amount] – The value for this amount tag will be derived as (Cheque Amount – Presenting bank charges)
- PresentingBk_Chg_Amt
Accounting Entries
As part of the REVR event, the following Accounting entries will be passed:
With Customer Account – With Charges (Insufficient Balance)
Event |
Account |
Dr/Cr |
Amount tag |
Transaction Code |
Branch Code |
REVR |
Customer |
Dr |
Cheque Amount |
Main Transaction Code |
Account Branch |
REVR |
Inward Suspense GL |
Cr |
Cheque Amount |
Offset Transaction Code |
Transaction Branch |
REVR |
Return Check GL at Account Branch |
Dr |
Cheque Amount |
Offset Transaction Code |
Account Branch |
REVR |
Customer |
Cr |
Cheque Amount |
Main Transaction Code |
Account Branch |
REVR |
Customer |
Dr |
Charge Amount |
Main Transaction Code |
Account Branch |
REVR |
Return Cheque GL at Account Branch |
Cr |
Charge Amount |
Offset Transaction Code |
Account Branch |
REVR |
Outward Return Susp GL |
Dr |
Cheque_Retn_ amt |
Offset Transaction Code |
Transaction Branch |
REVR |
Return Cheque GL at Account Brn |
Cr |
Cheque_Retn_ amt |
Offset Transaction Code |
Account Branch |
Cheque Return Amount = Cheque Amount – Charge Amount
With Customer Account –Without Charges
Event |
Account |
Dr/Cr |
Amount tag |
Transaction Code |
Branch Code |
REVR |
Customer |
Dr |
Cheque Amount |
Main Transaction Code |
Account Branch |
REVR |
Inward Suspense GL |
Cr |
Cheque Amount |
Offset Transaction Code |
Transaction Branch |
REVR |
Return Cheque GL at Account Branch |
Dr |
Cheque Amount |
Offset Transaction Code |
Account Branch |
REVR |
Customer |
Cr |
ChequeAmount |
Main Transaction Code |
Account Branch |
REVR |
Outward Return Susp GL |
Dr |
Cheque_Retn_ amt |
Offset Transaction Code |
Transaction Branch |
REVR |
Return Cheque GL at Account Branch |
Cr |
Cheque_Retn_ amt |
Offset Transaction Code |
Account Branch |
Without Customer Account – Without Charges
Event |
Account |
Dr/Cr |
Amount tag |
Transaction Code |
Branch Code |
REVR |
Return Cheque GL at Clearing Branch |
Dr |
Cheque Amount |
Offset Transaction Code |
Clearing Branch |
REVR |
Inward Suspense GL |
Cr |
Cheque Amount |
Offset Transaction Code |
Transaction Branch |
REVR |
Outward Return Susp GL |
Dr |
Cheque Amount |
Offset Transaction Code |
Transaction Branch |
REVR |
Return Check GL at Clearing Branch |
Cr |
Cheque Amount |
Offset Transaction Code |
Clearing Branch |
If the account is not found during the Inward clearing reject and if the ‘Update Cheque return in the Customer Account’ is not selected at the Clearing Reject Code Maintenance. then the system will not trigger the customer level entries. The charge related details will be maintained in the arc set up for the corresponding CG product. The charges related accounting entries will not be triggered if the account is not found during Inward clearing reject.
In case of handling returns for successfully processed Inward clearing transactions, the system will first reverse the entries that is passed as part of Inward clearing transaction and pass the newly introduced reject entries as well as part of this REVR event. This process is performed using ‘Inward Cheque Return’ screen.
The accounting entries that will be triggered as part of REVR event during return of an successfully processed Inward Clearing transaction will be as follows:
Event |
Account |
Dr/Cr |
Amount tag |
Transaction Code |
Branch Code |
REVR |
Customer |
Dr |
(-) Cheque Amount |
Main Transaction Code |
Account Branch |
REVR |
Inward Suspense GL |
Cr |
(-) Cheque Amount |
Offset Transaction Code |
Transaction Branch |
REVR |
Return Cheque GL at Account Branch |
Dr |
Cheque Amount |
Offset Transaction Code |
Account Branch |
REVR |
Inward Suspense GL |
Cr |
Cheque Amount |
Offset Transaction Code |
Transaction Branch |
REVR |
Outward Return Susp GL |
Dr |
Cheque_Retn_ amt |
Offset Transaction Code |
Transaction Branch |
REVR |
Return Cheque GL at Account Branch |
Cr |
Cheque_Retn_ amt |
Offset Transaction Code |
Account Branch |
Note
During this scenario, the system should not trigger the Customer cheque bounce entries even if ‘Update Cheque return in the Customer Account’ is specified at the Clearing Reject Code Maintenance.
6.4 Query Clearing (Repair) Upload Summary
This section contains the following topics:
- Section 6.4.1, "Querying Clearing (Repair) Upload Summary"
- Section 6.4.2, "Inward Clearing of Instruments"
- Section 6.4.3, "Validating Returned Outward Clearing Transaction"
6.4.1 Querying Clearing (Repair) Upload Summary
You can modify the details for multiple clearing transactions using ‘Query Clearing Upload’ screen. You can use this screen for both inward clearing as well as outgoing clearing transactions and you can also authorize, reject clearing transactions in bulk.
You can invoke this screen by typing ‘CGDCLGDT’ in the field at the top right corner of the Application tool bar and clicking on the adjoining arrow button.
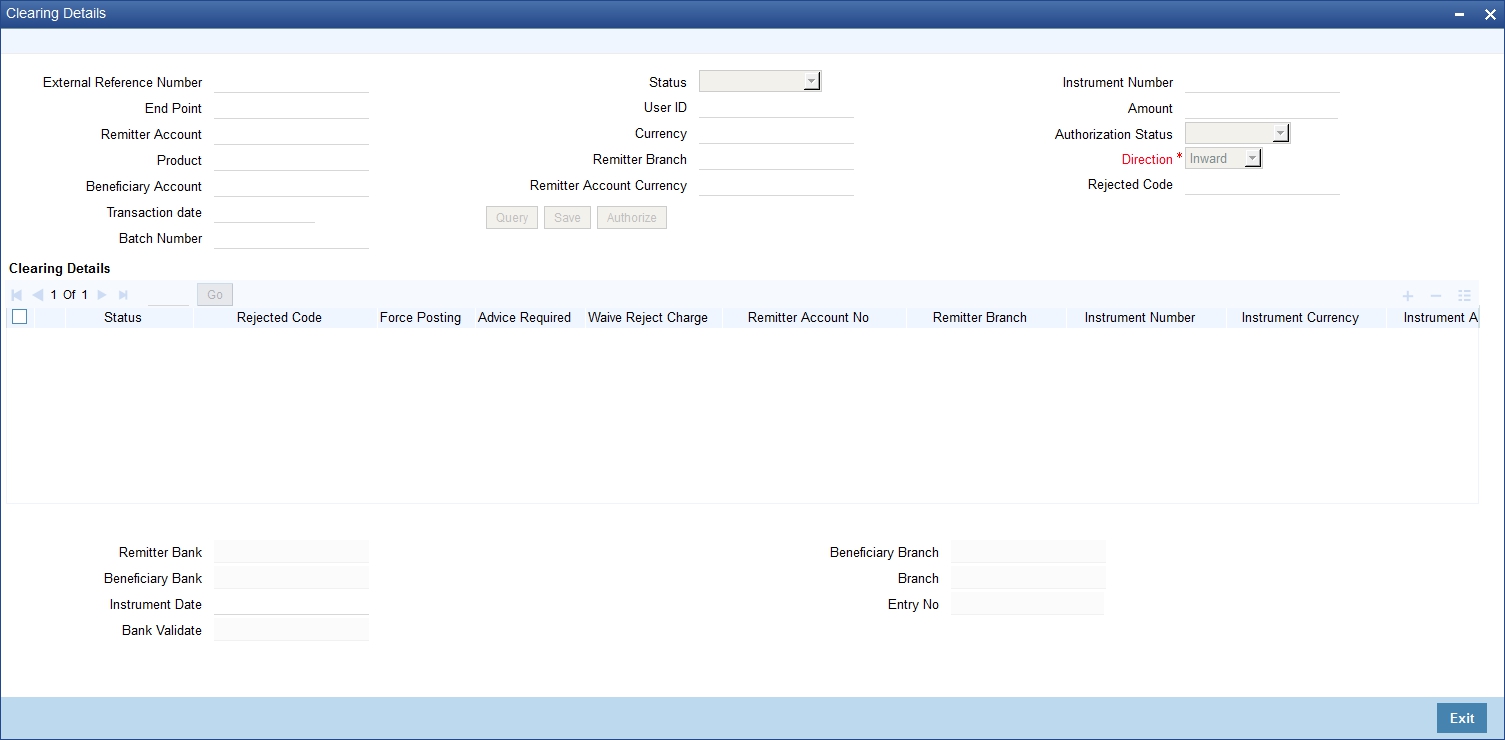
You can query the multiple clearing transactions based on:
External Reference No
Specify the external reference of the transaction you are querying. This adjoining option list displays all valid external reference numbers maintained in the system. You can choose the appropriate one.
The system displays the following details corresponding to the specified External Reference No. However, you can modify them, if the default status is not ‘Success’.
End Point
Specify the end point/clearing house of the transaction you are querying. This adjoining option list displays all valid end points maintained in the system. You can choose the appropriate one.
Remitter Account No
Specify the remitter account number of the transaction you are querying. This adjoining option list displays all valid external remitter account numbers maintained in the system. You can choose the appropriate one.
Product
Specify the clearing product of the transaction you are querying. This adjoining option list displays all valid clearing product codes maintained in the system. You can choose the appropriate one.
Beneficiary Account
Specify the beneficiary account you are querying. This adjoining option list displays all valid beneficiary account numbers maintained in the system. You can choose the appropriate one.
Transaction Date
Enter the transaction date you are querying.
User Id
Specify user Id who input the transaction you are querying. This adjoining option list displays all valid user Ids maintained in the system. You can choose the appropriate one.
Status
Select the status of the transaction you are querying from the drop-down list:
- Overrides
- Unprocessed
- Success
- Dishonour Return
- Error
Currency
Specify currency of the instrument you are querying. This adjoining option list displays all valid currencies maintained in the system. You can choose the appropriate one.
Remitter Branch
Specify remitter branch you are querying. This adjoining option list displays all valid remitter branches maintained in the system. You can choose the appropriate one.
Remitter Account Currency
Specify remitter account currency you are querying. This adjoining option list displays all valid remitter account currencies maintained in the system. You can choose the appropriate one.
Instrument No
Specify instrument number you are querying.
Amount
Specify the instrument amount you are querying.
Authorization Status
Select the authorization status of the transaction you are querying from the drop-down list:
- Authorized
- Unauthorized
Direction
Select the direction of the transaction you are querying from the drop-down list:
- Inward
- Outward
Rejected Code
Specify reject reason code for querying. This adjoining option list displays all valid reject codes maintained in the system. You can choose the appropriate one.
te one.
Batch Number
Specify the batch number for the transaction you want to query.
Click ‘Search’ button to view the records based on criteria you have selected. The following details of the record get displayed:
Clearing Details:
- Status
- Rejected Code
- Force Posting
- Advice Required
- Waive Reject Charge – Rejection charge will be waived if this box is checked.Remitter Account No
- Remitter Branch
- Instrument Number
- Instrument Currency
- Instrument Amount
- Cheque Return Amount
- Charge Amount
- Liquidation Date
- Product
- Contract Reference
- Beneficiary Account
- Beneficiary Customer
- Remarks
- Beneficiary Routing Number
- Routing No
- End Point
- External Reference Number
- Maker ID
- Release Time
- Check ID
- Checker Date Stamp
- Authorization Status
- Source Code
- Instrument Type
- Error Code
- Error Parameters
- Upload Status
The system displays the following details:
- Remitter Bank
- Beneficiary Bank
- Bank Validate
- Beneficiary Branch
- Branch
- Entry No
Instrument Date
Specify the instrument date.
6.4.2 Inward Clearing of Instruments
You can process the failed inward clearing transactions of instruments using ‘Query Clearing Upload’ screen. You can invoke this screen by typing ‘CGDCLGDT’ in the field at the top right corner of the Application tool bar and clicking on the adjoining arrow button.
To process the failed inward clearing transactions of instruments,
- Specify the instrument type from the adjoining option list.
- Select the status as ‘Error’ from the drop-down list.
- Click the ‘Query’ button to view all the failed transactions.
- Change the status as ‘Unprocessed’, to process the transactions failed due to expired instrument.
Note
- You need to revalidate the instrument before processing them from the clearing repair screen. If not, system will display the error message and the status will be updated as ‘ERRR’.
- The cheque cannot be rejected after the return marking cut off time, however will be postponed to the next working day.
6.4.3 Validating Returned Outward Clearing Transaction
If the outward clearing transaction is returned from ‘Clearing Repair Screen’ (CGDCLGDT); ‘Cheque Return Screen’ (6560); ‘Clearing Log Screen’ (IFDCLGDT), on save, the following validation will be done
- If the current time is greater than the return cut-off time maintained in the ‘Clearing Cut off Time Maintenance’ screen, system will display the following error message as “Return marking is not allowed for the day”.
- If the return cut-off time is not maintained in the ‘Clearing Cut off Time Maintenance’ screen, system will use the cut-off time maintained in the ‘Clearing Branch Parameter’ screen.
- On successful validation, the upload status would be changed to ‘Unprocessed’ and after authorization; the cheque return will be processed.
Note
Return cut-off time would be validated only for the outward clearing returns of cheques.
6.5 Inward Query Clearing Upload
This section contains the following topic:
6.5.1 Invoking Inward Query Clearing Upload
You can invoke this screen by typing ‘CGDIWCGD’ in the field at the top right corner of the Application tool bar and clicking on the adjoining arrow button.
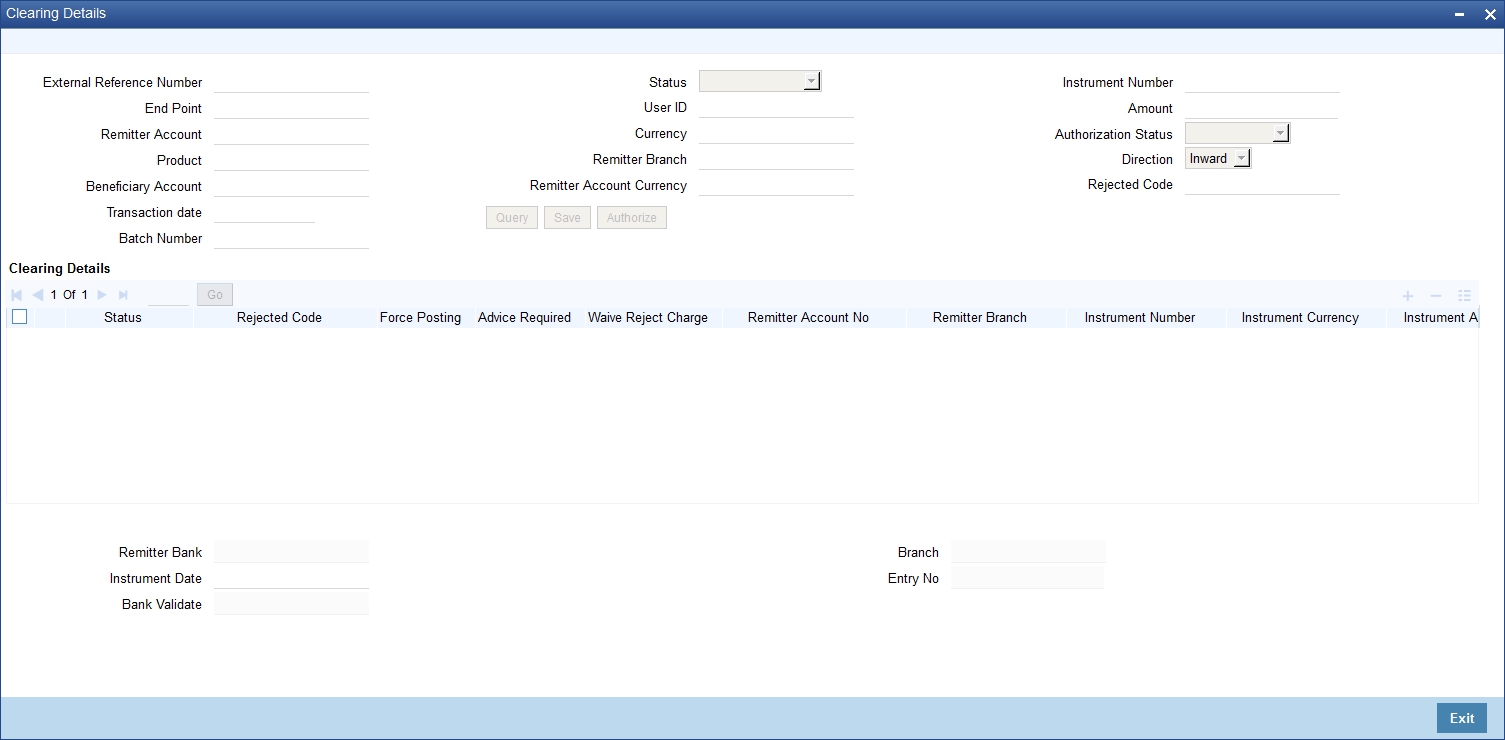
You can query the multiple clearing transactions based on:
External Reference No
Specify the external reference of the transaction you are querying. This adjoining option list displays all valid external reference numbers maintained in the system. You can choose the appropriate one.
The system displays the following details corresponding to the specified External Reference No. However, you can modify them, if the default status is not ‘Success’.
End Point
Specify the end point/clearing house of the transaction you are querying. This adjoining option list displays all valid end points maintained in the system. You can choose the appropriate one.
Remitter Account No
Specify the remitter account number of the transaction you are querying. This adjoining option list displays all valid external remitter account numbers maintained in the system. You can choose the appropriate one.
Product
Specify the clearing product of the transaction you are querying. This adjoining option list displays all valid clearing product codes maintained in the system. You can choose the appropriate one.
Beneficiary Account
Specify the beneficiary account you are querying. This adjoining option list displays all valid beneficiary account numbers maintained in the system. You can choose the appropriate one.
Transaction Date
Enter the transaction date you are querying.
User Id
Specify user Id who input the transaction you are querying. This adjoining option list displays all valid user Ids maintained in the system. You can choose the appropriate one.
Status
Select the status of the transaction you are querying from the drop-down list:
- Overrides
- Unprocessed
- Success
- Dishonour Return
- Error
Currency
Specify currency of the instrument you are querying. This adjoining option list displays all valid currencies maintained in the system. You can choose the appropriate one.
Remitter Branch
Specify remitter branch you are querying. This adjoining option list displays all valid remitter branches maintained in the system. You can choose the appropriate one.
Remitter Account Currency
Specify remitter account currency you are querying. This adjoining option list displays all valid remitter account currencies maintained in the system. You can choose the appropriate one.
Instrument No
Specify instrument number you are querying.
Amount
Specify the instrument amount you are querying.
Authorization Status
Select the authorization status of the transaction you are querying from the drop-down list:
- Authorized
- Unauthorized
Direction
Select the direction of the transaction you are querying from the drop-down list:
- Inward
- Outward
Rejected Code
Specify reject reason code for querying. This adjoining option list displays all valid reject codes maintained in the system. You can choose the appropriate one.
Batch Number
Specify the batch number for the transaction you want to query.
Click ‘Search’ button to view the records based on criteria you have selected. The following details of the record get displayed:
Clearing Details:
- Status
- Rejected Code
- Force Posting
- Advice Required
- Waive Reject Charge – Rejection charge will be waived if this box is checked.Remitter Account No
- Remitter Account Number
- Remitter Branch
- Instrument Number
- Instrument Currency
- Instrument Amount
- Cheque Return Amount
- Presenting Bank Charge Amount
- Liquidation Date
- Product
- Contract Reference
- Beneficiary Account
- Beneficiary Customer
- Remarks
- Beneficiary Routing No
- Routing Number
- End Point
- External Reference Number
- Maker ID
- Release Time
- Check ID
- Checker Date Stamp
- Authorization Status
- Source Code
- Instrument Type
- Error Code
- Error Parameters
- Upload Status
The system displays the following details:
- Remitter Bank
- Bank Validate
- Branch
- Entry No
Instrument Date
Specify the instrument date.
6.6 Intra-day Clearing Batch Process
This section contains the following topic:
6.6.1 Processing Intra-day Clearing Batch Process
The system runs Intra-day clearing batch process (CGFNDCHK) before the CGUPLOAD batch while the clearing upload records are still in the unprocessed state. This batch can also be triggered manually.This validates the Cheque amount and check the Drawer’s account balances for the unprocessed clearing records.
The system generates a report to give the details of the accounts with possible insufficient balances to pass the inward clearing cheques at the time of generation
The processing of this batch is as follows:
- On receipt of the inward clearing file from clearing house, the clearing data is uploaded into the Staging table with Clearing Status as ‘UNPR’ unprocessed so as to process the same from the upload batch
- Once the Intra-day Clearing batch (CGFNDCHK) is run, the system validates the Cheque amount and check the Drawer’s account balances of the unprocessed clearing records
- The clearing batch process updates all the unprocessed and unsimulated records with the status of the ‘Funds Check Simulation’ field on the ‘Summary/ Repair’ screen as Yes or No depending on the availability of sufficient account balances in the customer account. If Funds check simulation field is updated as N, the system further validates the inward clearing records in terms of Drawn Against Uncollected Deposits (DAUD) and Drawn Against Insufficient Funds (DAIF).
- The system generates the Funds Availability Simulation Report with
details of accounts with Funds check simulation check is No and clearing
processing status as ‘Unprocessed’ for that transaction date
- ‘Available Balance‘ in the Report is the Customer account balance without limits /cover account balance
- The field ‘Available Balance Including Limits/Cover account’ includes the limit /cover account balance, if the Primary Account is linked to a cover account. In this case, the system will perform the balance check for both the Primary Account and the corresponding cover account
- If the cheque amount is greater than the Available balance on simulation, but lesser than the Available Balance Including Limits/Cover account and withdraw-able uncollected balance, then system updates the OD type / Status as DAUD. If the cheque amount is greater than the Available Balance Including Limits/Cover + withdraw-able Uncollected fund, then the system updates OD type / Status as DAIF
- If multiple instruments are drawn on the same customer account in the inward clearing file, then on the run of the CGFNDCHK batch, the system validates the consolidated cheque amount for every customer account and updates the flag for these cheques based on the total amount availability in the Customer account. The ‘Funds Check Simulation’ field gets checked only if the total available balance in the Customer account is equal or greater than the consolidated Instrument amount
6.7 Clearing Auto Reject Mapping Maintenance
This section contains the following topic:
6.7.1 Invoking Clearing Auto Reject Mapping Maintenance Screen
You can map Oracle FLEXCUBE error codes to the corresponding Reject codes that will result in the auto reject of the incoming clearing transaction using ‘Clearing Auto Reject Mapping Maintenance’ screen. You can invoke this screen by typing ‘CGDERRCD’ in the field at the top right corner of the Application tool bar and clicking on the adjoining arrow button.
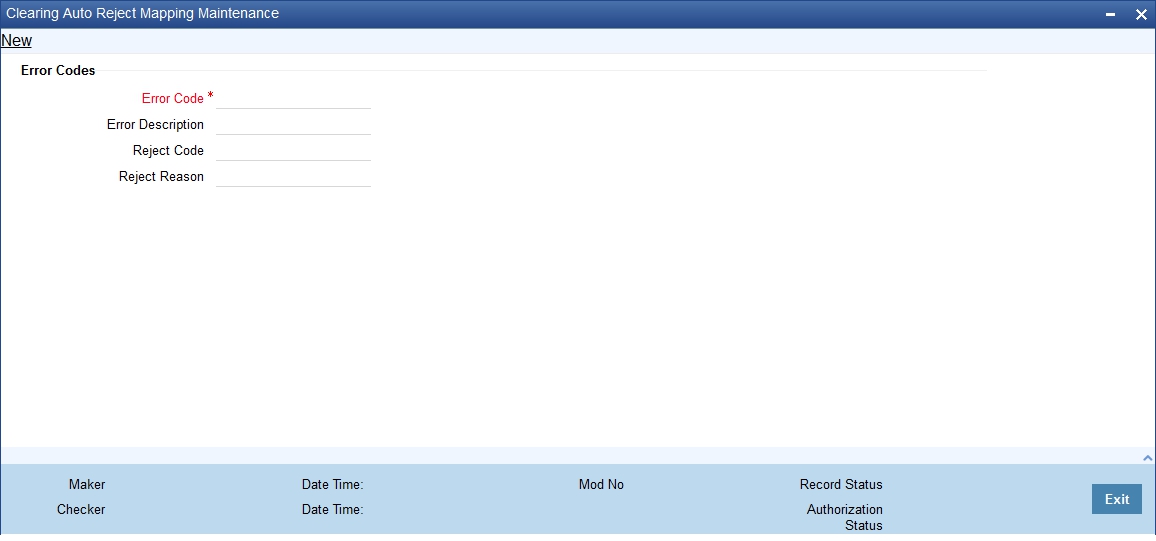
You can specify the following details:
Error Code
Specify the error code encountered due to the an exception resulting in the failure of an inward clearing transaction. Alternatively, you can select error code from the option list. The list displays all valid error codes maintained in the system.
Error Description
Specify the error description for the selected error code.
Reject Code
Specify the reject code maintained in the system specifically for auto rejection of Inward clearing transactions. Alternatively, you can select reject code from the option list. The list displays all valid reject codes maintained in the system.
Reject Reason
Specify the reject reason for the selected reject code.
If there corresponding set of exceptions mapped to the Reject codes that are marked for auto rejection, then the system will perform the following steps to automatically reject the incoming transactions
- The system will check if the exception error code is mapped with
Auto Reject/reason
- If Yes, the incoming clearing transaction will be rejected automatically
- If No, i.e. if error code is not mapped to the reject code in the ‘Clearing Auto Reject Mapping Maintenance’, the contracts will be in the error status in the CGDCLGDT/ IFDCLGDT screen.
- If the transactions are sent to the Referral queue, then based on the process defined, it can either be paid or rejected.In case the transaction is rejected, then the system will validate if the error codes are mapped for auto rejection and accordingly the transaction will get auto rejected.
6.8 Clearing Batch Process (CGUPLOAD)
This section contains the following topic:
- Section 6.8.1, "Processing Clearing Batch"
- Section 6.8.2, "Provision for populating Clearing Upload"
6.8.1 Processing Clearing Batch
CGUPLOAD batch can be configured as intra-day batch to process the uploaded clearing data. This will process the clearing upload data which are in unprocessed status and creates the clearing transaction based on the instrument type, instrument product.
- If the instrument type is ‘CHEQUE’, ‘DD’ or ‘BC’ and the product type is ‘OC’ (Outward clearing), the system will create the outward clearing transaction.
- If the instrument type is ‘CHEQUE’ and the product type is ‘IC’ (Inward clearing), the system will create the inward clearing transaction
- If the instrument type is ‘DD’ or ‘BC’ and the product type is not ‘OC’ (Outward Clearing) the system will trigger the liquidation process for the DD/BC instrument received for clearing.
- The Clearing batch process will update the status of the clearing upload data in the clearing log data store.
- If the clearing transaction is created successfully, the status will be updated as ‘SUCS’ in the clearing log data store which can be viewed from the ‘Clearing Log Summary’ screen.
- During accounting process, the system will fail the transaction based on the conversion error code maintenance for the accounting overrides.
- These transactions can be processed (fail to pass) from the ‘Clearing Log/Repair’ screen.
- If transaction is failed during batch process, the system would update the status as ‘ERRR’ with error code and error description in the clearing log, which can be viewed from clearing log summary (IFSCLGDT) or Clearing Repair Screen (CGDCLGDT).
- You can manually correct the error data from the ‘Clearing Bulk Repair’ screen.
6.8.2 Provision for populating Clearing Upload
The excel upload process exposed by the system can be utilized to upload the clearing data into the clearing log data store.
The following are the fields which are mandatory for both Inward and Outward Clearing:
Field |
Description |
Data Type |
INSTRNO |
Instrument number |
Number |
PROD |
Product code (inward clearing product) |
String |
INSTRCCY |
Instrument currency |
String |
INSTRAMT |
Instrument amount |
Number |
ROUTINGNO |
Routing Number |
String |
The following are the fields which are mandatory for Inward Clearing:
Field |
Description |
Data Type |
REMACCOUNT |
Remitter account |
Number |
ENDPOINT |
End point |
String |
The following are the fields which are mandatory for Outward Clearing:Clearing Intra-day Batch ProcessThis section contains the following topic:
Field |
Description |
Data Type |
BENACCOUNT |
Beneficiary account |
Number |
INSTRDATE |
Instrument date |
Date |
6.8.3 Processing Clearing Intra-day Batch Process
The clearing intra-day batch (CGOUTBAT) will read the outward and outward LOCH clearing cheques for the current date and pass a consolidated entry at the branch level for the total number of cheque amount.
The clearing intra-day batch (CGINBAT) will read the inward and inward LOCH clearing cheques for the current date and pass a consolidated entry at the branch level for the total number of cheque amount in the file.
The clearing intra-day batch (CGOUTRBT) will read the outward return and outward LOCH return clearing cheques for the current date and pass a consolidated entry at the branch level for the total number of cheque amount in the file.
The clearing intra-day batch (CGINRBAT) will read the inward return and inward LOCH return clearing cheques for the current date and pass a consolidated entry at the branch level for the total number of cheque amount.
You can trigger the consolidated entry for the total cheque amount in the Outward Clearing file. using CGOUTBAT batch. This batch will consider all the Outward clearing contracts with clearing date as current system date and based on the end point, product code and consolidation status combination and pass a consolidated entry for the total cheque amount for the branch as follows and update the consolidation status field:
Cr/Dr Indicator |
Account/GL |
Amount Tag |
Dr |
Clearing Nostro/Central Bank Account |
FILE_AMT |
Cr |
Outward Suspense GL |
FILE_AMT |
This batch job will trigger the consolidated entry for both Normal Outward and In-house clearing contracts.
The system will check if consolidation batch is executed prior to clearing upload batch. The system will update consolidated reference number against the individual cheques which were part of the consolidation amount.
If the CGINBAT is run prior to the clearing upload batch, the system will consider all the Return/reject of Inward clearing contracts based on the clearing type ‘IC’, file reference number or batch number and status as REJE and pass the consolidated batch entry for the Outward Return as follows:
Cr/Dr Indicator |
Account/GL |
Amount Tag |
Dr |
Clearing Nostro/Central Bank Account |
FILE_AMT |
Cr |
Outward Return Suspence GL |
FILE_AMT |
The CGOUTRBT batch will trigger to pass the above mentioned consolidated entries for outward return and below mentioned outward LOCH return clearing contracts. The following batch entry will be triggered for LOCH process. The Internal Susp GL and Internal Return Susp GL will be fetched from the End point GL maintenance.
Outward LOCH Process:
Cr/Dr Indicator |
Account/GL |
Amount Tag |
Dr |
Clearing Nostro Account/GL |
FILE_AMT |
Cr |
Outward Suspence GL |
FILE_AMT |
Outward Return LOCH:
Cr/Dr Indicator |
Account/GL |
Amount Tag |
Dr |
Clearing Nostro Account/GL |
FILE_AMT |
Cr |
Outward Return Suspence GL |
FILE_AMT |
Note
- Any outward clearing transaction will not be allowed to return before dispatch (or) CGOUTBAT is run
- Any outward clearing transaction will not be allowed to reverse from Branch workflow screen after dispatch (or) CGOUTBAT is run
6.8.3.1 Uploading Inward Clearing File
The system will upload inward clearing file and pass consolidated entry for the total cheque amount at branch level as follows:
- Inward clearing file is a fixed flat file of 64 bytes for each record
and file records are divided into 5 parts as follows.
- Header: Indicates the beginning of inward clearing file
- Record details: Indicates the cheque details for each branch
- Branch Footer: This record will appear after record details for every branch details and will be repeated for every unique branch details in the file and will give details on the total cheque for the branch and the total amount
- Bank footer: This record will appear after all record and branch detail and will display the total amount for the bank and the number of branch in the file
- Footer Details: Indicates the end of clearing file
- On receipt of the inward clearing file from clearing house, the clearing data is uploaded into the inward Staging table with Clearing Status as ‘UNPR’ unprocessed so as to process the same from the upload batch.
- The system will read the data from file and convert it into Oracle FLEXCUBE format. It will then identify all the record details for every unique branch and upload the same records.
- The system will upload the inward files at Java application layer.
- Clearing upload batch will be run to process the individual inward cheques.
- Once the Clearing batch ‘CGINBAT’ is run, based on the
clearing type ‘IC’ and file reference number or batch number,
the system will pass a consolidated entry for the total cheque amount
for the branch as follows:
Cr/Dr Indicator
Account/GL
Amount Tag
Dr
Inward Suspense GL
FILE_AMT
Cr
Clearing Nostro/Central Bank Account
FILE_AMT
- Inward LOCH will be treated as normal inward clearing with no details
being sent to clearing house. Following batch entry will be passed for
LOCH transactions:
Cr/Dr Indicator
Account/GL
Amount Tag
Dr
Inward Suspense GL
FILE_AMT
Cr
Clearing Nostro Account/GL
FILE_AMT
- The system will update consolidated reference number against the individual cheques which were part of the consolidation amount.
- Consolidation entry will be passed for every branch in the received inward file.
Uploading Inward Return Clearing File
The system will upload inward return clearing file and pass consolidated entry for the total cheque amount at branch level as follows:
- Inward clearing file is a fixed flat file of 64 bytes for each record
and file records are divided into 5 parts as follows.
- Header: Indicates the beginning of inward clearing file.
- Record details: Indicates the cheque details for each branch.
- Branch Footer: This record will appear after record details for every branch details and will be repeated for every unique branch details in the file and will give details on the total cheque for the branch and the total amount.
- Bank footer: This record will appear after all record and branch detail and will display the total amount for the bank and the number of branch in the file.
- Footer Details: Indicates the end of clearing file.
- On receipt of the inward clearing file from clearing house, the clearing data is uploaded into the inward return Staging table with Clearing Status as ‘UNPR’ unprocessed so as to process the same from the upload batch.
- The system will read the data from file and convert it into Oracle FLEXCUBE format. It will then identify all the record details for every unique branch and upload the same records.
- The system will upload the inward files at Java application layer.
- Clearing upload batch will be run to process the individual inward cheques.
- Once the new Clearing batch ‘CGINRBAT’ is run, based
on the clearing type ‘IC and file reference number or batch number
a consolidated entry will be passed for the total cheque amount for the
branch as follows:
Cr/Dr Indicator
Account/GL
Amount Tag
Dr
Inward Return Suspense GL
FILE_AMT
Cr
Clearing Nostro/ Central Bank Account
FILE_AMT
- Inward LOCH Return will also be treated as normal inward return clearing
with no details being sent to clearing house. Following batch entry will
be triggered for LOCH return:
Cr/Dr Indicator
Account/GL
Amount Tag
Dr
Inward Return Suspense GL
FILE_AMT
Cr
Clearing Nostro Account/ GL
FILE_AMT
- The system will update consolidated reference number against the individual cheques which were part of the consolidation amount.
- Consolidation entry will be passed for every branch in the received inward file.