3. External System Maintenance
3.1 Introduction
This chapter contains the following sections:
- Section 3.2, "External System"
- Section 3.3, "Access Rights to an External System"
- Section 3.4, "Gateway Password Generation Logic For External System Authentication"
- Section 3.5, "Incoming Message Browser"
- Section 3.6, "Duplicate Message Browser"
- Section 3.7, "Outgoing Message Browser"
- Section 3.8, "Defining Notification Messages"
- Section 3.9, "Defining the Notifications Enroutes"
- Section 3.10, "Maintaining MT Task Details"
- Section 3.11, "Amendment Maintenance"
3.2 External System
This section contains the following topics:
- Section 3.2.1, "Defining an External System"
- Section 3.2.2, "Specifying External System Details"
- Section 3.2.3, "Indicating Correlation Pattern "
- Section 3.2.4, "Specifying Message Exchange Pattern"
- Section 3.2.5, "Specifying Queue Details"
- Section 3.2.6, "Specifying External System Queue Details"
- Section 3.2.7, "Viewing External System Details"
- Section 3.2.8, "Accessing Services and Operations "
3.2.1 Defining an External System
You need to define an external system that will communicate with the Oracle FLEXCUBE Integration Gateway.
You can define an external system using the ‘External System – Detailed’ screen.
You can invoke this screen by typing ‘GWDEXSYS’ in the field at the top right corner of the Application tool bar and clicking the adjoining arrow button.
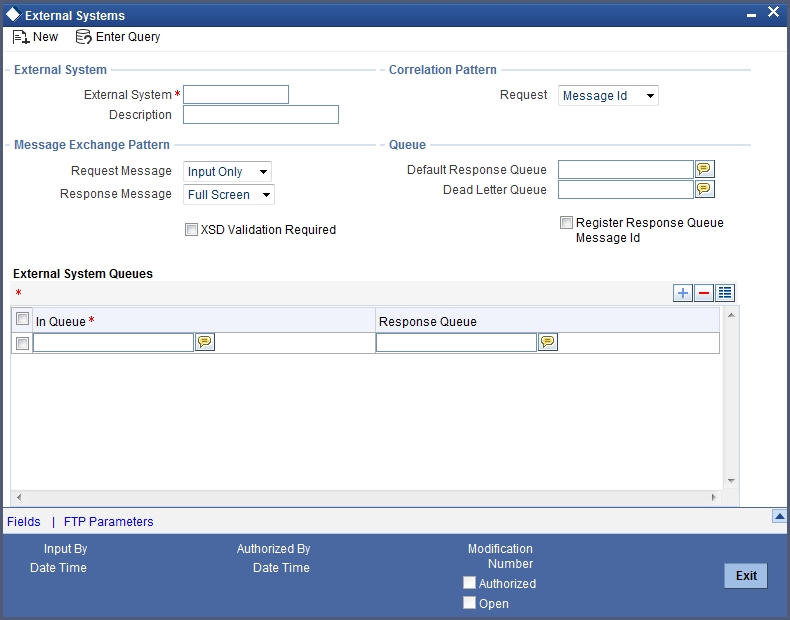
The various details required by the ‘External System - Detailed’ screen are described below.
3.2.2 Specifying External System Details
External System
Specify a name for the external system. This should be the same as the Source in an incoming message.
Description
Specify a brief description for the External System.
3.2.3 Indicating Correlation Pattern
Request
You can define a way in which the external system should correlate its request message with the response message. You can choose Message ID of a request message as the Correlation ID in the response message. Alternatively, you can choose Correlation ID of a request message and maintain it as the Correlation ID of the corresponding response message.
3.2.4 Specifying Message Exchange Pattern
Request Message
You can choose the Request message to be ‘Full Screen’ or ‘Input Only’. If you select ‘Full Screen’ as the request message, the response message will also display ‘Full Screen’.
Response Message
You can choose the Response message to be ‘Full Screen’ or ‘Record Identification Msg’.
Note
You can select ‘Record Identification Msg’ as the response message only if you select ‘Input Only’ in the request message.
3.2.5 Specifying Queue Details
Default Response Queue
You can define a response queue for each of the In Queue’s through which the External System will communicate with Oracle FLEXCUBE. Define a valid queue name as the Default Response Queue.
Dead Letter Queue
If the messages received are non-readable, such messages are directed to Dead Letter Queue defined for the external system.
Note
If the Dead Letter Queue is not defined, such messages will be redirected to a queue with the name of the request queue appended with ‘_E’.
XSD Validation Required
Check this box to indicate if the request message should be validated against its corresponding XSD.
Register Response Queue Message ID
Check this box to indicate if the message ID provided by the Response Queue should be logged when a response message is posted into the queue.
3.2.6 Specifying External System Queue Details
The ‘External System Queues’ list contains the ‘In Queue’ and ‘Response Queue’ lists. To add a record to the ‘External System Queues’ list click add icon. To delete a record from the list, select the record using its check box and then click delete icon.
In Queue
Specify the name of the queue from which the messages were received. The name of the queue will help identify the external system.
Note
This is required only if an incoming message does not display the source of the message. An In Queue is mapped to only one External System.
You can map multiple queues to a source. System will allow a source to post messages to multiple queues.
Response Queue
You can define Response Queue for every In Queue. This is required only when the External System fails to display the queue name on posting a request message into the In Queue.
3.2.7 Viewing External System Details
The details of previously defined external Systems can be viewed using the ‘External System - Summary’ screen as shown below. You can invoke this screen by typing ‘GWSEXSYS’ in the field at the top right corner of the Application tool bar and clicking the adjoining arrow button.
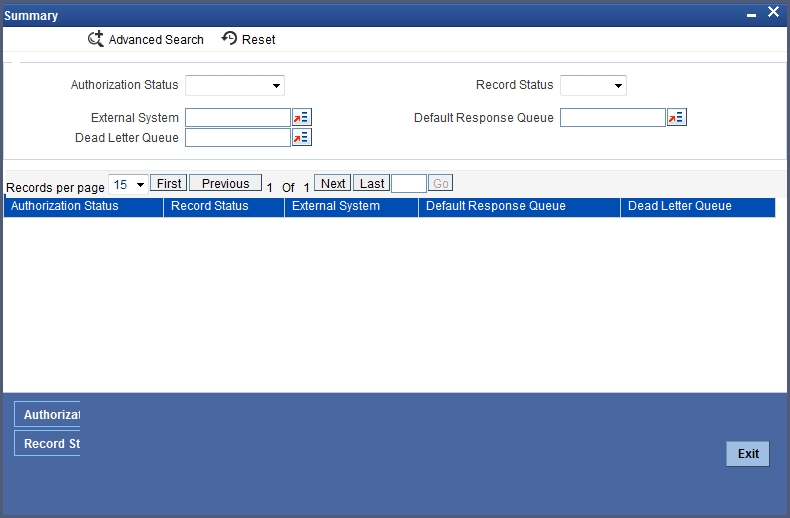
This summary screen can be used to search for external systems which match the data specified for any of the following criteria:
- Authorization Status
- External System
- Dead Letter Queue
- Record Status
- Default Response Queue
The ‘Result’ list shows the external systems which match your query. The search functions available are:
Advanced
Click Advanced to specify queries with logical operators such as AND, OR and NOT.
Reset
Click Reset to empty the values in the criteria fields, so that you may begin a new search.
Query
After specifying your search criteria click Query to view the list of results which match your search criteria.
Refresh
Click Refresh to refresh the list of results.
3.2.8 Accessing Services and Operations
In a message it is mandatory to maintain a list of Service Names and Operation Codes. This information is called Gateway Operations.
A combination of every such Service Name and Operation Code is mapped to a combination of Function ID and Action. Every screen in Oracle FLEXCUBE is linked with a function ID. This information is called Gateway Functions.
You can gain access to an external system using the Gateway Functions. The Function IDs mapped in Gateway Functions should be valid Function IDs maintained in Oracle FLEXCUBE. Hence, for every new Service or Operation being introduced, it is important that you provide data in Gateway Operations and Gateway Functions.
Refer the Message Formats chapter for more information on Services and Operations.
3.3 Access Rights to an External System
This section contains the following topics:
- Section 3.3.1, "Defining Access Rights to an External System"
- Section 3.3.2, "Viewing External System Function Details"
- Section 3.3.3, "Defining Access Rights to a User ID"
- Section 3.3.4, "Maintaining Upload Source Details"
- Section 3.3.5, "Specifying Upload Source Preferences"
- Section 3.3.6, "Maintaining Function ID Preferences"
3.3.1 Defining Access Rights to an External System
You can define access rights to an external system using the ‘External System Functions – Detailed’ screen.
You can invoke this screen by typing ‘GWDEXFUN’ in the field at the top right corner of the Application tool bar and clicking the adjoining arrow button.
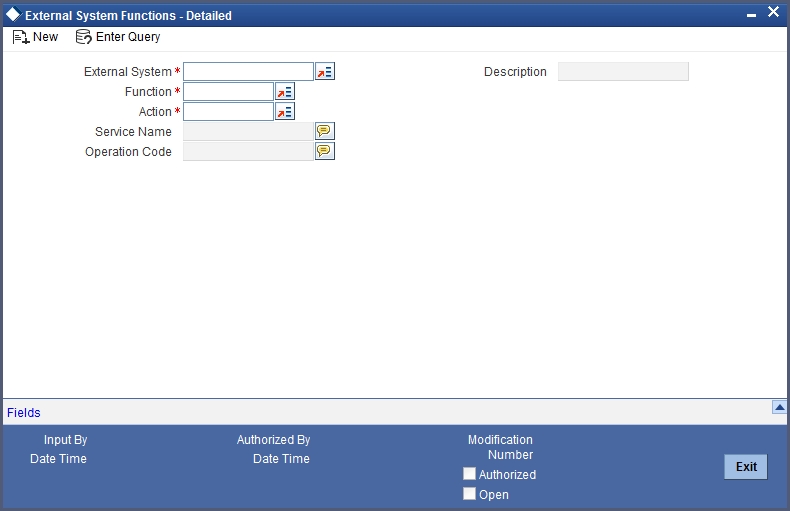
In the above screen, you need to specify the following details:
External System
Select an external system for which you wish to provide access rights. The adjoining option list displays all the external systems you have maintained in the ‘External Systems – Detailed’ screen.
Function ID
Select a Function ID from the list of values by clicking the adjoining option list. The function ids are invoked from Gateway Functions.
Action
Select an action for the external system from the option list provided.
Service Name
This displays the service name based on the Function ID and Action you select.
Operation Code
This displays the Operation Code based on the Function ID and Action you select.
3.3.2 Viewing External System Function Details
You can view the access rights details which have already been defined using the 'External System Functions - Summary' screen as shown below. You can invoke this screen by typing ‘GWSEXFUN’ in the field at the top right corner of the Application tool bar and clicking the adjoining arrow button.
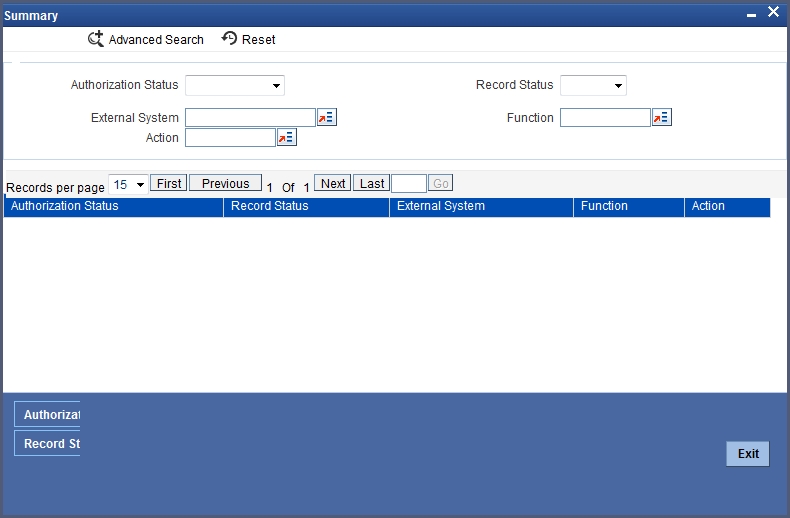
This summary screen can be used to search for external system functions which match any of the following criteria:
- Authorization Status
- External System
- Record Status
- Action
- Function
The ‘Result’ list shows the external system functions which match your query. The search functions available are:
Advanced
Click Advanced to specify queries with logical operators such as AND, OR and NOT.
Reset
Click Reset to empty the values in the criteria fields, so that you may begin a new search.
Query
After specifying your search criteria click Query to view the list of results which match your search criteria.
Refresh
Click Refresh to refresh the list of results.
3.3.3 Defining Access Rights to a User ID
For a User ID to access a request message, you can individually map each Function ID to a User ID.
Note
You can provide access to functions only if the Function IDs provided in Gateway Functions are valid.
3.3.4 Maintaining Upload Source Details
Oracle FLEXCUBE facilitates upload of data from an external source. The details of the source from which data has to be uploaded need to be maintained in Oracle FLEXCUBE using the ‘Upload Source Maintenance’ screen. You can invoke the ‘Upload Source Maintenance’ screen by typing ‘CODSORCE’ in the field at the top right corner of the Application tool bar and clicking the adjoining arrow button.
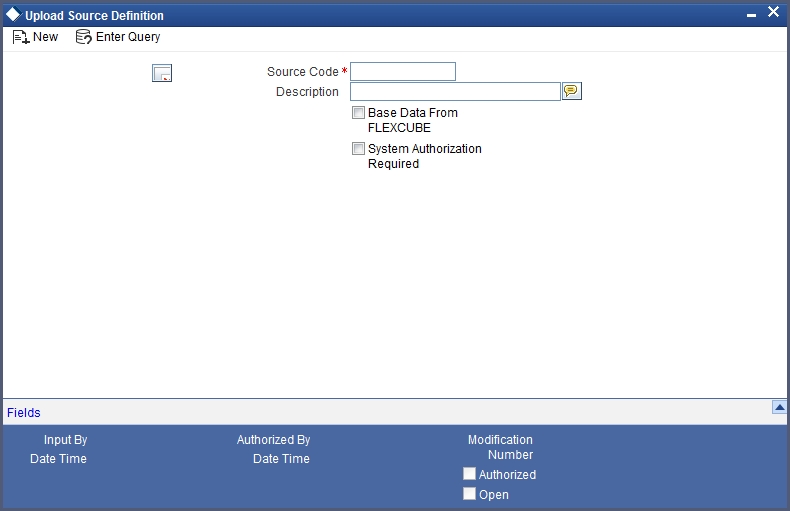
The following details need to be captured here:
Source Code
Specify a code for the for the source from which data has to be uploaded to Oracle FLEXCUBE.
Description
Give a small description for the source code specified.
Base Data From FLEXCUBE
Check this box to indicate if base data has to be uploaded from Oracle FLEXCUBE.
3.3.5 Specifying Upload Source Preferences
You can set preferences for upload of data from an external source in the ‘Upload Source Preferences Maintenance’ screen. You can invoke the ‘Upload Source Preferences Maintenance’ screen by typing ‘CODUPLDM’ in the field at the top right corner of the Application tool bar and clicking the adjoining arrow button.
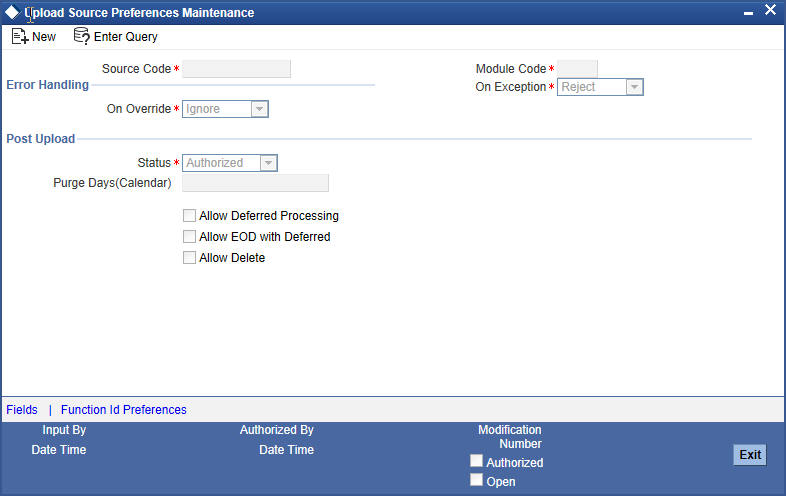
The following details are captured here:
Source Code
Select Source Code from the option list. Depending on the source code you select here data is uploaded from that source into Oracle FLEXCUBE.
Module Code
You can choose to upload data from a source directly onto a module in FLEXCUBE. Indicate the module into which you would like to upload data from a given source.
On Override
Oracle FLEXCUBE generates override messages in case it encounters any discrepancies during data upload. You can choose to do any of the following:
- Ignore – Select this option to ignore such error messages and continue with the upload process
- Put on Hold – Select this option to put the record on hold for user intervention later
- Reject – Select this option to reject the record
On Exception
In case a serious error occurs during data upload, Oracle FLEXCUBE generates an error message. You can choose to put the record with the error on hold. In such a case, choose ‘Put on Hold’ from the list of options available. If you would like to reject the record altogether, choose ‘Reject’.
Post Upload Status
If you would like to automatically authorize the data that is uploaded into Oracle FLEXCUBE choose the ‘Authorize’ option here.
If you would like the record to be put on hold choose this option in this field.
If you would like the record to be unauthorized, choose the ‘Unauthorized’ option in this field. The record will not be authorized automatically on upload. You will have to manually authorize the data.
Purge Days (Calendar)
Specify the days maintained for purging of the data uploaded.
Allow Deferred Processing
Check this option to defer processing of amendment and cancellation uploads.
Allow EOD with Deferred
Check this option to proceed even if the records exist in the deferred processing log.
If it is unchecked, then the EOD process halts until the deferred process log is cleared.
Allow Delete
Check this option to delete the process log.
3.3.6 Maintaining Function ID Preferences
Click ‘Function ID Preferences’ button in the ‘Upload Source Preferences Maintenance’ screen.
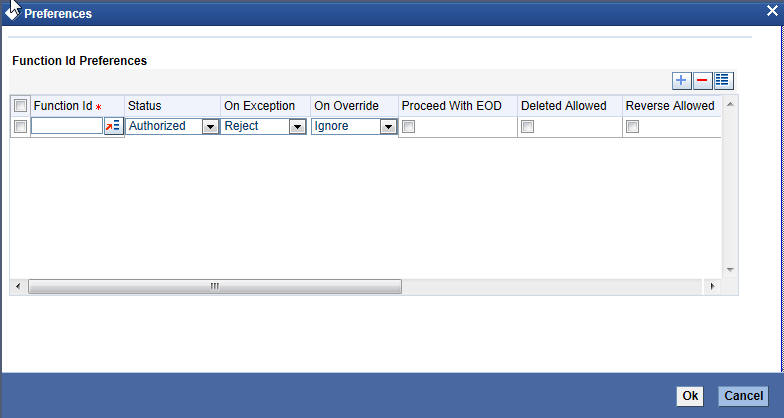
You can enter the following details:
Function Id
Specify the function ID. The adjoining option list displays all the function Ids maintained in the system. Select the appropriate one.
Status
Select the status of the record from the drop-down list and the available options are:
- Authorized
- Unauthorized
- Put On hold
On Exception
Select the record status in case of any exception while saving from the drop-down list and the available options are:
- Put On Hold
- Reject
On Override
Select the record status in case of any overriding a saved record.from the drop-down list and the available options are:
- Put On Hold
- Reject
- Ignore
Proceed With EOD
Check this box, if you wish to proceed with EOD.
Deleted Allowed
Check this box, if deleting is allowed.
Reverse Allowed
Check this box, if reversal is allowed.
Amend Allowed
Check this box, if amendment is allowed.
Purge Days (Calendar)
Specify the calendar purge days
Allow Deferred Processing
Check this box, if deferred processing is allowed.
Allow EOD with Deferred
Check this box, if EOD with deferred is allowed.
3.4 Gateway Password Generation Logic For External System Authentication
This section describes the Encryption information for gateway authentication.
If Password authentication is required for an external system, then check the ‘System Authentication Required’ check box while maintaining the External System details in CODSORCE.
Once this check box is checked Oracle FLEXCUBE validates for Encrypted password as part of every request sent by the External System. The password encryption logic as below:
3.4.1 Password and Message ID as input
Message ID, present as part of the header in Request XML, is considered as hash. External System generates an unique Message ID, which is functional mandatory field in the header. Create a Message Digest with SHA-512 algorithm.
The hash created from the previous step and the password in clear text together is encrypted in DESede encryption method. Apply Base64 encoding to encrypted value and send to the Oracle FLEXCUBE gateway.
3.5 Incoming Message Browser
The messages received from the external system will be displayed in the Incoming Message Browser.
You can invoke the ‘Incoming Message Browser’ screen by typing ‘GWDINBRW’ in the field at the top right corner of the Application tool bar and clicking the adjoining arrow button.
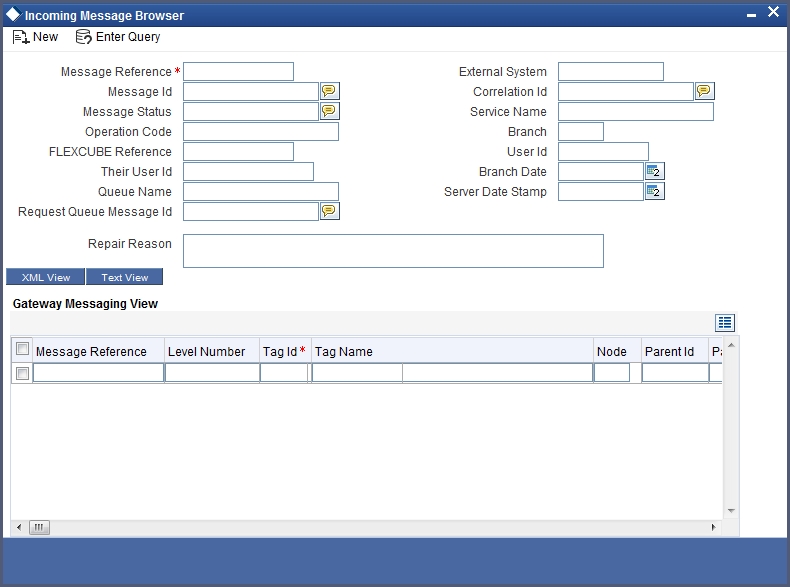
In the ‘Incoming Message Browser’ screen you can view the details of the messages received from the external systems. You can also view the messages in the XML format or the Text format.
Click ‘Text View’ button to view the incoming messages in text format as shown below:
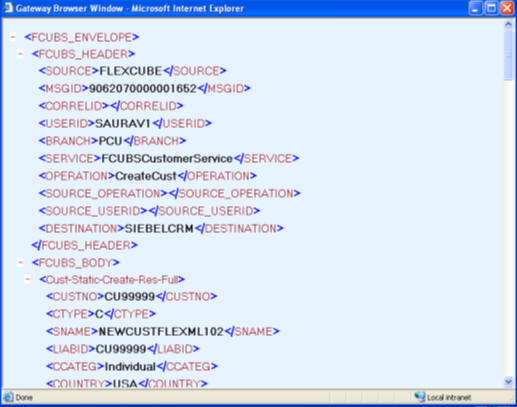
Click ‘XML View’ button to view the ‘Gateway Browser Window’ screen which displays the messages in XML format.
3.5.1 Viewing Incoming Message Details
The summary of all messages received from the external system can be viewed using the ‘Incoming Message Browser - Summary’ screen as shown below. You can invoke this screen by typing ‘GWSINBRW’ in the field at the top right corner of the Application tool bar and clicking the adjoining arrow button.
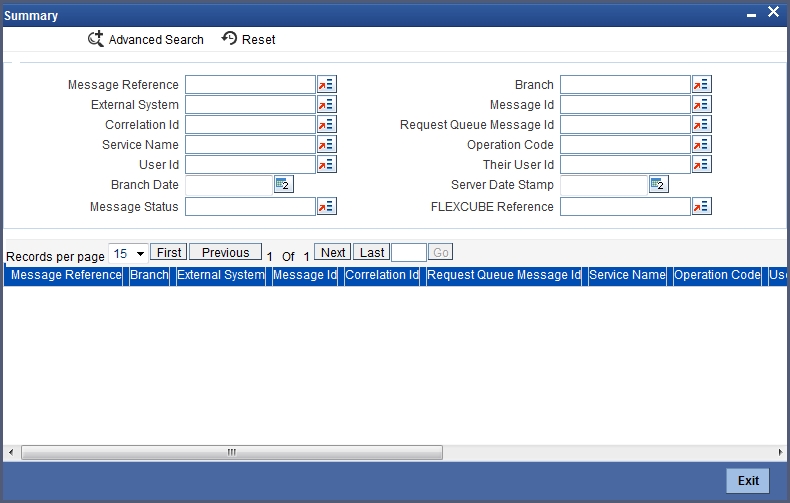
This summary screen can be used to search for incoming messages which match the criteria (Message Reference Number, External System, Service Name etc) you specify. The ‘Result’ list shows the messages which match your query. The search functions available are:
Advanced
Click Advanced to specify queries with logical operators such as AND, OR and NOT.
Reset
Click Reset to empty the values in the criteria fields, so that you may begin a new search.
Query
After specifying your search criteria click Query to view the list of results which match your search criteria.
Refresh
Click Refresh to refresh the list of results.
3.6 Duplicate Message Browser
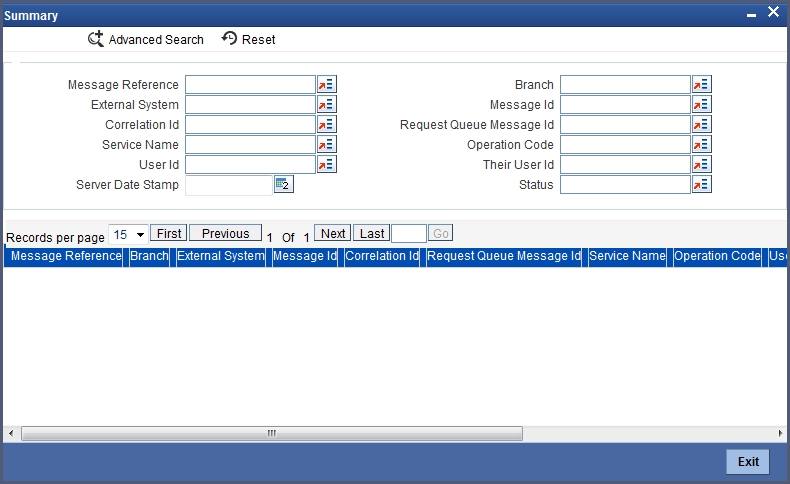
If Oracle FLEXCUBE Integration Gateway identifies a duplicate message it will be sent to the Duplicate Messages Browser. You can invoke the ‘Duplicate Message Browser - Summary’ screen by typing ‘GWSPBROW’ in the field at the top right corner of the Application tool bar and clicking the adjoining arrow button.
Click ‘Text View’ button in the ‘Duplicate Message Browser - Summary’ screen to view the duplicate messages in the text format.
Click ‘XML View’ button in the ‘Duplicate Message Browser - Summary’ screen to view the duplicate messages in the following format:

3.6.1 Querying Duplicate Message Browser
You can query the list of duplicate messages using the ‘Duplicate Message Browser - Summary’ screen with functions for search. You can invoke this screen by typing ‘GWSPBROW’ in the field at the top right corner of the Application tool bar and clicking the adjoining arrow button.

This query screen can be used to search for duplicate messages which match the criteria (Message Reference Number, External System, Service Name etc) you specify. The ‘Result’ list shows the messages which match your query. The search functions available are:
Advanced
Click Advanced to specify queries with logical operators such as AND, OR and NOT.
Reset
Click Reset to empty the values in the criteria fields, so that you may begin a new search.
Query
After specifying your search criteria click Query to view the list of results which match your search criteria.
Refresh
Click Refresh to refresh the list of results.
3.7 Outgoing Message Browser
Once the incoming messages have been processed, a response message will be sent to the external systems along with the status of the processed messages. The response messages will be displayed in the ‘Outgoing Message Browser’. You can invoke the ‘Outgoing Message Browser’ screen by typing ‘GWDOTBRW’ in the field at the top right corner of the Application tool bar and clicking on the adjoining arrow button.
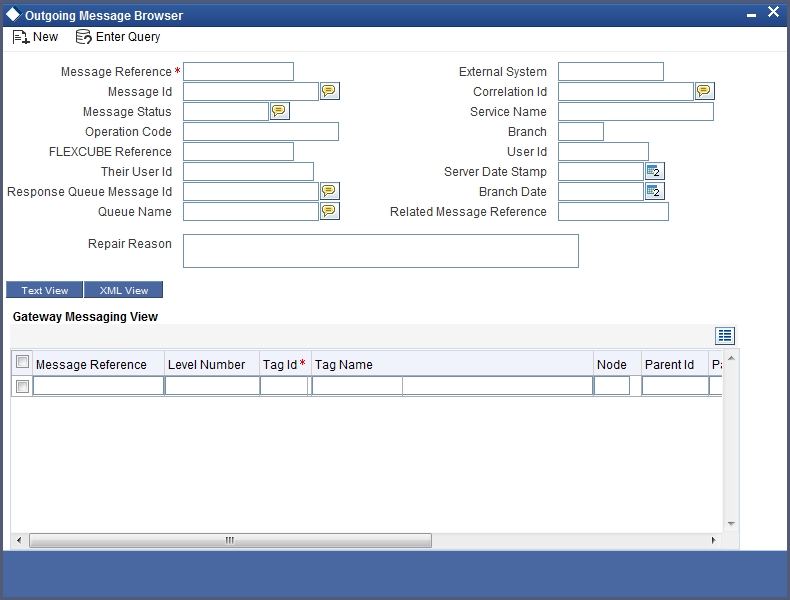
In the ‘Outgoing Message Browser’ screen you can view the details of the messages sent to the external systems. You can also view the messages in the XML format or the Text format.
Click ‘Text View’ button to view the response message in text format as shown below:
Click ‘XML View’ button to view the response messages in XML format as shown below:

3.7.1 Querying Outgoing Message Browser
You can query the list of outgoing messages using the ‘Outgoing Message Browser - Summary’ screen. You can invoke this screen by typing ‘GWSOTBRW’ in the field at the top right corner of the Application tool bar and clicking the adjoining arrow button.
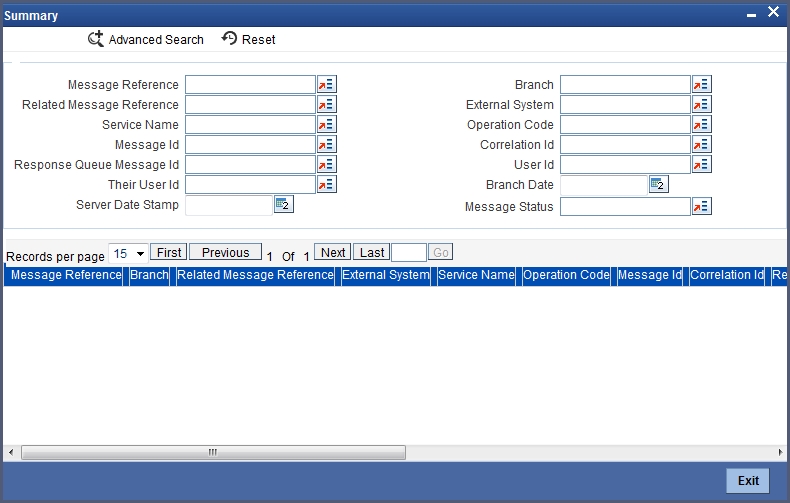
This query screen can be used to search for outgoing messages which match the criteria (Message Reference Number, External System, Service Name etc) you specify. The ‘Result’ list shows the messages which match your query. The search functions available are:
Advanced
Click Advanced to specify queries with logical operators such as AND, OR and NOT.
Reset
Click Reset to empty the values in the criteria fields, so that you may begin a new search.
Query
After specifying your search criteria click Query to view the list of results which match your search criteria.
Refresh
Click Refresh to refresh the list of results.
3.8 Defining Notification Messages
The outgoing message browser also displays the notification messages. Every time the database layer receives a notification message, it updates the outgoing message browser to display the same.
At the branch level, you can maintain notification codes for each branch. You can do this using the ‘Notifications Installed’ screen.
You can invoke the ‘Notifications Installed – Detailed’ screen by typing ‘GWDNTFIN’ in the field at the top right corner of the Application tool bar and clicking the adjoining arrow button.
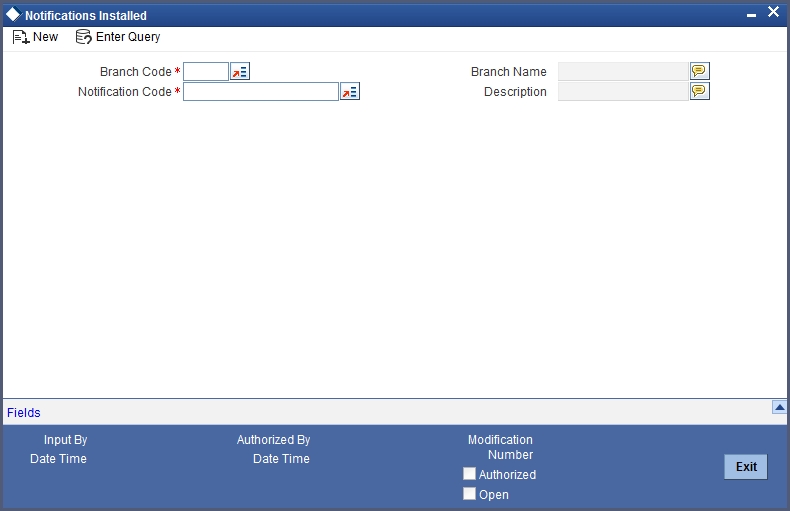
In this screen, you need to specify the following details:
Branch Code
Select a branch code for which you wish to assign a notification code. Once you select the branch code, the corresponding description is displayed.
Notification Code
From the list of values, select a notification code you wish to link with the branch. This will be used to generate notifications for the entire branch. Once you select the notification code, the corresponding description is displayed.
In addition to maintaining a notification code for a given branch, you can also specify a topic or a queue to which the notification messages should be sent.
You can define a topic/queue for a given branch and notification code in the ‘Notifications Enroute’ screen.
3.8.1 Viewing Installed Notification Details
You can view and query the list of notification messages using the ‘Notifications Installed - Summary’ screen. You can invoke this screen by typing ‘GWSNTFIN’ in the field at the top right corner of the Application tool bar and clicking the adjoining arrow button.
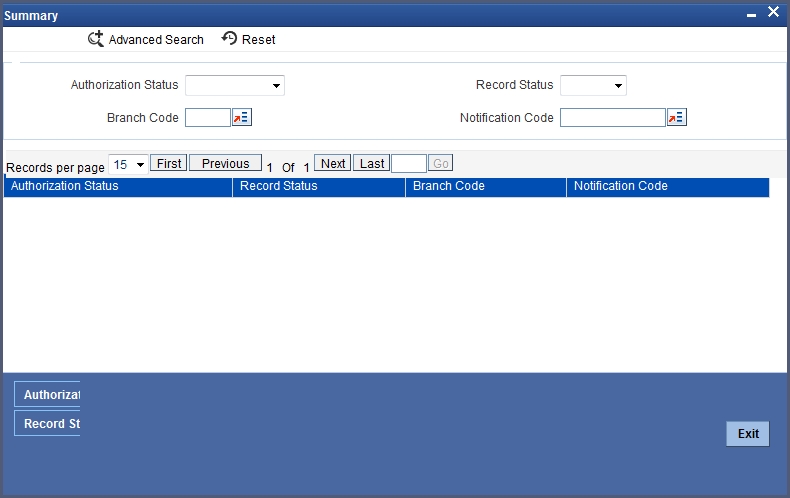
This summary screen can be used to search for notification messages which match the criteria (Message Reference Number, External System, Service Name etc) you specify. The ‘Result’ list shows the messages which match your query. The search functions available are:
Advanced
Click Advanced to specify queries with logical operators such as AND, OR and NOT.
Reset
Click Reset to empty the values in the criteria fields, so that you may begin a new search.
Query
After specifying your search criteria click Query to view the list of results which match your search criteria.
Refresh
Click Refresh to refresh the list of results.
3.9 Defining the Notifications Enroutes
You can invoke the ‘Notification Enroutes - Detailed’ screen by typing ‘GWDNTFEN’ in the field at the top right corner of the Application tool bar and clicking the adjoining arrow button.
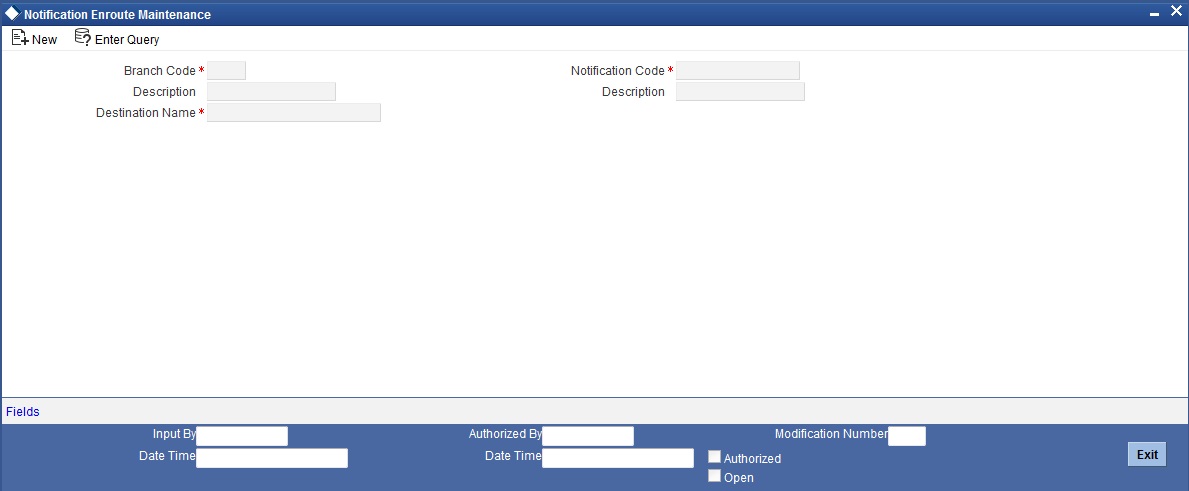
In ‘Notification Enroutes - Detailed’ screen, you define the following details:
Branch Code
Specify a branch for which you wish to define a topic. If you want to use a single topic for all branches and for a given notification code, you can use a wildcard ‘***’. Once you select a Branch Code, the corresponding description is displayed.
Notification Code
Select a notification code from the list of notification codes provided. You can indicate a wildcard ‘***’ if a single topic needs to be used for all notifications in a branch.
Destination Name
Specify the destination name.
Once you have captured the details, save the maintenance.
3.9.1 Viewing Summary screen
You can view and query the list of notifications enroute using the ‘Notifications Enroutes - Summary’ screen. You can invoke this screen by typing ‘GWSNTFEN’ in the field at the top right corner of the Application tool bar and clicking the adjoining arrow button.
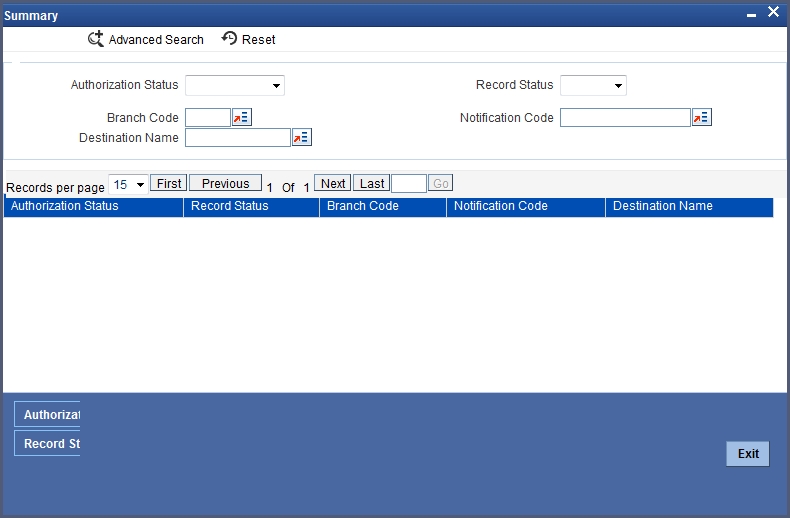
This summary screen can be used to search for notifications enroute which match the criteria (Message Reference Number, External System, Service Name etc) you specify. The ‘Result’ list shows the messages which match your query. The search functions available are:
Advanced
Click Advanced to specify queries with logical operators such as AND, OR and NOT.
Reset
Click Reset to empty the values in the criteria fields, so that you may begin a new search.
Query
After specifying your search criteria click Query to view the list of results which match your search criteria.
Refresh
Click Refresh button to refresh the list of results.
3.10 Maintaining MT Task Details
Using the ‘Gateway Maintenance Detailed’ screen, you can maintain the basis for creation of MT tasks for Gateway message. You can invoke this screen by typing ‘STDGWINT’ in the field at the top right corner of the Application tool bar and clicking the adjoining arrow button.
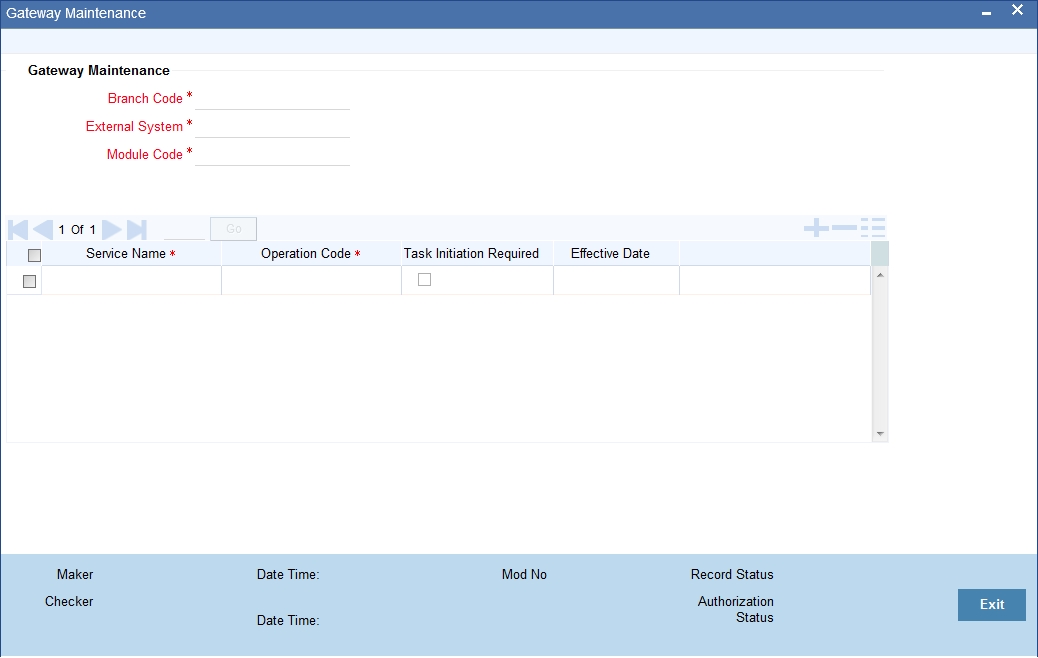
In this screen, you can specify the following details:
Branch Code
Specify the branch code of the bank. This adjoining option list displays all valid branches maintained in the system. You can choose the appropriate one.
External System
Specify the name of the external system. This adjoining option list displays all the external systems maintained in the system. You can choose the appropriate one.
Module Code
Specify the module name. This adjoining option list displays all the modules maintained in the system. You can choose the appropriate one.
Service Name
Specify the service name of the module selected. This adjoining option list displays all the service names maintained in the system. You can choose the appropriate one.
Operation code
Specify the operation code of the service. This adjoining option list displays all valid operation codes maintained in the system. You can choose the appropriate one.
Effective Date
Specify the date from which the gateway message maintenance becomes effective. Effective date should be equal to or greater than the application date.
3.11 Amendment Maintenance
This section contains the following topics:
3.11.1 Maintaining Gateway Amendment Details
To recall, you need to identify the fields that can be amended by an external system, say, a Siebel CRM application.
Every amendment request coming from such a system has the following data:
- Service Name: – This is a broad level grouping of similar operations within a module in Oracle FLEXCUBE. The service names are published by Oracle FLEXCUBE. As an example, you can consider FCUBSCustomerAccountService. This service is exposed by the FCUBS Interface Gateway to do a permissible operation on a customer account.
- Operation Name:- This is the name of the operation that the external system wishes to perform within the service. These operations names are published by Oracle FLEXCUBE. As an example, you can consider ModifyCustomer, which is for modification of a customer.
- External Operation Name:- This is the specific area of operation that an external system is performing on its side within the broad context of the Oracle FLEXCUBE’s amendment. In an external system, if the personal details of a customer are changed, this has a unique name by which it is identified within Oracle FLEXCUBE. Similarly, if the limits related details of a customer are modified, it also has a unique name.
It is through the ‘Gateway Amendment Maintenance’ screen that you maintain a set of amendable fields, which can amend in Oracle FLEXCUBE whenever a request for the same will be send from an external system. Based on this maintenance, the amendment request is addressed by Oracle FLEXCUBE. Invoke this screen by typing ‘GWDAMDMT’ in the field at the top right corner of the Application tool bar and clicking the adjoining arrow button.
The screen is as shown below:
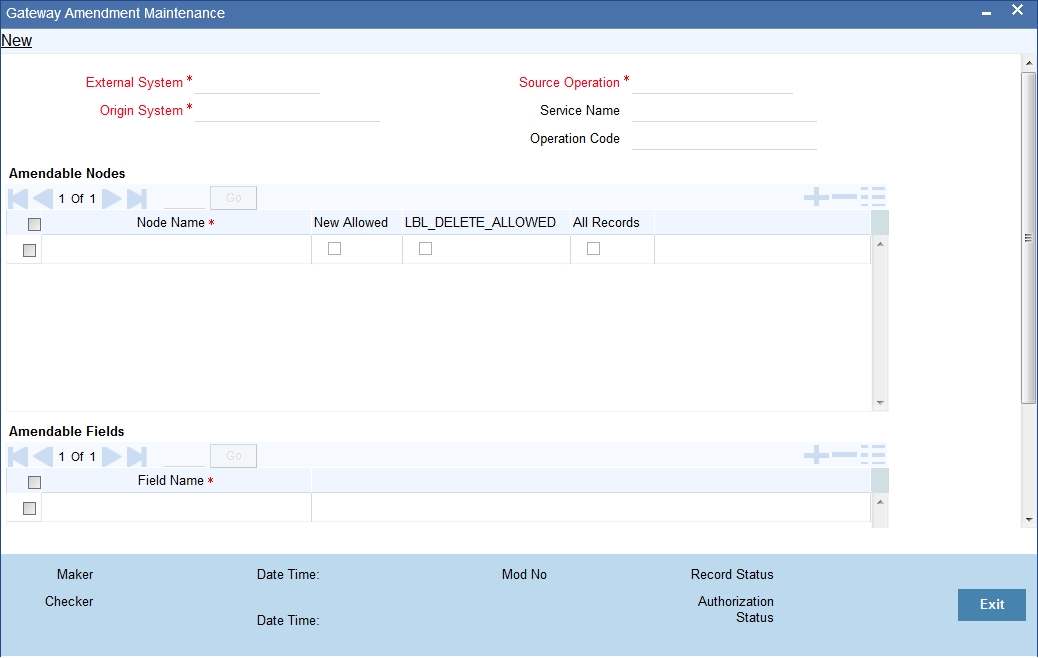
External System
Select the relevant external system. Based on the maintenance here, only the fields that are selected as amendable can be modified if a request comes from the chosen external system.
Note
The maintenance pertaining to external systems is factory shipped for your bank.
Origin System
Specify the origin system for which the amendment details are applicable.
For example, if we have a record that is created by a specific external system say 'CRM', and the requirement is that, for records created by this specific external system, only a set of fields are modifiable then, we should specify Origin System as CRM and FLEXCUBE as the External System. This Origin System field is used to identify such requirements wherein the amendable fields can be different if the Origination and Modification of the record are of different external sources.
You can specify the Origin System with the same value as the External System for Non FP services. For FP module services, you can provide the value as 'FLEXCUBE' and the respective External system can be specified in the External System field.
This feature is made available only for the FP modules with source operation as PMDTRONL_MODIFY.
Source Operation
The free format text (without spaces) which identifies the amendment you are doing. This is mandatory.
Note
Source Operation will be defaulted as (FUNCTIONID)_MODIFY, if the Source Operation is not sent from an external system and the function ID will be derived from Service and Operation combination.
Service Name
The relevant service name, this is a broad level grouping of similar operations within a module in Oracle FLEXCUBE. The service names are published by Oracle FLEXCUBE.
Note
The maintenance pertaining to service names is factory shipped for your bank
Operation Code
The relevant operation code. This is the operation that the external system wishes to perform within the selected service. The operation names are published by Oracle FLEXCUBE. As an example, you can take ‘ModifyCustomer’, which is for modification of a customer record. Each operation under different service names is identified by a unique code.
Note
The maintenance pertaining to operation codes is factory shipped for your bank.
Amendable Nodes
Node Name
Specify the node name. Alternatively, you can select the node name from the option list. The list displays all valid nodes maintained in the system.
New Allowed
Check this box if ‘New Allowed’ is applicable.
Delete Allowed
Check this box if ‘Delete Allowed’ is applicable.
All Records
Check this box if all records are applicable.