8 STA Media Validation
STA media validation is an optional STA feature that helps to ensure long-term preservation of the data in your tape library system. It provides automated, policy-driven validation of production media in StorageTek SL3000 and SL8500 libraries, using the data integrity checking capabilities of Oracle's StorageTek T10000C and T10000D drives. STA analyzes the validation results and makes recommendations for preserving your data.
Note:
STA media validation is supported only for tape library system configurations meeting the minimum requirements. See the STA Requirements Guide for a list of STA, library, drive, and media requirements.This chapter includes the following topics:
Overview of STA Media Validation
This section includes the following topics:
Features and Benefits of STA Media Validation
With STA, you can use one user interface to automate and manage media validation activities across all SL3000 and SL8500 libraries in your tape library system. This section summarizes the advantages of STA media validation.
Increased Security With Reduced Cost and Complexity
STA media validation is done internally by the T10000C and T10000D drives themselves, providing several advantages over validation methods offered by other vendors. Data in your tape library system is kept secure because there is no need to send it across a network to a separate application. Costs are reduced because there is no need for a dedicated host server or additional host software to read information from the media and drives, and there is no need for additional Fibre Channel data connections to the drives.
No Disruption to Library Production Operations
Validation drives are not available for use by host applications, but if a host requires media that is being validated, the host request takes priority. The library interrupts the validation, dismounts the media from the drive, and makes the media available to the application. This is done transparently to the application.
Assurance of Valid Test Results
To confirm the validity of all media validation tests, STA provides optional drive calibration and qualification features. Calibration ensures that validation drives are in good working order, and qualification ensures that the validation drives remain calibrated and failed validations are the result of problems with the media, not the drive. These features operate without user intervention once they are configured and enabled. See "Drive Calibration and Qualification" for details.
Automated Validation Operations
With STA, you can define policies for automatically selecting media for validation. For example, you could define policies to initiate validations whenever media health falls to Action or whenever a drive detects a bad media information record (MIR). STA automatically queues the media for validation on a a compatible drive.
STA can initiate and process multiple validations simultaneously, depending on the number of drives you have set aside for validation activities. See "Using Automated Media Validation" for details.
User Management of Validation Requests
You can use STA to manage the validation request queue. You can reprioritize pending validation requests, cancel in-progress requests, and initiate validations manually. See "Managing the STA Media Validation Request Queue" for details.
Limit to Validation Frequency
To prevent the overuse of data media, STA does not allow a piece of media to be validated more than once in a 24-hour period. This applies to both manual and automated validation requests.
Comprehensive Reporting of Validation Results
STA displays the results of all validation activities performed in your tape library system. This includes validations initiated by other applications, such as Oracle's StorageTek SL Console and Oracle's StorageTek Storage Archive Manager (SAM). STA analyzes validation results and makes recommendations for action you should take. See "Displaying the Status of Validation Requests" for details.
Note:
When a media validation is in process, the drive is reserved to the initiating application and not available to any others. Oracle recommends performing media validations through one application at a time to avoid potential drive reservation conflicts.Feature Comparison for STA and SL Console
Table 8-1 compares the media validation features available through STA and SL Console. An "X" in the column indicates the feature is supported by that product.
Table 8-1 Media Validation Feature Comparison for STA and SL Console
| Feature | STA |
SL Console |
|---|---|---|
|
Configure the validation drive pool. |
X |
|
|
Support all T10000C and T10000D verification test types. |
X |
X |
|
Automatically mitigate false-positive validation results. |
X |
|
|
Calibrate validation drives. |
X |
|
|
Automatically perform ongoing qualification of validation drives. |
X |
|
|
Perform one validation at a time. |
X |
X |
|
Perform multiple validations at a time. |
X |
|
|
Perform validations in multiple libraries or complexes at once. |
X |
|
|
Perform automated, policy-driven validations. |
X |
|
|
Submit multiple validation requests to a user-managed request queue. |
X |
|
|
Reprioritize pending validation requests. |
X |
|
|
Display progress indicators for in-progress validations. |
X |
X |
|
Display validation results one at a time. |
X |
X |
|
Display multiple validation results at one time. |
X |
|
|
Display validation results in table and graph form. |
X |
|
|
Display validation history over a selected date range. |
X |
|
|
Display detailed validation failure and disposition information. |
X |
|
|
Report indications of marginal tape quality (on selected drive firmware versions only). |
X |
|
|
Receive alerts about validation results |
X |
|
|
Display Dashboard summaries of validation activity on a PC or mobile device |
X |
|
|
Receive emailed Executive Reports summaries of validation activity |
X |
Types of Verification Tests
The T10000C and T10000D drives perform the following media validation tests, all of which are available through STA. When you define a media validation policy or initiate a manual media validation, you indicate which type of test to perform. See "Submit Manual Media Validation Requests" and "Create a Media Validation Policy" for instructions.
- Basic Verify
-
Verifies that the media is mountable and the media information record (MIR) is valid. The drive simply mounts the media and validates the MIR. This validation detects whether the MIR is unreadable or out of sync and updates the following data attributes for the media:
-
Exchange Recording Technique (recording format used by the drive to write to the media)
-
Media Suspicion Level
-
MB Written (total amount of data written to the media)
Note:
To be used by STA for policy-driven validation, media must have this information at a minimum. See "Media Eligible for Automated Validation" for details.This method takes approximately two minutes.
-
- Standard Verify
-
Verifies that the highest-priority areas of the media are readable. The drive verifies records at the beginning of tape (BOT), end of data (EOD), and the outer-most wraps of data written on the top and bottom edges of the tape.
This method typically takes a maximum of 30 minutes, regardless of the amount of data and the compression ratio used.
This test is not valid for blank tapes.
- Complete Verify
-
Verifies that all data records on the media are readable. The drive does a record-by-record verification with no decompression nor decryption.
By default, the validation starting point is the beginning of tape (BOT). For T10000T2 media, you can optionally choose to resume validation from the last verified location, as indicated by the media RFID chip; validations of T10000T1 media must always start at the BOT.
The drive validates data at maximum tape velocity, regardless of the compression ratio used on the media. This method may take approximately five to nine hours, depending on the starting point, the amount of data on the media, and the drive type.
This test is not valid for blank tapes.
- Complete Verify Plus
-
Verifies that all data records on the media are readable, including StorageTek Data Integrity Validation (DIV) checking. If the data records on the media include DIV cyclic redundancy check (CRC) codes added by the host, the data is decompressed and decrypted. Consequently, this test requires the validation drive to be encryption capable and connected to an Oracle Key Manager (OKM). This test is not valid for drives configured with a FICON interface.
By default, the validation starting point is the beginning of tape (BOT). For T10000T2 media, you can optionally choose to resume validation from the last verified location, as indicated by the media RFID chip; validations of T10000T1 media must always start at the BOT.
This method may take approximately five to nine hours, depending on the starting point, the amount of data on the media, the drive type, and the compression ratio.
This test is not valid for blank tapes.
- Verify and Rebuild MIR
-
Verifies the MIR and rebuilds it if necessary. The drive first verifies the MIR. If there are errors, the drive finds the last known-good spot on the MIR, then does a high-speed locate to that point on the tape. The drive then does a record-by-record verification with no decompression nor decryption. If the MIR is invalid or out of sync, the drive reads all records, starting from the beginning of tape (BOT), to gather the information necessary to rebuild the MIR, and then rebuilds it. Records are not decompressed nor decrypted.
You should use this method if there is a corrupt MIR on an exchange.
The drive reads the data at maximum tape velocity. This method may take approximately five to nine hours, depending on the starting point, the amount of data on the media, and the drive type. This is significantly faster than rebuilding the MIR with the drive Virtual Operator Panel (VOP).
Configuring STA Media Validation
This section includes the following topics:
Preparing for STA Media Validation
Before enabling media validation on STA, you should perform the following preparation steps.
-
Determine the library complexes and standalone libraries in which you want to implement media validation.
-
On the STA Drives – Overview screen, review and choose drives in these libraries that you want to use for media validation. See "Validation Drive Pools" for details.
-
Use SL Console to add the drives to the validation pools. You must log in to SL Console on the selected standalone library or a library that is part of the selected complex. See the library User's Guide for details.
-
Decide whether you want to use drive calibration and qualification, and if so, create the calibration media logical group. See "Drive Calibration and Qualification" for details.
Note:
Some of these steps may require Administrator privileges. See "User Roles for Media Validation" for details.Validation Drive Pools
Note:
The validation drive pools are maintained only through SL Console. See the library User's Guide for detailed instructions on maintaining the pools.Validation drives are drives that have been set aside exclusively for the time-being for media validation. These drives are not accessible to host applications. They must be assigned to a media validation drive pool through the SL Console.
Each SL8500 library complex and standalone SL3000 or SL8500 library has its own validation drive pool, and up to ten drives can be assigned to each pool. You must assign at least one drive per library complex or standalone library in which you want to validate media. If you will be validating encrypted media, in each applicable library you must assign at least one drive that has been enabled for encryption and connected to an Oracle Key Manager (OKM).
Note:
You may have only one validation drive at your site, in which case any media to be validated must be moved to that library.You can add and remove drives from the validation drive pools according to your needs. STA detects any changes and uses new drives as necessary.
Validation Drives That Can be Used by STA
SL Console does not check for STA minimum requirements when drives are added to the validation drive pools. As a result, drives in the pools may not necessarily be valid for use by STA. However, the STA Media Validation Configuration screen displays the total number of validation drives that do meet the minimum requirements for STA media validation. From there, you can link to the Drives – Overview screen, where you can see detail for these drives, such as drive type, Drive Health Indicator, and the drive location. See "Display Validation Drives for STA Media Validation" for instructions.
You can also select the Drives – Overview screen directly from the Navigation Bar and apply the STA–Drive–MV template, which is an STA predefined template. Figure 8-1 is a sample display.
Figure 8-1 Validation Drives on the Drives – Overview Screen
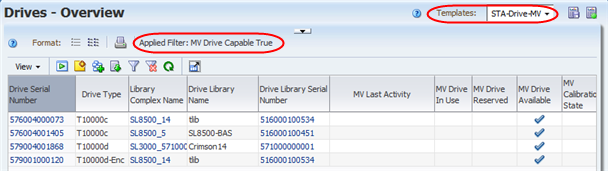
Description of ''Figure 8-1 Validation Drives on the Drives – Overview Screen''
Choosing Drives for the Validation Drive Pools
Although drives are assigned to the validation drive pools with the SL Console, you can use STA to review and select candidate drives.
You can assign any drives to the pools, but for STA to use them, they must meet the following minimum requirements:
-
Drive Model is T10000C or T10000D.
-
Drive Firmware Version ends in 5.40 or higher – This indicates the firmware supports TTI 5.4.
-
Drive Health Indicator is Use.
-
Drive Suspicion Level is 0.
Figure 8-7 is a sample filter you might use on the Drives – Overview screen.
Figure 8-2 Filter for Reviewing Validation Drive Candidates
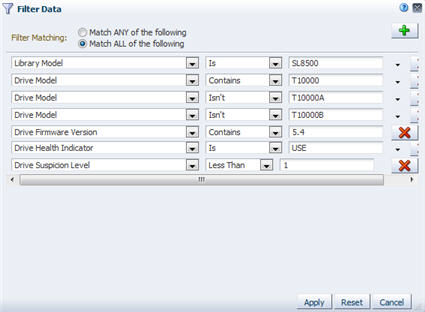
Description of ''Figure 8-2 Filter for Reviewing Validation Drive Candidates''
In addition to these minimum requirements, you should select drives that are of high quality, with some recent activity and few or no errors. Drives with the following characteristics may be good candidates for the validation pools:
-
Activity in the last 30 days. See the Drive Dismounts (30 Days) attribute.
-
No drive errors. See the Drive Errors (30 Days) attribute.
-
No excessive drive cleans. See the Cleans (30 Days) attribute.
-
No excessive alerts or SNMP traps. If there are alerts and traps, you may want to investigate to determine whether they indicate a potential problem with the drive. See the Drive SNMP Trap Count (30 Days) and Alert Count (30 Days) attributes.
-
Relatively fast. See the Mount R/W MB/sec (30 Days) attribute.
You may want to apply selected drives to the graphs to get a visual representation of the drive characteristics and confirm your selections. Figure 8-3 shows three candidate drives applied to the graphs on the Drives – Overview screen.
Figure 8-3 Drives – Overview Screen Showing Validation Drive Candidates
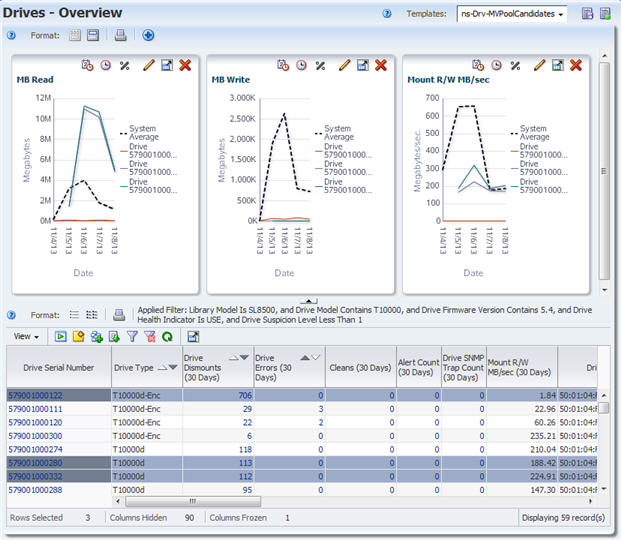
Description of ''Figure 8-3 Drives – Overview Screen Showing Validation Drive Candidates''
Enabling Media Validation
STA media validation is disabled by default, so you must explicitly enable it. This is a global setting, so once enabled, STA media validation is available for all SL3000 and SL8500 libraries in your tape library system. See "Enable or Disable Media Validation on STA" for detailed instructions. Enabling and disabling media validation requires Administrator privileges.
Once media validation is enabled, you can begin using STA to perform the following activities:
-
Create manual media validation requests. See "Submitting Manual Validation Requests" for complete details.
-
Display and manage the media validation request queue. See "Managing the STA Media Validation Request Queue".
-
Use media validation policies to perform automated validations. See "Using Automated Media Validation" for complete details.
Note:
You can create validation policies before enabling media validation on STA.
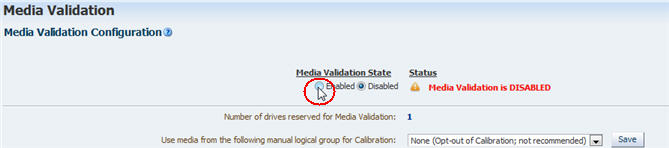
Media Validation Configuration Status Messages
The Media Validation Configuration screen displays the current configuration status of the STA media validation feature.
The following messages may appear while media validation is being configured without drive calibration and qualification. Figure 8-4 is an example.
-
Media Validation is DISABLED.
-
Media Validation successfully enabled.
-
Media Validation Enabled; Opted-out of Drive Calibration.
Figure 8-4 Media Validation Configuration Success Message
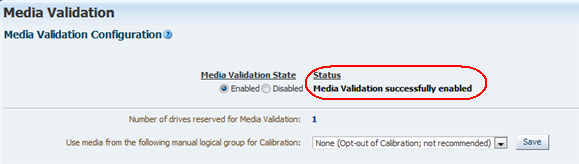
Description of ''Figure 8-4 Media Validation Configuration Success Message''
The drive calibration and qualification feature may take some time to enable and configure. You may see the following messages while this process is underway. Figure 8-5 is an example. See "Drive Calibration and Qualification" for information about these features.
-
Media Calibration Process in Progress.
-
Media Operation to Create History in Progress.
-
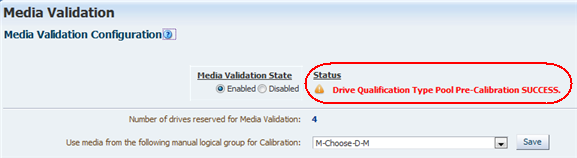
Drive Qualification Type Pool Pre-Calibration SUCCESS.
-
Calibration Success. Drive Qualification is Now Active.
Figure 8-5 Drive Calibration Configuration Success Message
Description of ''Figure 8-5 Drive Calibration Configuration Success Message''
The following messages indicate a problem with media validation configuration. Figure 8-6 is an example.
-
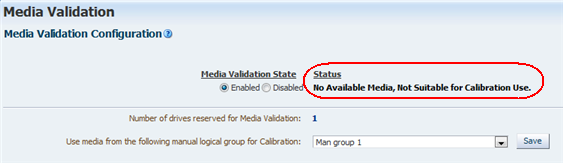
No Available Drives, Not Suitable for Media Validation Use.
-
No Available Media, Not Suitable for Calibration Use.
-
Warning: Insufficient Media in MV Media Pool for Number Of Drives in MV Partition.
Figure 8-6 Drive Calibration Configuration Error Message
Description of ''Figure 8-6 Drive Calibration Configuration Error Message''
Disabling Media Validation
Once media validation has been enabled at your site, you may want to temporarily disable it on occasion for library maintenance. See "Enable or Disable Media Validation on STA" for detailed instructions.
STA does not accept any new media validation requests while media validation is disabled. Any pending or in-progress requests are processed to completion unless you explicitly cancel them.
With media validation disabled, STA still displays requests initiated from other sources, such as SL Console and the library command-line interface (CLI).
Drive Calibration and Qualification
Drive calibration and qualification are optional STA features that confirm the validity of all media validation tests. When these features are enabled, STA uses only calibrated and qualified drives to perform media validation activities.
Calibration, which is a one-time, setup process, ensures that validation drives are in good working order before they are used for media validation. Qualification is an ongoing, automated process performed on drives that have been calibrated. It verifies that failed validations are the result of problems with the media, not the drive.
Together these features ensure that the results of each and every media validation reflect the true quality of the tested media and are not confounded by unknown issues with the validation drives.
This section includes the following topics:
Drive Calibration and Qualification Terms
These terms are useful in understanding the concepts of drive calibration and qualification and are used throughout this section.
- Validation exchange
-
A media and drive exchange in which the drive performs a specified validation test on the media and its data.
- Failed validation
-
A media validation exchange that ends with a "Degraded" or "Failed" status.
- False positive result
-
A failed validation that is the result of problems with the validation drive, not the media. STA uses drive calibration and qualification processes to reduce the possibility of false positive results and ensure that failed validations are the result of problems with the media.
- Drive calibration
-
Optional STA media validation feature whose purpose is to ensure that validation drives are performing optimally. If drive calibration is enabled, validation drives must be calibrated before STA can use them for media validation.
- Calibrated drive
-
Validation drive that has successfully passed the STA drive calibration process. A drive that fails calibration is considered disqualified and is not used by STA. If the STA drive calibration feature is disabled, all validation drives are considered uncalibrated, but they are used by STA.
- Uncalibrated drive
-
A drive that has not yet been calibrated; or a validation drive in a system in which the STA calibration feature has not been enabled.
- Drive qualification
-
Optional STA media validation feature that ensures validation drives remain calibrated and helps to ensure failed validations are the result of problems with the media, not the drive. STA automatically initiates a drive qualification process whenever there is a failed validation. Drive qualification is enabled as part of drive calibration.
Drive calibration is essentially a one-time process, whereas drive qualification is ongoing.
- Qualified drive
-
Calibrated drive that has successfully passed the STA drive qualification process.
- Disqualified drive
-
A drive that has failed STA calibration or qualification.
- Calibration media
-
Media that has been set aside specifically for drive calibration and qualification. You assign calibration media to a manual logical group through STA. It is highly recommended that you dedicate calibration media exclusively to drive calibration and not use them for production data. Calibration media should be of high quality.
- Read Quality Index (RQI)
-
Measure of the amount of error correction left on the media. RQI applies to the exchange as a whole and includes contributions from both the media and the drive involved in the exchange. This term is specific to media validation and differs from Read Margin.
RQI is reported as a percentage. A high value is desirable.
- Data Quality Index (DQI)
-
Measure of the amount of error correction left on the media, similar to Read Quality Index (RQI), but targeted specifically to the media because it factors out the drive's contribution. During drive calibration and qualification, STA uses the DQI to determine whether the drive is qualified or disqualified.
DQI is reported as a percentage. A high value is desirable.
Benefits of Calibration and Qualification
Although drive calibration and qualification are optional features, it is highly recommended that you enable them on STA, as they provide the following significant advantages:
Ensured Validity of Validation Results
Because each exchange involves both a piece of media and a drive, when an exchange failure occurs, there is always uncertainty whether the problem is with the drive, the media, or both. For production media, STA uses sophisticated health and suspicion algorithms that reduce this uncertainty, in part by using available historical data for the media and the drive. The more data available, the more reliable the analysis.
Media validation failures carry the same inherent uncertainty. However, they are further complicated by the fact that validation exchanges tend to involve a higher-than-normal percentage of problem media and media that have little or no available history.
For example, an archive media that has not been used in over a year may have minimal STA data. If the media is validated on an uncalibrated drive and the validation fails, there is a possibility the failure is the result of problems with the validation drive, not the media being validated. With minimal historical data available for the media, there is increased uncertainty about the validation result. The STA drive calibration and qualification features directly address these uncertainties, providing you with assurance the failed validation has identified a problem with the media.
Ensured Health of Validation Drives
Another advantage of calibration and qualification concerns drive quality. Because validation drives have a higher-than-normal number of exchanges with problem media, they may become degraded at a faster rate than production drives. Through drive qualification, STA continuously verifies the health of validation drives. Drive problems are identified early so the verification drives can be serviced or replaced before they, in turn, begin to cause problems with production media.
Operational Efficiency
When a media validation fails, some action must be taken to verify the result and confirm there is a problem with the media. If drive calibration and qualification is disabled, you must do this verification manually. For example, you could perform a Complete Verify on the media using a different drive, and if this validation also fails, then you could be reasonably certain the problem is with the media, not the drive. Depending on the amount of data on the media, this could take several hours.
If drive calibration and qualification is enabled, STA verifies all failed validations through the process of drive qualification. Qualification is done automatically with no user intervention. Because STA uses pre-qualified media, it is only necessary to do a Standard Verify for the qualification, which takes significantly less time than a Complete Verify.
How Calibration and Qualification Work
Calibration and qualification are separate processes, but they are enabled and disabled together. Before using calibration and qualification, you must create a manual logical group for media that will be used for these activities. See "Preparing for Calibration and Qualification" for details.
Drive Calibration Process
Drive calibration is a one-time setup process that begins as soon as drive calibration is enabled on the Media Validation screen. All drives in the validation pool are tested using a Standard Verify. This may take one to two hours per drive.
Once drive calibration is configured and enabled, it proceeds automatically with no need for manual intervention. If a new drive is added to the media validation pool, STA detects this and automatically begins calibrating the drive. STA also automatically recalibrates drives after a firmware update.
Calibration uses the following basic process for each validation drive:
-
STA performs two Standard Verify validations on the drive, each time using a different media from the calibration media logical group.
-
STA analyzes the Data Quality Index (DQI) values from the validations. For a drive to be qualified, the following criteria must be met:
-
One media must have DQI >=75. This is assigned to the drive as the primary calibration media.
-
One media must have DQI >=50. This is assigned to the drive as the secondary calibration media.
-
-
Depending on the DQI results, STA proceeds as follows:
-
If both criteria are met after two validations, the drive is calibrated. A third validation is not necessary for this drive.
-
If only one of these criteria is met after two validations, a third validation is performed using a different media from the calibration media logical group.
-
If both these criteria are not met after three validations, the drive is considered disqualified.
-
Results of Drive Calibration
If a drive passes calibration, two media are assigned to it as dedicated primary and secondary calibration media. During the calibration process, these media are confirmed to be of high quality. Each validation drive has its own primary and secondary calibration media, and these media are used for all drive qualification activities on the drive.
If a drive fails calibration, it is disqualified. Disqualified drives are assigned a Calibration State of "Not Suitable," and they are not used for any STA validation activities while drive calibration is enabled. They remain in the media validation drive pool until you explicitly remove them through the SL Console.
Note:
If drive calibration is disabled, STA ignores the "Not Suitable" Calibration State and uses the drives for validation. This may happen if calibration was enabled on STA at one point and has since been disabled.Once all drives have been calibrated, the Media Validation Configuration screen displays, "Drive and Media Pool Setup Success--calibration has been successful." Detailed results about individual drives are displayed on the Drives – Overview screen, and you can review the results and take appropriate action. See "Display Validation Drives for STA Media Validation" for instructions.
Validation Drive Qualification Process
Validation drives are qualified to assure the drives are still calibrated. Qualification is an ongoing process that runs automatically in the background and requires no user intervention. STA automatically initiates a qualification whenever a media validation results in a Degraded or Failed status.
During qualification, the validation drive is tested using a Standard Verify. The test are performed using the primary and secondary calibration media assigned to the drive. Qualification follows a process similar to drive calibration.
Results of Drive Qualification
Upon completion of qualification, STA makes one of the following recommendations about the quality of the drive and the media:
-
The drive is disqualified.
-
The data media is bad.
-
The data media is bad, and the secondary calibration media is disqualified.
Disqualified media are not used for drive calibration or qualification. They remain in the calibration media logical group until you explicitly remove them. See "Results of Drive Calibration" for information about disqualified drives.
Qualification results are displayed on the Media Validation Overview screen in the MV Calibration and Qualification attributes. You can review the results and take appropriate action.
Preparing for Calibration and Qualification
Before enabling calibration and qualification, you must perform the following preparation tasks.
-
On the Logical Groups screen, create a manual logical group for media that will be used for drive calibration. See "Calibration Media Logical Group" for details. This task requires Operator or Administrator privileges.
-
On the Media – Overview screen, review and choose the media you want to use for drive calibration. See "Choosing Calibration Media" for details.
-
Assign the media to the logical group. This task requires Operator or Administrator privileges.
-
Enable drive calibration and qualification. See "Enable Drive Calibration and Qualification" for instructions. This task requires Administrator privileges.
Calibration Media Logical Group
The media used for drive calibration and qualification must be assigned to a manual logical group dedicated exclusively for this purpose. This is the calibration media logical group. Once a logical group has been designated as the calibration media logical group, the media in it cannot be used for host operations, and STA will not allow them to be used in regular media validation operations.
There is only one calibration media logical group for your entire tape library system. You must assign at least two media for each drive in the validation drive pool, and the media must reside in the same standalone libraries and library complexes as the validation drives. For example, if you have eight validation drives in complex SL8500 1 and one validation drive in standalone library SL8500-Seattle, the logical group must include at least 16 media from the libraries in complex SL8500 1 and two media from library SL8500-Seattle. There is no maximum number of media you can assign to the group.
Note:
Since the purpose of this logical group is to identify media dedicated for calibration operations, Oracle recommends that you assign only media—no drives—to this group.You can add and remove media from the logical group according to your needs. STA detects any changes and uses new media as necessary.
Choosing Calibration Media
It is highly recommended that you dedicate calibration media exclusively for drive calibration and qualification, and not use them for production data. This helps to ensure that the quality of the media is not compromised by production operations. The following may be good candidates for calibration media:
-
Media that has been in use but has data you no longer need; for example, expired backup media in good condition.
-
New or unused media in good condition to which you have written dummy data. The data may be encrypted or not, depending on your needs.
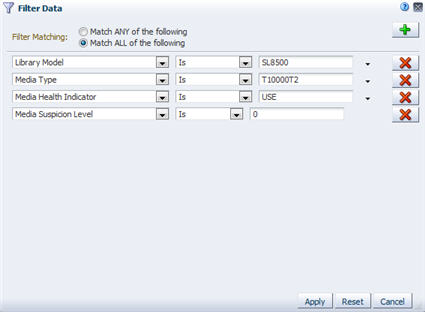
To be used for drive calibration and qualification, media must meet the following criteria:
-
Media Type is T10000T2 (indicating T100000T2 or T10000T2 Sport). Although T10000T1 media can be validated, they cannot be used for drive calibration and qualification.
-
Media Health Indicator is Use.
-
Media Suspicion Level is 0.
-
At least two wraps of data have been written to the media.
Note:
STA does not check for these criteria when you add media to the calibration logical group, so it is possible to assign media that cannot be used for calibration and qualification.Note:
If any media you assign to the calibration logical group do not have the minimum required STA history, STA automatically initiates a Basic Verify on them before attempting to use them for drive calibration. A Basic Verify provides the minimum required history. See "Types of Verification Tests" for details.To find media that meet these requirements, you can apply a filter to the Media – Overview screen. Figure 8-7 is a sample filter you might use on the Media – Overview screen.
Figure 8-7 Filter for Reviewing Calibration Media Candidates
Description of ''Figure 8-7 Filter for Reviewing Calibration Media Candidates''
You can sort the filtered results by the "Media MB Avail Post" attribute to find media with at least two wraps of data. This varies by recording format and media type. Table 8-2 provides a summary of required amounts.
Submitting Manual Validation Requests
Once the validation drive pools have been created and media validation has been enabled on STA, you can use STA to submit manual validation requests and manage the validation request queue. See "Submit Manual Media Validation Requests" for instructions.
Note:
If you have enabled drive calibration, the media included in the calibration media logical group cannot be included in manual or automated validation requests. STA will display an error message that the media are not eligible for media validation. See "Calibration Media Logical Group" for details about these media.You can submit manual validation requests from either of the following screens:
-
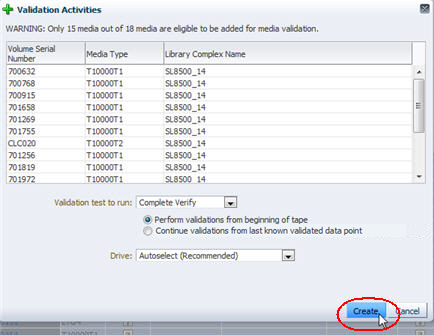
Media Overview—You can select multiple media at once to be validated using the same verification test. Only the eligible media within the selection range are confirmed for validation. Figure 8-8 is an example. Note that the selection range includes a variety of media types, including some that are not eligible for media validation.
Figure 8-8 Initiating Media Validations From the Media – Overview Screen
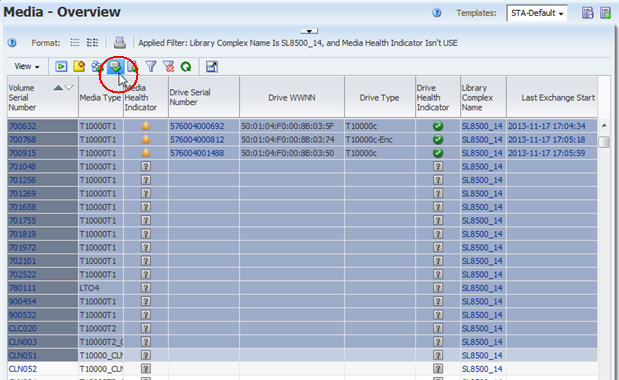
Description of ''Figure 8-8 Initiating Media Validations From the Media – Overview Screen''
-
Media Validation Overview—You can select only one media at a time for validation. Figure 8-9 is an example.
Figure 8-9 Initiating a Media Validation From the Media Validation Overview Screen
Description of ''Figure 8-9 Initiating a Media Validation From the Media Validation Overview Screen''
To generate a manual request, you specify the following information. Figure 8-10 is a sample manual validation request.
Figure 8-10 Sample Manual Validation Request for Multiple Media
Description of ''Figure 8-10 Sample Manual Validation Request for Multiple Media''
-
Media to be validated. STA allows you to generate requests for T10000 media only. If you select multiple media at once on the Media Overview screen and only some are T10000, then only the eligible media are confirmed for validation.
-
Validation test type. This is the type of verification test to be performed on the media. See "Types of Verification Tests" for detailed descriptions.
-
Start from beginning of tape (BOT) or resume where the last interrupted validation left off. This option is available only if all of the following conditions are true. See "Resuming Interrupted "Complete Verify" Tests on T10000T2 Media" for details.
-
You have selected T10000T2 media for validation. (T10000T1 media validations always start at the beginning of tape.)
-
The validation test type is Complete Verify or Complete Verify Plus. (Other test types always start at the beginning of tape.)
-
The most recent validations for some or all of the selected media are not 100 percent complete. (Media for which the most recent validation was complete are always validated from the beginning of tape.)
-
-
Validation drive – If your site has more than one validation drive, the recommended method of drive selection is to have STA select a compatible validation drive. However, if all selected media are in the same standalone library or library complex, you can manually specify the drive to use; STA provides a list of compatible drives from which to choose. If the media are distributed across multiple standalone libraries or complexes, then STA automatically selected the drives to use.
As soon as you submit the manual request, it is added to the STA media validation request queue. The validation is started when a compatible drive becomes available.
Manual Verify and Rebuild MIR Requests for Incompatible Media and Drives
Note:
See the STA Requirements Guide for the minimum firmware levels discussed in this section.If you submit a manual Verify and Rebuild MIR request for a media and drive that are incompatible (for example, you submit a request for a T10000C media to be validated by a T10000D drive), drives with minimum firmware levels for TTI 5.5.0 will correctly reject the request. Drives with firmware not meeting the minimum TTI 5.5.0 requirements may attempt to process the request, and if they are able to rebuild the MIR, may incorrectly report a success status for the request. This situation cannot arise for automatic requests, as STA only generates requests in which the media and drives are compatible.
The STA version of the Verify and Rebuild MIR request may be unable to rebuild a MIR if the last known good spot is at End of Data (EOD), in which case, you must use the drive Virtual Operator Panel (VOP) to rebuild the MIR.
Using Automated Media Validation
STA allows you to define any number of media validation policies, which automatically select media for validation based on a variety of user-defined criteria. For each selected media, STA generates a validation request, which is submitted to the STA validation queue. As soon as a compatible drive becomes available, the validation is started. This activity is all managed automatically by STA.
Depending on the number of media validation policies and how they are defined, a single piece of media could potentially be selected for validation several times a day. To prevent this from happening, STA limits automated validations to a maximum of one per day for each media. Once a validation request has been generated for a piece of media, STA will not generate any additional validation requests for it that day.
Media Eligible for Automated Validation
Note:
If you have enabled drive calibration, the media included in the calibration media logical group cannot be included in manual or automated validation requests. STA will automatically exclude these media from any validation policies. See "Calibration Media Logical Group" for details about these media.To be used by STA for policy-driven validation, media must have a minimum history. Media must have values for the following attributes:
-
Exchange Recording Technique (recording format used by the drive to write to the media)
-
Media Suspicion Level
-
MB Written (total amount of data written to the media)
If you want STA to validate media that does not have this history, you should manually initiate a Basic Verify to supply these attributes. See "Types of Verification Tests" and "Submit Manual Media Validation Requests" for details.
Defining Validation Policies
Users with Administrator privileges perform this part of the process from the Media Validation screen on the Setup & Administration tab. Media validation does not need to be enabled on STA for you to create validation policies, so you can do this ahead of time if you want.
When you create a validation policy, you can enable it immediately or leave it disabled for the time being. STA uses only enabled policies to generate validation requests.
To define a validation policy, you specify the following information:
-
Policy name – Alphanumeric identifier for the policy. Policy names must be unique.
-
Policy description – Optional description of the policy.
-
Applicable media group – You can choose to apply the policy to media with specified recording formats in a specified library complex, or media in a specified logical group. See "Validating Media by Logical Group" for details about logical groups.
-
Selection criteria – Predefined criteria by which media in the applicable media group are selected for validation. See "Selection Criteria for Validation Policies" for detailed descriptions.
-
Validation test type – Type of verification test to be performed on the media. See "Types of Verification Tests" for detailed descriptions.
See "Create a Media Validation Policy" for detailed instructions.
Validating Media by Logical Group
You can apply a media validation policy to any existing logical group, one logical group per policy. The logical group identifies the media to be validated by the policy but not the drives to be used; drives are always selected from the validation drive pool defined through SL Console (see "Preparing for STA Media Validation" for details).
STA generates validation requests only for media in the group that meet both of the following criteria:
-
T10000 media
-
Media that reside in standalone SL3000 or SL8500 libraries or library complexes that have validation drive pools with drives meeting the STA minimum requirements
Selection Criteria for Validation Policies
STA can select media for validation based on any of the following predefined criteria:
-
Random Selection – Randomly selects media for validation whenever a validation drive in the standalone library or library complex is available.
-
Media Health = Action – Selects media that have had a specified number of successive exchanges resulting in an Exchange Media Health of Action. You can specify from one to five exchanges.
-
Media Health = Evaluate – Selects media that have had a specified number of successive exchanges resulting in an Exchange Media Health of Evaluate. You can specify from one to five exchanges.
-
Media Health = Monitor – Selects media that have had a specified number of successive exchanges resulting in an Exchange Media Health of Monitor. You can specify from one to five exchanges.
-
Extended Period of non-use – Selects media that have not had an exchange for a specified number of days. You can specify from 365 to 1,095 days (one to three years).
-
Newly Entered – Selects media that have recently been entered into the library.
-
Bad MIR Detected – Selects media with an exchange resulting in a Bad MIR Detected error. A bad media information record (MIR) indicates degraded high-speed access on the media.
Managing the STA Media Validation Request Queue
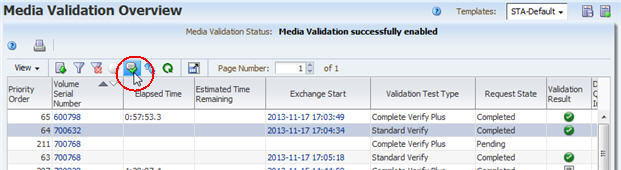
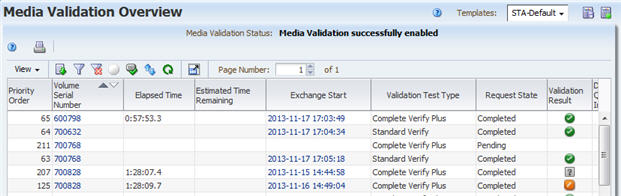
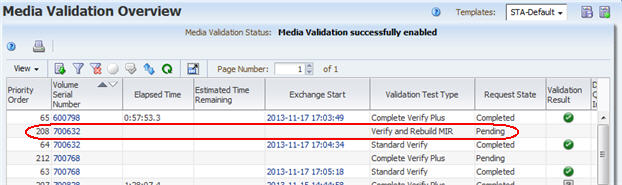
The media validation request queue is displayed on the Media Validation Overview screen on the Tape System Activity tab. The queue lists all media validation activity that has occurred in your tape library system. This includes pending and completed validation requests initiated by STA or any other application. By default, requests are listed in reverse Priority Order, with the most recent requests at the top of the list.
From the Media Validation Overview screen, you can perform any of the following activities:
Displaying the Status of Validation Requests
The Media Validation Overview screen displays complete details about all validation requests. This section describes attributes of particular interest on this screen.
Note:
If drives, media, or library connections are removed from your tape library system, any associated pending STA validation requests remain in the request queue until you explicitly cancel them. See "Cancel Pending Media Validation Requests" for instructions.Media Validation Request Priorities
The MV Priority Order attribute indicates the order of each validation request in the queue. When a new request is created, it is assigned the next available MV Priority Order value. STA processes requests in priority order, and you can reprioritize pending requests by moving them up or down in the queue. See "Reorder Pending Media Validation Requests" for instructions.
Pending and in-process requests are listed in reverse Priority Order, so the most recently received requests are at the top of the list. Completed validations have a blank Priority Order value.
Media Validation Request States
The Request State indicates the progress of each validation request. Requests are typically processed through the following sequence:
-
Pending – The request has been submitted and is waiting for a compatible validation drive to come available. The MV Status Information attribute may display additional details.
-
Starting – The drive has been reserved for the validation operation.
-
In-Progress – The validation is in progress. The MV Time Spent Validating and MV Estimated Time Remaining attributes are continually updated as the operation proceeds.
-
Completed – The validation has completed. See "Media Validation Results" for details about information STA may display.
In addition, the following Request States may occur at any time:
-
Error – An error has occurred with the request. The Request Status Information attribute may display additional details.
-
Stopping, or Stop Requested – The request has been stopped, either manually or by a media request from a host application. See "Canceling Pending or In-Progress Validation Requests" for details.
Media Validation Initiators
STA reports all media validation information it receives from your tape library system, including validations initiated from applications other than STA. The Initiator attribute indicates the source of the media validation. Options are as follows:
-
Drive – Indicates the validation was initiated directly on the T10000C or T10000D drive.
-
Host – Indicates an external host application, such as Oracle's StorageTek Storage Archive Manager (SAM). These applications do not use the internal media validation capabilities of the T10000C and T10000D drives.
-
Library – Indicates the library command-line interface (CLI). Only Oracle support representatives are authorized to initiate media validations through the CLI. However, library administrators can use the CLI to cancel pending or in-progress validations. See the library User's Guide for details.
-
SLC – Indicates SL Console.
-
STA – Indicates STA.
Media Validation Results
When a validation completes, the media is returned to a media slot, and STA displays the results and recommendations for user action. Following are attributes on the Media Validation Overview screen that you may find useful for interpreting validation results, particularly for validations that result in errors.
- MV Result
-
STA assigns one of the following values to each completed validation:
-
Use – The media passed validation.
-
Degraded – Migrate the data and scratch the media.
-
Failed – Migrate the data and disposition the media according to your site's policies.
-
Unknown – May occur in the following situations:
- The validation was canceled by STA or interrupted by a host request for the media.
- An error occurred during the validation.
- Communication between STA and the library was interrupted during the validation.
- The media information record (MIR) is corrupted.
- The validation was initiated by an application other than STA and STA has not received sufficient information from the library to determine the result.
-
- MV DQI
-
The data quality index (DQI) is a measure of the amount of error correction left on the media, computed by STA based on the results of the validation. This value is expressed as a percentage, with a higher value indicating a better result. This attribute is blank in the following cases:
-
The validation is a Basic Verify.
-
The validation resulted in an media validation Perm Status of True.
-
The validation resulted in an Invalid MIR error.
-
- MV Recommendation
-
This attribute includes recommendations from STA for user action. Following are some messages you may see.
-
Media OK: continue using.
-
Media Degraded--Perform Qualification.
-
Corrupted MIR: Rebuild MIR and Re-run Media Validation.
-
Disposition Drive.
-
Permanent error encountered: Perform drive qualification.
-
Not enough data to determine MV results. Rerun media validation.
-
Degraded Media: Rerun Media Validation Using a Different Drive.
-
Media Validation Interrupted.
-
- MV Status Information
-
This attribute is usually blank but may contain information about issues that occurred with the validation request. It may explain the problem or suggest corrective action to take. Following are some messages you may see:
-
Drive Timeout; MDV manager cancel – Indicates STA requested the library to return the media to a media slot because the validation took more than nine hours to complete. This is usually the result of a library operational error. If the Read Percentage attribute for the validation exchange is less than 100 percent, then the validation did not complete. If this status recurs for the media, there is probably an issue with the media; if it recurs for the drive, there is probably an issue with the drive.
-
Library returned error code – Indicates an error code returned by the library while processing the validation request. The error code is also listed in the Library Error attribute.
-
Canceling Pending or In-Progress Validation Requests
You may need to cancel validation requests, especially Complete Verify or Complete Verify Plus validations, which may take many hours to complete. From STA, you can cancel STA-initiated pending or in-progress validation requests only. You can cancel these requests at any time, and you can cancel multiple requests at once.
When a pending request is canceled, it is immediately removed from the validation request queue.
For in-progress validations, you can cancel Complete Verify or Complete Verify Plus tests only. When an in-progress request is canceled, the Request State changes to Stopped and STA sends a cancellation request to the drive. It may take several minutes for the drive to receive the request and unload and dismount the media. Once the media has been returned to a media slot, the validation request is removed from the validation request queue. You can later resume or repeat the validation. See "Resuming Interrupted "Complete Verify" Tests on T10000T2 Media" for details.
Resuming Interrupted "Complete Verify" Tests on T10000T2 Media
Note:
This option is available for T10000T2 media only; validations of T10000T1 media must always start at the beginning of tape (BOT).For T10000T2 media, Complete Verify and Complete Verify Plus validations that have been interrupted by host media requests or canceled manually can either be restarted from the beginning of tape (BOT) or resumed from the point where they left off. To resume a validation, the drive must be able to determine from the media RFID chip where the last validation left off.
This option is available both for manually submitted requests and for requests initiated by an STA media validation policy. See "Submit Manual Media Validation Requests" and "Create a Media Validation Policy" for instructions.
Note:
Depending on the read/write operations that have occurred on the media since the most recent validation was interrupted, the validation may no longer be valid, and you may want to restart the operation from the beginning.User Roles for Media Validation
Table 8-3 lists the user roles required for configuring STA media validation.
Table 8-3 Media Validation Configuration User Roles
| User Role | Media Validation Configuration Activity | Screen |
|---|---|---|
|
Viewer and above |
Display drives in the media validation drive pools. |
Select Tape System Hardware, then select Drives Overview. |
|
Administrator only |
Display drives in the media validation drive pools. Enable or disable media validation on STA. Enable or disable drive calibration by selecting the designated logical group of media. |
Select Setup & Administration, then select Media Validation. |
Table 8-4 lists the user roles required for managing the STA media validation request queue.
Table 8-4 Media Validation Request Queue User Roles
| User Role | Media Validation Request Queue Activity | Screen |
|---|---|---|
|
Viewer and above |
Display, filter, and print a list of all media validation requests. Export the media validation requests list to a spreadsheet or document.View detail for a selected media validation request. Manually submit media validation requests one at a time. Reorder pending media validation requests. Cancel selected pending or in-progress media validation requests. Resume an interrupted validation of a T10000T2 media. |
Select Tape System Activity, then select Media Validation Overview. |
|
Operator and above |
Manually submit multiple media validation requests. Resume multiple interrupted validations of T10000T2 media. |
Select Tape System Hardware, then select Media Overview. |
Table 8-5 lists the user roles required for managing STA media validation policies.
Table 8-5 Media Validation Policy User Roles
| User Role | Media Validation Policy Activity | Screen |
|---|---|---|
|
Operator and above |
Display and print the list of media validation policies. |
Select Setup & Administration, then select Media Validation. |
|
Administrator only |
Display the list of media validation policies. Define a media validation policy. Enable or disable a media validation policy. Copy a media validation policy. Modify a media validation policy as follows:
Delete a media validation policy. |
Select Setup & Administration, then select Media Validation. |
Best Practices for Media Validation
This section provides tips for using STA media validation.
- SNMP v3 required
-
The STA media validation feature requires the use of SNMP v3 for communication between STA and the libraries.
See the STA Requirements Guide.
- Calibration and qualification
-
If you are using media validation, it is highly recommended that you also enable the calibration and qualification features, as they help to ensure the validity of validation results, ensure the health of the validation drives, and provide operational efficiency for the media validation feature.
- Dedicated calibration media
-
The media used for drive calibration and qualification must be dedicated for this purpose; they cannot be used production data.
- Media validation autoselect
-
When submitting manual media validation requests, let STA select the drives for validation operations (Autoselect) rather than selecting manually. This will ensure that the media is mounted on a compatible validation drive.
Media Validation Tasks
Media Validation Configuration Tasks
Media Validation Request Management Tasks
Display Validation Drives for STA Media Validation
Use this procedure to display information about validation drives that meet minimum requirements for STA media validation. See "Validation Drives That Can be Used by STA" for details.
Note:
The validation drive pools are maintained only through SL Console. See the library User's Guide for detailed instructions on maintaining the pools.Note:
This procedure requires Administrator privileges.You can perform this procedure using either of the following methods:
From the Media Validation Screen
Note:
This method requires Operator or Administrator privileges.-
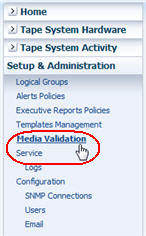
In the Navigation Bar, select Setup & Administration, then select Media Validation.
Description of the illustration ''fg_navbarmvsetup.jpg''
-
In the Media Validation Configuration section of the screen, the Number of Drives Reserved for Media Validation field displays the total number of drives assigned to the validation pools and that meet STA minimum requirements. Select the link.

Description of the illustration ''fg_mvdriveslink.png''
You are taken to the Drives – Overview screen with a filter applied to show detail about these drives.
Description of the illustration ''fg_mvdrivepool.png''
From the Drives – Overview Screen
Note:
This method can be done by any user.-
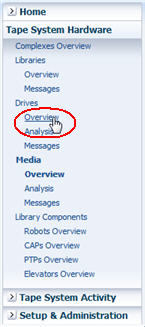
In the Navigation Bar, select Tape System Hardware, then select Drives Overview.
Description of the illustration ''fg_navbardrvovw.jpg''
The Drives – Overview screen appears, displaying all drives in your tape library system.
-
In the Table Toolbar, click Filter Data.
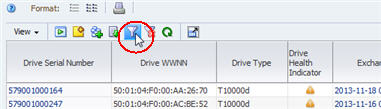
Description of the illustration ''fg_mvdrvfilter.jpg''
The Filter Data dialog box appears.
-
In the selection criteria menus, select MV Drive Capable and True. Then click Apply.
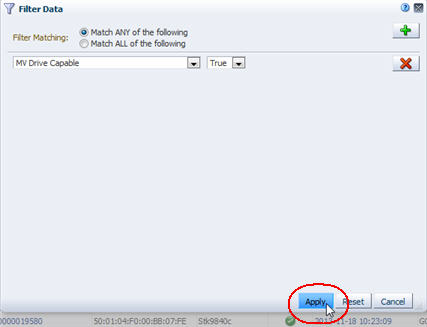
Description of the illustration ''fg_mvfiltermvcapable.jpg''
The table is updated to display only drives that have been assigned to the validation drive pools and that meet minimum requirements for STA media validation.
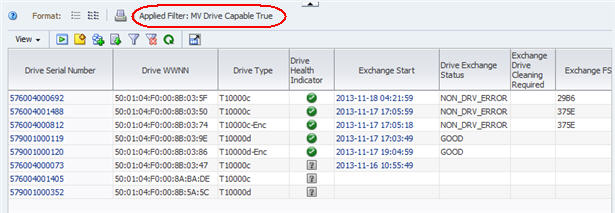
Description of the illustration ''fg_mvdrvcapabledone.jpg''
Enable or Disable Media Validation on STA
Use this procedure to review the current configuration of the media validation feature on STA and enable or disable it. By default, media validation is disabled when STA is installed. See "Enabling Media Validation" and "Disabling Media Validation" for details.
Note:
If you disable media validation after it has already been enabled, STA does not accept new validation requests. However, any pending or in-progress requests remain in the validation queue and are processed to completion. If you want to cancel these requests, you can do so either before or after disabling media validation. See "Canceling Pending or In-Progress Validation Requests" for details.Note:
This procedure requires Administrator privileges.-
In the Navigation Bar, select Setup & Administration, then select Media Validation.
Description of the illustration ''fg_navbarmvsetup.jpg''
The Media Validation screen appears.
-
In the Media Validation State field, select either Enable or Disable, as follows:
-
Enable – Enables STA media validation for all SL3000 and SL8500 libraries monitored by STA.
-
Disable – Disables STA media validation for all SL3000 and SL8500 libraries monitored by STA. You may want to temporarily disable media validation to perform library maintenance.
Description of the illustration ''fg_mvenable.jpg''
A confirmation dialog box appears.
-
-
Verify your selection, and click Yes to confirm.
Description of the illustration ''fg_mvenabled.jpg''
The STA media validation state is updated according to your selection, and the new status is indicated on the screen. If media validation cannot be enabled at this time, the reason is indicated on the screen.
Description of the illustration ''fg_mvenabledone.jpg''
Create the Calibration Media Logical Group
Note:
This is an optional procedure that you need to use only if you plan to enable drive calibration and qualification.Use this procedure to create the logical group of media you want to use for drive calibration and qualification. The media in this group should be dedicated exclusively for these purposes. Oracle recommends that you assign only media—no drives—to this group. See "Calibration Media Logical Group" for details.
Note:
Before using this procedure, you must create a manual logical group to be used exclusively for the calibration media. See "Choosing Calibration Media" and "Create a Manual Logical Group" for details.Note:
This procedure requires Operator or Administrator privileges.-
In the Navigation Bar, select Tape System Hardware, then select Media Overview.
Description of the illustration ''fg_navbarmedovw.jpg''
The Media – Overview screen appears, displaying all media in your tape library system.
-
In the Table Toolbar, click Filter Data.
Description of the illustration ''fg_mvmedfilter.jpg''
The Filter Data dialog box appears.
-
In the selection criteria menus, enter the criteria specified in "Choosing Calibration Media" Then click Apply.
Description of the illustration ''fg_mvqualmediaselect.jpg''
The table is updated to display only media that meet the criteria.
-
Sort the results by the Media MB Avail Post attribute to locate media with at least two wraps of written data.

Description of the illustration ''fg_mvmedovwqualmed.jpg''
-
From the list, select the media you want to use for drive calibration and qualification. Then from the Table Toolbar, click Logical Groups.

Description of the illustration ''fg_mvmedovwlg.jpg''
The Logical Groups dialog box appears.
-
In the menu, select the logical group you have created for the calibration media, and click OK.
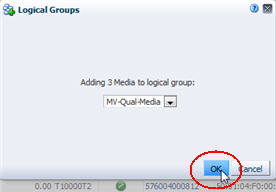
Description of the illustration ''fg_mvqualmedok.jpg''
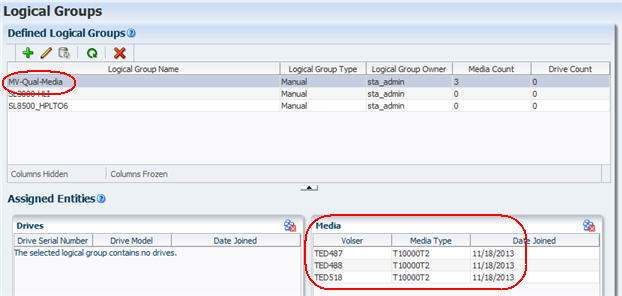
The media are added to the logical group. You can display them on the Logical Groups screen. See "List All Drives and Media Assigned to a Logical Group" for instructions.
Description of the illustration ''fg_mvqualmedlgdisp.jpg''
Enable Drive Calibration and Qualification
Use this procedure to enable the optional drive calibration and qualification features on STA. These features are separate processes, but they are enabled and disabled together.
Note:
It is highly recommended that you enable drive calibration and qualification if you are using STA media validation. See "Drive Calibration and Qualification" for details on the benefits of these features.Note:
Before using this procedure, you must create the calibration media logical group. See "Create the Calibration Media Logical Group" for instructions.Note:
This procedure requires Administrator privileges.-
In the Navigation Bar, select Setup & Administration, then select Media Validation.
Description of the illustration ''fg_navbarmvsetup.jpg''
The Media Validation screen appears.
-
In the Use Media From the Following Manual Logical Group for Calibration menu, select the logical group that includes the media you want to use for calibration and qualification. The menu lists manual logical groups only.
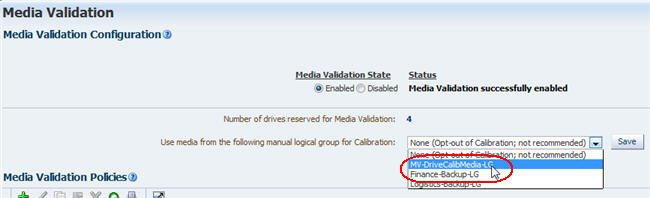
Description of the illustration ''fg_mvcalibmedselect.jpg''
-
Verify your selection, and click Save to confirm.

Description of the illustration ''fg_mvcalibmedsave.jpg''
Drive calibration and qualification are enabled, and STA begins calibrating drives in the media validation drive pool.
The new status is indicated on the screen. If calibration is successful, the screen displays the message, "Drive and Media Pool Setup Success--calibration has been successful." If there are any issues, they are also indicated.
Disable Drive Calibration and Qualification
Use this procedure to disable the optional drive calibration and qualification features on STA. These features are separate processes, but they are enabled and disabled together.
Note:
It is highly recommended that you enable drive calibration and qualification if you are using STA media validation. See "Drive Calibration and Qualification" for details on the benefits of these features.Note:
This procedure requires Administrator privileges.-
In the Navigation Bar, select Setup & Administration, then select Media Validation.
Description of the illustration ''fg_navbarmvsetup.jpg''
The Media Validation screen appears.
-
In the Use Media From the Following Manual Logical Group for Calibration menu, select None (Opt out of calibration; not recommended).
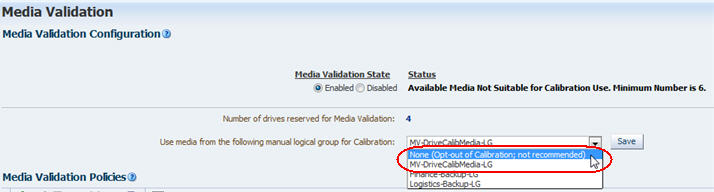
Description of the illustration ''fg_mvcalibdisable.jpg''
-
Verify your selection, and click Save to confirm.
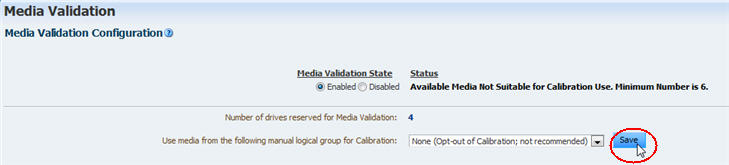
Description of the illustration ''fg_mvcalibdisablesave.jpg''
The Media Validation Configuration dialog box appears.
-
Review the selection and click Yes to confirm that want to disable drive calibration and qualification.
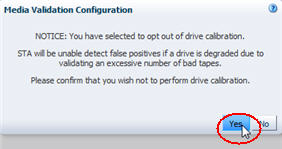
Description of the illustration ''fg_mvcalibdisabled.jpg''
Drive calibration is disabled, and STA does not begin any new calibration or qualification operations. Any in-progress calibration or qualification activities are processed to completion.
The new status is indicated on the screen. If there are any issues, they are also indicated.
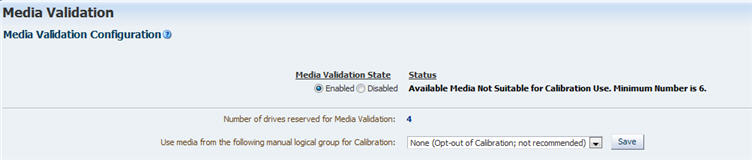
Description of the illustration ''fg_mvcalibdisableafter.jpg''
Display the Media Validation Request Queue
Use this procedure to display information about pending, in-progress, and completed media validation requests. See "Displaying the Status of Validation Requests" for details.
Note:
You can use this procedure even if media validation is disabled on STA.Note:
This procedure can be done by any user.-
From the Navigation Bar, select Tape System Activity, then select Media Validation Overview.
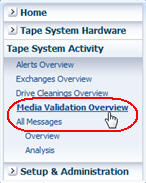
Description of the illustration ''fg_navbarmvovw.jpg''
The Media Validation Overview screen appears, displaying all validation requests for which STA has received information.

Description of the illustration ''fg_mvovwdisplay.jpg''
-
By default, the requests are sorted in Priority Order, starting with "1," which means the oldest requests are at the top of the screen. To view more recent requests, you can either scroll to the bottom of the screen or select the Descending Sort arrow on the Priority Order column.
-
From this screen, you can manage the validation request queue by performing any of the following tasks:
In addition, you can perform most of the same tasks as for any List View table. See the following procedures for instructions:
-
To display a printable form of the table in a separate browser tab or window, see the STA Screen Basics Guide. "
-
To export the list of media validation requests, see the STA Screen Basics Guide."
-
To filter the table records, see "Use the Filter Data Dialog Box to Change a Table Filter".
-
To reset a filter applied to the table, see "Clear the Current Filter".
-
To refresh the table to display any new requests, see the STA Screen Basics Guide"
-
To detach the table from the screen and display it in a separate window in the browser foreground, see the STA Screen Basics Guide."
Submit Manual Media Validation Requests
Use this procedure to manually submit media validation requests to the validation request queue. You can use this procedure as soon as media validation is enabled on STA. See "Submitting Manual Validation Requests" for details.
You can use this procedure to start new validations or to resume validations that were previously interrupted. The option to resume interrupted validations is available only if all of the following conditions are true:
-
You have selected T10000T2 media for validation. (T10000T1 media validations always start at the beginning of tape.)
-
The validation test type is Complete Verify or Complete Verify Plus. (Other test types always start at the beginning of tape.)
-
The most recent validations for some or all of the selected media are not 100 percent complete. (Media for which the most recent validation was complete are always validated from the beginning of tape.)
You can perform this procedure using either of the following methods:
-
"From the Media – Overview Screen". Using this method, you can submit multiple requests at once.
-
"From the Media Validation Overview Screen". Using this method, you can submit only one request at a time.
From the Media – Overview Screen
Note:
This method can be done by any user.-
From the Navigation Bar, select Tape System Hardware, then select Media Overview.
Description of the illustration ''fg_navbarmedovw.jpg''
The Media – Overview screen appears, displaying all media in your tape library system.
-
Apply appropriate filter criteria to narrow down the list of media. In the following example, the screen is filtered to show media with "Library Complex Name Is SL8500_14, and Media Health Indicator Isn't USE."
Note:
You may want to use the STA-Media-MV predefined template because it filters the screen to show only T10000-type media in SL3000 and SL8500 libraries.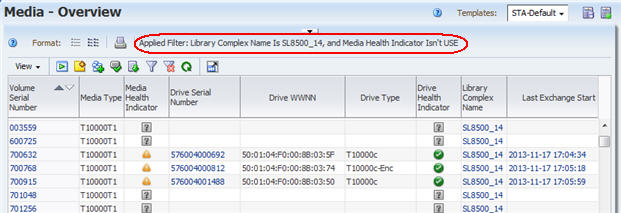
Description of the illustration ''fg_mvmedovwfiltered.jpg''
-
Select the media you want to validate. You can use multi-select to select as many media as you want. Then click Media Validation in the Table Toolbar.
Description of the illustration ''fg_mvmedovwmvselect.jpg''
The Validation Activities dialog box appears. A message indicates the total number of media eligible for validation, and the eligible media are listed. Media may be ineligible for any of the following reasons:
-
The media are not T10000 type.
-
The media are cleaning media.
-
The media are not in an SL3000 or SL8500 standalone library or complex.
-
Drives in the library or complex validation drive pool are not compatible with the media.
-
Drives in the validation drive pool do not meet minimum requirements for STA media validation.
Note:
If none of the selected media are eligible for validation, the message, "No valid media selected for validation" is displayed.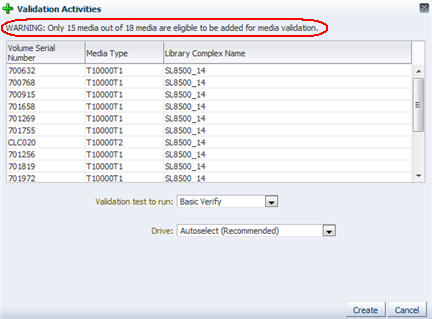
Description of the illustration ''fg_mvactivitieslist.jpg''
-
-
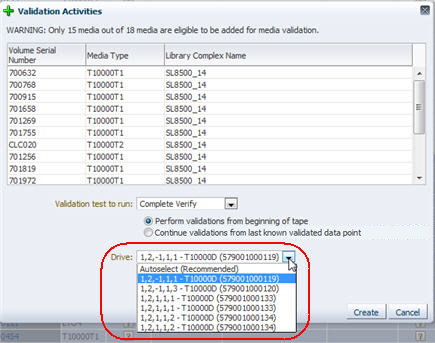
In the Validation test to run menu, select the type of verification test you want to perform. See "Types of Verification Tests" for details about the options.
If you select Complete Verify or Complete Verify Plus, you may also be required to select one of the following options. These options are available only if you are performing Complete Verify or Complete Verify Plus validations on T10000T2 media, and the most recent validations for these media were interrupted prior to completion.
-
Perform validations from beginning of tape – Indicates you want T10000T2 media to be validated from the beginning of tape (BOT).
-
Continue validations from last known validated data point – Indicates you want testing of T10000T2 media that has been partially validated to resume where the previous validation left off, if the drive can determine this from the media RFID chip. If the drive cannot determine where the previous validation left off, it will start from the beginning of tape.
See "Resuming Interrupted "Complete Verify" Tests on T10000T2 Media" for details on these options.
-
-
In the Drive menu, select the drive you want to use for the validations. This option is available only if the media you have selected all reside within the same library complex or standalone library. The menu lists the validation drives in the complex or standalone library.
Note:
You select just one drive, which means all media will be validated by the same drive, if possible. If the drive is not compatible with some media—for example, you have selected to perform a Complete Verify Plus, and some of the media are encrypted but the drive is not encryption capable—the validation requests will be added to the request queue, but they will remain in a pending state.Consequently, it is recommended that you choose Autoselect, which causes STA to automatically select a compatible validation drive for each media.
Description of the illustration ''fg_mvactivitiesdrvs.png''
-
Click Create.
Description of the illustration ''fg_mvactivitiescreate.png''
The validation requests are generated and added to the validation request queue.
-
You can view the requests on the Media Validation Overview screen. See "Display the Media Validation Request Queue" for instructions.
By default, each request is assigned the next available Priority Order as it is generated. See "Reorder Pending Media Validation Requests" for instructions on reprioritizing them.
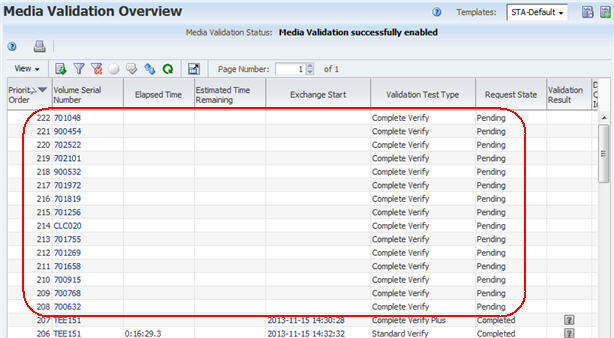
Description of the illustration ''fg_mvovwrequests.jpg''
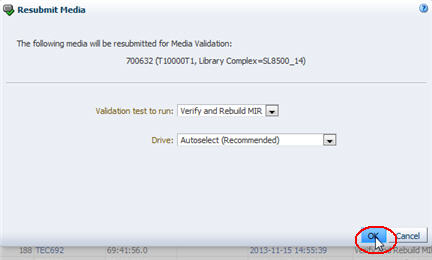
From the Media Validation Overview Screen
Using this method, you can submit only one request at a time. To submit multiple requests at once, see "From the Media – Overview Screen".
Note:
This method requires Operator or Administrator privileges.-
From the Navigation Bar, select Tape System Activity, then select Media Validation Overview.
Description of the illustration ''fg_navbarmvovw.jpg''
The Media Validation Overview screen appears. By default, the screen is displayed in ascending Priority Order.
-
If you want to sort the screen by Volume Serial Number, select the Ascending Sort or Descending Sort arrow in that column.
Description of the illustration ''fg_mvovwascendvsn.jpg''
-
Select the media you want to validate by selecting the request record. Then click Media Validation in the Table Toolbar.
Note:
You can select only one record at a time, and you cannot select media with pending or in-progress validation requests.
Description of the illustration ''fg_mvovwreqselect.jpg''
The Resubmit Media dialog box appears.
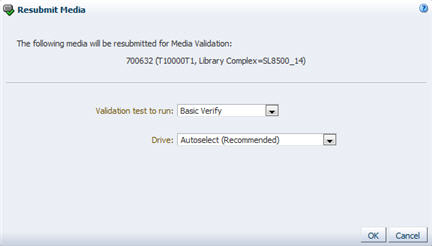
Description of the illustration ''fg_mvresubmitmed.jpg''
-
In the Validation test to run menu, select the type of verification test you want to perform. By default, this field is set to Basic Verify, but you can choose any appropriate verification test for this media. See "Types of Verification Tests" for details about the options.
If you select Complete Verify or Complete Verify Plus, you may also be required to select one of the following options. These options are available only if you are performing a Complete Verify or Complete Verify Plus validation on a T10000T2 media, and the most recent validation for the media was interrupted prior to completion.
-
Perform validations from beginning of tape – Indicates you want T10000T2 media to be validated from the beginning of tape (BOT).
-
Continue validations from last known validated data point – Indicates you want testing of T10000T2 media that has been partially validated to resume where the previous validation left off, if the drive can determine this from the media RFID chip. If the drive cannot determine where the previous validation left off, it will start from the beginning of tape.
See "Resuming Interrupted "Complete Verify" Tests on T10000T2 Media" for details on these options.
-
-
In the Drive menu, select the drive you want to use for the validation. The menu lists the validation drives in the complex or standalone library where the selected media currently resides.
Note:
If the drive you select is not compatible with the media—for example, you have selected to perform a Complete Verify Plus, and the media is encrypted but the drive is not encryption capable—the validation request will be added to the request queue, but it will remain in a pending state.Consequently, it is recommended that you choose Autoselect, which causes STA to automatically select a compatible validation drive for the media.
-
Click OK.
Description of the illustration ''fg_mvresubmitmedok.jpg''
The request is generated and added to the validation request queue. By default, it is assigned the next available Priority Order. See "Reorder Pending Media Validation Requests" for instructions on reprioritizing the request.
Description of the illustration ''fg_mvovwreqadded.jpg''
Reorder Pending Media Validation Requests
Use this procedure to reprioritize pending requests in the media validation request queue. See "Media Validation Request Priorities" for details.
Note:
You can use this procedure even if media validation is disabled on STA. For example, you may disable media validation for library maintenance and then reprioritize the pending requests left in the validation queue so they will be processed in a different order when media validation is reenabled.Note:
This procedure can be done by any user.-
From the Navigation Bar, select Tape System Activity, then select Media Validation Overview.
Description of the illustration ''fg_navbarmvovw.jpg''
The Media Validation Overview screen appears.
-
By default, the requests are sorted in ascending Priority Order. To see more recent requests, scroll to the bottom of the screen. Note the pending requests.
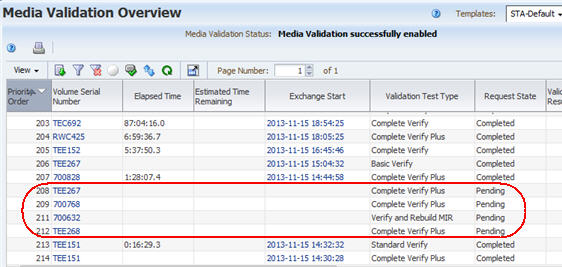
Description of the illustration ''fg_mvovwpending.jpg''
-
Click Reorder Pending Requests in the Table Toolbar.
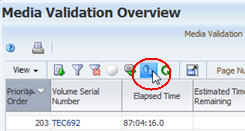
Description of the illustration ''fg_mvreorder.jpg''
The Reorder Pending Requests dialog box appears, with all pending requests listed in their current priority order. The requests are identified by the media Volume Serial Number and the current Priority Order.
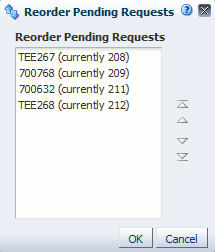
Description of the illustration ''fg_mvreorderd.jpg''
-
Select the requests you want to reprioritize, and click the appropriate arrows to move them in the list. This dialog box supports multi-select.
Arrows Description 
Move the selected item(s) up or down, one place at a time. 
Move the selected item(s) to the top or bottom of the list. 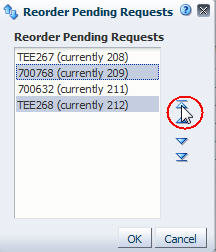
Description of the illustration ''fg_mvreorderselect.jpg''
-
When the requests are in the order you want, click OK.
Description of the illustration ''fg_mvreorderok.jpg''
The requests are reordered according to your selections, and the Priority Order values are updated on the Media Validation Overview screen to reflect the new order.
Description of the illustration ''fg_mvreorderdone.jpg''
Cancel Pending Media Validation Requests
Use this procedure to cancel one or more pending media validation requests. Canceled pending requests are immediately removed from the validation request queue, and they cannot be resubmitted. See "Canceling Pending or In-Progress Validation Requests" for details.
Note:
You can use this procedure even if media validation is disabled on STA. For example, you may disable media validation for library maintenance and then cancel the pending requests left in the validation queue.Note:
This procedure can be done by any user.-
From the Navigation Bar, select Tape System Activity, then select Media Validation Overview.
Description of the illustration ''fg_navbarmvovw.jpg''
The Media Validation Overview screen appears.
-
By default, the requests are sorted in ascending Priority Order. To see more recent requests, select the Descending Sort arrow on the Priority Order column. Note the pending requests.
Description of the illustration ''fg_mvovwpendtocxl.jpg''
-
Select the requests you want to cancel, and click Cancel in the Table Toolbar. You can select any number of pending requests.
Note:
The Cancel button does not activate if you select any completed validations.
Description of the illustration ''fg_mvovwcxl.jpg''
The Cancel dialog box appears, listing the volume serial numbers of the requests you have selected.
-
Verify the list of volume serial numbers and click Yes to confirm the cancellations.
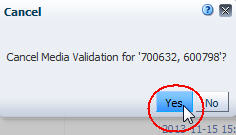
Description of the illustration ''fg_mvcanceld.jpg''
The requests are canceled and removed from the Media Validation Overview screen.
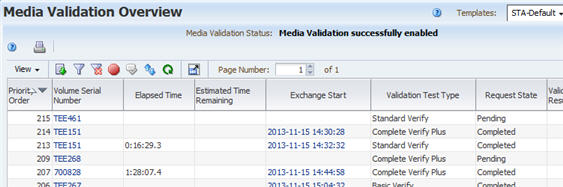
Description of the illustration ''fg_mvovwcxldone.jpg''
Cancel In-Progress "Complete Verify" Validations
Use this procedure to cancel one or more in-progress Complete Verify or Complete Verify Plus media validations. You cannot cancel other in-progress validation types. See "Canceling Pending or In-Progress Validation Requests" for details.
Note:
You can use this procedure even if media validation is disabled on STA. For example, you may disable media validation for library maintenance and then cancel the in-progress Complete Verify requests left in the validation queue.Note:
This procedure can be done by any user.-
From the Navigation Bar, select Tape System Activity, then select Media Validation Overview.
Description of the illustration ''fg_navbarmvovw.jpg''
The Media Validation Overview screen appears.
-
By default, the requests are sorted in ascending Priority Order. To see more recent requests, select the Descending Sort arrow on the Priority Order column. Note the in-progress validations.
Description of the illustration ''fg_mvovwpendtocxl.jpg''
-
Select the validations you want to stop, and click Cancel in the Table Toolbar. You can select any number of in-progress Complete Verify or Complete Verify Plus validations.
Note:
The Cancel button does not activate if you select any completed validations.
Description of the illustration ''fg_mvovwcxl.jpg''
The Cancel dialog box appears, listing the volume serial numbers of the validations you have selected.
-
Review the information displayed and click Yes to confirm the cancellation.
Description of the illustration ''fg_mvcanceld.jpg''
STA issues cancellation requests to the drives. This process may take several minutes to complete. Once each media has been dismounted from the drive and returned to a media slot, the associated validation request is removed from Media Validation Overview screen.
Description of the illustration ''fg_mvovwcxldone.jpg''
Create a Media Validation Policy
Use this procedure to create a media validation policy. Media validation policies allow you to automate media validation in your tape library system. See "Using Automated Media Validation" for details.
The Media Validation Policies wizard leads you through the steps to define all information for the policy.
Note:
This procedure requires Administrator privileges.-
In the Navigation Bar, select Setup & Administration, then select Media Validation.
Description of the illustration ''fg_navbarmvsetup.jpg''
The Media Validation Policies screen appears.
-
Click New Media Validation Policy.
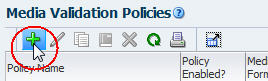
Description of the illustration ''fg_mvpolnew.jpg''
-
Complete the first screen of the wizard as follows:
-
In the Policy Name field, type a unique name.
Your entry can include any alphanumeric characters up to 250 characters in length.
-
In the Policy Description field, enter an optional description of the policy.
-
Click Next.
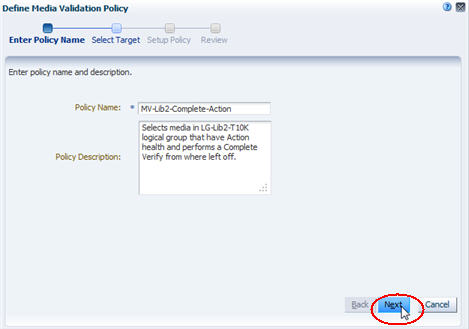
Description of the illustration ''fg_mvwiz1.jpg''
Note:
On any screen of the wizard, you can select the breadcrumb links at the top of the screen to go directly to the immediate-next screen or any screen you have already visited.
-
-
On the second screen of the wizard, you indicate the group of media you want this policy to validate, as follows:
-
If you want this policy to validate media using a specific recording format, optionally within a specific library complex, select the Select media format and optional library complex option, and complete the associated fields as follows:
-
In the Media Format menu, select the media recording formats you want this policy to validate. You can select as many formats as you want. Options are: T10000A and T10000B, which are available for T10000T1 media; T10000C and T10000D, which are available for T10000T2 media.
-
In the Library Complex (Optional) menu, select the library complex you want this policy to validate. If you select None, the policy will validate the specified media types across all complexes. If you select a library complex, the policy will validate media within that complex only.
-
-
If you want this policy to validate media in a specific predefined logical group, select the Select logical group option. In the Logical Group menu, select the logical group. The menu lists all logical groups that have been defined.
Note:
Be sure to select a logical group that includes T10000 media in SL8500 complexes or standalone SL3000 or SL8500 libraries with validation drives, as STA does not verify this for you.If you select a logical group that includes both media and drives, the policy applies to the media only and does not affect the drives used; compatible drives are always selected from the validation drive pool defined through SL Console (see "Preparing for STA Media Validation" for details).
-
-
Click Next.
Description of the illustration ''fg_mvwiz2.jpg''
-
Complete the third screen of the wizard as follows:
-
In the Policy Criteria menu, select the criteria by which media will be selected for validation. See "Selection Criteria for Validation Policies" for descriptions of the options.
Depending on your selection, you may need to complete additional fields, as follows:
-
If you select Media Health = Action, Evaluate, or Monitor, you must also specify the successive Number of exchanges that must occur before a media is selected for validation. Options are 1–5. For example, if you specify "2", media are selected for validation as soon as two successive exchanges occur with the indicated media health.
-
If you select Extended period of non-use, you must also specify the Number of days. Options are 365–1095 (one to three years). For example, if you specify "730", media are selected for validation if 730 days or more have passed since their last exchange.
-
-
In the Validation Test Type menu, select the type of verification test you want the drive to perform. See "Types of Verification Tests" for descriptions of the options.
If you select Complete Verify or Complete Verify Plus, you must also select one of the following options.
Note:
These options apply only to T10000T2 media; validations of T10000T1 media must always start at the beginning of tape (BOT).-
Perform validations from beginning of tape – Indicates you want testing of all T10000T2 media to start from the beginning of tape (BOT), even if the media has already been partially validated.
-
Continue validations from last known validated data point – Indicates you want testing of T10000T2 media that has been partially validated to resume where the previous validation left off, if the drive can determine this from the media RFID chip. If the drive cannot determine where the previous validation left off, it will start from the beginning of tape (BOT).
See "Resuming Interrupted "Complete Verify" Tests on T10000T2 Media" for details on these options.
-
-
Click Next.
Description of the illustration ''fg_mvwiz3.png''
-
-
Complete the last screen of the wizard as follows:
-
Verify that all the policy information is correct.
-
Complete the Enable Policy check box as follows:
-
Select the check box to create the policy and enable it immediately.
-
Deselect the check box to create the policy but leave it disabled for now. You can enable it at a later time. See "Enable or Disable a Media Validation Policy" for instructions.
-
-
Click Save.
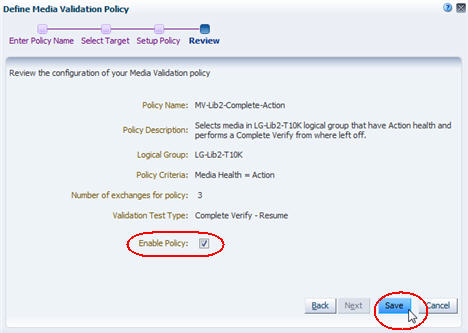
Description of the illustration ''fg_mvwiz4.jpg''
The policy is created. If the policy is enabled, then STA immediately begins evaluating media against the policy and generating media validation requests as appropriate.
If the policy is disabled, then the policy is not evaluated for now.
-
Display the List of Media Validation Policies
Use this procedure to display information about all STA media validation policies.
Note:
These procedures require Operator or Administrator privileges.-
In the Navigation Bar, select Setup & Administration, then select Media Validation.
Description of the illustration ''fg_navbarmvsetup.jpg''
The Media Validation Policies screen appears. The defined policies are listed in the Media Validation Policies section.
Description of the illustration ''fg_mvpollist.jpg''
-
From this screen, you can manage validation policies by performing any of the following tasks:
In addition, you can perform most of the same tasks as for any List View table. See the following procedures for instructions:
-
To display a printable form of the table in a separate browser tab or window, see the STA Screen Basics Guide. "
-
To export the list of media validation policies, see the STA Screen Basics Guide."
-
To filter the table records, see "Use the Filter Data Dialog Box to Change a Table Filter".
-
To reset a filter applied to the table, see "Clear the Current Filter".
-
To refresh the table to display any new policies, see the STA Screen Basics Guide"
-
To detach the table from the screen and display it in a separate window in the browser foreground, see the STA Screen Basics Guide."
Enable or Disable a Media Validation Policy
Use this procedure to enable or disable a selected media validation policy. STA uses only enabled policies to generate automated media validation requests. See "Using Automated Media Validation" for details.
Disabling a policy does not affect any pending or in-progress media validation requests generated from the policy; they are processed to completion unless you cancel them.
Note:
This procedure requires Administrator privileges.-
In the Navigation Bar, select Setup & Administration, then select Media Validation.
Description of the illustration ''fg_navbarmvsetup.jpg''
The Media Validation Policies screen appears.
-
Select the policy you want to modify.
If the policy is currently enabled, the Disable Media Validation Policy icon in the Media Validation Policies toolbar becomes active. If the policy is currently disabled, the Enable Media Validation Policy icon becomes active.
-
Click Enable Media Validation Policy or Disable Media Validation Policy, as applicable.
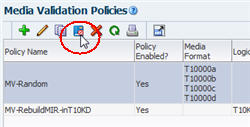
Description of the illustration ''fg_mvpoldisable.jpg''
The policy is updated to according to your selection.
-
If you have enabled the policy, STA immediately begins evaluating media against the policy criteria and generating media validation requests, as appropriate.
-
If you have disabled the policy, STA no longer generates media validation requests for the policy. Any pending or in-progress media validation requests are processed to completion unless you cancel them. See "Canceling Pending or In-Progress Validation Requests" for details.
-
Copy a Media Validation Policy
Use this procedure to copy a selected media validation policy. To use a policy as the basis for a new one, you can copy an existing policy that is similar to one you want to create, and then modify the copy. See "Modify a Media Validation Policy" for instructions.
Note:
This procedure requires Administrator privileges.-
In the Navigation Bar, select Setup & Administration, then select Media Validation.
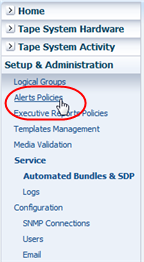
Description of the illustration ''fg_navbaralrt.png''
The Media Validation screen appears.
-
Select the media validation policy you want to copy and click Copy Media Validation Policy.
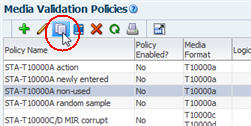
Description of the illustration ''fg_mvpolcopy.jpg''
The first screen of the Media Validation Policies wizard appears. The copy of the policy has all the same information as the original, except for the following:
-
The word "Copy" is added to the end of the Policy Name.
-
The policy is enabled (the Enable Validation Policy check box is selected).
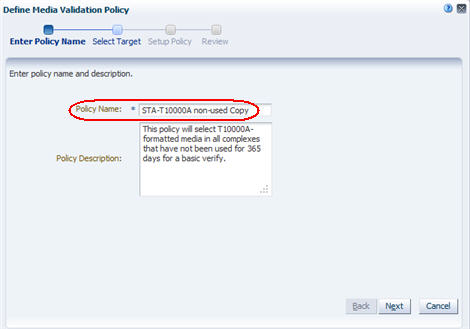
Description of the illustration ''fg_mvpolcopyd.jpg''
-
-
In the Policy Name field, type the name you want to assign, and modify the Policy Description as necessary.
-
Use the Next button or the wizard breadcrumbs at the top of the dialog box to navigate to the screens with the information you want to modify. See "Create a Media Validation Policy" for instructions on completing these screens.
-
Click Save when you have finished.
The new policy is created, and the Media Validation Policies screen is updated with the information.
In the following example, the "STA-T10000B non-used" policy was copied from the "STA-T10000A non-used" policy, and the policy criteria were modified for T10000B media.

Description of the illustration ''fg_mvpolcopydone.jpg''
Modify a Media Validation Policy
Use this procedure to modify a selected media validation policy. You can change any attributes of a policy.
Note:
For a more direct method of enabling or disabling a policy, see "Enable or Disable a Media Validation Policy".Note:
This procedure requires Administrator privileges.-
In the Navigation Bar, select Setup & Administration, then select Media Validation.
Description of the illustration ''fg_navbarmvsetup.jpg''
The Media Validation Overview screen appears.
-
Select the media validation policy you want to modify and click Edit Media Validation Policy.
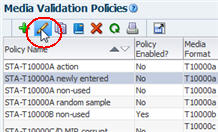
Description of the illustration ''fg_mvpoledit.jpg''
The first screen of the Media Validation Policies wizard appears, and the policy's current information is displayed.
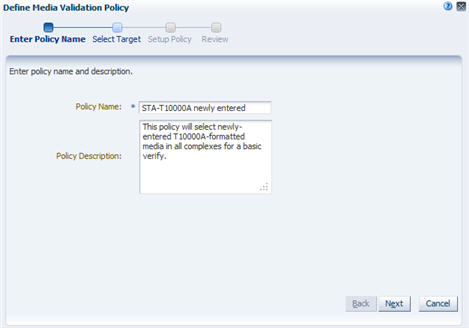
Description of the illustration ''fg_mvwizedit.jpg''
-
Use the Next button or the wizard breadcrumbs at the top of the dialog box to navigate to the screens with the information you want to modify. See "Create a Media Validation Policy" for instructions on completing these screens.
-
Click Save when done.
The policy is updated, and the changes are displayed on the Media Validation Policies screen.
Delete a Media Validation Policy
Use this procedure to delete a media validation policy. Deleting a policy does not delete media validation requests already generated from the policy; they are still available for viewing on the Media Validation Overview screen. Pending and in-progress requests generated from the policy are processed to completion.
You do not need to disable a media validation policy before deleting it.
Note:
This procedure requires Administrator privileges.-
In the Navigation Bar, select Setup & Administration, then select Media Validation.
Description of the illustration ''fg_navbarmvsetup.jpg''
The Media Validation Policies screen appears.
-
Select the media validation policy you want to delete and click Delete Media Validation Policy.
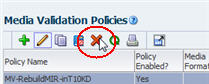
Description of the illustration ''fg_mvpoldelete.jpg''
The Delete dialog box appears.
-
Verify your selection and Click Yes to confirm the deletion.
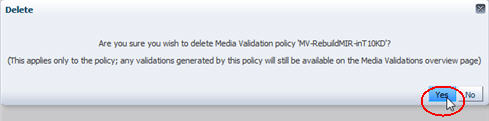
Description of the illustration ''fg_mvpoldeleted.jpg''
The policy is deleted and the list on the Media Validation Policies screen is updated.