6 Configuring Library Connections in STA
For STA to monitor libraries at your site, you must perform some configuration activities on the libraries and some on the STA server. This chapter describes activities performed on the STA server.
This chapter includes the following section:
STA Configuration Tasks
You must complete the procedures in the order listed. Once you have completed this process, STA can begin monitoring the libraries and performing analytics.
Log In to STA
Use this procedure to log in to STA to perform the other procedures in this section. See the STA User's Guide for full instructions.
Note:
The first login to STA after installation may take up to 30 seconds to authenticate the user and display the STA screens. This is normal, and future logins should occur without this delay.-
Start a supported Web browser on your computer and enter the URL of the STA application.
http(s)://STA_host_name:port_number/STA/
Where:
-
host_name is the hostname of the STA server.
-
port_number is the STA port number you specified during installation. The default HTTP port is 7021; the default HTTPS port is 7022.
-
STA must be uppercase.
For example:
https://staserver.example.com:7022/STA/
-
-
At the Login screen, enter the STA administrator username and password.
Verify SNMP Communication With a Library
Use this procedure to confirm a good SNMP connection between the STA server and a library.
This procedure verifies that UDP ports 161 and 162 have been enabled on all network nodes between the STA server and the library. It cannot validate that an SNMP v3 trap recipient has been specified correctly.
Perform this procedure for each monitored library. For SL3000 or SL8500 libraries with either Redundant Electronics or Dual TCP/IP, perform this procedure twice for the library: once for the primary library IP address and once for the secondary IP address.
Note:
This procedure is performed from the system command line on the STA server.-
Open a terminal window on the STA server, and log in as the Oracle user.
-
Test the SNMP v3 connection. The values you specify must match the corresponding ones on the library.
# snmpget –v3 –u SNMP_user –a SHA –A auth_pwd –x DES –X priv_pwd –l authPriv library_IP_addr 1.3.6.1.4.1.1211.1.15.3.1.0
Where:
-
v3 indicates SNMP v3
-
SNMP_user is the SNMP v3 username.
-
SHA indicates the authentication protocol.
-
auth_pwd is the authorization password.
-
DES indicates the privacy protocol.
-
priv_pwd is the privacy password.
-
authPriv indicates that privacy is performed on the command.
-
library_IP_addr is the IP address of the public port on the library.
-
For SL150 libraries, this is Network Port 1.
-
For SL500 libraries, this is port 1B.
-
For SL3000 and SL8500 libraries, there may be multiple ports to test, depending on whether Dual TCP/IP or Redundant Electronics are activated on the library. If there are multiple ports, run this command for each IP address.
-
-
1.3.6.1.4.1.1211.1.15.3.1.0 is the SNMP object identifier (OID) for the library, which is the same for all library models.
If the command output displays the library model, the test is successful. Following are some command examples.
Example 6-1 Successful snmpget Command
# snmpget –v3 –u STAsnmp –a SHA –A authpwd1 –x DES –X privpwd1 –l authPriv 192.0.2.20 1.3.6.1.4.1.1211.1.15.3.1.0
SNMPv2–SMI::enterprises.1211.1.15.3.1.0 =STRING: "SL8500"
-
-
Test the SNMP v2c connection.
# snmpget –v2c –c stasnmp –l authPriv library_IP_addr
Where:
-
-v2c indicates SNMP v2c
-
-c stasnmp indicates the SNMP v2c community string.
-
-l authPriv indicates that privacy is performed on the command.
-
library_IP_addr is the IP address of the public port on the library.
-
-
If both SNMP connection tests are successful, you can quit this procedure. If either test fails, proceed to the next step to troubleshoot suspected network issues, as necessary.
-
Use these steps only if the SNMP connection test are not successful. These steps require system root permissions.
-
Log in as the system root user.
$ su root Password: # -
Confirm packet routing from the STA server to the library.
# traceroute -I library_IP_addr
Where:
-
-I (uppercase "I") indicates to use Internet Control Message Protocol (ICMP) echo request packets instead of User Datagram Protocol (UDP) datagrams.
-
library_IP_addr is the IP address of the public port on the library.
The output shows the number of hops and the round-trip time to reach each one. The round-trip time (the last line in the command output) should be less than one second. If it is not, confirm the network's performance with your network administrator.
-
-
Monitor TCP/IP packets sent between the STA server and the library.
# tcpdump –v host library_IP_addr > /var/tmp/file_name &
Where:
-
-v indicates verbose output.
-
host indicates to collect packets to or from the indicated host only (in this case, the library).
-
library_IP_addr is the IP address of the public port on the library.
-
file_name is the name of the file to which to save the output.
-
-
Configure SNMP Client Settings for STA
Use this procedure to add or modify SNMP client settings for STA. These settings configure STA to receive SNMP data from one or more libraries.
There is just one SNMP client entry for each STA instance at your site.
-
From the Setup & Administration tab, select Configuration, then select SNMP Connections.
-
Proceed as follows:
-
To configure the client settings for the first time, select the empty table row in the Client Attributes table, then click Edit.
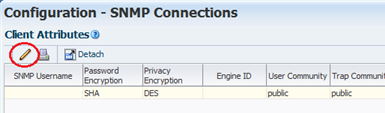
Description of the illustration ''snmpd_editclient.png''
-
To modify existing client settings, select the entry in the Client Attributes table, then click Edit.
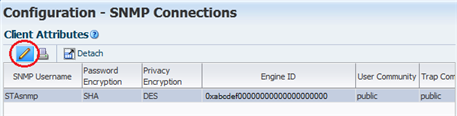
Description of the illustration ''snmpd_clientedit.png''
The Define SNMP Client Settings dialog box appears. If this is a new configuration, the fields are blank.
-
-
Complete the dialog box as follows. The values you specify must match the corresponding ones on the libraries.
Note:
Even if STA will only be monitoring libraries configured for SNMP v2c communication, you must complete all fields, including those applicable to SNMP v3. You cannot leave any fields blank.-
STA SNMP Connection Username (Auth)—Type the SNMP v3 username.
-
Enter STA SNMP Connection Password (Auth)—Type the connection authorization password.
-
Enter Privacy Encryption Password (Privacy)—Type the privacy encryption password.
-
User Community—Type the SNMP v2c community string specified on the library. This field is required for the SNMP handshake with the library.
-
Trap Community —Type the SNMP v2c community string specified on the library. This field is used only if SNMP v2c is used for communication with the library.
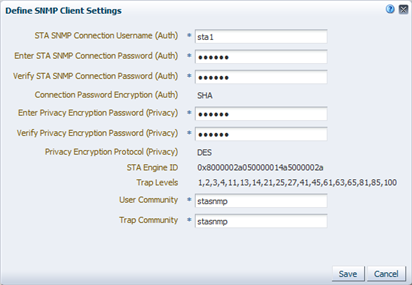
Description of the illustration ''snmpd_defclientd.png''
-
-
Click Save.
The configuration record is updated, and a message box is displayed, indicating you should perform a library connection test to establish or reestablish the SNMP communication handshake with the libraries.
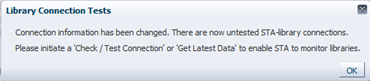
Description of the illustration ''snmpd_cxntestmsg.png''
-
Click OK to dismiss the message.
Configure the SNMP Connection to a Library
Use this procedure to configure an SNMP connection to each library you want STA to monitor, or to modify an existing connection. For existing connections, you must perform this procedure if there are changes to any of the SNMP configuration settings on a monitored library, such as a change to the library IP address.
Note:
If you are configuring multiple library connections at one time, to minimize library disruption, complete this procedure for all libraries before testing the SNMP connections.-
From the Setup & Administration tab, select Configuration, then select SNMP Connections.
-
Proceed as follows:
-
To configure a connection to a library for the first time, click Add in the Monitored Libraries toolbar.
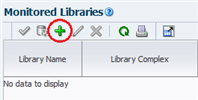
Description of the illustration ''snmpd_monlibadd.png''
-
To modify an existing library connection, select the library in the Monitored Libraries table, then click Edit.
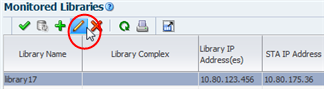
Description of the illustration ''snmpd_monlibselect.png''
The Define Library Connection Details dialog box appears. If this is a new library connection, the fields are blank.
-
-
Complete the dialog box as follows. The values you specify must match the corresponding ones on the library.
-
Library Name—Type a name to identify the library throughout the STA user interface screens (for example, the library host name).
-
Library Primary IP Address—Type the IP address of the primary public port on the library. You cannot specify the IP address of another monitored library.
-
Library Secondary IP Address—Applies only to SL3000 and SL8500 libraries using Dual TCP/IP or Redundant Electronics. Specify the IP address of the secondary public port on the library. You cannot specify the IP address of another monitored library. Leave the field blank for all other libraries, including all SL500 and SL150 libraries.
-
STA IP Address—Select the IP address of the STA server.
-
Library Engine ID—Do not change this field. This is the unique SNMP engine ID of the library, and it is automatically provided when the initial connection between STA and the library is made. It is blank for new connections.
-
Automated Daily Data Refresh—Specify the time of day you want STA to collect the latest configuration data from the library. The data is collected automatically every 24 hours at this time. You should choose a time when there is typically lighter library usage. The default is 00:00 (12:00 am). Use 24-hour time format.
Caution:
If you leave this field blank, scheduled automatic library data collections are disabled. This will cause your STA library configuration data to become out of sync with the library. -
Library Time Zone—Select the library's local time zone.
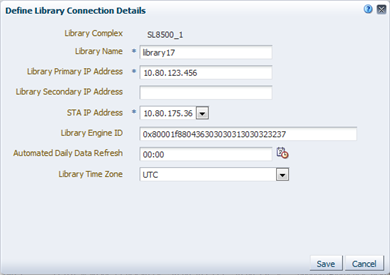
Description of the illustration ''snmpd_deflibd.png''
-
-
Click Save.
The configuration record is updated, and a message box is displayed, indicating you should perform a library connection test to establish or reestablish the SNMP communication handshake with the libraries.
Description of the illustration ''snmpd_cxntestmsg.png''
-
Click OK to dismiss the message.
If you have modified an existing library connection, the Library Engine ID field in the Monitored Libraries table is cleared, indicating the SNMP connection has been dropped.
Test a Library SNMP Connection
Use this procedure to test the SNMP connection between STA and a library and establish or reestablish the communication handshake. To avoid dropped connections and lost SNMP traps, you should perform this procedure for each monitored library whenever you add or change SNMP configuration settings for the library or the STA client.
You can test only one library connection at a time.
Note:
Because a connection test can cause a momentary loss of incoming SNMP packets, you should perform this procedure only when necessary.Note:
Before performing this procedure, you may want to verify that the library is operational.-
From the Setup & Administration tab, select Configuration, then select SNMP Connections.
-
In the Monitored Libraries table, select a library, then click Check / Test Connection.

Description of the illustration ''snmpd_cxntest.png''
The Connection Test Status message box appears, displaying results for the MIB Walk Channel, Trap Channel, and Media Validation Support tests.
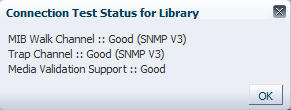
Description of the illustration ''snmpd_cxnteststatusd.png''
-
Click OK to dismiss the message box.
The Monitored Libraries table is updated with the results of the test.

Description of the illustration ''snmpd_cxntestupdate.png''
-
If the Library Complex field is blank, it will be supplied after you perform a manual data collection.
-
Library Engine ID indicates the unique SNMP engine ID for the library.
-
Last Connection Attempt indicates the date and time when the connection test was initiated.
-
Last Successful Connection indicates the date and time when the test was completed, if successful.
-
Last Connection Status indicates the results of the test. If the test fails, STA provides information in the Last Connection Failure Detail field. (You may need to extend the column width to see the entire value.)
-
-
If the test fails, repeat this procedure as follows:
-
If the test fails because of a timeout, repeat this procedure during a period of lower library activity. Once the test completes, you can compare the timestamps to verify that the library is providing current information
-
If the test fails for any other reason, edit the connection details for the library and clear the Library Engine ID field before repeating this procedure. See "Configure the SNMP Connection to a Library" for instructions.
-
Perform a Manual Data Collection
Use this procedure to initiate a manual data collection for a library and get the latest library configuration data. If this procedure is completed successfully, STA begins monitoring the library and performing analytics on the data.
Although STA performs a data collection automatically every 24 hours at the scheduled time, you must perform a manual data collection for each monitored library whenever you add or change SNMP configuration settings for the library or the STA client.
Data collections may take several minutes to an hour, depending on library size.
Note:
You can run multiple data collections simultaneously, but you must initiate them one at a time. Repeat this procedure as many times as necessary, selecting a different library each time-
From the Setup & Administration tab, select Configuration, then select SNMP Connections.
-
Select a library in the Monitored Libraries table, and then click Get latest data. You can select only one library at a time.
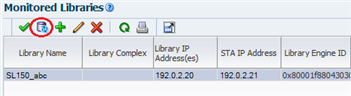
Description of the illustration ''snmpd_getdata.png''
A confirmation message box appears.
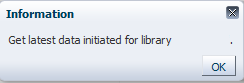
Description of the illustration ''snmpd_datacollectd.png''
-
Click OK to dismiss the message box.
The data collection proceeds, and the Monitored Libraries table is updated with the results.
-
Library Complex indicates the library complex ID.
-
Library Engine ID indicates the unique SNMP engine ID for the library.
-
Last Connection Attempt indicates the date and time when the data collection was initiated.
-
Last Successful Connection indicates the date and time when the data collection was completed, if successful.
-
Last Connection Status is updated as follows:
-
IN PROGRESS: The data collection process is underway.
-
SUCCESS: The data collection was successful. STA starts receiving exchange data from the library.
-
FAILED: The data collection was not successful. If possible, STA provides information in the Last Connection Failure Detail field. (You may need to extend the column width to see the entire value.)
Note:
The status is updated every four minutes, and the default screen refresh interval is 480 seconds. However, you can click the Refresh Table button to force a refresh of the table at any time.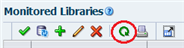
-
-
Recent SNMP Trap Communication Status may intermittently indicate MISSED HEARTBEAT. This is normal.
-