Configure Active Directory and OpenLDAP Authentication Providers
Configure OpenLDAP and Microsoft Active Directory authentication providers by following the tasks in order.
Prepare the External Authentication Provider for STA Authentication
Prepare an external authentication provider to authenticate STA users. This procedure provides general guidelines only, as the specific details depend on your site configuration. Perform these steps on the external authentication server.
-
Identify or create the LDAP Principal User, which WebLogic Server will use to access the external authentication provider.
-
Create the STA Access Group. This group must have the name
StorageTapeAnalyticsUser. -
Identify all users needing access to STA and assign them to the STA access group.
-
Record site-specific configuration information, which you will use to configure the provider in WebLogic Server. See Define Provider-specific Information for examples of the information to gather.
LDAP Principal User
Each external authentication provider must include a user account that WebLogic Server can use to connect to the external provider. In WebLogic Sever, this user is called the Principal user. You can either create a new user account for this purpose or use an existing one.
This user must have read and write access to the external provider's authentication directory so WebLogic Server can resolve user and group searches and authentications. This user does not need to be assigned to the STA access group.
STA Access Group
All users requiring access to STA must belong to the STA access group, which has the name StorageTapeAnalyticsUser. All providers performing authentication for STA must include this group.
For the DefaultAuthenticator, this group is created during STA installation, and all users added through the STA installer, WebLogic Administration console, and STA user interface are assigned to this group automatically.
For external authentication providers, you must create this group in the provider and assign the appropriate users to it.
Lock the WebLogic Server Active Security Realm
Lock the Security Realm to ensure no one else can make changes while you are configuring WebLogic.
-
In a browser, go to the WebLogic Administrator console. The URL uses one of the following formats:
http://local_host_name:port_number/consolehttps://local_host_name:port_number/consolewhere
local_host_nameandport_numberare the name and port number of the WebLogic Administrator console defined during STA installation. The default HTTP port number is 7019, and the default HTTPS port number is 7020.For example:
https://sta_server:7020/console -
Enter the WebLogic Administration console username and password defined during STA installation, and then click Login.
-
In the Domain Structure navigation tree, select Security Realms.
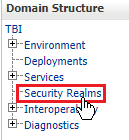
-
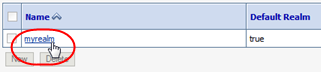
In the Realms table, select the myrealm active link.
-
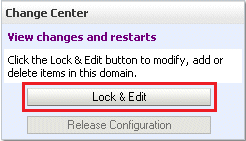
In the Change Center, click Lock & Edit. This locks out other users from making changes at the same time.
-
Proceed to Add an External Authentication Provider.
Understand the WebLogic Server Active Security Realm
The WebLogic Server, which is included in the STA installation, manages all user authentication for STA. The STA installation includes one WebLogic Server active security realm, named myrealm. All authentication providers for STA must be defined in this security realm.
WebLogic Server includes an embedded LDAP server, and this is the default authentication provider for STA. During STA installation, the embedded LDAP server is configured in the active security realm with the name DefaultAuthenticator. The DefaultAuthenticator data store includes credentials for the two default user accounts defined during STA installation—the WebLogic Administrator and the default STA Administrator. It also includes credentials for all STA usernames created through the STA user interface.
Do not change the names of the myrealm security realm and the DefaultAuthenticator; these names are required for STA.
The active security realm also includes a provider named DefaultIdentityAsserter. Do not make any changes to this provider.
Add an External Authentication Provider
Add an external authentication provider to the WebLogic Server active security realm.
-
Make sure you have locked the active security realm from other users (see Lock the WebLogic Server Active Security Realm).
-
Within the Settings for myrealm section, click the Providers tab.

-
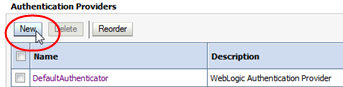
In the Authentication Providers table, click New.
-
Complete the Create a New Authentication Provider screen:
-
Name—Enter a name to identify the authentication provider in the WebLogic Server security realm. For example, "My External OpenLDAP Server" or "My AD Server".
-
Type—Select one of the following options:
-
For OpenLDAP providers, select
OpenLDAPAuthenticator. -
For Microsoft Active Directory providers, select
LDAPAuthenticator.
Note:
TheActiveDirectoryAuthenticatoroption is not supported; do not use it, even for Microsoft Active Directory providers. -
-
-
Proceed to Define Provider-specific Information.
Define Provider-specific Information
Define provider-specific information for each external authentication provider you have added to the WebLogic Server active security realm.
-
Make sure you have locked the active security realm from other users (see Lock the WebLogic Server Active Security Realm).
-
Make sure you have gathered the necessary configuration information from the external authentication provider (see Prepare the External Authentication Provider for STA Authentication).
-
In the Settings for myrealm control bar, select the Providers tab.
-
In the Authentication Providers table, select the active link for the provider you want to configure.
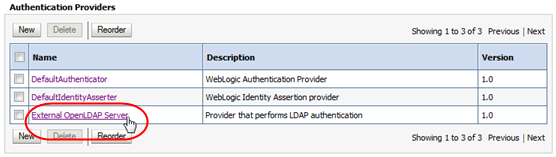
-
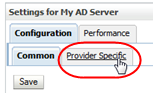
In the control bar, select the Configuration tab, and then the Provider Specific.
-
Complete the screen attributes using the values you gathered from the external authentication provider. These values must match the directory schema and other configuration attributes specific to that provider.
Following are guidelines for attributes required for a basic configuration. Depending on your site requirements, you may need to enter values for other attributes as well.
-
Host—IP address of the external authentication server
-
Port—Port number on which the external authentication server is listening. Typically this is 389.
-
Principal—Distinguished Name of the user account on the external provider that WebLogic Server will use to connect to the external authentication server.
-
Credential and Confirm Credential—Password for the Principal user
-
SSLEnabled—Select this check box if communication between WebLogic Server and the external authentication server will be through SSL. You must perform additional configuration tasks to fully enable this feature. See Configure SSL for Communications for details.
-
User Base DN—Base distinguished name (DN) of the tree that contains users.
-
User From Name Filter—Filter WebLogic Server should use to find users
-
User Object Class—LDAP object class that stores users
-
Group Base DN—Base distinguished name (DN) of the tree that contains groups
-
Group From Name Filter—Filter WebLogic Server should use to find groups
-
Group Object Class—LDAP object class that stores groups
-
Connection Timeout—The default value is 0, which indicates no timeout limit. Oracle recommends setting this value to a nonzero value, such as 60 (expressed in seconds).
-
Follow Referrals—Select this check box if the external authentication provider is configured to use referrals to other authentication servers. If an external authentication provider uses LDAP referrals, you must ensure that the
Follow Referralsattribute is selected on the Provider Specific screen This attribute is selected by default, but Oracle recommends y
-
-
When you have finished entering screen values, click Save. Proceed to Set the JAAS Control Flag.
Sample Provider-Specific Values
These examples show sample values for an OpenLDAP and a Microsoft Active Directory provider, respectively. The values you enter will be different, but these examples may assist you with entry syntax. alues
Example E-1 Sample Provider-specific Values for an OpenLDAP Provider
Host: 10.123.456.789
Port: 389
Principle: cn=root,o=staOpen,dc=mycompany,dc=com
Credential: OpenLDAP root password>
Confirm credential:  OpenLDAP root password
SSL Enable: not selected
User Base DN:  ou=users,o=staOpen,dc=mycompany,dc=com
All Users Filter:
User From Name Filter: (&(cn=%u)(objectclass=posixAccount))
User Search Scope:  subtree
User Name Attribute:  cn
User Object Class:  posixAccount
Use Retrieve User Name as Principle:  selected
Group Base DN:  ou=groups,o=staOpen,dc=mycompany,dc=com
All Groups Filter:
Group From Name Filter:  (&(cn=%g)(objectclass=groupOfUniqueNames))
Group Search Scope:  subtree
Group Membership Searching:  unlimited
Max Group Membership Search Level:  0
Ignore Duplicate Membership:  not selected
Static Group Name Attribute: cn
Static Group Object Class:  groupOfUniqueNames
Static Member URL Attribute: uniquemember
Static Group DNs from Member DN Filter:  (&(uniqueMember=%M)(objectclass=groupOfUniqueNames))
Dynamic Group Name Attribute:
Dynamic Group Object Class:
Dynamic Member URL Attribute:
User Dynamic Group DN Attribute:
Connection Pool Size:  6
Connect Timeout:  60
Connection Retry Limit:  1
Parallel Connect Delay:  0
Results Time Limit: 0
Keep Alive Enabled:  not selected
Follow Referrals: selected
Bind Anonymously On Referrals:  not selected
Propagate Cause For Login Exception: selected
Cache Enabled: selected
Cache Size: 32
Cache TTL:  60
GUID Attribute: entryuuid
Example E-2 Sample Provider-specific Values for an Active Directory Provider
Host: 10.123.456.789
Port: 389
Principle: CN=StaLdapUser,OU=Users,O=STA,DC=oracle,DC=com
Credential: LDAP (SAM) password
Confirm credential:  LDAP (SAM) password>
SSL Enable: not selected
User Base DN:  OU=Users,O=STA,DC=mycompany,DC=com
All Users Filter:
User From Name Filter: (&(cn=%u)(objectclass=user))
User Search Scope:  subtree
User Name Attribute:  cn
User Object Class:  user
Use Retrieve User Name as Principle:  selected
Group Base DN:  OU=Groups,O=STA,DC=oracle,DC=com
All Groups Filter:
Group From Name Filter:  (&(cn=%g)(objectclass=group))
Group Search Scope:  subtree
Group Membership Searching:  unlimited
Max Group Membership Search Level:  0
Ignore Duplicate Membership:  not selected
Use Token Groups for Group Membership Lookup:  not selected
Static Group Name Attribute: cn
Static Group Object Class:  group
Static Member URL Attribute: member
Static Group DNs from Member DN Filter:  (&(member=%M)(objectclass=group))
Dynamic Group Name Attribute: >
Dynamic Group Object Class:
Dynamic Member URL Attribute:
User Dynamic Group DN Attribute:
Connection Pool Size:  6
Connect Timeout:  60
Connection Retry Limit:  1
Parallel Connect Delay:  0
Results Time Limit: 0
Keep Alive Enabled:  not selected
Follow Referrals: selected
Bind Anonymously On Referrals:  not selected
Propagate Cause For Login Exception: selected
Cache Enabled: selected
Cache Size: 32
Cache TTL:  60
GUID Attribute: objectguid
Set the JAAS Control Flag
The Java Authentication and Authorization Service (JAAS) Control Flag attribute assigned to each provider defines whether users must be authenticated by that provider. The default value for this attribute is "Optional," but for STA, Oracle recommends setting it to "Sufficient" for each provider, including the DefaultAuthenticator.
-
Make sure you have locked the active security realm from other users (see Lock the WebLogic Server Active Security Realm).
-
In the Settings for myrealm control bar, select the Providers tab.
-
In the Authentication Providers table, select the active link for the provider you want to update.
IMPORTANT: You must set the control flag for all authentication providers, including the
DefaultAuthenticator. Do not perform this procedure for theDefaultIdentityAsserter. -
In the Control Flag menu, select
Sufficient.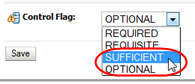
The "Sufficient" setting indicates that if the provider successfully authenticates a user, no additional authentication is required, and if the provider cannot authenticate the user, authentication continues to the next provider in the list. See Fusion Middleware Securing Oracle WebLogic Server for descriptions of all options for this attribute.
-
Click Save.Proceed to Ensure Proper Order of Authentication Providers
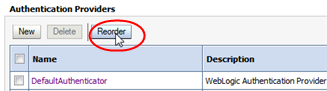
Ensure Proper Order of Authentication Providers
When a user attempts to log in to STA, WebLogic Server calls authentication providers in the order they are listed in the Authentication Providers table. By default, the providers are listed in the order they were added to the active security realm, but you can change their order to better meet the needs of your site.
For example, if an external authentication provider includes many STA users, you may want to put that provider at the top of the list so it is called first.
-
Make sure you have locked the active security realm from other users (see Lock the WebLogic Server Active Security Realm).
-
In the Settings for myrealm control bar, select the Providers tab.
-
In the Authentication Providers table, click Reorder.
-
In the Reorder Authentication Providers table, arrange the providers in the order you want WebLogic Server to access them, from first to last. Select the check box of the providers you want to reorder, then use the arrow buttons to move them up or down in the list.
Note:
TheDefaultAuthenticatorand theDefaultIdentityAssertermust be the first two providers in the list.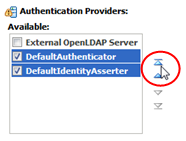
-
When the providers are listed in the order you want, click OK.
-
The Authentication Providers table is updated. Proceed to Apply All Configuration Changes.
Apply All Configuration Changes
Apply all changes you have made during this editing session. The changes are applied to WebLogic Server and STA.
-
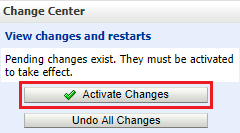
In the Change Center section, click Activate Changes.
-
The Messages area indicates that STA must be restarted for the changes to take effect. Log out of the WebLogic Administration console.
-
Open a terminal session on the STA server and log in as the Oracle user.
-
Stop and restart STA using the
STAcommand. See the STA Administration Guide for command usage details.$ STA stop all $ STA start all
-
Proceed to Verify Configuration of Authentication Providers.
Verify Configuration of Authentication Providers
After you have finished configuring one or more external authentication providers for STA, verify that WebLogic Server can access the appropriate users and groups.
-
Log back into WebLogic and make sure you have locked the active security realm from other users (see Lock the WebLogic Server Active Security Realm).
-
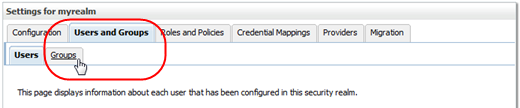
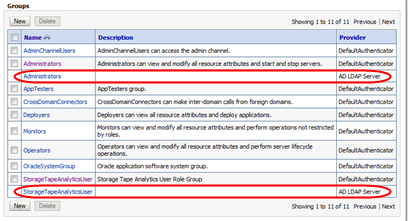
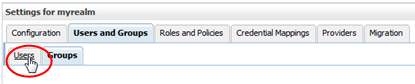
In the Settings for myrealm control bar, select the Users and Groups tab and then the Groups secondary tab.
-
Verify that the Groups table includes groups from all configured external authentication providers.
The following example shows groups from two external providers.
-
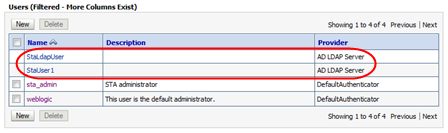
In the Settings for myrealm control bar, select the Users secondary tab.
-
Verify that the Users table includes all users assigned to the STA access group (
StorageTapeAnalyticsUser) on the configured external providers.The following example shows users from two external providers.
-
Log out of the WebLogic Server Administration console.
-
Go to the STA GUI. Verify that you can use a user account from the external authentication provider to log in to STA and display the Dashboard.

-
STA users from external authentication providers are assigned the STA Viewer role by default. If a user requires a different role (Operator or Administrator), you must modify it manually through the STA user interface. See the STA User's Guide for instructions.