Install STA
Installing STA involves multiple procedures. You must complete them in the order listed.
Identify or Create Information Required for the Installation
Identify and, if necessary, create users and locations to run the STA installer.
-
Review the information in Users, Groups, and Locations Used by the STA Installer to understand the users and locations needed for the STA installer.
-
On the STA server, open a terminal session. Log in as the system
rootuser. -
Determine if there is an Oracle central inventory pointer file
/etc/oraInst.loc.# cat /etc/oraInst.loc-
If the file exists, you will likely need to identify and record information as outlined in the following steps.
-
If the file does not exist, you will likely need to create users and locations as outlined in the following steps.
-
-
Identify or create the Oracle group.
# groupadd oinstall -
Identify or create the username and password of the Oracle user. This user must belong to the Oracle group.
# useradd -g oinstall -d /home/oracle oracle
# passwd oracle
Depending on your site configuration, some of the activities performed by this user may require system root privileges. You should add the user to the system sudoers file.
-
Identify or create the Oracle central inventory location. This directory must be owned by the Oracle user.
# mkdir -p /opt/oracle/oraInventory
# chown oracle /opt/oracle/oraInventory
# chgrp oinstall /opt/oracle/oraInventory
# ls -la /opt/oracle/oraInventory
-
Identify or create Oracle storage home location. This directory must have at least 11 GB of free space. It must be owned by the Oracle user and Oracle group.
# mkdir /Oracle
# chown oracle /Oracle
# chgrp oinstall /Oracle
-
Identify or create the STA installer location. For example:
# mkdir /Installers -
Obtain the password for the system root user. The STA installer requires root access to perform certain tasks and will prompt for the password.
-
Choose usernames for the WebLogic Administrator, STA Administrator, and MySQL accounts that will be created during the installation.
-
Choose port numbers for the configurable internal and external ports required for STA operations. Ensure that the external ports are open on the required networks.
-
Obtain your site's domain name for configuring Oracle's Remote Diagnostics Agent (RDA). See the STA User's Guide for details.
Verify Installation Prerequisites
Verify prerequisites before running the STA installer. The installation will fail if any of these prerequisites are not met.
The STA installation assumes 64-bit Linux has been installed with the Linux RPM packages specified in Install Required Linux Packages. If a required package is not installed, the STA installation will display an error message and not allow you to continue until the package is installed. See Requirements for STA for a complete list of installation requirements.
-
Before choosing to permanently remove or replace existing software, back up files as needed.
-
On the STA server, open a terminal session. Log in as the Oracle user.
-
Verify that STA is not installed on the server. For example:
$ ls /etc/init.d/sta*
ls: cannot access /etc/init.d/sta*: No such file or directory
$ ls /usr/bin/STA
ls: cannot access /usr/bin/STA: No such file or directory
If STA is already installed, you must deinstall it and then install the new version of STA and then upgrade the database. See Upgrade to STA 2.3.1 for details.
-
Verify that MySQL is not installed on the STA server. For example:
$ ls /etc/init.d/mysql*
ls: cannot access /etc/init.d/mysql*: No such file or directory
$ ls /usr/bin/mysql*
ls: cannot access /usr/bin/mysql*: No such file or directory
If MySQL is already installed, you must deinstall it before you can install STA.
-
Verify that the
/tmpdirectory has at least 4 GB of free space. For example:$ df -H /tmp Filesystem Size Used Avail Use% Mounted on /dev/mapper/vg_tbivb03-lv_root 53G 35G 16G 70% / -
Verify that the Oracle storage home location has at least 11 GB of free space. This is the default STA and WebLogic installer working location. For example:
$ df -H /Oracle
Filesystem             Size   Used  Avail Use% Mounted on /dev/mapper/vg_tbivb03-STA_OracleVol  34G   3.8G    29G  12% /Oracle
If the directory does not have enough space, you can optionally specify a different working directory when you start the STA installer. See STA installer working location for details.
-
Verify SELinux is disabled.
$ sestatus SELinux status: disabled -
Verify the iptables firewall service is running. Depending on your site configuration, this step may require system root privileges.
Linux 6:
$ sudo service iptables statusLinux 7:
$ systemctl status iptables -
Stop and deconfigure SNMP services.
To avoid network port collisions and other issues, the STA server must not run other SNMP services. The STA installer will quit in the following situations:
-
The snmpd and snmptrapd daemon services are running,
-
UDP ports 161 (SNMP) and 162 (SNMPTRAP) are not available.
Perform the following steps as required to stop the SNMP services:
-
Display the current status of the SNMP
snmpdandsnmptrapdservices.Linux 6:
$ service snmpd status
$ service snmptrapd status
Linux 7:
$ systemctl status snmpd
$ systemctl status snmptrapd
-
If necessary, stop the SNMP services immediately.
Linux 6:
$ service snmpd stop
$ service snmptrapd stop
Linux 7:
$ systemctl stop snmpd
$ systemctl stop snmptrapd
If you receive a "FAILED" error, the services may already be stopped.
-
Disable the SNMP services in the Linux services configuration file so they do not start automatically when Linux reboots. Depending on your site configuration, this step may require system root privileges.
Linux 6:
$ sudo chkconfig snmpd off
$ sudo chkconfig snmptrapd off
Linux 7:
$ systemctl disable snmpd
$ systemctl disable snmptrapd
-
-
Review and verify the applicable mode-specific requirements, as follows:
-
For the installation wizard, see Installation Wizard Display Requirements.
-
For the silent-mode installer, see Silent-mode Requirements.
-
Download the STA Installer
Download the STA installation package from the Oracle Software Delivery Cloud.
-
Go to the Oracle Software Delivery Cloud:
http://edelivery.oracle.com/ -
Sign In or Register.
-
In the search field, enter
StorageTek Tape. Select select StorageTek Tape Analytics. -
Click +Add to Cart for the release you want to download.
-
Click View Cart/Checkout.
-
Verify the release level is correct, then click Continue.
-
Read and accept the terms/restrictions. Click Continue.
-
Download all parts of the STA installation package (for example 1of2 and 2of2).
-
If prompted, install the Download Manager.
-
Save the STA download package to an accessible location.
The download package files include the following, where
versionis the STA installation version number.-
sta_install_version_linux64.bin—Required for all installations. -
sta_install_version_linux64-2.zip—Required for all installations. -
silentInstallUtility_version.jar—Response file build utility. Required only if you will be using the silent-mode installer or deinstaller.
-
Unzip the STA Installer
Unzip the download package to the installation directory. Unzip only the top-level zip files (for example, V76699-01of2.zip). Do not unzip any files contained within these files (for example, sta_install_2.1.1.9.16_linux64-2.zip).
-
Unzip the STA installer to the installation directory created earlier. For example:
$ unzip V76699-01_1of2.zip -d /Installers
$ unzip V76699-01_2of2.zip -d /Installers
-
Ensure that the Oracle user has all of the following permissions:
-
Ownership of the installation files
-
Execute permissions to the
sta_install_version_linux64.binfile -
Read access to
sta_install_version_linux64-2.zipfile andsilentInstallUtility_version.jarfiles
-
-
Review the Release Notes, which are included in the installer download package.
Run the STA Installer
Begin the installation by launching either the installation wizard or the silent mode installer.
-
On the STA server, open a terminal session. Log in as the root user.
-
Clear as much space as possible in the system temporary directory (
/tmp). Remove all files and directories owned by the Oracle user, which may be left over from previous STA installations or installation preparation activities.$ rm -rf /tmp/* -
Switch to the Oracle user. Change to the STA installer location. For example:
$ cd /Installers -
Launch the STA installer with one of the following commands:
-
Installation Wizard (recommended)— See Install STA with the Installation Wizard. This mode provides a graphical user interface for installing STA. It requires an X11 display.
$ ./sta_install_<sta version>_linux64.bin
For example:
$ ./sta_install_2.3.1_linux64.bin -
Silent Installer — Silent mode allows you to bypass the graphical user interface and supply the installation options in an XML properties file called the response file. This mode is useful for unattended installations and for installing STA on multiple machines. By using a response file, you can supply a single set of parameters and automate the installation. You can run the silent-mode installer either from a script or from the Linux command line.
$ ../sta_install_<sta version>_linux64.bin –silent –responseFile <absolute path to response file>
For example:
$ ./sta_install_2.3.1_linux64.bin –silent –responseFile /Installers/SilentInstall.rspBefore using this mode, you must also download the
silentInstallUtility_version.jarfile and create a response file specifying the installation options.See Silent-mode Installer for instructions.
-
Install STA with the Installation Wizard
Install STA by completing the prompts within the installation wizard.
Note:
System changes are not implemented until you complete all the installer screens and click Install on the summary screen. Anytime before then, you can return to a previous screen and modify your entries.-
Before running the installer, review the following to familiarize yourself with the what you will configure during the installation:
-
Launch the installer by following the instructions in Run the STA Installer.
-
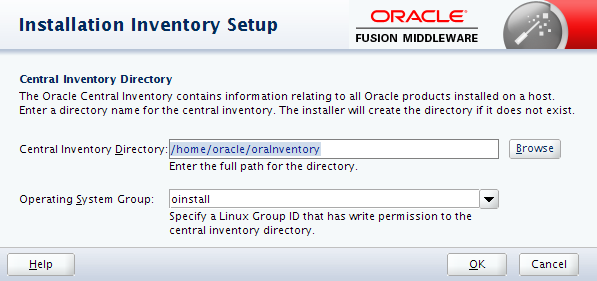
On the Installation Inventory Setup screen:
-
Central Inventory Directory — Enter an absolute path or click Browse to navigate to the directory to use for the Oracle Central Inventory directory (see Oracle central inventory location). For example
/opt/oracle/oraInventory. -
Operating System Group — Enter the Linux group that will have write permissions to the central inventory group (see Oracle group). For example
oinstall.
-
-
Review the Welcome screen, then click Next.
-
On the Installation Location screen:

-
Oracle Storage Home — Enter an absolute path or click Browse to navigate the directory where STA and associated Oracle software will be installed. For example,
/Oracle.-
If the directory already exists, the Oracle user and group must have full permissions to it.
-
If the directory does not exist, the Oracle user and group must have full permissions to the parent directory, so the STA installer can create the Oracle Storage Home directory.
-
-
STA Home — This cannot be changed. This is the subdirectory within Oracle Storage Home where STA will be installed. This subdirectory is assigned the name
StorageTek_Tape_Analyticsand it will be created automatically during the installation. -
View — Click this button to display a list of all software currently installed in the Oracle Storage Home directory you have specified.
-
-
On the Prerequisite Checks screen, the installer performs a series of checks which may take several minutes.
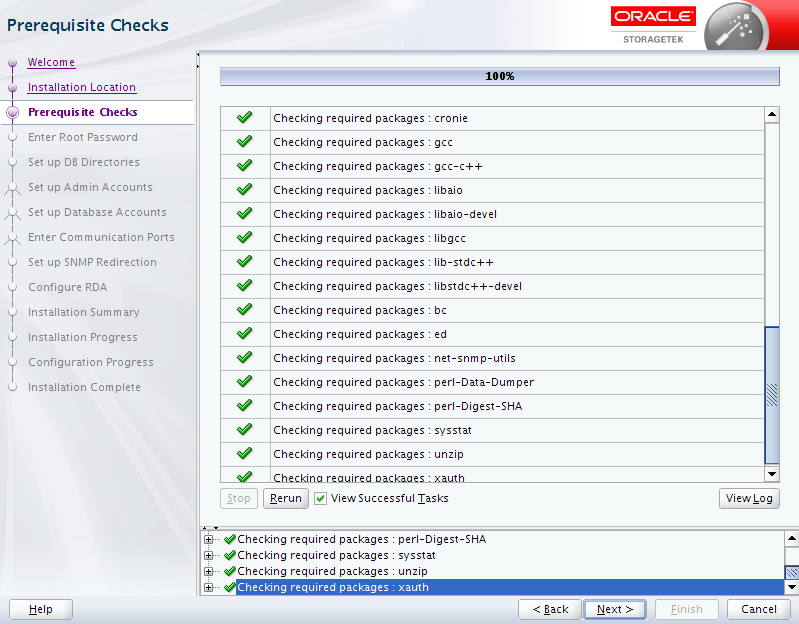
The possible outcomes of each verification task are as follows:
-
Success
 —The prerequisite passed successfully.
 -
Warning
 —The recommended prerequisite did not pass.
 -
Failure
 —The required prerequisite did not pass.
You cannot continue the installation if there are any Failures. You should resolve all Warning outcomes before continuing. You can keep the installer up at this screen while you resolve any issues, and then click Rerun to run the verification process again.
Depending on the nature of a prerequisite, you may need to stop a service, change user privileges, or install a yum package to resolve issues. Click a task in the main window. The task is highlighted in the Message pane with expanded detail.
-
-
On the Enter Root Password screen, enter the existing system root password.
-
On the Set up DB Directories screen, enter:
-
Database Data Location — the absolute path to the directory where the STA database will be located (for example
/dbdata). -
Database Backup Location — the absolute path to the directory where the STA database backups will be located (for example
/dbbackup). This cannot be the same as the database data location.
-
-
Review the Set up Admin Accounts screen, then click Next. Follow the prompts to enter the username and passwords for each of the following users.
-
WebLogic Administrator
-
STA Administrator
Caution:
Make a secure record of the account credentials (passwords) you create. If you lose them, you will not be able to login and must re-install STA. -
-
Review the Set up Database Accounts screen, and then click Next. Follow the prompts to enter the username and passwords each of the following users:
-
Database Root User
-
Database Application User
-
Database Reports User
-
Database Administrator
-
-
Review the Enter Communication Ports screen, then click Next. Follow the prompts to enter the ports for the following:
-
WebLogic Admin Console
-
STA Engine
-
STA Adapter
-
STA UI
The typical ports used are listed in Ports Configured During STA Installation.
-
-
On the Set up SNMP Redirection screen, enter the redirection port used for SNMP traps.
-
On the Configure RDA screen, enter your site's fully qualified domain name. For example,
us.example.com.STA uses RDA to take snapshots of all logs related to the STA application and database, including operating system, installation, and configuration information.
-
Review the Installation Summary screen.
IMPORTANT:
Once you click Install, you cannot pause or cancel the installation.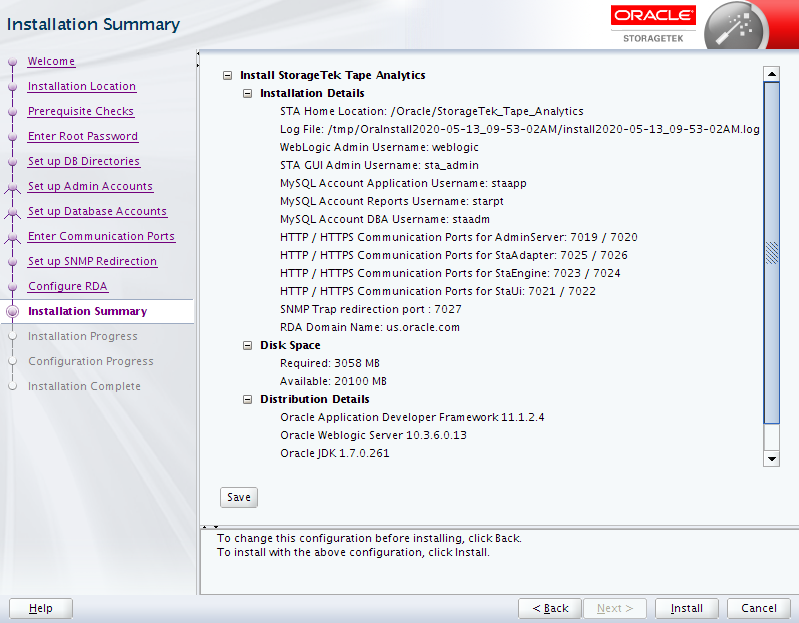
Optionally, click Save to save the installation details to a .txt file. Once you are ready to install STA, click Install.
-
The Installation Progress and Configuration Progress screens will display the current status of the installation. Configuration can take 30-60 minutes to complete.
IMPORTANT:
Do not close this window or interrupt the installation, as this may leave incomplete installation components on the server.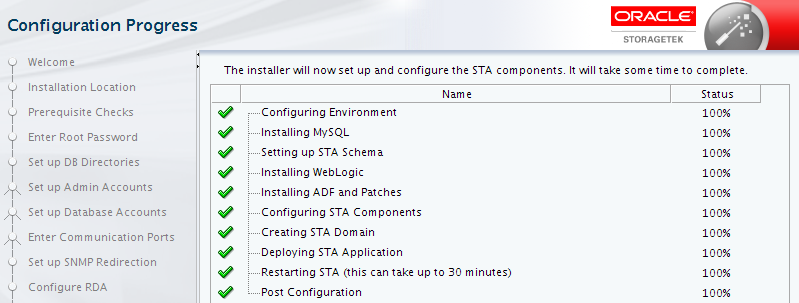
-
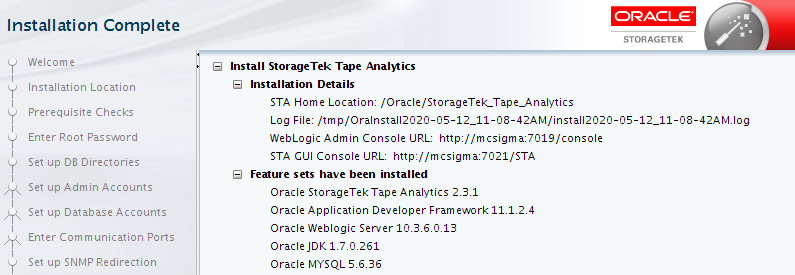
Once the Installation Complete screen displays, you can click Finish.
Verify Successful Installation
Verify that STA is running to make sure the installation was successful.
-
Verify the STA bin directory is included in the
PATHvariable for the Oracle user.-
On the STA server, open a terminal session. Log in as the Oracle user.
-
Open the Oracle user profile using a text editor. For example:
$ vi /home/oracle/.bash_profile -
Add the STA bin directory to the
PATHdefinition. For example, add the following line to the file:PATH=$PATH:<Oracle_storage_home>/StorageTek_Tape_Analytics/common/binWhere
Oracle_storage_homeis the Oracle storage home location specified during STA installation. -
Save and exit the file.
-
Log out and log back in as the Oracle user.
-
Confirm that the
PATHvariable has been updated correctly.$ echo $PATH /usr/lib64/qt-3.3/bin:/usr/local/bin:/bin:/usr/bin:/usr/local/sbin:/usr/sbin:/sbin:/home/oracle/bin:/Oracle/StorageTek_Tape_Analytics/common/bin
-
-
Verify that all STA services are running and active:
$ STA status all mysql is running staservd service is running staweblogic service is running staengine service is running .... and the deployed application for staengine is in an ACTIVE state staadapter service is running .... and the deployed application for staadapter is in an ACTIVE state staui service is running .... and the deployed application for staui is in an ACTIVE state -
Proceed as follows:
-
If the STA services are running and active, you can begin configuring the libraries and STA. See Configure SNMP.
-
If there are any issues with the STA services, you can review the installation and STA logs for more information. See Logs Created During Installation, Upgrade, and Deinstallation for their locations.
-
Relocate the STA Logs Directory (optional)
Relocate the STA and MySQL logs to a location other than the default, which is /var/log/tbi.
After you complete this procedure, STA will write logs to the new location. You can perform this procedure anytime after STA has been installed. See Review STA File System Layout for the location requirements.
-
On the STA server, open a terminal session. Log in as the system root user.
-
Stop all STA services:
# STA stop all -
Create the new logs directory. For example:
# mkdir -p /LOGS_DIR/log/ -
Change access permissions to the directory so STA and MySQL can write to it. For example:
# chmod 777 /LOGS_DIR/log -
Move the current
/var/log/tbidirectory to the STA logs directory you have just created.# mv /var/log/tbi /LOGS_DIR/log -
Create a symbolic link from your new STA logs directory to the default location. For example:
# ln -s /LOGS_DIR/log/tbi /var/log/tbi -
Restart STA:
# STA start all
Register the Oracle Central Inventory Location
After STA installation, register the Oracle central inventory location on the STA server to create an Oracle central inventory pointer file, /etc/oraInst.loc. The pointer file allows the Oracle central inventory location and Oracle group to be known to all Oracle installers used on the server.
-
On the STA server, open a terminal session. Log in as the Oracle user.
-
Display the location, as follows.
-
If the Oracle central inventory has been registered, you can display the contents of the
/etc/oraInst.locpointer file. The location is defined by theinventory_locparameter, and the Oracle group is defined by theinst_groupparameter.For example:
$ cat /etc/oraInst.loc inventory_loc=/opt/oracle/oraInventory inst_group=oinstall -
If the Oracle central inventory has not been registered or the pointer file has been deleted, you can search for the Oracle central inventory, which has the directory name
oraInventory. For example:$ find / -name oraInventory /opt/oracle/oraInventory
-
-
Change to the Oracle central inventory directory. You specify this directory the first time an Oracle product is installed on the STA server. For example:
$ cd /opt/oracle/oraInventory -
Switch to the root user. Run the registration script, located in that directory.
# ./createCentralInventory.shThe Oracle central inventory location and the Oracle group and are now identified in the Oracle central inventory pointer file,
/etc/oraInst.loc.