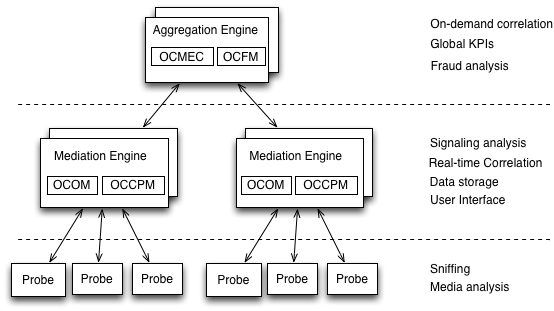
Figure 1-1 shows the Session Monitor system architecture.
E89196-02
January 2018
Oracle Communications Session Monitor Installation Guide,
E89196-02
Copyright 2017, 2018, Oracle and/or its affiliates. All rights reserved.
This software and related documentation are provided under a license agreement containing restrictions on use and disclosure and are protected by intellectual property laws. Except as expressly permitted in your license agreement or allowed by law, you may not use, copy, reproduce, translate, broadcast, modify, license, transmit, distribute, exhibit, perform, publish, or display any part, in any form, or by any means. Reverse engineering, disassembly, or decompilation of this software, unless required by law for interoperability, is prohibited.
The information contained herein is subject to change without notice and is not warranted to be error-free. If you find any errors, please report them to us in writing.
If this is software or related documentation that is delivered to the U.S. Government or anyone licensing it on behalf of the U.S. Government, then the following notice is applicable:
U.S. GOVERNMENT END USERS: Oracle programs, including any operating system, integrated software, any programs installed on the hardware, and/or documentation, delivered to U.S. Government end users are "commercial computer software" pursuant to the applicable Federal Acquisition Regulation and agency-specific supplemental regulations. As such, use, duplication, disclosure, modification, and adaptation of the programs, including any operating system, integrated software, any programs installed on the hardware, and/or documentation, shall be subject to license terms and license restrictions applicable to the programs. No other rights are granted to the U.S. Government.
This software or hardware is developed for general use in a variety of information management applications. It is not developed or intended for use in any inherently dangerous applications, including applications that may create a risk of personal injury. If you use this software or hardware in dangerous applications, then you shall be responsible to take all appropriate fail-safe, backup, redundancy, and other measures to ensure its safe use. Oracle Corporation and its affiliates disclaim any liability for any damages caused by use of this software or hardware in dangerous applications.
Oracle and Java are registered trademarks of Oracle and/or its affiliates. Other names may be trademarks of their respective owners.
Intel and Intel Xeon are trademarks or registered trademarks of Intel Corporation. All SPARC trademarks are used under license and are trademarks or registered trademarks of SPARC International, Inc. AMD, Opteron, the AMD logo, and the AMD Opteron logo are trademarks or registered trademarks of Advanced Micro Devices. UNIX is a registered trademark of The Open Group.
This software or hardware and documentation may provide access to or information about content, products, and services from third parties. Oracle Corporation and its affiliates are not responsible for and expressly disclaim all warranties of any kind with respect to third-party content, products, and services unless otherwise set forth in an applicable agreement between you and Oracle. Oracle Corporation and its affiliates will not be responsible for any loss, costs, or damages incurred due to your access to or use of third-party content, products, or services, except as set forth in an applicable agreement between you and Oracle.
This guide provides instructions for installing Oracle Communications Session Monitor.
The Oracle Communications Session Monitor product family includes the following products:
Operations Monitor
Enterprise Operations Monitor
Control Plane Monitor
This guide is intended for systems administrators, network administrators, and network operations personnel who install and administer the Session Monitor family of products. Familiarity with installing software with RPMS or ISO is a prerequisite for installing Session Monitor.
Oracle Communications Session Monitor documentation and additional Oracle documentation is available from the Oracle Help Center Web Site:
For information about Oracle's commitment to accessibility, visit the Oracle Accessibility Program website at http://www.oracle.com/pls/topic/lookup?ctx=acc&id=docacc.
Oracle customers that have purchased support have access to electronic support through My Oracle Support. For information, visit http://www.oracle.com/pls/topic/lookup?ctx=acc&id=info or visit http://www.oracle.com/pls/topic/lookup?ctx=acc&id=trs if you are hearing impaired.
The following table lists the revision history for this document:
| Version | Date | Description |
|---|---|---|
| E89196-01 | November 2017 | Initial release. |
| E89196-02 | January 2018 |
Multiple updates were made across the guide. |
This chapter provides an overview of the Oracle Communications Session Monitor system architecture and the installation process.
The Session Monitor system works by capturing the traffic from your network, correlating it in real-time, and storing it in indexed formats so that they are available for the various reports offered by the web interface.
The Session Monitor system architecture has three layers:
Probe layer: This layer is responsible for capturing the traffic from your network and performing the Media Quality analysis. The probes send meta-data for each of the signaling messages to the Mediation Engine layer and analyze the RTP streams locally, sending the results of this analysis to the Mediation Engine layer.
Mediation Engine (ME) layer: This layer is responsible for understanding in real-time the traffic received, correlating it and storing it for future reference. This layer is also responsible for measuring, managing, and storing the KPIs. In the common case, there is one ME per geographical site. It is possible, however, to have the probes from multiple geographical sites sending the traffic to a single ME. It is also possible to have multiple ME installations in the same geographical site.
Aggregation Engine (AE) layer: This layer is responsible for aggregating the global KPIs, on-demand correlation of calls passing multiple geographical sites, and for the global search features. In a typical setup, there is only one AE for the whole network.
Figure 1-1 shows the Session Monitor system architecture.
Each of the three layers supports high-availability by deploying two identical servers in active-passive or active-active modes of operation. For small setups, it is possible to run the probe layer and the ME layer on the same physical hardware. The AE layer always requires its own hardware.
From the Session Monitor products perspective, the Operations Monitor and the Control Plane Monitor (CPM) run on the Mediation Engine (ME) while the Mediation Engine Connector (MEC) and the Fraud Monitor products run on the Aggregation Engine (AE).
One AE (OCOM's MEC feature) will support up to:
- 64 MEs One ME (OCOM, OCCPM) will support up to:
Native-only probes:
- media+sig ; signalling-only: 128
- packet inspector: 16
Embedded-only probes (SBC as a probe):
- < 500 parallel calls per SBC: 1k (might require some manual tweaking, ulimit open files)
- >= 500 parallel calls per SBC: 128
Mixture of SBC and native probes: 128 (individual limits still apply)
One Probe (OCOM, OCCPM) or SBC-probe can be connected to up to:
- Probe: 2 MEs
- SBC: 8 MEs
One ME (OCOM, OCCPM) can be connected to up to:
- 1 AE The installation of Session Monitor includes these steps:
Reviewing the system requirements and selecting the hardware that is needed.
Using the Session Monitor Installer to do the software installation.
Using the Platform Setup Application for initial system configuration.
The following sections describe the system requirements for installing Session Monitor.
Session Monitor.
Table 1-1 Supported Operating Systems
| Product | Version | Notes |
|---|---|---|
Oracle Linux 7 x86-64 (64 bit) |
7 or higher (with Oracle UE Kernel for Linux) |
By default Oracle Linux installs Kernel 3. Oracle recommends that the latest Unbreakable Enterprise (UE) Kernel 4 for Linux is installed. |
Note:
- You must configure network device when installing Oracle Linux 7.
- If required, update the DPDK Drivers.
- The ISO installer ships with the latest Oracle Unbreakable Enterprise Kernel for Linux.
Table 1-2 Supported Client Browsers
| Browser | Version |
|---|---|
Microsoft Internet Explorer |
8 or higher |
Mozilla Firefox |
1.5 or higher (on any operating system) |
Apple Safari |
Any version, including Safari for iPad |
Google Chrome |
Any version |
Opera |
9 or higher (on any operating system) |
Session Monitor is supported on Oracle, Sun, and HP systems.
Table 1-3 Supported Hardware for Oracle systems
| Component | Requirement |
|---|---|
Server |
The following severs are supported:
|
Table 1-4 Supported Hardware for Oracle Sun systems
| Component | Requirement |
|---|---|
Server |
The following severs are supported:
|
Network Adapter |
The following network adapters are supported:
|
Table 1-5 Supported Hardware for HP Systems
| Component | Requirement |
|---|---|
Server |
The following servers are supported:
|
Network Adapter |
The following network adapter s are supported:
|
Driver/Chipsets |
The following drivers/chipsets are supported:
|
Table 1-6 Supported Session Border Controller Versions
| Product | Versions |
|---|---|
Enterprise Session Border Controller (E-SBC) |
|
Session Border Controller (SBC) |
|
Table 1-7 Hardware Requirements for Demonstration Systems
| Component | Minimum Requirement |
|---|---|
Processor |
2.6 GHz Intel Xeon processor, 64-bit with 8 processing threads |
Memory |
8 GB RAM |
Disk Space |
80 GB storage on a hardware RAID controller |
Ports |
2 Ethernet ports |
For production systems, Oracle recommends to complete a sizing exercise together with your Oracle Customer Support. Higher performance hardware may be required, for example, in cases with:
High levels of monitored traffic
High numbers of concurrent users
High volumes of historical information
On the Mediation Engine machines, Oracle recommends using a RAID-10 array for the operating system and the database. A separate RAID-5 array is recommended for storing long-term data.
This section describes the software and hardware requirements for Session Monitor virtualization.
The following hypervisors are supported:
Oracle VM version 3.4
VMware vSphere ESXi 5.x/6.x
Kernel-based Virtual Machine (KVM)
Table 1-8 Hardware Requirements for Virtual Machines
| Component | Requirement |
|---|---|
Processor |
8 vCPUs |
Memory |
8GB RAM |
Disk Space |
80GB |
NIC Card |
1Gbps vNIC |
In virtualized Mediation Engines, 50,000 concurrent calls (1 SIP leg per call) have been tested successfully.
The physical machine that hosts the virtual machines should contain at a minimum the hardware resources that are required to host all the virtual machines, in addition to the hardware that is required for the hypervisor.
Session Monitor probes can use two modes of monitoring network mode:
mmpcap: The mmpcap mode is based on the libpcap Packet Capture Library similar to tcpdump, using the Kernel's Packet Socket Interface. The network interface is set to promiscuous mode.
Data Plane Development Kit (DPDK): DPDK is a set of data plane libraries and network interface controller drivers for fast packet processing. In this mode, the network interface is no longer accessible by the Kernel. You can find more information regarding the DPDK libraries in the website, http://dpdk.org/.
By default, the installer enables the mmpcap mode which is recommended for small to medium installations (for up to 1400Mbps depending on server capabilities). For higher network traffic solutions, you may choose to enable DPDK mode for better performance. For more information on DPDK, see "Installing and Configuring DPDK for Session Monitor".
Note:
The above number is only for reference. The actual decision on when to use DPDK depends on many factors. For consulting regarding this decision, Oracle recommends to complete a sizing exercise together with your Oracle sales engineer.
Session Monitor may be installed using a DVD or USB flash drive. If you are going to use a USB flash drive, make sure that its size is at least 1GB. See "Preparing Session Monitor Installation Media" for instructions on how to prepare a USB flash drive.
Important:
When updating from a Palladion2.X installation, no data is carried over. If you want to keep the settings, create a configuration savepoint using the web interface and export it to a file. After completing the installation, you can upload the savepoint file and restore the settings.
Note:
Oracle recommends the following: - Use brand drives, as issues have been reported when using low-quality thumb drives.
- If the hardware on which Session Monitor is installed supports iLO or another out-of-band management technology, Oracle recommends to configure it before starting the installation.
This chapter describes how to install Oracle Communications Session Monitor.
Before installing Session Monitor, read the following:
You can install Session Monitor using either the ISO installer or the Red Hat Package Manager (RPM):
ISO Installer
The ISO installer installs the Oracle Linux operating system and the Session Monitor applications and components. For installation instructions, see "Installing Session Monitor Using the ISO Installer".
RPM
The RPM installer does not install Linux. The RPM requires an installation of Oracle Linux on the computer that will host your Session Monitor applications. For installation instructions, see "Installing Session Monitor Using the RPM".
The ISO installer installs Oracle Linux operating system and Session Monitor applications and components.
Installing Session Monitor using the ISO installer requires a server with no operating system. The Session Monitor installer erases any existing files on the primary and secondary disk on which Session Monitor is installed. Back up any important files on the disk before proceeding with the installation. For more information on preparing the Session Monitor ISO installation media, see "Preparing Session Monitor Installation Media".
This section describes installing Session Monitor installation using the ISO installer.
To install Session Monitor with the ISO installer:
Download the Session Monitor ISO installer by doing the following:
Download the software pack for your operating system from the Oracle software delivery web site.
Download the Session Monitor ISO image and follow the instructions in "Preparing Session Monitor Installation Media" in a local computer.
Insert the DVD or attach the USB flash drive and restart the server that will host Session Monitor.
Ensure that the server boots from the installation media. This is usually done using a one-time boot option.
The Session Monitor installer Boot Menu screen appears.
Start the installation process by pressing Enter.
The installer verifies whether the hardware passes the minimum system requirements for Session Monitor.
The OCSM Installer - Network Configuration screen appears containing a list of supported network interfaces together with their hardware addresses (MAC).
If the minimum system requirements are not met, the installation stops and a dialogue box providing the reason for failure appears. For example, see the following message:
Problems were found:
*** Found only 1 CPU threads instead of at least 8.**
*** Found only 1.95 GB system memory instead of at least 7 GB.**
Abort the installation.
See "Session Monitor System Requirements" or contact your Oracle Customer Support for more information on the minimum system requirements.
From the Network device list, select the network interface you require for accessing the Session Monitor web interface and click OK.
From the Network type list, select the following setting that is appropriate for your network and :
To automatically configure the network port IP address with the dynamic host configuration protocol (DHCP), select dhcp.
To manually configure the network port IP address, select static.
Click OK.
When prompted, enter the IP address, netmask, and default gateway values of your network.
The OCSM Installer - Disk Configuration screen appears.
From the Primary disk list, select the primary disk or disk array on which to install Session Monitor and click OK.
The OCSM Installer - Software Installation screen appears.
(Optional) The Session Monitor operating system and database are installed on the primary disk of the server that hosts the mediation engine. If your server has more than one disk, you will receive a prompt to choose to either keep all your data on one disk or store your data on a secondary disk. To store your data on a secondary disk, click Yes.
Note:
The default size for the primary disk is between 70 GB and 2 TB. If you require a larger disk array for data storage, configure it as a secondary disk.
In the Enter a password for the root user field, enter the root user password and click OK.
In the Confirm the root user password field, re-enter the root user password and click OK.
The installer prepares the disks, sets up the system, and updates the firmware required for the hardware components.
Important:
Do not power off the system during this process, as this may leave components in an unusable state.
The OCSM Installer - Finished screen appears.
The installer prompts you to remove the Session Monitor flash drive installation media.
Press Enter and remove the installation media.
Verify that the installation is successful by restarting the system from the primary hard disk that you chose in step 8.
If the installation is successful, a console appears, displaying the Session Monitor secure URL.
If unsuccessful, check the /var/log/ocsm/pld-installer.log file.
See "Session Monitor Post-Installation Tasks" for the post-installation configuration steps.
You can choose to install Session Monitor using the RPM if you would like to set up the machine with the Oracle Linux operating system or if the machine on which you will install Session Monitor is already running Oracle Linux.
Note: OCSM requires the yum groups @base and @core
This section describes installing the Session Monitor using RPM.
To install Session Monitor using an RPM:
Change the edition of MySQL by doing the following:
Go to the Oracle Software Delivery web site:
Read and accept the license agreement and export restrictions and click Continue.
Download the latest Enterprise edition of MySQL in version 5.5 series.
Un-install the Community edition of MySQL by running the following command:
yum remove -y mysql-community-common
Install the Enterprise edition of MySQL by running the following command:
yum install -y mysql-commercial*.rpm
If you have a running Oracle Linux 7 (DPDK) probe with an Oracle Communications Session Monitor version prior to 3.4.0, uninstall Session Monitor by running the following command:
yum remove ocsm
Verify that the system hosting the mediation engine is connected to the Internet.
Log on to the Mediation Engine server as the root user.
Verify that Oracle Linux 7 is installed by running the following command:
cat /etc/oracle-release
Download the Session Monitor software by doing the following:
Create a temporary directory (tempdir) on the system that hosts the mediation engine.
Download the software pack for your operating system from the Oracle software delivery web site.
Download the Session Monitor installation software RPM ZIP file to tempdir_.
Unzip the Session Monitor installation software RPM ZIP file.
Install the Session Monitor RPM file by running the following command:
yum install ocsm-rnx86_64.rpm
where:
For example, ocsm-3.4.0.0.0.x86_64.rpm.
The following partitioning options are available:
Perform the following steps to create separate partition for data(block) storage:
Create the partition for data storage
Run the following command to create a directory to mount the partition:
mkdir -pv /opt/oracle/ocsm/var/vsi
Adjust /etc/fstab to mount the data storage partition. For example:
LABEL=PLD_DATA /opt/oracle/ocsm/var/vsi ext4 defaults,nosuid,nodev,nofail 0 2
Result: During installation partition will be detected by product setup application and the system uses the separate partition.
Verify the installation by doing the following:
Navigate to /var/log/ocsm file.
Verify whether the following log file exists:
ocsm_installed_*.log
Adjust the firewalld to access the Session Monitor applications by doing the following:
Allow firewalld to access the HTTPS service (port 443) by running the following command:
firewall-cmd --permanent --zone=public --add-service=https
(Optional) If you are planning to configure the system as a mediation engine, allow the firewalld to access the probe connection by doing the following:
For SBC (embedded) probes:
firewall-cmd --permanent --zone=public --add-port=4739/tcp
firewall-cmd --permanent --zone=public --add-port=4740/tcp
For standalone probes:
firewall-cmd --permanent --zone=public --add-port=4741/tcp
firewall-cmd --permanent --zone=public --add-port=4742/tcp
Reload the configuration by running the following command:
firewall-cmd --reload
Note:
If you are planning to enable additional services, see the discussion about network security in Oracle Communications Session Monitor Security Guide for a complete list of services and their respective ports.
Disable SELinux by running the following commands:
setenforce 0
sed -i -e "s/^SELINUX=.*/SELINUX=disabled/" /etc/selinux/config
See "Session Monitor Post-Installation Tasks" for the post-installation configuration steps.
Note:

Configuring reverse proxy server is optional.
The Session Monitor services are available to you through a reverse proxy web server. By default, the Session Monitor comes with a bundled copy of NGINX, the configuration files located at /opt/oracle/ocsm/etc/nginx file. However, you may choose to use another web server, such as Apache. A sample configuration file for Apache 2.4 is located at /opt/oracle/ocsm/etc/httpd/conf.d/pld.conf file.
After installing Apache, run the following commands to enable Apache as a front-end web server instead of NGINX:
systemctl stop pld-nginx.service
systemctl disable pld-nginx.service
ln -sf /usr/lib/systemd/system/{httpd,pld-webserver}.service
cp /opt/oracle/ocsm/etc/httpd/conf.d/pld.conf /etc/httpd/conf.d/
mv /etc/httpd/conf.d/ssl.conf{,.orig}
systemctl daemon-reload
systemctl start httpd.service
systemctl enable httpd.service
If you choose to authenticate users at the level of the reverse proxy, you must uncomment the sections in the sample Apache configuration file which configures LDAP authentication for the /me/ and /mec/ routes, and modify them as appropriate for your authentication provider. Additionally, you must enable external authentication in the Mediation Engine and the Mediation Engine Controller. See the discussion on external authentication in the Operations Monitor User's Guide.
Note: The NGINX Web Server provided with Session Monitor does not support the external authentication. To enable external authorization you are required to have NGINX Web Server that provides external authentication and is optional.
The following procedure explains configuring external authentication using Apache Web Server as it is widely used.
To configure Apache in Session Monitor for authenticating with LDAP service:
Login to Session Monitor.
Click Admin and select Settings.
Enable the setting, External authentication enabled and set it to True.
Logout from Session Monitor.
(Optional) If the current web service is Nginx, change to HTTPD by performing following steps:
Run the following commands to install the Apache webserver and mod_ssl packages:
$ yum install -y httpd mod_ssl
IMPORTANT: Install Apache webserver and mod_ssl packages together as the httpd package executes a post-install script which uses mod_ssl for generating a localhost certificate. The certificate is required for the default httpd service configuration.
If the certificate is not generated, enter the following lines in the /etc/httpd/conf.d/ssl.conf file to start httpd server:
SSLCertificateFile /etc/pki/tls/certs/localhost.crt
SSLCertificateKeyFile /etc/pki/tls/private/localhost.key
NOTE: If you have installed Session Monitor using the ISO, then httpd and mod_ssl are preinstalled.
If the localhost certificates are not generated, perform the following workaround to start the Apache server:Run the following commands to stop and disable the nginx server:
$ systemctl stop pld-nginx.service
$ systemctl disable pld-nginx.service
Run the following command to switch the pld-webserver link to httpd:
$ ln -sf /usr/lib/systemd/system/{httpd,pld-webserver}.service
Run the following command to reload systemd to view the changes:
$ systemctl daemon-reload
Run the following commands to start and enable httpd:
$ systemctl start httpd.service
$ systemctl enable httpd.service
Run the following commands to install all additional packages:
$ yum groupinstall "Development Tools" -y
Run the following commands to install the required httpd modules and to enable external authentication in Apache:
$ yum --enablerepo=ol7_optional_latest install mod_ldap
Run the following command to configure httpd to perform external authentication:
$ vi /etc/httpd/conf.d/pld.conf
Add following Location section in '< VirtualHost_default_:443 >', after RequestHeader unset X-Forwarded-User:
< Location />
RewriteEngine On
RewriteCond %{LA-U:REMOTE_USER} (.+)
RewriteRule .* - [E=RU:%1,L]
AuthType basic
AuthName <"LDAP authentication">
AuthBasicProvider ldap
AuthLDAPURL <"ldap://
AuthLDAPBindDN "cn=ldapadm,dc=LDAP_Server,dc=com"
AuthLDAPBindPassword
Require valid-user
RequestHeader unset X-Forwarded-User
RequestHeader set X-Forwarded-User %{RU}e
< / Location >
Where:
LDAP_Server is your LDAP server name
<”LDAP authentication"> is the AuthName for Session Monitor LDAP authentication
<"ldap://
< password > is the password for LDAP server to which authentication to the specific user is to be processed. It should be a Hashed Password.
Uncomment following parameters:
RewriteEngine On
RewriteCond %{SERVER_PORT} 443
RewriteCond %{LA-U:REMOTE_USER} (.+)
RewriteRule .* - [E=RU:%1,L]
RequestHeader set X-Forwarded-User %{RU}e
Change the AuthName directive in the Location /me/logout.html to AuthName "LDAP authentication"
Start/Re-start httpd server to enable external authentication
$ service httpd start
$ service httpd restart
Result: The httpd server of Session Monitor has been configured for external authentication.
When you open the Session Monitor in web browser, the external authentication pop-up appears. On providing the correct LDAP user credentials, the user will be logged in successfully.
This section provides instructions for the post-installation tasks for Session Monitor.
Before starting the post-installation tasks, verify that Session Monitor installation tasks are completed and all components are installed. See "Installing Session Monitor Using the ISO Installer" or "Installing Session Monitor Using the RPM".
The Platform Setup Application guides you through the Session Monitor configuration steps, including configuring the machine type, capture settings, and simple mail transfer protocol (SMTP) settings as follows:
The menu on the right shows your progress during configuration.
The Machine Type page sets which licensed Session Monitor applications are installed. In the Server Certificate page, you can upload your signed certificate for secure HTTPS connections.
Subsequent sections configure the Session Monitor server for your network. These steps are optional.
Except for Machine Type and Extensions, you can review and change settings at any time by visiting the Platform Setup Application at https://ipaddress_/setup/, where ipaddress_ is the IP address of the server that hosts a Session Monitor application. This URL is valid for any Session Monitor server.
In the final step, each selected Session Monitor application is installed.
After a successful installation, the log in page appears for each of your licensed Session Monitor application.
All the Session Monitor application interfaces are accessed through encrypted HTTPS connections. At the initial login, your web browser may not recognize the server and displays the This Connection is Untrusted warning message. Click Confirm Security Exception to proceed.
For information about how to protect connections to the system and avoid the untrusted certificate warning in the future, see Oracle Communications Session Monitor Security Guide.
This section describes how to configure Session Monitor using the Platform Setup Application.
To configure Session Monitor:
In a web browser, go to https://ipaddress_/setup.
The Platform Setup Application Log in page appears.
In the Username field, enter sysadmin and; in the Password field, enter oracle.
The License Terms agreement page appears.
Accept each Session Monitor application license terms agreement, by selecting the I agree to the license terms check box.
Click Proceed.
The Change Password dialog box appears.
The Platform Setup Application page appears.
Change the password by doing the following:
In the Set password field, enter a new password.
Note:
The password must have at least 8 characters. The password must contain at least one uppercase character. The password must contain a number. The password must contain a special character (@, #, -, _, .).
In the Repeat password field, re-enter the password used in the previous step, which verifies that the password value was entered correctly.
Click Change.
The Machine Type page appears.
On the Machine Type page, select the machine type on which to install your licensed Session Monitor applications and components:
To install an Operations Monitor probe, select Probe.
To install one or more of the Session Monitor applications belonging to the Mediation Engine machine type, select Mediation Engine and then select one or more of the following:
To install Oracle Communications Operations Monitor, select the Communications Operations Monitor check box.
To install Oracle Communications Control Plane Monitor, select the Control Plane Monitor check box.
To install an Operations Monitor embedded probe, select the Probe (embedded) check box.
To install the Session Monitor applications belonging to the Aggregation Engine machine type, select Aggregation Engine and then select the Mediation Engine Connector check box.
Only the checked items are included in the installation.
Notes:
The Machine Type page only appears the first time you configure Session Monitor prior to the products installation. Machine type cannot be changed after the PSA installation is completed.
You can select only one machine type for each installation process.
Packet Inspector probe is not supported on a Session Monitor probe with SIP/RTP sniffing for the calls and VQ analysis.
The products are machine-type specific and cannot be interchanged between machine types.
For example, the Probe machine type requires a probe product, and the Mediation Engine machine type requires the Operations Monitor product.
The machine type Mediation Engine Probe (embedded) must be chosen either with Operation Monitor or with Control Plane Monitor option selected.
For more information, see "Selecting the Machine Type".
Click Continue.
The machine type and application information appear in the status panel located on the right under the navigation list.
The Configuration page appears.
Configure the Session Monitor settings for the machine type you chose in step 5 in accordance with the terms of your license as follows:
From the Capacity section in the Concurrent calls field, enter the number of concurrent calls printed on your license.
If you have licensed RTP recording, select the RTP Recording check box.
From the Capacity section in the Concurrent RTP streams field, enter the number of concurrent RTP streams printed on your license.
From the Extensions section, select all the product extensions you have licensed.
Notes:
The number entered in the Concurrent RTP streams field can cause performance and stability issues if it is set higher than what your network hardware supports. Values above 20 are not recommended. Changes to the RTP recording setting take effect only after restarting the system.
You cannot change the configured extensions after the installation. All Oracle Communications Session Monitor Enterprise users should select Media quality.
For more information, see, "Configuring Session Monitor".
The Disk Usage page appears.
Notes:
On the Disk Usage page, specify the maximum disk usage partition for the shared filesystem containing the database/data storage (single raid systems). For systems with two raid arrays you can select the usage independently for both filesystems. For Probes with Packet Inspector feature you would be able to select the maximum storage capacity.
The ME Connection List page appears.
The ME Connection List page appears only if you have selected machine type as Probe or Mediation Engine and Probe.
(Optional) If you selected Probe on the Machine Type page, set which mediation engines are connected to the Operations Monitor probe.
Click Add a new ME.
In the Hostname or IP field, enter the IP address of the machine that hosts the mediation engine.
In the Port field, enter the port number of the mediation engine. For a Cleartext transmission enter 4741 and for TLS enter 4742.
In the Name field, enter a name for the mediation engine.
In the TLS field, select the checkbox for TLS transmissions or leave the checkbox unchecked for Cleartext.
The Operations Monitor Probe can transmit data to one or more mediation engines with either transport layer security (TLS) encryption, or with un-encrypted Cleartext. A mediation engine can connect to more than one Operations Monitor Probe or more than one Session Border Controller Probe. Add your list of mediation engines as follows:
Click Continue.
The Trusted Certificate page appears.
In the Upload signed certificate field, select Browse and locate the signed certificate file.
Click Continue.
(Optional) By default, the mediation engine machine accepts only encrypted transmissions, (unless the mediation engine and probe are on the same machine); for Cleartext transmissions select the Accept insecure connections from remote probes check box.
Click Continue.
The Server Certificate page appears.
All Session Monitor interfaces are accessed through encrypted (secure) HTTPS connections. Each Session Monitor machine uses a unique certificate to establish secure connections and to guarantee its authenticity and protect users' data.
Do one of the following:
To use the self-signed certificate, click Continue.
To sign the server certificate with your organization's Public Key Infrastructure (PKI):
Select Download request.
Sign the certificate with the X.509 format.
In the Upload signed certificate field, select Browse and locate the signed certificate file.
Click Continue.
The SMTP Configuration page appears.
To regenerate a key and certificate on install, select Regenerate key and self-signed certificate on install and click Continue.
(Optional) Click Download current certificate to download the current self-signed certificate.
Session Monitor can send notifications and alerts directly to a user's email address. If you require notifications or alerts, select the Enable SMTP check box and fill in the relevant fields with your SMTP server details.
Click Continue.
The Capture Settings page appears.
The Capture Settings page contains a list of configured network interfaces. Monitoring can be enabled and disabled. You should have configured network devices while installing Oracle Linux 7.
For more information, see "Configuring the Capture Settings".
Click Continue.
The Data Retention page appears.
To configure Data Retention page, see "Configuring Data Retention".
Click Continue.
The Install page appears.
(Optional) Click Download Configuration, which downloads your configuration settings file in the default download location of your computer.
Open the psa_conf.json configuration file and verify your settings.
Click Install.
The Did you select the right applications dialog box appears.
Verify that you have chosen the correct Session Monitor applications and components for installation; after installation is complete, the selected applications and components cannot be changed.
Click OK.
The Platform Setup Application initiates the installation and reports its progress.
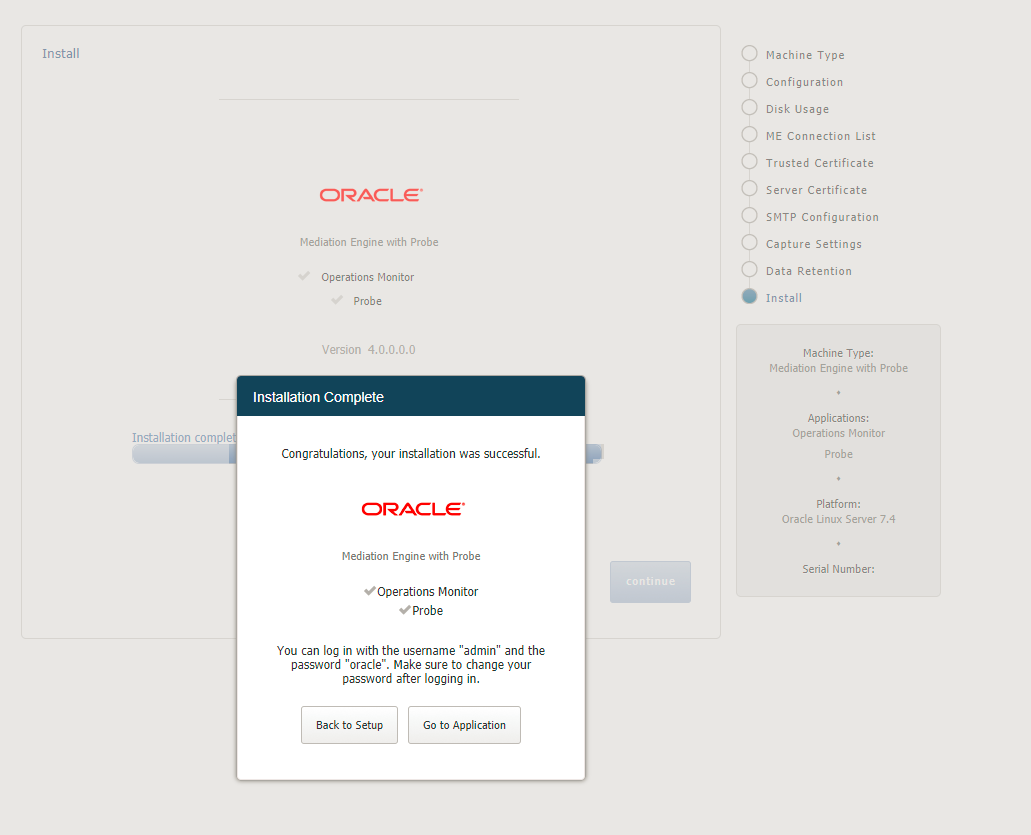
The Installation Complete dialog box appears.
Do one of the following:
To go back to the Platform Setup Application, click Back to Setup.
To go to a Session Monitor application dashboard, click Go to Application.
The credentials for logging in to Session Monitor are:
For Platform Setup Application, user name is sysadmin and the password is the one you set up in step 5.
For Operations Monitor and Control Plane Monitor, user name is admin and the default password is oracle.
This chapter describes how to configure Oracle Communications Session Monitor.
The Platform Setup Application (PSA) guides you through the configuration steps to get the Session Monitor system running, including configuring the machine type, capture settings, DNS settings, and SMTP settings.
The menu on the right shows your progress in the overall configuration.
This section provides how to log into Platform Setup Application initially.
Open the web browser and enter the URL provided by the System Administrator.
Confirm the security exception to proceed.
The Log in page appears.
Enter the Username and Password. The default username is sysadmin and password is oracle.
Click Sign in.
Review and Accept the license of the software to continue.
The Platform Application Setup page appears.
To change your password, click your user name in the top right-hand corner of the screen and select Change Password from the drop-down menu.
In the Change Password dialog box, enter the old and the new passwords in the indicated fields and click Change.
Note:

The password contains only digits, letters and white spaces.</div>The restart and power off buttons are accessible through the power button on the top right-hand corner of the screen.
Figure 3-1 Restarting or Powering Off Session Monitor
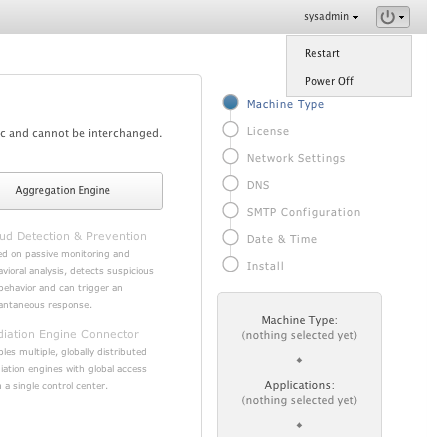
The figure is a screen capture of the drop-down menu with Restart and Power Off menu items.
After selecting an option, you are prompted a final time to confirm that you wish to proceed.
Figure 3-2 Machine Type Settings
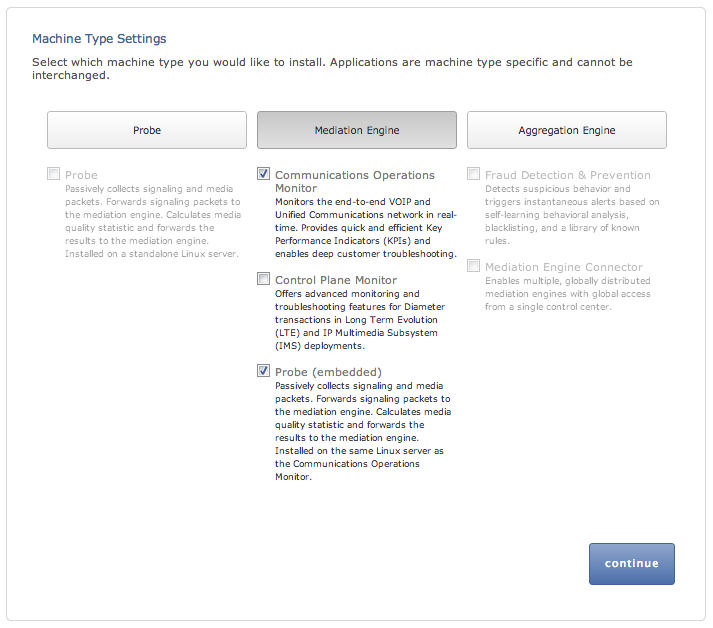
The figure is a screen capture of the Machine Type Settings page. The figure shows a representation of the Probe, Mediation Engine, and Aggregation Engine machine type and the descriptions of the components for each machine type.
The Machine Type Settings page allows you to select which products you want to install. This page only appears the first time you configure Session Monitor prior to the products installation.
Select your machine type by clicking Probe or Mediation Engine or Aggregation Engine button. This will enable the corresponding product selection.
Notes:
You can select only one machine type per installation.
Packet Inspector is not supported on the machine collocated with Operations Monitor or Probe with SIP/RTP sniffing for the calls and VQ analysis.
Next, select the check boxes next to the products that you want to install. Only checked items are included in the installation.
Note:
The products are machine type specific and cannot be interchanged between machine types.
For example, the Probe machine type requires a probe product, and the Mediation Engine machine type requires the Operations Monitor product.
After selecting the products, click continue to proceed with the installation. Your machine type and product selections should appear in the status panel located on the right under the navigation menu.
This step in the configuration process allows you to configure Session Monitor settings for this machine in accordance with the terms of your license.
Note:
If you do not have a valid Session Monitor license, contact Oracle.
Figure 3-3 shows the Configuration page.
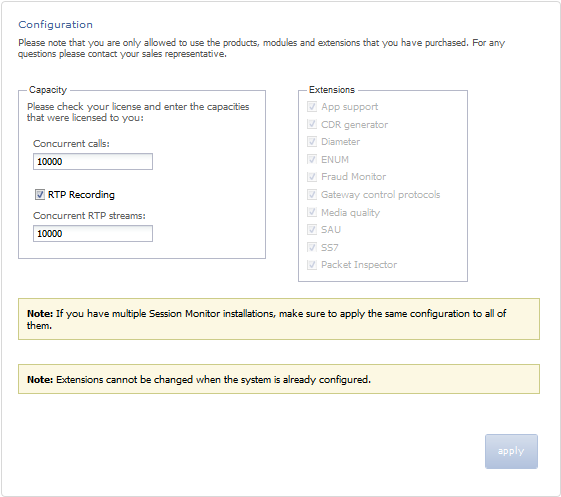
The figure is a screen capture of the Configuration page. The figure is described in the subsequent text.
On the left side of the page you must enter the number of concurrent calls printed on your license. On the right side you must check the product extensions you have a license to use. All enterprise customers should automatically check Media quality.
Note:
The number of Concurrent RTP streams can cause performance and stability issues if it is set higher than the hardware and the network permits. Values above 20 are not recommended. Changes to the RTP recording setting take effect only after a restart of the system.
If you have multiple servers involved in your set up (additional standalone Probes servers connected to the Mediation Engine), this setting must be set on each Probe (unless certain Probe is not sniffing Media so that RTP recording is not really applicable for the Probe). In such scenarios, the value that is set should be same on each node, on the Mediation Engine (or the Mediation Engine with local Probe), and the Probes.
Click the continue button to navigate to the Capture Settings page.
The Capture Settings page contains a list of configured network interfaces, with a toolbar for deleting interfaces, as well as a restore button to reset the last applied settings (usually, you want to add interfaces you didn't add during the installation procedure).
There's also a check box below the network list that can be checked if you wish to apply capture settings that won't allow you to reconnect to the Platform Setup Application again.
Figure 3-4 Capture Settings Page

The figure is a screen capture of the Capture Settings page. The figure is described in the preceding text.
Note:
Monitoring is only enabled for machines that are configured as probes. On other machines, the monitoring check box is grayed out.
Important:
Do not configure dummy interfaces with DHCP if there is no DHCP server to give an IP.
When applying settings with a dummy interface using the DHCP method wait for the DHCP client to time out (usually one minute).
For a Probe machine type, the Mediation Engine Connection List page allows you to configure which Mediation Engines the Operations Monitor Probe connects to.
Figure 3-5 shows the ME Connection List page.
The Operations Monitor Probe can connect to one or more Mediation Engines, using TLS encryption, or with some configurations, also cleartext. Likewise, a Mediation Engine can connect to more than one Operations Monitor Probe (as well as Session Border Controller Probes).
On the Mediation Engine, cleartext connections are usually on port 4741 and encrypted connections on port 4742. For encrypted connections, the Operations Monitor Probe and the Mediation Engine need to be able to verify the certificate of the other party. See "Secure Configuration" for more information.
Figure 3-5 Mediation Engine Connection List Page
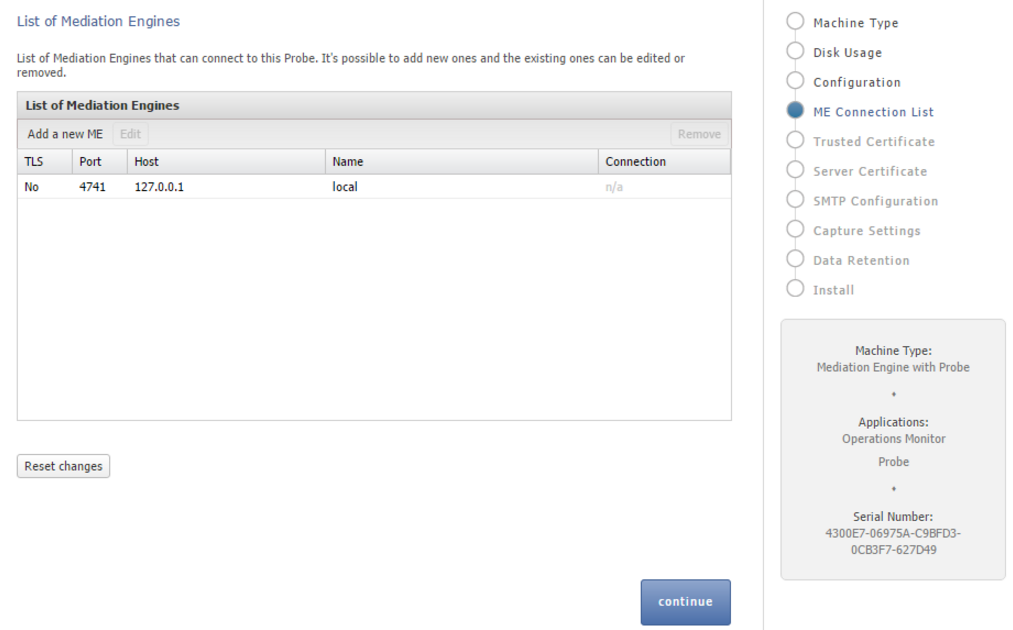
The figure is a screen capture of the List of Mediation Endines dialog box. The figure is described in the subsequent text.
The Mediation Engine machines by default only accept encrypted connections (unless the Mediation Engine and Probe are on the same machine); for unencrypted connections the check box Accept insecure connections from remote probes on the Trusted Certificate page must be checked.
Figure 3-6 Trusted Certificate Page
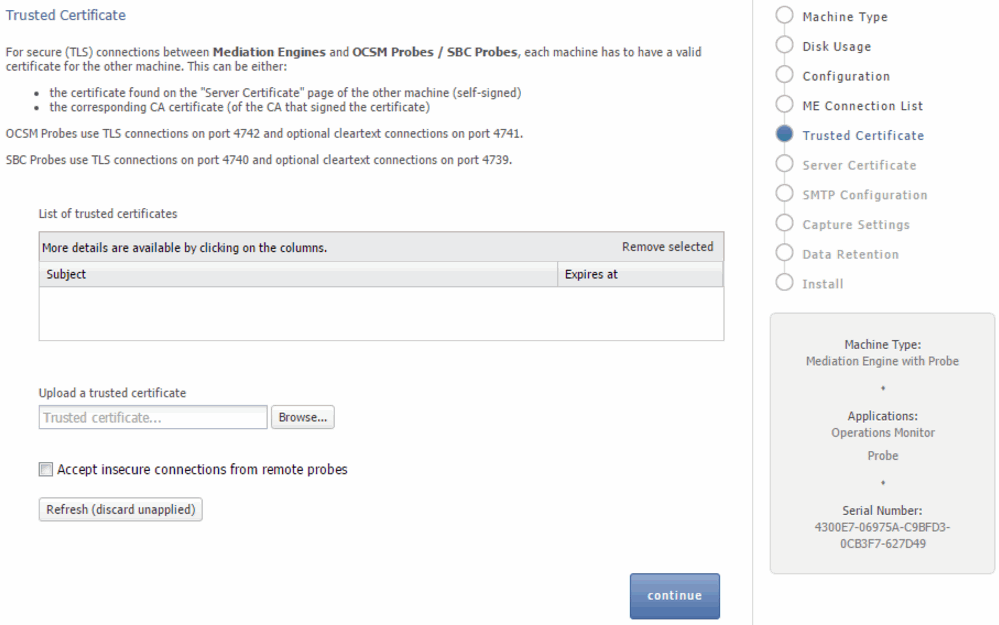
The figure is a screen capture of the Trusted Certificate page. The Upload a trusted certificate section allows you to upload server certificates. The certificates that are uploaded are displayed in the List of trusted certificates section.
Mediation Engine and Operations Monitor Probe Are on the Same Machine
For setups with a Mediation Engine machine with an embedded Probe, a cleartext connection is automatically added to the ME connection list. For cleartext connections, no certificates are exchanged.
One Mediation Engine and Two Operations Monitor Probes
For setups with one Mediation Engine and two Operations Monitor Probes, the self-signed server certificates of both Operations Monitor Probes are uploaded as trusted certificates on the Mediation Engine, and the self-signed server certificate of the Mediation Engine is uploaded on both Operations Monitor Probes as a trusted certificate. On each Operations Monitor Probe, the IP of the Mediation Engine is added to the ME connection list with TLS check box selected.
Table 3-1 describes the actions to configure the connections between one Mediation Engine and two Operations Monitor Probes.
Table 3-1 One Mediation Engine and Two Operations Monitor Probes
| Machine | Action |
|---|---|
|
Mediation Engine |
|
|
Operations Monitor Probe 1 |
|
|
Operations Monitor Probe 2 |
|
Two Mediation Engines and One Operations Monitor Probe
For setups with two Mediation Engines and one Operations Monitor Probe, the self-signed server certificate of the Operations Monitor Probe is uploaded as trusted certificate on both Mediation Engines, and the self-signed server certificates of the Mediation Engine are uploaded on the Operations Monitor Probe as a trusted certificate. On the Operations Monitor Probe, the IPs of the Mediation Engines are both added to the ME connection list with TLS check box selected.
Table 3-2 describes the actions to configure the connections between two Mediation Engines and one Operations Monitor Probe.
Table 3-2 Two Mediation Engine and One Operations Monitor Probe
| Machine | Action |
|---|---|
|
Mediation Engine 1 |
|
|
Mediation Engine 2 |
|
|
Operations Monitor Probe |
|
For setups with more than two Operations Monitor Probes or Mediation Engines, Oracle recommends that you use PKI (Public Key Infrastructure) with root certificates as described in Oracle Communications Session Monitor Security Guide.
Figure 3-7 shows the SMTP Configuration page.
Figure 3-7 SMTP Configuration Page
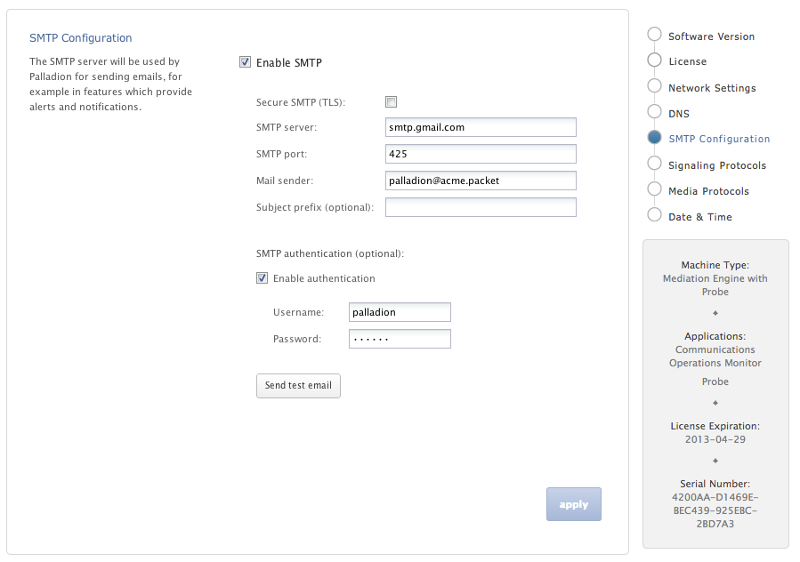
The figure is a screen capture of the SMTP Configuration page. The figure is described in the subsequent sections.
Session Monitor can send notifications and alerts directly to users' email addresses. Which notification to send to which address is configured in the relevant products. However, you first need to configure the SMTP settings properly for this feature to be available.
To use the email notification feature, select Enable SMTP check box. The system will need an SMTP server to send emails. Contact your network administrator to find out the address of the server your organization uses. The default port is the standard port 25.
If the server requires a valid email account, you will need to create one for Session Monitor. Then, select Enable authentication check box and enter the credentials.
You can choose how the emails from Session Monitor will look like in the users' mailboxes.The field Mail sender is the email address Session Monitor will use; users will see this address in the Sender: or From: field of the emails. You can optionally specify a Subject prefix; this will appear at the beginning of the subject of the emails and make it easy to identify Session Monitor's emails in users' inbox.
The Data Retention page is used for configuring data retention in database for different data sources. Some settings depend on the license settings and will be available only if the associated configuration is set.
Figure 3-8 shows the Data Retention page.
Figure 3-8 Data Retention Page
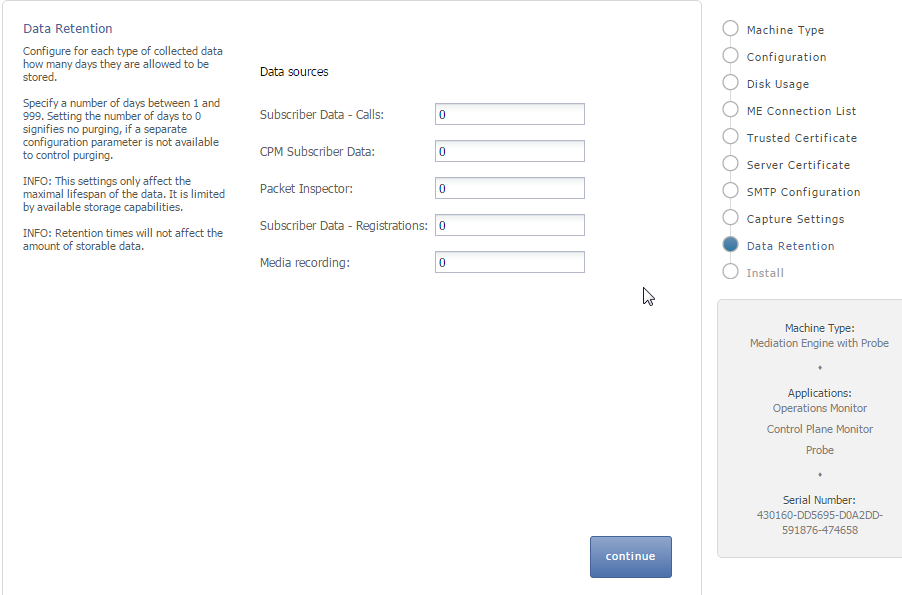
The figure is a screen capture of the Data Retention page. It also displays fields to set the data retention criteria. The fields are described in the subsequent text.
Data retention is configured in days per data source. A value of 0 disables time based data retention.
Notes:
The settings only affect the maximal lifespan of the data. Data availability is limited by available storage capabilities.
Retention times does not affect the amount of storable data.
You can configure data retention times for the following data sources:
CPM Subscriber Data: Specifies the number of days to consider for storing the Diameter S6 transaction data. Enabled by the CPM module.
Media Recording: Specifies the number of days to consider for storing the RTP recordings. Enabled by RTP recording configuration.
Packet Inspector: Specifies the number of days to consider for storing the network-traffic history. Enabled by Packet Inspector configuration.
Subscriber Data - Calls: Specifies the number of days to consider for storing the call meta data and signaling.
Note:
Saved calls are not deleted by this option. Saved calls must be deleted by operators. (Optional) Disable user permissions for saved call functionality.
Note:
CDR/MDRs are not supported. Data retention affects data in the database only. For deleting CDR/MDRs, use FTP to delete files after downloading.
To help protect users of Session Monitor and consumers' data, see the Session Monitor Security Guide for information on the security features of Session Monitor.
During the installation of a Session Monitor server, you will encounter the server certificate and trusted certificate pages.
The Server Certificate page is used to see and change the certificate used by this server. This step is recommended to protect users' data.
For more information, see the discussion about encryption and certificates in the Session Monitor Security Guide.
The Trusted Certificates page is used to configure the authentication of session border controllers (SBCs). This step is necessary before attempting to connect SBCs to Session Monitor.
For more information, see the discussion about connection with Oracle Session Border Controller in Session Monitor Security Guide.
The Install page summarizes the components to install. Check that you selected the correct components; after the installation is complete, the selection of the components cannot be changed.
The figure is a screen capture of Session Monitor install screen. The figure displays information about the machine type and the components to be installed.
Click Install to start with the installation. The Platform Setup Application initiates the installation process and reports back the progress. The installation process might take a few minutes to complete.
You can click on the Session Monitor button when the installation is complete. This will bring you to the installed products' interface.
This chapter provides instructions for Oracle Communications Session Monitor post-installation tasks.
After you log in to the product interface, you can see the status of the system or update the system. A system update will update all applications as well as the Platform Setup Application itself.
The Software Version page shows the currently installed components and the software version.
To install a software update, go to the Software Version page and select the update file (file type .rpm) that was provided by Oracle or your service provider. Click Apply to initiate the upload.
When the upload has finished, the page will show the version number and issue the date of the update. Click Install to proceed with upgrading the system. You can also abort the upgrade by clicking Clear.
Important:
Session Monitor or parts of it may not be available during the update process.
Platform Setup Application will show the progress during the upgrade. You may click Close to hide the progress window.
Note:
If you have a setup with multiple servers (for example, one ME and multiple Probe servers), upgrade all of them at the same time. Running different servers of the Session Monitor at different versions is not supported.
Warning
Downgrading to a previous version is not supported.
The Media Protocols menu is available after the installation process has finished and only for machine type Probe (which includes the machine type Mediation Engine with Probe).
You use the Media Protocols page to identify the RTP traffic that the Probe looks for. The Probe accepts only the traffic that matches the BPF filter.
You can set the media protocols filter as follows:
Check all traffic for signaling: When this check box is enabled, all traffic (including the traffic that matches the BPF filter rule) is passed to the signaling probes for filtering using the signaling protocols filters. When this check box is disabled, only the traffic that does not match the BPF filter rule is passed to the signaling probes.
If you use Packet Inspector for media recording, you need to enable this option to filter the media packets using the Packet Inspector filter in Signaling Protocols.
Note:
Packet Inspector supports STCP, TCP, and UDP as transport protocol for capturing the signaling network traffic or media. Due to the design limitation, other transport protocols such as ICMP are not supported.
Enabling this option may decrease system performance.
See "Signaling Protocols" for more information about signaling protocols.
See "Filter Syntax" for more information about filters.
The following status are shown for the RTP packets:
Active streams: Specifies the number of RTP streams found. Only the traffic that matches the filter is counted.
Packets processed: Specifies the packets that match the filter and processed successfully.
Packets dropped: Specifies the packets that match the filter but not processed due to insufficient resources. Shows same information as "Counter total dropped".
The Signaling Protocols menu is available after the installation process has finished and only for machine type Probe (which includes the machine type Mediation Engine with Probe).
You use the Signaling Protocols page to identify the types of traffic the various probes (which sniff traffic) look for. The Probe accepts only the traffic that matches the filter rule and sends them to the Mediation Engine.
You might want to configure strict filtering rules for several reasons:
The probes process all traffic that matches the filter. For most installations, the high volume of traffic makes inspecting every packet infeasible. Ignoring unnecessary packets, therefore, puts less stress on your system and makes subsequent analysis easier. For example, you may want to make sure the signaling probe, which monitors SIP, does not also get all the RTP traffic.
You might not be interested in certain sources of traffic, even though the machine would pick it up.
More complex VLAN configurations.
The default filters are sufficient for most installations and provide a good starting point.
After you configure the filters, it takes a few seconds for the probe(s) to reconfigure. The statistics on this page should show the totals for the new filters. The Packets processed statistic is a good indicator of how the filters are working.
Notes:
Make sure to use vlan keywords in the filters when that is used on the network.
Make sure to change the default filters if you use non-standard ports or other options.
Traffic is first filtered using the media protocols setting. Only the traffic that does not match the media protocols BPF filter (except when Check all traffic for signaling filter option is enabled) is passed to the signaling probes.
If you use Packet Inspector for recording media, you need to include media packets in the Packet Inspector filter.
You need to ensure that there is sufficient disk space for storing media on the Probe machine. Media packets are initially stored on the Probe machine. The Probe forwards the packets to the Mediation Engine only when a user downloads the media to a PCAP file. When the disk is full, the Probe overwrites the calls stored on the disk with new calls. You can define the Packet Inspector filter to restrict the calls stored on the Probe and thus minimize calls that are overwritten.
For more information about filters, see "Filter Syntax".
You can select to turn on packet deduplication for the associated traffic type. If you turn on packet deduplication, you must also provide a time value in milliseconds. The value should be greater than zero.
Packet deduplication is done at L3 and above and it is best effort. Some types of traffic might not get deduplicated, for example, duplicates on nested VLANs, ipv6, and so on.
There is a System Setting to enable deduplication in the core, which should be enabled if there are multiple Probes connected to one ME, and seeing the same traffic. If traffic is seen without and with vlan tags, you should also disable VLAN awareness in System Setting.
The following statistics are shown for each protocol:
Rate: Specifies the total number of packets accepted after the filtering.
Packets processed: Specifies the number of packets processed in the last second. Only packets that match the filter are processed.
The following statistics are shown for all devices:
Total sniffed: Specifies the number of packets sniffed across all configured devices.
Total dropped: Specifies the number of packets that were not processed. Packets were dropped either by the NICs or during processing due to system performance reasons. If possible, tighten the filter rules and disable the Check all traffic for signaling filter option in Media Protocols to ignore unnecessary packets and reduce stress on the system. If that is not possible, consider upgrading the machine. Shows same information as "Packets Dropped".
The System Diagnostics menu allows the creation of a report with information on the installation. This report may be requested by the support team in case of issues.
A report can be created by clicking Create. This may take several minutes to complete. Afterwards, the report can be downloaded as a file by clicking Download. This file can then be sent to the support team, for example by email.
If a report exists, its creation date will be shown. It can be downloaded as often as necessary, but there can be only one report at a time; creating a new report will overwrite any existing one.
Reports are deleted around midnight UTC.
The contents of a report include:
Information on the available hardware of the machine that the monitoring solution is running on
Log files
Configuration of the monitoring solution
Statistics about the performance and status of components of the system and of the monitoring solution
If the check box Include mysql dump... is checked, the report includes a dump of most of the database tables. Note that the respective tables might be huge.
If the check box Include mysql dump... is not checked, the report will include only minimal information about the database tables.
Note:
Sensitive information is removed before report creation, including, but not limited to, passwords, keys, and certificates.
The filter syntax used is the same as tcpdump or libpcap. For an example, see http://wiki.wireshark.org/CaptureFilters.
The following filters are also known as BPF filters:
(tcp port 5060)
((udp or tcp) and port 5060)
(vlan (udp or tcp) and port 5060)
(tcp portrange 5060-5070)
(not port 5060)
(host 10.10.0.5 and port 5060)
(not host 10.10.0.5 and port 5060)
(not ether dst 12:34:56:78:90:ab)
Entries with a vlan keyword must be included for networks using VLANs. It is harmless to include them on networks which don't use VLANs, but do make sure there is a separate identical filter without the vlan. For example, (tcp port 5060) or (vlan and tcp port 5060).
This chapter provides instructions for installing and configuring Data Plane Development Kit (DPDK) for the Oracle Communications Session Monitor to monitor high volume of network traffic.
DPDK provides sniffing performance for some of the Intel network cards and network traffic patterns. If you have a compatible network card, you can enable DPDK.
Note:
See Oracle Communications Session Monitor Release Notes to verify if you need to update DPDK. If you need to update DPDK, verify if the DPDK requires latest Oracle Linux Platform.
DPDK is a special architecture supported by specific network card designs, drivers, and server architectures, that improves performance when processing network traffic. For high network traffic monitoring, you can select to enable DPDK option on Session Monitor Probes. DPDK uses NUMA architecture special feature to have faster access to traffic written from a Network Card and to enhance the performance.
DPDK architecture involves two parts for Session Monitor Probes. The daemon is responsible for network traffic analysis (rat) is compiled against a specific DPDK library, and is deployed upon Session Monitor installation. For DPDK to work, the DPDK driver must be downloaded and installed on the Probe, as well.
The following sections describe the hardware and software requirements for installing and configuring DPDK for Session Monitor.
Note:
The software and hardware details mentioned in this section are minimum requirements to enable DPDK for capturing high volume of network traffic. Contact Oracle Support for more assistance.
This section describes the hardware requirements for installing and configuring DPDK.
Following are the list of minimum hardware requirements:
Probe machine (with DPDK) (2 Intel processors, each with 8 cores, 8 GB RAM, Intel based network card)
Mediation Engine and Probe in one machine (at least 2 Intel processors and 24 cores in total, 24 GB RAM, Intel based network card)
For supported servers, see "Session Monitor System Requirements".
The following networking cards are supported:
Sun Dual Port 10 GbE PCle 2.0 Networking Card with Intel 82599 10 GbE Controller
Sun Quad Port GbE PCIe 2.0 Low Profile Adapter, UTP
Sun Dual Port GbE PCIe 2.0 Low Profile Adapter, MMF
Supported DPDK versions for Session Monitor
Table 5-1 DPDK Support Versions for Session Monitor
| DPDK Version | Session Monitor Release |
|---|---|
|
16.07 |
Supported from 3.4.0.0.0 |
This section describes the procedure for installing and configuring DPDK for session monitor.
To install and configure the DPDK:
Note:
You must be connected to the internet before starting the installation. Running the following command installs, downloads the required files, and configures the DPDK automatically.
Log into the Platform Setup Application page:
Select Capture Settings.
Check the box in Monitoring column against each sniffing interface that you want to use for capturing the traffic.
Log into the computer that hosts the probe or mediation engine and probe as a root user.
(Optional) For better understanding of the network, CPU, and NUMA nodes of the server, you can run the following command to review the output of the system_layout.py script, that will display system information:
source /opt/oracle/ocsm/ocsm_env.sh
/opt/oracle/ocsm/usr/share/pld/rat/system_layout.py
Run the following commands which guides you through the installation:
source /opt/oracle/ocsm/ocsm_env.sh
/opt/oracle/ocsm/usr/share/pld/rat/configure_dpdk.py
The configure_dpdk.py script downloads and installs the required DPDK driver, the corresponding Kernel headers required for compiling DPDK driver, compiles, installs the driver, and creates server and Session Monitor DPDK related configuration.
(Optional) To view all the available advanced options, run the following command:
/opt/oracle/ocsm/usr/share/pld/rat/configure_dpdk.py -h
Reboot the computer that hosts the probe or mediation engine and probe.
This section provides the instructions to install and configure DPDK securely when not connected to the internet.
To install and configure DPDK:
Log into the Platform Setup Application page:
Select Capture Settings.
Check the box in Monitoring column against each sniffing interface that you want to use for capturing the traffic.
Log into the computer that hosts the probe or mediation engine and probe as a root user.
(Optional) For better understanding of the network, CPU, and NUMA nodes of the server, you can run the following command to review the output of the system_layout.py script, that will display system information:
source /opt/oracle/ocsm/ocsm_env.sh
/opt/oracle/ocsm/usr/share/pld/rat/system_layout.py
Run the following command:
yum install kernel-uek-devel-$(uname -r)
Download the **dpdk-<versionnumber>** tar.gz file from the following website: http://dpdk.org/browse/dpdk/snapshot/dpdk-
Run the following commands as a root user:
source /opt/oracle/ocsm/ocsm_env.sh
/opt/oracle/ocsm/usr/share/pld/rat/configure_dpdk.py
(Optional) To view all the available advanced options, run the following command:
/opt/oracle/ocsm/usr/share/pld/rat/configure_dpdk.py -h
Reboot the computer that hosts the probe or mediation engine and probe.
This section provides the instructions to update DPDK after a Kernel update.
Note:
You must perform the instructions in this section if you have installed another Linux Kernel.
To update DPDK:
Reboot the system.
Follow the procedure detailed in "Installing and Configuring DPDK with Internet" or "Installing and Configuring DPDK without Internet" depending on your setup.
Reboot the computer that hosts the probe or mediation engine and probe.
This section describes the instructions for uninstalling DPDK.
To uninstall DPDK:
Run the following commands:
source /opt/oracle/ocsm/ocsm_env.sh
/opt/oracle/ocsm/usr/share/pld/rat/configure_dpdk.py --remove
Reboot the computer that hosts the probe or mediation engine and probe.
This appendix provides instructions for creating the Oracle Communications Session Monitor installation media.
Session Monitor may be installed using a DVD or USB flash drive. If you are going to use a USB flash drive, make sure that its size is at least 1GB. Oracle recommends using brand drives, as issues have been reported when using low-quality thumb drives.
Download the Session Monitor Installer ISO image from the repository indicated to you by Oracle or your service provider. If you want to use the DVD installation method, create a new DVD from the image. Otherwise follow the instructions below to create a bootable USB flash drive.
Caution:
Following the instructions writes the image directly to the device, which can be very dangerous when done without care, if you give the wrong device name, for example, the one representing your internal hard drive instead of the one representing the USB flash drive, all data from the running system can be deleted.
Note:
Using UNetBootin is the recommended way to prepare a USB flash drive for the installation. For Linux and Mac OS X, if this approach fails, an alternative preparation method is described in "Preparing a USB Flash Drive (alternative, Linux/Mac OS X)".
http://unetbootin.sourceforge.net/
This site also contains more information on using and troubleshooting the tool.
Plug the USB flash drive into the computer.
Start UNetBootin. Select Diskimage and ISO as the source. Click ... next to the empty text entry and select the Session Monitor ISO image.
Select the type USB Drive and the USB flash drive you just plugged in.
Double check the selections you have made. If they are all correct, click OK to start the writing process. UNetBootin informs you about the progress.
Figure A-1 Using UNetBootin to Prepare a USB Flash Drive for the Installation
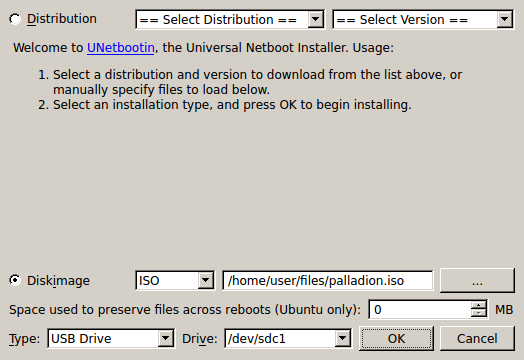
This figure is a screen capture of the UNetBootin configuration page. The fields are described in the above text.
Important:
The method described below only applies to Linux and Mac OS X and should only be used if the preferred method using UNetBootin does not work.
Plug the USB flash drive into the computer.
Find out which device name has been given to the USB flash drive:
Linux Execute lsblk on the command line. A tree of devices with their names, sizes and other information is shown. If lsblk is not available on your system, you can use dmesg.
Example output:
scsi 8:0:0:0: Direct-Access USB Flash Disk PMAP PQ: 0 ANSI: 0 CCS
sd 8:0:0:0: Attached scsi generic sg2 type 0
sd 8:0:0:0: [sdb] 7827456 512-byte hardware sectors (4008 MB)
sd 8:0:0:0: [sdb] Write Protect is off
sd 8:0:0:0: [sdb] Mode Sense: 23 00 00 00
sd 8:0:0:0: [sdb] Assuming drive cache: write through
sdb: sdb1
In this example, sdb is the device name to use. A tree of devices with their names, sizes and other information is shown.
Mac OS X Execute diskutil list on the command line. A list of devices with their names, sizes and other information is shown.
Unmount the partitions of the USB flash drive in case any have been mounted automatically.
On Linux, execute:
umount USB device name
For example:
umount /dev/sdb1
On Mac OS X, execute:
diskutil unmountdisk USB device name
For example:
diskutil unmountdisk /dev/disk1
Write the image to the USB flash drive:
dd if=/path/to/ocsm-3.3.90.0.0.iso of=USB device name bs=1m
where /path/to/ocsm-3.3.90.0.0.iso is the path to the image file.
Important:
All data from the USB flash drive will be deleted.
Synchronize the disk caches and wait until disk activity stops to assure that all data has been completely written to the USB flash drive:
On Linux, execute sync on the command line.
On Mac OS X, execute:
diskutil eject _USB device name
For example:
diskutil eject /dev/disk1
If running Windows 7, use the Windows7 USB/DVD Download Tool.
Download the Windows 7 USB/DVD Download Tool from:
http://www.microsoft.com/en-us/download/windows-usb-dvd-download-tool
In the Setup Wizard, click Next> Install.
After installing, click Finish and open the program.
Click Browse and locate the ISO file.
Click USB device.
Locate your USB device and click Begin copying.
If prompted, click Erase USB Device and then Yes.
If running Windows XP, use UNetbootin.
Download UNetbootin from:
Open the downloaded file and click Run.
When the program opens, click Diskimage and set to ISO.
Click . . . and locate the ISO file.
Set the Type to USB Drive, and set the Drive to the drive where the USB is mounted.
Click OK.
This appendix explains how to install the Skype for Business Agent for Oracle Communications Operations Monitor.
Before installing Skype for Business Agent, ensure that you have the following:
To install Skype for Business Agent:
Download the Skype for Business installation file to a temporary directory (temp_ dir).
Go to the temp_dir directory.
Unpack the Skype for Business to Skype Agent for Business (SFB) server.
Run the Skype for Business Agent file.
The Oracle EOM Skype for Business Agent Setup wizard appears.
The End-User License Agreement screen appears.
Accept the license agreement and click Next. The ME Connection Settings screen appears.
Enter the ME Host Address field.
It is recommended not to deselect Use TLS. When selected, the connection to Mediation Engine is encrypted.
Uninstalling Skype for Business Agent
Note: If encryption is selected, you must generate a TLS certificate for the Skype for Business Agent which includes a certificate. Upload the TLS certificate authority public key to the Enterprise Operations Monitor machine, and install it on the Skype Server in the local computer Trusted Certification Authorities store, and install the generated certificate including the private key in the Personal Certificate store.
Important:
Grant the read permissions for the private key to the OracleSkypeProbeUser account.
If encryption is not selected, the user must also select the Allow insecure connection checkbox in the Trusted certificates section in the Enterprise Operations Monitor setup.
The Ready to Install Oracle EOM Skype Agent screen appears.
The installation sets up a service on the windows server and creates a user account, OracleSkypeProbeUser for the service.
The Skype for Business Agent installation is now complete and the calls made from Skype will appears as a Skype call in the call details window.
To uninstall Skype for Business Agent:
From your computer, click Start and then click Control Panel.
Click Programs.
Click Program and Features.
In the list of currently installed programs, select Oracle EOM Skype for Business Agent and then click Uninstall/Change.
A confirmation dialogue box appears. Confirm Uninstallation. The Skype for Business Agent is uninstalled.
Open the configuration file, C:\Program Files\Oracle\Oracle EOM > Skype Probe\SkypeProbe.exe.config.
Change the value of the tag having key apidAddr. For example,
<add key="apidAddr" value="192.168.123.120" />
Save the SkypeProbe.exe.config file.
Place the cursor on the Oracle EOM Skype Probe service name and > right click to restart.
The Skype for Business Agent monitors only the SIP call flow. The call quality information is reported by the user agent, Skype for Business Desktop Client.
To get the call quality information:
Enable monitoring on the Skype server. See, https://technet.microsoft.com/en-us/library/jj687994.aspx
Install and configure the Skype for Business SDN API on the Skype Front-End Server, as described in the Skype for Business SDN API 2.4.1 Installation Admin Guide.
https://msdn.microsoft.com/en-us/library/office/dn785197(v=office.16).aspx
SDNManager.exe /p s EOM submituri=https://IP_address/sfb/
Where, IP_address is the IP address or the hostname of your Mediation Engine.
Result: The finished Skype calls show the MOS values and media summary.
Configure the SDN Manager to send QualityUpdate messages to the Mediation Engine by running the following command:
SDNManager.exe /p s EOM "quality=True"
Operations Monitor reads the SDN Interface messages from the following URL: https://<Mediation Engine Host>/sfb/
After configuring the SDN Dialog Listener and SDN Manager, run the following command for SDN Manager to forward the messages to Operations Monitor:
cd "C:\Program Files\Microsoft Skype for Business Server\Microsoft Skype for Business SDN Manager\"
SDNManager.exe /parameter subscriber ocom "submituri=https://<Mediation Engine Host>/sfb/"
Run the following command to verify SDN Manager configuration:
cd "C:\Program Files\Microsoft Skype for Business Server\Microsoft Skype for Business SDN Manager\"
SDNManager.exe /download subscriber
Result: You should get an XML describing the configuration. “Pay attention to the value of the submituri parameter: does it match the address of the Enterprise Operations Monitor machine?”
Check the SDN Manager and Dialog Listener log files at %LOCALAPPDATA%\Local\Temp\SDN after each Skype for Business call. Open the SDNManager.log file and search for the following:
Starting to transmit the message?
If the line does not exist, the SDN manager is configured incorrectly. Repeat the configuration process again.
This section provides guidelines for troubleshooting problems with Skype for Business Agent.
Problems with Viewing Skype Call Data Information
Perform the following if you are unable to view skype call data:
Verify that the SkypeProbe.exe.config file located in the installation directory has the correct IP address of Mediation Engine.
Verify Mediation Engine machine is reachable by pinging the Mediation Engine Machine from Skype for Business Server.
Verify the logs for any exceptions or connection errors in the following path:
C:\ProgramData\Oracle EOM Skype Probe\Logs
Ensure that OracleSkypeProbeUser is a member of RTC Server Applications local group. If not, add the user by doing the following:
Configuring Skype for Business Agent for Monitoring Call Quality Information
The Computer Management screen appears.
Click Local Users and Groups.
Select and right-click the RTC Server Applications group and click Add to Group.
Locate and add the OracleSkypeProbeUser and click OK.
The OracleSkypeProbeUser will be added to the RTC Server Applications group.
Verify the Enterprise Operations Monitor Skype for Business agent service is running in services.msc. by doing the following:
From your computer, click Start and search for Computer Management.
Click Computer Management.
The Computer Management screen appears.
Click Services and Applications.
Click Services.
Verify if Skype for Business Agent service is running, if not, right-click the service and click Start.
The Skype for Business Agent will start running.
Verify if the connection between Mediation Engine and Skype for Business Server is blocked by firewall. If blocked, disable the setting depending on your Operating System.
If you have selected Accept insecure connections from remote probes during Enterprise Operations Setup, set the UseTIs parameter to false in the SkypeProbe.exe.config file.
A machine which filters and processes network traffic. It does not calculate the statistics.
RTP (Real-time Transport Protocol) is the voice part of the network traffic, as opposed to the signaling (meta) part.
VLAN (Virtual Local Area Network) is a technique to separate a network into distinct, isolated broadcast domains. See Virtual_LAN.