Configuring Diameter Peers

The MPE and MRAdevices support Diameter Rx, Gq, Ty, Gxx, Gx, S9, and Sd applications. For example, traffic control is supported using the Diameter Gx application. When a subscriber attaches to the network (for example, using a phone) via a GGSN (Gateway GPRS Support Node), the GGSN can establish a session with both the MPE and MRA devices using a Diameter Gx CCR (Credit Control Request) message. The MPE and MRA devices respond to the request with a Gx CCA (Credit Control Answer) message.

Use this procedure if you need to configure system devices (peers) to a diameter-based network.

To configure Diameter peers for either an MPE or MRA device:

  1. Either in the Policy Server or MRA section of the navigation pane, select Configuration.

    The content tree displays a list of policy server or MRA groups.

  2. From the content tree, select the MPE or MRA device.

    The Administration page for that device opens in the work area.

  3. Select the Diameter Routing tab.

    The Diameter Routing configuration settings appear.

  4. Click Modify Peers which opens the Modify the Diameter Peer Table.
  5. Add a peer to the table using these steps.
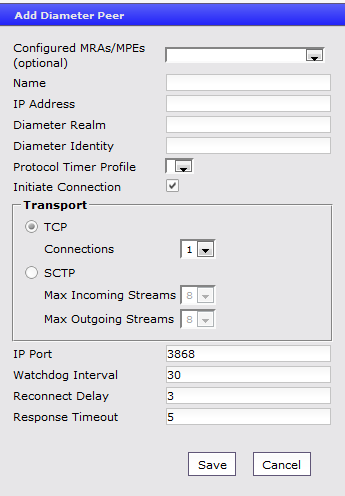
    1. Click Add.

      The Add Diameter Peer window opens.
      Add Diameter Peer

    2. Enter the following:

      • Configured MRAs/MPEs (optional)

        If you are defining an existing Policy Management cluster as a Diameter peer, select it from this list; the other fields are populated.

      • Name (required)

        Name of the peer device (which must be unique within the CMP database).

      • IP Address (required)

        IP address in IPv4 or IPv6 format of the peer device.

        If not specified, the MPE device uses a DNS lookup to resolve the value in the Diameter Identity field into an IP address and try to connect.

      • Diameter Realm (required)

        The domain of responsibility for the peer (for example, Example.com).

      • Diameter Identity (required)

        Fully qualified domain name (FQDN) of the peer device (for example, mpe33.Example.com).

      • Protocol Timer Profie

        Select from the list.

      • Initiate Connection

        Select to initiate an S9 connection for this Diameter peer.

      • Transport

        Select either TCP or SCTP (shown as Transport Info in the Diameter peer table). For TCP select Connections (range 1 through 8, default 1). For SCTP select Max Incoming Streams and Max Outgoing Streams(1 to 8 connections, default is 8) which will be shown as Connection Info in the Diameter peer table.

      • IP Port

        Enter the IP Port number.

      • Watchdog Interval

        Enter the watchdog interval in seconds. The default is 6 seconds.

      • Reconnect Delay

        Enter the response time in seconds. The default is 3 seconds.

      • Response Timeout

        Enter the response timeout interval is seconds. The default is 5 seconds.

    3. Click Save.
  6. Complete these steps to add, edit or delete additional Diameter Peers.
    • Cloning an entry in the table
      1. Select an entry in the table.
      2. Click Clone. The Clone window opens with the information for the entry.
      3. Make changes as required.
      4. Click Save. The entry is added to the table.
    • Editing an entry in the table
      1. Select the entry in the table.
      2. Click Edit. The Edit Response window opens, displaying the information for the entry.
      3. Make changes as required.
      4. Click Save. The entry is updated in the table.
    • Deleting a value from the table
      1. Select the entry in the table.
      2. Click Delete. A confirmation message displays.
      3. Click Delete to remove the entry. The entry is removed from the table.
  7. Click Save.