Configuring the OPERA PMS Enhanced Interface
Follow these steps to configure and install the SIM OPERA Interface.
- Select the Enterprise, property, revenue center, or zone, click Setup, and then click Extension Application.
- Click the Insert icon to add a record (using a record number of your choice).
- Enter a record name in the Name field (for example, OPERA), and then click OK.
- Double-click the record to open it in form view.
- Click the Insert Application Content button. You must insert four application content records.
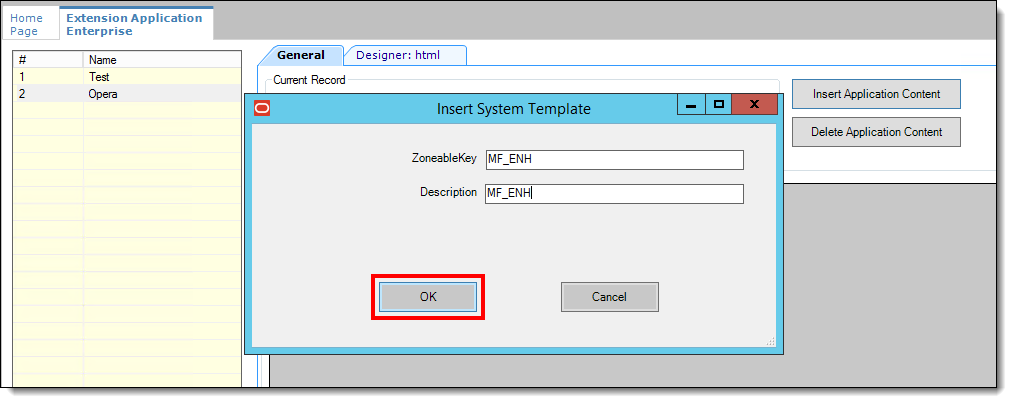
Figure 51-1 Extension Application Inserting Content

- Enter the text reflecting the file names within the ZoneableKey and Description fields, and then click OK.
Figure 51-2 Extension Application Configuring Content
- Select 19 - SimScript as the Content Type, and then click the Import from a file link.
Figure 51-3 Extension Application Importing Content
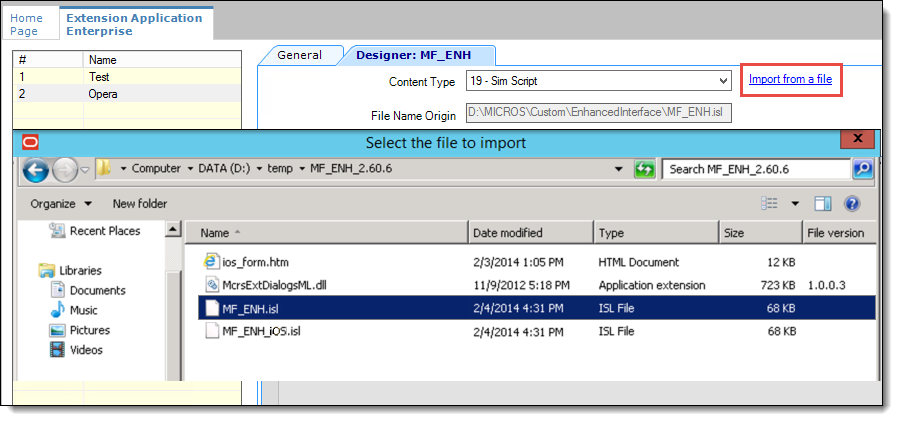
- Select the SIM file MF_ENH.isl (*.isl), and then click Open.
- Set the target to WIN32.
- Insert new application content for the second SIM file named MF_ENH_Android.isl.
- In the Content Type drop-down list, select 19 - SIM Script.
- Enter MF_ENH_ANDROID in the ZoneableKey and Description fields, and then click OK.
- Set the target to the Android platforms.
- Insert a new application content for the DLL file named McrsExtDialogsML.dll.
- In the Content Type drop-down list, select 3 - DLL.
- Enter McrsExtDialogsML in theZoneableKey and Description fields, and then click OK.
- Insert new application content for the Android form file named android.htm.
- In the Content Type drop-down list, select 23 - Text.
- Enter html in the ZoneableKey and Description fields, and then click OK.
- For the SIM file records MF_ENH.isl and MF_ENH_ANDROID.isl, click the ellipsis (...) button under the Options Bits column, select 2 - Main SIM Content, and then click OK.
- For each file, enter the entire file name under the Disk File Name column, and then click Save.
-
Disk File Name entries must exactly match the name of their associated SIM scripts and DLL file names. These entries are case-sensitive.
-
The ZoneableKey entry for the Android.htm file must match html, and it is case-sensitive.
-
The Version column is not required.
Figure 51-4 Extension Application Content Record Details

-
- Set the related target for each file:
-
MF_ENH.isl target: WIN32
-
MF_ENH_ANDROID.isl target: Android
-
McrsExtDialogsML.dll target: WIN32
-
Android.htm target: Android
For multi-tenant environments using releases earlier than Simphony release 2.9, you are required to configure the content information (outlined in the following section under Content Information) as Extension Application content, as in these environments the content feature cannot be used.
-
Create new Application Content for the enhanced interface, selecting the Insert Application Content button. The ZoneableKey and Description fields must be set to EnhIFC_Config. These entries are case-sensitive.
-
Select the Content Type 23 - Text, and insert the content information as outlined in the following section under Content Information. Apply the configuration settings as required.
Content Information
Select the Enterprise, property, revenue center, or zone, click Setup, and then click Content. Insert a record for the Property Management System (PMS) configuration. The name of the new entry must beEnhIFC_Config (which is case-sensitive), and enter STRING. Enter the strings as shown in the following figure (the content text file is delivered with the other files), and change the options as needed.
Figure 51-5 Content Text File
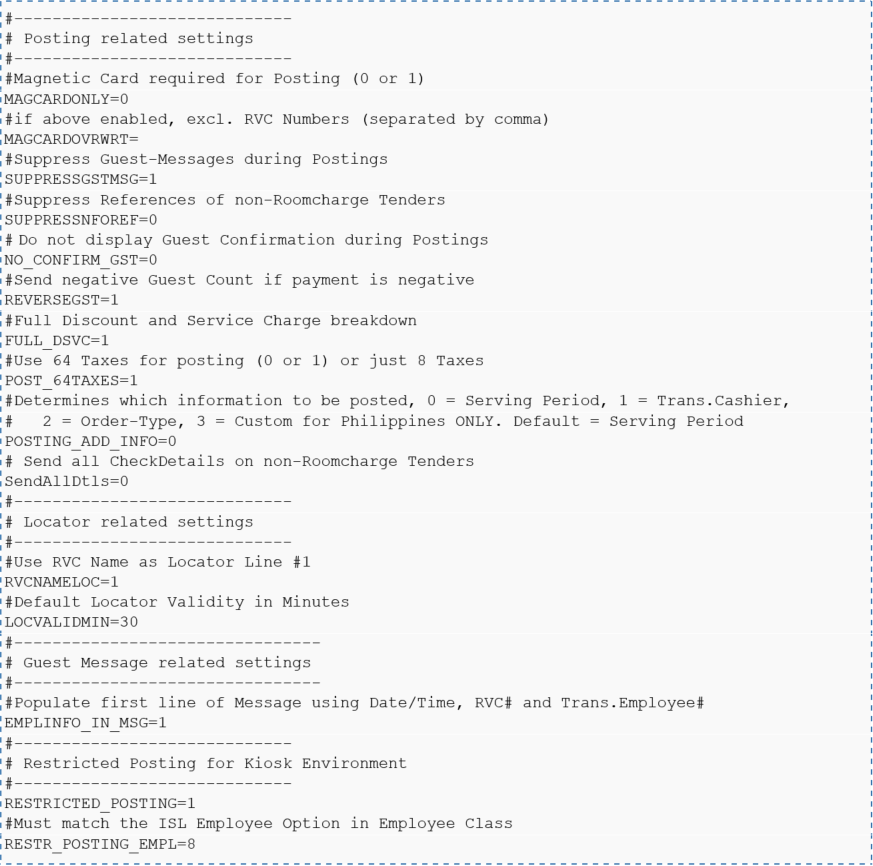
Posting Related Configuration Settings
Table 51-1 Posting Related Configurations
Configuration String Configuration Value MAGCARDONLY
Set to 1 (one) if you want to limit the entries in the Room-Charge event to magnetic cards, or set to 0 (zero) to allow both magnetic cards and keyboard as input.
MAGCARDOVRWRT
When MAGCARDONLY is enabled, the setting can be overwritten for certain RVC's by entering a list of RVC numbers (separated by a comma).
SUPPRESSGSTMSG
When set to 1 (one), this suppresses the message indicator during the posting. For high-volume sites this should be enabled.
SUPPRESSNFOREF
For Non-Room-Charge tenders, this shows the Department Code they were posted to. When set to 1 (one), this suppresses this reference.
REVERSEGST
Set to 1 (one) if the guest count should be negative in case the payment is negative (i.e., the payment is voided). Note that this feature requires specific setup on the Front-Office interface to work correctly.
FULL_DSVC
If set to 1 (one), a full breakdown of discounts are sent. This requires a specific version of the Front-Office interface. An additional full breakdown of service charges requires this to be set to 2 (two), this setting also includes a full breakdown of discounts.
NO_CONFIRM_GST
Set to 1 (one) if the guest name should not be confirmed when posting. Unless magnetic cards are used to identify the guest, this option should be disabled and set to 0 (zero).
POST_64TAXES
If set to 1 (one), up to 63 Tax Itemizers are sent to the Front-Office interface. Note that this requires IFC8 V.8.7.1.2 or higher, as well as a certain version of the Front-Office itself. If set to 0 (zero), only 8 (eight) Tax Itemizers are sent to the Front-Office interface.
POSTING_ADD_INFO
This setting determines which information value is to be used for any posting. Currently, the following values are supported:-
0 = Serving Period Number (Default)
-
1 = Transaction Cashier
-
2 = Order-Type Number
-
3 = Custom value for Philippines ONLY
SendAllDtls
When set to 0 (zero), only check details of Room-Charges are sent to the Front-Office interface. If set to 1 (one), the check details of non-Room-Charges are also sent.
RESTRICTED_POSTING
Select if you want to restrict responses returned from the Front-Office Interface in the Room-Charge event. Note that this only works in combination with, and if the RESTR_POSTING_EMPL option is configured correctly. Currently there are two supported values :-
Setting this to 1 (one):
Both the Room# and at least 3 (three) characters of the Surname (last-name field) need to be provided in order to post the Room-charge. If less than 3 characters are provided, an error is shown. If the response from the PMS contains more than one record, an error is shown and the operator needs to enter additional characters to provide a unique identifier.
-
Setting this to 3 (three):
RESTR_POSTING_EMPL
Specify the ISL Option that should be used with the above option (see EMC, Employee Maintenance, Employee Class, ISL Options). As such, the valid value for this configuration is between 1 (one) and 8 (eight).
Guest-Locator and Guest-Message Related Configurations
Table 51-2 Guest-Locator and Guest-Message Configurations
Configuration String Configuration Value RVCNAMELOC
If set to 1 (one), the first line of the locator contains the RVC name, otherwise it is blank. The operator can overwrite this value when entering the locator information.
LOCVALIDMIN
Each new locator is only valid for a certain amount of time. Enter the default time in minutes here. The server can overwrite this value when entering the locator information.
The Content can be overridden by property, zone, or revenue center. If overridden, ensure that you select the Use Existing Record option.
Figure 51-6 Override Record Controls

Configuring Interfaces
Select the Enterprise level, click Setup, and then click Interfaces, and then insert a record for the OPERA PMS interface.
Figure 51-7 Interface Module
The following is an example. Use a System Name that reflects the property using the interface.
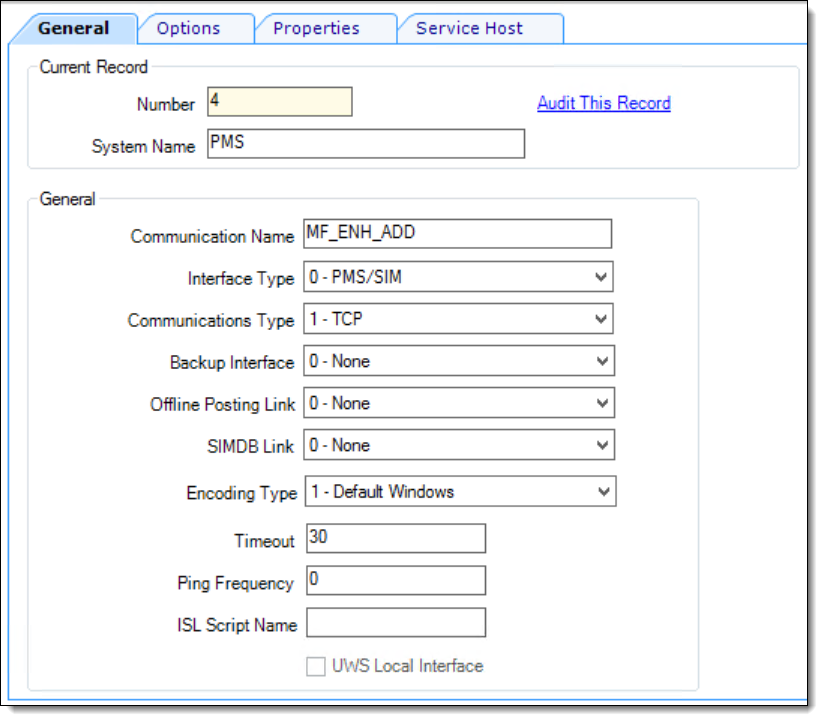
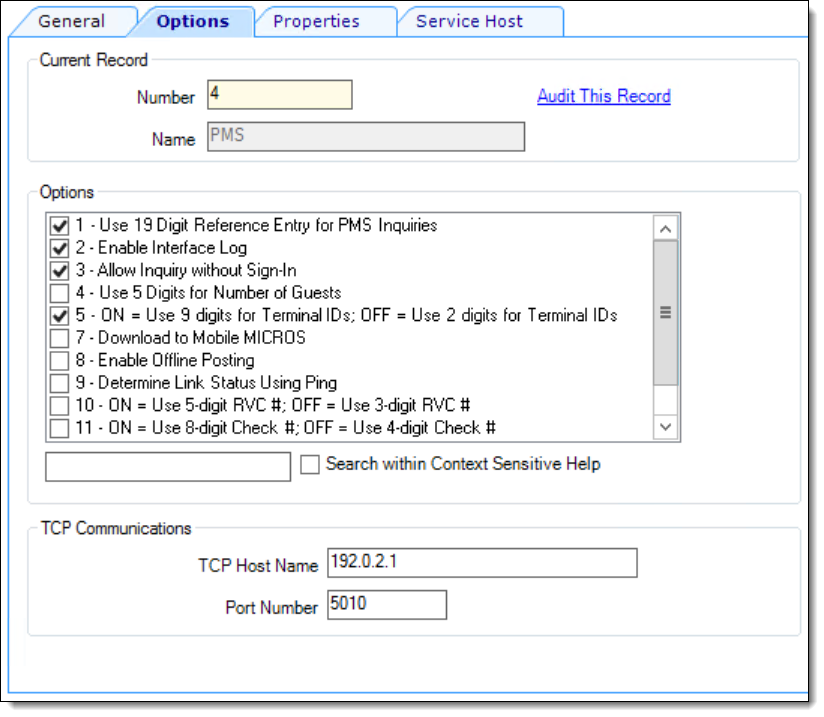
To avoid double posting, the PING Frequency setting must be 0 (zero), and is required to create an interface for each property. Click the Options tab and enable the desired options. Enter the Opera PMS application server's connection information within the TCP Communications section and Save all changes.
Figure 51-8 Interface Module’s Options Tab
Note:
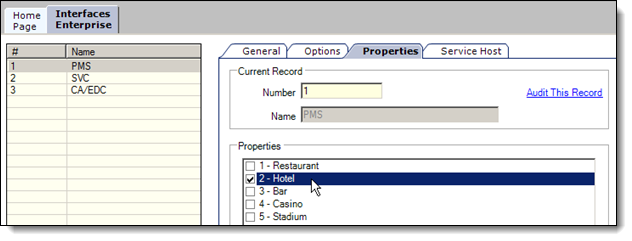
Only options 1, 2, 3, and 5 must be enabled. Do NOT enable option 8, as that causes double posting.Click the Properties tab and enable the Opera PMS interface for each desired property and Save all changes.
Click the Service Host tab and select the desired Service Host for the Opera PMS interface. Click OK and Save all changes.
Figure 51-9 Interface Module’s Properties Tab
Extension Application Interface Configuration
Navigate to the EMC, Enterprise level, Setup tab, Custom Content, and then click Extension Application. Select the PMS interface in the Interface column to link it to the Opera Extension Application record and Save.
This configuration normally occurs at the Property level (PMS Interface is on-premise).
Figure 51-10 Extension Application PMS Interface Assignment

Revenue Center Configuration
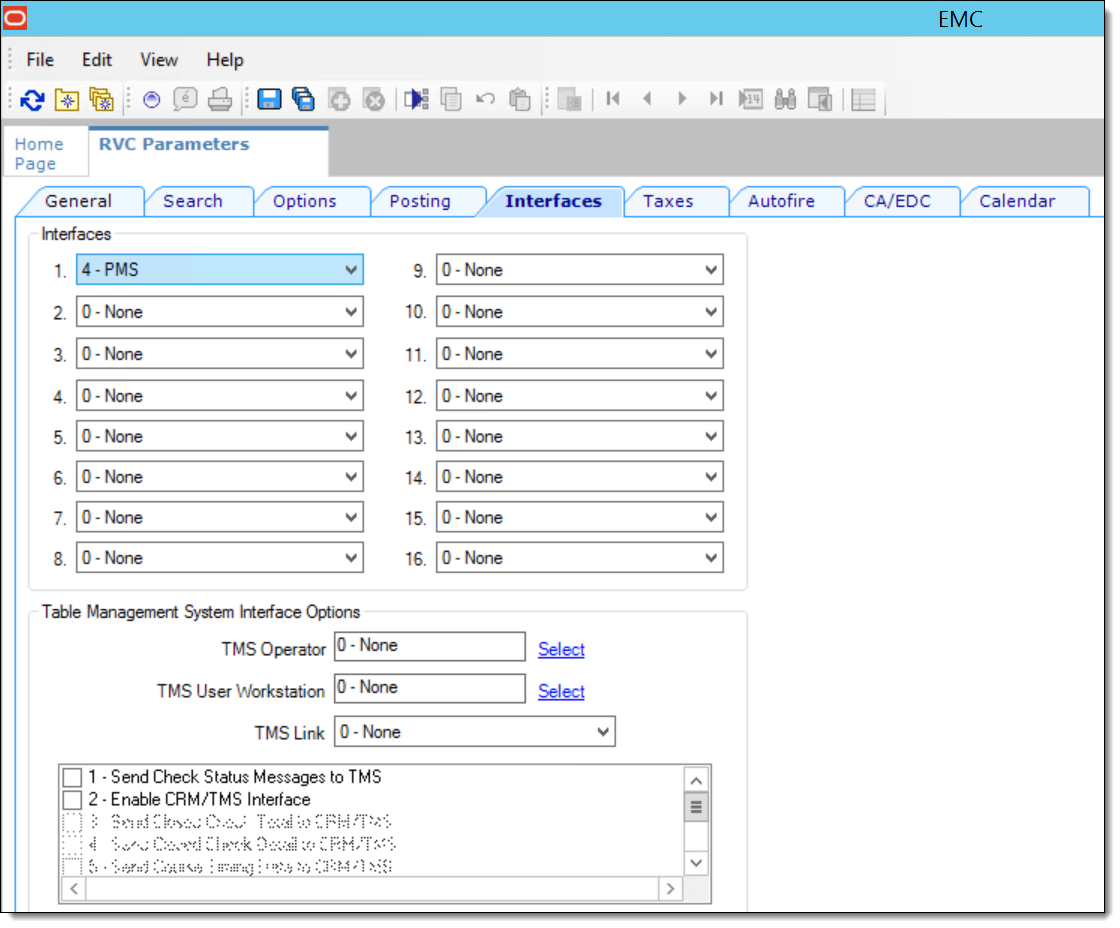
Navigate to the EMC, Revenue Center level, Setup tab, Parameters, RVC Parameters, and then click the Interfaces tab. Select the PMS interface to enable the interface for the RVC(s). Navigate to and perform this step for every desired RVC (using the same PMS link for each RVC) and Save all changes throughout the process.
Figure 51-11 Revenue Center Parameters Interfaces Tab
Data Extensions – Add the Tender Media Extra Column
Navigate to the EMC, Configuration tab, and then click the Data Extensions module. Select the Insert icon and add a record.
Enter the following information:-
Table: 71 – Tender Media
-
Extra Column name: RoomCharge
-
Type: 4 – Boolean
-
Data Constraints: N/A
-
Sort Priority: N/A
-
Display Width: 150
-
Translatable Name: Enh.IFC – Room Charge (translatable)
-
Translatable Help: Enable this for Room-Charge Payments (translatable)
Figure 51-12 Data Extensions Module

-
Enable all three access check-boxes.
Figure 51-13 Data Extensions Translatable Settings

Tender Media Setup
Navigate to the Property level, Configuration tab, Sales, and then click Tender/Media. Create a Room Charge tender media record. Configure the generic options as required.
Figure 51-14 Tender/Media Room Charge Configuration
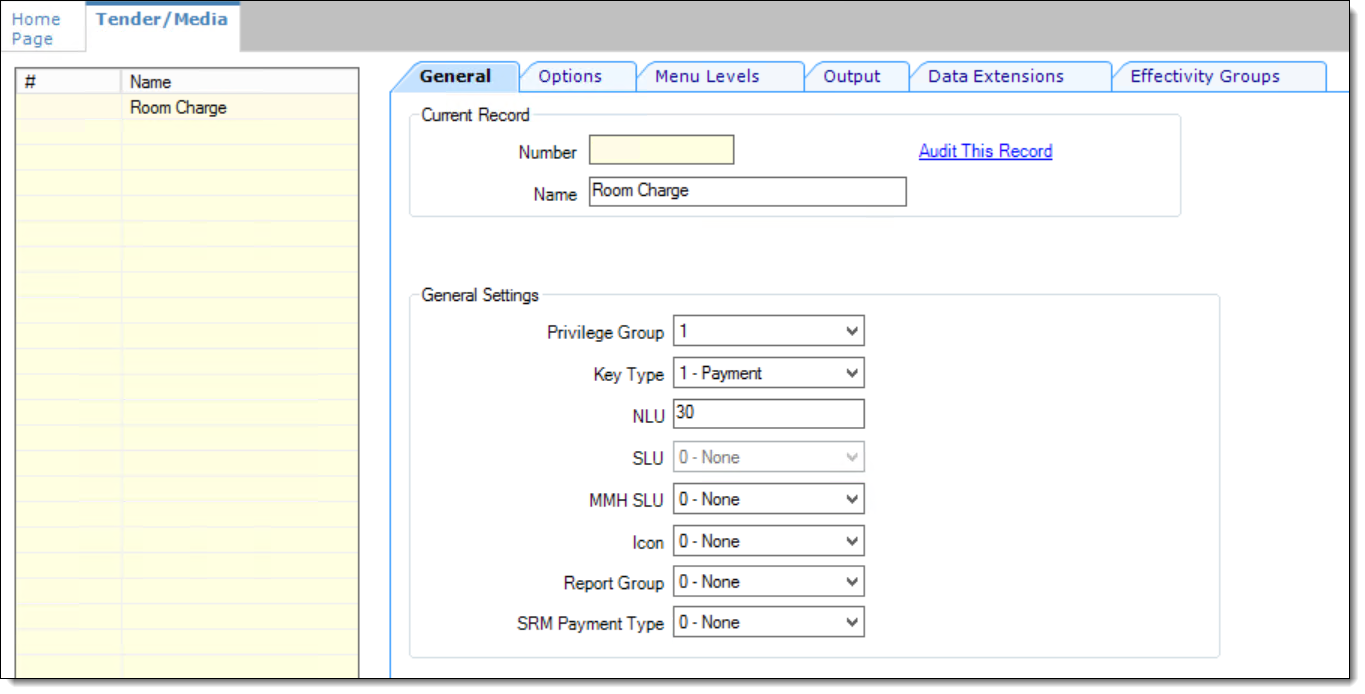
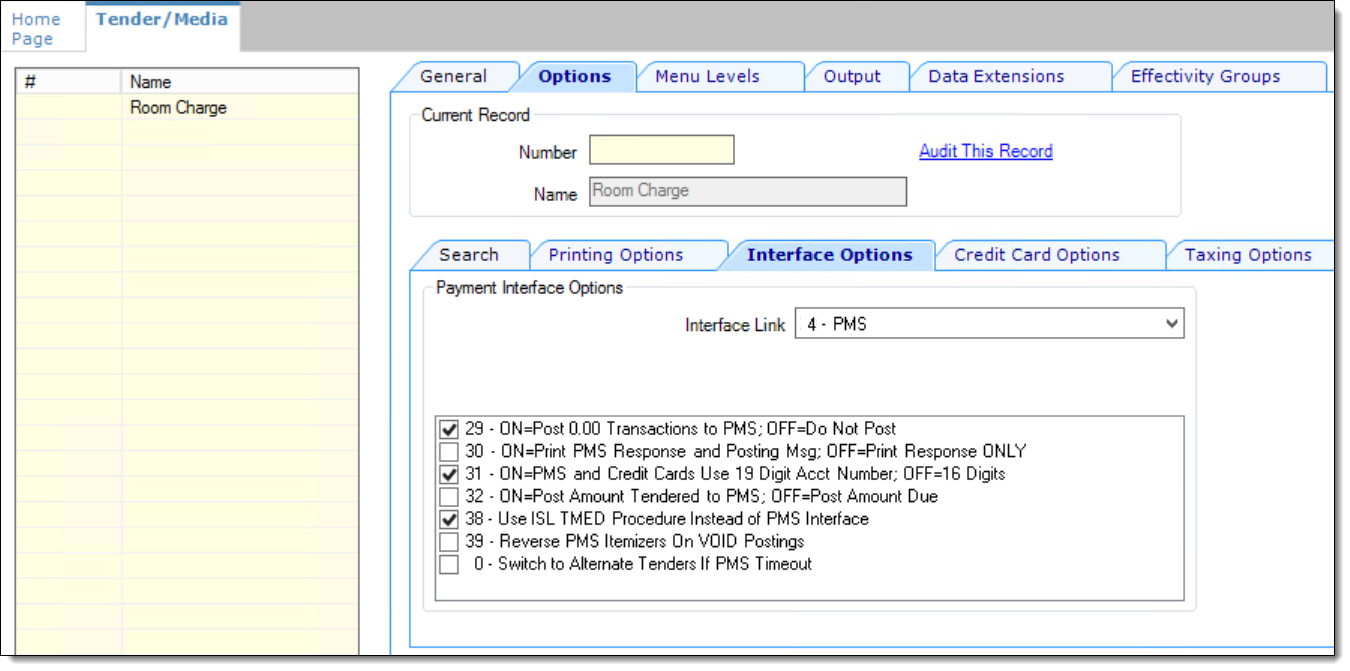
Click the Tender/Media Options tab, Interface Options tab, and then select PMS from the Interface Link drop-down list. The name of the interface link and the View Interface Names for RVC option are only available if the Tender/Media configuration has been performed at the Property level.
The following options must be enabled:
-
29 – ON=Post 0.00 Transactions to PMS; OFF=Do Not Post
-
31 – ON=PMS and Credit Cards Use 19 Digit Acct Number; OFF=16 Digits
-
38 - Use ISL TMED Procedure Instead of PMS Interface
Click the Ops Behavior tab and under the General Options section, ensure that the 5 - Reference Entry Required option is NOT enabled. Save all changes.
The Interface Link must be set for all of the payments that need to be auto-balanced (e.g., Cash, Credit Cards, etc.)
Figure 51-15 Tender/Media Room Charge Options
Enable the Room Charge Data Extensions Option
Click on the Data Extensions tab and select the check box under the Value column for the Enh.IFC – Room Charge.
Figure 51-16 Tender/Media Room Charge Data Extensions Tab
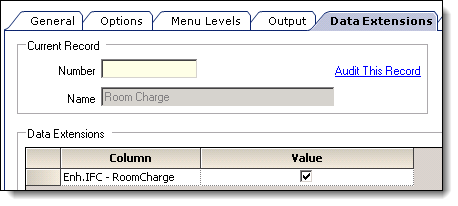
The Value check-box must be selected for the room charge tender media(s) (see above). Deselect the check-box for all of the other tender medias, but it should NOT be greyed out, as shown in the example screen capture below.
Figure 51-17 Undesired Tender/Media Data Extensions Example

Page Design
Navigate to the EMC, Configuration tab, under the User Interface section, click Page Design. Ensure that the previously reviewed Room Charge tender media is configured correctly on the payment tab/page (see sample below).
Figure 51-18 Page Design Module - Room Charge Payment Button
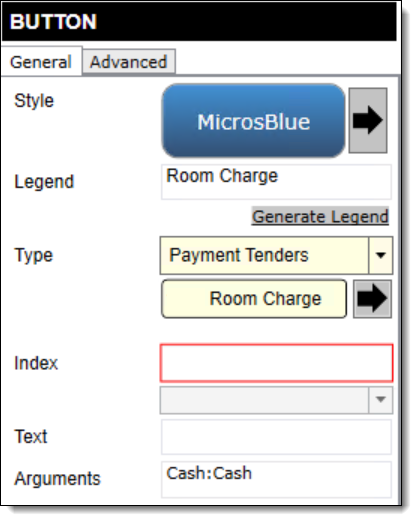
Add the inquire buttons on any required page/tab. Normally, the inquire buttons are created on the payment and/or function page/tab.
Figure 51-19 Page Design Module - Room Charge Inquire Button
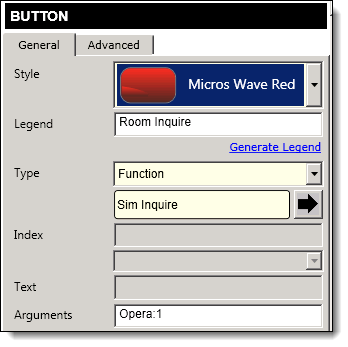
Inquiry Button Definitions
Configure potential room inquire buttons utilizing the definitions listed here:
-
Type: Function
-
Sim Inquire
-
Argument:<EXTENSION APPLICATION NAME>:<INQUIRY NUMBER>
Once the button configurations are completed, perform a full reload of all of the workstations and restart the service hosts!Table 51-3 Inquire Names and Numbers for Room Inquire Buttons
Inquire Inquire Number Room Inquire
1
Info Room Inquire
2
Short Inquire
5
Info Line Inquire
6
View Reservation Inquire
7
Extended Inquire
8
PMS Interface Information Inquire
911
Features and Revisions since the Release of Simphony version 2.70 and Higher
Itemizer 1
Service-Charge based on SVC Itemizer 1
See remark (1) below
2
Service-Charge based on SVC Itemizer 2
See remark (1) below
3
Service-Charge based on SVC Itemizer 3
See remark (1) below
4
Service-Charge based on SVC Itemizer 4
See remark (1) below
5
Service-Charge based on SVC Itemizer 5
See remark (1) below
6
Service-Charge based on SVC Itemizer 6
See remark (1) below
7
Service-Charge based on SVC Itemizer 7
See remark (1) below
8
Service-Charge based on SVC Itemizer 8
See remark (1) below
9
OPEN Amount Service-Charge with no SVC Itemizer enabled
See remark (2) below
10
PRESET Amount Service-Charge with no SVC Itemizer enabled
See remark (2) below
11
Stored Value Transaction Service Charge
Enable SVC Option 14 to ON
12
Non-Revenue Service Charge
Enable SVC Option 7 to ON
13
Charged Tip
14
Auto Service-Charge
Remark 1: Amount of any PERCENTAGE based Service-Charges based on the SVC Itemizer (1-8) and the Menu-Items present on the check. For AMOUNT based Service-Charge based on the FIRST active SVC Itemizer found (if any).
Remark 2: Only used with AMOUNT based Service-Charges with no SVC Itemizer enabled.
Note:
Enabling a more detailed breakdown of Service-Charges requires related changes on the PMS/IFC8 side. As such, coordinate any changes with the PMS team. -
Parent topic: Interfaces with Simphony