| Oracle® Application Integration Architecture Agile Product Lifecycle Management for Oracle E-Business Suite: Design to Release Install Guide Release 3.6 E88835-06 |
|

 Previous |
 Next |
| Oracle® Application Integration Architecture Agile Product Lifecycle Management for Oracle E-Business Suite: Design to Release Install Guide Release 3.6 E88835-06 |
|
Previous |
Next |
This chapter describes how to install and configure prerequisites.
The following items are required to be done before the install:
Preparing Two Database DBA Users
Installing the Server JDK
Installing Oracle Fusion Middleware Infrastructure
Installing Oracle SOA Suite
Running the Repository Creation Utility for RCU Schema
Running the Config Script to Create SOA Domain
Installing SCE Package
Extending the Created SOA Domain
Validating the Domain Extension
Configuring the SCE
Running the Post Install
The application server software for AgileToEbiz PIP 3.6 requires two schemas: one is RCU schema (see Running the Repository Creation Utility for RCU Schema) for creating SOA Domain, and another is PIP schema (see PIP Database Connect Details Screen for PIP Schema) for creating PIP related tables, so you need to prepare two database dba users.
The application server software for AgileToEbiz PIP 3.6 requires a 64-bit JDK be installed in order to perform the installation. Download and install a supported JDK from the downloads link on the Oracle Technology Network website.
The SOA Suite requires that Oracle Fusion Middleware Infrastructure, which includes Oracle WebLogic Server, be installed before installing the Oracle SOA Suite. The Oracle Fusion Middleware Infrastructure installer installs additional components including Java-required files, Oracle Web Services Manager, Oracle Enterprise Manager, and Oracle Platform Security Services.
|
Note: Oracle Fusion Middleware 12c Infrastructure version 12.2.1.1 can be downloaded by logging into Oracle Software Delivery Cloud (https://edelivery.oracle.com), searching with the term "Oracle Fusion Middleware 12c Infrastructure" and choosing "REL: Oracle Fusion Middleware 12c Infrastructure 12.2.1.1.0". |
To install the Oracle Fusion Middleware Infrastructure:
Download the Oracle Fusion Middleware 12c Infrastructure version 12.2.1.1 distribution to your machine and extract its contents.
Open a command window and set JAVA_HOME to the location of the previously installed JDK.
Run the following command: $JAVA_HOME\bin\java -jar fmw_12.2.1.1.0_infrastructure.jar
Click Next.
Type the path that you want to install the Oracle Fusion Middleware Infrastructure and make a note of this location because you will need it later during the installation.
Click Next on all panels until Installation Summary.
Click Finish to complete the installation.
The AgileToEbiz PIP 3.6 should be deployed on SOA Server, and SOA Server requires that Oracle Fusion Middleware Infrastructure 12.2.1.1, which includes Oracle WebLogic Server, be installed before installing the SOA Suite.
Copy the Oracle SOA Suite 12.2.1.1.0 (fmw_12.2.1.1.0_soa_quickstart.jar and fmw_ 12.2.1.1.0_soa_quickstart2.jar) files from the Agile Product Lifecycle Management Integration Pack for Oracle E-Business Suite Package to your machine.
Open a command window and set JAVA_HOME to the location of the previously installed JDK.
Run the following command: $JAVA_HOME\bin\java -jar fmw_12.2.1.1.0_soa_ quickstart.jar.
Click Next.
Type the path that you installed the Oracle Fusion Middleware Infrastructure and make a note of this location because you will need it later during the installation.
Click Next on all panels until Installation Summary.
Click Finish to complete the installation.
The Repository Creation Utility (RCU) creates database schemas required by Oracle Fusion Middleware Infrastructure. It must be run before creating the soa domain.
|
Note: Creating the SOA domain requires fresh RCU repository. If a previously installed environment is being reinstalled, then its associated RCU repository must be dropped and recreated before recreating SOA domain. |
To create the repository using RCU:
In a command window, change to the directory, $ORACLE_HOME\oracle_common\bin.
ORACLE_HOME is the location of the Oracle Fusion Middleware Infrastructure 12.2.1.1
Run the following commands for Windows and UNIX: Windows rcu.bat Linux: ./rcu
On the Welcome page, click Next.
On the Create Repository page, select System Load and Product Load and then click Next.
On the Database Connection Details page, enter the RCU database connection information, then click Next.
On the Select Components page, type a prefix for schemas that you want to create. You should consider setting the RCU schema prefix to the soa domain schema name so it is clear with which soa domain schema the RCU schemas are associated. Make a note of the schema prefix because they are needed during creating soa domain.
Select the following repository components under AS Common Schemas:
Common Infrastructure Services (selected by default)
User Messaging Services
Metadata Services
Weblogic Services
Oracle Platform Security Services
Audit Services Append
Audit Services
Audit Services Viewer
SOA Infrastructure
Click Next. On the Schema Passwords page, type the password that should be used for all schemas. You can also type different passwords for each schema.
Click Next.
A table of default and temp Tablespaces is displayed on the Map Tablespaces page.
Click Next.
Click Create to complete the RCU installation.
The config tool creates soa domain. It must be run before installing SCE package.
To Create the SOA Domain using config:
In a command window, change to the directory $ORACLE_HOME\oracle_common\common\bin.
ORACLE_HOME is the location of the Oracle Fusion Middleware Infrastructure 12.2.1.1
Run the following command for Windows and UNIX:
Windows: config.bat
Linux: ./config.sh
On the Welcome page, select Create a new domain, change the domain name to soa_domain by modify the location from base_domain to soa_domain, then click Next.
Select the following components under Available Templates:
Basic Weblogic Server Domain - 12.2.1.1.0 [wlserver]* (selected by default)
Oracle SOA Suite - 12.2.1.1.0 [soa]
Oracle Enterprise Manager - 12.2.1.1.0 [em]
Oracle WSM Policy Manager - 12.2.1.1 [oracle_common]
Oracle JRF - 12.2.1.1.0 [oracle_common]
Weblogic Coherence Cluster Extension - 12.2.1.1.0 [wlserver]
Click Next. Keep default for Application Location Page, then Click Next.
Type the password twice, then Click Next.
Change the Domain Mode to Production, then Click Next.
Type in the RCU Data which you created in above section, Click Get RCU Configuration button, make sure the connection is success, then Click Next.
Keep default for JDBC Component Schema, Click Next.
Wait for the JDBC Component Schema Test to complete, then Click Next.
Keep default for Keystore, Click Next.
Enable Administration Server, NodeManager and Topology in Advanced Configuration, then Click Next.
Update Listen Address to hostname, then Click Next.
Type in NodeManager Credentials: Username and Password, then Click Next.
Update Listen Address to hostname, then Click Next.
Click Next for Clusters Page.
Keep default for Coherence Cluster, Click Next.
Click Add button, switch to Unix Machine tab for Linux:
Optional: update the Name (for example: PIP)
Update Node Manager Listen Address to hostname
For Cluster environment:
On Machine tab, delete default machine
On Unix Machine tab, add two boxes, also set Node manager listen address to hostname, others left default
clusterhost1 ... clusterhost1
clusterhost2 ... clusterhost2
Click Next. Add AdminServer and soa_server1 to the created machine PIP.
For Cluster environment:
Assign AdminServer and soa_server1 to clusterhost1
Assign soa_server2 to clusterhost2
Keep default for Virtual Targets, Click Next.
Keep default for Partitions, Click Next.
Click Create to create the SOA domain.
To install the SCE Package:
Copy the SCE Package (d2r_home_installer_generic.jar) file from the Agile Product Lifecycle Management Integration Pack for Oracle E-Business Suite Package (V971125-01.zip) to your machine.
Install it into a new D2R Installation Directory (best practice is to put the D2R Installation Directory and ORACLE_HOME, ORACLE_HOME in the same location as Oracle Fusion Middleware Infrastructure 12.2.1.1).
Once installed, go to $D2R_HOME/comms_home/src/SCEApp and execute the file: SCEApp.sh
Provide the SOA Middleware home path (from Setup base middleware section). It will copy relevant files and complete.
|
Note: For windows environment, the zip files must be extracted manually first and then run the script to follow instructions. |
|
Note: For cluster setups the files must be moved manually to each host and the Middleware home must be updated accordingly. |
To extend the Created SOA Domain:
In a command window, change to the directory, $ORACLE_HOME\oracle_common\common\bin.
ORACLE_HOME is the location of the Oracle Fusion Middleware Infrastructure 12.2.1.1
Run the following commands for Windows and UNIX:
Windows: config.bat
Linux: ./config.sh
On the Welcome page, select Update an existing domain and select the soa_domain location, then click Next.
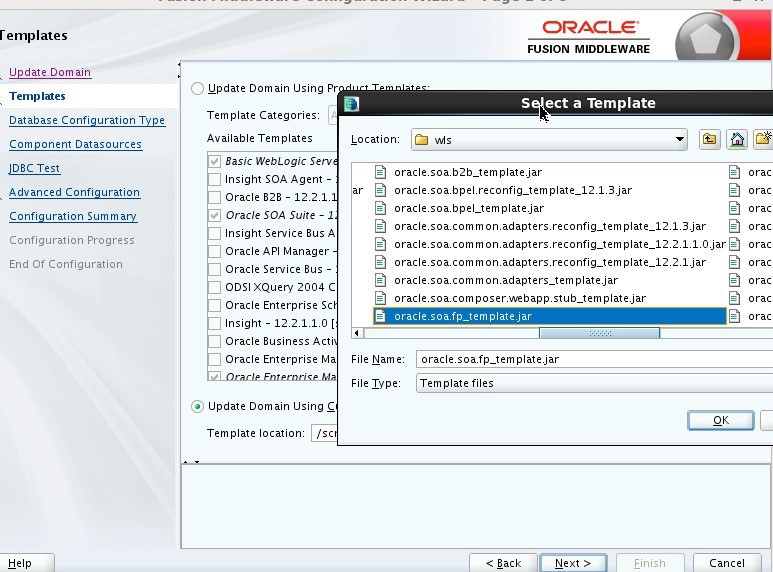
Select Update Domain Using Custom Template, then click Browse button.
Browse and select the jar oracle.soa.fp_template.jar from "$ORACLE_HOME /soa/common/templates/wls", then click Next.
Keep RCU schema information, Click Get RCU Configuration button, make sure the connection is success, then Click Next.
Keep default for Component Datasources, Click Next.
Click Next for the JDBC Test.
Enable Topology in Advanced Configuration, then Click Next.
Click Next for Managed Servers.
Click Next for Clusters.
Click Next for Coherence Clusters.
Click Next for Machines.
Click Next for Assign Servers to Machines.
Click Next for Virtual Targets.
Click Next for Partitions.
Click Update to update the SOA domain.
To setup an optional Secondary Server for a Cluster:
Go to primary server, cd /$CLUSTER_DOMAIN/bin
Start the Node Manager by triggering startNodeManager.sh/startNodeManager.bat
Start admin server by triggering startWeblogic.sh/startWeblogic.bat
Login Console http://clusterhost1:portnumber/console, go to Environment -> servers -> Control, start soa_server1.
Pack and unpack
Pack on primary server
./pack.sh -managed=true -domain=/$SOA_HOME/user_projects/domains/cluster_domain/ -template=soadomaintemplate.jar -template_name=soa_domain_template
Copy soa_domain_template.jar file from primary server to secondary server /$SOA_HOME/oracle_common/common/bin
Copy soa_domain_template.jar file from primary server to secondary server /$SOA_HOME/oracle_common/common/bin
./pack.sh -managed=true -domain=/$SOA_HOME/user_projects/domains/cluster_domain/ -template=soadomaintemplate.jar -template_name=soa_domain_template
Go to secondary server, cd /$CLUSTER_DOMAIN/bin
Start the Node Manager by triggering startNodeManager.sh/startNodeManager.bat
Start secondary server by triggering ./startManagedWebLogic.sh soa_server2 http://clusterhost1:portnumber/ or startManagedWebLogic.bat soa_server2 http://clusterhost1:portnumber/
To validate the Domain Extension:
Start the admin and soa servers.
Navigate to the Oracle Enterprise Manager Fusion Middleware Control (http://<server name>:<port number>/em/).
Click Target Navigation, expend SOA folder, click soa-infra.
Click Deployed Composites tab, the error handler related processes and reload process should be listed.
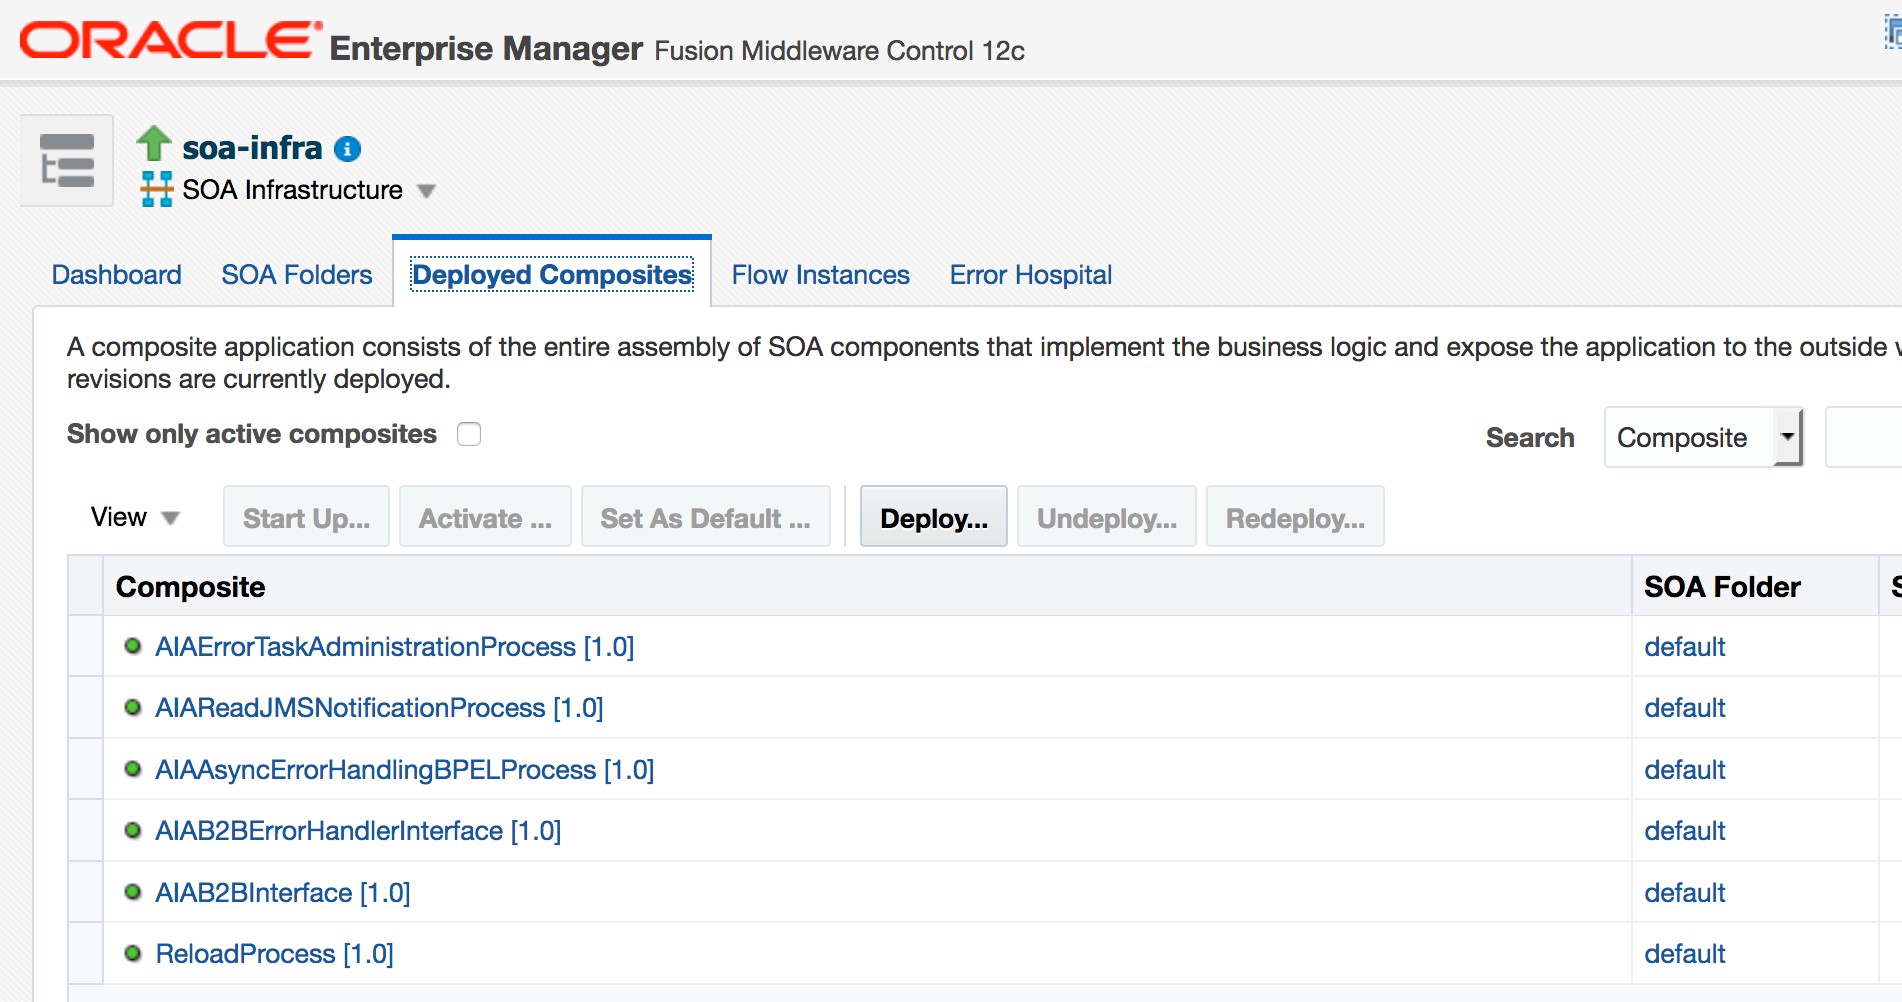
If those six composites are not been listed under the Deployed Composites tab, you need double check your previous steps, and make sure you follow each steps correctly.
Update the AIAInstallProperties.xml file, located in <DOMAIN_LOCATION>/soa/aia/bin as described in the following table
Table 2-1 AIAInstallProperties.xml file
| Field | Value |
|---|---|
|
sharedlocation |
Used in clustering environment. No need to update CLUSTER_ SHARED_LOCATION to your shared folder location. Installer will complete field. |
|
isencrypted |
Keep "false" value here. After post-install configuration, it will be updated to true. |
|
version |
SOA version |
|
adminhostname |
Hostname of Admin Server |
|
adminport |
Port of Admin Server |
|
domainname |
Domain Name of the SOA domain |
|
username |
User Name to log in to WebLogic Console and Enterprise Manager |
|
password |
Password for the user name. Keep "ADMIN_PASSWORD" value here. Post-install configuration script will ask for the password and write the encrypted password here. |
|
servertype |
In a clustered environment, enter Cluster. Otherwise enter Server, it is case sensitive. |
|
soaserver |
In a clustered environment, enter Cluster Name. Otherwise, enter Managed Server name. |
|
soaserverhostname |
In a clustered environment, enter HTTP Proxy hostname. Otherwise, enter Managed Server hostname. |
|
soaserverport |
In a clustered environment, enter HTTP Proxy Port. Otherwise, enter Managed Server port. |
|
The URL should be in the format: t3://<managed server hostname>:<managed server port>. In a clustered environment, add all managed servers delimited with ","; for example, t3://<managed server 1 hostname>:<managed server1 port>,<manabed server2 hostname>:<managed server2 port> |
Example 2-1 An example of a clustered environment
<?xml version="1.0" encoding="UTF-8"?>
<properties>
    <aiaDomain>
        <sharedlocation>CLUSTER_SHARED_LOCATION</sharedlocation>
        <isencrypted>false</isencrypted>
    </aiaDomain>
    <fp>
        <version>12.2.1.1.0</version>
        <server>
            <adminhostname>hostname.us.oracle.com</adminhostname>
            <adminport>7037</adminport>
            <domainname>soa_domain</domainname>
            <username>weblogic</username>
            <password>ADMIN_PASSWORD</password> <!--Do not edit this property.-->
            <servertype>Cluster</servertype>
            <soaserver>soa_cluster</soaserver>
            <soaserverhostname>hostname.us.oracle.com</soaserverhostname>
            <soaserverport>7777</soaserverport>
            <jndiurl>t3://hostname.us.oracle.com:8037,hostname2.us.oracle.com:8037</jndiurl>
        </server>
    </fp>
</properties>
Example 2-2 An example of a standalone environment
<?xml version="1.0" encoding="UTF-8"?>
<properties>
    <aiaDomain>
        <sharedlocation>CLUSTER_SHARED_LOCATION</sharedlocation>
        <isencrypted>false</isencrypted>
    </aiaDomain>
    <fp>
        <version>12.2.1.1.0</version>
        <server>
            <adminhostname>hostname.us.oracle.com</adminhostname>
            <adminport>7001</adminport>
            <domainname>soa_domain</domainname>
                <username>weblogic</username>
            <password>ADMIN_PASSWORD</password> <!--Do not edit this property.-->
            <servertype>Server</servertype>
            <soaserver>soa_server1</soaserver>
            <soaserverhostname>hostname.us.oracle.com</soaserverhostname>
            <soaserverport>7003</soaserverport>
            <jndiurl>t3://hostname.us.oracle.com:7003</jndiurl>
        </server>
    </fp>
</properties>
|
Note: Shared Location is a remote network position/container that can be set for NFS, Drive Mapping or another technology. Shared Location is needed for PIP clustering and should be configured before installation to assure successful installation and deployment. In each SOA machine, the path to the shared location must be the same, and also must be Readable and Writeable. |
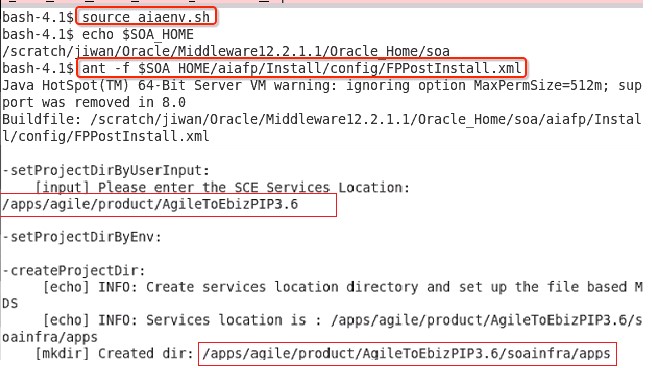
Run the following commands to create the AIA Home which will be used for installing AgileToEbiz PIP:
On Linux:
source <DOMAIN_LOCATION>/soa/aia/bin/aiaenv.sh
ant -f $SOA_HOME/aiafp/Install/config/FPPostInstall.xml
On Windows:
<DOMAIN_LOCATION>\soa\aia\bin\aiaenv.bat
ant -f %SOA_HOME%\aiafp\Install\config\FPPostInstall.xml
|
Note: You will be asked to set the SCE Services Location which is the same as AIA Home Path (eg: apps/agile/product/AgileToEbizPIP3.6). It will be used for AgileToEbiz PIP 3.6 installation.You will also be asked for the Admin User and Password. The script will be finished in minutes. It should be "BUILD SUCCESSFUL". |
