This section describes the Watch List Management functionality and gives step-by-step instructions for using it. The following topics are covered in this chapter:
· Accessing Watch List Management
This section covers the following topics:
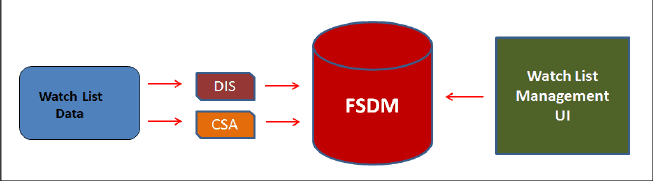
· Watch List Management Architecture
A Watch List is a list of entries that are known to have the same level of risk characteristics. Watch Lists can represent public sources or can be created and managed internally by the institution. Watch List data can originate from public sources. For example, the Office of Foreign Asset Control (OFAC) and Financial Action Task Force (FATF) or private sources like a client’s list of entities on which suspicious activity reports are filed.
Oracle Financial Services Watch List Management gathers risk metrics based on the processing of risk or trust values from client records during data ingestion. You can then use these risk metrics to find high-risk behaviors. Watch lists and their entries conform to types and characters that the Data Interface Specification (DIS) specifies; OFSBD audits all changes.
Public lists used by clients are huge, and can contain typographical errors. Without the Watch List Management UI, clients must accept these errors, or manually correct them each time the list is updated and transformed for delivery to Ingestion. Some clients established staging databases in which they applied corrections, managed internal lists, and transformed lists into the Oracle Financial Services DIS format.
The staging database process created the following limitations:
· Inefficient processing
· Increased complexity
· Increased cost for installation
· Requirement that clients review
The Watch List Management UI allows you to perform the following actions:
· Add new watch lists
· Add new watch list members to watch lists
· Modify watch lists
· Deactivate existing watch list members and watch lists
· Review recommended actions to approve or reject
The following figure depicts the architecture of Watch List Management.
Figure 1: Watch List Management Architecture
To access the Watch List Management page, follow these steps:
1. Navigate to the OFSAA Application page. For more information on how to navigate to the OFSAA Application, see Getting Started.
2. Select Financial Services Anti-Money Laundering. The Behavior Detection- Anti-Money Laundering page is displayed.
3. Click Watch List Management in RHS. The Watch List Management page is displayed.
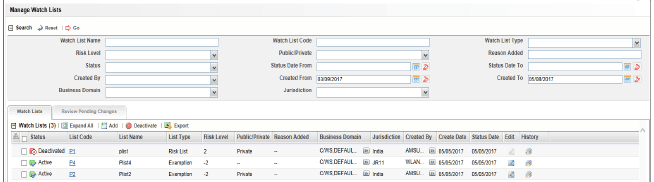
Figure 2: Watch List Management
This section explains how to add, modify, and deactivate watch lists.
The following sections describe how to manage watch lists:
· Accessing the Managing Watch Lists Page
To access the Manage Watch Lists page, follow these steps:
1. Navigate to the Watch Lists Management page. By default, The Manage Watch Lists Search and List page is displayed.
Or, hover over the Watch List Management main menu. Select the Manage Watch Lists submenu. The Manage Watch Lists Search and List page is displayed.
To add new watch lists, follow these steps:
1. Navigate to the Manage Watch Lists Search and List page. click the Add. The Add Watch List window is displayed.

Figure 3: Add Watch List window
2. Enter the following information in the appropriate fields.
Field |
Description |
|---|---|
Watch List Name |
Enter the name of the watch list you wish to add. |
Watch List Code |
Enter the unique, three character identifier for the watch list you wish to add. |
Watch List Type |
Select the type of watch list you wish to add from the drop-down list. The Watch List Type you select helps displayed your options in the Risk Level drop-down list. |
Risk Level |
Select the degree of risk associated with the watch list you wish to add from the drop-down list. The drop-down list is displayed with specific values based on your selection in the Watch List Type drop-down list. If you have selected the Watch List Type Trust or Exemption, the system automatically assigns a risk level -1 and -2 (respectively) to the watch list and you need not select a value. |
Public/Private |
Select whether the watch list you are adding is public or private from the drop-down list. |
Reason Added |
Enter the reason to add new watch list. |
Business Domain |
Select the business domain you wish to associate with the watch list from the drop-down list. You must be mapped to the business domain associated with the watch list to be able to view it on the UI. |
Jurisdiction |
Select the jurisdiction you wish to associate with the watch list from the drop-down list. You must be mapped to the jurisdiction associated with the watch list to be able to view it on the UI. |
Comments |
Enter appropriate comments for this watch list. |
3. Click Save. The following message is displayed:
Watch List will be created. Click OK to Save. Click Cancel to go back to the Add Watch List popup.
4. Click OK.
To modify existing watch lists which are in Active status, follow these steps.
1. Navigate to the Manage Watch Lists Search and List page.
2. Select a watch list you wish to modify. Click Edit. The Edit Watch List window is displayed.
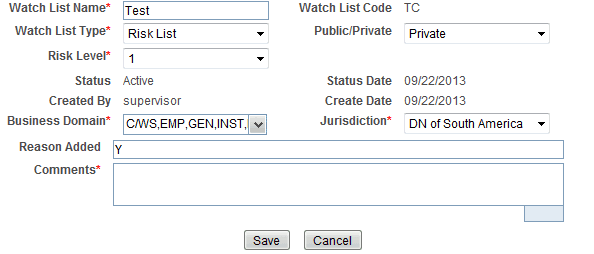
Figure 4: Edit Watch List window
3. Modify the necessary information in the appropriate field.
NOTE:
You cannot remove a business domain or jurisdiction that is currently linked with at least one watch list member associated with this watch list.
4. Click Save. The following message is displayed:
You have selected to edit this record. Click OK to continue and save changes.
5. Click OK.
This section describes how to deactivate one or more watch lists in Active status.
To deactivate a watch list all watch list members must be unlocked.
NOTE:
If you add watch list members to the deactivated watch list, the watch list members are also deactivated.
The Watch List Management Utility does not allow you to reactivate the deactivated watch lists. Therefore, you must perform the deactivation action carefully.
If you deactivate a watch list, any watch list members associated with that watch list will be deactivated.
To deactivate watch lists, follow these steps:
1. Navigate to the Manage Watch Lists Search and List page.
2. Select one or more watch lists. The status of the selected watch lists must be Active.
NOTE:
If you select a watch list which is already recommended for deactivation, the following message is displayed:
Pending watch lists (members) cannot be deactivated. Please select only active watch lists (members).
3. Click Deactivate. The Deactivate Watch List window displays.

Figure 5: Deactivate Watch List pop-up window
The Deactivate Watch List window lists the watch lists you have selected to deactivate.
4. Enter the justification for deactivating watch lists in the Comments field.
5. Click Save. The following message is displayed.
The following watch lists are being deactivated-konda. Click OK to Save. Click Cancel to go back to the Watch List Action popup.
6. Click OK.
To view watch list history, follow these steps:
1. Navigate to the Manage Watch Lists Search and List page.
2. Select a required watch list. Click History. The Watch List History window is displayed.

Figure 6: Watch List History window
The history of the watch list displays in ascending order, based on date and time the action is recorded. The following table describes the columns in the Watch List History window.
Column Name |
Description |
|---|---|
Action Name |
Displays the name of the action which was taken on the watch list. |
Date and Time |
Displays the date and time at which the action was taken. |
By |
Displays the name of the user who has taken the action on the. |
Status |
Displays the status of the watch list after the action was recorded. |
Watch List Name |
Displays the name of the watch list after the action was recorded. |
List Type |
Displays the list type associated with the watch list after the action was recorded. |
Risk Level |
Displays the risk level assigned to the watch list after the action was recorded. |
Public/Private |
Displays the whether the watch list was public or private after the action was recorded. |
Reason Added |
Displays the description of the watch list after the action was recorded. |
Comments |
Displays any user comments recorded with the action. |
Business Domain |
Displays the business domain associated with the watch list after the action was recorded. |
Jurisdiction |
Displays the jurisdiction associated with the watch list after the action was recorded. |
3. Click Close to close the Watch List History window.
The Manage Watch Lists Search section enables you to search for watch lists based on criteria that you provide within this search section. Drop-down lists and text boxes enable you to filter available watch lists more precisely for analysis. A blank value in a filter means that no specific value is selected. If the blank value is selected, it will have no impact on filter criteria.
The following fields are displayed:
· Created From: Displays today's date - 60 days
· Created To: Displays today's date.
If a search is performed with blank values in fields, then the results are displayed without applying filters on those fields. In particular, if a status is not specified, the system applies a set of underlying rules to the records returned in the results. Blank search is not supported. You need to enter one or more search criteria in order to execute a search.
To search watch lists, follow these steps:
1. Navigate to the Manage Watch Lists Search and List page.

Figure 7: Manage Watch Lists page
2. Enter the following information in the respective fields.
Field |
Description |
|---|---|
Watch List Name |
Enter the name of the watch list that you wish to search for. |
Watch List Code |
Enter the unique three-character identifier of the watch list that you wish to search for. |
Watch List Type |
Select the type of watch list you wish to search for from the drop-down list. |
Risk Level |
Select the degree of risk associated with the watch list from the drop-down list. |
Public/Private |
Select whether the watch list you are searching for is a public or private watch list. |
Reason Added |
Enter the description of the watch list you wish to search for. |
Status |
Displays current status of the watch list. There are four possible statuses: · Active · Deactivated · Pending · Rejected If you have access to view only Deactivated lists, this field will be blank. |
Status Date From |
Select the date range when the last status change took place. This drop-down list is populated with values based on your mapping to statuses in the database. |
Status Date To |
Select the date range when the last status change took place. This drop-down list is populated with values based on your mapping to statuses in the database. |
Created From |
Select a date range from which the watch list was created. By default, this field selects a date 60 days ago. |
Created To |
Select a date range during which the watch list was created. By default, this field selects today’s date. |
Created By |
Select the name of the watch list creator from the drop-down list of all users that have a role with permission to Add Lists and Watch List Members. |
Business Domain |
Select the business domain associated with the watch list. You must be mapped to the business domain that is associated with the watch list to be able to view it on the UI. |
Jurisdiction |
Select the jurisdiction associated with the watch list. You must be mapped to the jurisdiction that is associated with the watch list to be able to view it on the UI. |
3. Click Go. The relevant list of watch lists is displayed.
This section explains the search result of watch lists. Most of the column headings in the Watch Lists section are sortable. You will be able to sort each column by right-clicking on the column header and choosing ascending or descending options.
The column heading that is selected for the sorting option displays with an arrow beside it. The direction of the arrow indicates the sort order (ascending or descending). When you click a different column heading, the arrow displays beside that column with the direction indicating the sort direction. Oracle Financial Services Behavior Detection refreshes the list and re-sorts the watch lists display by that field, retaining the current list entries based upon the criteria you selected in the Watch List Search. If you click the same column heading again, Oracle Financial Services Behavior Detection sorts the column in the opposite direction.
The following table describes the columns in the Watch Lists section.
Column Name |
Description |
|---|---|
Status |
Displays the current status of the watch list and an icon that represents the status. The following statuses may display: · Pending · Rejected · Active · Deactivated |
List Code |
Lists the unique three-character identifier of the watch list as a hyperlink. Click the Watch List Code to view the Manage Watch List Members page, which displays all members associated with the selected watch list. Use the bread crumbs to navigate back to the Manage Watch Lists page. |
List Name |
Displays the name of the watch list. |
List Type |
Displays the type associated with the watch list. |
Risk Level |
Displays the degree of risk associated with members of the watch list. |
Public/Private |
Indicates the origin of the watch list: · Public: Indicator of a public source as the origin of the watch list. · Private: Indicator of a private source as the origin or watch list; that is, a list maintained by the Oracle client. · All: Indicator of both Public and Private sources of watch lists. |
Reason Added |
Displays the watch list description. |
Business Domain |
Displays the business domains associated with the watch list.You must be mapped to the business domain that is associated with the watch list to be able to view it on the UI. |
Jurisdiction |
Displays the jurisdictions associated with the watch list. You must be mapped to the jurisdiction that is associated with the watch list to be able to view it on the UI. |
Created By |
Name of the user who created the watch list. |
Create Date |
Date the watch list was created. |
Status Date |
The date when the status of this watch list was last updated. |
Edit |
Click the Edit button to open the Edit Watch Lists pop-up window and edit the watch list details. The Edit button is enabled only when you have access to edit and the list is not in Deactivated status. Deactivated lists cannot be edited. For more information, refer to Editing Watch Lists, on page 22,. |
History |
Click the History button to open the Watch Lists History pop-up window and view the watch list history. For more information, refer to Deactivating Watch Lists, on page 22,. |
This section explains how to add, deactivate, and search watch list members.
This section covers the following topics:
· Accessing the Watch List Members Page
· Deactivating a Watch List Member
· Viewing Watch List Member Details
· Searching Watch List Members
To access the Watch List Members page, follow these steps:
1. Navigate to the Watch List Management page.
2. Hover over Watch List Management main menu. Select the Watch List Members submenu. The Watch List Members Search and List page is displayed.
This section allows you to add new watch list members to the watch list.
NOTE:
If you add watch list members to the deactivated watch list, the watch list members are also deactivated.
To add a watch list member, follow these steps:
1. Navigate to the Watch List Members Search and List page.
2. Click Add. The Add Watch List Member window is displayed.

Figure 8: Add Watch List Member window
3. Enter the following information in the appropriate fields.
Field |
Description |
|---|---|
Watch List Code |
Select the unique identifier Watch List Code from the drop- down list. This is the watch list you wish to associate with this member. |
Watch List Name |
Displays the name of the watch list associated with this member. This field is pre-populated based on the Watch List Code. |
Watch List Type |
Displays the watch list type for the watch list associated with this member. This field is pre-populated based on the Watch List Code. |
Watch List Status |
Displays the status of the watch list associated with this member. This field is pre-populated based on the Watch List Code. |
Risk Level |
Displays the risk level of the watch list associated with this member. This field is pre-populated based on the Watch List Code. |
Public/Private |
Displays the whether the watch list associated with this member is public or private. This field is pre-populated based on the Watch List Code. |
Business Domain |
Displays the business domains associated with the watch list associated with this member. This field is pre-populated based on the Watch List Code. |
Jurisdiction |
Displays the jurisdiction associated with the watch list associated with this member. This field is pre-populated based on the Watch List Code. |
ID Type |
Select the type of entity represented by the member from the drop-down list. |
ID |
Enter the identifier or name of the member you wish to add. |
Source |
Select the source of the member from the drop-down list. |
Business Cluster |
Select the business cluster associated with the member you wish to add from the drop-down list. |
Reason Added |
Select the reason this member is being added from the drop-down list. |
Description |
Enter a description for this member. |
Comments |
Enter appropriate comments to add this member. |
Business Domain |
By default, this drop-down list is disabled and the Inherit Watch List Business Domains Check box is checked. This means that the watch list member inherits all domains assigned to the parent watch list (selected via the Watch List Code). Uncheck the Inherit Watch List Business Domains check box to enable the Domains drop-down list, which is populated with all domains assigned to the watch list. If a watch list has not been selected via the Watch List Code, then the Domains drop-down list is blank. Check the check box again to clear and disable the Domains drop-down list. |
Jurisdiction |
Displays jurisdiction associated with the watch list member. |
The values in the Business Cluster and Reason Added fields in the Add Watch List Member window displays based on the attribute values available in the Reference Table Detail table.
NOTE:
A watch list member must be associated with a watch list.
The following table describes the attribute values for these fields:
Business Table |
Business Field |
Code Set Identifier |
Instruction |
|---|---|---|---|
Watch List Entry |
Reason Added |
Watch List Entry Reason Added |
· Code 1: Code for the Reason Added · Code 2: not used · Code Description: Description of reason for creating the watch list entry. · Code Additional Information: not used |
Watch List Entry |
Source |
Watch List Entry Source |
· Code 1: Code for the Source · Code 2: not used · Code Description: Description of source of the watch list entry. · Code Additional Information: not used |
Watch List Entry |
Business Cluster |
Watch List Entry Business Cluster |
· Code 1: Code for the business cluster · Code 2: not used · Code Description: Description of business cluster of the watch list entry. · Code Additional Information: not used |
4. Click Save. The following message is displayed:
Watch List Member will be created. Click OK to Save. Click Cancel to go back to the Add Watch List popup.
5. Click OK.
This section guides how to deactivate watch list members. The Watch List Management option does not allow you to reactivate the deactivated watch list members.
To deactivate a watch list member, follow these steps:
1. Navigate to the Watch List Members Search and List page.
2. Select one or more watch list members. The status of the selected watch list members must be Active.
NOTE:
If you select a watch list member which is already recommended for deactivation by another user, the following message is displayed:
Pending watch lists (members) cannot be deactivated. Please select only active watch lists (members).
3. Click Deactivate. The Deactivate Watch List Member window is displayed.

Figure 9: Deactivate Watch List Member window
The Deactivate Watch List Member window lists the watch list members you have selected to deactivate.
4. Enter justification to deactivate watch list member in the Comments field.
5. Click Save. The following message is displayed. The following watch list members are being deactivated.Click OK to Save. Click Cancel to go back to the Watch List Member Action popup.
6. Click OK.
This section allows you to a view complete history of the Watch List Members details. To view member details, follow these steps:
1. Navigate to the Watch List Members Search and List page.
2. Click the Member ID of the member you wish to view details for. The Watch List Member Details and History window is displayed.
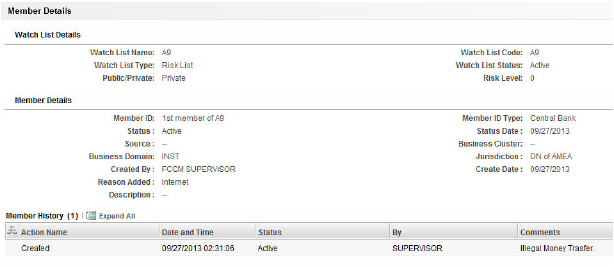
Figure 10: Watch List Member Details and History window
The following table describes the columns in the Watch List Member Details and History window.
Field Name |
Description |
|---|---|
Watch List Name |
Displays the watch list name. |
Watch List Code |
Displays the watch list unique identifier. |
Watch List Type |
Displays the type of watch list. |
Watch List Status |
Displays the status of watch list. |
Risk Level |
Displays the degree of Risk associated with the watch list. |
Public/Private |
Displays the public or private watch list. |
Status |
Displays the current status of this member. |
Status Date |
Last status change date for this member. |
Created By |
Displays the creator of the member. |
Create Date |
Displays the date the member was created. |
ID Type |
Displays the type of entity represented by the member. |
ID |
Displays the identifier or name of a member. The value for this field is automatically populated as the Entity Identifier 1 Text field in the Watch List Entry FSDM table. |
Source |
Displays the source of the member. |
Business Cluster |
Displays the business cluster associated with the member. |
Business Domain |
Displays the business domain(s) associated with the member. If the member is associated with more than one domain, the UI displays available business domains in alphabetical order. |
Jurisdiction |
Displays the jurisdiction associated with the member. |
Reason Added |
Displays the reason member was added. |
Description |
Displays the description of the watch list member. |
The Manage Watch List Members Search section enables you to search for watch list members based on criteria that you provide within this search section. Drop-down lists and text boxes enable you to filter available watch list members more precisely for analysis.
The following fields are displayed:
· Created From: Displays today's date - 60 days
· Created To: Displays today's date
To search watch list members, follow these steps:
1. Navigate to the Manage Watch List Members Search and List page.
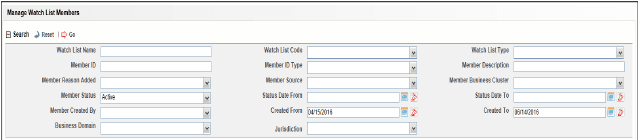
Figure 11: Manage Watch Lists page
2. Enter the following information in the respective fields.
Fields |
Description |
|---|---|
Watch List Name |
Enter the name of the watch list associated with the watch list member you wish to search for. |
Watch List Code |
Enter the unique, three character identifier of the watch list associated with the watch list member that you wish to search for. |
Watch List Type |
Select the type of watch list associated with the watch list member you wish to search for from the drop-down list. |
Member ID |
Enter the identifier or name of the member on the watch list. |
Member ID Type |
Select the type of entity represented by the member you wish to search for from the drop-down list. |
Member Description |
Enter a description for the watch list member. |
Member Reason Added |
Select the reason the member was added from the drop-down list. |
Member Source |
Select the source of the member you wish to search for from the drop-down list. |
Member Business Cluster |
Select the business cluster associated with the member you wish to search for from the drop-down list. |
Member Status |
Select the status of the watch list member you wish to search for from the drop-down list. There are four possible statuses: · Active · Deactivated · Pending · Rejected If you have access to view only Deactivated lists, this field will be blank. |
Status Date From |
Select the date range when the last status change took place. This drop-down list is populated with values based on your mapping to statuses in the database. |
Status Date To |
Select the date range when the last status change took place. This drop-down list is populated with values based on your mapping to statuses in the database. |
Member Created By |
Select the name of the user who created the watch list member you wish to search for in the drop-down list. |
Created From |
Select a date range from which the watch list member was created. By default, this field selects a date 60 days ago. |
Created To |
Select a date range during which the watch list member was created. By default, this field selects today’s date. |
Business Domain |
Select the business domain associated with the watch list member you wish to search for. You must be mapped to the business domain associated with the member to be able to view it on the UI. |
Jurisdiction |
Select the jurisdiction associated with the watch list member you wish to search for. You must be mapped to the jurisdiction associated with the member to be able to view it on the UI. |
3. Click Go. The relevant watch list members list is displayed.
This section describes the search result of watch list members. Most of the column headings in the Watch List Members section are sortable. You will be able to sort each column by right-clicking on the column header and choosing ascending or descending options.
The column heading that is selected for the sorting option displays with an arrow beside it. The direction of the arrow indicates the sort order (ascending or descending). When you click a different column heading, the arrow displays beside that column with the direction indicating the sort direction. Oracle Financial Services Behavior Detection refreshes the list and re-sorts the watch lists display by that field, retaining the current list entries based upon the criteria you selected in the Watch List Search. If you click the same column heading again, Oracle Financial Services Behavior Detection sorts the column in the opposite direction. The following table describes the columns in the Watch List Members section.
The following table describes the columns in the Watch List Members section.