| Oracle Agile Engineering Data Management Server Installation Guide on Windows and UNIX Release e6.2.1.0 E69109-02 |
|

 Previous |
 Next |
| Oracle Agile Engineering Data Management Server Installation Guide on Windows and UNIX Release e6.2.1.0 E69109-02 |
|
Previous |
Next |
|
Note: This chapter describes the manual installation of the Oracle Database 12c Release 1 (12.1.0.2) client. Keep in mind that on UNIX only the manual installation can be performed. For the automatic installation on a Windows operating system refer to the chapter Installation with the Agile e6 Installer. |
|
Note: If you have already installed Oracle database server on the same machine, please restart it before installing the Oracle database client. |
|
Note: The 32-bit Oracle client must be installed on the same machine where Agile e6.2.1.0 is installed. |
The first step of the installation is different for Windows and UNIX.
Windows
1. Run setup.exe from the downloaded Oracle Installation Media.
UNIX
1. Log in as the Oracle user and start the Oracle Universal Installer with the following command:
./runInstaller
The Select Installation Type screen is opened.
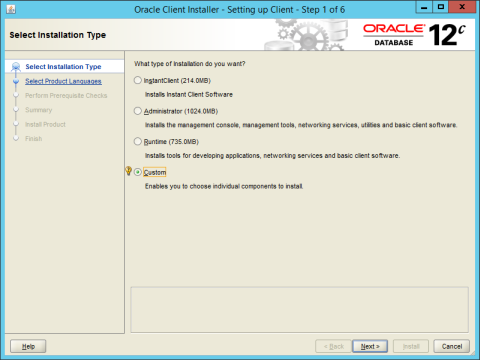
Select Custom and click Next.
The Download Software Updates screen is opened.
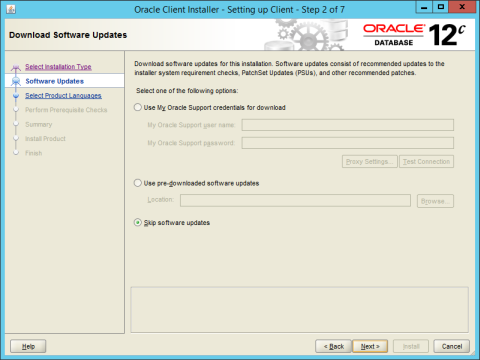
Select Skip software updates and click Next.
Skip software updates is the default selection.
The Select Product Languages screen is opened.

Select English as the product language and click Next.
The Specify Oracle Home User screen is opened.
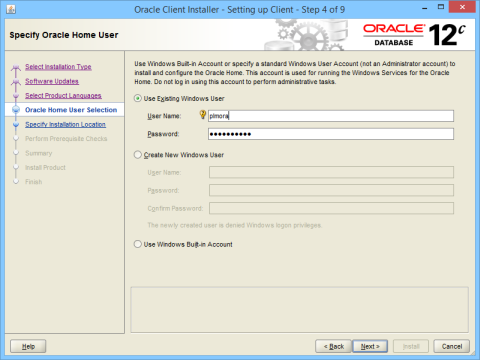
The Oracle home user is different from an Oracle installation user. The Oracle installation user is the user who requires administrative privileges to install Oracle products. The Oracle home user is used to run the Windows services for the Oracle home.
The Oracle home user can be the Windows built-in account or a Windows user account. For enhanced security, Oracle recommends that a standard Windows user account has to be chosen as the Oracle home user for a database client installation. If a Windows user account is used, it must be a standard Windows user account (not an administrator) and can be a local user, a domain user, or a managed services account.
Specify the Oracle home user and click Next.
The Specify Installation Location screen is opened.
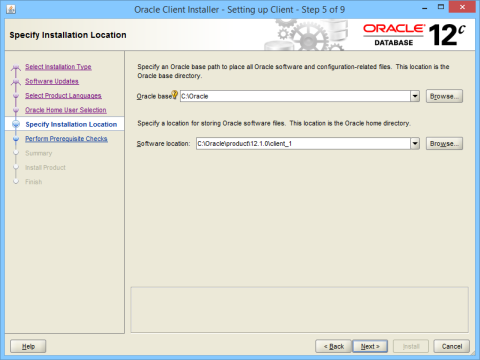
Specify the installation location for the Oracle base directory and the Oracle home directory.
Click Next.
If the Oracle base location is the same as the user home directory, the following warning message appears:
[INS-32008] Oracle base location can't be the same as the user home directory.
|
Note: If possible, avoid having the same directory for the Oracle Base and the Oracle home directory. |
If the selected Oracle home location is outside of Oracle base, the following warning message appears:
[INS-32018] The selected Oracle home is outside of Oracle base.
|
Note: If possible, avoid having the Oracle home outside of Oracle base. |
Click Yes to override the warning.
The Available Product Components screen is opened.
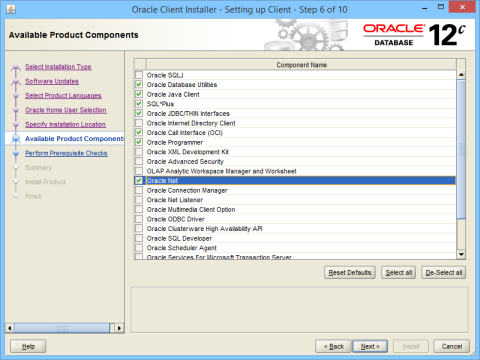
Select the following components to install (as shown in the screen above):
Oracle Database Utilities
Oracle Java Client
SQL*Plus
Oracle JDBC/THIN Interfaces
Oracle Call Interface (OCI)
Oracle Programmer
Oracle Net
Click Next.
The Perform Prerequisites Checks screen is opened, displaying the verification process.
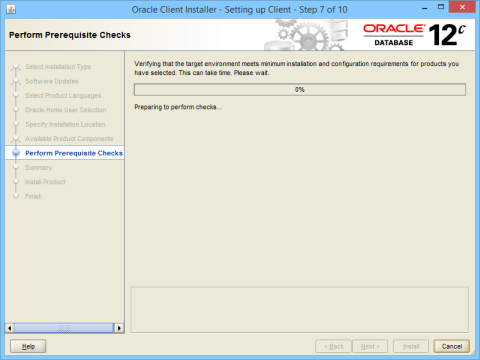
The Perform Prerequisite Checks screen verifies if your computer meets the minimum system requirements to install the desired product.
Upon completion of the checks, the installer displays the results for review.
If any of the requirements are not met, the installer displays a list of the failed checks and their actual and expected values.
|
Note: UNIX:The "Fix & Check Again" button and the function to create a fixup script will only appear on a UNIX operating system. You may click the Fix & Check Again button to generate a fixup script. The nodes on which the prerequisites failed are listed in the Execute Fixup Script window. You can run the fixup script as a root user to complete the required pre-installation steps. Using the fixup scripts does not ensure that all the prerequisites for installing the Oracle database are satisfied. You must still verify that all the pre-installation requirements are met to ensure a successful installation. |
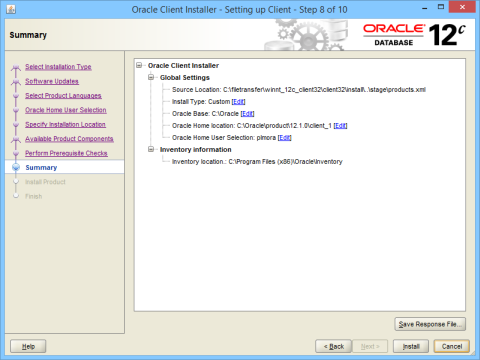
Upon completion, the Finish screen is opened.
Click Close to exit the Oracle Client Installer.
|
Note: The database client requires the following patch (32-bit) to be installed:- WINDOWS DB BUNDLE PATCH 12.1.0.2.170117 - 25115951 - UNIX Database Patch Set Update 12.1.0.2.170117 - 24732082 |
|
Note: Further information and instructions about these database client patches can be found in the respective Readme file from the Oracle Patches and Updates support website:- Windows: https://updates.oracle.com/Orion/Services/download?type=readme&aru=20996006 - UNIX example: https://updates.oracle.com/Orion/Services/download?type=readme&aru=21238448 |
Installation Example for Windows:
|
Note: You must use the OPatch utility version 12.1.0.1.2 or later to apply this patch. |
unzip p25115951_121020_WINNT.zip
 cd 25115951
 %ORACLE_HOME%\OPatch\opatch.bat apply
Installation Example for UNIX:
|
Note: Ensure that the Oracle home on which you are installing the patch, or from which you are rolling back the patch, is Oracle Database 12c Release 12.1.0.2.0. |
$ unzip -d <PATCH_TOP_DIR> p24732082_<121020_UNIX-SYSTEM>.zip
$ cd <PATCH_TOP_DIR>/24732082
$ $ORACLE_HOME/OPatch/opatch apply
