4 Interpreter Configuration and Connectivity

An interpreter is a program that directly executes instructions written in a programming or scripting language, without requiring them previously to be compiled into a machine language program. Interpreters are plug-ins, which enable users to use a specific language to process data in the back-end. Examples of Interpreters are, jdbc-interpreter, spark-interpreters, python-interpreters, and so on. Interpreters allow you to define customized drivers, URLs, passwords, connections, SQL result to display, and so on.

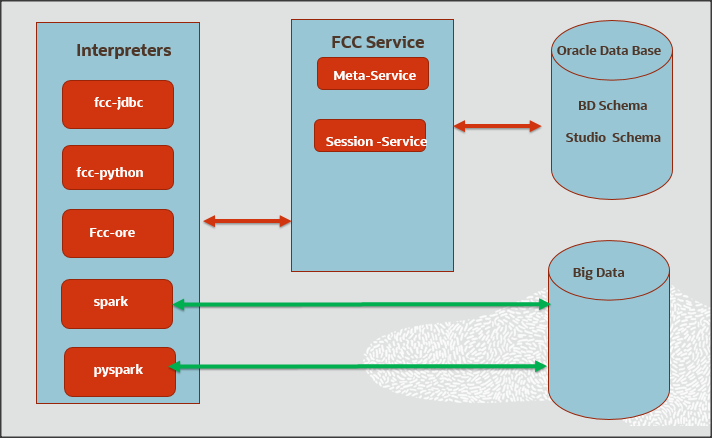
In FCC Studio, Interpreters are used in Notebooks to execute code in different languages. Each interpreter has a set of properties that are adjusted and applied across all notebooks. For example, by using the python-interpreter, it is possible to change between versions, whereas the jdbc-interpreter offers to customize the URL, schema, or credentials. In FCC Studio, you can either use a default interpreter variant or create a new variant for an interpreter. You can create more than one variant for an interpreter. The benefit of creating multiple variants for an Interpreter is to connect different versions of interpreters (Python ver:3, Python ver:2, and so on ), this helps to connect a different set of users, database schema. For example, FCC Studio schema, BD schema, and so on. FCC Studio provides secure and safe credential management such as Oracle Wallet (jdbc wallet) Password (jdbc password), or KeyStores to link to interpreter variants to access secured data.

The following image illustrates the examples of interpreters used in FCC Studio and database connections.

Topics:

·        Configure Interpreters 

·        Create a New Interpreter Variant 

·        Link Credentials

·        Create Credential

·        Create an Interpreter Variant

·        Modify the Python Docker Images

·        Configure Spark Query Parameters

Configure Interpreters

FCC Studio has ready-to-use interpreters such as fcc-jdbc, fcc-spark-scala Interpreter, fcc-python Interpreter, and so on. You can configure them based on the use case. Additional variants of interpreters are created as multiple users might require different settings to access the database securely. Interpreters such as fcc-jdbc and jdbc are linked using credentials to enable secure data access.

Interpreters are configured when you want to modify URL, data location, drivers, enable or disable connections, and so on.

To configure ready-to-use interpreters, follow these steps:   

1.       In the Crime & Compliance Studio menu list, click Interpreters. By default, the Interpreters page lists all the available interpreters.  

            interpreter_page.png 

2.      Click the interpreter that you want to view from the list displayed on the LHS. The default configured interpreter variant is displayed on the RHS.

3.      Modify the values in the fields as per requirement. For example, to modify the limit of a parameter, to connect to a different schema, PGX server, and so on.

4.     Click Update. The modified values are updated in the interpreter.

Table 2 lists the Ready-to-use interpreter in FCC Studio:

Table 2:   Ready-to-use Interpreters

Interpreters

Description

fcc-jdbc Interpreter

The fcc-jdbc Interpreter is a ready-to-use interpreter used to connect to Behavior Detection (BD) or Enterprise Case Management (ECM) atomic schema and is used for scenario notebooks.

The parameters are configured to connect to an ECM or BD schema.

NOTE: If it is used to connect to another schema, Virtual Private Database (VPD) must be configured. Alternatively, you can use jdbc interpreter.

In the fcc-jdbc Interpreter, you can configure the connection to pull or push data to the desired location, set the default jdbc authentication type, link credentials, and so on. To access addition access permissions for fcc-jdbc Interpreter, you can link with credentials too.

fcc-ore Interpreter 

The fcc-ore Interpreter is a ready-to-use interpreter used to connect to BD schema. This interpreter is used to write a notebook in R language (ORE: Oracle R Enterprise). Additional configuration is required and must be done as pre-requisite or post-installation with a manual update in the interpreter setting.

In the fcc-ore Interpreter, you can configure the Oracle system identifier (SID) of the database server to configure different databases, configure to display the output number of rows, set the hostname of the database server to connect the fcc-ore Interpreter, schema details, and so on.

fcc-pyspark Interpreter 

The fcc-pyspark Interpreter is a ready-to-use interpreter used to connect to Big data server from the livy server. After it is connected, you can write in the PySpark language to query and perform analytics on data present in big data.

In the fcc-pyspark Interpreter, you can configure the number of executors to launch for the current session, cached execution timeout, amount of memory to use for the executor process, and so on.    

fcc-python Interpreter

The fcc-python Interpreter is used to write Python code in a notebook to analyze data from different sources, machine learning, and artificial intelligence, and so on.

In the fcc-python Interpreter, you can configure the python installed path, set the maximum number of results that must be displayed, change the Python version, add Python Packages, and so on.

fcc-spark-scala Interpreter

The fcc-spark-scala Interpreter is a ready-to-use interpreter using the livy server to connect to the Big data server. It is used to perform analytics on data present in Big data using the Scala language.

In the fcc-spark-scala Interpreter, you can configure the number of executors to launch for the current session, set livy URL, configure keytab location, and so on.

fcc-spark-sql Interpreter 

The fcc-spark-sql Interpreter is a ready-to-use interpreter using the livy server to connect to the Big data cluster. It is used to perform analytics on data present in Hive schema using SQL queries.

In the fcc-spark-sql Interpreter, you can configure the number of executors to launch for the current session, data pull interval in milliseconds, and so on.

jdbc Interpreter 

The jdbc Interpreter is a ready-to-use interpreter used to connect to Studio schema. This interpreter is used to connect and write SQL queries on any schema without any restriction.

In the jdbc Interpreter, you can configure schema details, link Wallet Credentials to jdbc Interpreter, and so on.

md Interpreter 

The md Interpreter is used to configure the markdown parser type. This interpreter is used to display text based on Markdown, which is a lightweight markup language.

The connection is not applicable for this interpreter.

pgql Interpreter 

The pgql Interpreter is a ready-to-use interpreter used to connect to the configured PGX server. This interpreter is used to perform PGQL queries on the graph in FCC Studio.

In the pgql Interpreter, you can configure the class which implements the formatting of the visualization output, the size of the output message, and so on.

pgx-algorithm Interpreter 

The pgx-algorithm Interpreter is a ready-to-use interpreter used to connect to the configured PGX server. This interpreter is used to write the algorithm on the graph, and it is also used in pgx-java interpreter.

In the pgx-algorithm Interpreter, you can configure the class which implements the PGQL driver, the size of the output message, and so on.

pgx-java Interpreter 

The pgx-java Interpreter is a ready-to-use interpreter used to connect to the configured PGX server. This interpreter is used to write the algorithm on the graph and also used in the pgx-java interpreter.

Configure the class which implements the formatting of the visualization output, the class which implements the PGQL driver, and so on.

pyspark Interpreter 

The pyspark Interpreter connects to the big data environment by default. Users must write code for connection either in the Initialization section or in the notebook’s paragraph.

This interpreter is used to write the pyspark language to query and perform analytics on data present in big data. This requires additional configuration, which must be performed as prerequisite or as post-installation with the manual change of interpreter settings.

In the pyspark Interpreter, you can configure the Python binary executable to use for PySpark in both driver and workers, set true to use IPython, else set to false, and so on.

spark Interpreter

The spark Interpreter connects to the big data environment by default. Users must write for connection either in the Initialization section or in the notebook’s paragraph.  

This interpreter is used to perform analytics on data present in the big data clusters in the Scala language. This requires additional configuration, which must be performed as a prerequisite or as post-installation with the manual change of interpreter settings.  

In the spark interpreter, you can configure the cluster manager to connect, print the Read–eval–print loop (REPL) output, the total number of cores to use, and so on.


fcc-jdbc Interpreter

The fcc- jdbc is a ready-to-use Interpreter variant in FCC Studio that connects BD and ECM database schema and is used for scenario notebooks. The parameters are configured to connect different schemas. It filters results based on security attributes mapped to the user.

NOTE

 If it is used to connect to another schema, Virtual Private Database (VPD) must be configured. Alternatively, you can use the jdbc Interpreter.


In the fcc-jdbc Interpreter, you can configure the connection to pull or push data to the desired location, set the default jdbc authentication type, link credentials, and so on. To access additional access permissions for the fcc-jdbc Interpreter, you can link with credentials too.

Use this section to perform the following activities:

·        Configure a fcc-jdbc Interpreter Variant

·        Link Wallet Credentials to fcc-jdbc Interpreter

Configure a fcc-jdbc Interpreter Variant

To configure a fcc-jdbc Interpreter variant, follow these steps:

1.       On the Interpreter page LHS menu, select fcc-jdbc. The fcc-jdbc interpreter pane is displayed.

2.      Enter the following information in the fcc-jdbc Interpreter variant pane as tabulated in Table 3.

Table 3:   fcc-jdbc Interpreter Fields and Descriptions

Field

Description

pgx.baseUrl

Enter the PGX URL. This is the location where the data is pushed.

For example: http://<HOSTNAME>:7007

default.url

Enter the ofsaa jdbc URL.

For example:

jdbc:oracle:thin:@<database hostname>:<database port>:<SID>

and

jdbc:oracle:thin:@<database hostname>:<database port>/<Service Name>


NOTE:

If you want to use the Oracle Wallet credentials, you must enter the alias name in the following format:

jdbc:oracle:thin:@<alias_name>

zeppelin.jdbc.principal

Enter the principal name to load from the keytab. This variable is used if they are connecting to HIVE from the jdbc Interpreter.   

default.driver

Enter the default JDBC driver name.

For example: oracle.jdbc.driver.OracleDriver

default.completer.ttlInSeconds

Enter the time to live SQL completer in seconds (-1 to update every time, 0 to disable update)

default.password

Enter the default password.

NOTE:

This value can be null if you have entered the alias name in the default.url parameter for the fcc-jdbc interpreter.

default.splitQueries

Enter 'True' or False' to specify the presence of default split queries.    Each query is executed apart and returns the result.

default.completer.schemaFilters

Enter a comma-separated schema filter to get metadata for completions.

ofsaa.sessionservice.url

Enter the session service URL in this field.

For example: http://<HOSTNAME>:7047/sessionservice

 <HOSTNAME> refers to the server name or IP address where fcc-studio is installed.

default.user

Enter the name of the default user in this field.

For example, root.

zeppelin.jdbc.concurrent.max_connection

Enter the number of maximum connections allowed.

NOTE: This depends on the database settings.

ofsaa.metaservice.url

Enter the metaservice URL in this field.

For example, http://<HOSTNAME>:7045/metaservice

<HOSTNAME> refers to the server name or IP address where fcc-studio is installed.

common.max_count

Enter the maximum number of SQL result to display.

zeppelin.jdbc.auth.type

Enter the default JDBC authentication type.

zeppelin.jdbc.precode

Enter the snippet of code that executes after the initialization of the interpreter.

zeppelin.jdbc.concurrent.use

Enter to enable or disable concurrent use of JDBC connections. Enter 'True' or 'False'.

zeppelin.jdbc.keytab.location

Enter the keytab file location.

Link Wallet Credentials to fcc-jdbc Interpreter

FCC Studio provides secure and safe credential management. Examples for credentials are passwords, Oracle Wallets, or KeyStores.

Oracle Wallet is a file that stores database authentication and signing credentials. It allows users to securely access databases without providing credentials to third-party software, and easily connect to Oracle products.

A Keytab is a file containing pairs of Kerberos principals and encrypted keys (which are derived from the Kerberos password). You can use a keytab file to authenticate various remote systems using Kerberos without entering a password. However, when you change your Kerberos password, you must recreate all your keytab files.

Use this section to link credentials (a wallet or a password) to the fcc-jdbc interpreter variant to enable secure data access. This linking enables the fcc-jdbc interpreter to securely connect to the specified Oracle database. For more information to link Wallet Credentials to the fcc-jdbc Interpreter, see  Linking Credentials to Interpreters.

NOTE

The Credentials' section is enabled if an interpreter variant can accept credentials.


You can also create new credentials and link to the fcc-jdbc Interpreter. For more information, see Creating Credentials.

fcc-ore interpreter

The fcc- ore (ORE: Oracle R Enterprise) is a ready-to-use interpreter to connect to BD schema. This interpreter is used to write a notebook in R language, to perform R based analytics on data from database schema on the business table.

Additional configuration is required and must be done as a prerequisite or post-installation with a manual update in the interpreter setting. In the fcc-ore interpreter, you can configure the Oracle system identifier (SID) of the database server to connect the fcc-ore Interpreter, configure to the display the output number of rows, set the hostname of the database server to connect the fcc-ore interpreter, schema details, and so on.

To configure the fcc-ore interpreter variant, follow these steps:

1.       On the Interpreter page LHS menu, select fcc-ore. The fcc-ore interpreter pane is displayed.

2.      Enter the following information in the fcc-ore interpreter variant pane as tabulated in Table 4.

Table 4:   fcc-ore Interpreter fields and description

Field

Description

ore.sid

Enter the Oracle system identifier (SID) of the database server where the fcc-ore interpreter must be connected.  A SID is a unique name that uniquely identifies the database instance whereas a service name is the Database TNS Alias that is given when users remotely connect to the database.

rendering.row.limit

Enter the number of rows to be shown in the fcc-ore interpreter output. For example, 1000.

ore.conn_string

Enter the database connection URL with which the fcc-ore interpreter can make the connection to the schema.

NOTE: This is not a mandatory field.

https_proxy

Enter the proxy server to establish a connection with the internet.

For example, http://sample.proxy.com

ore.type

Enter the fcc-ore interpreter type as Oracle.

ore.password

Enter the schema password where the fcc-ore interpreter is connected.

libpath

Enter the custom library path from where R packages are installed via FCC Studio and added to R lib (library) path.

R packages are collections of functions and data sets.

Enter the library path of the home directory where FCC Studio is installed.

For example: If you want the packages to be available under /home/user/library, and FCC Studio is installed at /home/user/fccstudio, then mention /library as the lib path.

ore.host

Enter the hostname of the database server to connect with the fcc-ore interpreter.

rserve.password

Enter the Rserve password.

NOTE: Enter up to 255 characters.

RServe is an R package that allows other applications to talk to R using TCP/IP. It creates a socket server to which other applications can connect.

rendering.numeric.format

Enter the number of digits to round off.

For example, %.2f.

This displays the output. You can round off the digits in number after the decimal.

ore.service_name

Enter the service name of the database server to connect the fcc-ore interpreter.

rserve.try.wrap

Enter False.   

rserve.host

Enter the Rserve host. The Rserve is a TCP/IP server which allows other programs to use facilities of R from various languages without  initializing R or linking to the R library.

repo_cran

Enter the CRAN URL from where R libraries are downloaded to install R packages.

For example, https://cran.r-project.org/

The Comprehensive R Archive Network CRAN is a network of web servers around the world where you can find the R source code.

ofsaa.sessionservice.url

Enter the session service URL.

For example: http://<HOSTNAME>:7047/sessionservice

Here, <HOSTNAM> refers to the server name or IP address where fcc-studio is installed.

ore.all

Enter 'All' to sync all tables with the fcc-ore interpreter.

The value must be 'True'.

rserve.plain.qap.disabled

Enter whether plain QAP is disabled on the server or not. If disabled, the connection will be always attempted using SSL.

For example: 'False'.

ore.user

Enter the schema name where the fcc-ore interpreter is to be connected.

http_proxy

Enter the proxy server to establish a connection with the internet.  

This value is used to set the initial setting that makes the environment compatible to download the libraries available in R.

For example:http://sample.proxy.com

rserve.port

Enter the Rserve port.

rserve.secure.login

Enter 'True' to enforce a secure login.

rendering.knitr.options

Enter the Knitr output rendering option.

For example: out.format = 'html', comment = NA, echo = FALSE, results = 'verbatim', message = F, warning = F, dpi = 300

knitr is an engine for dynamic report generation with R. It is a package in the R programming language that enables integration of R code into LaTeX, LyX, HTML, Markdown, AsciiDoc, and reStructuredText documents.

rserve.user

Enter the Rserve username.

ore.port

Enter the port number of the database server to connect with the fcc-ore interpreter.

ofsaa.metaservice.url

Enter the metaservice URL.

For example: http://<HOSTNAME>:7045/metaservice

Here, <HOSTNAME> refers to the server name or IP address where fcc-studio is installed.

rendering.include.row.name

Specify whether to include row names.

Enter 'True' to include or 'False' to exclude.

rendering.knitr.image.width

Enter the image width specification for ore output.

For example, 60.

fcc-pyspark Interpreter

The fcc-pyspark Interpreter is a ready-to-use interpreter used to connect to Big data server from the livy server. After it is connected, you can write in the pyspark language to query and perform analytics on data present in the Big data. In the fcc-pyspark interpreter, you can configure the number of executors to launch for the current session, cached execution timeout, amount of memory to use for the executor process, and so on.     

To configure the fcc-pysprk interpreter variant, follow these steps:

1.       On the Interpreter page LHS menu, select fcc-pyspark. The fcc-pyspark interpreter pane is displayed.

2.      Enter the following information in the fcc-pyspark interpreter variant pane as tabulated in Table 5.

Table 5:   fcc-pyspark Interpreter fields and description

Field

Interpreter

pgx.baseUrl

Enter the PGX Base URL. This is the location where the data is pushed.

For example, http://##HOSTNAME##:7007

livy.spark.executor.instances

Enter the number of executors to launch for the current session. For example, Executor instances can be 1, 4, and so on.

livy.spark.dynamicAllocation.cachedExecutorIdleTimeout

Enter the cached execution timeout in seconds. Remove an executor that has cached data blocks.

zeppelin.livy.url

Enter the Livy URL. The Livy is an interface between Data Studio and Spark. This is the URL where the livy server is running.

For example, http://<hostname>:<port>

zeppelin.livy.pull_status.interval.millis

Enter the data pull interval in milliseconds. This is the interval for checking paragraph execution status.

livy.spark.executor.memory

Enter the amount of memory to use for the executor process.   Executor memory per worker instance. For example,  512m, 32g.

livy.spark.dynamicAllocation.enabled

Specify whether the dynamic allocation is enabled or not. Enter 'True' to enable or 'False' to disable.

livy.spark.dynamicAllocation.minExecutors

Enter the minimum number of required dynamic allocation executors. It is the lower bound for the number of executors.

livy.spark.executor.cores

Enter the number of executor cores to use for the driver process. This is the number of cores per executor. For example, 1, 4, and so on.

zeppelin.livy.session.create_timeout

Enter the Zeppelin session creation timeout in seconds. This is the timeout in seconds for session creation.

zeppelin.livy.spark.sql.maxResult

Enter the maximum number of results that must be displayed.

livy.spark.jars.packages

Enter to add extra libraries to a livy interpreter.  

livy.spark.driver.cores

Enter the number of driver cores to use for the driver process.

zeppelin.livy.displayAppInfo

Specify whether the application information must be displayed or not. Enter “True” or “False”.

livy.spark.driver.memory

Enter the amount of memory to use for the driver process.   

zeppelin.livy.principal

Enter the principal name to load from the keytab file.

ofsaa.sessionservice.url

Enter the session service URL in this field.

For example, http://##HOSTNAME##:7047/sessionservice

Here, ##HOSTNAME## refers to the server name or IP address where fcc-studio is installed.

ofsaa.metaservice.url

Enter the metaservice URL in this field.

For example, http://##HOSTNAME##:7045/metaservice

Here, ##HOSTNAME## refers to the server name or IP address  where fcc-studio is installed.

zeppelin.livy.keytab

Enter the keytab file location.

livy.spark.dynamicAllocation.maxExecutors

Enter the maximum number of required dynamic allocation executors.

fcc-python Interpreter

The fcc-python interpreter is used to write Python code in a notebook to analyze data from different sources, machine learning, and artificial intelligence, and so on. In the fcc-python interpreter, you can configure the python installed path, set the maximum number of results that must be displayed, change the Python version, add Python Packages, and so on. When FCC Studio stops supporting any of the outdated Python versions, you can add or change the Python version. For example, Python 3.6.0, Python 3.6.6, Python 3.6.7, and so on.

Topics:

·        Configure an fcc-python Interpreter

·        Change Python Version in the fcc-python Interpreter

·        Add or Modify Python Packages to the fcc-python Interpreter

Configure an fcc-python Interpreter

To configure an fcc-python interpreter variant, follow these steps:

1.       On the Interpreter page LHS menu, select fcc-python. The fcc-python interpreter pane is displayed.

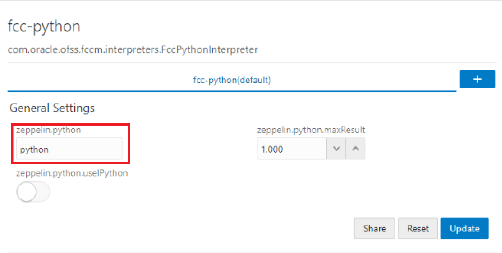
2.      Enter the following information in the fcc-python interpreter variant pane as tabulated in Table 6.

Table 6:   fcc-python Interpreter fields and description

Field

Description

zeppelin.python

Enter the Python installed path. The value points to the default Python version set for the interpreter.

NOTE:

To use a different Python version, see Changing Python Version in the fcc-python Interpreter

zeppelin.python.useIPython

Set to 'True' to use IPython, else set to 'False'.

zeppelin.python.maxResult

Enter the maximum number of results that must be displayed.

Change Python Version in the fcc-python Interpreter   

In the fcc-python interpreter, the Linux console uses the default python version in. /user/fccstudio/python_user/bin/python as value. If you want to modify the python version, either you can create an interpreter variant or modify the existing python version in the same interpreter variant.

NOTE

Python2 is the default version used in the Linux console and it is no more supported. Hence, you can use any version of python3 or any virtual environment with a specific python version or a specific version of python packages.


To use a different version of Python, follow these steps:

1.       Navigate to the fcc-python Interpreter Settings page.

2.      Change the default Python version in the zeppelin.python parameter to the new version. For example, python3.6.

fcc_python.png 


Create a new interpreter variant and configure the version in the zeppelin.python parameter. For information on creating a new interpreter variant, see Creating a New Interpreter Variant. For example, to use Python 3.6, create a new fcc-python interpreter variant and enter the value as python3.6.

Add or Modify Python Packages to the fcc-python Interpreter

When a user wants to write something in Python but the packages are not present. Use case: ML or AI code. By default, the Linux server (or docker image) has a limited number of packages present inside it.

To add desired Python packages to the fcc-python interpreter, follow these steps:

·        For FCC Studio installed on-premise:

To add or modify Python libraries to the fcc-python interpreter, contact System Administrator to install the required additional Python libraries on the Processing Server (Studio Notebook Server). The newly added Python libraries must be accessible to the Linux user for FCC Studio.

To add the python packages for python3, follow these steps:

1.       Navigate to the <Studio_Installation_Path>/python-packages/bin directory.

2.      Execute the following command:

python3 -m pip install <package name> --user

·        For FCC Studio installed using Kubernetes:

To install additional Python libraries to the fcc-python interpreter, see  Modify the Python Images for the Python Interpreter.

fcc-spark-scala Interpreter

fcc-spark-scala Interpreter is a ready-to-use interpreter using the livy server to connect to the Big data server. It is used to perform analytics on data present in Big data using the Scala language. fcc-spark-scala interpreter does not connect to any schema by default. Users must write code for connection either in the Initialization section or in the notebook’s paragraph. In the fcc-spark-scala interpreter, you can configure the number of executors to launch for the current session, set the Livy URL, and configure keytab location, and so on.

To configure the fcc-spark-scala interpreter variant, follow these steps:

1.       On the Interpreter page LHS menu, select fcc-spark-scala. The fcc-spark-scala interpreter pane is displayed.

2.      Enter the following information in the fcc-spark-scala interpreter variant pane as tabulated in Table 7.

Table 7:   fcc-spark-scala Interpreter fields and description
   

Field

Description

pgx.baseUrl

Enter the PGX Base URL. This is the location where the data is pushed.

For example, http://<HOSTNAME>:7007

livy.spark.executor.instances

Enter the number of executors to launch for the current session. For example, executor instances 1, 4, and so on.

livy.spark.dynamicAllocation.cachedExecutorIdleTimeout

Enter the cached execution timeout in seconds.

zeppelin.livy.url

Enter the Livy URL in this field. Livy is an interface between Data Studio and Spark.

For example: http://<hostname>:<port>

zeppelin.livy.pull_status.interval.millis

Enter the data pull interval in milliseconds. This is the interval for checking paragraph execution status.

livy.spark.executor.memory

Enter the amount of memory to use for the executor process.   

Executor memory per worker instance. For example,  512m and 32g.

livy.spark.dynamicAllocation.enabled

Specify whether the dynamic allocation is enabled or not. Enter 'True' to enable or 'False' to disable.

livy.spark.dynamicAllocation.minExecutors

Enter the minimum number of required dynamic allocation executors. It is the lower

bound for the number of executors.

livy.spark.executor.cores

Enter the number of executor cores to use for the driver process. This is the number

of cores per executor. For example, 1, 4, and so on.

zeppelin.livy.session.create_timeout

Enter the Zeppelin session creation the timeout in seconds. This is the timeout in seconds

for session creation.

zeppelin.livy.spark.sql.maxResult

Enter the maximum number of results that must be displayed.

livy.spark.jars.packages

Enter to add extra libraries to the livy interpreter.

livy.spark.driver.cores

Enter the number of driver cores to use for the driver process.

zeppelin.livy.displayAppInfo

Specify whether the application information must be displayed or not. Enter 'True' to display

or 'False' not to display.

livy.spark.driver.memory

Enter the amount of memory to use for the driver process.   

zeppelin.livy.principal

Enter the principal name to load from the keytab file.

ofsaa.sessionservice.url

Enter the session service URL in this field.

For example, http://<HOSTNAME>:7047/sessionservice

Here, <HOSTNAME> refers to the server name or IP where fcc-studio is installed.

ofsaa.metaservice.url

Enter the metaservice URL in this field.

For example, http://<HOSTNAME>:7045/metaservice

Here, <HOSTNAME> refers to the server name or IP address where fcc-studio is installed.

zeppelin.livy.keytab

Enter the keytab file location.

livy.spark.dynamicAllocation.maxExecutors

Enter the maximum number of required dynamic allocation executors.

livy.spark.dynamicAllocation.initialExecutors

Enter the initial dynamic allocation executors.

fcc-spark-sql Interpreter

The fcc-spark-sql Interpreter is a ready-to-use interpreter uses livy server to connect Big data cluster. It is used to perform analytics on data present in Hive schema using Hive queries. In the fcc-spark-sql interpreter, you can configure the number of executors to launch for the current session, data pull interval in milliseconds, and so on.

To configure the fcc-sprk-sql interpreter variant, follow these steps:

1.       On the Interpreter page LHS menu, select fcc-sprk-sql. The fcc-sprk-sql interpreter pane is displayed.

2.      Enter the following information in the fcc-sprk-sql interpreter variant pane as tabulated in Table 8.

Table 8:   fcc-spark-sql Interpreter fields and description

Field

Description

pgx.baseUrl

Enter the PGX Base URL. This is the location where the data is pushed.

For example: http://<HOSTNAME>:7007

livy.spark.executor.instances

Enter the number of executors to launch for the current session. For example, Executor

instances can be 1, 4. and so on.

livy.spark.dynamicAllocation.cachedExecutorIdleTimeout

Enter the cached execution timeout in seconds.

zeppelin.livy.url

Enter the Livy URL. The Livy is an interface between Data Studio and Spark.

For example: http://<HOSTNAME>:8998

zeppelin.livy.pull_status.interval.millis

Enter the data pull interval in milliseconds. This is the interval for checking paragraph execution status.

livy.spark.executor.memory

Enter the amount of memory to use for the executor process.   

Executor memory per worker instance. For example, 512m and 32g.

livy.spark.dynamicAllocation.enabled

Specify whether the dynamic allocation is enabled or not. Enter 'True' to enable or 'False' to disable.

livy.spark.dynamicAllocation.minExecutors

Enter the minimum number of required dynamic allocation executors. It is the lower

bound for the number of executors.

livy.spark.executor.cores

Enter the number of executor cores to use for the driver process.

zeppelin.livy.session.create_timeout

Enter the Zeppelin session creation timeout in seconds.

zeppelin.livy.spark.sql.maxResult

Enter the maximum number of results that must be fetched.

zeppelin.livy.spark.sql.field.truncate

Specify to truncate values longer than 20 characters. Enter 'True' or 'False.

livy.spark.jars.packages

Enter to add extra libraries to a livy interpreter.

livy.spark.driver.cores

Enter the number of driver cores to use for the driver process.

zeppelin.livy.displayAppInfo

Specify whether the application information must be displayed. Enter 'True' to display or 'False' to not to display.

livy.spark.driver.memory

Enter the amount of memory to use for the driver process.   

zeppelin.livy.principal

Enter the principal name to lead from the keytab file.

ofsaa.sessionservice.url

Enter the session service URL in this field.

For example: http://<HOSTNAME>:7047/sessionservice

Here, <HOSTNAME> refers to the server name or IP address where fcc-studio will be installed.

ofsaa.metaservice.url

Enter the metaservice URL in this field.

For example: http://<HOSTNAME>:7045/metaservice

Here, <HOSTNAME> refers to the server name or IP address where fcc-studio will be installed.

zeppelin.livy.keytab

Enter the keytab file location.

livy.spark.dynamicAllocation.maxExecutors

Enter the maximum number of required dynamic allocation executors.

jdbc Interpreter

The jdbc Interpreter is a ready-to-use interpreter used to connect Studio schema without OFSAA. This interpreter is used to connect and write SQL queries on any schema without any restriction. The jdbc interpreter has no security attributes, it can be used to access any schema. In jdbc interpreter, you can configure schema details, link Wallet Credentials to the jdbc Interpreter, and so on.

Topics:

·        Configure jdbc Interpreter Variant

·        Link Wallet Credentials to jdbc Interpreter

Configure a  jdbc Interpreter Variant

To configure a jdbc interpreter variant, follow these steps:

1.       On the Interpreter page LHS menu, select jdbc. The jdbc interpreter pane is displayed.

2.      Enter the following information in the jdbc interpreter variant pane as tabulated in Table 9.

Table 9:   jdbc Interpreter fields and description

Field

Description

pgx.baseUrl

Enter the PGX Base URL. This is the location where the data is pushed.

For example, http://<HOSTNAME>:7007

default.url

Enter the jdbc URL.

NOTE:

If you want to use the Oracle wallet credentials, you must enter the alias name in the following format:

jdbc:oracle:thin:@<alias_name>

zeppelin.jdbc.principal

Enter the principal name to load from the keytab file.

default.driver

Enter the default JDBC driver name.

default.completer.ttlInSeconds

Enter the time to live SQL completer in seconds.

default.password

Enter the default password.

NOTE:

This value can be null if you have entered the alias name in the default.url parameter for the jdbc interpreter.

default.splitQueries

Each query is executed apart and returns the result.

Specify the presence of default split queries. Enter 'True' to split or 'False' not to.

default.completer.schemaFilters

Enter comma-separated schema filters to get metadata for completions.

ofsaa.sessionservice.url

Enter the session service URL.

For example, http://<HOSTNAME>:7047/sessionservice

Here, <HOSTNAME> refers to the server name or IP address where fcc-studio is installed.

default.user

Enter the name of the default user.

zeppelin.jdbc.concurrent.max_connection

Enter the number of maximum connections allowed.

ofsaa.metaservice.url

Enter the metaservice URL.

For example, http://<HOSTNAME>:7045/metaservice

Here, <HOSTNAME> refers to the server name or IP address where fcc-studio is installed.

common.max_count

Enter the maximum number of SQL result to display.

zeppelin.jdbc.auth.type

Enter the default JDBC authentication type. The authentication methods supported are SIMPLE and KERBEROS

zeppelin.jdbc.precode

Enter the snippet of code that executes after the initialization of the interpreter.

zeppelin.jdbc.concurrent.use

Specify concurrent use of JDBC connections. Enter 'True' to enable or 'False' to disable.

zeppelin.jdbc.keytab.location

Enter the keytab file location.

Link Wallet Credentials to jdbc Interpreter

FCC Studio provides secure and safe credential management. Examples for credentials are passwords, Oracle Wallets, or KeyStores. Use this section to link credentials (a wallet and a password) to jdbc interpreter variant to enable secure data access. This linking enables the jdbc interpreter to securely connect to the specified Oracle database. For more information to link Wallet Credentials to jdbc Interpreter, see  Link Credentials.

NOTE

The Credentials' section is enabled if an interpreter variant can accept credentials.


You can also create new credentials and link to jdbc Interpreter. For more information, see Create Credentials.

md Interpreter

This interpreter is used to display text based on Markdown, which is a lightweight markup language. In the md interpreter, you can configure the markdown parser type. Markdown (md) is a plain text formatting syntax designed so that it can be converted to HTML. Use this section to configure the markdown parser type.

To configure the md interpreter variant, follow these steps:

1.       On the md Interpreter page LHS menu, select md. The md interpreter pane is displayed.

2.      Enter the markdown parser type and click Update. To confirm the modified configuration.

pgql Interpreter

The pgql Interpreter is a ready-to-use interpreter used to connect the configured PGX server. This interpreter is used to perform queries on the graph in FCC Studio. In the pgql Interpreter, you can configure the class which implements the formatting of the visualization the output, the size of the output message, and so on.

PGQL is a graph query language built on top of SQL, bringing graph pattern matching capabilities to existing SQL users and to new users who are interested in graph technology but who do not have an SQL background.

To configure the pgql interpreter variant, follow these steps:

1.       On the Interpreter page LHS menu, select pgql. The pgql interpreter pane is displayed.

2.      Enter the following information in the pgql interpreter variant pane as tabulated in Table 10.

Table 10:   pgql Interpreter fields and description

Field

Description

graphviz.formatter.class

Enter the class which implements the formatting of the visualization output.

For example,

oracle.datastudio.graphviz.formatter.DataStudioFormatter

graphviz.driver.class

Enter the class which implements the PGQL driver.

For example:

oracle.pgx.graphviz.driver.PgxDriver

base_url

Enter the base URL of the PGX.

For example, http://<HOSTNAME>:7007

zeppelin.interpreter.output.limit

Enter the output message limit. Any message that exceeds the limit is truncated.

For example, 102 or 400.

pgx-algorithm Interpreter

The pgx-algorithm Interpreter is a ready-to-use interpreter used to connect to the configured PGX server. This interpreter is used to write an algorithm on the graph, and it is also used in the pgx-java interpreter. In the pgx-algorithm Interpreter, you can configure the class which implements the PGQL driver, the size of the output message, and so on.

To configure pgx-algorithm interpreter variant, follow these steps:

1.       On the Interpreter page LHS menu, select pgx-algorithm. The pgx-algorithm interpreter pane is displayed.

2.      Enter the following information in the pgx-algorithm interpreter variant pane as tabulated in Table 11.

Table 11:   pgx-algorithm Interpreter fields and description

Field

Description


graphviz.formatter.class


Enter the class which implements the formatting of the visualization output.

For example,

oracle.datastudio.graphviz.formatter.DataStudioFormatter

graphviz.driver.class

Enter the class which implements the PGQL driver.

For example,

oracle.pgx.graphviz.driver.PgxDriver

base_url

Enter the base URL of the PGX server.

pgx-java Interpreter

The pgx-java Interpreter is a ready-to-use interpreter used to connect to the configured PGX server. This interpreter is used to write an algorithm on the graph and also used in the pgx-java interpreter. In the pgx-java Interpreter, you can configure the class which implements the formatting of the visualization output, the class which implements the PGQL driver, and so on.

PGX-java interpreter is Java11 based interpreter with PGX client embedded in it to query on graph present in the PGX server.

To configure the pgx-java interpreter variant, follow these steps:

1.       On the Interpreter page LHS menu, select pgx-java. The pgx-java interpreter pane is displayed.

2.      Enter the following information in the pgx-java interpreter variant pane as tabulated in Table 12.

Table 12:   pgx-java Interpreter fields and description

Field

Description

graphviz.formatter.class

Enter the class which implements the formatting of the visualization output.

For example,

oracle.datastudio.graphviz.formatter.DataStudioFormatter

graphviz.driver.class

Enter the class which implements the PGQL driver.

For example,

oracle.pgx.graphviz.driver.PgxDriver

base_url

Enter the base URL of the PGX server in this field.

zeppelin.interpreter.output.limit

Enter that the output message from the interpreter exceeding the limit will be truncated.

For example, 102,400.

pyspark Interpreter

Users must write for connection either in the Initialization section or in the notebook’s paragraph. This interpreter is used to write the pyspark language to query and perform analytics on data present in big data. This requires additional configuration, which must be performed as a prerequisite or as post-installation with the manual change of interpreter settings.

In the pyspark interpreter, you can configure the Python binary executable to use for PySpark in both driver and workers,  set 'True' to use IPython, else set to 'False', and so on.

To configure the pyspark interpreter variant, follow these steps:

1.       On the Interpreter page LHS menu, select pyspark. The pyspark interpreter pane is displayed.

2.      Enter the following information in the pyspark interpreter variant pane as tabulated in Table 13.

Table 13:   pyspark Interpreter fields and description

Field

Description

zeppelin.pyspark.python

Enter the Python binary executable to use for PySpark in both drivers and workers. The default value is python.

For example, python

zeppelin.pyspark.useIPython

Set to 'True' to use IPython, else set to 'False'.

spark Interpreter

The spark Interpreter does not connect to any schema by default. Users must write for connection either in the Initialization section or in a notebook’s paragraph. This interpreter is used to perform analytics on data present in Big data clusters in the Scala language. This requires additional configuration, which must be performed as pre-requisite or as post-installation with the manual change of interpreter settings. 

In spark interpreter, you can configure the cluster manager to connect, print the Read–eval–print loop (REPL) output, the total number of cores to use, and so on.

To configure the spark interpreter variant, follow these steps:

1.       On the Interpreter page LHS menu, select spark. The spark interpreter pane is displayed.

2.      Enter the following information in the spark interpreter variant pane as tabulated in Table 14.

Table 14:   spark Interpreter fields and description

Field

Description

pgx.baseUrl

Enter the PGX Base URL. This is the location where the data is pushed.

For example, http://<HOSTNAME>:7007

spark.executor.memory

Enter the amount of memory to use for the executor process.

Executor memory per worker instance. For example,  512m and 32g.

In Spark, the executor-memory flag controls the executor heap size (similarly for YARN and Slurm), the default value is 512MB per executor. And the driver-memory flag controls the amount of memory to allocate for a driver, which is 1GB by default and should be increased in case you call a collect or take(N) action on a large RDD inside your application.

spark.master

Enter the cluster manager to connect to.

For example, local[*]

spark.yarn.archive

Enter the archive containing the required. Spark jars for distribution to the YARN cache, to make Spark runtime jars accessible from the YARN side.

spark.app.name

Enter the name of the application.

For example, Zeppelin

zeppelin.spark.ui.hidden

Set to True or False.

zeppelin.spark.maxResult

Enter the maximum number of results that must be fetched.

spark.pyspark.python

Enter the Python binary executable to use for PySpark in both driver and executors.

For example, python

zeppelin.spark.enableSupportedVersionCheck

Set to 'True' or 'False'.  

args

Enter the Spark command-line args.  

zeppelin.spark.useNew

Set to 'True' to use the new version of the SparkInterpreter.

zeppelin.spark.useHiveContext

Set to 'True' to use HiveContext instead of SQLContext.

zeppelin.spark.uiWebUrl

Overrides Spark UI default URL. Value should be a full URL (http://{hostName}/{uniquePath})

zeppelin.spark.printREPLOutput

Enter to print the REPL output.

spark.cores.max

Enter the total number of cores to use.

NOTE: Empty value uses all available cores.

Link Credentials

FCC Studio provides secure and safe credential management. Examples for credentials are passwords, Oracle Wallets, or KeyStores. Use this section to link credentials (a wallet and a password) to fcc-jdbc or jdbc interpreter variant to enable secure data access. This linking enables the fcc-jdbc or jdbc interpreter to securely connect to the specified Oracle Database. You can also create new credentials, based on your requirement to connect to the new interpreter variants. For more information, see Create Credentials.

NOTE

You can link credentials only to fcc-jdbc and jdbc interpreters. The Credentials' section is enabled if an Interpreter variant can accept credentials.


To link ready-to-use credentials to the required interpreters, follow these steps:

1.       On the Interpreters page, select the required interpreters. For example, fcc-jdb or jdbc.

2.      Go to the Credentials section.

credentials_7.png 

3.      To select Oracle Wallet (jdbc wallet) credential that you want to link to the Interpreter variant, click Select.  The Select Credential dialog is displayed.  

credentials_8.png 

4.     Select the required Oracle Wallet (jdbc wallet).

5.      To select Password (jdbc password) that you want to link to the Interpreter variant, click Select. The Select Credential dialog is displayed.

credentials_9.png

6.     Select the required Password (jdbc password). Click Select.

7.      Click Update to save the changes. The required password and Oracle Wallet are linked to the fcc-jdbc or jdbc Interpreter.

Create a Credential

New credentials are created when database details are changed or updated. For example, change in Transparent Network Substrate (TNS) due to hostname change or compulsory periodic update of passwords of the schema.

Oracle Wallet provides a simple and easy method to manage database credentials across multiple domains. It allows you to update database credentials by updating the Wallet instead of having to change individual data source definitions.

Use this section to add a new credential to the interpreters.

To create a credential, follow these steps:

1.       On the FCC Studio workspace LHS Menu, click Credentials. The Credentials page is displayed. 

2.      Click Create. The Create Credential dialog is displayed.

credentials_2.png 

3.      Enter the following information in the Create Credential dialog box as tabulated in Table 15:

Table 15:   Create Credential fields and description

Field

Description

Name

Enter the name for the wallet credential.

Type

Select Oracle Wallet.

File

Upload the wallet zip file that includes the following files:

·        cwallet.sso

·        ewallet.p12

·        tnsnames.ora

NOTE:

·        The wallet file must be in .zip format.

·        The maximum file size allowed for the credential file is 128Kb.

4.     Click Create. The wallet credential is created and displayed on the Credentials page.

To create a new password credential for the wallet, follow these steps:

1.       Click Create. The Create Credential dialog is displayed.  

credentials_6.png 

2.      Enter the following information in the Create Credential dialog as tabulated in Table 16.

Table 16: Wallet Credential Details fields and description

Field

Description

Name

Enter the name for the password credential.

Type

Select password type from the drop-down (wallet or keytab).

Password

Enter the wallet password for the password credential.

3.      Click Create. The password is created for the wallet and displayed on the Credentials page.

4.     To download the credential files, click the credential file name on the Credentials page.

5.      To delete a required credential, click Delete delete.png. The credential is removed from the list.

Create an Interpreter Variant

In FCC Studio, you can either use a default interpreter variant or create a new variant for an interpreter. You can create more than one variant for an interpreter. Multiple variants for an interpreter are created to connect different versions of interpreters (Python ver:3, Python ver:2 ), connect a different set of users, database schema. For example, FCC Studio schema, BD schema, and so on.  

To create a new interpreter variant, follow these steps:

1.       On the Interpreters page, click the required interpreters from the LHS list. For example, fcc-jdbc interpreter.

The default interpreter variant is displayed on the RHS.

2.      On the default interpreter, click Add interpreter_new_variant.png to create a new variant. The Create Interpreter Variant dialog box is displayed.

3.      Enter the Name for the new interpreter variant. Click Create. A new variant is created with a name, <Interpreter Type>.<Variant Name>.

4.     Provide the new schema details such as the default.url, default.user, and default.password.

NOTE

Steps: 5 and 6 are applicable only for fcc-jdbc


5.      The Oracle Database schema that you have created must be granted with the same permissions that are granted to the BD or ECM atomic schema.

For more information, see the Prerequisite Environmental Settings section in the OFS Crime and Compliance Studio Installation Guide (On-Premise).

6.     Navigate to the <Studio_Installation_Path>/ficdb/bin directory. Run the following script after modifying the schema name with the newly created schema:

../OFS_FCCM_STUDIO/metaservice/model/SQLScripts/Atomic_Schema/FCC_JRS­DCN_CONTEXT_ATOMIC.sql

../OFS_FCCM_STUDIO/metaservice/model/SQLScripts/Atomic_Schema/PKG_FCC_­STUDIO_JURN_VPD.sql

../OFS_FCCM_STUDIO/metaservice/model/SQLScripts/Atomic_Schema/PKG_FCC_­STUDIO_JURN_VPD_BODY_ATOMIC.sql

7.      Configure the required values for the properties.

8.     Click Update. A new variant is created for the selected interpreter.

9.     For using the new interpreter variant in the notebook paragraphs, use the following format:

%fcc-jdbc.<VariantName>


Enable Second Spark or PySpark interpreter

Interpreter variants do not apply to Spark or PySpark interpreter. Hence, you must enable an additional set of interpreters.

To enable a second Spark or PySpark interpreter, see Enabling a Second Spark or PySpark Interpreter chapter in the OFS Crime and Compliance Studio Installation Guide (On-Premise).

Modify the Python Docker Images for the Python Interpreter

Use this section to modify the Python Docker images in the Kubernetes environment. A Docker image is built by a series of layers. Each layer represents an instruction in the image’s Docker file. Each layer except the very last one is read-only.  

When the FCC studio is installed and started, the image is loaded on the local node and pushed into a docker repository. The image can be modified on the local node or any machine which can pull in and push to the Docker repository.

To modify the Python packages or change the Python version, you must modify the Python image.

NOTE

·        This section is applicable for FCC Studio installed using Kubernetes.

·        This section can be used as an example to understand the steps involved to modify the Python images for the Python interpreter in FCC Studio.


Topics:

·        Prerequisite to Build a Python Interpreter Docker Image

·        Build and Pushing an Image

·        Replace Python Image in FCC Studio

Prerequisite to Build a Python Interpreter Docker Image

To build Python images, you can either modify the Python packages in the Python interpreter or add different versions of Python to the Python interpreter.

Modify Python Packages

Python packages are present inside the python interpreter image, FCC Studio allows you to modify the version or upgrade to a new Python package in the Python interpreter.

The following Python libraries are part of the fcc-python interpreter images for Python 3.6 version:

·        pandas 0.25.3

·        numpy 1.17.4

·        scipy 1.3.2

·        scikit-learn 0.21.3

·        matplot-lib 3.1.1

·        seaborn 0.9.0

·        cx-oracle 7.2.2

·        sqlalchemy 1.3.11

To modify the Python packages in the Python interpreter, follow these steps:

NOTE

This process adds the Python packages to Python 3.6.


1.       Navigate to the Studio Installation Path directory.

2.      Create a directory in the same location as the <Studio_Installation_Path> and create a file inside the directory as Dockerfile.

3.      Copy and paste the following information as a template into the Dockerfile:

FROM ofsaa-fccm-docker-release-local.dockerhub-den.oraclecorp.com/fcc-studio/fcc-python:8.0.8.0.0

RUN pip3 --no-cache-dir install scipy pandas cx_oracle --user

4.     Modify the Dockerfile depending on the following installation method:

a.      If Internet connectivity is available, follow these steps:

Depending on the version of the Python package, install the scipy and cx_oracle Python packages using the following command:

RUN pip install scipy cx_oracle

b.     If Internet connectivity is unavailable, follow these steps:

i.       Download the Python package files.

ii.     Create a directory besides the Dockerfile file.

For example, packages

iii.   Place the downloaded files in the newly created packages directory.   

iv.    Modify the Dockerfile using the following commands:

For example, to install using Python3:

COPY packages /var/olds-python-interpreter/packages

 RUN cd /var/olds-python-interpreter/packages

 RUN pip3 --no-cache-dir  install --no-deps numpy-1.17.4-cp36-cp36m-manylinux1_x-86_64.whl

NOTE

For more information on how to write Dockerfile, visit https://docs.docker.com/engine/reference/builder/.


5.      Build and push the image to the Docker registry. For more information, see Build and Push an Image

6.     Replace the Python image in FCC Studio. For more information, see Replace a Python Image in FCC Studio

Add Different Version of Python

Python packages are present inside the python interpreter image, FCC Studio allows you to add a new version or upgrade to a new Python package in the Python interpreter. Use this section to add different versions or upgrade to a new Python version to a Python interpreter.

To add a different version of Python to Python interpreter in FCC Studio, follow these steps:

1.       Navigate to the Studio Installation Path directory.

2.       Create a directory at the same location as the <Studio_Installation_Path> and create a file inside the directory with the file name, Dockerfile.

3.        Copy and paste the following information as a template into the Dockerfile:

          FROM ofsaa-fccm-docker-release-local.dockerhub-den.oraclecorp.com/fccstudio/ fcc-              

  python:8.0.8.0.0

         USER root

         RUN yum install -y python3.5

         USER interpreteruser

         RUN python3.5 -m pip install scipy pandas cx_oracle --user

4.              Modify the Dockerfile based on the preferred way of installing Python in the RHEL server.

        For more information on how to modify the Dockerfile, visit https://docs.docker.com/engine/reference/builder/.

5.      Build on LINUX and push the image to the Docker Registry . For more information, see Build and Push an Image

6.     Replace the Python image in FCC Studio. For more information, see Replace a Python Image in FCC Studio

Build and Push an Image

An image is built on LINUX and pushed to a docker Registry.

To build and push an image, follow these steps:

1.       Navigate to the Studio Installation Path directory.

2.      Build the docker image using the following command:

 docker build . --build-arg http_proxy=http://<proxy-url>:<port> --build-arg https_proxy=http://<proxy_url>:<port> -t <my.docker-registry.com:port>/ofsaa-fccm-docker-release-local.dockerhub-den.oraclecorp.com/fcc-studio/fcc-python:<version>

               Where:

§           <my.docker-registry.com:port> is the docker-registry URL with port number.

§        <version> is the custom tag for this image.

 For example,

 docker build . --build-arg http_proxy=http://my-proxy-url:80 --build-arg https_proxy=http://my-proxy-url:80 -t my.docker-registry.com:5000/ofsaa-fccm-docker-release-local.dockerhub-den.oraclecorp.com/fcc-studio/fcc-python:8.0.8.0.0-C1

NOTE

build-arg can be skipped if proxy is not required or if packages are placed locally.


3.        Push the images using the following command:

 docker push <my.docker-registry.com:port>/ofsaa-fccm-docker-releaselocal.dockerhub-den.oraclecorp.com/fcc-studio/fcc-python:<version>

Replace a Python Image in FCC Studio

Python packages are present inside the python interpreter image, but if you want to replace the Python images, FCC Studio allows you to perform this activity. Use this section to replace a Python image in the FCC Studio.

To replace the Python images in FCC Studio, follow these steps:

1.       Navigate to the <Studio_Installation_path>/deployments/ directory.

2.      Update the image name in the fcc-python.yml file as follows:

            spec:

               spec:

                  containers:

                              - name: python-interpreter

                                                  image: ofsaa-fccm-docker-release-local.dockerhub-den.oraclecorp.com/fcc-studio/fcc-python:<version>

3.              To restart the FCC Studio application, follow these steps:

a.                  Execute the following command from the Kubernetes master node:

               kubectl delete namespace <Namespace>

b.                 Navigate to the <Studio_Installation_Path>/bin directory.

c.                  Execute the following command:

               ./fcc-studio.sh --registry <registry URL>:<registry port>