Use this chapter to understand and perform configuration activities before running the extract, transform, and load (ETL) process. The ETL process loads business data from FCDM (BD and ECM) which can be used by any interpreter. FCDM and External data sources such as ICIJ are processed and loaded as a graph in FCC Studio.
Topics:
· Apply Graph Fine-Grained Access Control
Use this section to understand how to move source data into the PGX server to generate a graph. The following sections provide more insight on data sources, jobs, rulesets, and workflows used in FCC studio to generate graphs.
Topics:
· Rulesets
· Indices
· PGX
The FCC Studio provides the following ready-to-use data sources:
· FCDM: The Financial Crime Data Model (FCDM) is the data source for Behavior Detection (BD) and Enterprise Case Management (ECM) Atomic schema tables.
· ICIJ: International Consortium of Investigative Journalists (ICIJ) is the data source for external entities like Panama Papers, Paradise Papers, and so on. Where input data files are in the .CSV format and these files must be placed in Hadoop Distributed File System (HDFS).
Ruleset facilitates to identify the similarity between two entities within the data source that is, FCDM to FCDM (customer to customer) or across the data source that is, FCDM to ICIJ (FCDM entities, customer to customer, and customer to Panama papers) to derive a match and create similarity edges in the graph. A Ruleset is a set of rules that are applied to the defined source and target entities, compares the attributes of the entities to derive a match for similarity edges. FCC studio provides ready-to-use rulesets; however, you can modify these rulesets or create your rulesets.
Based on the rulesets, a task is executed. The indices perform the correlation and based on the threshold score and weightage the similarity edges are created. The threshold scoring parameters such as Automatic Threshold and Manual Threshold determine the creation of similarity edges.
· Auto Threshold: Enter values from 0 to <=1. Enter a matching percentage above which you want the matches to get into the graph automatically.
· Manual Threshold: Enter values from 0 to <=1. Enter a value above which you want to do borderline decisions of similarity edges. It is considered as a range greater than the Manual threshold and less than the Automatic threshold.
The ready-to-use threshold scoring logic works as explained in the following example:
§ A total threshold score of less than 0.7 (70%) must be discarded.
§ A total threshold score of more than or equal to 0.8 (80%) must create a similarity match automatically in the graph. This is configured using the Automatic Threshold parameter in the Ruleset.
§ A total threshold score between 0.7 (70%) and less than 0.8 (80%) must be decided manually by the user to publish the similarity matches in the graph. This is configured using the Manual Threshold parameter in the Ruleset.
Users can increase the threshold values based on false positive matches. If there are more false positives, it means the threshold value is less. To get more positive matches, increase the threshold value.
An Elasticsearch is a distributed search and analytical engine for all types of structured and unstructured data. In FCC Studio, Node tables are moved to Elasticsearch to get faster responses to identify the entity's relationships.
An index is a logical namespace that maps to one or more primary shards (a shard is a unit in which Elasticsearch distributes data around the cluster). As a part of the connector’s job, the node entities from the graph’s data source are populated as indices. The indices are used to query to generate similarity edges in the graph.
PGX is a toolkit for graph analysis, supporting both efficient graph algorithms and fast SQL-like graph pattern matching queries.
FCC Studio’s ETL is a process, where the business data and external data can be processed to get a global graph, with entity resolved based on matching rules. This graph can be further queried for investigation.
ETL has two stage:
· Generation and maintenance of Graph
· Resolving entities based on matching rules and updating
In first stage, the business data and external data are collected in HIVE Schema and then transformed based on query and saved into HIVE tables. The Node type data are updated in elastic search for second stage of ETL.
ETL classifies entity into “delta type” or “pluggable type” and based on entity type it updates the change, referred as delta, into graph. For delta type, the ETL compares data from previous batch and recognizes changes as insert or delete.
Example: To understand the ETL delta, see 14 Appendix Example of ETL Delta.
For pluggable type which are transaction edges, the data are separated into multiple datasets based on a parameter like ‘transaction date’ and then are updated into graph based on the valid range of transaction date. ETL also removes older transaction and thus maintains graphs with desired range of transactions.
In second stage, based on matching rules (ruleset) the nodes are resolved and similarity edges are generated among which edges having similarity score more than automatic thresholds are directly updated into graph and other edges with score between manual and automatic threshold can be review from FCC Studio by users and as soon as they are approved, these edge(s) are updated into graph.
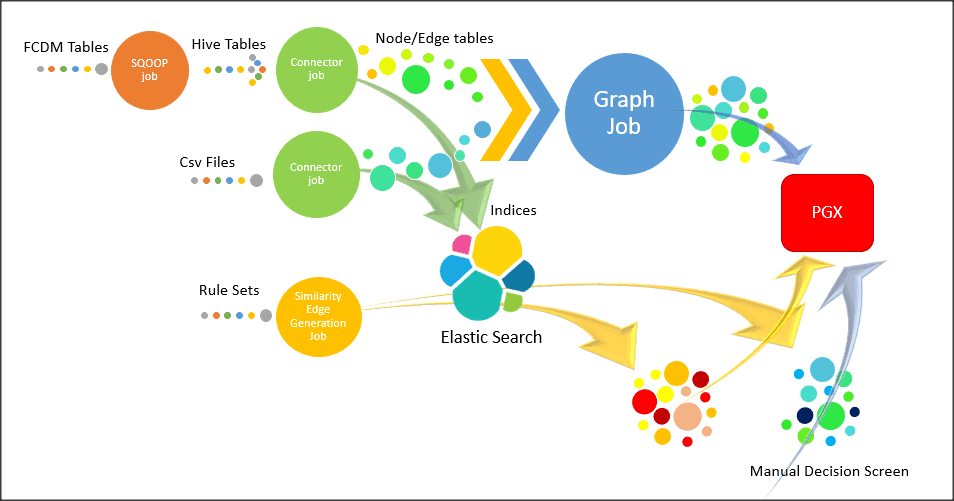
The ETL process is split into four Jobs: Sqoop Job (if applicable), Connector Job, Graph Loading, and Similarity Edge Generation Job.
The following image illustrates the sequence of the ETL process.
· Sqoop Job: This task moves data from Behavior Detection (BD) and Enterprise Case Management (ECM) Atomic tables to Hive tables based on the date range. The Sqoop job creates and saves the import and export commands. It specifies parameters to identify and recall the saved job. This recalling or re-executing is used in the incremental import, which can import the incremental data from the RDBMS table to Hive.
· Connector Job: This task transforms data from Hive tables or the .csv files into nodes and edges format and identifies the changes in data loaded between previous and current batch. This task also pushes node tables into Elastic Search.
· Graph Job: This task generates the .csv files and configuration files for the graph, update the changes into a graph, and manages transaction edges as per the date range.
· Similarity Edge Generation Job: This task generates the similarity edges based on a ruleset in the FCC Studio application and adds similarity edges for breaching automatic threshold into the graph directly.
The following image illustrates the workflow of ETL for specific datasources such as, Ready-to-use datasource, FCDM, and ICIJ:
For more information on Jobs execution, see Run ETL.
To understand how to move source data to the PGX server using connector jobs to create graphs in FCDM and ICIJ workflows as tabulated in Table 17.
Jobs |
FCDM Workflow |
ICIJ Workflow |
|---|---|---|
Sqoop Job |
Moves data from FCDM (BD or ECM) source into Hive tables. |
Not applicable |
Connector job |
· Transforms data into nodes and edges tables using ready-to-use queries · Identifies incremental and updated data · Pushes nodes into Elasticsearch as indices |
· Reads the .csv files and transforms the data into nodes and edges tables using ready-to-use queries · Identifies incremental and updated data · Pushes nodes into Elasticsearch as indices |
Graph Loading Job |
· Generates the .csv files and configuration files to load graph into the PGX server · Loads the delta graph changes |
· Generates the .csv files and configuration files to load graph into the PGX server · Loads the changes directly into the PGX server from subsequent batches · Loads the delta graph changes |
Similarity edge Generation Job |
· Generates similarity edges · Pushes automatic matches of similarity edges into graph |
· Generates similarity edges · Pushes automatic section of similarity edges into graph |
After running the ETL process, global graphs are generated. For more information on the ready-to-use Graph Model, see Graph Model.
For more information on Jobs execution, see Run ETL.
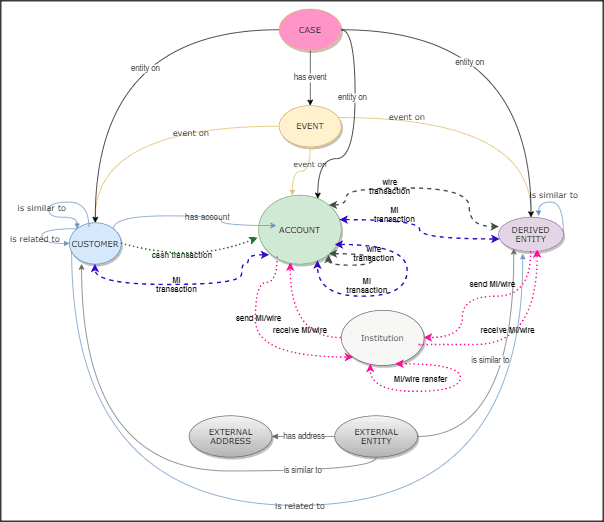
The Oracle Financial Crime Graph Model serves as a window into the financial crimes data lake. It collates disparate data sets into an enterprise-wide global graph, enabling a whole new set of financial crime use cases. The Graph model enables to accelerate financial crime investigation use cases. The graph model expresses the conditional dependence structure between nodes and edges.
For information on Graph Data Model, see Graph Data Model.
The following image illustrates the Graph Model.
For information on the node and edge properties of the Oracle Financial Crime Graph Model, see the Data Model Guide.
In FCC Studio, data is obtained from FCDM (Financial Crime Data Model) to generate Financial Crime Graph Model. The graph model includes nodes for entities such as Customers, Accounts, Events, and Derived Entities, and edges for transactions and relationships.
Entity Resolution compares nodes to identify pairs or groups of nodes that refer to the same entity. Entity Resolution creates Similarity Edges between nodes by comparing the attributes of the nodes and identifying where the similarity is significant enough to create an edge so the nodes are linked with the graph model and can be analyzed as a single entity.
Entity matching rules are used to compare nodes of different types. For example, deduplicating customers, resolving derived entities, linking customers or derived entities to external data such as Panama papers or sanctions lists with different rules and thresholds. For more information on matching rulesets, see the Financial Crime Graph Model Matching Guide.
The ruleset facilitates to identify the similarity between two entities (customer, account, and so on) and derive a match. A Ruleset is a set of rules that are applied to the defined source and target entities, compares the attributes of the entities to derive a match. Rulesets are configured before running the ETL to move the data from the source database (BD atomic schema) into Hive schema. Graphs are also configured for similarity edges to identify the similarity between two entities (customers, account, and so on). Entity details and attributes are configured in the rulesets when there any modification or addition to the entity details such as Email ID, Tax ID, or jurisdiction. Similarly, when there are changes to thresholds or scoring methods rulesets are configured.
FCC studio provides ready-to-use rulesets; however, you can modify these rulesets or create your rulesets.
Topics:
Use this section to enable or disable the ready-to-use rulesets. You can also modify source or target entities, attributes for these rulesets, and also remove rulesets from the existing list.
To manage ready-to-use rulesets, follow these steps:
1. In the Crime and Compliance Studio LHS Menu, select Ruleset. The Ruleset page is displayed with all ready-to-use rulesets.
Figure 1: Ruleset Page
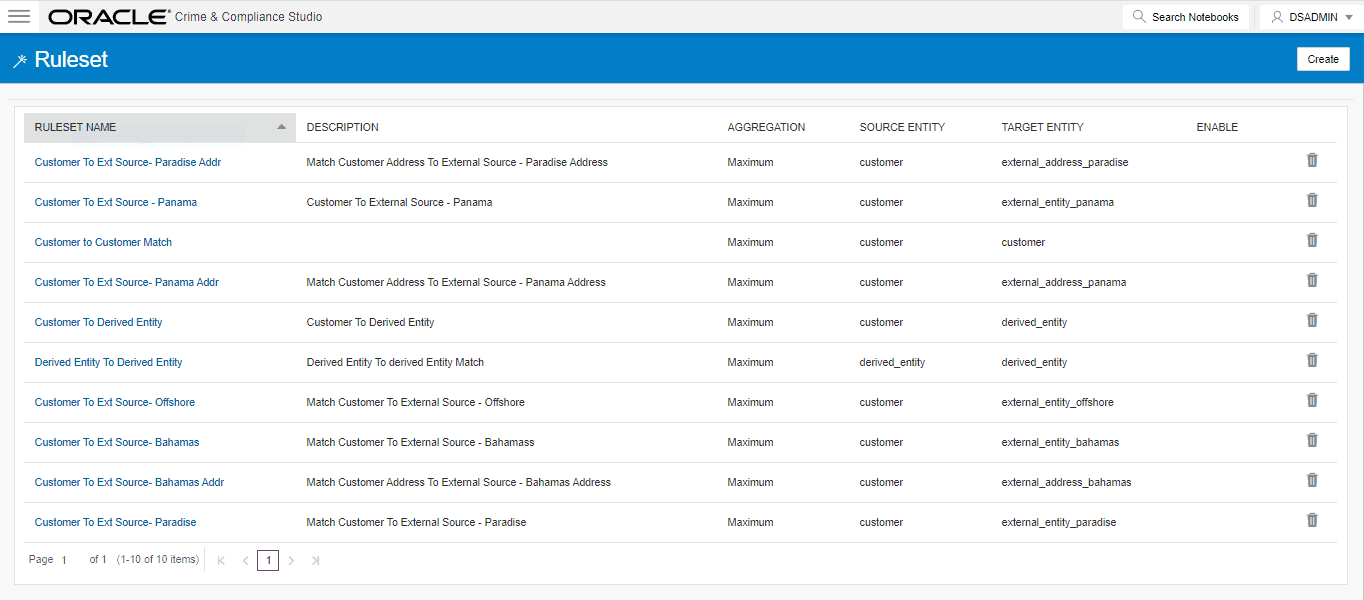
This page provides you the names of rulesets, description, aggregation, source entity, and target entity details. For more information, see Table 18.
2. To enable the Rulesets, click the check box against the required ruleset.
3. To
remove the rulesets from the list, click Delete
 against the required ruleset.
4. To modify the rulesets, click the Ruleset name on the list. The Ruleset Details page is displayed.
5. Modify the required information and click Save. The Ruleset details are updated. For more information on the fields, see Table 18.
Each ruleset comprises of multiple rules. The ruleset compares the attributes that are defined in the rules for the source entity with the target entity. For example, Customer to Customer, Customer to Derived Entity, Derived Entity to Derived Entity, and so on.
Rulesets are created using source entity and target entity such as customer, account, and so on. Every entity has attributes such as email IDs, the date on birth, jurisdiction, and so on. To derive a match and create a similarity edge on the graph, you must apply the conditions for these attributes such as match type, scoring method, threshold score, and weightage. When you execute the ETL, a match is created based on the new ruleset.
FCC Studio offers ready-to-use rulesets, However, a new ruleset is created based on the business requirement to get a match between new entities, to apply new scoring methods, apply new threshold score, and so on.
To create a new ruleset, follow these steps:
1. On the Ruleset page, click Create. The Ruleset Details page is displayed.

2. Enter the ruleset fields information as tabulated Table 18.
Field |
Description |
|---|---|
Name |
Enter the name of the ruleset. NOTE: · Enter up to 30 characters. · A ruleset cannot have the same name. |
Description |
Enter the description of the ruleset. For example, Match Customer to Customer is based on its attributes. NOTE: Enter up to 60 characters. |
Scoring Aggregation Type |
Select the scoring aggregation method. By default, the maximum scoring aggregation method is selected. This scoring aggregation considers the highest score obtained out of all the rules created for a ruleset. |
Threshold |
Enter the threshold value for a ruleset. This is cumulative of all the attributes values entered in the rule for entity match. 1 stands for 100%. Auto Threshold: Enter values from 0 to <=1. Enter a matching percentage above which you want the matches to get into the graph automatically. Manual Threshold: Enter values from 0 to <=1. Enter a value above which you want to do borderline decisions of similarity edges. It is considered as a range greater than the Manual threshold and less than the Automatic threshold. The threshold scoring logic works in the following way: · A total threshold score of less than 0.7 (70%) must be discarded. · A total threshold score of more than or equal to 0.8 (80%) must create a similarity match automatically. This is configured using the Automatic Threshold in Ruleset. · A total threshold score between 0.7 (70%) and less than 0.8 (80%) must be decided manually by the user. This is configured using Manual Threshold in Ruleset. Users can increase the threshold values based on false positive matches. If there are more false positives, it means the threshold value is less. To get more positive matches, increase the threshold value. A Similarity Edge is generated only when the maximum score obtained for a ruleset is equal to or higher than the auto threshold value. NOTE: The Manual Threshold value must be less than the Auto Threshold. |
Source |
Select the source entity (node). For example, customer, account, address, and so on. NOTE: The values are auto-populated from the metadata table that contains the Elasticsearch, index names generated as a result of running the Sqoop job. For more information, see Sqoop Job. |
Target |
Select the target entity (node). For example, customer, account, address, and so on. NOTE: The values are auto-populated from the metadata table that contains the elastic search index names generated as a result of running the Sqoop job. For more information, see Sqoop Job. |
3. Click Create. The Rules Details page is displayed to create the rules for the new ruleset. For more information, see Create Rules in a Ruleset.
Every Ruleset has a set of rules such as rule threshold, scoring method (default or Jaro Winkler), match type (exact or fuzzy), and source and target attribute (Country, Email, Date of birth). These attributes help to create a set of rules for a ruleset.
To create rules in a ruleset, follow these steps:
1. On the Ruleset Details page, click Create. A New Rule section is displayed.
2. Enter rules information as tabulated in Table 19.
3. Click
Save  . A
new rule is created.
. A
new rule is created.
4. To map a rule to the attributes (date of birth, email ID, jurisdiction, and so on), click Create. You can map one or more attributes to the rule.
5. Enter attributes information as tabulated in Table 20.
Field |
Description |
|---|---|
Source Attribute |
Select the source attribute. For example, date of birth, email ID, entity type, jurisdiction, tax ID, and so on. NOTE: Attributes are displayed based on the source entity selected when creating a rule. For example, address, event, and so on. |
Target Attribute |
Select the target attribute. For example, entity type, jurisdiction, tax ID, and so on. NOTE: Attributes are displayed based on the source entity selected when creating a rule. For example, customer, account, and so on. |
Match Type |
Select one of the following match types: · Exact: To obtain the matches that are 100% perfect when finding the entities in a database. · Fuzzy: To obtain the matches that are less than or equal to 100% perfect when finding the entities in a database. |
Days |
This field is deprecated. |
Scoring Method |
Select the scoring methods: · Default: Uses elasticsearch algorithms. · Jaro Winkler: A measure of similarity between two strings. For more information, see the Scoring Method. |
Threshold |
Enter the threshold score. It indicates the score value provided to the attribute. The sum of the total threshold value of all attributes must be from 0 to <=1. It indicates that a score below the mentioned value does not generate a result from the elasticsearch. |
Weightage |
Enter the weightage. It indicates the weightage given for the attributes in the rule. NOTE: Cumulative of attributes' weightage must not exceed 1. |
Condition |
Select the condition Must. It indicates that this attribute cannot have a null value. This attribute must be populated and must return a value for the matching. |
NOTE |
· Source attribute, target attribute, and weight cannot be null. · Rules cannot have the same name. |
6. Click Save. The new ruleset is created.
The scoring methods used in the entity resolution component are as follows:
· Default Method: The distance is computed by finding the number of edits that transform one string to another. The transformations allowed are as follows:
§ Insertion: Adding a new character
§ Deletion: Deleting a character
§ Substitution: Replace one character with another
By performing these operations, the algorithm attempts to modify the first string to match the second one. The final result obtained is the edit distance.
For example:
a. textdistance.levenshtein('arrow', 'arow')
1
b. >> textdistance.levenshtein.normalized_similarity('arrow', 'arow')
0.8
If you insert a single ‘r’ in string 2, that is, ‘arow’, it becomes the same as the string 1. Hence, the edit distance is 1. Similar to Hamming distance, you can generate a bounded similarity score between 0 and 1. The similarity score obtained is 80%.
· Jaro Winkler: This algorithm gives high scores for the following strings:
§ The strings that contain the same characters, but within a certain distance from one another.
§ The order of the matching characters is the same.
The distance of finding a similar character is one character less than half of the length of the longest string. So, if the longest string has a length of five, a character at the start of the string 1 must be found before or on ((5/2)–1) ~ 2nd position in the string 2. This is considered a valid match. Hence, the algorithm is directional and gives a high score if matching is from the beginning of the strings.
For example:
a. textdistance.jaro_winkler("mes", "messi")
0.86
b. textdistance.jaro_winkler("crate", "crat")
0.96
c. textdistance.jaro_winkler("crate", "atcr")
0.0
· First case (a): As the strings are matching from the beginning, a high score is given.
· Second case (b): Only one character was missing and that too at the end of the string 2, hence a very high score is given.
· Third case (c): The last two characters of string 2 are rearranged by bringing them at the front and hence results in 0% similarity.
The data source configuration allows you to view the newly added edges or nodes in the graph. Define the source of the data, specify the order in which the files must be read, and so on.
To configure a new data source for a graph, follow these steps:
1. Navigate to the fcc_studio_etl_queries table in the Studio Schema. The FCDM related nodes and edges are available in the table.
If you want to add additional nodes or edges, you can add a new entry in the fcc_studio_etl_queries table.
2. Enter the following details in the fcc_studio_etl_queries table to add a new node or edge as tabulated in Table 21.
Column Name |
Description |
Applicable For |
|---|---|---|
Type |
Enter the column name. Enter the value as NODE or EDGE. |
Applicable for node and edge queries. |
DF_NAME |
Enter the name for the node or edge. |
Applicable for node and edge queries. |
SOURCE |
Enter the source of the data. For example, FCDM or ICIJ |
Applicable for node and edge queries. |
DATAFRAME |
Enter the properties of the node or edge. NOTE: Enter this value only if the data source is Hive and not a .csv file. |
Applicable for node and edge queries. |
QUERY |
· If the source is Hive, provide the Hive query. · If the source is a .csv file, provide the query in the following format: spark.read.format("csv").option("header", "true") .option("mode", "DROPMALFORMED").load("(##FILEPATH##)").select("node_1","node_2","rel_type","SourceID") .withColumn("Label",lit("address of")).withColumnRenamed("node_1","from").withColumnRenamed ("node_2","to").withColumnRenamed("rel_type","EDGE_TYPE").withColumnRenamed("SourceID","Source") .filter(col("EDGE_TYPE")==="registered_address").withColumn("node_ID",concat(lit("#NUMBER#"),col("node_ID"))) For more information, see Configure Spark Query Parameters. NOTE: Ensure that the source .csv file is UTF-8 compatible. |
Applicable for node and edge queries. |
KEY_COLUMN_NAME |
Set the value to the column name of your unique identifier, if the query is for node. For example: 'node_id'. |
Applicable for node query. |
SOURCE_NODE |
Enter the DF_NAME of the node from which the edge starts from. |
Applicable for edge query. |
DESTINATION_NODE |
Enter the DF_NAME of the node from which the edge ends. |
Applicable for edge query. |
SOURCE_KEY_COLUMN_NAME |
Set the value to the column name which has key_column values of the Source Node. For example: 'from_id' |
Applicable for edge query. |
DESTINATION_KEY_COLUMN_NAME |
Set the value to the column name which has key_column values of the Destination Node. For example: 'to_id' |
Applicable for edge query. |
ACTIVE |
Enter the value. The expected values are 'Y' or 'N'. Set the value to Y to consider ETL and Graph loading. |
Applicable for node and edge queries. |
If the source is a .csv file, configure the file path in the fcc_studio_etl_files table.
NOTE |
Ensure that the source .csv file is UTF-8 compatible. |
3. Enter the following details in the fcc_studio_etl_files table to add the file path as tabulated in Table 22.
Column Name |
Description |
|---|---|
DF_NAME |
Enter the name of the node or edge. |
DF_SEQ_NO |
Enter the unique sequence ID for each file. For example, column number. |
FILEPATH |
Enter the path where the .csv files are stored. NOTE: If one data frame has multiple .csv files, then make separate entries for all the files. For example: see Figure: fcc_studio_etl_files Table . |
FILEORDER |
If data must be imported from multiple files, specify the order in which the files must be read. For example, if the query for an entity uses multiple files, then the sequence must be provided so that the file path is replaced with the path of the correct file. |
The following image provides an example of fcc_studio_etl_files.
Figure : fcc_studio_etl_files Table

This section provides information on the Spark query parameters that are used during configuring a new data source for a graph or modifying existing data queries for ICIJ. This can be used for modifying the spark query of ICIJ. For example, adding new attributes or adding a new data source.
NOTE |
This activity is optional for the ETL process while adding or modifying data sources. |
To configure Spark Query Parameter, follow these steps:
1. Navigate to the fcc_studio_etl_queries table in the Studio Schema. The FCDM related nodes and edges are available in the table.
2. Enter the following details in the fcc_studio_etl_files table to add the file path as tabulated in Table 23.
Table 23: Spark Query Parameter Details
Query Parameter |
Description |
|---|---|
spark.read.format("csv") |
Enter the input file format. For example: .csv. |
option("header", "true") |
Enter the presence of a header in the input file. · True indicates that the header is available in the input file. · False indicates that the header is absent in the input file. |
load("Path"). |
· Load indicates to load the data from the mentioned file path. · The path indicates the path where the files are placed. You can load to multiple paths using the following format: ("Path1","Path2",...) |
select("Col1","Col2","Col3","Col4") |
Select the columns in the input file. |
withColumn("A",lit("Test1")) |
Add a new column with column name A and column value Test1. |
withColumnRenamed("A","B") |
Rename a column with a different name. For example, rename column from A to B. |
filter(col("A")==="Test1") |
Enter the "Where" filter condition. Here, the value for column A is Test1. |
withColumn("B",concat(lit("Test1"),col("A"))) |
Add a new column B, whose value is the concatenated value of Test1 and column A. For example, Test1=ABC · Column A contains Country and Pin code as the column values. · Column B gets ABC Country and ABC Pincode as column values. |
The FCC Studio provides an intuitive way for creating graphs used in notebooks, where you can load graphs from external sources or create custom graphs. Using PGX, you can load multiple graphs into a notebook and create PGQL queries against different graphs. The result obtained from running a paragraph in a notebook can be used as an input to other paragraphs in the notebook. The results of analytics algorithms are stored as transient properties of nodes and edges in the graph. Pattern matching can then be used against these properties.
The graph configuration can be defined through UI based configurator or a JSON configurator. Graph configurations give you easy access to graphs using PGX-ALGORITHM, PGX-JAVA, and PGQL interpreters.
Use this section to configure attributes, extra empty nodes and edges providers, local date format for graphs.
Topics:
· Extra Empty Nodes and Edges Providers
Use this section to configure the attributes of nodes and edges in the graph.
NOTE |
In FCC Studio, the heterogeneous graph does not support the dynamic addition of Nodes and Edges Provider in the graph. If extra nodes or edge providers are required, then you must add the entries to the FCC_GRAPH_EMPTY_ENTITY_MAPPING table. |
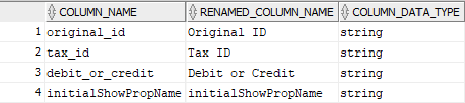
All the attributes of nodes or edges must be present in FCC_GRAPH_COLUMN_NAME_MAPPING table.
· COLUMN_NAME: Indicates the attributes name in queries.
· RENAMED_COLUMN_NAME: Indicates the required attribute name.
· COLUMN_DATA_TYPE: Indicates the PGX's data type of the attribute.
NOTE |
· The accepted PGX's datatype formats are boolean, integer, float, long, double, string, date, local_date, time, timestamp, time_with_timezone, timestamp_with_timezone, and point2d. · The date is deprecated; hence, you can use one of the following: § local_date § time § timestamp § time_with_timezone § timestamp_with_timezone |
For example, if the values are as follows:
· COLUMN_NAME: sample_attribute
· RENAMED_COLUMN_NAME: Sample_AttributeName
· COLUMN_DATA_TYPE: string
Then the attribute name shown in the graph is, Sample_AttributeName.
The following image provides you an example.
Figure : FCC_GRAPH_COLUMN_NAME_MAPPING Table
In FCC Studio, the heterogeneous graph does not support the dynamic addition of Nodes and Edges Provider in the graph. If extra nodes or edge providers are required, then you must add the entries to the FCC_GRAPH_EMPTY_ENTITY_MAPPING table.
Where,
· TYPE: Indicates the type of empty entity provider to be added. Expected value: “NODE" or "EDGE"
· NAME: Indicates the name of the entity provider.
· COLUMN_MAPPING: Indicates the attributes required for the entity with its data type. The value must be a comma-separated paired value of the column name and its type.
For example: column1:string,column2:long
NOTE |
· In the case of NODE, do not specify key_column for the node. In the case of EDGE, do not specify the source and destination key_columns. · The accepted PGX's datatype formats are boolean, integer, float, long, double, string, date, local_date, time, timestamp, time_with_timezone, timestamp_with_timezone, and point2d. · The date is deprecated; hence, you can use one of the following instead: § local_date § time § timestamp § time_with_timezone § timestamp_with_timezone |
· Example 1:
§ TYPE: NODE
§ NAME: extra_node
§ COLUMN_MAPPING: name:string,phone_number:integer
An extra vertex provider with the name "extra_node" is added with the attributes, Name and Phone Number, datatype, string, and integer respectively.
· Example 2:
§ TYPE: EDGE
§ NAME: extra_edge
§ COLUMN_MAPPING: name:string,risk:long,edge_type:string
Extra edges are formed between every node provider including itself with the name as "<source_node_provider>_extra_edge_<destination_node_provider>", with the attributes, Name, Risk and Edge Type, datatype, string, long, and string respectively.
To configure extra empty nodes and edges providers:
1. Navigate to Studio schema and go to the FCC_GRAPH_EMPTY_ENTITY_MAPPING table.
2. Add the entries to the FCC_GRAPH_EMPTY_ENTITY_MAPPING table.
The following image provides you an example.
Figure: FCC_GRAPH_EMPTY_ENTITY_MAPPING Table

Use this section to configure the local date format.
To configure the local date format, follow these steps:
1. Navigate to Studio schema and go to the FCC_DATASTUDIO_CONFIG table.
2. For the ready-to-use graph's configuration, the following parameters are set in the FCC_DATASTUDIO_CONFIG table:
a. local_date_format: The default value: [M/D/YYYY, M-D-YYYY, D/M/YYYY, D-M-YYYY, YYYY-MM-DD, YYYY/MM/DD, YYYY-D-M, or YYYY/D/M].
NOTE |
The date format option can be used only to view the data type of an attribute on the graph in the configured format. |
b. vertex_id_type: The default value is "long" as per the ready-to-use queries.
This parameter represents the datatype of the vertex_id column or key_column of node providers.
NOTE |
This data type should be consistent across all nodes. |
The Graph Fine-Grained Access Control and Redaction changes are applied to the FCC Studio to redact the sensitive data in the Graph and provides role-based access control, which restricts the graph access at Business domain and Jurisdiction level of the user.
DSREDACT role enables data redaction feature for any user. In case, you are using OFSAA for user creation, then map the user you want redact to be applied with DSRedact role.
To apply Graph Fine-Grained Access Control, follow these steps:
1. For OFSAA user creation, navigate to OFSAA Identity Management page and map the user to the DSREDACT role.
For SAML user creation, map the required user group to DSREDACT
2. Data redaction and fine grain access (Business Domain and Jurisdiction filters) on the Graph is configurable.
§ fcc_studio_redaction_mapping table is used to manage turning On and Off of Data redaction and fine grain access features.
§ If the Graph data is to be filtered based on Business domain and Jurisdiction associated with the user. Then set “Jur_BusDmn_Rule” role in the table to 'Y', else set it to 'N'
§ To enable the redaction feature on the graph, then set “DSREDACT” role in the table to 'Y' else 'N'.
3. There are ready-to-use graph properties specified for data redaction that are available in FCC_STUDIO_REDACTION_RULE table. To add new properties for redaction, you can specify details in the FCC_STUDIO_REDACTION_RULE table.
The following are the column names:
§ RULE_SEQ_ID: Unique sequence ID
§ LABEL: Node or Edge label name
§ PROPERTY: Property that you want to redact
§ TYPE: Node or Edge based on the property's expected value.
4. Navigate to Studio installed server and set a variable with name FIC_DB_HOME as,
Export FIC_DB_HOME=<FCC_STUDIO_HOME>/ficdb
5. Navigate to the <FIC_DB_HOME>/bin directory.
6. Run the FCCM_Studio_ApplyGraphRedaction.sh file. The Graph Fine-Grained Access Control changes are applied.
NOTE |
Whenever you enable or disable jurisdiction filter, FCCM_Studio_ApplyGraphRedaction.sh has to be executed. |