3 Library
Definitions
This section
enables you to create a library of definitions that are used across all the
MRMM components.
Topics:
· RFET
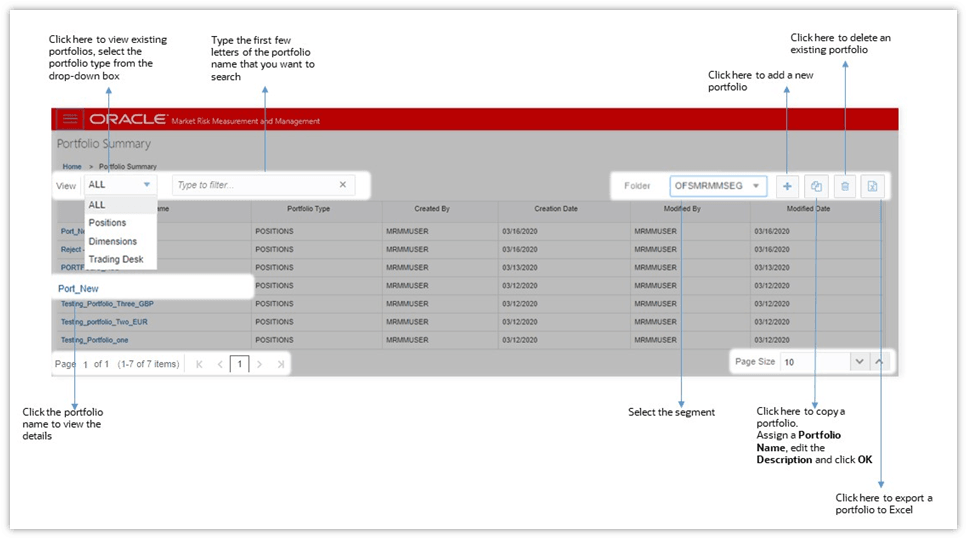
Common UI Elements
This section
describes the common UI elements in the Library menu.
Figure 4: Common
UI Elements in the Library Menu Windows

The following table
describes the common UI elements in the Library menu windows.
|
Table
4: Common UI Elements in the Library Menu Windows |
||
|
Sl. No. |
Element |
Description |
|
1 |
View |
Click the View
drop-down list to view existing definitions. |
|
2 |
Search |
Type the
first few letters of the definition name that you want to search in the
search box. The summaries whose names consist of your search string are
displayed in a tabular format. In the Name column,
click the name of the definitions you want to view. If there are multiple
results for your search, try refining the search string by providing the
exact names of the portfolio. From the
breadcrumb on top, click the respective feature Summary link to return to the summary window
after viewing details of the definition. |
|
3 |
Add |
Enables you
to add a new definition. |
|
4 |
Copy |
Enables you
to copy a definition. This is available for Portfolio only. Assign a Portfolio
Name, edit the Description and click OK. |
|
5 |
Delete |
Enables you
to delete an existing definition in the respective feature summary window. To delete a
definition, follow these steps: 1. Select the definition name in the
respective feature Summary window and click Delete 2. Click OK to delete the portfolio. Note: You can perform this action for Portfolio, Risk Factor, RFET,
Stress Scenario, Bucket Definition, and Pricing Policy. |
|
6 |
Export |
Enables you
to export a definition to Excel, for offline viewing. To export a
definition, follow these steps: 3. 1. Select the definition name in
the respective feature Summary window and click Export 4. The portfolio is exported as an XLS
file and gets downloaded. Note: You can perform this action for Portfolio, Risk Factor, RFET,
Stress Scenario, Bucket Definition, and Pricing Policy. |
|
7 |
Approve or Reject |
To approve
or reject a definition, follow these steps: 5. 1. Select the definition from the
respective feature Summary window. The feature Definition
window is displayed. 6. Click Edit 7. Click Approve The
respective message is displayed. Approved definitions cannot be edited. Note: You can perform this action for Portfolio and Bucket
Definition. |
|
8 |
Page View
Options |
· Page Size
Enter the
number of entries to be viewed on a single page in the Page Size field on the
bottom. You can increase or decrease the number of entries to view, using the
up and down arrows. · Page Navigation
To
navigate easily, use the First Page To
navigate to the desired page, type a different page number in the View
bar control and press Enter. |
Portfolio
A portfolio is a
group of financial instruments bundled together. It gives business users the
flexibility to analyze a group of instruments together, which results in better
business decisions. This section discusses the procedure for defining and
maintaining a Portfolio.
A portfolio is the
base for any evaluations performed in MRMM. For example, in Instrument
Valuation, all the analysis that are performed are at the granularity of the
portfolio. Portfolio definition functionality provides flexibility to create a
portfolio based on positions, dimensions, or trading desks. The business
hierarchy provides flexibility to cut across any supported hierarchy and create
a desired portfolio for further analysis. Alternatively, MRMM also provides the
option to select individual instruments and create a portfolio. The options
provide a wider view of analysis using various dimensions.
You can define a
portfolio to specify the criteria for portfolio identification of on and
off-balance sheet exposures. This will be available to calculate risk measures
for portfolio-level analysis. Portfolio defined in this section will be used in
the analysis of instrument valuations and portfolio valuations.
Topics:
· Navigate to the Portfolio
Summary Window
Navigate to the Portfolio Summary Window
From the MRMM Home page,
select Market Risk Measurement and Management. Click the Navigation
Menu ![]() ,
select Library, and then select Portfolio. In the View drop-down list, select the type of
portfolio you want to view. The available options are All, Positions, Dimensions, Trading Desk.
,
select Library, and then select Portfolio. In the View drop-down list, select the type of
portfolio you want to view. The available options are All, Positions, Dimensions, Trading Desk.
See the Common
UI Elements section for details on tasks such as view, search, copy,
delete, export, approve, reject, and page view options.
Figure 5:
Portfolio Summary Window
View and Search for a
Portfolio
In the Portfolio Summary
window, follow these steps:
Figure 6:
Portfolio Summary - View Drop-down List
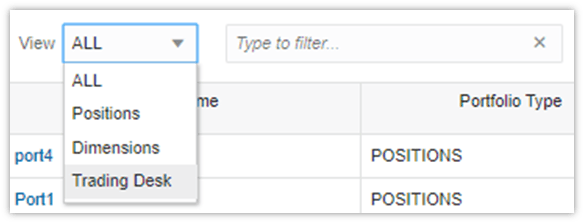
1. In the View drop-down list, select the type of
portfolio. The available options are All, Positions, Dimensions, and Trading
Desk.
2. Select the Portfolio you want to view
and click the portfolio name. The Portfolio Definition window opens and displays the details
of the selected Portfolio. You cannot edit any details in view mode.
3. In the Search field, type the first few letters of
the portfolio that you want to search. The summaries whose names consist of
your search string are displayed in a tabular format.
· In the Portfolio
Name column, click the
name of the portfolio you want to view. If there are multiple results for your
search, try refining the search string by providing the exact names of the
portfolio.
· Use the page navigation buttons at the
bottom of the table for multiple search results.
· From the breadcrumb on top, click the Portfolio Summary
link to return to the summary window after viewing details of the portfolio.
Define a Portfolio
Portfolios can be
created based on multiple filters, represented as portfolio type. You can
define a portfolio based on Positions, Dimensions, or Trading Desk. The
portfolios created in this window are used for computations in the MRMM
Instrument Valuation module.
In the Portfolio Summary
window, click Add ![]() to create a new portfolio. The Portfolio
Definition window is
displayed.
to create a new portfolio. The Portfolio
Definition window is
displayed.
Define a Portfolio – Based on Positions
To define a new
Portfolio based on Positions, follow these steps:
1. In the Portfolio
Definition window,
populate the details mentioned in the following table. Fields marked in red
asterisk (*) are mandatory.
|
Table
5: Portfolio Definition Based on Position - Fields and Descriptions |
|
|
Fields |
Description |
|
Name* |
Enter the
portfolio name. |
|
Description |
Enter a
short description of the portfolio. |
|
Folder |
Select the
folder in which you want to save the definition. |
|
Access Type* |
Specify
whether the Portfolio is Read-Only/ Read-Write. |
|
Version |
Displays the
workflow version. |
|
Portfolio
Type |
Select Position. In this
option, the portfolio can be defined at a most granular level based on trades
or positions. This indicates that specific positions can be selected and
defined as a part of the portfolio definition- these positions can be
selected by applying filters such as Instrument type, currency, and so on. |
|
Available
Positions |
Displays the
available positions. |
|
Selected
Positions |
Displays the
selected positions. |
|
Filters |
If you have
selected the Available Position option, then you will be provided with
filters such as Instrument Type, Entity Name, Counterparty Name, Currency. |
2. Select Positions in Portfolio
Type.
Figure 7: Portfolio Definition Window - Position
3. Click Filter ![]() to add the required Available
Positions for Instrument Type, Entity Name, Counterparty
Name, or Currency, and
click Apply
to add the required Available
Positions for Instrument Type, Entity Name, Counterparty
Name, or Currency, and
click Apply ![]() . The application allows multiple selections for this section. The
filtered positions are listed in the Available
Positions section. Click Reset
. The application allows multiple selections for this section. The
filtered positions are listed in the Available
Positions section. Click Reset ![]() to
refresh the list. You can sort the columns in ascending or descending order,
using the sorter
to
refresh the list. You can sort the columns in ascending or descending order,
using the sorter ![]() .
.
4. You can select multiple entries using Ctrl + Click to group the required entries in the
Available Positions and click Add ![]() . These selected entries from Available
Positions are added in the
Selected Position section.
. These selected entries from Available
Positions are added in the
Selected Position section.
5. If you want to remove any entry from
the Selected Position, select the entry and click Remove ![]() .
.
6. Click Submit ![]() to save and submit the portfolio
for approval. A confirmation dialog box is displayed.
to save and submit the portfolio
for approval. A confirmation dialog box is displayed.
Or,
Click Save ![]() to
update the portfolio before submitting it for approval.
to
update the portfolio before submitting it for approval.
7. Click OK. You can now view the Portfolio in the
Portfolio Summary window.
Define a Portfolio – Based
on Dimensions
To define a new
Portfolio based on dimensions, follow these steps:
1. In the Portfolio
Definition window,
populate the details mentioned in the following table. Fields marked in red
asterisk (*) are mandatory.
|
Table
6: Portfolio Definition Based on Dimensions - Fields and Descriptions |
|
|
Fields |
Description |
|
Name* |
Enter the
portfolio name. |
|
Description |
Enter a
short description of the portfolio. |
|
Folder |
Select the
folder in which you want to save the definition. |
|
Access Type* |
Specify
whether the Portfolio is Read-Only/Read-Write. |
|
Version |
Displays the
workflow version. |
|
Portfolio
Type |
Select Dimension. In this
option, the portfolio can be defined based on a more aggregate level as
compared to the position type. You can apply filters based on dimensions such
as Country, Market Risk Asset class, and so on. |
|
Available
Hierarchies |
Displays the
available hierarchies. |
|
Selected
Hierarchies |
Displays the
selected hierarchies. |
2. Select Dimensions in Portfolio
Type.
Figure 8: Portfolio Definition Window - Dimension
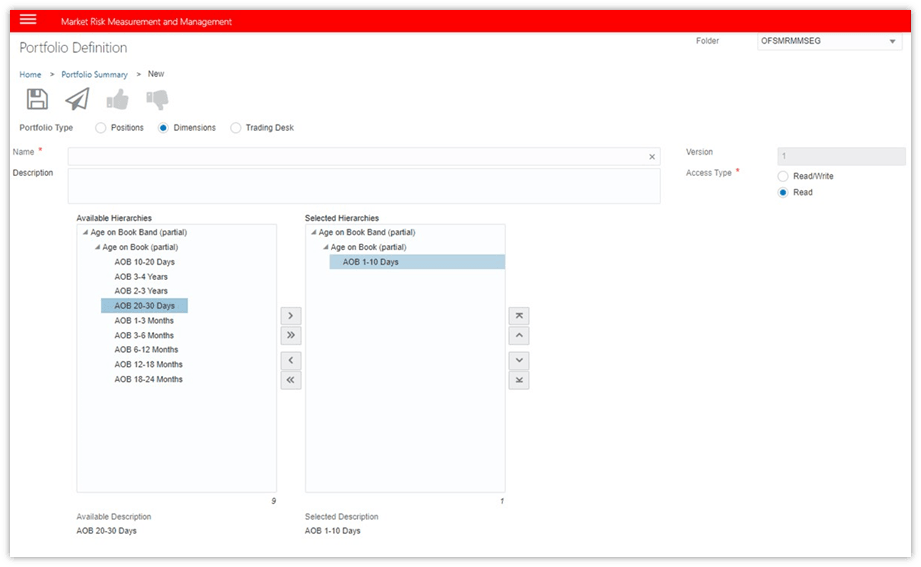
3. To select one value, select the value
and click Move ![]() , to select all the Available Values, click Move All
, to select all the Available Values, click Move All ![]() . To
remove any selected value from the list, select the value and click Remove
. To
remove any selected value from the list, select the value and click Remove ![]() . To
remove all the selected values, click Remove All
. To
remove all the selected values, click Remove All ![]() .
.
4. Click Submit ![]() to save and submit the portfolio
for approval. A confirmation dialog box is displayed.
to save and submit the portfolio
for approval. A confirmation dialog box is displayed.
Or,
Click Save ![]() to
update the portfolio before submitting it for approval.
to
update the portfolio before submitting it for approval.
5. Click OK. You can now view the Portfolio in the
Portfolio Summary window.
Define a Portfolio – Based on Trading Desk
To define a new
Portfolio based on the trading desk, follow these steps:
1. In the Portfolio
Definition window,
populate the details mentioned in the following table. Fields marked in red
asterisk (*) are mandatory.
|
Table
7: Portfolio Definition Based on Trading Desk - Fields and Descriptions |
|
|
Fields |
Description |
|
Name* |
Enter the
portfolio name. |
|
Description |
Enter a
short description of the portfolio. |
|
Folder |
Select the
folder in which you want to save the definition. |
|
Access Type* |
Specify
whether the Portfolio is Read-Only/ Read-Write. |
|
Version |
Displays the
workflow version. |
|
Portfolio
Type |
Select Trading Desk.
This option allows a trading desk to be represented as a separate portfolio. |
|
Trading Desk |
Displays the
available trading desk information. Select the required trading desk from the
drop-down list. |
2. Select Trading
Desk in Portfolio Type.
Figure 9: Portfolio Definition Window – Trading Desk
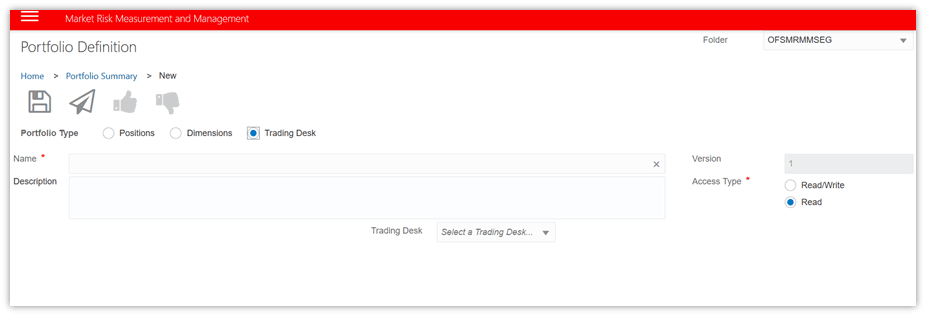
3. Enter details in the fields Name and Description.
4. Select a Trading
Desk from the drop-down
list.
5. Click Submit ![]() to save and submit the portfolio
for approval. A confirmation dialog box is displayed.
to save and submit the portfolio
for approval. A confirmation dialog box is displayed.
Or,
Click Save ![]() to
update the portfolio before submitting it for approval.
to
update the portfolio before submitting it for approval.
6. Click OK. You can now view the Portfolio in the
Portfolio Summary window.
Edit a Portfolio
You can edit a
portfolio at any point from the Portfolio Summary window. To edit an existing portfolio,
follow these steps:
1. Click the Portfolio Name you want to edit.
2. Click Edit ![]() and modify the required fields.
and modify the required fields.
3. Click Save ![]() . The updated information can be viewed in the Portfolio Summary
page.
. The updated information can be viewed in the Portfolio Summary
page.
NOTE:
You can edit the portfolio in the draft
stage only.
Copy a Portfolio
You can copy a
portfolio at any given point from the Portfolio Summary window. To copy an existing portfolio,
follow these steps:
1. Select the Portfolio
Name and click Copy ![]() . The Copy
Dialog box is displayed.
. The Copy
Dialog box is displayed.
2. Assign a new Portfolio
Name and edit the Description field if required.
3. You cannot modify the fields Access Type and
Folder.
Figure 10: Copy a Portfolio – Dialog Box
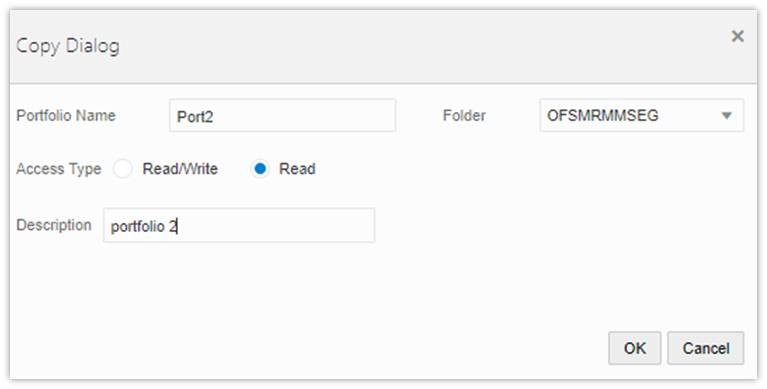
4. Click OK. You can view the created copy in the Portfolio Summary
window.
Risk Factor
This window
displays the preseeded risk factors in OFS MRMM. It is a repository of various
risk factors covering the market data elements that are used for the pricing of
different financial instruments of the bank.
In Release 8.1,
this window is enhanced to include the columns for the modellable and
non-modellable Risk Factor Eligibility Test (RFET) under FRTB.
Navigate to the Risk Factor Window
From the MRMM Home page,
select Market Risk Measurement and Management, click the Navigation Menu
![]() ,
select Library, and then select Risk Factor.
,
select Library, and then select Risk Factor.
See the Common
UI Elements section for details on tasks such as view, search, copy,
delete, export, approve, reject, and page view options.
Figure 11: Risk
Factor Page
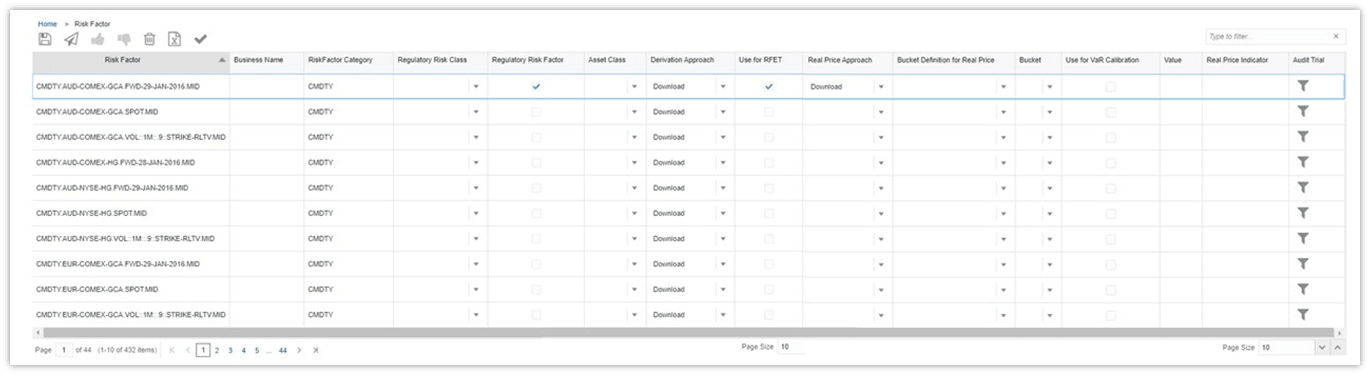
Define a Risk Factor
To define a new
Risk Factor, follow these steps:
1. In the Risk
Factor window, for every
risk factor you want to test for RFET, populate the required details mentioned
in the following table.
|
Table
8: Risk Factor Window - Columns and Descriptions |
|
|
Columns |
Description |
|
Risk Factor |
Displays the
risk factor name. |
|
Business
Name |
Assign a
business name to the risk factor. |
|
Risk Factor
Category |
Displays the
preseeded risk factor categories. |
|
Regulatory
Risk class |
Select the
regulatory risk class for the risk factor. |
|
Regulatory
Risk Factor |
Select the
check box if the risk factor is regulatory in nature. |
|
Asset Class |
Select the
asset class from the drop-down list. |
|
Derivation
Approach |
Select the
derivation approach as Download. |
|
Use for RFET |
Select the
check box if the risk factor is to be used for RFET. |
|
Real Price
Approach |
Specify the
approach for real price computation. Select Download or Bucket from the
drop-down list. |
|
Bucket
Definition for Real Price |
Select the
bucket definition to be used for real price computation from the drop-down
list. |
|
Bucket |
Select the
bucket from the drop-down list. |
|
Use for VaR
Calibration |
Select the
check box if the risk factor is to be used for VaR Calibration. |
|
Value |
This is the
value generated after executing the risk factor. |
|
Real Price
Indicator |
This is the
value generated after executing the risk factor. |
|
Audit Trail |
Click the Filter |
2. Click Submit ![]() to save and submit the risk
factor for approval. After a risk factor is submitted, it cannot be edited
until it is approved or rejected. A confirmation dialog box is displayed.
to save and submit the risk
factor for approval. After a risk factor is submitted, it cannot be edited
until it is approved or rejected. A confirmation dialog box is displayed.
Or,
Click Save![]() to update
the risk factor before submitting it for approval.
to update
the risk factor before submitting it for approval.
3. Click OK. The risk factor created in this
module is used for RFET computations in the RFET window.
Approve or Reject a Risk
Factor
To approve or
reject a risk factor, follow these steps:
1. In the Risk Factor window, submit the risk factor for
approval.
2. Click Approve ![]() or Reject
or Reject ![]() .The
respective message is displayed.
.The
respective message is displayed.
3. Click OK.
Execute a Risk Factor
To execute a risk
factor, follow these steps:
1. Select the risk factor and click Execute ![]() .
.
2. Specify a date in the Date editor.
Figure 12: Executing a Risk Factor - Date editor
3. Click OK. A confirmation dialog box is
displayed.
4. Click OK. The risk factor is executed
successfully.
RFET
A risk factor is
referred to as modellable when the price of the risk factor is real and is
continuously available. All the risk factors must be classified into modellable
and non-modellable.
As part of the FRTB
regulations, every risk factor the bank or financial institution wants to get
through has to go undergo checks for Real Price (RP) and Risk Factor
Eligibility Test (RFET). After Identifying the data sourced from the data
provider, the bank transactions, and committed quotes against the selected risk
factors banks must perform an RFET and calculate if the value is real price.
RFET analysis aims
to find if a risk factor has enough data points in a year. Banks or Financial
institutions must identify at least 24 real price observations for the risk
factor for the observation period. Additionally, over the historical period
there must not be a 90-day period in which fewer than four real price observations
have been identified for the risk factor. The preceding criteria must be
monitored on a monthly basis; or the bank must identify at least 100 real price
observations over the selected historical period for the risk factor. The
results of the RFET test enables you to find out if the outcome is modellable
or non-modellable.
Rules are set for
the risk factors before proceeding for the identification of the modellable
risk factors. After the configuration of rules, modellable or non-modellable
classification is performed.
Real Price can be
identified as follows:
· Download: In the download approach, you
must specify the real price as per the download value and as part of the market
data, specify the Real Price indicator as Yes or No.
· Bucket: In the bucket approach, you
must obtain all the instruments associated with a bucket and perform the
following validation. If any one instrument passes the following criteria then
mark the risk factor price as Real Price.
The RP value is
computed as Yes for each risk factor if the following conditions are met:
|
Table
9: Identification of Real Price for Each Risk Factor |
||||
|
Vendor Certified |
Arms Length Transaction |
Committed Quote |
Transaction of Same Instrument |
Real Price |
|
Yes |
Yes |
Yes |
NA |
Yes |
|
No |
Yes |
No |
NA |
Yes |
|
No |
No |
Yes |
NA |
Yes |
|
No |
No |
No |
Obtain all
the transactions performed for the instrument on a specific business day. If
any of the transaction price matches with the instrument price, then the risk
factor is marked as Real Price. |
|
The flag for Modellable
is computed with values as Yes or No. Risk Factor is identified
as Modellable if Real Price is Yes and Continuously Available
is Yes.
Navigate to the RFET Window
From the MRMM Home page,
select Market Risk Measurement and Management, click Navigation Menu ![]() ,
select Library, and then select RFET.
,
select Library, and then select RFET.
See the section Common
UI Elements, for details on tasks such as view, search, copy, delete,
export, approve, reject, and page view options.
Figure 13: RFET
Page

RFET Test
In this window you
can identify risk factors as modellable or non-modellable.
To test a risk
factor for RFET, follow these steps:
1. In the RFET window, the required
details mentioned in the following table are populated.
|
Table
10: RFET Window - Columns
and Descriptions |
|
|
Columns |
Description |
|
Risk Factor |
Displays the
risk factor name. |
|
Business
Name |
Displays the
business name assigned to the risk factor. |
|
Asset Class |
Displays the
asset class of the risk factor. |
|
Regulatory
Risk class |
Displays the
regulatory risk class of the risk factor. |
|
Idiosyncratic |
Displays if
the risk factor is idiosyncratic. You can modify this field. |
|
Model-able |
Displays if
the risk factor is modellable or non-modellable. After execution, you can
modify this field and mention the justification in the Justification
field. |
|
Approved By |
Displays the
approver of the risk factor. |
|
Last Run
result |
Displays the
result after the last execution. |
|
Change |
Displays
whether the result of the RFET was modified after the last run execution. |
|
Edited |
Displays the
modification made to the result of the RFET after the last run execution. |
|
Justification |
If you
change the status of the RFET, justify the reason in this field. |
|
Status |
Displays the
execution status. |
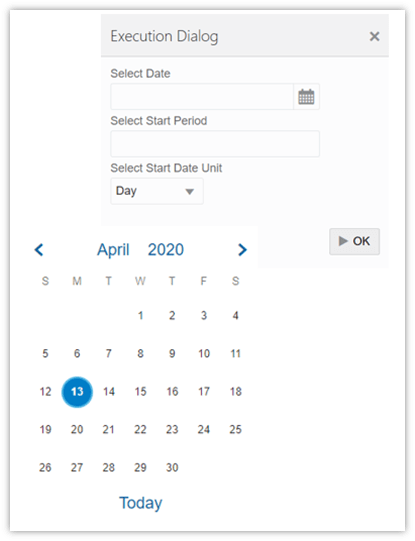
2. Select the RFET and click Execute ![]() .
.
3. Click Calendar to select a date from the Date editor
window. In the Select Start Date Unit field, specify the number of
historical days to be considered for the RFET execution.
Figure 14: RFET Execution – Date Editor
4. Click OK. A confirmation dialog box is
displayed.
5. Click OK to confirm.
6. Click Submit ![]() to save and submit the RFET for
approval. After an RFET is submitted, it cannot be edited until it is approved
or rejected. A confirmation dialog box is displayed.
to save and submit the RFET for
approval. After an RFET is submitted, it cannot be edited until it is approved
or rejected. A confirmation dialog box is displayed.
Or,
Click Save![]() to update
the RFET before submitting it for approval.
to update
the RFET before submitting it for approval.
7. Click OK.
Edit an RFET
To edit an existing
RFET, follow these steps:
1. Double-click the risk factor you want
to edit from the RFET window. The fields become editable.
2. In the columns Change, Edited, and Justification, mention the relevant details.
3. Click Submit ![]() .
.
Approve or Reject an RFET
To approve or
reject an RFET, follow these steps:
1. In the RFET window, submit the RFET for approval.
2. Click Approve ![]() or Reject
or Reject ![]() .The respective message is displayed.
.The respective message is displayed.
Execute an RFET
To execute an RFET,
follow these steps:
1. Select
the RFET and click Execute ![]()
2. Click Calendar to select a date from the Date editor
window. In the Select Start Date Unit field, specify the number of
historical days to be considered for the RFET execution.
Figure 15: RFET Execution – Date Editor
3. Click OK. A confirmation dialog box is
displayed.
4. Click OK to confirm.
Stress Scenario
OFS MRMM uses a
variety of market data such as Rate, Price, Curve, and Volatility to perform
Instrument and Portfolio level risk analysis.
A scenario is a set
of changes that can be applied to a base market. Current market data can be
used for business as usual analysis. However, to perform What-if analysis and
other scenario analysis modified market data is required. Market Scenarios
section in the MRMM application enables you to define market data under
multiple scenarios, which can be further used to perform valuations.
Navigate to the Stress Scenario Summary Window
From the MRMM Home page,
select Market Risk Measurement and Management, click Navigation Menu ![]() ,
select Library, and then select Stress Scenario.
,
select Library, and then select Stress Scenario.
In the Stress Scenario Summary window, click Add ![]() to create a new stress scenario. The Stress
Scenario Definition window
is displayed. See the Common
UI Elements section, for details on tasks such as view, search, copy,
delete, export, approve, reject, and page view options.
to create a new stress scenario. The Stress
Scenario Definition window
is displayed. See the Common
UI Elements section, for details on tasks such as view, search, copy,
delete, export, approve, reject, and page view options.
Figure 16:
Stress Scenario Summary Window
Define a Stress Scenario
You can define a
new scenario in the Stress Scenario Definition window.
Figure 17:
Stress Scenario Definition Window
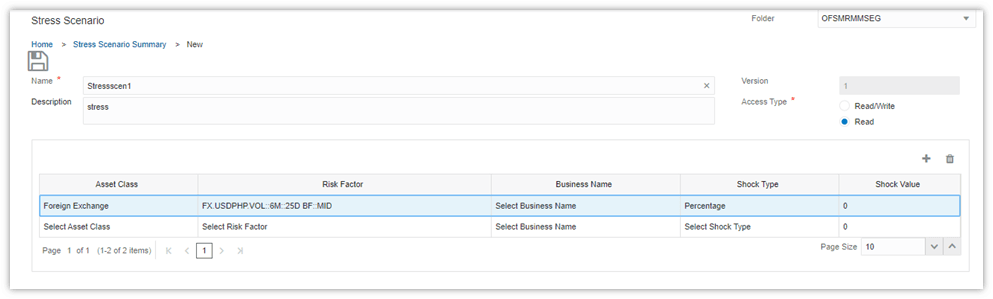
To define a new
stress scenario, follow these steps:
1. In the Stress
Scenario Definition window
populate the details mentioned in the following table. Fields marked in red
asterisk (*) are mandatory.
|
Table
11: Stress Scenario
Definition Window - Fields and Descriptions |
|
|
Fields |
Description |
|
Name* |
Enter the
stress scenario name. |
|
Description |
Enter a
short description for the stress scenario |
|
Folder |
Select the
folder in which you want to save the scenario. |
|
Access Type* |
Specify
whether the scenario is Read-Only/Read-Write |
|
Version |
Displays the
workflow version. |
2. Click Add ![]() , and select the Asset Class, Risk Factor, and Business
Name from the drop-down
list. If the risk factor has been assigned a business name, it is displayed.
, and select the Asset Class, Risk Factor, and Business
Name from the drop-down
list. If the risk factor has been assigned a business name, it is displayed.
3. Select the Shock
Type and assign a Shock Value.
For details, see Shock
Definition Parameters. You can create multiple shocks in a scenario.
4. Click Delete![]() to delete any entry from the table.
to delete any entry from the table.
5. Click Save![]() . A confirmation dialog box is
displayed.
. A confirmation dialog box is
displayed.
6. Click OK. The Scenario is defined and displayed
in the summary page.
Shock Definition Parameters
Shock can be
defined at the level of risk factor, market data, and market quotes. You need
to select the risk factors based on which the shock needs to be defined. You
can select multiple risk factors and define unique scenarios.
The shocks defined
above are used to revalue the portfolio subjected to stress using the perturbed
values. For example, if the scenario consists of all risk factors relevant to a
yield curve for a specific currency type, the instruments for which these risk
factors are mapped for pricing will be revalued with the perturbed values.
For example, if the
shock value for IR-USD-LIBOR-3M is 1% and that for IR-USD-LIBOR-6M is 2%.for a
particular stress scenario definition. In this case a three-month term point
will be shocked by 1% and six month risk factor curve will be shocked by 2%.
Type of Shocks
Shock types are
defined as a set of additive and multiplicative operations. It results in
either an increase or decrease of the base market quotes. Shock can be defined
as Percent, Basis Points, or Absolute Value.
Shock in Terms of
Percent
In this scenario
the shock value is defined in terms of percent. For example: 1%, -2% and so on.
This is applicable to all the risk factors.
Following are a few
examples:
· Example 1:
If the Base
quote = 2 and the Shock value = - 2%
Modified quote =
2 * [1 + (-2%)] = 1.96
· Example 2:
If the Base
quote = 2 and the Shock value = 1%
Modified quote =
2 * [1 + (1%)] = 2.02
Shock in Terms of
Basis Points
In this scenario
the shock value is defined in terms of Basis Points (BP). For example, 1 BP up,
5 BP down and so on. This is applicable to risk factors expressed in terms of
rate such as Interest Rate, Swap Rate, and Forward Rate Agreement (FRA) Rate, and
so on. Following are a few examples:
· Example 1:
If the Base
quote = 2 and the Shock value = - 5 BP
Modified quote =
2 + (-0.05) = 1.95
· Example 2:
If the Base
quote = 2 and the Shock value = 4 BP
Modified quote =
2 + 0.04 = 2.04
Shock in Terms of
Absolute Value
In this scenario
the shock value is defined in absolute terms. For example, USD 10 up, GBP 5
down and so on. This is applicable to risk factors expressed in terms of price
such as Equity Spot Price, Index, Futures, Bond Price, and so on. Following are
a few examples:
· Example 1:
If the Base
quote = 112 and the Shock value = 5
Modified quote =
112 + 5 = 117
· Example 2:
If the Base
quote = 112 and the Shock value = - 8
Modified quote =
112 + (- 8) = 94
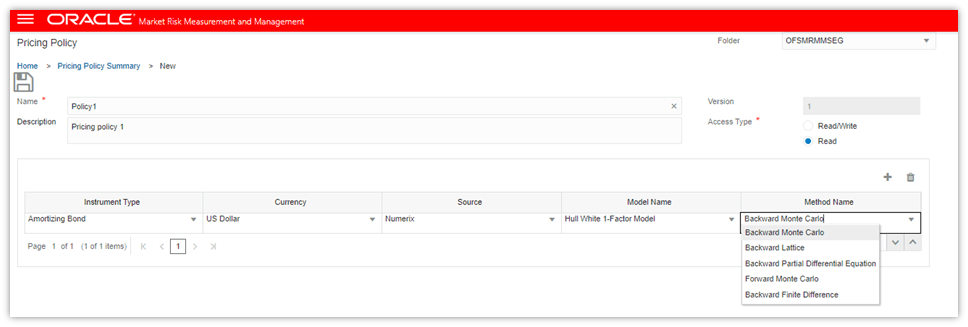
Pricing Policy
Pricing policy
enables you to select models and methods to be used for pricing the instrument.
On this page, you can define the pricing policies to be used for instrument
pricing.
The Define option
allows you to select the models and methods at the granularity level of
Instrument Type and Currency. The pricing policy of an instrument can be
defined based on the instruments considered for valuation. You can select the
models and methods for the corresponding Instrument type and Currency.
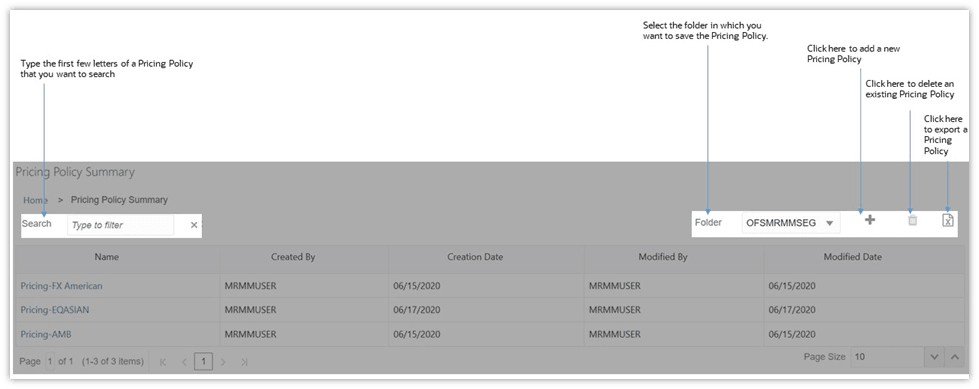
Navigate to the Pricing
Policy Summary Window
From the MRMM Home page,
select Market Risk Measurement and Management, click Navigation Menu ![]() ,
select Library, and then select Pricing Policy.
,
select Library, and then select Pricing Policy.
In the Pricing Policy Summary
window, click Add ![]() to create a new pricing policy. The Pricing
Policy Definition window
is displayed. See the Common
UI Elements section for details on
tasks such as view, search, copy, delete, export, approve, reject, and page
view options.
to create a new pricing policy. The Pricing
Policy Definition window
is displayed. See the Common
UI Elements section for details on
tasks such as view, search, copy, delete, export, approve, reject, and page
view options.
Figure 18:
Pricing Policy Summary Window
Define a Pricing Policy
You can define a
new Pricing Policy in the Pricing Policy Definition window.
Figure 19:
Pricing Policy Definition Window
To define a pricing
policy, follow these steps:
1. In the Pricing
Policy Definition window
populate the details mentioned in the following table. Fields marked in red
asterisk (*) are mandatory.
|
Table
12: Pricing Policy Definition – Fields and Descriptions |
|
|
Fields |
Description |
|
Name* |
Enter the
pricing policy name. |
|
Description |
Enter a
short description for the pricing policy. |
|
Folder |
Select the
folder in which you want to save the policy. |
|
Access Type* |
Specify
whether the policy is Read-Only/Read-Write. |
|
Version |
Displays the
workflow version. |
2. Click Add ![]() , and select the Instrument Type, Currency, Source, Model Name, and Method
Name. You can create
multiple entries in a pricing policy.
, and select the Instrument Type, Currency, Source, Model Name, and Method
Name. You can create
multiple entries in a pricing policy.
NOTE:
Release 8.1 supports only Numerix as
the Source.
3. Click ![]() to delete any entry from the
table.
to delete any entry from the
table.
4. Click Save ![]() . A confirmation dialog box is displayed.
. A confirmation dialog box is displayed.
5. Click OK. The pricing policy is defined and
displayed in the Pricing Policy Summary window.
Bucket Definition
FRTB guidelines
allow the banks to define risk buckets based on the group of risk factors with
similar characteristics. A bucket can be defined as a set of risk factors that
are grouped together by common characteristics.
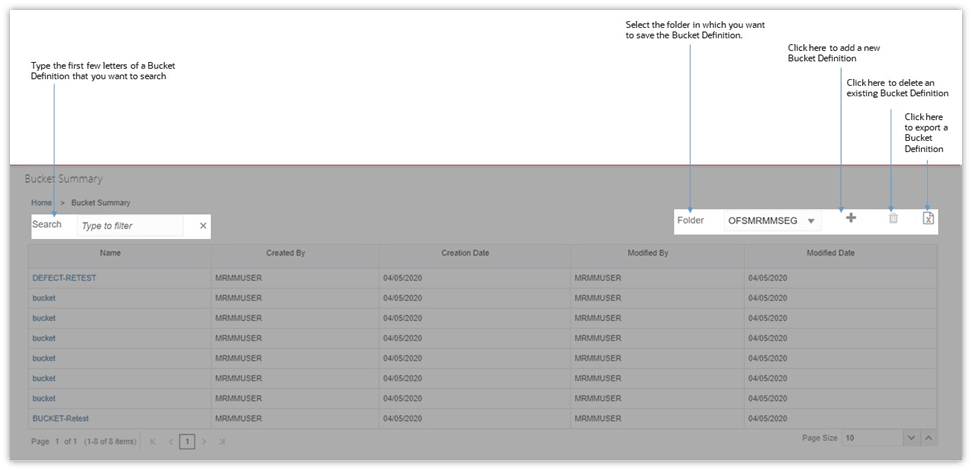
Navigate to the Bucket Summary Window
From the MRMM Home page,
select Market Risk Measurement and Management, click Navigation Menu ![]() ,
select Library, and then select Bucket Definition.
,
select Library, and then select Bucket Definition.
In the Bucket Summary
window, click Add ![]() to create a new bucket definition. The Bucket Definition
window is displayed. See the Common
UI Elements section for details on tasks such as view, search, copy, delete,
export, approve, reject, and page view options.
to create a new bucket definition. The Bucket Definition
window is displayed. See the Common
UI Elements section for details on tasks such as view, search, copy, delete,
export, approve, reject, and page view options.
Figure 20:
Bucket Summary Window
Define a Bucket
You can define a
new bucket in the Bucket Definition window.
Figure 21:
Bucket Definition Window
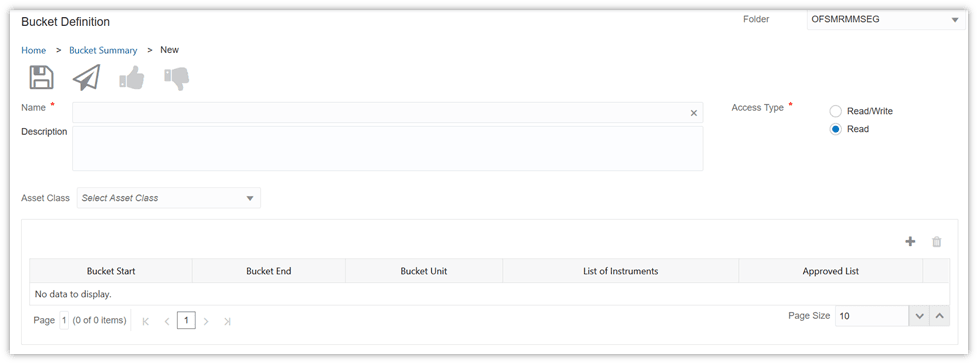
To define a new
bucket, follow these steps:
1. In the Bucket
Definition window,
populate the details mentioned in the following table. Fields marked in red
asterisk (*) are mandatory.
|
Table
13: Bucket Definition: Fields and Descriptions |
|
|
Fields |
Description |
|
Name* |
Enter the
bucket name. |
|
Description |
Enter a
short description for the bucket. |
|
Folder |
Select the
folder in which you want to save the bucket. |
|
Access Type* |
Specify
whether the bucket is Read-Only/Read-Write. |
|
Version |
Displays the
workflow version. |
2. Select the Asset
Class from the drop-down
list.
3. Click Add ![]() , and specify details for fields Bucket
Start and Bucket End.
Enter numeric values in these fields.
, and specify details for fields Bucket
Start and Bucket End.
Enter numeric values in these fields.
4. Specify the Bucket
Unit in terms of Day,
Month, or Year. Select the relevant option from the drop-down list.
5. Click Filter ![]() to add instruments in the List of Instruments
column.
All the instruments that the bank has exposure such as Bonds, Equity, and so
on, must be added here. The List of Instruments column is updated after the
Bucket definition is saved.
to add instruments in the List of Instruments
column.
All the instruments that the bank has exposure such as Bonds, Equity, and so
on, must be added here. The List of Instruments column is updated after the
Bucket definition is saved.
The
following window is displayed. You can create multiple entries in a definition.
Figure 22: Add Instruments in the Bucket Definition
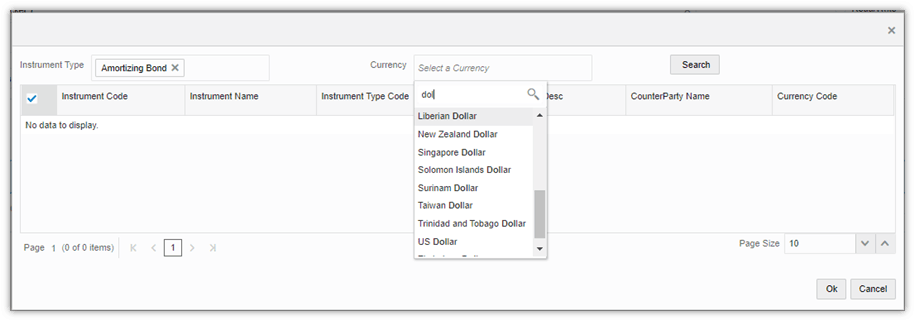
6. Specify the Instrument
Type and Currency and click Search. The results get listed in the columns Instrument
Code, Instrument Name, Instrument
Type Code,
Instrument Type Desc, Counterparty Name, and Currency Code. Click OK.
7. The Approved List column is updated
after the bucket definition is approved.
8. Click Submit ![]() to save and submit the bucket for
approval. A confirmation dialog box is displayed.
to save and submit the bucket for
approval. A confirmation dialog box is displayed.
Or,
Click Save ![]() to
update the bucket before submitting it for approval. A confirmation dialog box
is displayed. After
Save the Bucket Start, Bucket End and Bucket Unit fields become uneditable.
to
update the bucket before submitting it for approval. A confirmation dialog box
is displayed. After
Save the Bucket Start, Bucket End and Bucket Unit fields become uneditable.
9. Click OK. The bucket is defined and displayed in
the summary page.
Approve or Reject a Bucket Definition
To approve or
reject a bucket definition, follow these steps:
1. Select the bucket definition from the Bucket Definition Summary window. The Bucket Definition window is displayed.
2. Click Edit ![]() .
.
3. Click Approve ![]() or Reject
or Reject ![]() .
.
The respective message
is displayed. Approved bucket definitions cannot be edited.
Hybrid Model
Hybrid model is a
combination of models used to price multi-asset class deals. The Monte Carlo
technique used for Counterparty Risk calculation requires a global hybrid model
to be constructed and used for the exposure calculation of each trade. The
hybrid model is composed of a set of component models, for which parameters,
correlation values, and calibration strategies must be defined.
Rule within a
hybrid model defines a pattern that is used to match the name of the
underlyings specified by the trades. If a rule’s pattern matches the name of an
underlying, other attributes in the Rule element specify what type of model
should be generated, and the parameters for that (such as calibration strategy,
and primary or secondary selection). Multiple rules can match an underlying,
since the same underlying can require multiple factor models.
Navigate to the Hybrid Model Window
From the MRMM Home page,
select Market Risk Measurement and Management, click Navigation Menu ![]() ,
select Library, and then select Hybrid Model.
,
select Library, and then select Hybrid Model.
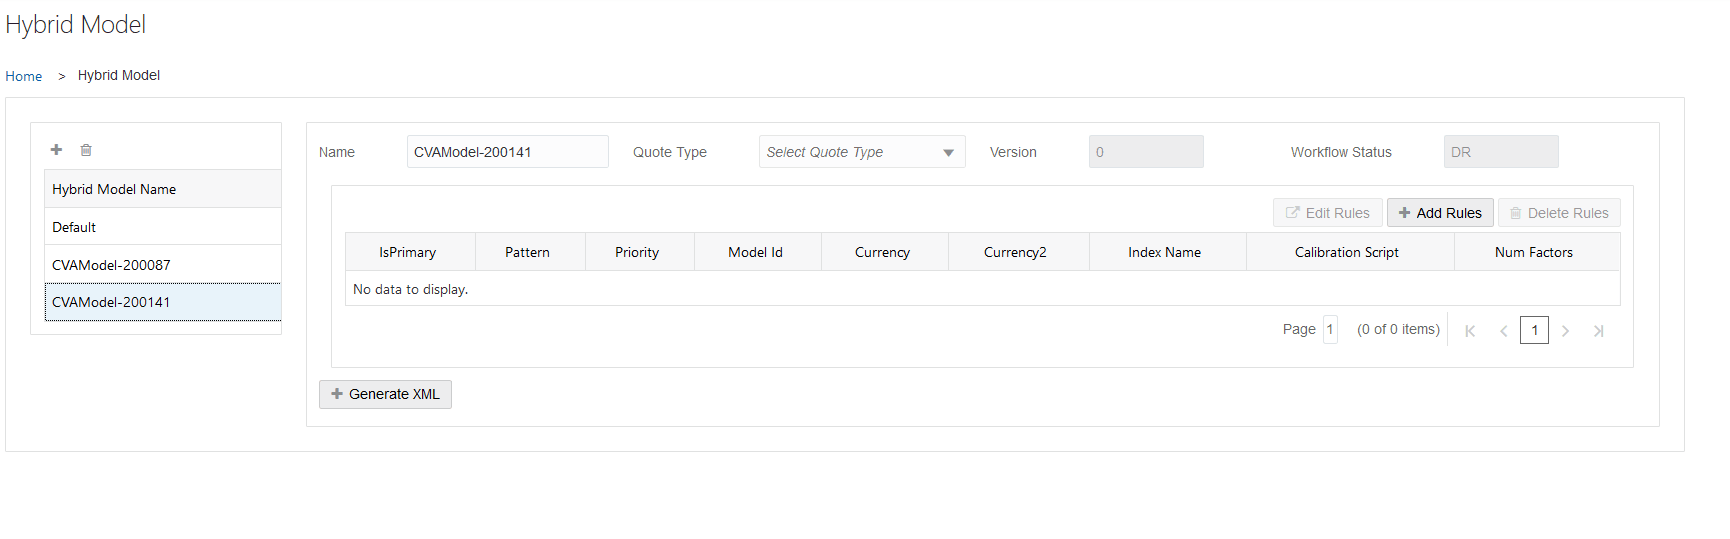
Adding a Hybrid Model
This section
details the procedure for adding a hybrid model. The following table describes
the fields in the Hybrid Model window:
To add a hybrid
model, follow the below steps:
1. Navigate to the Hybrid Model
window.
Figure 23 Hybrid
Model Definition Screen
2. Click Add ![]() . A new model is created.
. A new model is created.
Figure 24 Hybrid
Model Add
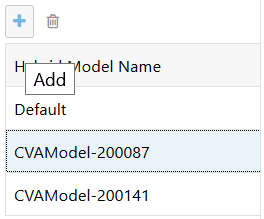
3. Select the new model. It is added in
the definition pane. Populate the relevant details in the fields.
Table 14 Fields
and their Descriptions in Hybrid Model Pane
|
|
|
|
Fields |
Description |
|
Fields
marked in red asterisk(*) are mandatory |
|
|
Name* |
The Hybrid Model name is
displayed. |
|
Quote Type |
Correlation
factors are found by looking in the market data, and this element notes how
to form the full key of those correctly factor quote keys. Select any one
value from available list – ASK, BID, FIX, LAST, MID Select the Quote Type
from the drop-down list. |
|
Version* |
Displays the
workflow version. |
|
Workflow
Status |
Displays the
status of the workflow. |
4. Click Add Rules ![]() . The Add Rule Window is displayed.
. The Add Rule Window is displayed.
Figure 25 Add
Rule Window
5. Follow these steps:
a. Select the Pattern from the drop-down list. It defines a
pattern with positional strings that is used to match the name of an
underlying. This determines if the rule is applicable for a specific trade’s
underlying. If the pattern matches, the rule is used to generate one or more
factor models in the output hybrid model setup. For example,
"IR.<Currency>" will match any underlying with the pattern that
it starts with the string "IR." and ends with some currency string.
The positional strings are set with the specified name (or names), and will be
substituted in the value of other attributes of the rule. Based on the selected
Pattern, the fields are displayed. Enter the relevant details in the fields.
The below table lists the mapping between pattern and fields displayed:
|
Table 15 Fields and their
Descriptions in Add Rules Window |
||
|
Pattern |
Fields |
Description |
|
Common
fields |
Number
Factor |
The number
of factors for the underlying component model, if it can be configured with
multiple factors. Specify the
Num Factor. |
|
Priority |
It indicates
the priority that is used when two or more pattern match the name of an
underlying. Specify the
Priority. |
|
|
Model ID |
This field
indicates the ID string of the model to be created for the single-factor
model. It can refer to positional strings found when the Pattern was matched.
For example, “IR.MODEL.HW1F.<Currency>" will be the string "IR.MODEL.HW1F.USD"
if the previous example’s Pattern matched the underlying "IR.USD". Select the
Model ID from the drop-down list. |
|
|
Is Primary |
Set this to
"true" or "false" to indicate if the generated model is a
primary or secondary one. Secondary models are separate from other secondary
models, and are only correlated with the primary models. Check the Is
Primary check box, if applicable. |
|
|
Calibration
Script |
A Numerix
Extension Library (NXEL) script function to call to generate the calibration
instruments for the model |
|
|
IR.Currency |
Currency |
Select the
Currency. |
|
FX.<Basecurrency>/<Termcurrency> |
Base
Currency |
Select the
Base Currency. |
|
Term
Currency |
Select the
Term Currency. |
|
|
CR.<Currency>-<ReferenceEntity>_<DebtType>_<RestructuringClause> |
Currency |
Select the
Currency. |
|
Debt Type |
Select the
Debt Type. |
|
|
Reference
Entity |
Select the
Reference Entity. |
|
|
Restructuring
Clause |
Select the
Restructuring Clause. |
|
|
EQ.<Currency>-<Exchange>-<Ticker> |
Currency |
Select the
Currency. |
|
Exchange |
Select the
Exchange. |
|
|
Ticker |
Select the
Ticker. |
|
|
CMDTY.<Currency>-<Exchange>-<Ticker> |
Currency |
Select the
Currency. |
|
Exchange |
Select the
Exchange. |
|
|
Ticker |
Select the
Ticker. |
|
|
CPI.<Currency>-<InflationIndex> |
Currency |
Select the
Currency. |
|
Inflation
Index |
Select the
Inflation Index. |
|
|
RR.<Currency>-<InflationIndex> |
Currency |
Select the
Currency. |
|
Inflation
Index |
Select the
Inflation Index. |
|
b. Click Save.
6. Click Generate
XML. A message XML
generation is Successful is displayed. This file is used while defining a
business definition in Monte-Carlo simulation user interface, Hybrid Model Name
field.
Edit a Hybrid Rule
You can edit all
the fields in an XML if it is not used in any business definition.
Delete a Hybrid Rule
You can delete XMLs
which are not used in any business definition.