Capturing Analytic Instance Data
You need to capture the relevant data and metadata before sending it to PeopleSoft support for diagnosis. You can capture the data by loading an analytic instance and then exporting it with the Analytic Instance Capture Utility.
By default, the Analytic Instance Capture Utility exports the analytic instance to a directory that it creates entitled <PS_HOME>\appserv\<domain>\LOGS\<analytic instance><timestamp>. For example, if you export an analytic instance named ACEINST, the resulting export directory is named something like <PS_HOME>\appserv\<domain>\LOGS\ACEINST_20041113_015912. A valid export directory will by default include the following files. If not, the export was not successful:
The utility registration file items.reg.
One or more data cache files named data_1.bin, data_2.bin, and so forth.
Two .txt files, exportResults.txt and importDirections.txt.
The exportResults.txt file contains explicit details on how to export your metadata to a project. The importDirections.txt file contains details on how to import this particular analytic instance.
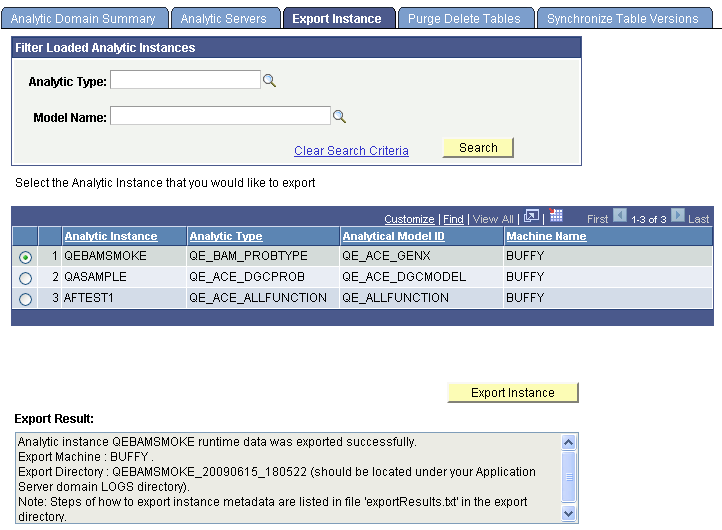
Use the Export Instance page (PTATEXPORT) to export an analytic instance.
Navigation
Image: Export Instance page
This example illustrates the fields and controls on the Export Instance page.
To export an analytic instance:
Load the analytic instance.
In PeopleSoft Pure Internet Architecture, select
Select the Export Instance tab.
(Optional) Select whether to filter the loaded analytic instances, either by analytic type or by model name.
Click the Search button to display the designated loaded analytic instances.
Click the option button to the left of the analytic instance that you want to export.
Although you can load multiple analytic instances, you can export only one at a time.
Click the Export Instance button.
The Export Result text box displays the status of the export operation. This message lists:
The instance name and whether it was exported successfully.
The export machine.
The export directory.
A message about the exportResults.txt file.
Retrieve the exportResults.txt file for specific details on how to export this analytic instance.
In PeopleSoft Application Designer, create a project that has the same name as the export directory that was created during the export procedure.
Remember, the export process creates a directory whose name consists of the analytic instance name followed by the date and timestamp. For example, if the analytic instance is named ACEINST, the directory might be named ACEINST_20041113_015912.
Select and insert the items listed in the exportResults.txt file into the project.
Save the project.
Select
Select <PS_HOME>\appserv\<domain>\LOGS\<analytic instance><timestamp> as the export directory and then click the Copy button.
Zip the contents of <PS_HOME>\appserv\<domain>\LOGS\<analytic instance><timestamp> and send it to PeopleSoft user support.