Creating Indexes
This section provides an overview of indexes and discusses how to:
Configure indexes.
Add a custom index.
Edit the DDL.
Indexes are an important part of your physical database because they affect the efficiency and speed with which your application can store and retrieve data. PeopleSoft application indexes are defined in two ways.
Some indexes are defined for you automatically, based on the key, search key, list box items, and alternate search keys that you specified in your record definition. The application processor uses these indexes for quick access when you use the online system.
However, sometimes you need to define additional indexes to improve the performance of demanding queries, reports, or batch programs. You define and modify these additional indexes using the data administration tools in PeopleSoft Application Designer.
Note: You can only create indexes for record definition types that are SQL or temporary tables. You would not create indexes on views, such as a SQL view, because views are never physically created. The Indexes option in the Tools, Data Administration menu is disabled when a view is open.
When you use SQL Create or SQL Alter for a table, the system automatically builds database indexes to the SQL table that are based on the keys and list items that you specify in the record definition. Your database uses indexes to find definitions in the database the same way that you use indexes to find specific information in a book. If an index entry exists for a specific field in a table, the database can search and quickly find what it needs to complete your request; otherwise, it must search the contents of the entire table.
Indexes enhance system performance by generating key lists that the application processor uses to extract the data that it uses to populate pages and search records. The system automatically creates:
Standard indexes (key or duplicate order key indexes) if at least one field in the table is a key or duplicate order key.
The index contains all key and duplicate order key fields. The system automatically names this index with a prefix of PS_.
Alternate search key indexes for each alternate search key.
The system automatically names this index with a prefix of PSn, in which n is a number between 0 and 9.
Custom indexes, which you can define using the Edit Index, Edit DLL, and Add Index dialog box in the PeopleSoft Application Designer administration tools.
The system automatically names this index with a prefix of Psa, in which a can be any letter between A and V. The system does not create custom indexes automatically.
For most database tables (those with unique keys), the key index defines unique keys for a table, but the system also uses it to access high-level keys and orders by all keys. Alternate search key indexes support the search record and field prompts. The purpose of these different indexes is to enable the system to respond to all system prompts through index-only SQL access, minimizing direct database table access.
Note: If you use Create Table or Alter, the Create Index option is automatically selected. With the Create Table or Alter options, you cannot deselect the Create Index option.
The alter process takes care of indexes regardless of the Alter Table Options you select on the Alter tab of the Build Settings dialog box. In the case of the Alter by Table Rename option, the indexes are dropped automatically when the temporary table is dropped. For the Alter in Place option, the index creation process goes through the Recreate index only if modified option on the Create tab.
When creating indexes with the Alter method, before altering the table, drop the statistics using "DROP STATISTICS" that were created explicitly in columns using "CREATE STATISTICS."
The following record definition modifications require you to create new indexes:
Add, delete, or modify keys, duplicate order keys, alternate search keys, or descending keys in the Record Field Properties dialog box.
Change the order of keys (ascending, as opposed to descending) in the Change Record Indexes dialog box.
Change the Unique settings in the Edit Index dialog box.
Platform Support for Indexes
Most database platforms support indexes with an unlimited number of keys. However, Microsoft SQL Server, and DB2/UDB for Linux, UNIX, and Windows (DB2/UDB LUW) support indexes that have a maximum of 16 keys only. PeopleSoft Application Designer supports indexes for these databases by creating functional indexes. If a record definition has more than 16 keys, the Build process automatically alters the table to support functional indexes. The system adds a warning message to the log file indicating this.
You can find sample code for functional indexes for each of these platforms in the “Understanding Functional Indexes” topic.
The following list offers more details about functional indexes by database platform:
Functional indexes for Microsoft SQL Server 2000.
If an index has more than 16 keys, the key fields are concatenated to a functional key. This key field is then added to the table as the last column, called MSSCONCATCOL. A unique index is created for MSSXCONCATCOL as well as an additional index called PSW<record name>, which is used as a search index.
Functional indexes for DB2/UDB LUW.
Similar to the concatenation that occurs with SQL Server, DB2/UDB LUW also concatenates the key fields to a functional key. The key is then added to the table as the last column, called DBXCONCATCOL. A unique index is created for DBXCONCATCOL as well as an additional index called PSW<record name>, which is used as a search index.
Note: Beginning with PeopleTools 8.54, descending indexes are no longer supported on the Oracle platform for performance reasons.
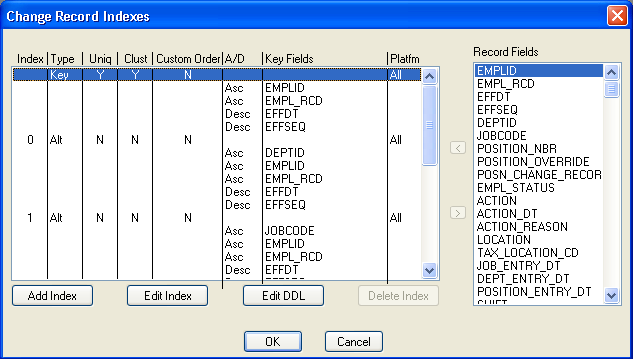
For performance tuning, you might want to change the order of your index keys. PeopleSoft Application Designer provides direct control over all of the indexes created by PeopleTools. You can inspect, add, or change all defined indexes or delete custom indexes for any record in the system through the Change Record Indexes dialog box.
Standard indexes are based on the key, duplicate order key, or alternate search key only. However, with the Change Record Indexes dialog box, you can modify those indexes and create additional indexes, which might be required if you do custom processing. Any of the indexes that you entered can be maintained for all database platforms or for a list of specific platforms. All indexes and keys created by PeopleTools are stored in PeopleSoft system tables.
Image: Change Record Indexes dialog box
This example illustrates the fields and controls on the Change Record Indexes dialog box. You can find definitions for the fields and controls later on this page.
To edit the index key order:
Open the record definition for which you want to make the custom index.
Select to access the Change Record Indexes dialog box.
The Custom Order column indicates whether the index keys were configured. The default selection is N, indicating that no index keys were configured.
Double-click N or Y in the Custom Order column for the index that you want to alter, or click Edit Index.
Select the Custom Key Order check box.
Click OK.
The Custom Order entry changes from N to Y.
Drag and drop the field that you want to move into the appropriate order.
After configuring the key order, to reset the key order of the index to the original order as defined in the record definition, deselect the Custom Order entry (Y to N), and click OK. The order of the key fields reset to the original position in the Change Record Indexes dialog box.
Check the key order in the Use Display mode of your record definition.
The Num (number) column represents the original order of the keys in your record, and the Ordr (order) column reflects the key order in the index.
Create the indexes:
Select
Select Create Indexes in the Build Options group box.
Make sure that you select the appropriate build settings.
Run the Build process to either generate a script or run the SQL online.
Confirm the construction of the new index with your native SQL command processor.
Note: Users might also configure indexes for parent records that contain one or more subrecords without key fields, such as the ADDRESS_SBR subrecord . However, if the subrecords contain key fields, then index key order changes are restricted. The Custom Key Order option is deactivated and cannot be changed from N to Y. Change the index key order for the parent before inserting the subrecord.
To add a custom index:
Open a record.
Select to access the Change Record Indexes dialog box.
Click Add Index.
The Add Index dialog box enables you to determine for which database platforms you want to define the index if you selected the Some option for Platform. The system selects the Custom Key Order check box to ensure that the underlying record definition is not adversely affected by the change to your index.
For all user-defined indexes, you must enter a description of the index in the Comments section. You should know the purpose of the index, the transactions and processes that use this index, and other relevant information. This information assists you when you want to remove unused indexes. An error message appears if you do not remove unused indexes.
Note: You cannot add more than 22 user indexes (A–V). The system disables the Add Index button if the record already contains 22 user indexes.
Indicate the database platforms for which you want to create an index.
Click the OK button to add a row to the Change Record Indexes dialog box and to enable the arrow buttons.
Move the field under the new index row:
In the Record Fields list box, select the field that you want indexed.
Click the arrow button or double-click the field.
Repeat this step for each field that you want to add.
Click OK.
Save the record definition.
Select
Select Create Indexes under Build Options.
Make sure that you select the appropriate build settings.
Run the Build process to either generate a script or run SQL online.
Run the generated SQL script if you opted to generate one.
Confirm the construction of the new index with your native SQL command processor.
In the Change Record Indexes dialog box, you can view the DDL for the index and override DDL parameters that are defined in the DDL model for this index.
To edit the DDL:
In the Change Record Indexes dialog box, select the index that you want to edit.
Click the Edit DDL button to access the Maintain Index DDL dialog box.
The upper list box in this dialog box lists the platform and DDL parameter, and the lower list box shows the DDL templates for the various platforms. Your database might have fewer platforms enabled. The sizing set enables different collections of tables to have different model statements and parameters.
Select the platform and sizing set.
Click View DDL.
The dialog box that appears shows the index DDL for the platform and sizing set that you selected. Review this DDL statement.
Click the Close button when you are finished.
Select the parameter that you want to edit in the upper list box.
The default value is set in the DDL Model Defaults dialog box. You can change this setting by selecting in PeopleSoft Application Designer, or by selecting in the browser.
Click the Edit Parm (edit parameter) button to access the Edit Override Parm Value (edit override parameter value) dialog box.
Enter the override value for the parameter that you selected.
Select OK for both open dialog boxes.