Manipulating Page Controls
After you place a control on a page, you have several choices for manipulating it.
This section discusses how to:
Select controls.
Resize controls.
Use the Page Control Inspector.
Delete controls.
Move controls on the same page.
Copy and move controls to another page.
Position page control labels.
Before you manipulate a control, you must select it. You can do this by clicking the control or by using the Edit menu. A check mark beside the option in the menu indicates which of these modes you are in:
|
Field or Control |
Definition |
|---|---|
| Select Field |
Select one control on the page by clicking on it. To deselect a control, click once outside the dotted box. Deselected is the default mode. |
| Select Group |
Select a group of controls by drawing a box around the controls that you want to select. You can also activate this option by clicking and dragging over the target fields. Note: You are in Select Group mode when the cursor changes to a pointing finger. If the cursor does not change when you select try first selecting an individual control on the page and then selecting again. |
| Select All |
Select all of the controls on the active page. The result is the same as using the Select Group option to draw a box around the controls. |
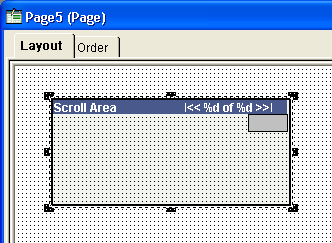
You can adjust the size or shape of any page control that displays selection handles when it is selected:
Image: Resizing a control with selection handles
This example illustrates the fields and controls on the Resizing a control with selection handles. You can find definitions for the fields and controls later on this page.
Note: Some browsers do not support the resizing of certain control types. In these cases, changing the size in PeopleSoft Application Designer has no effect upon the runtime size of the field.
See Troubleshooting Browser Limitations available on the My Oracle Support website.
To resize a control, use one of these methods:
Select the control and drag a handle to adjust the height or width.
Note: For some control types, you can adjust only the width.
Hold down the Shift key while pressing the Up Arrow, Down Arrow, Left Arrow, or Right Arrow key.
The frame size is adjusted one grid unit in the indicated direction.
Note: The position of the top, left corner of the frame does not change; resizing with the keyboard occurs by adjusting the position of the bottom, right corner.
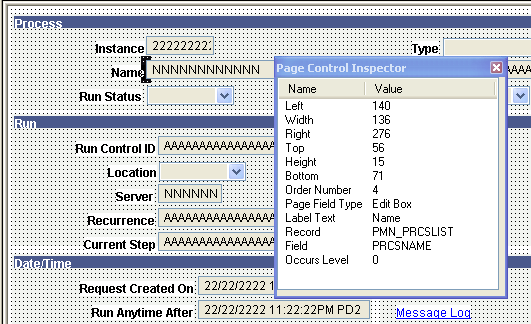
The Page Control Inspector provides location, size, type, and data source information for the selected page control on the page. The first six values, Left, Width, Right, Top, Height, and Bottom, display the exact bounding coordinates in pixels of the control on your page in PeopleSoft Application Designer. The remaining values help distinguish the selected control from others on the page.
Access the Page Control Inspector from the View menu or by clicking the Toggle Inspector button on the page definition toolbar. When you finish viewing the values for one control, click another control to view its values. You can check multiple controls on a page in quick succession.
Image: Page Control Inspector
This example illustrates the fields and controls on the Page Control Inspector. You can find definitions for the fields and controls later on this page.
Note: The HTML that is generated for your page uses table layout, rather than pixel layout. You should preview how your page might look in the PeopleSoft Pure Internet Architecture as you design it. Spacing of fields at runtime may not appear exactly the same as during design time.
While the Page Control Inspector displays values for a grid, no information is available for individual grid columns.
If you remove a control from a page, look for other controls that are related to it, such as display controls or invisible controls used by PeopleCode. You may need to delete them as well or alter their attributes so that they can be standalone fields.
Check for PeopleCode that references this control on the page by opening the field definition and selecting If any references exist, modify or delete them because the control no longer exists on the page.
To delete controls from a page:
Select the controls.
Select
To move controls to another position on the same page, use one of these methods:
Select a control and drag it to the new position.
Select a control and press the Up Arrow, Down Arrow, Left Arrow, or Right Arrow key.
The control moves one grid unit in the indicated direction.
Select a group of controls and drag them to the new location.
Moving Controls on Long Pages
Long pages are too big to be seen in their entirety in the definition workspace. Scroll bars appear on the right and bottom enabling you to move about the page. To move controls that appear in the visible area of the page to an area that is outside the visible area:
Select the set of controls by using Edit, Select Group.
Click and hold the set of controls.
Without releasing the mouse button, scroll the mouse wheel to move up or down the page.
Release the button to place the controls.
Save the page.
To copy a single control to another page, drag the control from one page to the other. For a group of controls, you also can select the controls and use the copy and paste functionality.
To move a group of controls to another page, cut and paste the group onto the new page.
PeopleSoft Application Designer enables you to change the relative position of most page controls and their labels. This section discusses how to:
Move page control labels.
Prevent translation buffer overlap.
Moving Page Control Labels
To move page control labels, use one of these methods:
Select multiple labels and either click one of the Align Label (position) buttons in the toolbar or select (position).
PeopleSoft Application Designer aligns the selected labels based on the last label that you select. Alignment is based on the first letter, last letter, or middle letter of the labels; the translation buffer is ignored.
Select the label and drag it to the new position on the page.
Select the label and use a directional arrow key on the keyboard to move the label one grid unit in the indicated direction.
Access the control properties dialog box, select the Label tab, and then select an option in the Position group box (the Location group box for radio button and check box controls). The Custom option is informational only; it does not move the label. All other options move the label to the selected position when you click the OK button.
Click the Left label position button in the toolbar to move the label to the default left position of the page control.
Note: Select the control itself when you want to move both the control and its label and retain their relative positioning.
Preventing Translation Buffer Overlap
Often, when you translate your own field labels, the label in the new language requires more space than the English label. When you create or modify pages, you need to accommodate this requirement by leaving additional space between the label and the field control. This space is called the translation buffer. If you do not account for the translation buffer during page design, labels and controls can overlap, which can interfere with readability after the translation.
PeopleSoft Application Designer automatically calculates the translation buffer size as 30 percent of the current label length + the length of 2 upper case'Ns. The calculation uses the number of characters, but it ignores the individual character itself. The combined character length and translation buffer length is limited to 60 characters for static text labels, 30 characters for RFT_LONG labels, and 15 for RFT_SHORT labels.
Based on the calculation, a page control label appears with dashed lines that surround and extend beyond the label, visually indicating the appropriate translation buffer. PeopleSoft Application Designer appropriately moves and adjusts the translation buffer indicators whether you align your labels to the left, right, or center. For most page controls, the translation buffer indicators envelope only the label. However, the translation buffer indicators for push buttons and links enclose the entire control because these labels are embedded in the controls themselves. By default, PeopleSoft Application Designer resizes push buttons and links automatically to accommodate the combined length of the label and the translation buffer.
Note: Group box, grid, and scroll area controls do not display translation buffer indicators.
When you save a page, PeopleSoft Application Designer warns you if the page control label translation buffer overlaps a control. When you dismiss the warning dialog box, PeopleSoft Application Designer brings focus to the problematic page control. If more than one label is inappropriately positioned, the first one receives the focus. When your page contains no translation buffer overlaps, the page saves without warning.
Note: Translation buffer indicators appear even if you do not translate your labels. Translation buffer overlap, however, is inconsequential to English language pages.
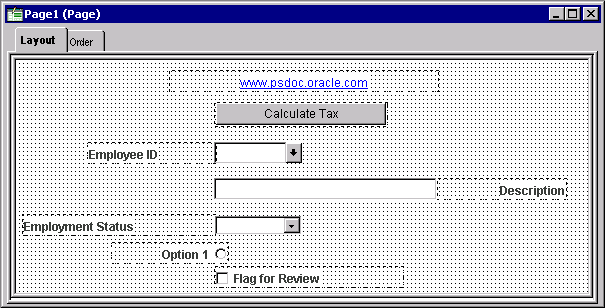
Example: Translation Buffer Indicators
In this example, you see the translation buffer indicators for seven page controls. The link and the push button demonstrate center label alignment. The Employee ID , Employment Status, and Flag for Review labels demonstrate left alignment. The Description and Option 1 labels demonstrate right alignment:
Image: Translation buffers indicators on several page control types showing different label alignment settings
This example illustrates the fields and controls on the Translation buffers indicators on several page control types showing different label alignment settings. You can find definitions for the fields and controls later on this page.
Example: Translation Buffer Overlap
In this example, the Effective Date label maintains the translation buffer, but the Short Description label does not maintain the translation buffer and overlaps the associated edit box page control:
Image: Field labels demonstrating proper label positioning (Effective Date) and translation buffer overlap (Short Description)
This example illustrates the fields and controls on the Field labels demonstrating proper label positioning (Effective Date) and translation buffer overlap (Short Description). You can find definitions for the fields and controls later on this page.
