Modifying Page Tabs
This section provides an overview of tabs and discusses how to:
Create tab images.
Customize page tab style sheets.
To provide a greater degree of and simpler user-level configuration, PeopleSoft applications use the sliding door technique for tabs. Cascading style sheets (CSS) have the advantage of layering background images, which enables them to slide over each other to create visually interesting effects.
The default style sheet and the SWAN style sheet contain CSS tabs. You can, however, change the background colors of these CSS folder and grid tabs. To change the background colors of tabs, you should have a basic understanding of how tab definitions are constructed and stored in the database.
Sliding Doors Technique
Sliding door tabs expand and contract based on the size of the text by using two separate background images: one image to render the left side of a tab and the other image to render the right. Think of these two images as the sliding doors that complete one opening. The doors slide together and overlap more to fill a narrower space, or slide apart and overlap less to fill a wider space. The background images only show in the available doorway of the element to which they are applied (content area plus padding). The two images are anchored to the outside corners of their respective elements. The visible portions of these background images fit together inside the doorway to form a tab-like shape.
Sliding Door Tab Images
You need to know the following image names to modify the style sheets that ship with PeopleSoft applications.
For the dark blue look and feel, folder tabs and grid tabs use these images:
PSTAB_LEFT.gif
PSTAB_RIGHT.gif
For the SWAN look and feel, the folder tabs and the grid tabs use these images:
PSTAB_LEFT_SWAN.gif
PSTAB_RIGHT_SWAN.gif
The CSS code behind the rendering of the tab image is:
 #PSTAB a { background:transparent
url(%IMAGE(PSTAB_LEFT)) no-repeat left top; padding:0 2px 0 5px; }
#PSTAB a span { font-size:9pt; background:transparent url(%IMAGE(PSTAB_RIGHT))
no-repeat right top; padding:4px 14px 2px 5px; }
When working with sliding door tabs, the images load faster, are simpler to maintain, and the text within them can be scaled up or down significantly in size without breaking the page. Along with these new images, applications take advantage of the CSS background-position property to move into view the appropriate portion of the combined-state background image when the user hovers over a tab.
Image: Style sheet sliding door tab preload technique
The following image is an example of a Style sheet sliding door tab preload technique
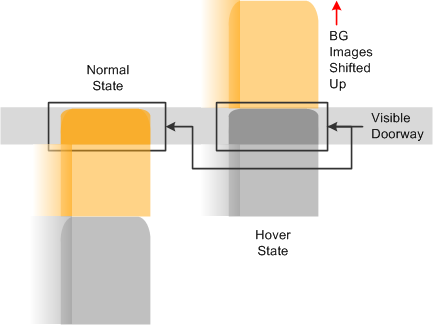
Applications use the shifted background positions from the active, inactive, and hover states.
Before you can assign a new background color to the active, inactive, and hover states of the tabs, you must create the necessary tab images in that color. To produce tabs in a different color combination:
In PeopleSoft Application Designer, open the image definitions for the tabs that you want to change.
Select File, Export Image and, in the Save Image dialog box, select the directory in which you want to place the images.
Use any image editor to alter the image colors to the same as the new background color you choose.
Note: Do not replace any of the transparent pixels with solid pixels. Additionally, you should leave the size and shape as they are even though the style sheets allows you to alter the size and shape of images.
Select File, New, Image to add the new image definitions to the database.
Save the new image files under the appropriate names.
Customize the tabs.
After you create the new images, you must change the properties of the style classes rendering the new sliding door tabs. The style classes that render the folder tabs and the grid tabs are PSTAB and PTGRIDTAB, respectively. Both style classes are part of the PSTAB_PTCSS free form style sheet.
To modify the tab properties:
Open the appropriate free form style sheet, PSTAB_PTCSS if you are using the default style sheet or PSTAB_PTCSS_SWAN if you are using the SWAN style sheet.
For folder tabs, modify the PSTAB style class; for grid tabs, modify the PTGRIDTAB style class.
For example, if you have two new folder tab images, the left and the right image of the tab, each has a different name and you must change the code as you see here:
#PSTAB a
{
background:transparent url(%IMAGE(<newlyCreatedLeftSideTabImageName>)) no-repeat left top;
....
}
#PSTAB a span
{
font-size:9pt;
background:transparent url(%IMAGE(<newlyCreatedRightSideTabImageName>)) no-repeat right top;
....
}
Note: You must replace
<newlyCreatedLeftSideTabImageName>and<newlyCreatedRightSideTabImageName>with the names of the new images that you create. You might have to modify the position property if the new images vary in size from the original images.Because the image contains all active, inactive, and hover color properties, you only need to change the pixel properties and background positioning if the delivered images have changed in size and shape.
You can modify style class properties such as border, padding, font, and text to create the required look for the tabs you are implementing.
You can override the tab bottom line by changing the following code:
 #PSTAB #TABBOTTOMLINE
{ Color: #809EBA; background: repeat-x right 18px; }
You can adjust the hover properties as shown in this example:
 #PSTAB a:hover a  { color:
#555555; }  #PSTAB a:hover span {font-size:9pt; background-position:100%
-50px; }
Note: The
<span>element renders the main part of the tab. Adjust any necessary properties, such asbackground-positionin the<span>element to render the image correctly. The left image is small, and you need to adjust only the color and possibly the border properties.Save the style sheet.
Stop the application server, clear the cache, and restart the application server.
Stop the web server, clear the cache, and restart the web server.