Producing Sample File Layouts
This section discusses how to:
Create file layout definitions.
Adjust file layout properties.
Insert segments and fields.
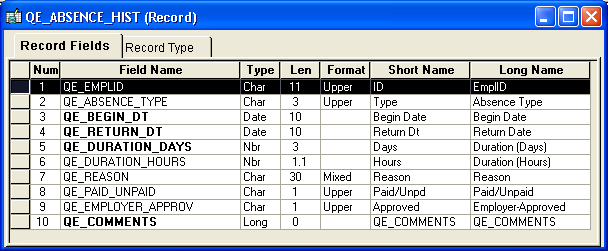
The following example shows how to create a file layout to be used with the QE_ABSENCE_HIST record:
Image: QE_ABSENCE_HIST record definition
This example illustrates the fields and controls on the QE_ABSENCE_HIST record definition. You can find definitions for the fields and controls later on this page.
For simplicity, suppose that each row in the FIXED format file has the following structure:
888 A
000 8001 VAC  1981-09-12 1981-09-26 14  .0                     P Y
888 A
000 8001 VAC  1983-03-02 1983-03-07 5   .0                     P Y
888 A
000 8001 VAC  1983-08-26 1983-09-10 13  .0                     P Y
888 A
000 8516 MAT  1986-06-06 1986-08-01 56  .0                     P Y
888 C
000 8516 SCK  1988-08-06 1988-08-07 1   .0                     P Y
888 A
000 8516 VAC  1987-07-14 1987-07-28 14  .0                     P Y
888 A
000 8553 JUR  1990-12-12 1990-12-17 5   .0  Local Jury Duty    P N
888 A
000 8553 MAT  1992-02-20 1992-10-01 224 .0  Maternity Leave    U N
888 A
000 8553 MAT  1994-08-19 1995-03-01 194 .0  Maternity          U Y
888 A
000 8553 PER  1993-04-15 1993-04-19 4   .0                     U N Personal
Day required
888 C
000 8553 SCK  1987-01-28 1987-01-30 2   .0  Hong Kong Flu      P N
888 A
000 8553 SCK  1988-08-02 1988-08-03 1   .0  Sick               P N
888 A
000 8553 SCK  1995-09-12 1995-09-13 1   .0                     P N
888 C
000 G001 MAT  1991-07-02 1991-09-28 88  .0  3-month Maternity  P Y Maternity will
be paid as 80% of Claudia's current salary.
000 is the file record ID for ABSENCE_HIST, and each field appears in the same order as in the ABSENCE_HIST database record. 888 is the file record ID for an extra segment called CHANGE_ACTION, which contains an AUDIT_ACTION field with the following meanings:
A: Row inserted.
C: Row updated, but no key fields changed.
Note: The end of file (EOF) character must be on a separate line and not on a line containing data for any incoming file, regardless of the file type. Each data line needs to be terminated with an end of line (EOL) character, which is different than an EOF character.
To create a file layout definition:
Use the QE_ABSENCE_HIST record definition as the template for the file layout.
Create a new file layout and then drag the QE_ABSENCE_HIST record into the open file layout.
Save the file layout with the name ABS_HIST.
The name of the first node changes from NEW FILE to ABS_HIST.
In the file layout definition, open the file layout, record, or field properties as appropriate for each step in the following procedure.
To adjust file layout, record, and field properties:
Change the file layout properties.
Double-click the topmost node in the file layout, ABS_HIST, to display the file layout properties.
Enter a short and long description of the file layout you are creating. For this example, you are creating a FIXED file layout, so you do not need to make any changes on the Use tab.
Change the file record properties.
Double-click the QE_ABSENCE_HIST file record to display its properties. Enter a record ID of 000, and a starting position of 1. The ID length is automatically set.
When you click OK, you see a message asking if you want to increment the start positions for all fields.
Click Yes to automatically increment the start position numbers for every field to take the length of the file record ID that you just added into account. If you do not click Yes, you must manually increment the start position for all fields.
You just created the file record ID for the QE_ABSENCE_HIST record:
000 8001       VAC  1981-09-12 1981-09-26 14  .0                     P Y
000 8001       VAC  1983-03-02 1983-03-07 5   .0                     P Y
Change the file field properties.
When a record definition is used as a template for a file layout, the default starting position for each field is based on the order in which it appears in the record as well as its length.
Double-click the QE_EMPLID file field to display its properties.
The start position is automatically incremented to 4 because the file record ID is 3 characters long. However, in the example, an extra space is between the end of the file record ID and the first field. Therefore, you need to change the start position of this field and all of the fields that follow this field to increment the starting position of this field and all fields following this field by 1. To do this:
Click the up arrow under Propagate to change that number from 0 to 1.
Click the button with the arrows pointing right (>>>).
(Optional) Adjust other fields.
The last field (QE_COMMENTS) has a length of 0 because it is based on a Long field type.
Note: When a Long field type is inserted into a file layout, the system converts it to a Character field type with a length of 0.
Because the format for this file layout is FIXED, you have to change the field length of that file field so that it is long enough to accommodate the data that you expect from the file.
You do not have to propagate this change because this is the last field in the record.
Open the file layout definition based on the ABS_HIST record:
Image: File layout with new segment and field added
This example illustrates the fields and controls on the File layout with new segment and field added. You can find definitions for the fields and controls later on this page.

Note: You will insert a segment that is a sibling, that is, it has the same level as the QE_ABSENCE_HIST record.
To insert a segment and then a field into that segment:
Select Insert Segment from the pop-up menu or select to insert a segment.
The Insert New Segment dialog box appears. This dialog box is identical to the File Layout Segment Properties dialog box.
On the Insert New Segment dialog box:
Enter the file record name, file record ID, and ID start position.
Click the OK button to insert the segment.
Note: If you provide a Record File ID when adding a segment to a file layout that is either CSV or FIXED, the system prepends this Record File Id to every row of data that is written.
Insert a file field.
Select Insert FileField from the pop-up menu.
The Insert New Field dialog box appears. It is identical to the File Layout Field Properties dialog box.
Enter a field name, start position, and field length, and then click the OK button.
Note: The start position is not automatically set when you add a file field to the file record. For this example, the AUDIT_ACTION field requires a start position of 5.
Select File, Save, or click the save icon in the toolbar to save your changes to the file layout.
Now that you have created and saved a file layout, you must use PeopleCode to access the data. File layouts rely solely on PeopleCode as the engine behind the actual data access and movement.