Administering Integration Gateways
This section discusses how to:
Define integration gateways.
Ping integration gateways.
Load target connectors.
Edit connector properties.
Use the Gateways page (IB_GATEWAY) in the Gateways component (IB_GATEWAY) to specify the location of the gateway, update configuration settings, and register target connectors to be used with the gateway.
Note: A default local gateway definition is automatically created upon installation. If you plan to use only the local gateway, you do not need to create a new definition; however, you still must configure the gateway.
To access the Gateways page, select .
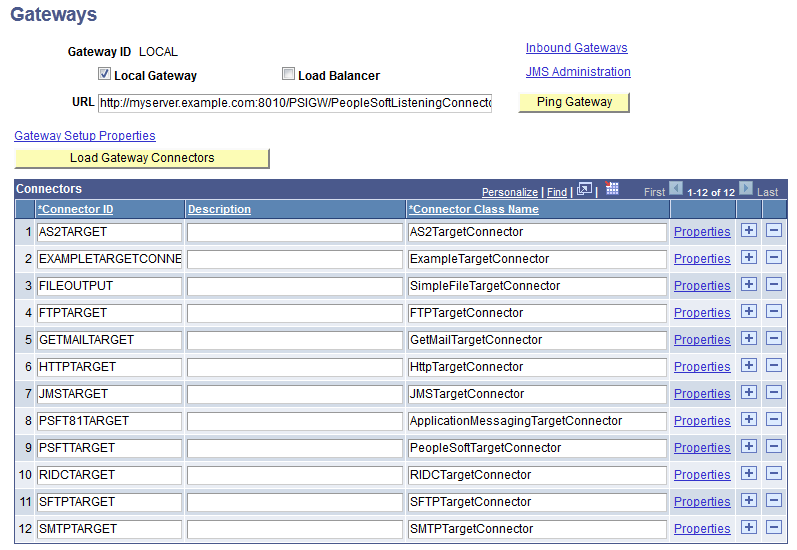
Image: Gateways page
This example illustrates the Gateways page with the gateway URL defined and the target connectors loaded.
To define and configure a gateway:
Access the Gateways page (select ).
Click Search, and select an existing gateway definition.
The Gateways page appears, displaying the gateway definition.
Note: The default ID for the delivered local gateway is LOCAL.
Add a new value, enter an integration gateway ID, and click Add.
The Gateways page appears.
(Optional.) Select Local Gateway to designate the gateway as local.
Each PeopleSoft Integration Broker node requires exactly one local gateway, which is the application’s first point of contact with other PeopleSoft applications, third-party systems, Integration Broker hubs, and remote gateways.
Note: You must open the definition of the designated local gateway and clear the Local Gateway check box before you can select that check box in another definition.
Enter the gateway URL for the selected gateway’s PeopleSoft listening connector.
Specify the URL with the format:
http://machinename:port/PSIGW/PeopleSoftListeningConnector
In this case, machinename:port is the machine name and port, host name, or IP address of the web server hosting the gateway.
By default the port number is 80 for HTTP and 443 for HTTPS. If using the default port number, you do not need to specify it in the URL.
For HTTPS, the URL should start with https.
The integration gateway URL is case sensitive.
The gateway uses the PeopleSoft listening connector to receive service operations from an integration engine node or a remote gateway.
(Optional.) To load the delivered target connectors, click the Load Gateway Connectors button.
You can load the delivered target connectors at this point, or at a later time.
Save the gateway definition.
Click the Gateway Setup Properties link to configure additional gateway settings and connector properties.
Use the Gateways page to ping an integration gateway to verify that it is running. Before you ping an integration gateway, you must define the gateway URL.
To ping an integration gateway:
Access the Gateways page (select ).
Select the integration gateway to ping.
The Gateways page appears.
Click the Ping Gateway button.
If the ping is successful a PeopleSoft Listening Gateway page appears that displays a status of Active.
The Connectors grid on the Gateways page lists the target connectors registered with the current gateway. Initially, none of the delivered connectors are loaded and the grid is empty. You can load target connectors automatically by introspection or manually by entering information in the grid.
Note: You typically load and configure the gateway target connectors only when you configure a new gateway or install a new connector.
Loading Connectors by Introspection
If the connector was delivered with the PeopleSoft application or developed using the PeopleSoft Integration Broker Connector Software Development Kit (SDK), you can easily load it with the PeopleSoft Integration Broker connector introspection feature. Before you can register a new connector, you must install it.
See Understanding the PeopleSoft Integration Broker Connector SDK.
To load connectors by introspection:
Access the Gateways page (select ).
Click the Load Gateway Connectors button to trigger introspection for the current gateway.
PeopleSoft Integration Broker examines the properties of all installed target connectors and loads those properties into the gateway definition. All the connectors appear in the Connectors grid, and the properties of each connector are updated to reflect its current state.
Note: The introspection never overrides existing information. It adds only missing information, so manually edited values are not affected. If you modified a connector, new and modified properties are loaded and do not interfere with existing properties.
Loading Connectors Manually
To load and configure a connector manually, you enter the connector ID, connector class name, and property information that’s hard-coded in the connector. This information is provided by PeopleSoft for all delivered connectors; information about connectors from any other source must be provided by that source.
To load a new connector manually:
Access the Gateways page (select ).
Add a new row in the Connectors grid.
Enter the ID for the new connector.
Enter the connector class name.
Click Properties to edit the connector’s properties.
Node-level target connector properties represent parameters that can be used by the connector. These properties are hard-coded in the connector class. The Connector Properties page (IB_CONNPROP) lists all of a connector’s available properties and their values. When you specify a connector in a node definition, only the properties that you are required to set and specify display.
Note: Available connector properties are automatically entered on the Connector Properties page when you register the connector.
Each property entry is defined by a combination of property ID and property name, both of which must already exist in the connector class. A single connector can handle service operations that adhere to different header formats, communication protocols, or other requirements. You can represent these variations on the Connector Properties page by entering multiple instances of the properties used, each with a different value.
Warning! Do not add new properties to any of the delivered connectors, as doing so requires changes to the delivered Java connector programs. Add connector properties only for custom connectors you have created.
Image: Connector Properties page
This example illustrates the Connector Properties page and the properties for the SMTPTARGET connector.

To add a new property instance:
Access the Connector Properties page (select to display the Gateways page).
In the Connectors section locate the row that lists the target connector with which you want to work, and click the Properties link at the end of the row. The Connector Properties page displays.
Select a Property ID.
Available property IDs are specific to the connector that you’re configuring.
Select a Property Name.
The available property names are specific to the property ID that you selected.
If the property is required for the connector to work properly, select the Required check box.
All instances of a property (that is, all identical property ID and property name combinations) should have the same Required status.
Enter an appropriate value for the property instance.
Appropriate values might come from PeopleSoft, from the connector’s developer, or from your own experience and requirements.
(Optional.) Select the Default check box.
When you specify the connector in a node definition, only properties marked as both required and default appear automatically on the Connectors page of the Node Definitions component.
Note: In most cases, only one instance (value) of a required property should be used by a given node; however, you might designate multiple values as default so that they all appear. Keep in mind which properties can be used with multiple values and which ones require a single value.
Save the properties.
Click OK.
The Gateways page appears.