Configuring Routing Definitions for Deployment
This topic discusses how to:
Use the Deployment Configuration page.
Use the Deployment Configuration grids.
Use the Get Routing Information page.
Select routing definitions for routing deployment configurations.
Populate deployment configurations from routing definitions.
Add routing definitions for deployment.
Update release levels.
Many PeopleSoft applications deliver integrations. The routing definitions on these integrations are frequently delivered inactive, because:
The node names defined in the delivered routing definitions do not march the names integration partners have assigned to the source and target systems.
The information on the routing is not applicable to the application version for the integration.
PeopleTools enables you to store specific routing information in a deployment table in the database for integrations among PeopleSoft applications, thereby allowing routing definitions to be excluded from deployment metadata.
Prior to a new application release or patch create an integration group or subgroup. For any new or modified integrations, add the services and service operations to the newly defined integration group or subgroup.
After quality assurance testing with other PeopleSoft integration partners, and prior to creating the final project, examine the new or modified integrations and determine if you need to add any routing definitions. If so, use the Deployment Configuration page in the Service Utilities component to add the routing definitions. The routing metadata gets saved as part of the service operation version.
Note: The routing information you define using the routing deployment configuration pages is saved as part of the service operation version.
The associated physical routing(s) defined in the Routings component can then be deleted.
Integration partners then upload the project and use the Integration Network Introspection and Deployment feature to introspect and deploy the integrations to all PeopleSoft integration partners using the integration group name you created earlier.
When introspection takes place the receiving system is interrogated to get the application version information. The information is used to determine the PeopleSoft application (for example, HCM, SCM, and so on) for look up against the deployment configuration metadata to determine an integration match.
Note: You need to add routing information to the deployment table using the Deployment Configuration page only if specific routing data needs to be part of an auto-generated routing, such as transformation information, alias name (if different from the default), and so on. Therefore, not all PeopleSoft-to-PeopleSoft routing definitions need to be added to the deployment table using the Deployment Configuration page.
Routing deployment configuration metadata is only applicable for a defined PeopleSoft application. This means that the source system where introspection is invoked can have deployment configuration information, while the receiving system does not have deployment configuration information. As a result, you only need to update the deployment data for your own application.
The introspection process uses the following order to determine proper integration bindings:
Valid routing. The sending and receiving nodes match, the alias name matches.
Deployment configuration metadata (as defined in the Deployment Configuration page). Routing name matches.
Service operation and version match.
During introspection processing, the system examines the deployment configuration metadata and can determine the proper routing (if one is available) based on the PeopleSoft application name and application version.
Use the Deployment Configuration pages (IB_INTDEPLOY) to select services for routing deployment configuration and to define routing parameters.
To access the Deployment and Configuration pages select PeopleTools, Integration Broker, Service Utilities, Deployment Configuration.
Image: Deployment Configuration page
This example illustrates the fields and controls on the Deployment Configuration page. You can find definitions for the fields and controls later on this page.
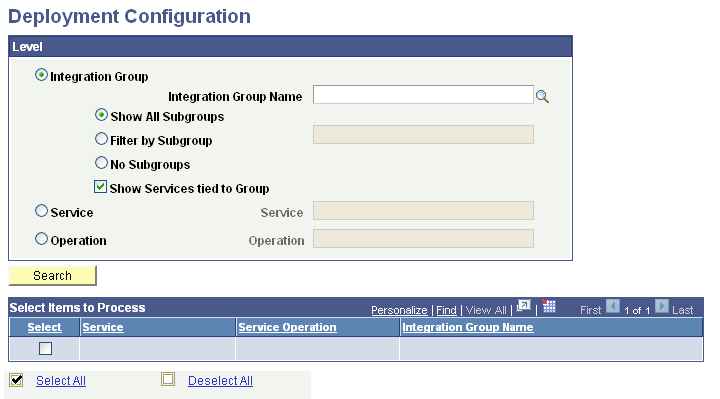
The following fields and controls appear on the page:
|
Field or Control |
Definition |
|---|---|
| Integration Group |
Select the radio button to search for service operations by integration group. Use one of the following integration group filters:
|
| Integration Group Name |
If searching by integration group, enter the integration group name to search, or click the Lookup button to search for one. |
| Service |
Select the radio button to search for service operations by service. When you select this option a Lookup button appears next to the Service field. |
| Service Operation |
Select the radio button to search for service operations by service operation. When you select this option a Lookup button appears next to the Operation field. Click the Lookup button to search for a service operation to introspect and deploy or enter the name directly in the field. |
| Search |
Click the button to search the database for service operations based on the search criteria entered. |
| Select Items to Process (grid) |
This grid displays the search results and contains the following fields and controls:
|
| Select All |
Select the box to select configure routing definitions for all items in the Select Items to Process grid. |
| Deselect All |
Select the box to clear all selections in the Select Items to Process grid. |
| Continue |
Click the button to define routing parameters for selected items in the Select Items to Process grid. |
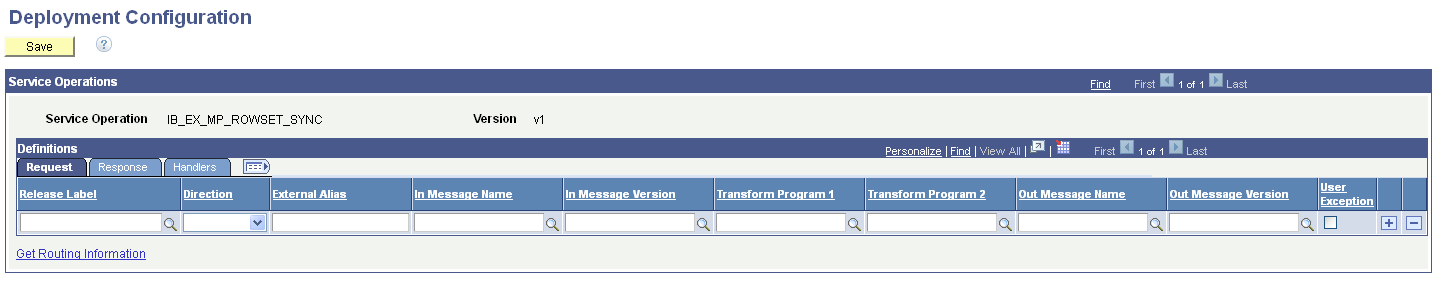
To define routing parameters for selected services, service operations or integrations groups, use the Deployment Configuration grid (IB_INTDEPLOY2).
To access the grid click the Continue button after you search for and select integrations for which to configure routings. This example illustrates the Deployment Configuration grid used to define routing parameters. You can find definitions for the fields and controls later on this page.
Image: Deployment Configuration grid
This example illustrates the fields and controls on the Deployment Configuration grid. You can find definitions for the fields and controls later on this page.
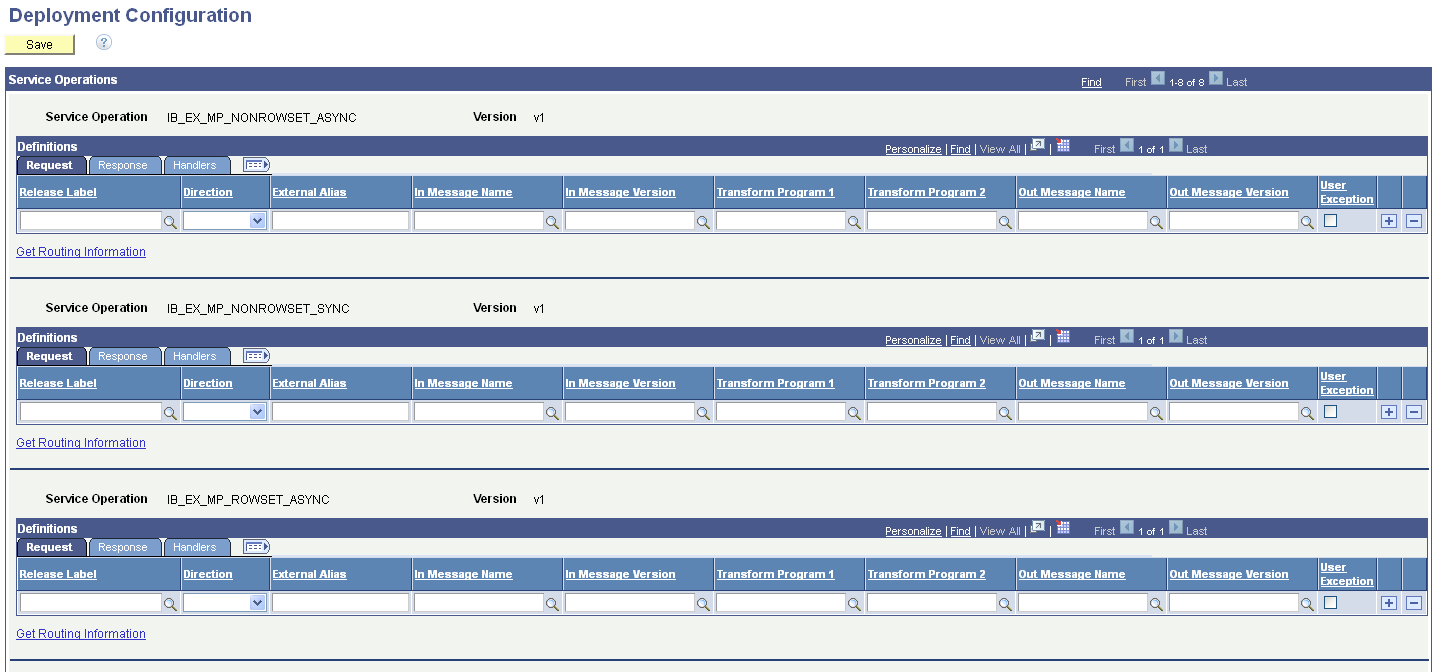
If on the Deployment Configuration page you select a service or integration group, separate grids appear on the page for each service operation in the service or integration group
Image: Deployment Configuration grids
This example illustrates the fields and controls on the Deployment Configuration grids. You can find definitions for the fields and controls later on this page.
You can create routing definitions for each application or patch release, or populate the grid with data from the existing routing definition in the database.
To configure a different routing definition for another release, click the Add Row button (+) to create a new row, configure another definition.
You can manually create and configure routing definitions to deploy by entering and selecting fields on the page. You can also populate a definition using the existing routing definition data defined in the Routings component using the Get Routing Information link. When you click the link the existing routing definition for the service operation appears and you can choose to populate the page with that data. Information on using the Get Routing Information link appears later in this topic.
The following fields and controls appear on the page:
|
Field or Control |
Definition |
|---|---|
| Save |
When you have completed configuring routing definitions on the page, click the button to save the changes. The main Deployment Configuration page appears after the save action |
| Service Operation |
Name of the service operation for which you are configuring routing definitions. |
| Version |
Version of the service operation for which you are configuring routing definitions. |
| Request (tab) |
This tab features routing parameters that you configure for the request transaction. The parameters that appear in this grid are described later on this page. |
| Response (tab) |
This tab features routing parameters that your configure for the response transaction. The parameters that appear in this grid are described later on this page. |
| Handler (tab) |
This tab features handler parameters that you can configure for the service operation. The parameters that appear in this grid are described later on this page. |
| Get Routing Information |
Click the link to view existing routing parameters defined for the service operation and to access the routing definition. |
The previous example shows the default view of the page. The Request tab appears in the Definitions section. Use this tab to configure routing parameters for the request transaction. Use the Response tab in the Definitions section to configure routing parameters for the response transaction.
Image: Deployment Configuration grid – Response tab
This example illustrates the fields and controls on the Deployment Configuration grid – Response tab. You can find definitions for the fields and controls later on this page.
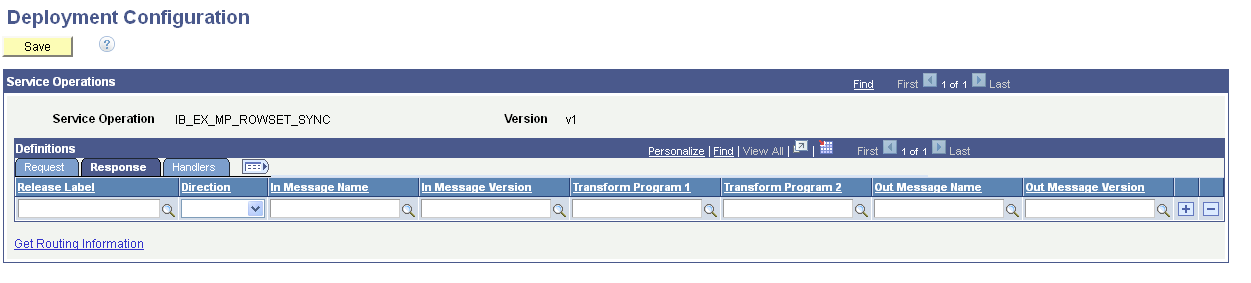
The following fields and controls appear on the Request tab and on the Response tab of the Deployment Configuration grid:
|
Field or Control |
Definition |
|---|---|
| Release Label |
Select the PeopleSoft application and release or patch number from the drop-down list. |
| Direction |
From the drop-down list, select the direction of the transaction. The options are:
|
| External Alias |
Enter the external alias name. |
| In Message Name |
Enter the name of the inbound message. |
| In Message Version |
Enter the version of the inbound message. |
| Transform Program 1 |
Enter the name of transform program number one. |
| Transform Program 2 |
Enter the name of transform program number two. |
| Out Message Name |
Enter the name of the outbound message. |
| Out Message Version |
Enter the version of the outbound message. |
| User Exception |
Check the box to enable user exception handling using PeopleCode. This control appears on the Request grid only and is applicable to synchronous service operation processing only. When enabled and an error occurs you can handle any errors in the calling PeopleCode. If not enabled any errors that occur cause the program to stop. |
Use the Handlers tab to configure and populate handler metadata for the service operation.
Image: Deployment Configuration grid – Handler tab
This example illustrates the fields and controls on the Deployment Configuration grid – Handler tab. You can find definitions for the fields and controls later on this page.
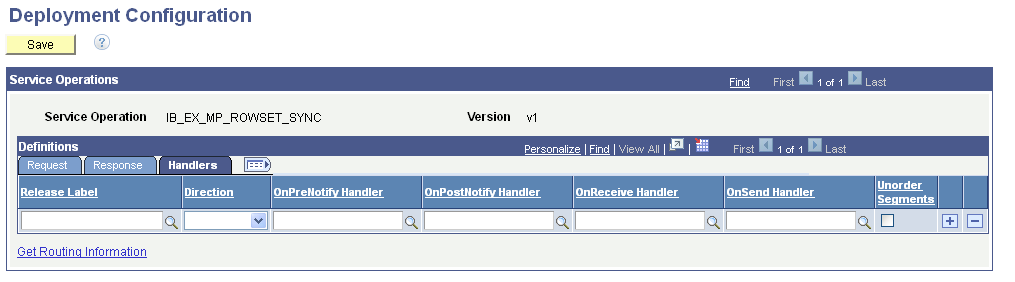
The following fields and controls appear on the Handlers tab of the Deployment Configuration grid:
|
Field or Control |
Definition |
|---|---|
| Direction |
From the drop-down list, select the direction of the transaction. The options are:
|
| OnPreNotify Handler |
Enter the name of the OnPreNotify service operation handler to perform pre-processing on segmented messages. This option is relevant only when using the unordered segments option to process service operation messages in parallel. |
| OnPostNotify Handler |
Enter the name of the OnPostNotify service operation handler to perform post-processing on segmented messages being processed in parallel. This option is relevant only when using the unordered segments option to process service operation messages in parallel. |
| OnReceive Handler |
Enter the name of the OnReceive service operation handler to perform processing logic: To use this handler for deployment one of the following conditions must exist:
|
| OnSend Handler |
Enter the name of the OnSend service operation handler to perform processing logic. To use this handler for deployment configuration:
|
| Unorder Segments |
Check the box to indicate that the system should process service operation messages in parallel. To use this option the local node must be the receiving node. This option is frequently used in conjunction with the OnPreNotify handler and OnPostNotify handler to perform pre- or post-processing on segmented messages |
Use the Get Routing Information page (IB_INTDEPLOY_SEC) to view the existing routing definition for a service operation and to add the data to the deployment configuration table.
To access the page, on the Deployment Configuration grid page, click the Get Routing Information link.
Image: Get Routing Information page
This example illustrates the fields and controls on the Get Routing Information page. You can find definitions for the fields and controls later on this page.
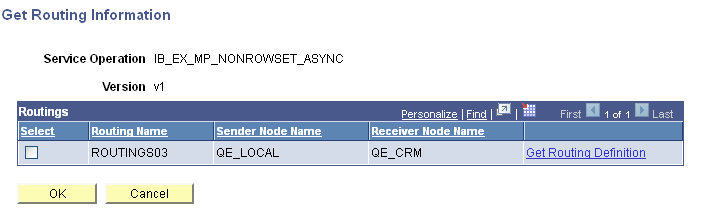
The following fields and controls appear on the page:
|
Field or Control |
Definition |
|---|---|
| Service Operation |
Service operation name. |
| Version |
Service operation version. |
| Select |
Select the box to populate the routing deployment table with the routing definition in the database. |
| Routing Name |
Routing name. |
| Sender Node Name |
Name of the sending node. |
| Receiver Node Name |
Name of the receiving node. |
| Get Routing Definition |
Click the link to access the Routings component to view the existing routing definition for the service operation. Click the Return button from the component to return to the Get Routing Information page. |
| OK |
Click the button after you select the Select box to populate the routing deployment table with the routing definition in the database. |
| Cancel |
Click the button to exit the page without populating the routing deployment database with the data from the existing routing definition. |
To select service operations for routing deployment configuration:
Access the Deployment Configuration page (select
In the Level section of the page, select the options and enter the criteria to use to search the database for service operations. The fields and controls of the page are described previously in this topic.
Click the Search button.
The search results appear in the Select Items to Process grid.
Select the box next to each service operation, service, or integration group for which to configure routings for deployment.
Click the Continue button.
Deployment Configuration grids appear and you can configure or add routings for deployment.
You can populate the grids on the Deployment Configuration page with data from existing routing definitions.
To populate deployment configurations from routing definitions:
Access the Deployment Configuration grid ( Select the service operation(s) with which to work and click the Continue button).
Select the Request tab or the Response tab, depending on the transaction for which you are configuring the routing.
From the Release Level drop-down list, select an application or patch version from the list.
The value you select should be the application/patch version that the remote node on the routing is running.
Click the Get Routing Information link.
The Get Routing Information page appears.
(Optional.) Click the Get Routing Definition link to view the routing definition associated with the service operation in the Routings component. Click the Return button to return to the Get Routing Information page.
Select the Select box.
Click the OK button.
The Deployment Configuration (grids) page appears and the routing data from the routing definition appears in the Request or Response grid.
(Optional.) Click the Add Row button (+) to add a row and configure another routing for another application or patch version and repeat steps 2 through 6.
Click the Save button.
Add routing definitions for deployment using the Deployment Configuration (grids) page.
To add routing definitions:
Access the Deployment Configuration (grids) page ( Select the service operation(s) with which to work and click the Continue button).
Select the Request tab or the Response tab, depending on the transaction for which you are configuring the routing.
From the Release Level drop-down list, select an application or patch version from the list.
The value you select should be the application/patch version that the remote node on the routing is running.
Use the fields and controls on the tab to configure the routing. The fields and control that appear on the Request and Response tabs are described earlier in this topic.
Click the Save button.
As new application versions and patches are released add the appropriate application versions and patches to the PS_IB_REL_LOOKUP table so that they are available for selection for this feature.