Managing Container Messages
This section provides an overview of managing container messages and discusses how to:
Add message parts to container messages.
Add and get container message attributes.
Generate XML message schemas for container messages.
Container messages are used for those situations where you want to produce XML that contains none of the standard PeopleSoft messaging XML structures, such as PSCAMA, FieldType, and so on, yet you want to use PeopleSoft rowset-based classes and methods to populate and read the message structure.
Container messages:
Hold one or more message parts.
Are always nonrowset-based messages.
The message parts you add to a container message must all be rowset-based message parts, or all nonrowset-based message parts.
When working with container messages that contain rowset-based message, PeopleSoft Integration Broker enables you to add attributes and attribute values to the container messages. Adding attributes to container messages enables you to provide integration partners with data and information, without the need to modify or provide the information in the container message definition or in any of the part message definitions.
When you are working with a container message that holds rowset-based message parts, you can specify the minimum and the maximum number of level 0 rows for each message part.
When you are working with a container message, the Message Definition page, the Parts grid displays the following fields:
|
Field or Control |
Definition |
|---|---|
| Minimum Occurs |
The value you enter determines the minimum number of level 0 rows in the message part to include in the container message. |
| Maximum Occurs |
The value you enter in this field determines the maximum number of level 0 rows in the message part to include in the container message. By default the Maximum Occurs value is set to 1 to represent the single row of data on the level 0 record defined on the part (typical for component processing). However, for the case where more then one row of data is to be passed on the level 0 record, for example there is a single record defined on the message part and you want to send x number of rows of data, then increase the Maximum Occurs value to the value of x (the number of rows of data you are sending) or set the Unbounded Maximum field to Y. |
| Maximum Unbounded |
The value you select determines if the system includes unlimited level 0 rows from the message part in the container message. The valid values are:
|
Example: Message XML when Maximum Occurs is Set to a Non-Default Value
The section contains a example of a container message with three message parts: QE_PART_1, QE_PART_2, and QE_PART_3.
Each part contains only one record (level 0 record).
As described earlier in this section, the Maximum Occurs value is 1 by default.
In the following example QE_PART_1 is defined on the container with a Maximum Occurs value of 2 and what is actually published in this case is two rows on the level 0 record for QE_PART_1, as shown in the example.
<?xml version="1.0"?>
<QE_PARTS xmlns="http://xmlns.oracle.com/Enterprise/Tools/schemas/
  QE_PARTS.VERSION_1">
  <QE_PART_1>
    <QE_NAVIGATION class="R" xmlns="http://xmlns.oracle.com/Enterprise/
      Tools/schemas/QE_PART_1.VERSION_1">
      <QE_ACNUMBER>100</QE_ACNUMBER>
      <QE_WAYPOINT_NBR>10</QE_WAYPOINT_NBR>
      <QE_BEARING/>
      <QE_RANGE/>
      <QE_ALTITUDE/>
      <QE_LATITUDE/>
      <QE_LONGITUDE/>
      <QE_HEADING/>
      <QE_VELOCITIES/>
      <QE_NAVDESC/>
    </QE_NAVIGATION>
  </QE_PART_1>
  <QE_PART_1>
    <QE_NAVIGATION class="R" xmlns="http://xmlns.oracle.com/Enterprise/
      Tools/schemas/QE_PART_1.VERSION_1">
      <QE_ACNUMBER>100</QE_ACNUMBER>
      <QE_WAYPOINT_NBR>20</QE_WAYPOINT_NBR>
      <QE_BEARING/>
      <QE_RANGE/>
      <QE_ALTITUDE/>
      <QE_LATITUDE/>
      <QE_LONGITUDE/>
      <QE_HEADING/>
      <QE_VELOCITIES/>
      <QE_NAVDESC/>
    </QE_NAVIGATION>
  </QE_PART_1>
  <QE_PART_2>
    <QE_RADAR_PRESET class="R" xmlns="http://xmlns.oracle.com/Enterprise/
      Tools/schemas/QE_PART_2.VERSION_1">
      <QE_ACNUMBER>2</QE_ACNUMBER>
      <QE_RADAR_SELECTION>1</QE_RADAR_SELECTION>
      <QE_RADARMODE>TWS</QE_RADARMODE>
      <QE_RADAR_OPERMODE>N</QE_RADAR_OPERMODE>
      <QE_BARSCAN>4B</QE_BARSCAN>
      <QE_RADARRANGE>40</QE_RADARRANGE>
      <QE_TGTAGE>8</QE_TGTAGE>
      <QE_CHANNELSET>B</QE_CHANNELSET>
      <QE_AZIMUTH>80</QE_AZIMUTH>
      <QE_PRF>H</QE_PRF>
    </QE_RADAR_PRESET>
  </QE_PART_2>
  <QE_PART_3>
    <QE_ARMAMENT class="R" xmlns="http://xmlns.oracle.com/Enterprise/Tools/
      schemas/QE_PART_3.VERSION_1">
      <QE_ACNUMBER>2</QE_ACNUMBER>
      <QE_STATION_NBR>1</QE_STATION_NBR>
      <QE_AGMODE>CCIP</QE_AGMODE>
      <QE_BIT>SBIT</QE_BIT>
      <QE_WEAPONSPECS/>
    </QE_ARMAMENT>
  </QE_PART_3>
</QE_PARTS>
This section discusses how to add message parts to container messages.
Use the Messages – Message Definitions page to add message parts to a container message. To access the page, select .
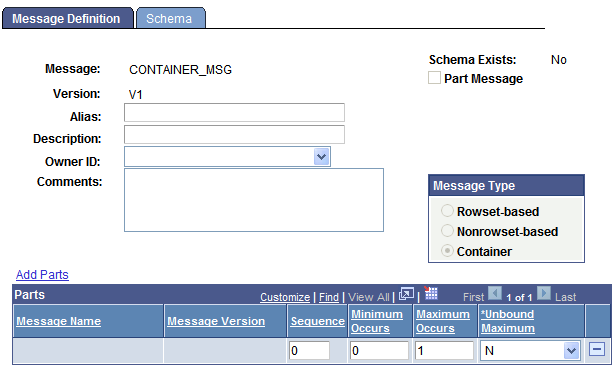
Image: Messages – Message Definitions page
This example illustrates the Messages – Message Definitions page for the container message CONTAINER_MSG.
When you click the Add Parts link to specify a message, version, and message type to add, the Add Parts page (IB_MESSAGE_PARTS) appears.
Image: Add Parts page
This example illustrates the Add Parts page.

For a message definition to be available for you to add to a container message, you must have selected the Message Parts check box when you created the message definition. In addition, container messages can contain only all rowset-based messages or all nonrowset-based messages.
After you add message parts to a container message, the Messages – Message Definitions page displays and the message parts that you have added to the message are listed in the Parts grid.
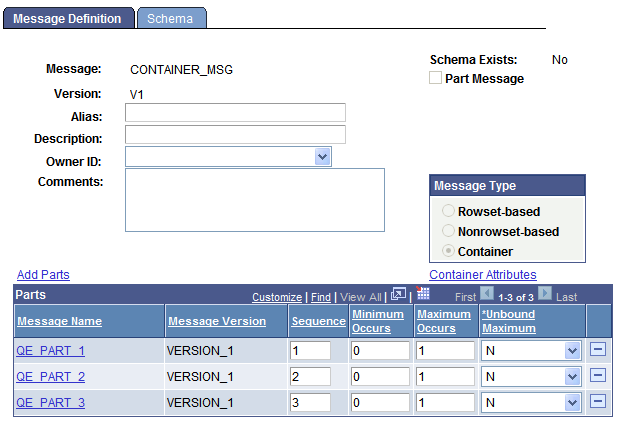
Image: <Messages – Message Definitions
This example illustrates the Messages – Message Definitions page. The example shows three message parts added to the container message.
Click the name of any of the message parts that appear in the grid to open the individual message definition. If the service system status is set to Production, when assigned to a container message, you cannot modify a message definition. To modify the definition, you must delete it from the container message first.
Image: Messages – Message Definitions page
This example illustrations the Messages – Message Definitions page. The example shows how the PART_1 message part displays if you click the message name in the Parts grid shown in the previous example.
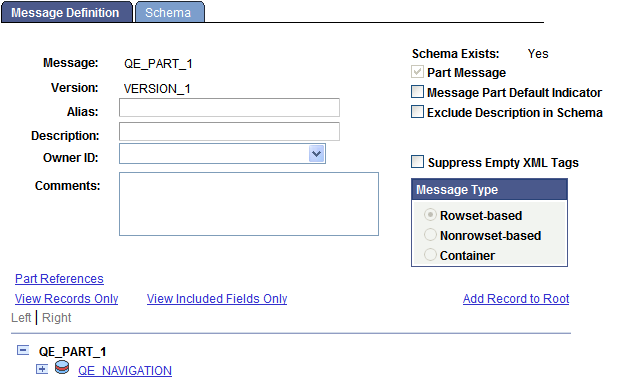
Clicking the Part References link displays all messages to which the message part is assigned.
Note: Before you add nonrowset-based message parts to a container message, you must upload XML message schemas to each message part that you intend to include in the container message. Nonrowset-based part messages cannot be saved without a schema.
To add a message part to a container message:
Select
Select a container message to which to add message parts.
The Messages - Message Definitions page appears.
Click the Add Parts link.
The Add Parts page appears.
Select a message to add.
You can use one of two methods to select a message to add:
In the Message Name and Message Version fields, enter the message name and version to add.
Select the Show Rowset-Based Parts option or the Show Nonrowset-Based Part option and click the Search button to display all rowset-based or nonrowset-based messages that are designated as part messages in the system.
Select one or more messages to include in the container message.
Click the OK button.
The Messages - Message Definitions page appears, with the Parts grid populated with the message or messages that you selected.
(Optional.) In the Parts grid, enter numeric values in the Sequence column to order message part placement in the container message.
If you do not enter any values, the system sequences the messages in the order in which you add them to the container message.
(Optional.) In the Minimum Occurs field, enter the number of minimum rows in the message part to include in the container message.
In the Maximum Occurs field, enter the maximum number of level 0 rows from the part message to include in the container message.
In the Unbound Maximum drop-down list, select whether to include all level 0 rows from the part in the container message.
Note: If you select Y, note that the Maximum Occurs field no longer displays on the page, as all rows are included in the container message.
The Minimum Occurs, Maximum Occurs and Unbound Maximum fields are described elsewhere in this section.
See Understanding Including Level 0 Rows for Message Parts in Container Messages.
This section discusses how to:
Add the language code of the message sender as an attribute to a container message.
Add attribute names to a container message.
Populate attribute values for container message attributes.
Get attribute names and values from a container message.
This section also provides a summary of PeopleCode that you can use to populate attribute values and get attribute data from container messages.
Understanding Adding, Populating, and Getting Container Message Attributes
You can add attributes to container messages that contain rowset-based message parts to provide integration partners with data and information, without adding the information to the message definition.
To add attributes to a container message, you first define the attribute name, length, and required flag in the container message definition in the PeopleSoft Pure Internet Architecture. This information appears in generated container message schema. At runtime the attributes appear at the root level of the generated XML. Next you use PeopleCode to populate the attribute values using the IBInfo object. At runtime, PeopleSoft Integration Broker validates the attribute values against the lengths you defined in the container message definition.
PeopleSoft provides a number of IBInfo object methods to get attributes from container messages.
Adding Language Codes of the Message Senders as Attributes to Container Messages
The language code of the user who executed the publish or sync request is a common attribute to add to a container message. As such, PeopleSoft provides an Include Language Code attribute box, that when selected automatically includes the information as an attribute name and value in the container message.
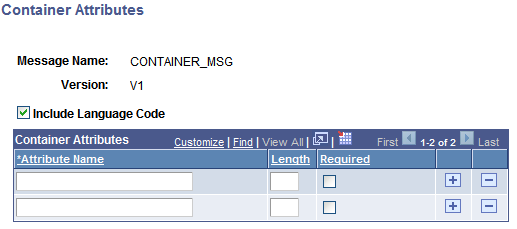
Image: Container Attributes page
This example illustrates the Container Attributes page. The example shows that the Include Language Code check box is selected.
To add the language code of the message sender as an attribute:
Access the Container Attributes page ( and click the Container Attributes link).
Select the Include Language Code check box.
Click the OK button.
The Messages–Message Definitions page appears.
Adding Attribute Names to Container Messages
After you add one or more rowset-based message parts to a container message and save the message, a Container Attributes link appears on the Messages-Message Definition page under the Message Type group box. When you click the Container Attributes link, the Container Attributes page (IB_MESSAGE_ATT_SEC).
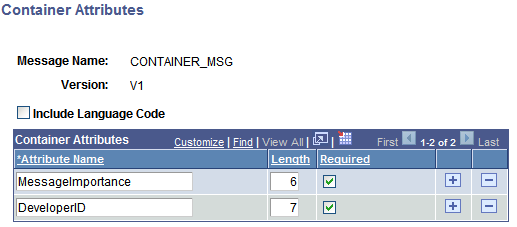
Image: Container Attributes page
This example illustrates the Container Attributes page. In the example two attribute names are defined, MessageImportance and DeveloperID.
To add an attribute name to a container message:
Access the Container Attributes page ( and click the Container Attributes link).
In the Attribute Name field, enter a name for the attribute.
In the Length field, enter a numeric field length value.
(Optional.) Select the Required check box if you want the attribute name to be required.
Click the OK button.
The Messages–Message Definitions page appears.
Populating Attribute Values for Container Message Attributes
PeopleSoft provides several IBInfo object methods within the Message object to populate container message attributes.
Here is an example of how to populate attributes. The attribute values will be validated at runtime against the defined lengths.
&MSG = CreateMessage(Operation.MY_SVC_OPERATION);

&ret = &MSG.IBInfo.AddContainerAttribute("MessageImportance", "Medium");
&ret = &MSG.IBInfo.AddContainerAttribute("DeveloperID", "mdawson");
Additional IBInfo objects that you can use for working with container message attributes are described elsewhere in this section.
Getting Attribute Names and Values from Container Messages
PeopleSoft provides several IBInfo object methods within the Message object to Get attribute information from container messages.
Note that if you attempt to read attributes within an Integration Broker event, such as OnNotify, OnRequest, and so on, you must first Get a part rowset to load the attributes into the Message object from the XML.
The following code snippet shows one example of how to read attributes from a container message:
RowSet = &MSG.GetPartRowset(1);
&index = &MSG.Ibinfo.GetNumberOfContainerAttributes();

For &i = 1 To &index

   &attrName = &MSG.Ibinfo.GetContainerAttributeName(&i);
   &attrValue = &MSG.Ibinfo.GetContainerAttributeValue(&i);

End-For;
Additional IBInfo objects that you can use for working with container message attributes are described elsewhere in this section.
Summary of PeopleCode Use for Working With Container Message Attributes
The following table summarizes the PeopleCode methods that you can use for working with container message attributes.
|
Method |
Description |
|---|---|
|
GetNumberOfContainerAttributes Syntax: |
Gets the number of container attributes |
|
GetContainerAttributeName Syntax: |
Returns the name of the container attribute based on an index. |
|
GetContainerAttributeValue Syntax: |
Returns the value of the container attribute based on an index. |
|
AddContainerAttribute Syntax: |
Add container attributes by passing in attribute name and value. |
|
DeleteContainerAttribute Syntax: |
Delete a container attribute based on the attribute name. |
|
ClearContainerAttributes Syntax: |
Deletes all container attributes in the IBInfo object. |
XML message schemas for container messages re automatically generated when you save the definition. You can view the generated XML message schema on the Messages - Schema page. To access the page, select and click the Schema tab.
Image: Messages – Schema page
This example illustrates the Messages – Schema page. The example shows system-generated XML message schema for a container message with rowset-based message parts.
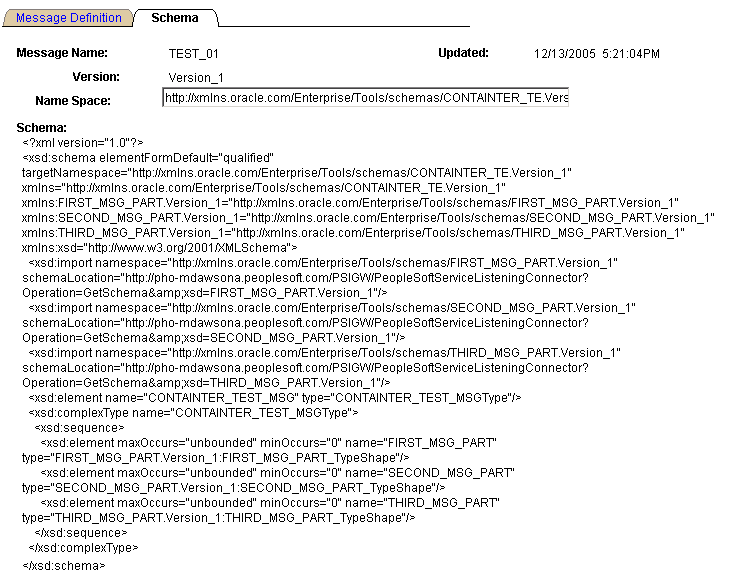
The namespace that is used in the XML message schema becomes by default the value that is defined on the Service Configuration page. To change the namespace, enter a the new namespace on the Schema page in the Namespace field, the Message Definition tab, and save the change. The XML message schema is generated again by means of the modified namespace value.