Managing Rowset-Based Messages
This section provides an overview of managing rowset-based message definitions and discusses how to:
View rowset-based message structures.
Insert root records.
Insert child and peer records.
Specify record aliases.
Delete records.
Exclude fields from messages.
Specify field name aliases.
Manage XML message schemas for rowset-based messages.
Enforce message record and field aliases in generated WSDL.
This section provides overview information about managing rowset-based message definitions.
Root Records
When you create a rowset-based message, you must at a minimum insert a root record (level 0) into the definition.
Records and Record Fields
You create and modify records and record fields in PeopleSoft Application Designer.
Note: Avoid using derived/work records in messages. Work records don't behave like regular records when used with PeopleCode rowset methods. A good alternative is to use dynamic views.
Record and Record Field Aliases
Record and field aliases are optional parameters that are used for schema and XML generation.
When record and field aliases are used, the receiver of a message sees the alias names instead of the actual record and field names. The alias names are seen in the message definition, in message schemas, and on generated runtime XML that is sent to the receiver.
Note that the sender still codes to the actual record and field name.
XML Schema for Rowset-Based Messages
When you create or make changes to a rowset-based message definition, the system automatically generates message schema.
This section discusses the three ways to view the structure of rowset-based message definitions. This section discusses how to:
View the entire structure of rowset-based message definitions.
View only the records in rowset-based message definitions.
View only included records fields in rowset-based message definitions.
Viewing the Entire Structure of Rowset-Based Message Definitions
By default, when you open a rowset-based message definition in the Messages – Message Definition page, PeopleSoft Integration Broker displays the complete message definition structure.
Image: Messages – Message Definition page
This example illustrates a partial view of the Messages – Message Definition page. The bottom portion of the page, shown here, shows the complete message definition structure for the message QE_FLIGHTPLAN.
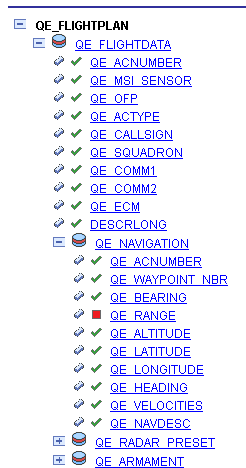
The system displays the definition in a tree structure. Use the Expand button (+) and the Collapse (-) button to expand and collapse the tree to view all records, subrecords and fields (both included and excluded) in the definition.
Record fields that are included in the message definition have a check next to them. Record fields that are not included in the message definition have a box next to them. In the previous graphic, QE_RANGE is the only record field that is not included in the QE_FLIGHTPLAN message definition.
You can view the record or field properties by clicking the record or field name.
To view the entire structure of a rowset-based message:
Select
Select a message to view.
The Messages-Message Definitions page appears and the entire structure of the message appears in a tree view.
Expand and collapse the tree to view the message structure.
Viewing Only the Records in Rowset-Based Message Definitions
You can use the Records Only page (IB_MESSAGE_TR_SEC) to view the records and subrecords in a rowset-based message definition.
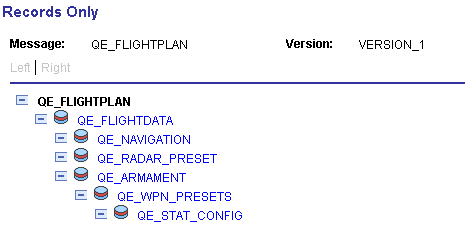
Image: Records Only page
This example illustrates the Records Only page. The example shows records and subrecords for the QE_FLIGHTPLAN message displaying in the Records Only page.
To view only the records in a rowset-based message:
Select
Select a message to view.
The Messages-Message Definitions page appears.
Just above the tree structure view of the message structure, click the View Records Only link.
The Records Only page appears and the records and subrecords in the message definition display in a hierarchical view.
Click the Return button to return to the Messages-Message Definitions page.
Viewing Only Included Record Fields in Rowset-Based Message Definitions
You can use the Included Fields Only page (IB_MESSAGE_TR_SEC) to view the included records fields for a rowset-based message definition.
Image: Included Fields Only page
This example illustrates the Included Fields Only page. The example shows a sample of the records and their included fields contained in the QE_FLIGHTPLAN message definition.
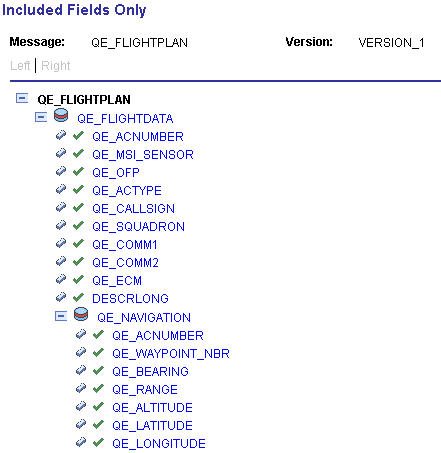
Included fields are denoted by a green icon in the shape of a check mark.
To view included record fields in a rowset-based message:
Select
Select a message to view.
The Messages–Message Definitions page appears.
Just above the tree structure view of the message structure, click the View Included Fields Only link.
The Included Fields Only page appears and included records fields contained in the message display.
Click the Return button to return to the Messages-Message Definitions page.
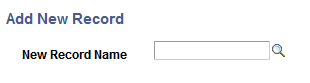
You insert a root record into a rowset-based message definition using the Add New Record page (IB_MESSAGE_TOP_SEC).
Image: Add New Record page
This example illustrates the Add New Record page.
Note: There can only be one root record defined for each rowset-based message.
To insert a root record into a definition:
Access the Add New Record page.
Select . The Messages-Message Definitions page appears. Click the Add Record to Root link.
In the New Record Name field, enter the name of the record to add, or click the Lookup button to search for and select one.
Click the OK button.
The root record appears in the tree structure. Click the Expand button (+) to expand the tree and view fields that are associated with the record.
You can exclude fields from the record and specify field name aliases. Steps for performing these actions are described elsewhere in this topic.
You insert child and peer records into a rowset-based message definition using the Message Record Properties page (IB_MESSAGE_REC_SEC).
Image: Message Record Properties page
This example illustrates the Message Record Properties page.
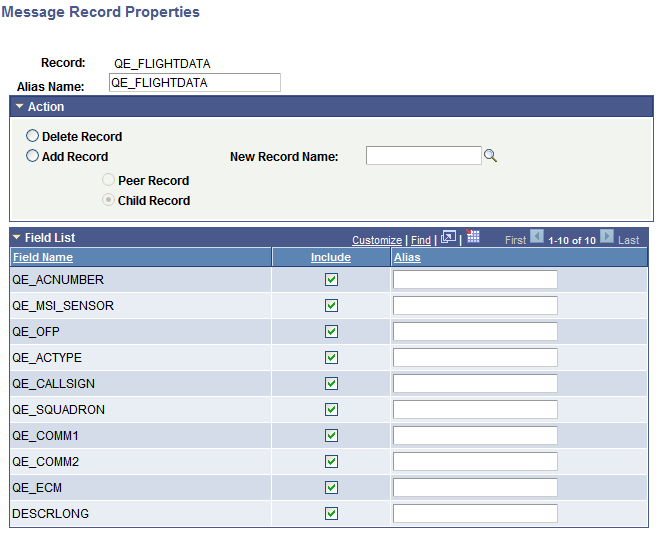
To insert a child or peer record into a rowset-based message definition:
Access the Message Record Properties page.
(Select . The Messages-Message Definitions page appears. Click the linked record name to which to add a peer or child record.)
In the Action group box, select Add Record.
In the New Record Name field, enter the name of the record to add, or click the Lookup button to search for and select a name.
Select whether to add the record as a peer record or a child record.
Select Peer Record to add the record as a peer.
Select Child Record to add the record as a child.
Click the OK button.
The Messages-Message Definitions page appears.
Click the Save button.
You can specify aliases of the root, peer, and child records that you insert into rowset-based messages using the Message Record Properties page.
To specify a record alias:
Access the Message Record Properties page.
(Select . The Messages-Message Definitions page appears. Click the linked record name to which to specify an alias.)
In the Alias Name field, enter an alias name.
Click the OK button.
The Messages-Message Definitions page appears.
Click the Save button.
This section describes how to delete records from a rowset-based message.
Note: Deleting the root record deletes all records and their associated fields that are inserted into the definition.
To delete a record:
Access the Message Record Properties page.
(Select . The Messages-Message Definitions page appears. Click the name of the record to delete.)
In the Action group box, select Delete Record.
Click the OK button.
The Messages-Message Definitions page appears.
Click the Save button.
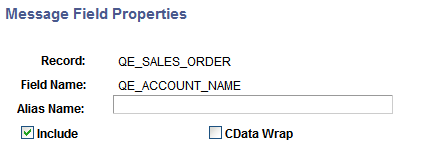
You can exclude record fields from inclusion in a rowset-based message definition using the Message Field Properties page.
After you exclude fields from records, the tree view of the message definition on the Message Definitions page displays a red icon in the shape of box next to the excluded fields.
Image: Message Field Properties page
This example illustrates a partial view of the Message Field Properties page. The example shows that the field QE_ACNUMBER has been excluded from the QE_FLIGHTDATA record.
To exclude fields:
Access the Message Field Properties page.
Select . The Messages-Message Definitions page appears.
Click the Expand button (+) to expand the record tree structure, and locate the field to exclude from the definition.
Click the name of the field to exclude.
The Message Field Properties page appears.
Click the name of the field to exclude.
Deselect the Include check box.
Click the OK button.
The Messages-Message Definitions page appears.
Click the Save button.
Use the Message Field Properties page to specify field name aliases.
To specify a field name alias:
Access the Message Field Properties page.
Select . The Messages-Message Definitions page appears.
Click the Expand button (+) to expand the record tree structure, and locate the field to exclude from the definition.
Click the name of the field for which to specify a field name alias.
The Message Field Properties page appears.
In the Alias Name field, enter an alias name.
Click the OK button.
The Messages–Message Definitions page appears.
Click the Save button.
You can specify that fields be included in CData sections in generated XML. When you select the CData Wrap check box on the Message Field Properties page, the field will be wrapped in a CData section in generated XML.
Image: Message Field Properties page
This example illustrates the Message Field Properties page
To include a field in a CData section in generated XML:
Access the Message Field Properties page.
Select . The Messages-Message Definitions page appears.
Click the Expand button (+) to expand the record tree structure, and locate the field to exclude from the definition.
Click the name of the field for which to specify a field name alias.
The Message Field Properties page appears.
Select the CData Wrap check box.
Click the OK button.
The Messages–Message Definitions page appears.
Click the Save button.
This section discusses how to:
View XML message schemas for rowset-based messages.
Exclude descriptions in XML message schemas.
Choose the number of level 0 rows to include in generated XML message schema.
Include namespaces in generated XML message schemas.
Suppress empty XML tags in message schema.
Viewing XML Message Schemas for Rowset-Based Messages
PeopleSoft Integration Broker automatically generates message schema for rowset-based messages when you save the message definition.
After you save a message definition on the Messages-Message Definitions page, click the Schema tab to view the generated XML message schema.
Excluding Descriptions in XML Message Schemas
Message data that is used to define services can have actual database record and field names in the generated XML message schema. PeopleSoft Integration Broker provides an option where you can exclude descriptions in generated message schemas so that sensitive information is not exposed.
The Messages–Message Definitions page features an Exclude Descriptions in Schema check box that enables you to suppress descriptions in generated schema.
To exclude descriptions in XML message schemas:
Access the Messages–Message Definition page (
Select the Exclude Description in Schema check box.
Save the changes.
Choosing the Number of Level 0 Rows to Include in Generated XML Message Schema
You can choose to include a single level 0 row in the generated schema or all level 0 rows in the generated schema.
When you select the Single Level 0 Row check box, PeopleSoft Integration Broker includes a single level 0 row in the XML message schema when you Save the definition. If this box is not selected, then the system includes all level 0 rows in the message in the generated schema.
By default the Single Level 0 Row check box is not selected.
If you check the Single Level 0 Row check box to generate schema with one level 0 row, the level 0 row included in the schema is the first level 0 row the system encounters in the message.
Including Namespaces in Generated XML Message Schemas
PeopleSoft Integration Broker enables you to include a namespace in XML message schemas that you generate for rowset-based messages.
When working with a rowset-based message type, the Messages–Message Definition page displays an Include Namespace check box. When the Include Namespace check box is selected, you can specify a namespace to include in the generated schema on the Messages-Schema page.
Image: Messages–Schema page
This example illustrates the Messages – Schema page. The example shows the Namespace field is populated with the namespace as defined in the Service Configuration page.
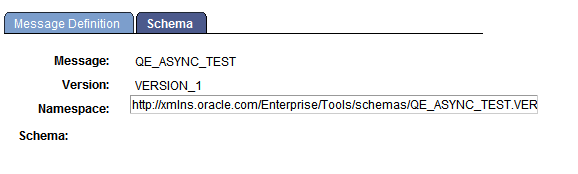
By default the Namespace field is populated with the namespace defined on the Service Configuration page, however you can change the namespace to use in the message schema as required.
To include a namespace in generated schema:
Access the Messages–Message Definition page ().
Select the Include Namespace check box.
Click the Schema tab.
The Messages–Schema page appears. By default the namespace as defined on the Service Configuration page populates the Namespace field.
In the Namespace field enter the namespace to use in the generated XML message schema.
Click the Message Definition tab.
Save your changes.
The system generates the message schema and includes the namespace specified.
Suppressing Empty XML Tags in Message Schema
PeopleSoft Integration Broker enables you to suppress empty XML tags in message schema of rowset-based messages.
The Messages-Message Definition page features a Suppress Empty XML Tags check box.
When you select this box, message schema generated for the message will not include any XML tags that contain empty or Null values.
PeopleSoft Integration Broker enables you to enforce record and field aliases in generated WSDL.
The Service Configuration page features a WSDL Generation Alias Check drop-down list that enables you to set a system check level for aliases on message definition records and fields.
You can set the following check levels:
|
Check Level |
Description |
|---|---|
|
Error. |
If the system encounters a message definition without proper record and field aliases, it displays an error and it will not generate a WSDL document. |
|
None. |
Default. The system creates a WSDL document regardless of whether message records and fields are aliased or not. |
|
Warning. |
As the system creates a WSDL document it displays a warning it encounters messages definitions that do not have complete aliasing for records and/or fields. If the system encounters records or fields that do not have aliases defined, you can continue to generate the WSDL document or terminate the generation of the WSDL document. |
To enforce message record and field aliases in generated WSDL:
Access the Service Configuration page ().
From the WSDL Generation Alias Check drop-down list, select a value. The valid options are:
Error.
None.
Warning.