Applying Filter Criteria
This section provides an overview of filter criteria and discusses how to:
Select filter criteria options.
Add field and tree node values to filter criteria.
Add field and detail values to filter criteria.
Add criteria values.
Remove fields and values from criteria.
Filter criteria comprise field or dimension criteria combined with query or ledger criteria. They display a value from the query column results. You can combine filter criteria with label criteria to display a tree node or detail value as a descriptive label. Using nPlosion, one row or column of filter criteria can generate multiple detail rows or columns.
You can apply filter criteria at the column, row, or cell level.
Filter criteria consist of one or more tree detail values. If you select more than one value for your filter criteria, the total of all specified values is used to limit intersecting query or ledger criteria, and the results appear as one consolidated value. However, where multi-value filter criteria intersect with label criteria, the label values cannot be combined. Only the first label retrieved appears.
You can accept tree effective date when you define criteria. This option enables you to have multiple trees in the layout with different effective dates, and you can compare the results of the reports based on different effective dates. In addition, when you run a report request, you can specify a new effective date that overrides effective date of all trees if effective date was specified in the layout.
Note: Accept tree effective date at the time of criteria definition is available only in nVision windows client.
When defining filter criteria, you can use detail values summarized under particular tree nodes, or detail values from value tables. If a value table is entered in filter criteria, it will be used for prompting and nPlosion labeling. During nPlosion, if some field values do not exist in the value table or if nVision cannot find corresponding labels in the value table for some field values, nVision will not include the amount for those values in the nPloded result.
Note: If the value table specified for nPloded labels has an incomplete set of values, the total may differ from a non-nPloded total.
Use the PeopleSoft nVision Filter Criteria dialog box to add, modify, and delete the nodes from the criteria.
In addition, you can use this dialog box to include fields that build negative criteria; for example, to select nodes for Not In Criteria of the query. With this feature, you can select multiple values, tree nodes, and dimensions as part of Not In criteria query. After making a list of values to be part of the Select clause with Not-In Criteria, this criterion is inserted as any other criteria into the selected cell of the layout.
To define filter criteria in Windows client:
Open nVision client by selecting
Open any existing layout or create a new one.
If you create a new layout, select the Matrix Layout Sheet option, define required values, and click the OK button.
Select from the menu.
The PeopleSoft nVision Layout Definition dialog box appears.
Select the Filter tab, and click the Add button.
The PeopleSoft nVision Filter Criteria dialog box appears.
Note: The PeopleSoft nVision Filter Criteria dialog box can only be opened in nVision's Windows client.
Image: PeopleSoft nVision Layout Definition - Filter dialog box
This example illustrates the fields and controls on the PeopleSoft nVision Layout Definition - Filter dialog box.
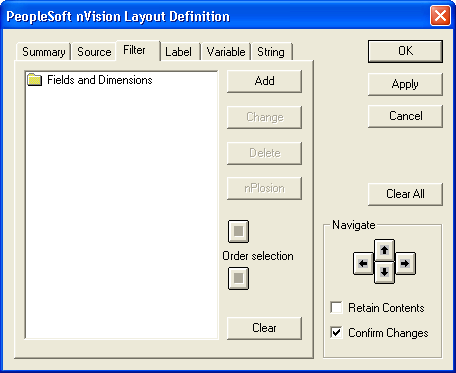
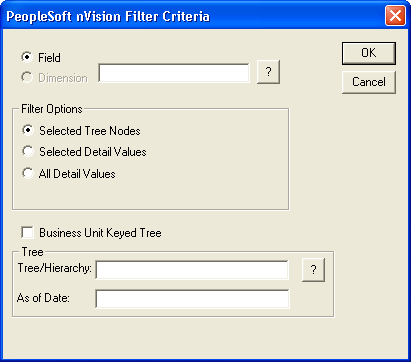
Image: PeopleSoft nVision Filter Criteria dialog box
This example illustrates the fields and controls on the PeopleSoft nVision Filter Criteria dialog box, which enables you to select the fields and field values to use as filter criteria.
|
Field or Control |
Definition |
|---|---|
| Field |
The text box to the right of the Field option displays the field that will be used as criteria. It displays value for only one field at a time—whichever field is selected in the upper text box. You add fields to this list by clicking the Search (?) button and selecting field names. To select from a list of fields, type in a partial name before clicking the Search button. |
| Filter Options |
Use the Filter Options section to specify the source of the field values that you want to add to the filter criteria: Selected Tree Nodes, Selected Detail Values, or All Detail Values. If your database contains ledgers, the Selected Summary ChartField Nodes option appears. If the Selected Summary ChartField Nodes option is selected, the Tree fields appear prompting you to select a tree from which you select node values to use as criteria. You can select any tree that uses the specified field for its node values and is defined for the setID and effective date associated with the layout. |
| Business Unit Keyed Tree |
Select this option if your criteria is based on a business unit keyed tree. |
| Tree/Hierarchy |
Displays the name of the tree. Note: In a dynamic detail tree structure, the field name of the detail values should match the field name of the tree nodes. If these two field names do not match, then an error message appears indicating that the tree is invalid. |
| As of Date |
Optionally, enter the As of Date values for the tree. If the As of Date value is earlier than the effective date of the tree or is invalid, an error message appears when you save the criteria. |
To access the PeopleSoft nVision Tree Nodes dialog box:
Open nVision client.
Open any existing layout or create a new one.
If you create a new layout, select the Matrix Layout Sheet option, define required values, and click the OK button.
Select from the menu.
The PeopleSoft nVision Layout Definition dialog box appears.
Select the Filter tab, and click the Add button.
The PeopleSoft nVision Filter Criteria dialog box appears.
Click the OK button.
The PeopleSoft nVision Tree Nodes dialog box appears.
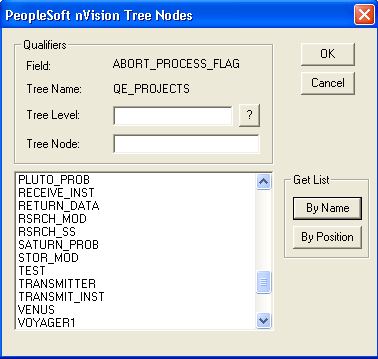
Image: PeopleSoft nVision Tree Nodes dialog box
This example illustrates the fields and controls on the PeopleSoft nVision Tree Nodes dialog box.
To add a field and tree node values to filter criteria in PS/nVision:
Open any existing layout or create a new one.
Select from the menu.
Select the Filter tab, and click the Add button.
The PeopleSoft nVision Filter Criteria dialog box appears.
In the PeopleSoft nVision Filter Criteria dialog box, click the prompt button to the right of the Field option.
Select a field name and click the OK button.
Enter a partial tree name in the Tree/Hierarchy field and click the prompt button.
Select a tree and click the OK button.
The Tree Nodes dialog box appears.
If you know the exact node you want to add, enter it in the Tree Node field and click the OK button.
The Tree Nodes dialog box closes and you are returned to the PeopleSoft nVision Layout Definition – Filter Criteria dialog box, which has an added node in the list box.
Optionally, apply a node list filter.
To limit node choices to a particular level, select a valid tree level.
To limit node choices to a particular tree branch, enter the tree node at the top of the branch.
Display the node list.
To see an alphabetical list of the tree nodes, click the By Name button. Use this button if you have specified a tree level. If you have also specified a tree node, it must be a valid node in the level or no nodes will appear in the list.
To see the hierarchical node structure of the tree—similar to what you would see in Tree Manager—click the By Position button. Use this button if you have specified a tree node. If you also specified a tree level, it is ignored.
Note: You can use the two list filtering buttons together to help you find the nodes you want. For example, you might first want to see nodes at a particular tree level, in alphabetical order, using the By Name button to find the higher-level node that you want. Then, you can specify that tree node and click the By Position button to see the portion of the tree headed by that node.
Highlight the nodes you want to add.
Click the OK button to add the highlighted nodes.
The Tree Nodes dialog box closes. You can now see the new node values listed in the tree control list box of the PeopleSoft nVision Layout Definition – Filter dialog box.
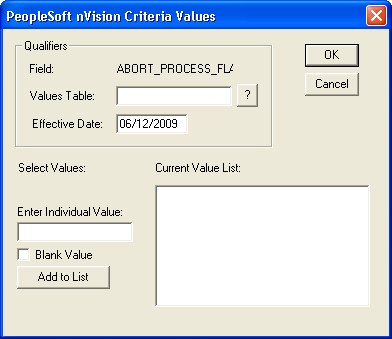
Image: PeopleSoft nVision Criteria Values dialog box
This example illustrates the fields and controls on the PeopleSoft nVision Criteria Values dialog box.
To add a field and detail values to filter criteria in PS/nVision:
Open any existing layout or create a new one.
Select from the menu.
Select the Filter tab, and click the Add button.
The PeopleSoft nVision Filter Criteria dialog box appears.
Enter a field name.
Select either the Selected Detail Values option or the All Detail Values option.
Note: If the field is a DrillDown child layout, you can select all detail values from a tree node. The All Detail Values option is used primarily with nPlosion and DrillDown features.
If you selected the All Detail Values option, enter a values table name.
Click the OK button.
If you selected the All Detail Values option, the Field Name dialog box closes and the PeopleSoft nVision Layout Definitions – Filter dialog box appears again. You can skip the rest of this procedure if you do not need to add specific values and you are using all of them.
If you select the Selected Detail Values option, the PeopleSoft nVision Criteria Values dialog box appears. You use this dialog box to specify the tree detail values you want to add to your filter criteria.
In the Qualifiers group box of the PeopleSoft nVision Criteria Values dialog box, specify a values table.
Optionally, enter a new effective date.
The default effective date is the value you specified when creating the layout definition.
Select the values to add.
If you know the value you want, enter it in the Enter Individual Value field and click the OK button. Otherwise, use the prompt button to display a list of detail values from the Values Table that you specified. You can select multiple values before clicking the Add to List button.
Select the Blank Value option—with the Enter Individual Value field empty—to include a null value.
Click the Add to List button.
Clicking the Add to List button adds a null value to the list, represented graphically by (None) in the Current Value List text box. The null value appears at the top of the list in the list box, but the actual null value is inserted at the bottom of the list on the PeopleSoft nVision Layout Definition – Filter dialog box.
You can change the order of a value by using the order selection controls on the PeopleSoft nVision Layout Definition – Filter dialog box.
Click the OK button to save your changes and to close the PeopleSoft nVision Criteria Values dialog box.
Click the OK button again to close the PeopleSoft nVision Layout Definition dialog box.
See Using DrillDown, Using DrillDown Navigation, Using DrillDown Layout Formats.
To add criteria values in PS/nVision:
Open any existing layout or create a new one.
Select from the menu.
Select the Filter tab, and click the Add button.
On the PeopleSoft nVision Filter Criteria dialog box, select a specified field.
If you have not specified any fields, you must do so now. During that procedure, you are prompted to add criteria values.
Click the Add button.
At the new dialog box, add your values.
In PS/nVision, to remove a field and its values from filter criteria:
Open any existing layout or create a new one.
Select from the menu.
Select the Filter tab, and click the Add button.
On the PeopleSoft nVision Filter Criteria dialog box, select the field to remove.
Click the Delete button.
In PS/nVision, to remove a field value from filter criteria:
Open any existing layout or create a new one.
Select from the menu.
Select the Filter tab, and click the Add button.
On the PeopleSoft nVision Filter Criteria dialog box, select the field value you want to remove.
Click the Delete button.