Defining Scopes
This section discusses how to:
Create new scopes.
Select scope fields.
Select tree levels and tree nodes.
Access the PeopleSoft nVision Scope Definition dialog box by selecting from the nVision menu.
Image: PeopleSoft nVision Scope Definition dialog box
This example illustrates the fields and controls on the PeopleSoft nVision Scope Definition dialog box.
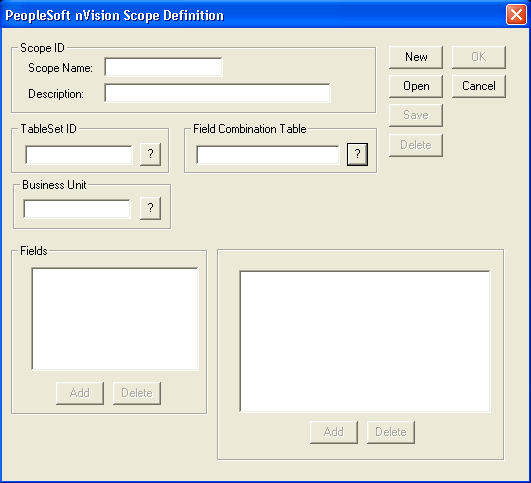
To define a new scope in PS/nVision:
Select from the nVision menu.
Click theNew button.
Enter a scope name and a description.
You may use up to 10 characters for the scope name and up to 30 characters for the scope description.
Enter the setID for this scope.
If you are defining your scope using business unit keyed trees, enter the business unit.
If you are using multiple scope fields, enter the appropriate tables in the Field Combination Table field.
Add fields to the scope definition by clicking the Add button.
The PeopleSoft nVision Scope Field dialog box appears.
Image: PeopleSoft nVision Scope Field dialog box
This example illustrates the fields and controls on the PeopleSoft nVision Scope Field dialog box.
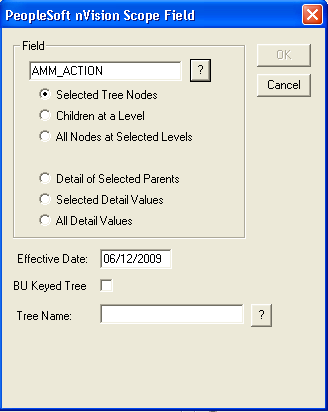
For each field that you add to a scope, you specify the source of the field values and the values to use. This process is similar to defining field criteria in a matrix layout.
Each of the options in the PeopleSoft nVision Scope Field dialog box selects a different set of these values for building your scope:
Tree Node (Summary) Instances: Selected Tree Nodes, Children at a Level, All Nodes at Selected Levels.
Used with Summary Ledgers only: Selected Summary ChartField Nodes.
Detail Value (Detail) Instances: Detail of Selected Parents, Selected Detail Values, All Detail Values.
|
Field or Control |
Definition |
|---|---|
| Field |
Enter a field to add to your scope. |
| Selected Tree Nodes |
Select this option to create an instance for each tree node that you select. When you type the field name, you are prompted to enter a tree name and level. |
| Children at a Level |
Select this option to create an instance for each tree node at a specified tree level that is a child of the parent node. The parent nodes need not be the immediate parent of nodes at the specified level. When you type the field name, you are prompted to specify a tree name and level. |
| All Nodes at Selected Levels |
Select this option to create an instance for every node at each selected level. When you type the field name, you are prompted to specify a tree name and level. |
| Selected Summary ChartField Nodes |
Select this option to create an instance for every specified node in a tree used to create a summary ledger. (This option applies only to users of PeopleSoft General Ledger.) You should use summary trees rather than the summary ChartField nodes. When detail values are summarized into tree nodes, you must use a different ChartField in the summary ledger data record to accommodate the maximum length of a node name (20 characters). When you type a field name, you are prompted to specify a tree name and level. |
| Detail of Selected Parents |
Select this option to create an instance for each detail value associated with the specified tree nodes. |
| Selected Detail Values |
Select this option to create an instance for each detail value that you specify. This option activates the Value Table field, where you can specify the table that contains the values that you want to select. |
| All Detail Values |
Select this option to create an instance for all detail values. This option activates the Value Table field, where you can specify the table that contains the values that you want to use. |
| Effective Date |
Enter a date to determine the trees you can select from. |
| BU Keyed Tree |
Select this option to limit tree selection to trees keyed by the business unit entered on the PeopleSoft nVision Scope Definition dialog box. |
| Tree Name |
Select the required tree for your scope. The list is filtered based on the setID or business unit, and field entered. |
If you selected the All Nodes at Selected Levels, Selected Tree Nodes, Children at a Level, or Detail of Selected Parents options in the PeopleSoft nVision Scope Field dialog box, the PeopleSoft nVision Tree Nodes dialog box appears prompting you to specify the tree levels that contain the nodes you want to use.
Image: PeopleSoft nVision Tree Nodes dialog box
This example illustrates the fields and controls on the PeopleSoft nVision Tree Nodes dialog box.
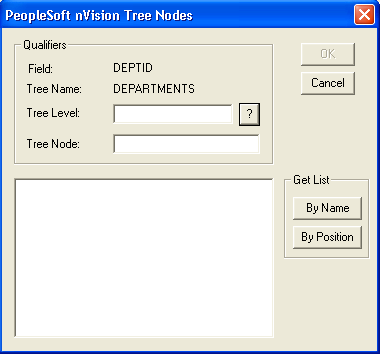
To select tree levels and nodes in PS/nVision:
Select from the nVision menu.
Click theNew button.
Enter a scope name and a description.
You may use up to 10 characters for the scope name and up to 30 characters for the scope description.
Enter the setID and other values for this scope.
Add fields to the scope definition by clicking the Add button.
The PeopleSoft nVision Scope Field dialog box appears.
Select All Nodes at Selected Levels,Selected Tree Nodes,Children at a Level, or Detail of Selected Parents option.
The PeopleSoft nVision Tree Nodes dialog box appears.
In the PeopleSoft nVision Tree Nodes dialog box, select a level.
Place the cursor in the Tree Node field and click to see a list of nodes either by name or by position.
Select the nodes to use for your report.
Click the OK button.
The PeopleSoft nVision Scope Definition dialog box shows your fields and tree nodes.
Click the Save button to save the scope.
Note: Make sure to click the Save button when you are finished with your scope. Clicking the OK button closes the PeopleSoft nVision Scope Definition dialog box without saving your scope.