Using Style Sheets with nPlosion Layouts
This section provides an overview of style sheets and discusses how to:
Use the style sheet wizard.
Open the Style Sheet Wizard.
Modify a style.
Apply styles to a report layout.
Modify styles using the Excel menu bar.
Configure the style sheet directory location.
Note: If a level is missing within the hierarchy, the next-lower-numbered level that is defined takes on the missing level’s style attributes.
With nPlosion styles, you can control the layout and appearance of the multilevel hierarchy of rows and columns nPlosion generates. In PS/nVision, the styles for your summary rows and columns come directly from the styles that you have defined in the summary rows and columns in your layout. The styles for all nPloded rows or columns in your report are controlled by nPlosion styles, but not the styles defined in the summary rows or columns. You define nPlosion styles either by using Style Sheet Wizard or by directly applying the styles from the Excel menu bar using PS/nVision nPlosion style naming conventions.
Note: You can also format nPloded detail rows or columns by selecting from the Microsoft Excel menu bar when you create a report layout. However, by default, PS/nVision nPlosion style sheets override any such manual formatting of nPloded detail rows or columns. If you want nPloded details to appear in the format that you applied from the Excel menu bar rather than the nPlosion style sheet, you must define the name NvsSkipDetailStyles using the Define Name dialog box (by selecting from the Excel menu bar), entering the value =1 in the Refers To field.
You can use the Style Sheet Wizard exclusively to create and edit nPlosion styles, which are stored in a special Excel worksheet provided with PS/nVision.
Image: nVision nPlosion Style Wizard window
This example illustrates the fields and controls on the nVision nPlosion Style Wizard window.
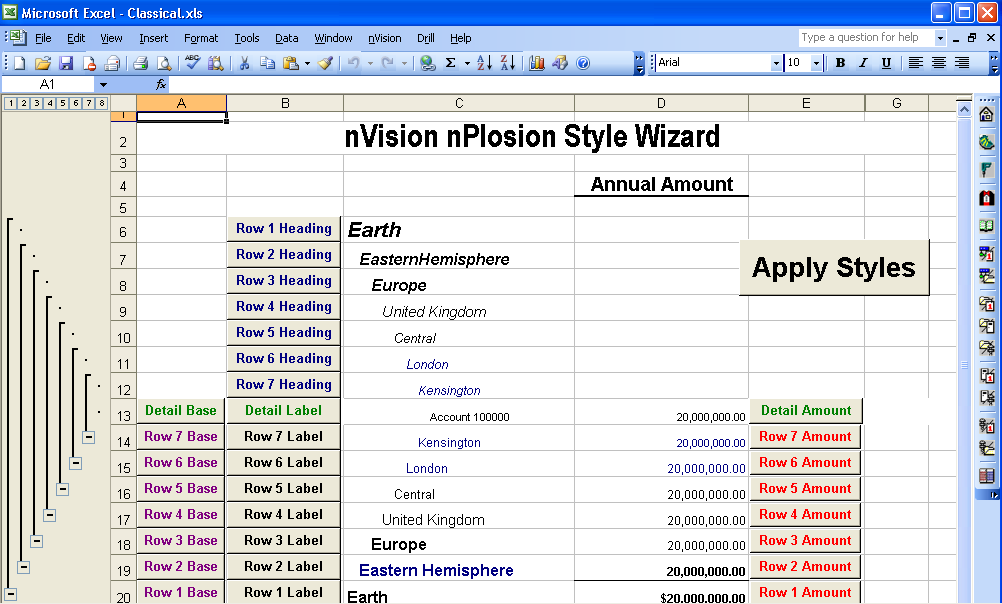
There are two nPlosion styles:
The RowStyles tab displays Row styles.
The ColumnStyles tab displays Column styles.
Seven levels of each style are provided, as well as a separate style for detail values.
The Style sheet Classical.xls is delivered with PS/nVision. You can create your own style sheet wizard by saving the Classical.xls file under a different name in the Style Sheet directory location. Configure the Style Sheet directory location using the Configuration Manager.
Note: You can override the base style by modifying any of the other styles that come after it. For example, you could make a particular field shaded, even though the base style for that row or column does not include shading.
To open the Style Sheet Wizard:
With an layout opens in PS/nVision, click the Format Style Sheets button on the nVision toolbar.
Select the Classical.xls style sheet and click the OK button.
The RowStyles tab of the Style Sheet Wizard appears.
The Style Sheet Wizard displays a rollup of data for eight rows and eight columns (Excel has a limitation of rolling data up into only eight outlines).
|
Field or Control |
Definition |
|---|---|
| Heading |
An outlined row or column of data has two parts. When opened, the top portion of the outline is considered the header, and the bottom portion is considered the Label. The Heading does not contain any data; it is strictly for display purposes. |
| Label |
The bottom portion of the outline. The Label is the only thing displayed if the outline is collapsed. |
| Amount |
Any numeric data that will be a result of an nPlosion. |
| Base |
The formatting options for the Heading, Label, and Amount styles. Note: If there are style settings for the Label, Heading, or Amount, they will override the Base Style setting. |
To modify a style:
With an layout opens in PS/nVision, click the Format Style Sheets button on the nVision toolbar.
Select the Classical.xls style sheet and click the OK button.
The RowStyles tab of the Style Sheet Wizard appears.
Click the button with the name of the style you want to modify.
The Style dialog box of Excel appears.
Click the Modify button to modify the style’s display attributes, and then click the OK button.
The Format Cells dialog box of Excel appears.
Make more changes to styles by clicking the appropriate Style button.
If you do not have any PS/nVision report layouts open, you can save the current styles by selecting from the nVision menu.
This saving enables you to modify styles globally in the style worksheet, and then apply the new styles to any report layout you want.
If you have a style at the Label, Heading, or Amount level, this saving overrides the base style.
Note: All Row Style settings override the Column Style settings.
See the Microsoft Excel documentation for more information about how to use the Excel Format Cells dialog.
To apply styles to a report layout in PS/nVision:
Open a report layout in nVision by selecting nVision, Open Layout.
Click the Format Style Sheets button on the nVision toolbar to open the Style Sheet Wizard and modify styles as needed.
When you have finished modifying styles, click the Apply Styles button on the Style Sheet Wizard.
A list of all open layouts appears.
Select the required layout and click the OK button.
The Style Sheet Wizard is designed so you can easily take advantage of the Excel Style formatting settings and properly use the designed nVision Style naming convention. You can accomplish the same thing simply by opening a layout and selecting from the Excel menu bar. The Style dialog appears and you can create styles using the same naming convention as the Style Sheet Wizard.
The following examples show the naming convention for PS/nVision nPlosion styles. Note that if you apply the styles both from the Style Sheet Wizard and the Excel Menu Bar, the last applied style takes effect:
|
Field or Control |
Definition |
|---|---|
| RxxH |
The Header Style for any given level of a Row, where R represents a row, xx represents the number of the level (that is, 01, 02, and so on—00 represents the detail level), and H represents the Header Style. |
| RxxL |
The Label Style for any given level of a Row, where R represents a row, xx represents the number of the level (that is, 01, 02, and so on—00 represents the detail level), and L represents the Label Style. |
| CxxA |
The Amount Style for any given level of a column, where“C represents a column, xx represents the number of the level (that is, 01, 02, and so on—00 represents the detail level), and A represents the Amount Style. |
| CxxB |
The Base Style for any given level of a column, where C represents a column, xx represents the number of the level (that is, 01, 02, and so on—00 represents the detail level), and B represents the Base Style. |
Note: Detail Row and Column Style settings are represented by the 00 level.
Your style sheet directory is indicated by PeopleSoft Configuration Manager for PS/nVision on Windows or by the Process Scheduler configuration file for PS/nVision on the web.
To configure the style sheet directory using the Configuration Manager for PS/nVision on Windows:
Open the Configuration Manager by double clicking the Configuration Manager icon on your desktop.
Alternatively, select
Select the Profile tab, select a profile to edit, and then select the nVision tab to view or change PS/nVision settings.
Enter the location of the PeopleSoft style sheets.
The Oracle PeopleSoft application delivers a set of style sheets that can be located at
To configure the style sheet directory using the Process Scheduler configuration file for PS/nVision on the web:
Select
Change the directory to <PS_HOME>\appserv\.
Type psadmin and press ENTER.
The PeopleSoft Server Administration menu appears.
Select option 2 (Process Scheduler) and press ENTER.
The PeopleSoft Process Scheduler Administration menu appears.
Select option 3 (Configure a Process Scheduler Configuration) from the Process Scheduler Administration menu.
Enter the number that corresponds to the desired database and press ENTER.
A message about shutting down the Process Scheduler is displayed.
Enter y to continue.
Reply n to the questions Do you want to change any values <y/n> [n]? for all sections, except the nVision section.
For the nVision section, reply y to the questions Do you want to change any values <y/n> [n]?.
Use the following information to modify the nVision section:
Parameter: StyleDir
Description: Enter the default location where PS/nVision keeps nPlosion Styles (these are usually inherited by the layout that the user is designing).
Accept the default values for the remaining options.