Defining Report Nodes
This section provides an overview of report distribution nodes and the transfer protocols available such as XCopy, FTP, FTPS, SFTP or HTTP and HTTPS.
The report distribution node defines how your reports are moved to the Report Repository, where you can view them from Report Manager. Reports are moved using XCopy, FTP, FTPS, SFTP or HTTP and HTTPS, depending on the type of server that you are using.
Before transferring the files to the Report Repository, determine which transfer protocol to use.
|
Setup |
Transfer Protocol |
|---|---|
|
Both PeopleSoft Process and Web server on Microsoft Windows. |
Use XCopy, FTP/FTPS, SFTP or HTTP/HTTPS. Note: For XCopy, the Report Repository directory must be a shared drive on the network. |
|
PeopleSoft Process Scheduler on Microsoft Windows and a UNIX Web server. |
Use FTP/FTPS,SFTP or HTTP/HTTPS. |
|
PeopleSoft Process Scheduler on OS390. |
Use FTP/FTPS or HTTP/HTTPS. |
Note: If you are using FTP/FTPS or SFTP, the corresponding daemon must be set up on the Web server.
|
Field or Control |
Definition |
|---|---|
| Node Name |
Enter a name for the node. The node name must be unique and must begin with a character and may contain up to 30 characters. |
| Protocol |
Specify the mode of transfer. |
| Validate |
Click the Validate button after you have entered all the required information for the report node definition to check if the report node configurations are correct. Note: The report node validation is independent of the running status of the Process Scheduler. It validates using the report node definition details in the database. |
| URL ID |
Enter the URL of the Web server with this format: http://<machine name>:<port number>/psreports/<PeopleSoft site name> Replace <machine name> with the name of the machine. |
| Description |
Enter a description of the node. |
| Operating System |
Choose the operating system. |
To access the Http Distribution Node page, select . From the Protocol list, select HTTP.
Note: You should use web server basic authentication when you configure the SchedulerTransfer servlet that is used by the report distribution system. Please see the install guide for details.
Image: Report Node Definition-HTTP page
This example illustrates the fields and controls on the Report Node Definition — HTTP page. You can find definitions for the fields and controls later on this page.

|
Field or Control |
Definition |
|---|---|
| Login ID, Password, and Confirm Password |
These are required only when the Web administrator has set up basic authentication on the Web server. |
| URI Host |
Enter the machine name. If you are using PeopleSoft Process Scheduler for UNIX or OS390, you must enter either the fully qualified name (for example, ADHP04.peoplesoft.com or the IP address. Warning! If you specify the Auth Token Domain name during the PeopleSoft Pure Internet Architecture installation, you must include a fully qualified domain name on the URL Host instead of the IP address. Otherwise, the Distribution Agent will not pass authentication. |
| URI Port |
Enter the port number. This value must match the port number of the Web server. The default is80. Note: If you change a port number, you lose the default value for the protocol. |
| URI Resource |
Enter SchedulerTransfer/<PeopleSoft site name>. |
| Save |
Click to save your entries. To add additional distribution nodes, click the Add button to return to the search page. |
File Chunking
The Distribution Agent automatically breaks up a large file and sends it in multiple HTTP posts. For example, a 150-MB file can be sent in 10 × 15 MB, 15 × 10MB, and so on.
To accommodate different hardware configurations (memory) and dissimilar Java Virtual Machine (JVM) tuning, two new parameters have been added to the PeopleSoft Process Scheduler section of the configuration file (prcs.cfg):
Chunking Threshold
File Chunk Size
These parameters enable clients to determine the most favorable configuration for their systems by trading off between the number of hits to the Web server when sending small chunks and memory usage due to sending large chunks.
Access the HTTPS distribution node page. Select HTTPS from the Protocol list.
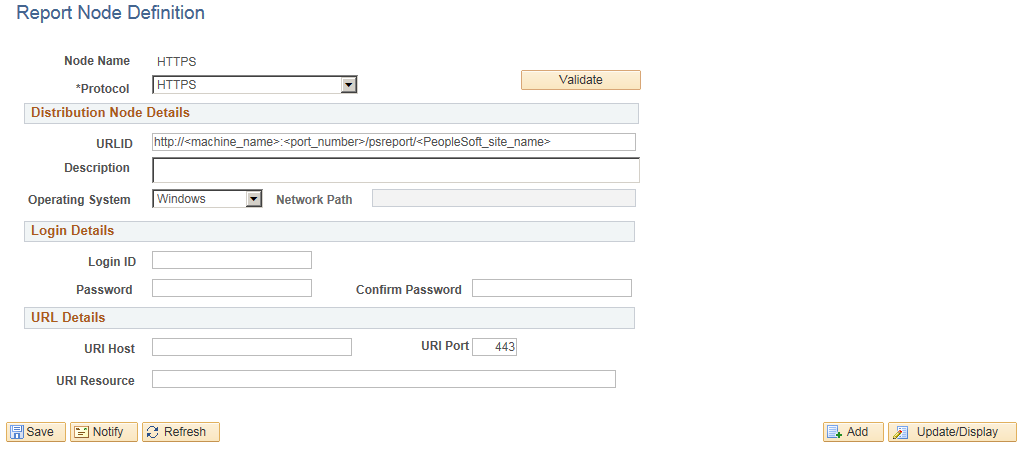
Image: Report Node Definition—HTTPS page
This example illustrates the fields and controls on the Report Node Definition — HTTPS page. You can find definitions for the fields and controls later on this page.
|
Field or Control |
Definition |
|---|---|
| Login ID, Password, and Confirm Password |
These are required only when the Web administrator has set up basic authentication on the Web server. |
| URI Host |
Enter the machine name. If you are using PeopleSoft Process Scheduler for UNIX or OS390, you must enter either the fully qualified name (for example, ADHP04.peoplesoft.com or the IP address. Warning! If you specify the Auth Token Domain name during the PeopleSoft Pure Internet Architecture installation, you must include a fully qualified domain name on the URL Host instead of the IP address. Otherwise, the Distribution Agent will not pass authentication. |
| URI Port |
Enter the port number. This value must match the port number of the Web server. The defaults is 443. Note: If you change a port number, you lose the default value for the protocol. |
| URI Resource |
Enter SchedulerTransfer/<PeopleSoft site name>. |
| Save |
Click to save your entries. To add additional distribution nodes, click the Add button to return to the search page. |
To access the FTP distribution node page, select FTP from the Protocol List.
Image: Report Node Definition-FTP page
This example illustrates the fields and controls on the Report Node Definition—FTP page. You can find definitions for the fields and controls later on this page.

|
Field or Control |
Definition |
|---|---|
| Home Directory |
Enter the directory that is specified during the installation of PeopleSoft Pure Internet Architecture as the Report Repository. Note: The FTP user ID must have write-access to this directory. |
| FTP Address |
Enter the machine name or TCP/IP information for the Report Repository. |
| Login ID, and Password |
Specify the FTP user ID and password. |
| SSL Mode |
Specify the SSL mode. The SSL mode is Explicit for FTP mode of transfer and it cannot be changed. This can be changed for other modes like FTPS and SFTP. |
| (Optional) Connection Properties |
Specify the connection property name and property value for FTP transfer. You must set the connection properties to configure the security modes such as, Active mode or Extended Passive mode of file transfer. |
| Password Encryption |
Generate an encrypted password.
|
To access the FTPS distribution node page, select FTPS from the Protocol List.
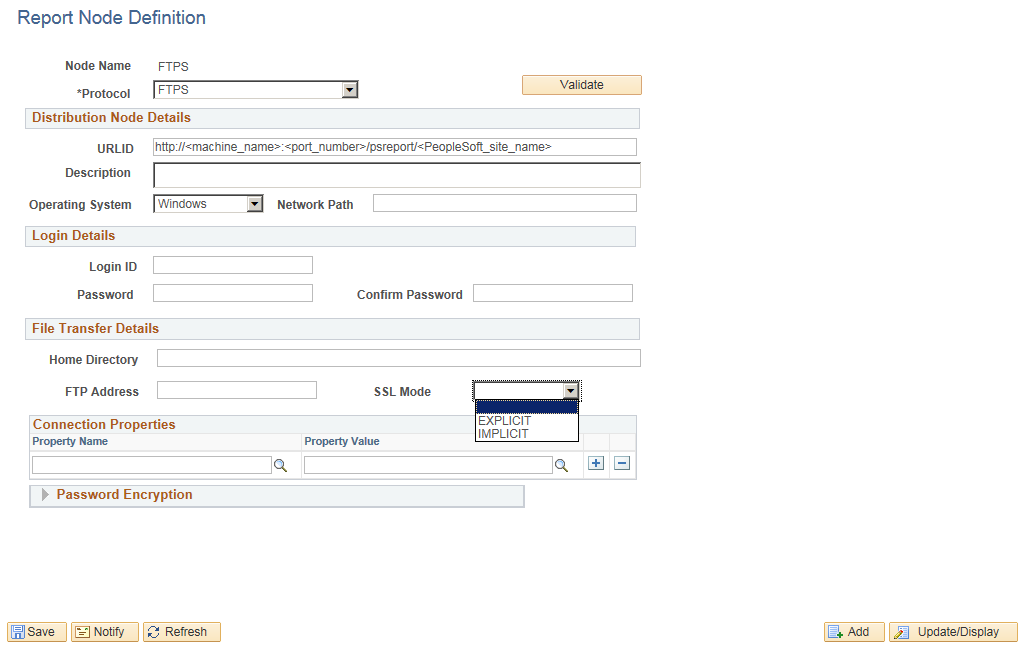
Image: Report Node Definition - FTPS page
This example illustrates the fields and controls on the Report Node Definition — FTPS page. You can find definitions for the fields and controls later on this page.
|
Field or Control |
Definition |
|---|---|
| Home Directory |
Enter the directory that is specified during the installation of PeopleSoft Pure Internet Architecture as the Report Repository. |
| FTP Address |
Enter the machine name or TCP/IP information for the Report Repository. |
| Login ID, and Password |
Specify the FTPS user ID and password. |
| SSL Mode |
Specify the SSL mode. |
| (Optional) Connection Properties |
Specify the connection property name and property value for FTPS transfer. You must set the connection properties to configure the security modes such as, Active mode or Extended Passive mode of file transfer. |
| Password Encryption |
Generate an encrypted password.
|
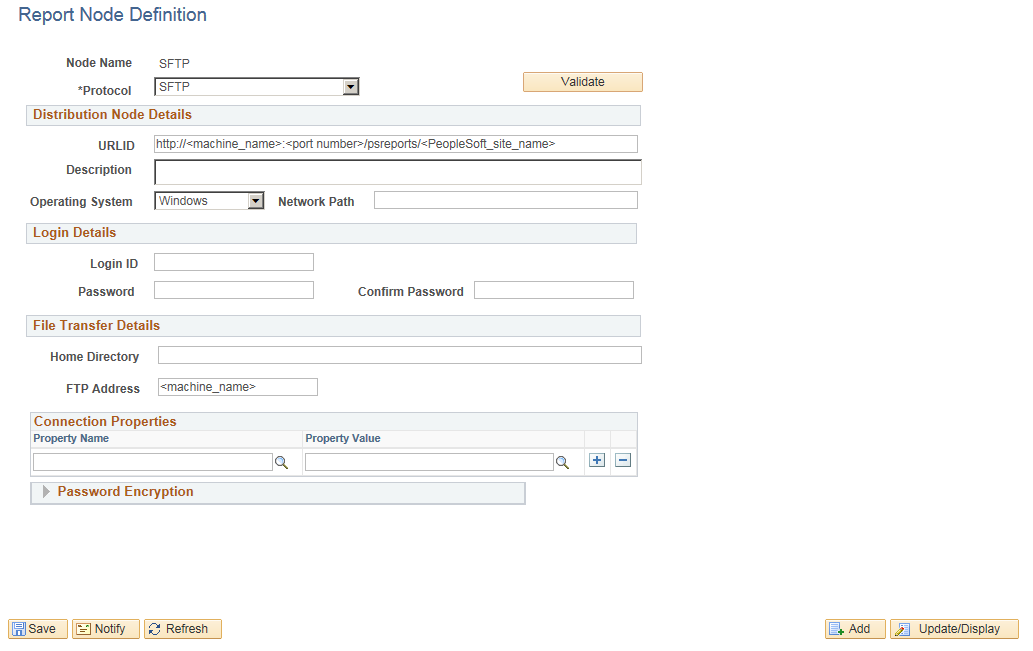
Access the SFTP distribution node page. Select SFTP from the Protocol list.
Image: Report Name Definition — SFTP page
This example illustrates the fields and controls on the Report Node Definition — SFTP page. You can find definitions for the fields and controls later on this page.
|
Field or Control |
Definition |
|---|---|
| Login ID Password |
Enter the SFTP log on credentials. |
| Home Directory |
Enter the directory that is specified during the installation of PeopleSoft Pure Internet Architecture as the Report Repository. Note: The FTP user ID must have write-access to this directory. |
| FTP Address |
Enter the machine name. |
| (Optional) Connection Properties |
Specify the connection property name and property value for SFTP transfer. You must set the connection properties to configure the security modes such as, Active mode or Extended Passive mode of file transfer. You can also set the Certificate information,Keystore password, SSL usage level and Keystore path for this mode. |
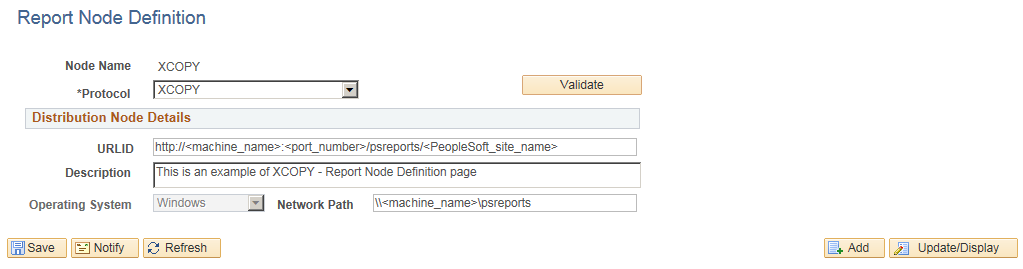
Access the XCOPY – Report Node Definition page. Select XCOPY from the Protocol list.
Select the XCOPY transfer mode when both the Process Scheduler and the Report Repository machines are on Windows.
Image: Report Node Definition - XCOPY page
This example illustrates the fields and controls on the Report Node Definition — XCOPY page. You can find definitions for the fields and controls later on this page.
|
Field or Control |
Definition |
|---|---|
| Network Path |
Enter the universal naming convention (UNC) path that points to the Report Repository, for example: \\<machine name>\psreports |