Creating Contextual Fluid Dashboards
Contextual fluid dashboards allow application developers to design a fluid dashboard in which user-specified or fixed context values determine the content of the tiles displayed on the dashboard. To create a contextual fluid dashboard, an application developer must:
Create a dashboard header page and component definition.
Create a custom application class that implements the PTNUI:Banner:BannerTile base class.
Add PeopleCode to the header page and component.
Create one or more context-enabled tiles that can consume the context provided by the dashboard header component.
Create a fluid dashboard definition.
The dashboard header component defines the contextual data keys that are used to provide context to the tiles on the dashboard. This dashboard header component is normally displayed fixed at the top of the dashboard page except when the dashboard is displayed in a fluid activity guide, master/detail component, or on a small form factor device.
To create a dashboard header page and component:
Create a new, standard page definition. Do not select the Page (Fluid) definition type because that also requires selecting a layout type.
On the Use tab of the Page Properties dialog box, select the Fluid Page check box.
Add a group box to the page encompassing most of the width and height of the page.
Select the Fluid tab of the Group Box Properties dialog box.
In the Style Classes field, enter the following style: psc_lpbanner-context
In the Group Box Type field, select Layout Only.
Add one or more input fields that represent the contextual data keys. Note the following design considerations:
Disable autocomplete for each field (record field properties, Use tab).
Do not use FieldChange PeopleCode on these input fields to invoke any BannerTile methods that would refresh the dashboard. See Adding PeopleCode to the Dashboard Header Page and Component for information on how to add an Update button to the page.
In certain circumstances, rather than allowing input directly on this page, create a secondary page for entering contextual data. Do this when there are more than two input fields on the page or if an input field is a date field or a popup group box field.
Add an Edit button on the main page to open the secondary page.
Set the input fields on the main page to display only.
In designing your page and component, note the “Limitations with Interactive Grouplets” in Fluid Related Content.
Create a standard fluid component definition. Note the following design considerations:
Specify a search record as is appropriate for your page and component design.
On the Fluid tab of the Component Properties dialog box, ensure the search page type is None.
Do not run the component registration wizard or register this component in the portal registry. Do not create a content reference definition for this component in the tile repository. Moreover, do not provide any direct menu navigation to this component.
Manually, add the dashboard header component to a menu definition in Application Designer.
Note: If necessary, create a menu definition specifically for this and other dashboard header components.
In the browser, add the menu, component, and page to one or more permission lists. Use these same security settings when you create the fluid dashboard definition.
Warning! While the delivered PTNUI_BANNERTILE component provides an example of a dashboard header component, do not clone this component or the PTNUI_BANNERTILE page as a starting point for your implementation. Moreover, do not clone the PTNUI:Banner:DefaultBannerTile to create your custom application class.
The custom application class that you implement has a one-to-one relationship to your dashboard header component. The dashboard header page must instantiate an object of this class in the page’s Activate event. Note the following design considerations for your custom application class:
Your class implements the PTNUI:Banner:BannerTile base class. Use the implements keyword, not extends.
The constructor method of your class must call BannerTile to instantiate the superclass by passing the dashboard ID. In your constructor, you can optionally:
Set the AnnounceText property.
Set the IsPersistContext property only if you do not wish to persist the context data.
You must implement the GetGroupletURL abstract method to return the URL to the dashboard header component. The following example demonstrates the recommended approach using the GenerateComponentContentURL built-in function.
Oracle recommends that you implement (override) the GetBannerLabel method to set a label for the dashboard header component for accessibility purposes only.
Optionally, implement (override) the SetDefaultContext method to set default context values, possibly from persistent storage.
The following example provides a simple implementation of PTNUI:Banner:BannerTile:
import PTNUI:Banner:BannerTile;

class MyBannerComp implements PTNUI:Banner:BannerTile
   method MyBannerComp(&hp_ID As string);
   method GetGroupletURL() Returns string;
   method SetDefaultContext();
   method GetBannerLabel() Returns string;
end-class;

method MyBannerComp
   /+ &hp_ID as String +/
   %Super = create PTNUI:Banner:BannerTile(&hp_ID);
   %This.AnnounceText = "One or more tiles has been updated.";
   rem %This.IsPersistContext = False;
end-method;

method GetGroupletURL
   /+ Returns String +/
   /+ Extends/implements PTNUI:Banner:BannerTile.GetGroupletURL +/
   Local string &url = GenerateComponentContentURL(%Portal, %Node, MenuName.MY_MENU, "GBL", Component.MY_DRIVERCOMP, "", "");
   Return &url;
end-method;

method SetDefaultContext
   /+ Extends/implements PTNUI:Banner:BannerTile.SetDefaultContext +/
   %This.SetKeyValue("SETID", "AUS01");
   %This.SetKeyValue("DESCR", "Default description");
end-method;

method GetBannerLabel
   /+ Returns String +/
   /+ Extends/implements PTNUI:Banner:BannerTile.GetBannerLabel +/
   Return "My Dashboard: Contextual Data Area";
end-method;
Warning! Do not clone or copy PTNUI:Banner:DefaultBannerTile to create your custom application class.
Update your page and component definition to include these PeopleCode programs:
Add page Activate PeopleCode to this page that links this component to your custom application class. There is a one-to-one relationship between a dashboard header component and a custom application class. In the Activate program:
Get the TABID value from the Request object and use this value to instantiate an object of your custom application class.
Display the current context values to the user.
Invoke the required ApplyVisuals method.
For example:
import MYPKG:MyBannerComp;

Component MYPKG:MyBannerComp &oBanner;

Local string &hp_ID = %Request.GetParameter("TABID");

&oBanner = create MYPKG:MyBannerComp(&hp_ID);

/* Display the current context values to the user.                          */
/* When IsPersistContext is true, the keys exist; use GetKeyValue.          */
/* Else, you must assign the same values as specified in SetDefaultContext. */
If &oBanner.IsKeyExist("SETID") Then
   GetField(MY_REC.SETID).Value = &oBanner.GetKeyValue("SETID");
Else
   GetField(MY_REC.SETID).Value = "AUS01";
End-If;

If &oBanner.IsKeyExist("DESCR") Then
   GetField(MY_REC.DESCR).Value = &oBanner.GetKeyValue("DESCR");
Else
   GetField(MY_REC.DESCR).Value = "Default description";
End-If;

/* Required for correct rendering of the dashboard. */
&oBanner.ApplyVisuals();
If there are fields to update either on the main page or on a secondary page, add an explicit trigger field as a push button or hyperlink on the main page (even if the data entry occurs on the secondary page):
Add FieldChange PeopleCode to this component record field to invoke the UpdateContext method, which updates the dashboard with the context data values. For example:
import MYPKG:MyBannerComp;

Component MYPKG:MyBannerComp &oBanner;

&oBanner.SetKeyValue("SETID", GetField(MY_REC.SETID).Value);
&oBanner.SetKeyValue("DESCR", GetField(MY_REC.DESCR).Value);

&oBanner.UpdateContext()
On the Use tab of the Page Field Properties dialog box, select the Activate by Enter Key check box.
The dashboard header component will pass all context values as query string parameters to all tiles on the fluid dashboard. Each tile can consume zero, one, or more of these query string parameters. In the component or iScript definition for the tile, use the QueryString property or the GetParameter method of the Request class to get the query string parameters passed by the dashboard header component.
To configure a contextual fluid dashboard:
In the browser, select .
Select the Fluid Dashboards page.
Create a fluid dashboard definition.
Add contextually driven tiles to the dashboard.
In the portal registry, edit the content reference definition for this fluid dashboard.
Note: The content reference definition can be found in Fluid Structure Content > Fluid Homepages.
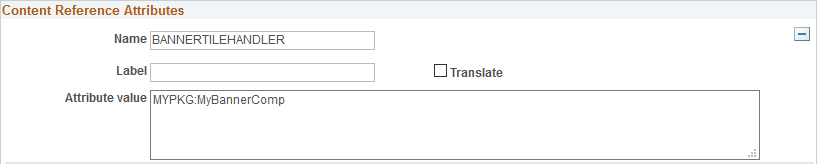
Add a content reference attribute:
Name: BANNERTILEHANDLER
Translate: deselected
Attribute value: The name of your custom application class. For example: MYPKG:MyBannerComp
BANNERTILEHANDLER content reference attribute
Image: BANNERTILEHANDLER content reference attribute
The following example illustrates the definition of the BANNERTILEHANDLER content reference attribute.