Configuring the LDAP Directory
This section provides an overview of LDAP directory configuration and discusses how to:
Specify network information for LDAP.
Specify additional connect DNs.
Install selected PeopleSoft-specific schema extensions.
Test connectivity.
The Configure Directory component (PSDSSETUP) contains four pages that you use for specifying connection information and testing directory server connections.
To enable your PeopleSoft system to successfully connect to your directory server, you must enter the appropriate connection information. This information includes the server name (DNS or IP address) and the listening port number. You also must enter the user distinguished name (User DN) and associated password.
The PeopleSoft application server uses the User DN and password to connect to the LDAP server to retrieve user profile information about the specific user signing in to the system. The User DN must reflect a user with the appropriate LDAP browse rights.
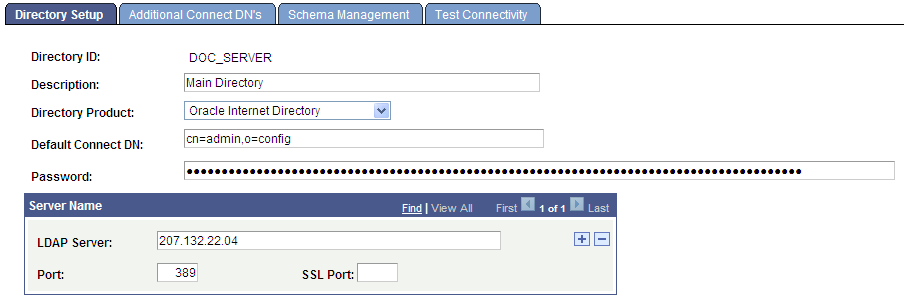
Access the Configure Directory - Directory Setup page (select and click the Directory Setup tab).
Image: Configure Directory - Directory Setup page
This example illustrates the fields and controls on the Configure Directory - Directory Setup page.
|
Field or Control |
Definition |
|---|---|
| Directory ID |
Displays the directory connection that you are creating. The directory ID that you enter can identify a specific LDAP server or a collection of LDAP servers, depending on how many servers you add in the Server Name section. |
| Description |
Enter a description of the directory connection. |
| Directory Product |
Select your directory product from the list of options. |
| Default Connect DN (default connect distinguished name)DNsconnecting to LDAP servers |
Displays the default connect DN associated with the directory ID that you entered or selected on the initial search page. The connect DN is the ID that you can use to connect to the directory server. You can enter an alternative connect DN. |
| Password |
Enter the password associated with the directory-based account that appears in the Default Connect DN field. Note: The password is stored in encrypted form in the database; not even individuals with administration access to the database can view the password. |
| Server Name |
Add LDAP directory servers to a connection list. You can add multiple servers for failover purposes using the plus button. All servers you add must participate in the same directory service. |
| LDAP Server |
Identify a specific LDAP server. You can use the DNS name or you can use IP address dotted notation. For example, either of the following formats is acceptable: ldap12.yourcompany.com or 192.201.185.90. |
| Port |
Enter the port number on which the LDAP server is configured to receive search requests. The standard LDAP port is 389. If you do not specify the correct port, PeopleSoft Directory Interface cannot exchange data with your LDAP server. |
| SSL Port |
If you are implementing SSL, enter the SSL port on the LDAP server. |
Access the Additional Connect DN’s page (select and click the Additional Connect DN's tab).
Image: Configure Directory - Additional Connect DN's page
This example illustrates the fields and controls on the Configure Directory - Additional Connect DN's page.
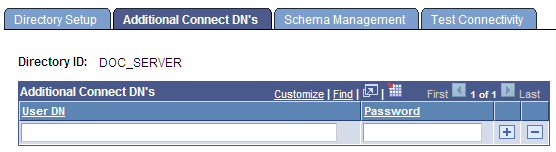
The PeopleSoft application server uses the user DN and password specified on this page to connect to the LDAP server to retrieve user profile information about the specific user signing in to the system. The user DN must reflect a user with the appropriate LDAP browse rights.
Note: You will not see any available schema extensions unless you have installed the PeopleSoft Directory Interface.
|
Field or Control |
Definition |
|---|---|
| User DN |
Add any DNs that you need in addition to the default connect DN that you entered on the Directory Setup page. The default user ID is most likely an administrative ID. This value enables you to set up a more secure user ID for the scope of the mapping. |
| Password |
For each additional DN that you enter, add the corresponding password. |
Access the Schema Management page (select and click the Schema Management tab).
Image: Configure Directory - Schema Management page
This example illustrates the fields and controls on the Configure Directory - Schema Management page.
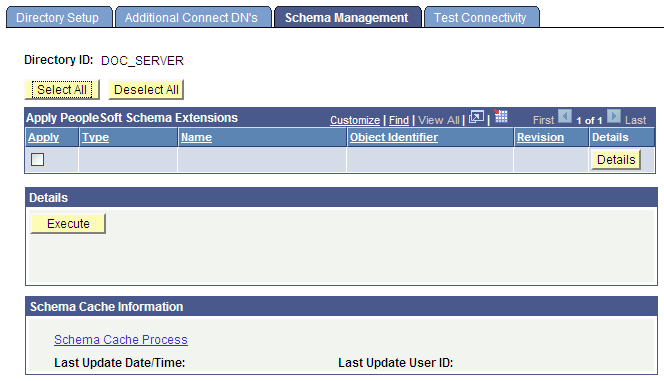
Note: Unless you have installed the PeopleSoft Directory Interface product, you might not have any PeopleSoft schema extensions available to you.
Note: The Schema Management page enables you to add PeopleSoft-delivered object classes and attribute types to your directory. If you add attributes and object classes using the Schema Management page, you must also delete them using this page.
|
Field or Control |
Definition |
|---|---|
| Apply |
Select this check box to apply the selected schema extension type to your directory. |
| Type |
Displays the type of schema extension, either Object Class or Attribute Type. |
| Name |
Displays the schema extension name. |
| Object Identifier |
Displays the schema extension object identifier. The sequence 1.3.6.1.4.1.2810.20 identifies the object as a PeopleSoft object. The second to last number is either a 1 or a 2. A 1 indicates an object class type and a 2 indicates an attribute type. The last number indicates the sequence in which the extension was created. |
| Revision |
Displays the number of times the schema extension was revised. |
| Details |
Click to display details about the selected schema extension in the Details region at the bottom of the page. |
| Select All |
Click to select all the schema extensions to apply to your directory. |
| Deselect All |
Click to deselect every schema extension. |
| Apply |
Click to apply the selected schema extensions to your directory. |
Details
When you click a schema extension Details button, the system displays the details of that extension. In addition to the object identifier and name, you may also be interested in the Superiors detail, which indicates which extensions, if any, are above this one in the hierarchy. Also of interest is the Type detail, which indicates whether the schema extension is a mandatory, optional, or auxiliary extension.
Schema Cache Information
For convenience, you can use the Schema Cache Process link to transfer you to the Schema Cache page so that you can invoke the Schema Cache process. Last Update Date/Time and Last Update User ID enable you to monitor the frequency of updates as well as the last administrator to run the process.
Access the Test Connectivity page (select and click the Test Connectivity tab).
Image: Configure Directory - Test Connectivity page
This example illustrates the fields and controls on the Configure Directory - Test Connectivity page.
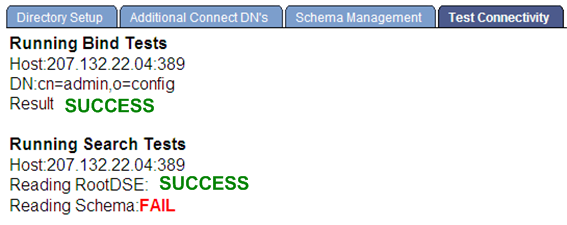
The page displays the results (SUCCESS or FAIL) of the connectivity test. If connectivity fails, modify the connect information on the Directory Setup and Additional Connect DN’s pages.